I have a number of tutorials listed on the menu above, which are free and you can access any time. Due to some large time commitments in the next little while, which will leave me little time to sew, I have decided to take some of this month (September 2016) and post Sampler Quilt block tutorials most days. I want the blog to seem like a quilt class. They will, essentially be the same as the tutorials, but I will rewrite them and, perhaps, add some information just to make it worth your while to read a revised version. This will start in a few days.
Back in the Dark Ages when I learned to quilt, everyone, or most everyone, learned by making a sampler quilt. [I know TFQ will disagree as she didn’t learn using a sampler, thus the qualifier.] I think it is a good way to learn because students learn most of the techniques required to make any block they can find.
In the class I took, we covered the basic skills of quiltmaking. We made templates and used scissors to cut them out. I have updated the tutorials as rotary cutting is de rigueur. I think it is better to learn to use them early. Also, we can make more quilts if we can cut faster.
I have added a number of additional techniques to my blog class, and I am not limiting myself to once a week. I hope to be able to finish by the end of September, but I may go into October. It will be October 4 before I can expect much sewing time.
The class will consist of the following techniques and blocks:
Selecting fabric
Nine Patch (piecing and rotary cutting)
Double Four Patch (smaller squares) – this is a bonus block
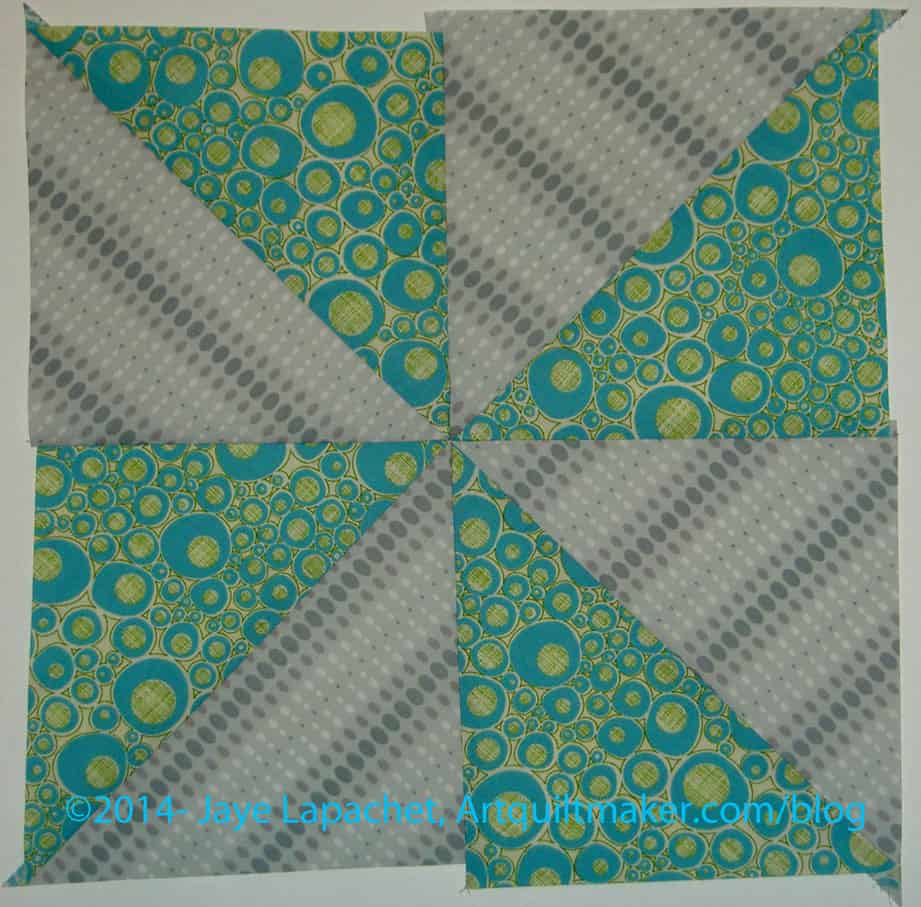
Double Pinwheel (triangles)
Dutchman’s Puzzle (triangles, flying geese)
Sawtooth Star (fussy cutting, flying geese)
Card Trick (piecing, layout of fabrics)
LeMoyne/8 pointed star (Y seams)
Dresden Plate (hand applique’)
Hexagon (machine applique’, Y seams)
New York Beauty (paper piecing)
The Dove (curves)
Drunkard’s Path (small curves)
Rose Wreath (fusible applique’)
Double Windmill (partial seams)
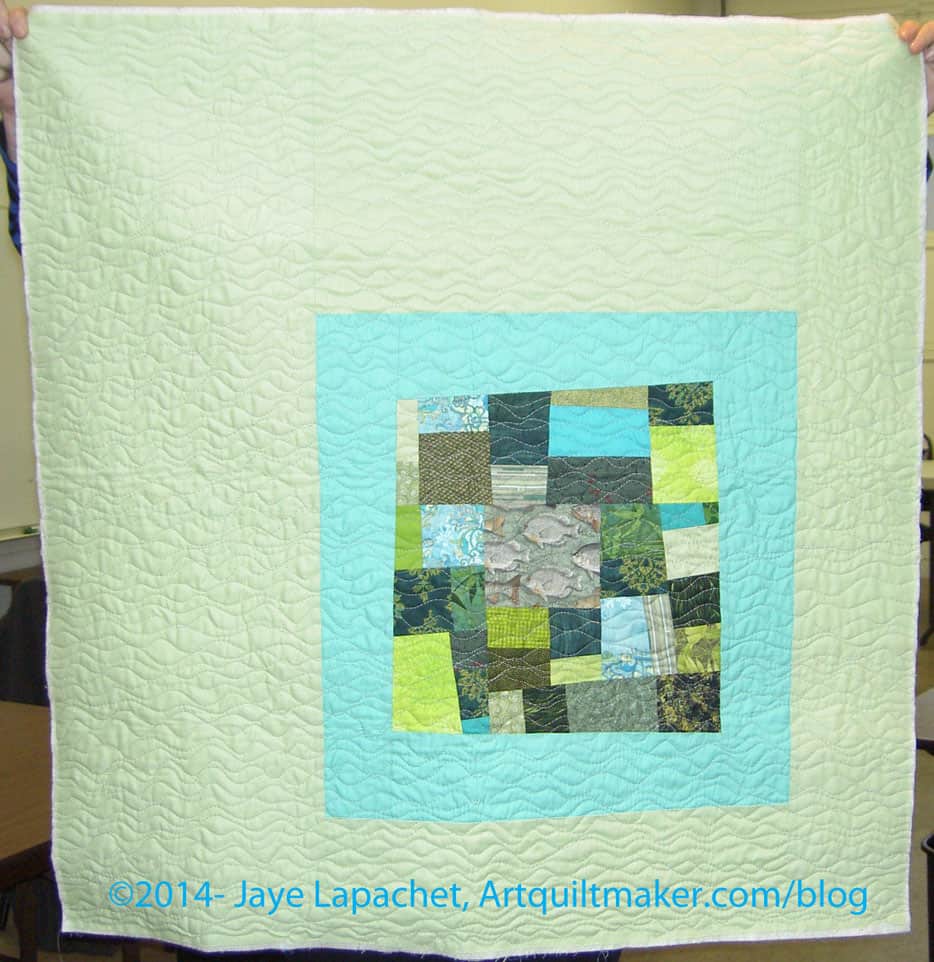
Pieced Backs
Quilting discussion and resources
Binding
Skills need practice. If you have done a block for each tutorial in the past, perhaps it is time to do them again? Perhaps I’ll have a drawing for those who complete a quilt top using my tutorials. We’ll see.
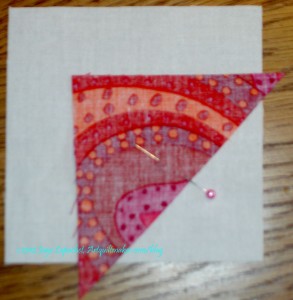
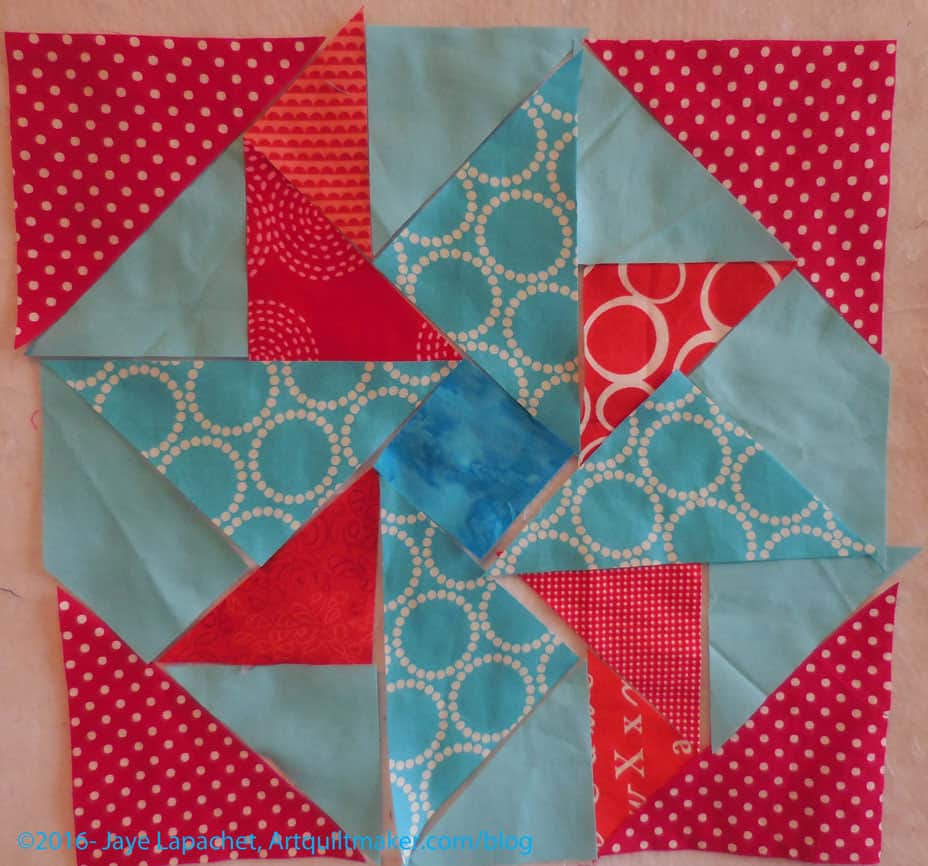
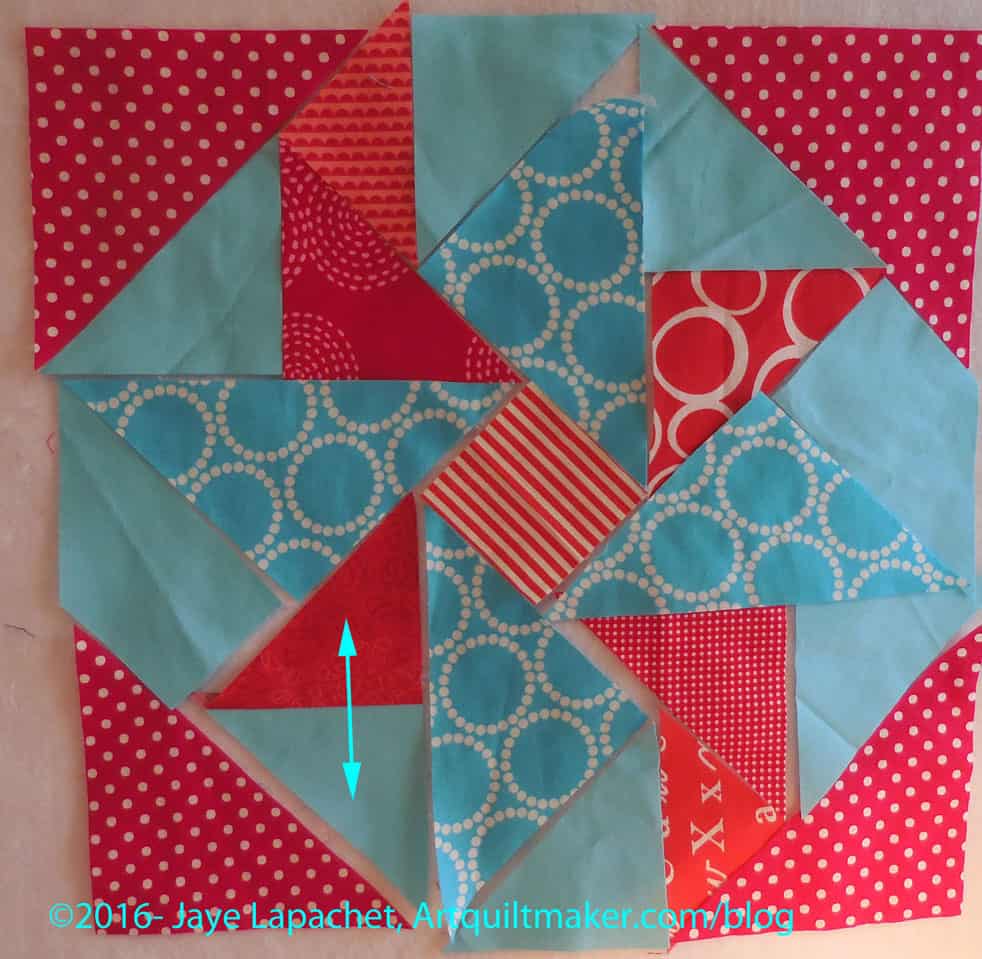
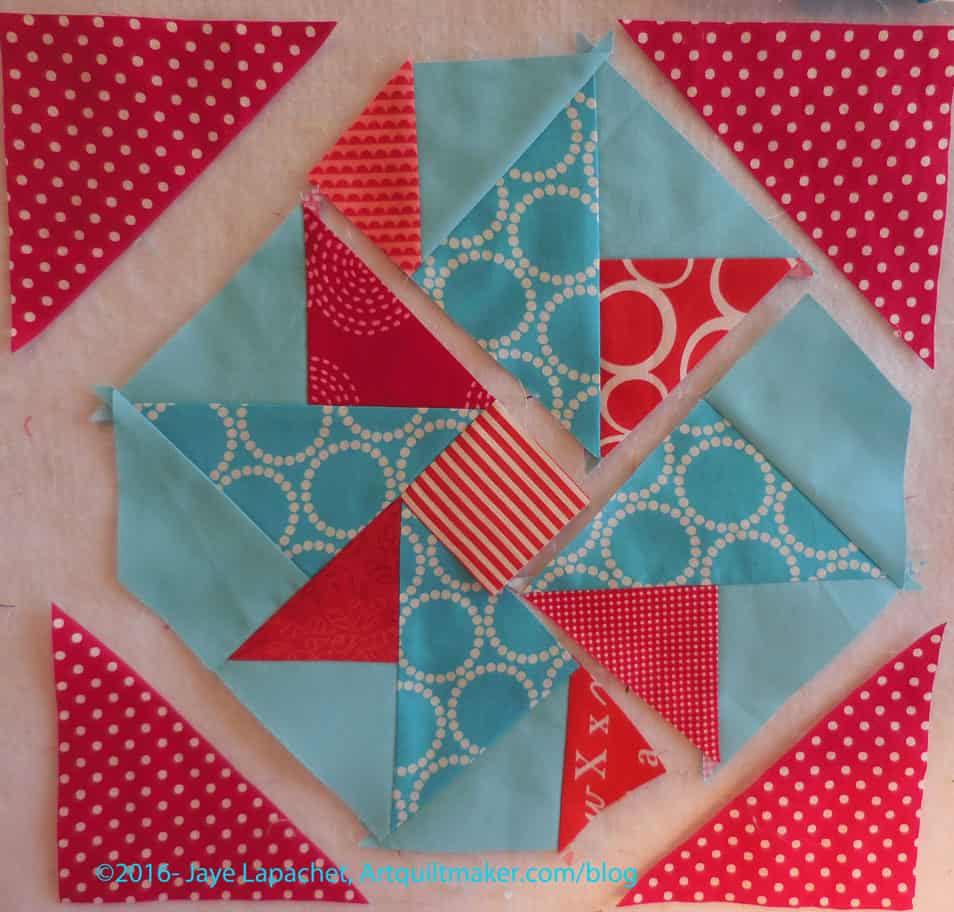
We are going to talk about partial seams. Partial seams are a way to create a more complex looking block without using truly difficult piecing techniques. Even a relative beginner can navigate partial seams successfully.
2. Select fabrics to fit the color scheme of your other blocks. You need contrast between the various pieces.
Partial Seam Final Colors
The one red triangle with the white curves might not be exactly right, but it will look fine in the overall quilt.
3. Cut out pieces using the chart. Press as you cut if necessary.
Partial Seams: Sew Triangles Together
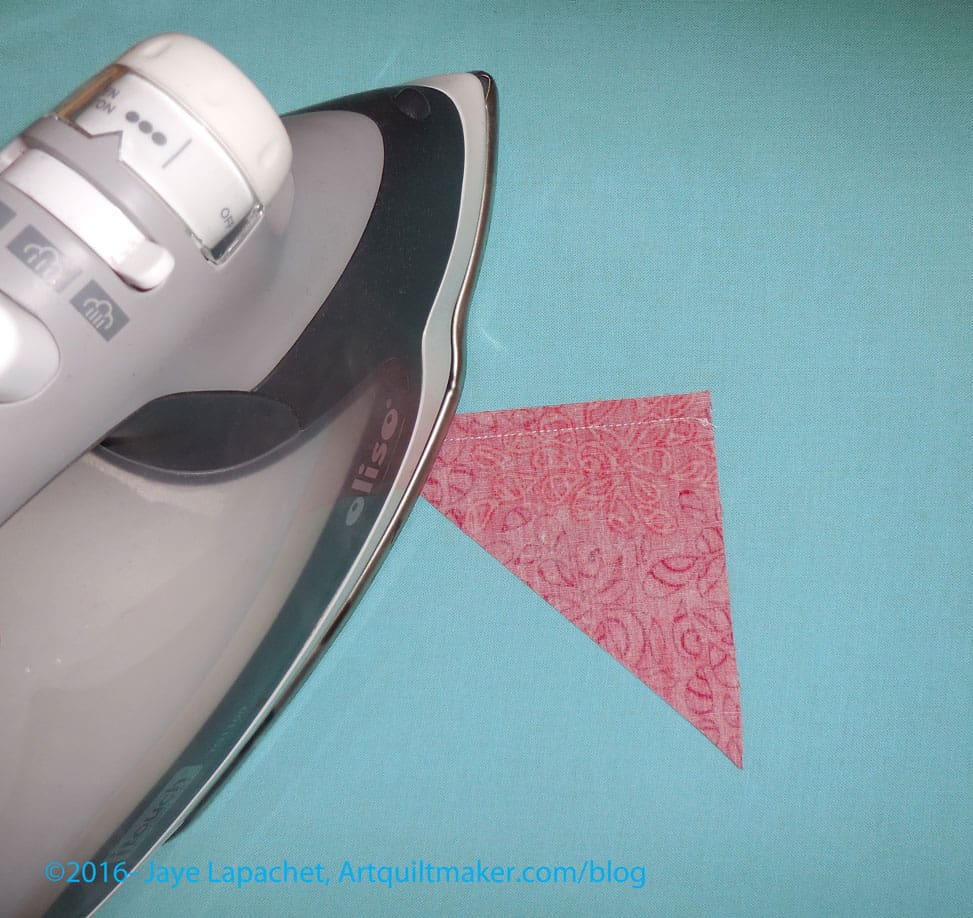
4. As we discussed before, sew smallest to largest. I started with the matching small triangles. Sew carefully without yanking the bias.
Press flat, then press to the red
5. Press flat and then press to the red. Press carefully without distorting the bias.
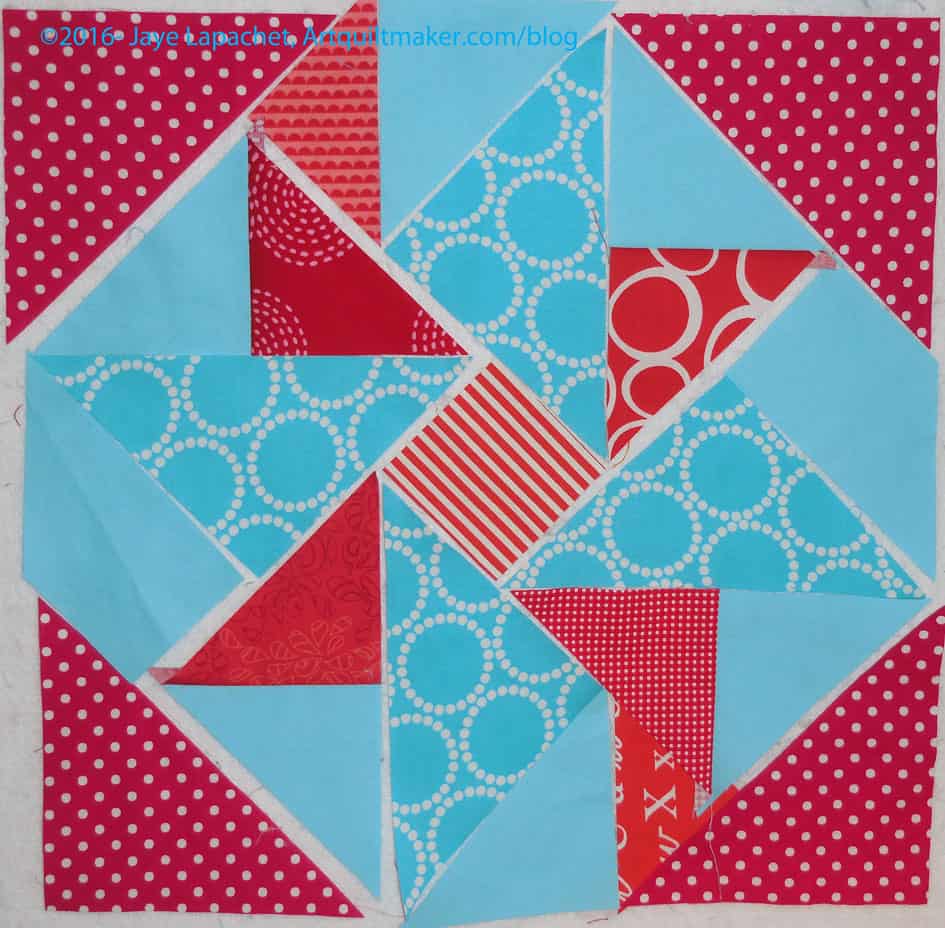
Partial Seam Triangles Sewn
6. Place the newly sewn triangles back in position on your design wall.
Partial Seam: Sew other like triangles
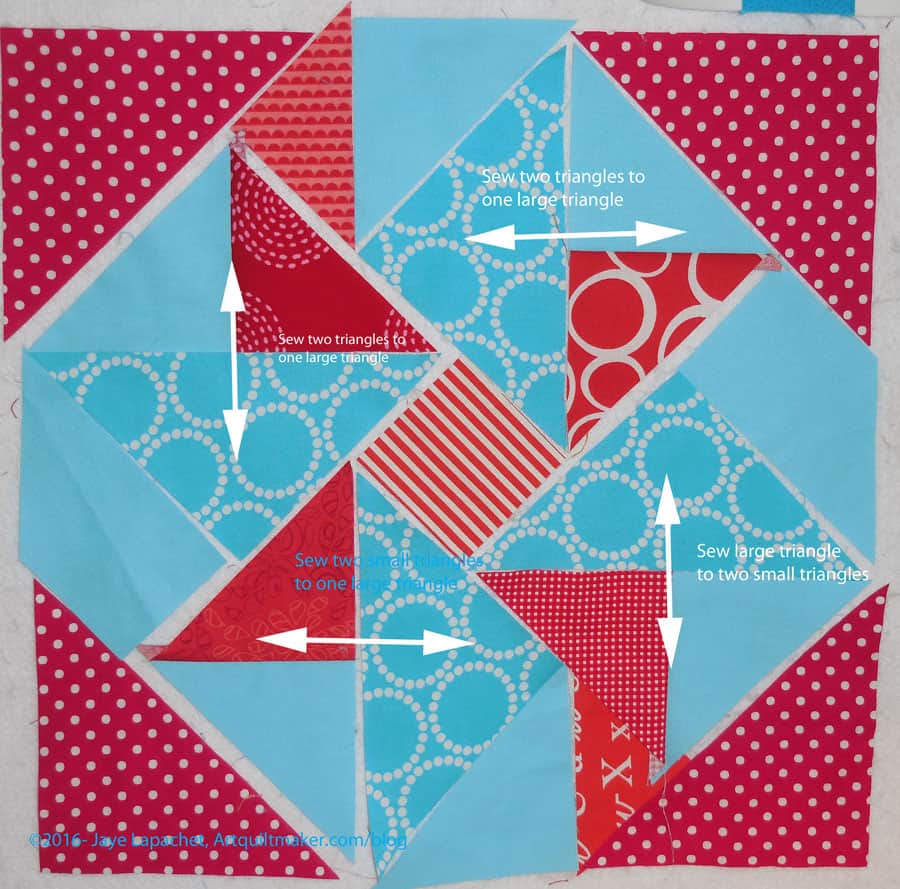
7. Sew the similar triangles, press and place back in place.
Remember, you are sewing from smallest to largest. This means that you are creating larger and larger sections until the whole block is done.
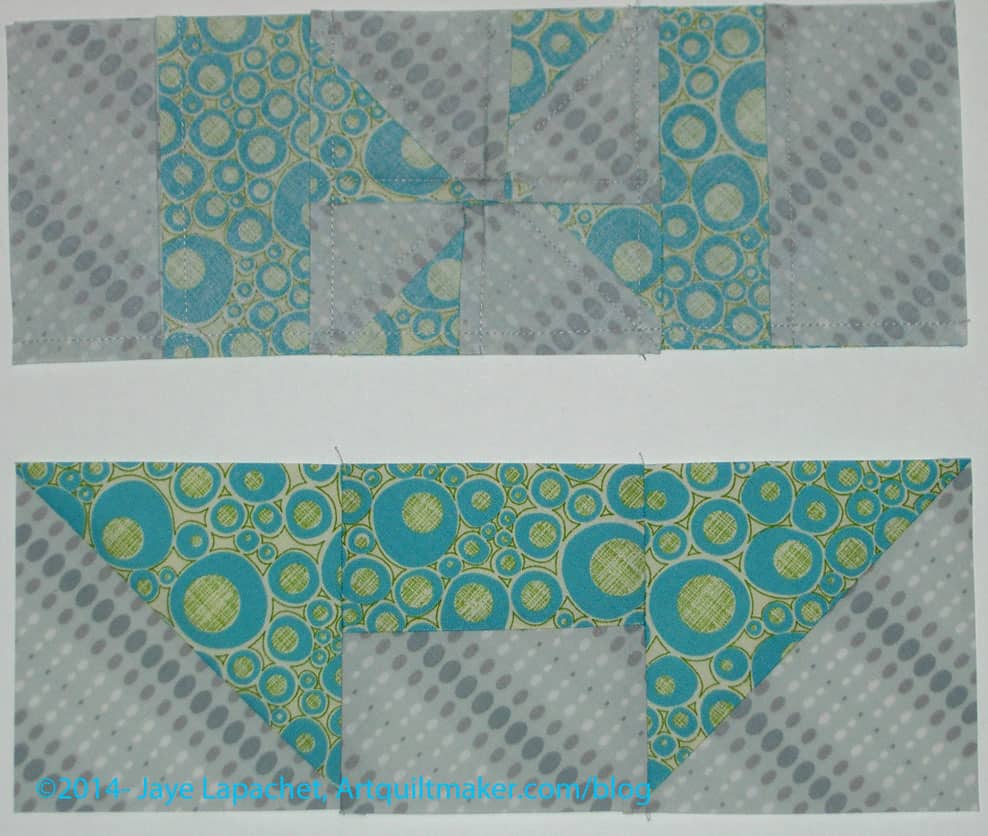
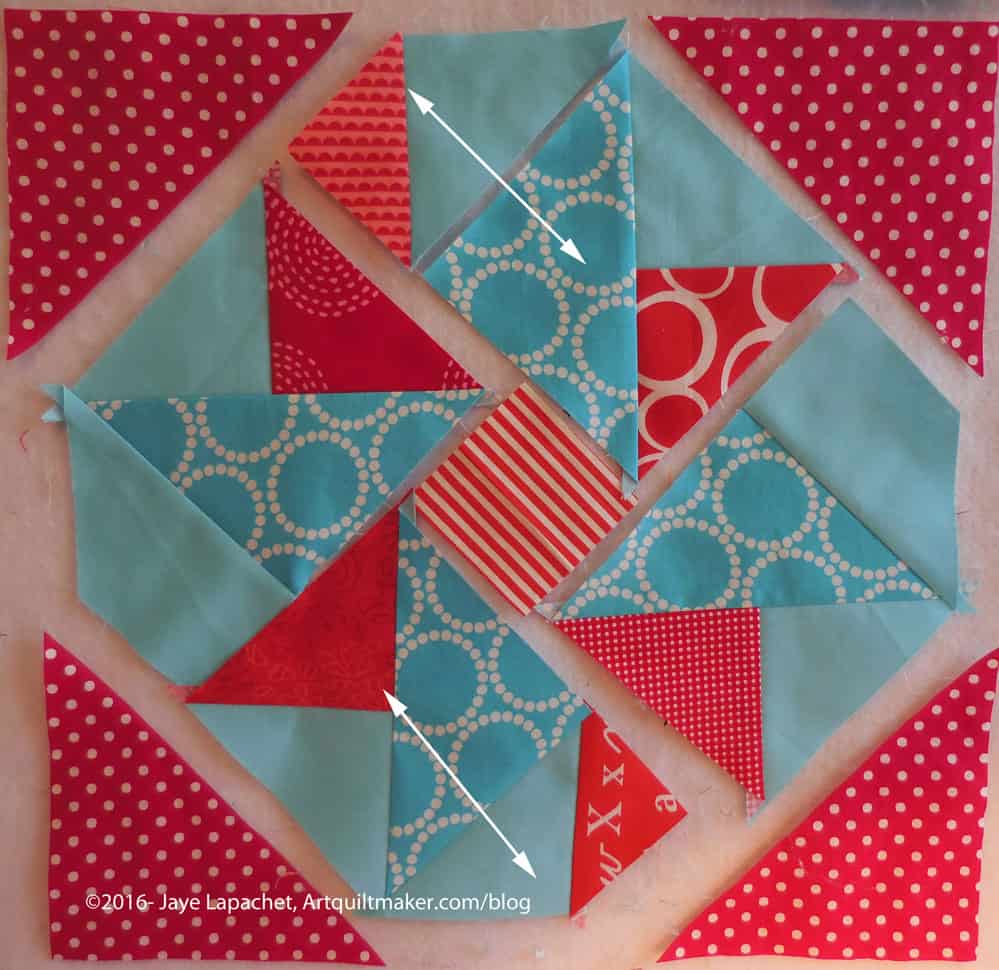
Patches Sewn in 4 sections
8. Once the newly sewn patches are back in place, it is fairly easy to see the next logical step. The large turquoise triangles (mini-Pearl Bracelets fabric in the example) should be sewn to your two triangles. This will make a square.
Sew small triangles to larger triangle
9. Sew the two small triangles, which are now sewn together (step 4-7), to the large turquoise triangle. This step makes the triangles into a square.
Place sewn squares on to the design wall
10. Press flat and then press to the larger triangle. Press carefully without distorting the bias. Place the squares back on the design wall.
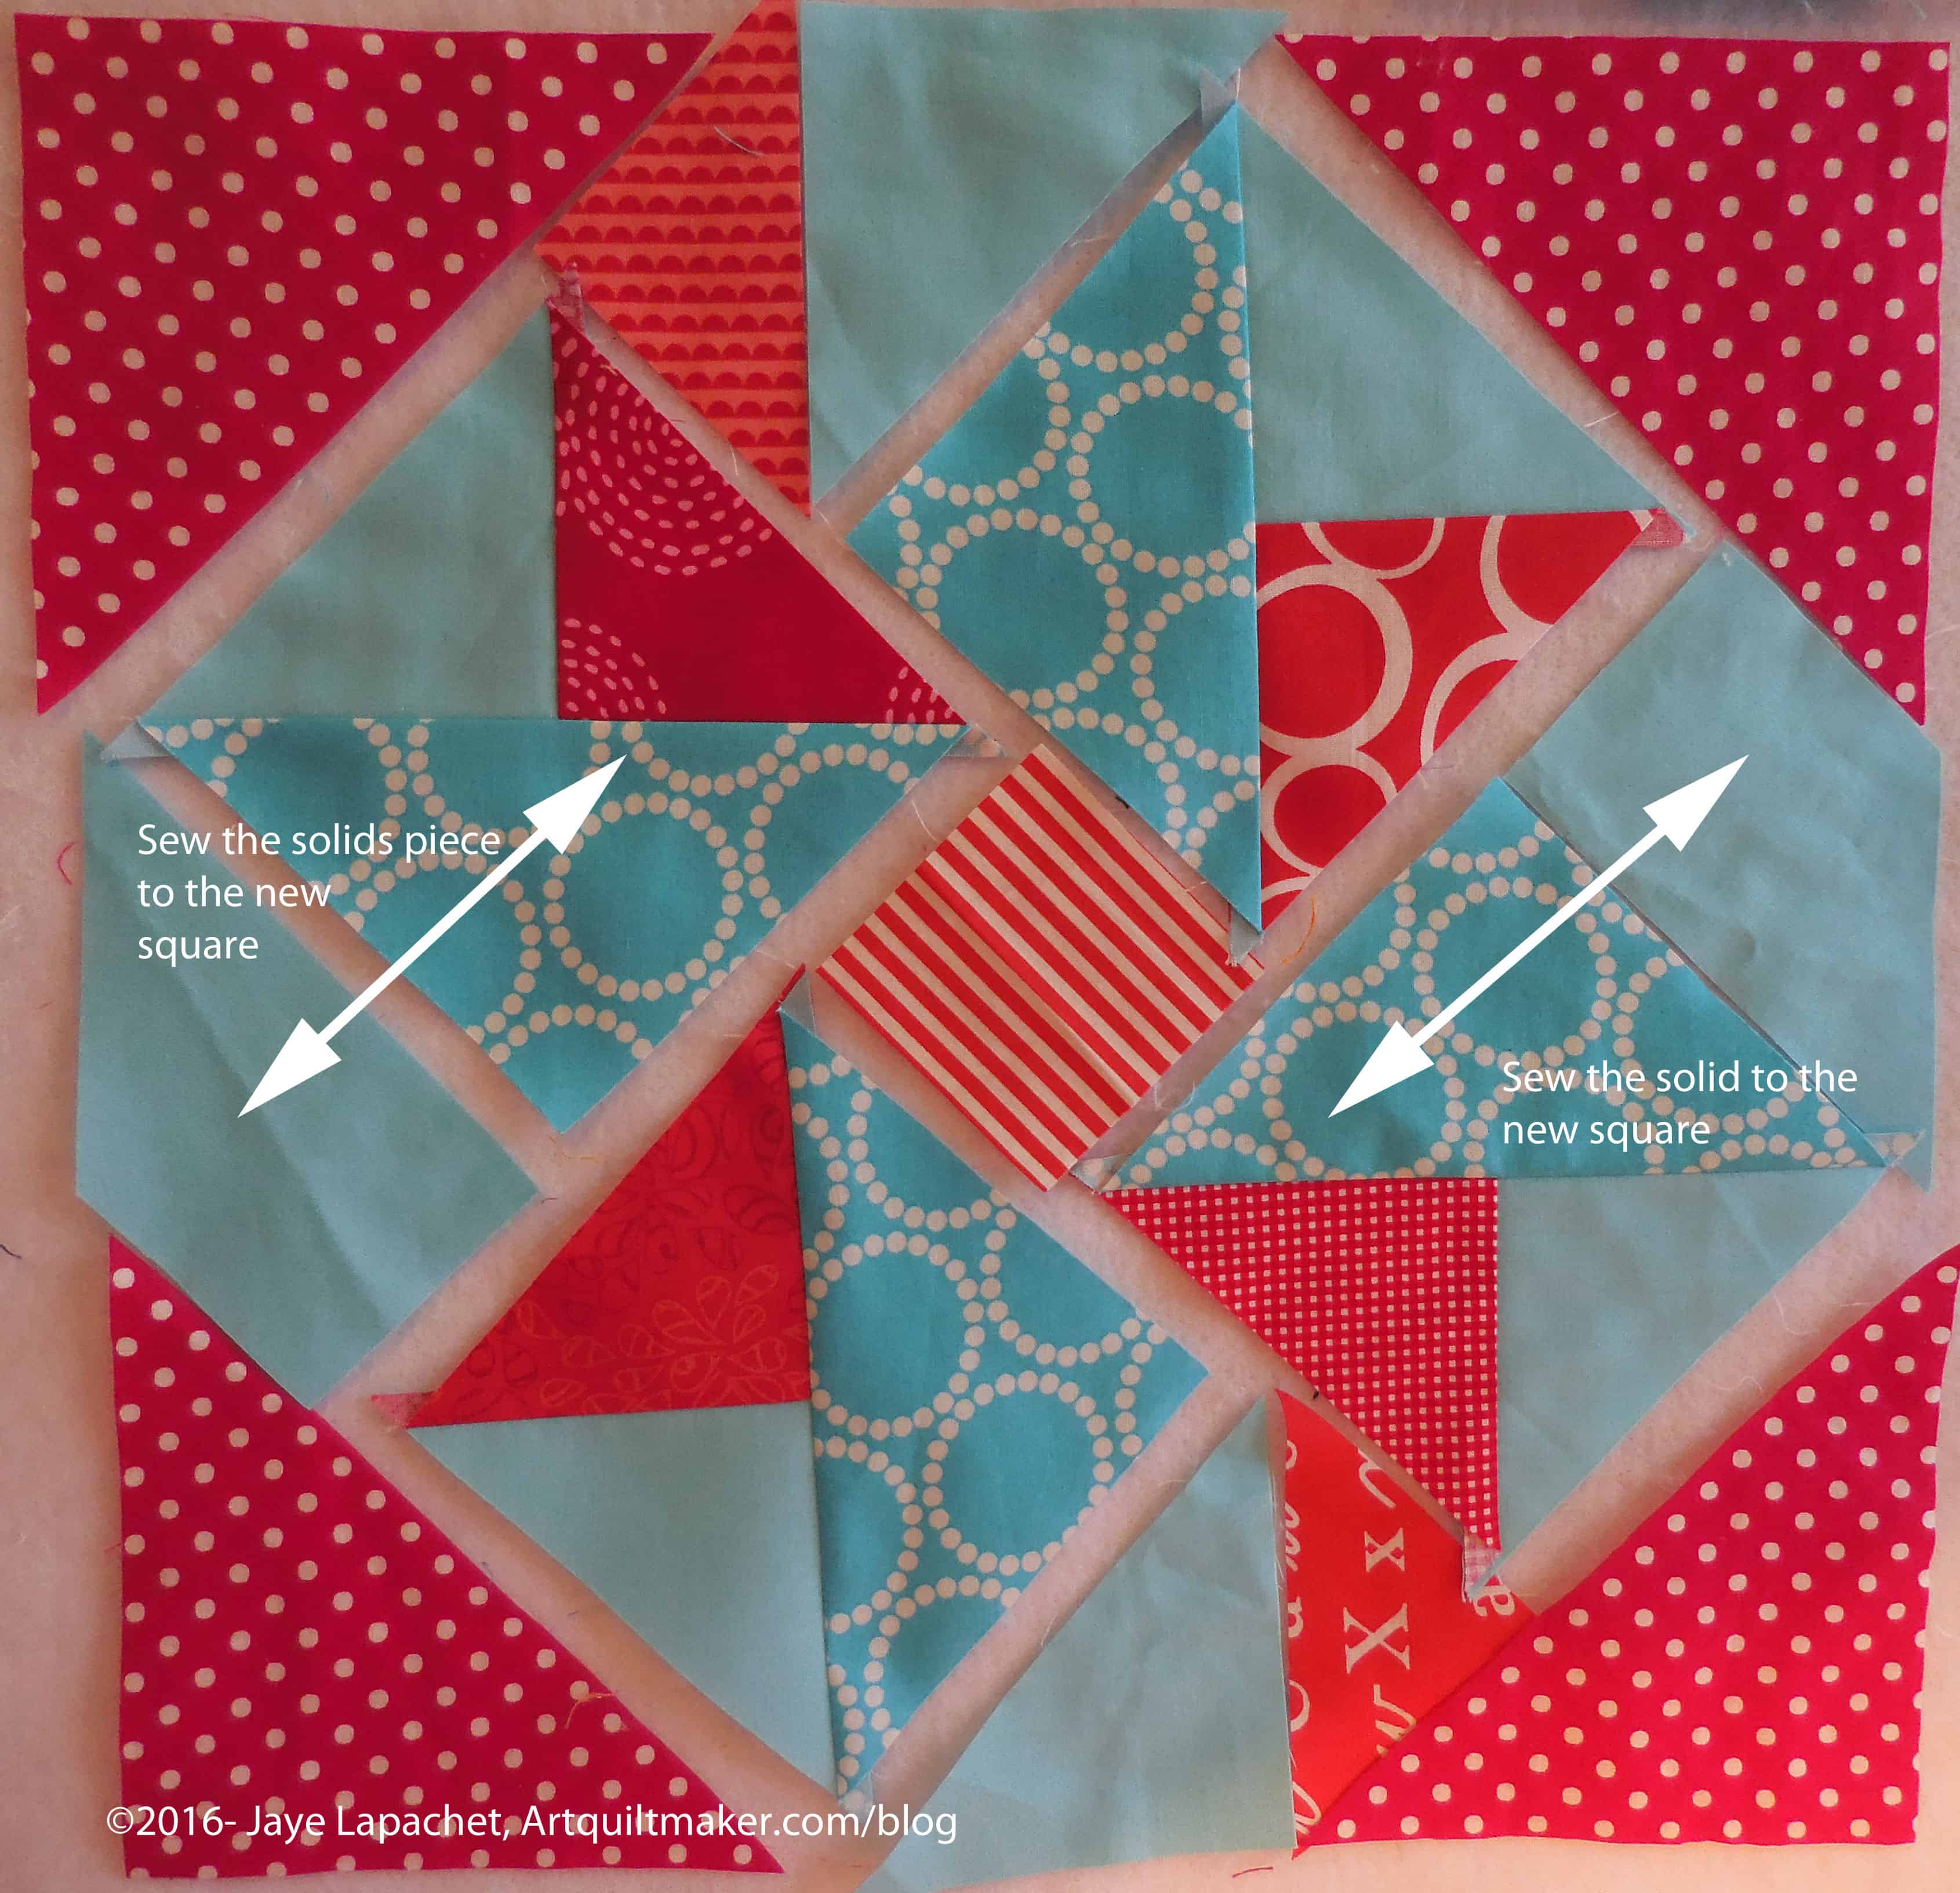
Sew squares to solid fabric
11. Sew the solid, rectangle-ish pieces to the squares you just sewed.
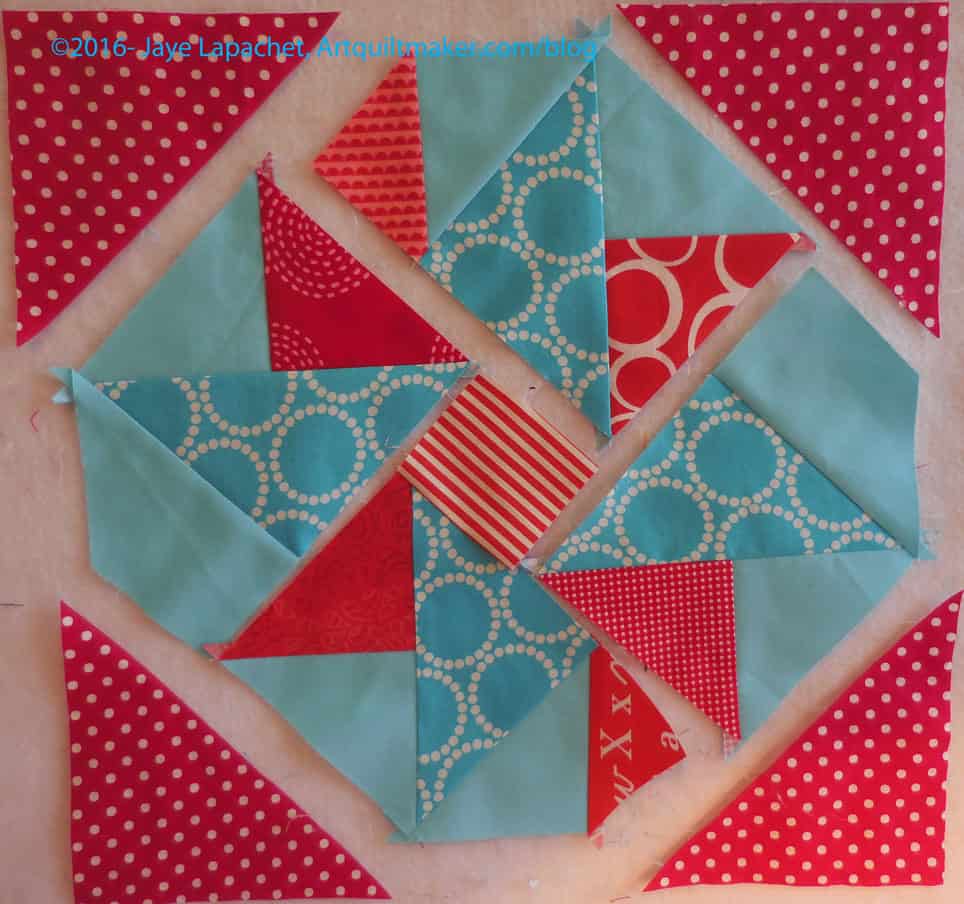
Place sewn sections back on the design wall
12. Place the sewn sections back on the design wall.
Sew small red triangles to solid triangles
13. Sew small red triangles to solid triangles
Sew new section to square
14. Sew new section to your squares.
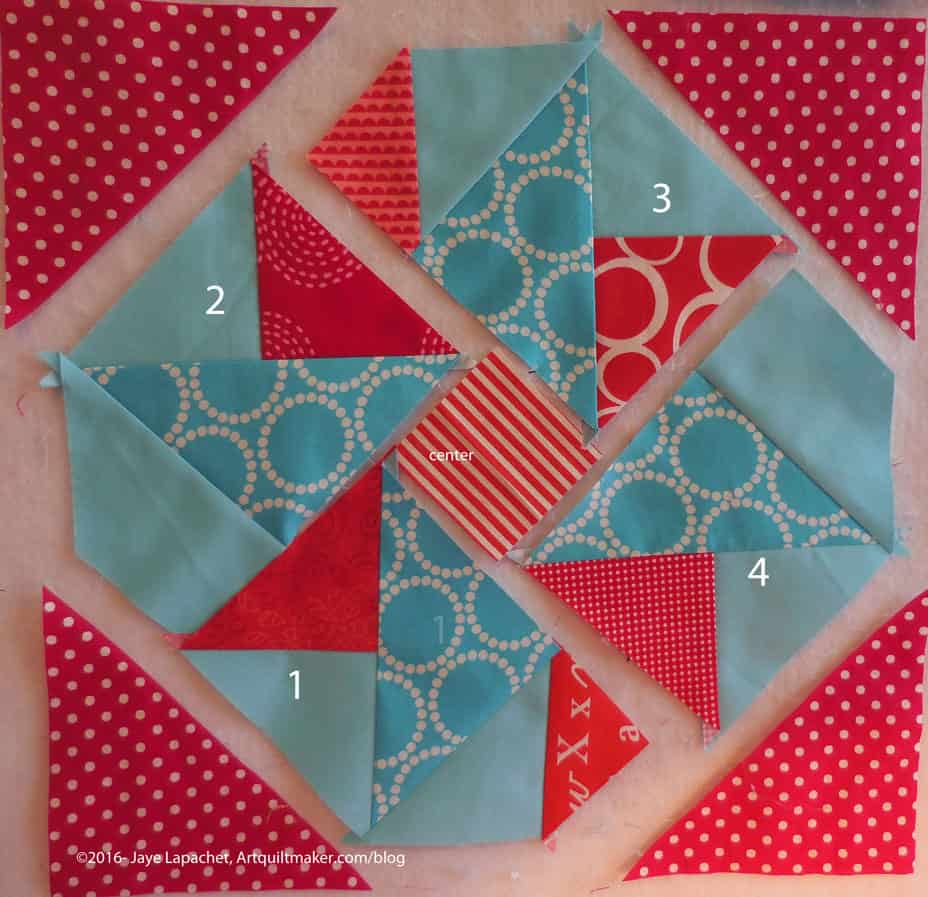
Place sewn sections back on the design wall
15. Place the sewn sections back on the design wall.
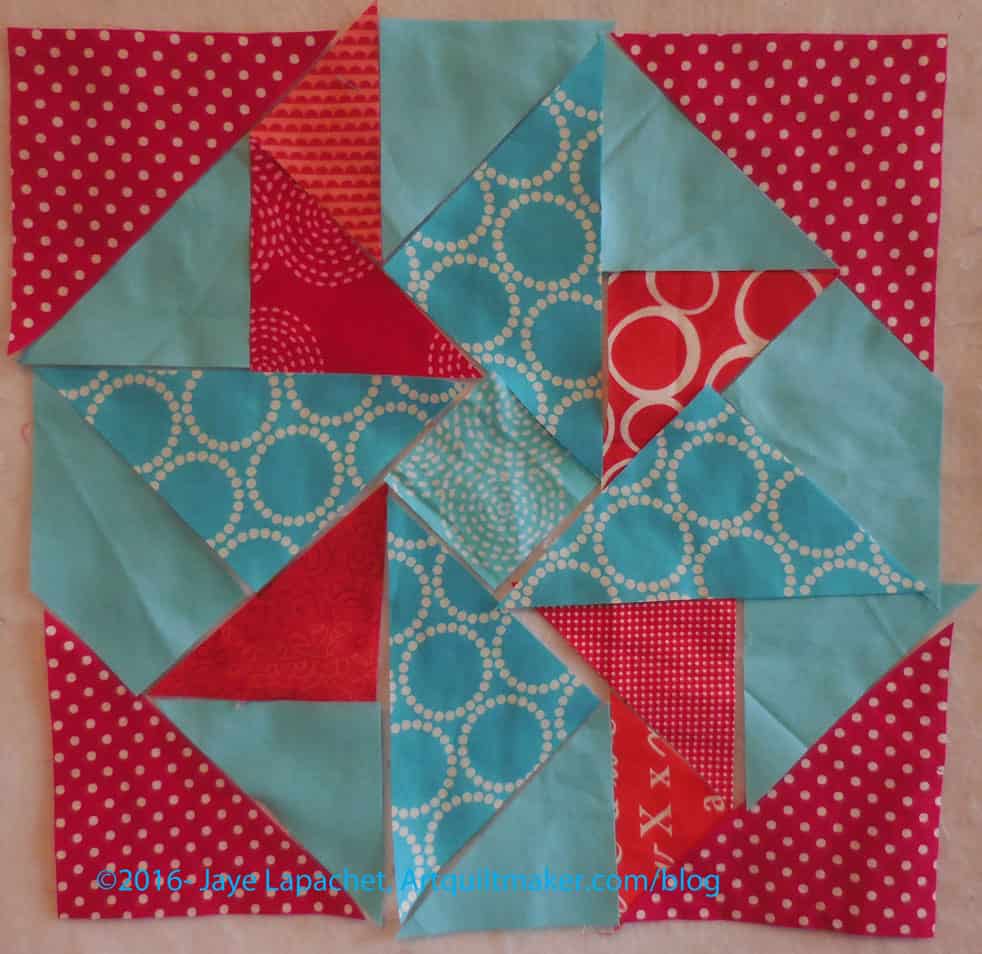
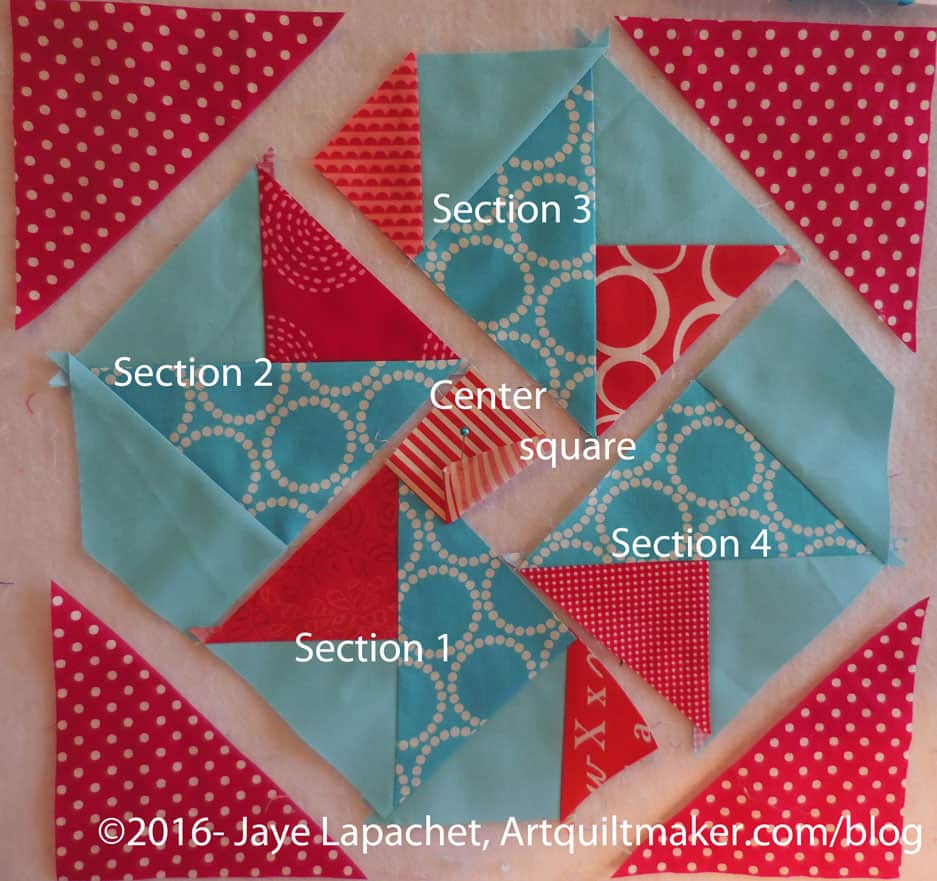
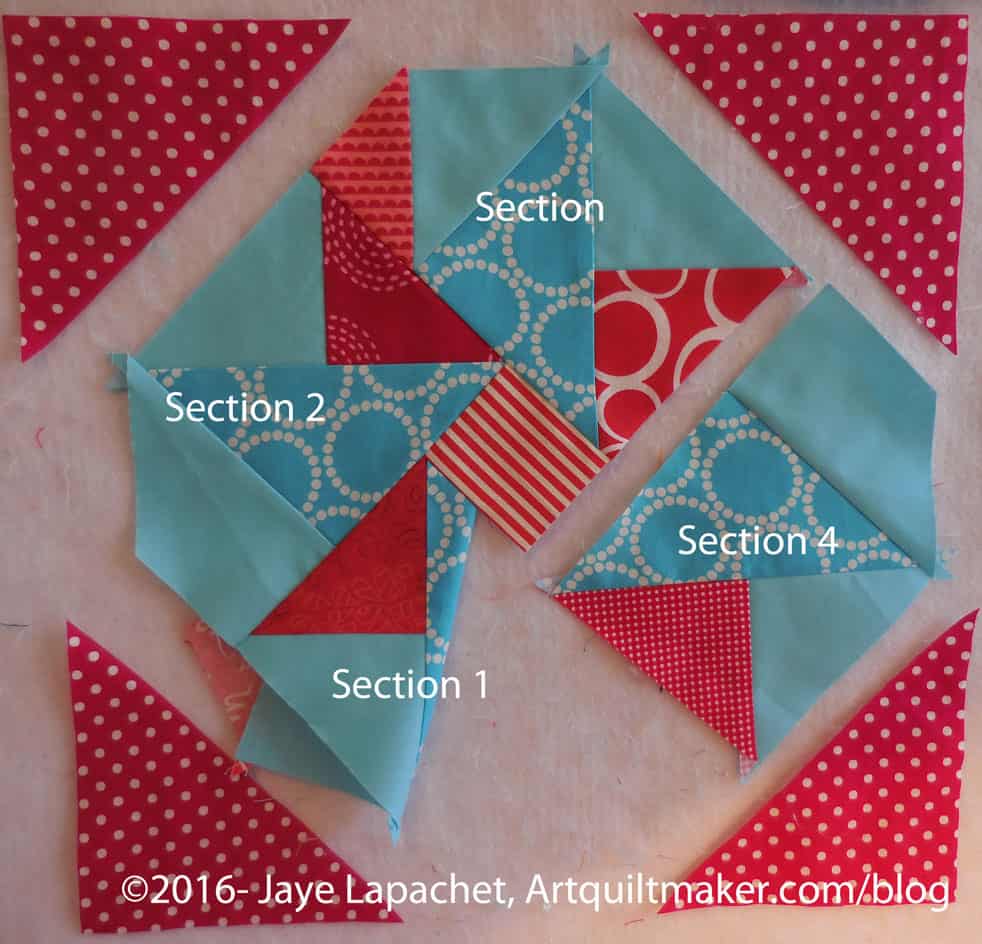
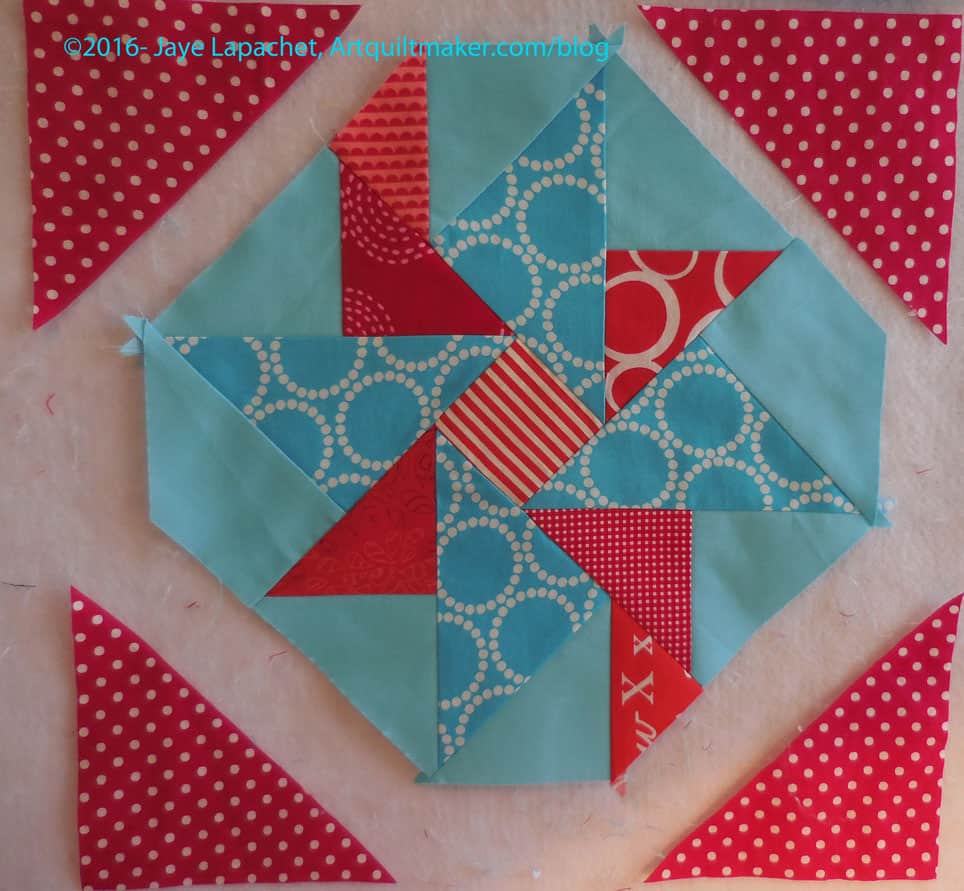
Now you have 4 major sections plus the center and 4 corner patches. Now we are going to get serious with partial seaming.
Take the center and section 1
16. Take the center and section 1.
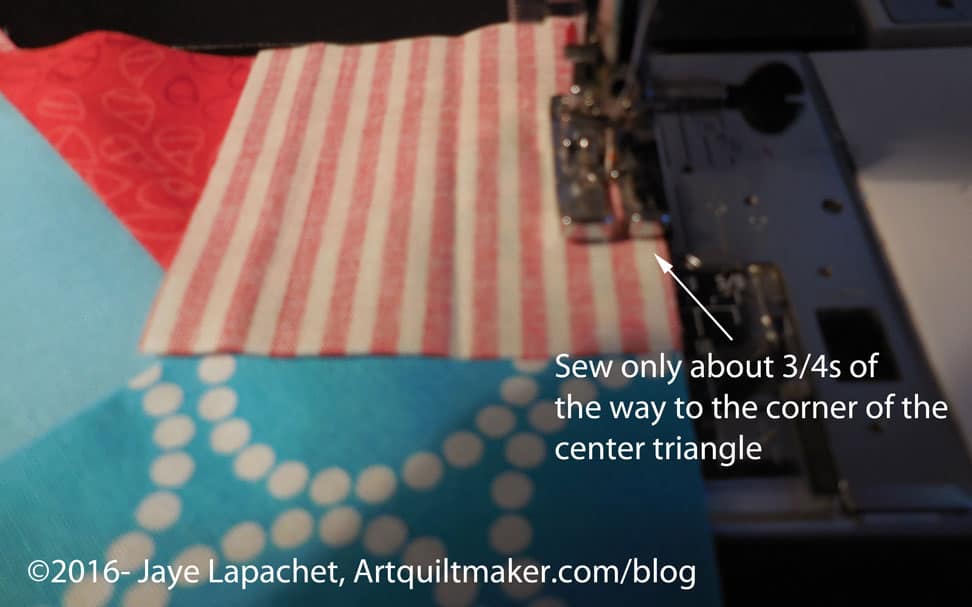
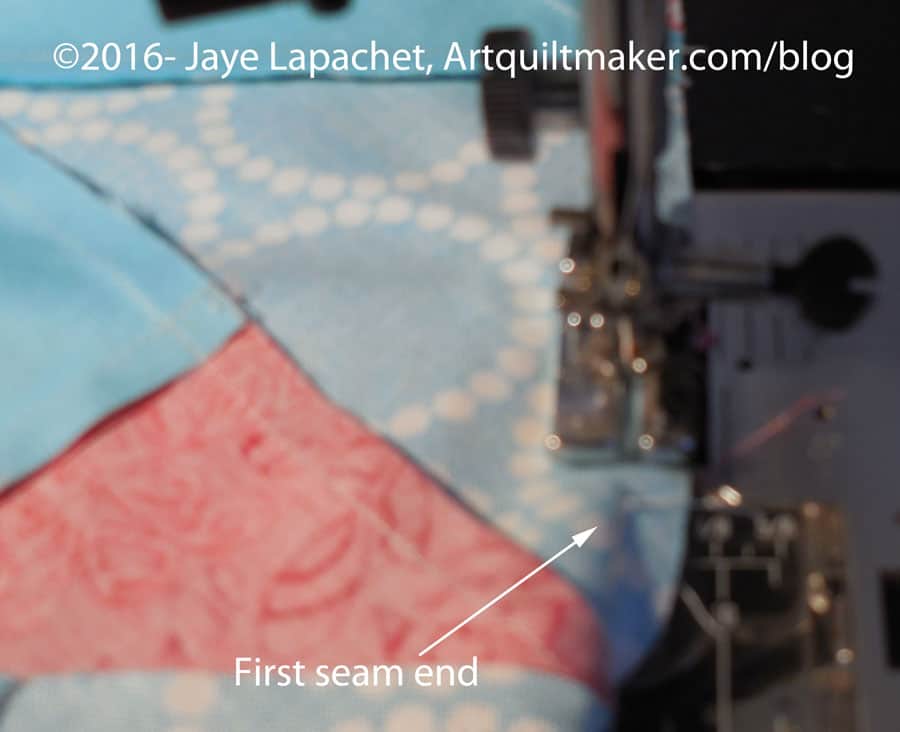
Sew about 3/4s of the way down the center square seam
17. Put section 1 under the needle with the center square on top. Line the center square up with the intersection of the red triangle and the Pearl Bracelets triangle (my fabrics used as a guide).
Backstitch at the end of the seam to secure the seam since you will be playing with it.
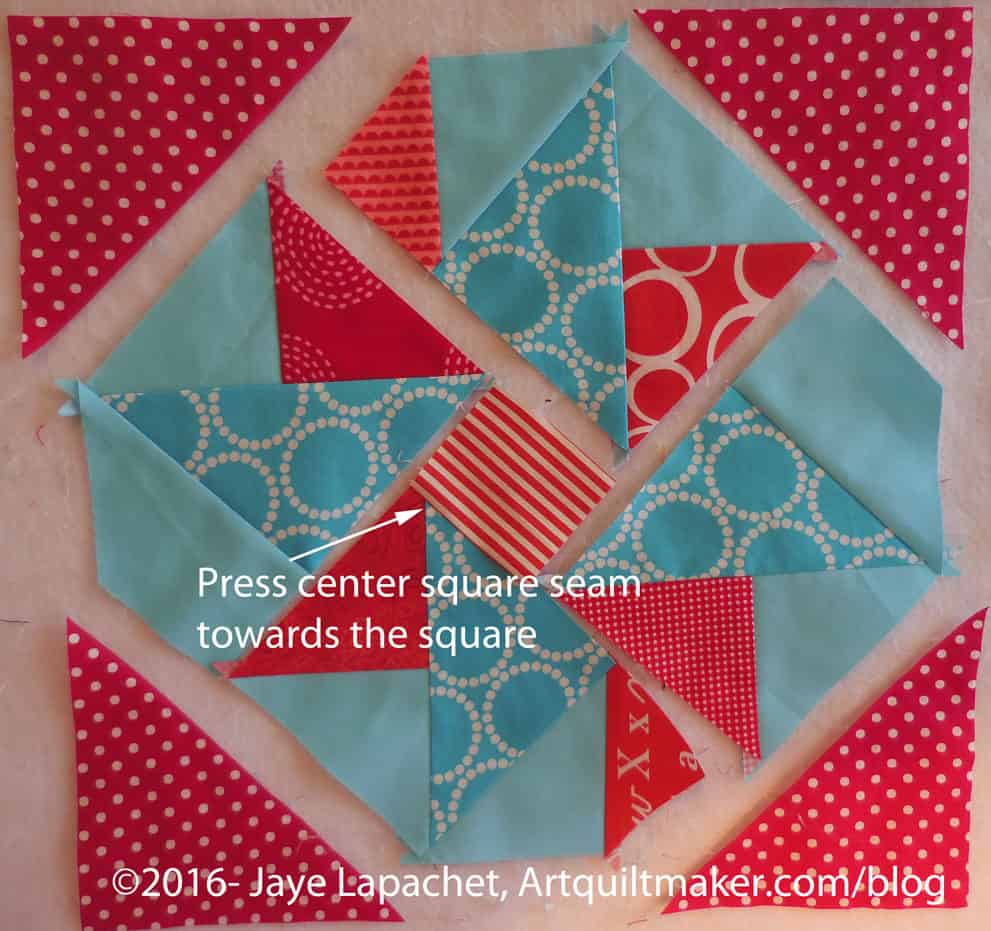
Press seam towards center
18. Press seam towards center square. Press carefully since the whole seam isn’t sewn.
Partially sewn seamPartially sewn seam – detail
The sewn piece will flip up. You can see about how much to sew in the picture above.
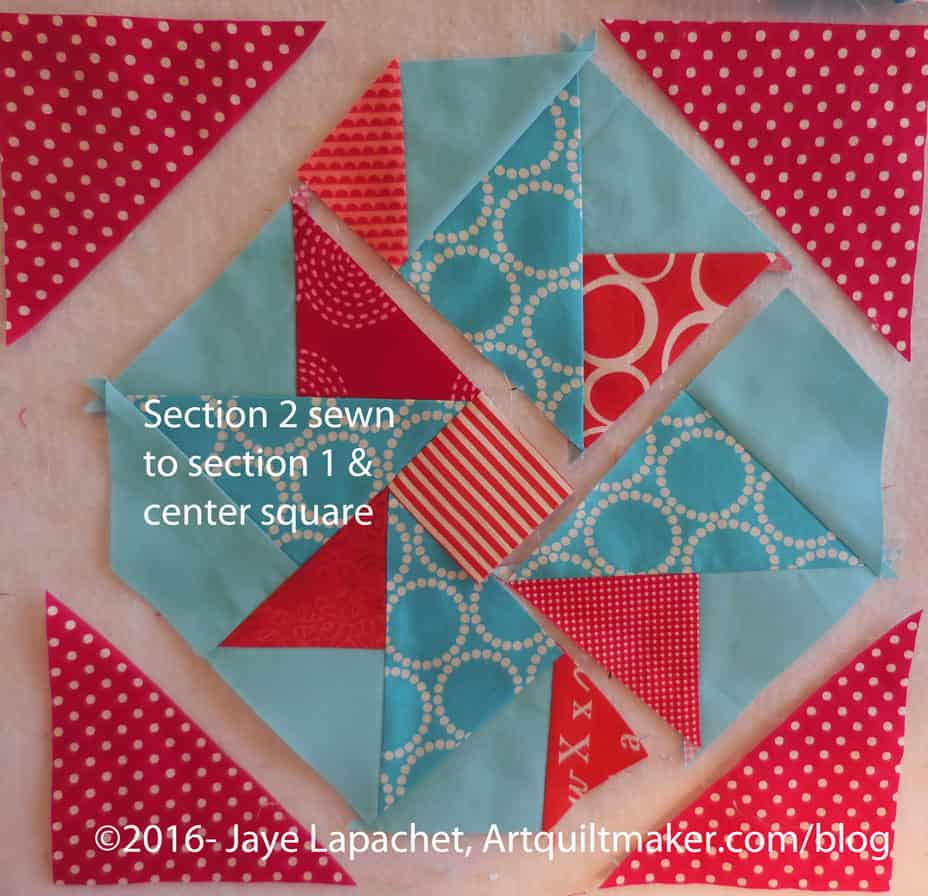
19. Take section 2 and lay it over section one and the center square with right sides together. The lengths should be about the same.
Section 2 sewn to section 1Section 2 sewn to section 1 + center square
Completing the sewing of section 2 makes the section look like it is possible to sew on section 3.
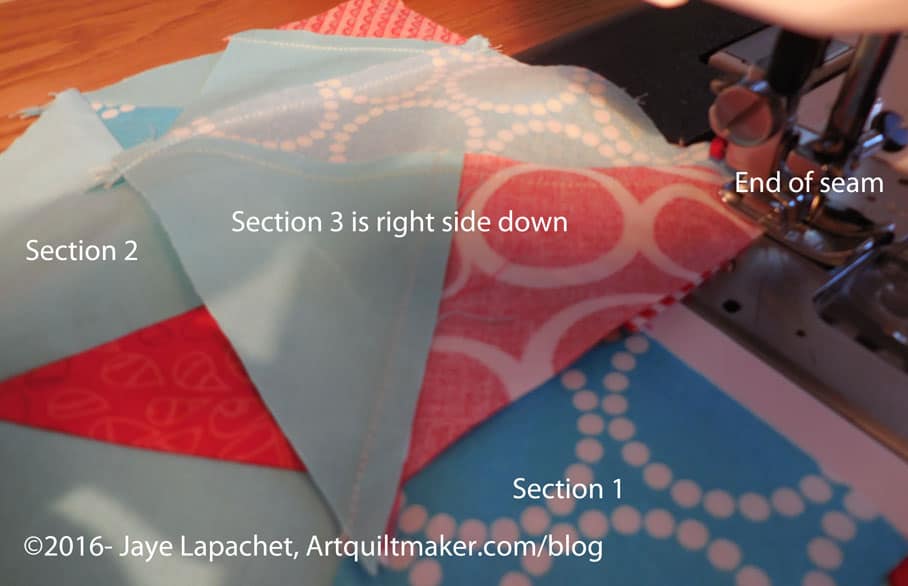
Section 3 right side downEnd of section 3 seam
20. Lay section 3 over section 2 and the center square. Line up the edges so they are event.
Center section almost done
Now your center section is almost done.
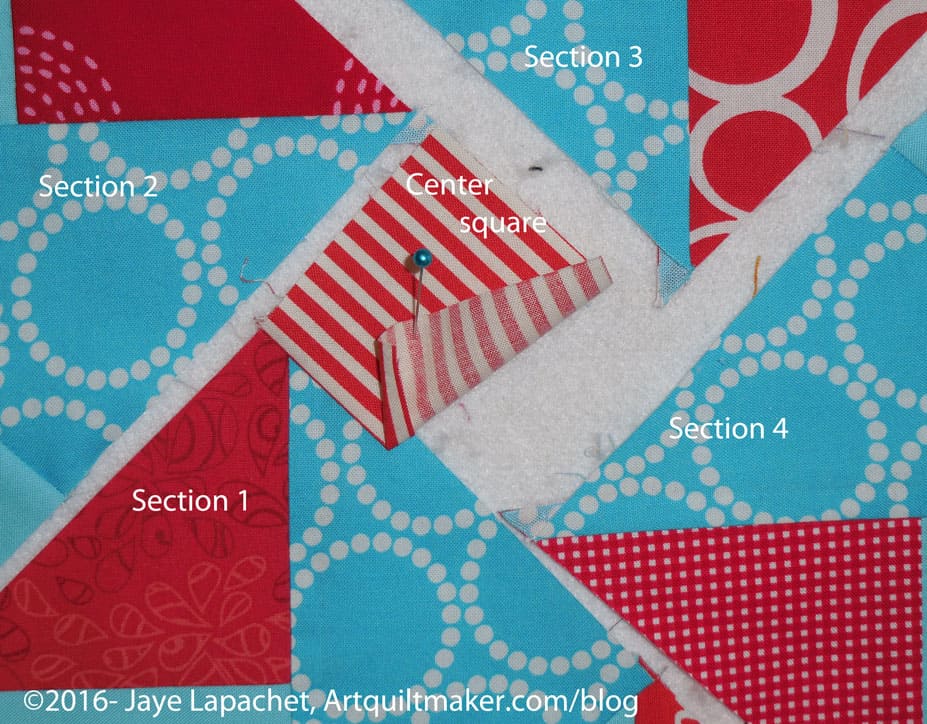
Tuck section 1 under section 2
21. Prepare to sew section 4 to the larger piece you have made by tucking section 1 under section 2. You might want to use a pin to keep it out of the way.
22. Lay section 4 over section 3, right sides together.
Section 4 sewn
Section 4 is sewn. Keep section 1 tucked under and out of the way for the next step. Get ready to complete your partial seam.
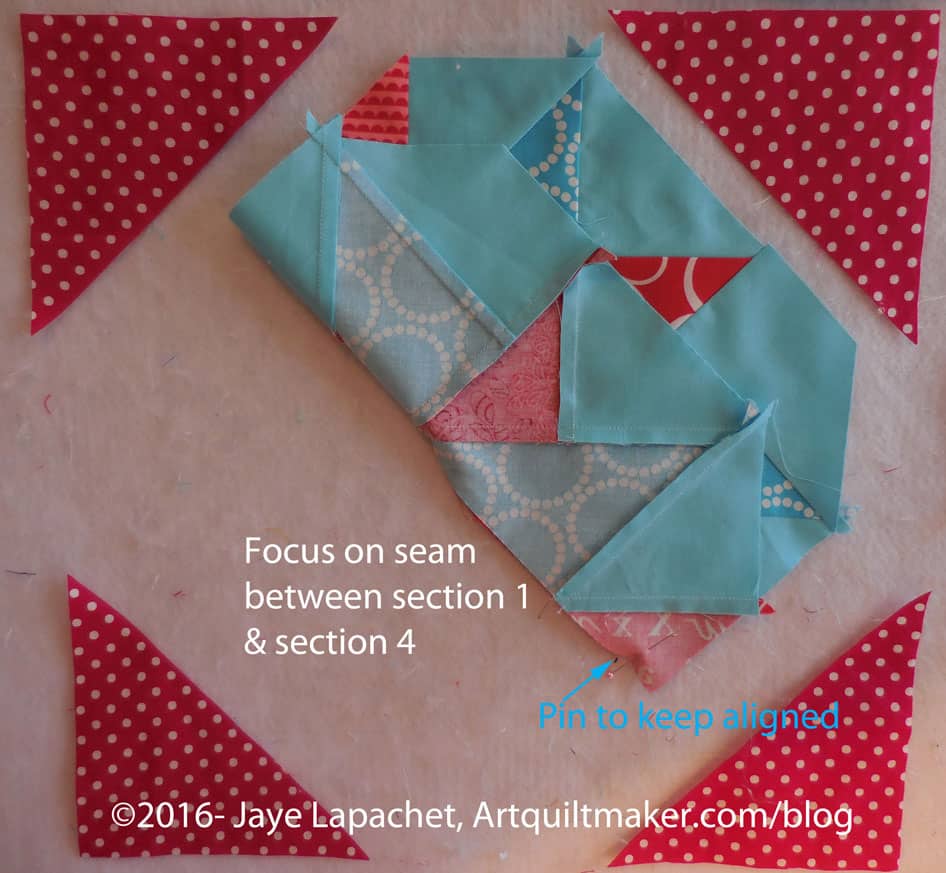
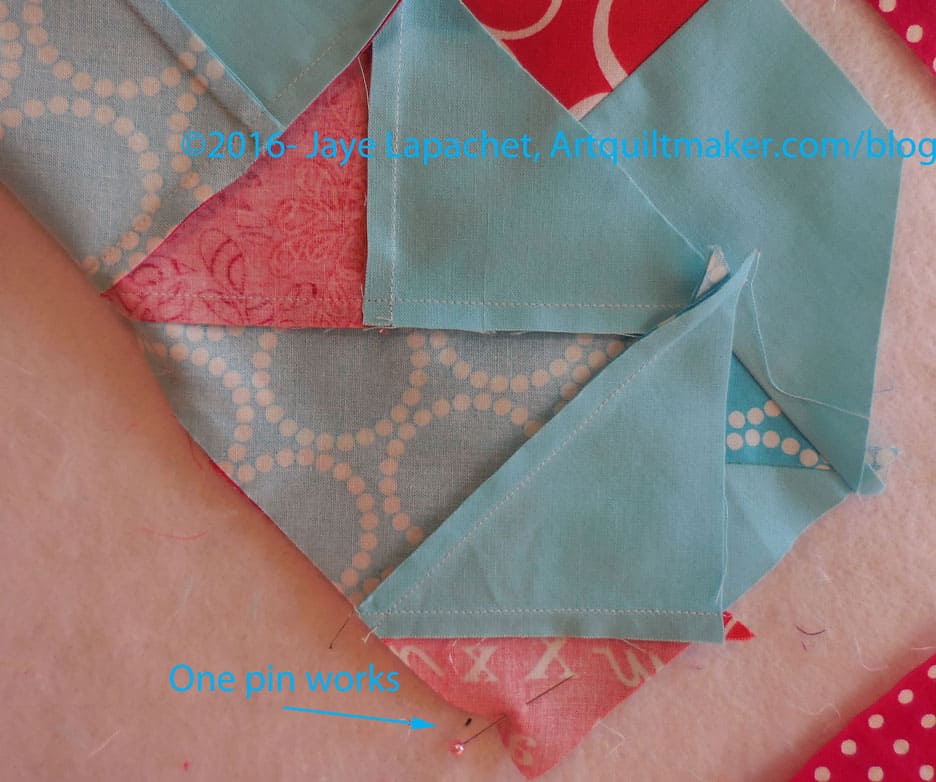
Fold center section upFold section up – detail
23. Fold the raw edges between section 1 and section 4 up like half of it wasn’t sewn. Use a pin near the end of the seam (edge of the section) to keep it in place.
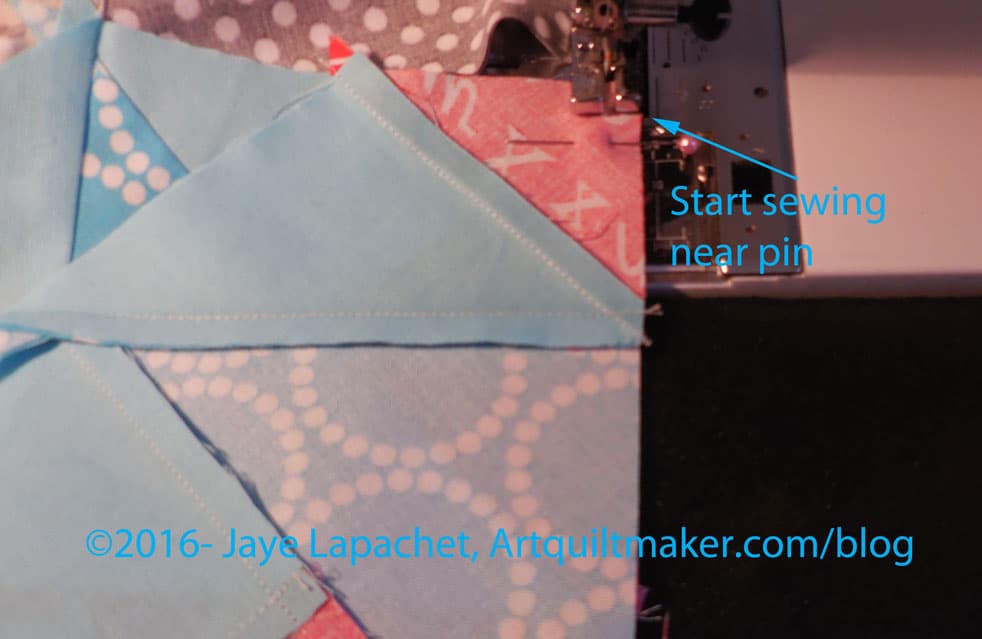
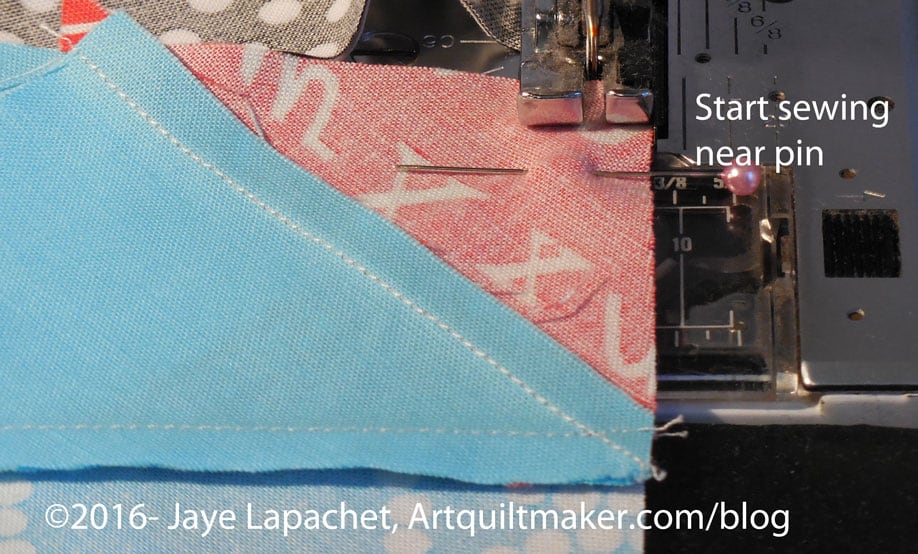
Position piece near pinStart sewing near pin – detail
24. Position piece so you start sewing near the pin.
Now you will sew the partial seam.
Sew partial seamSew partial seam
25. Once you start sewing from the pin (noted above), you will see the end of the first seam you partially sewed. Sew slowly to the end of previous seam line. To avoid a lump in the middle where the two seams meet, you can tug VERY gently towards your body as you sew. Do this only if necessary.
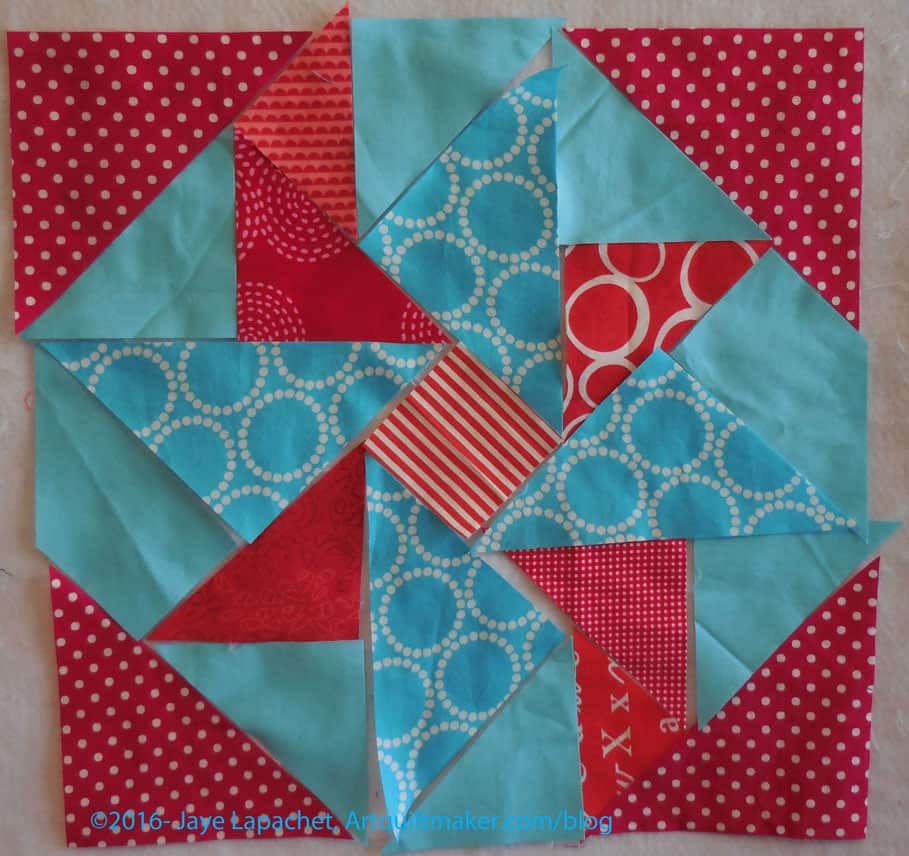
Center section sewn
Hooray!!! You have finished the center section
Now you have to sew the corner triangles to the center section to finish the block.
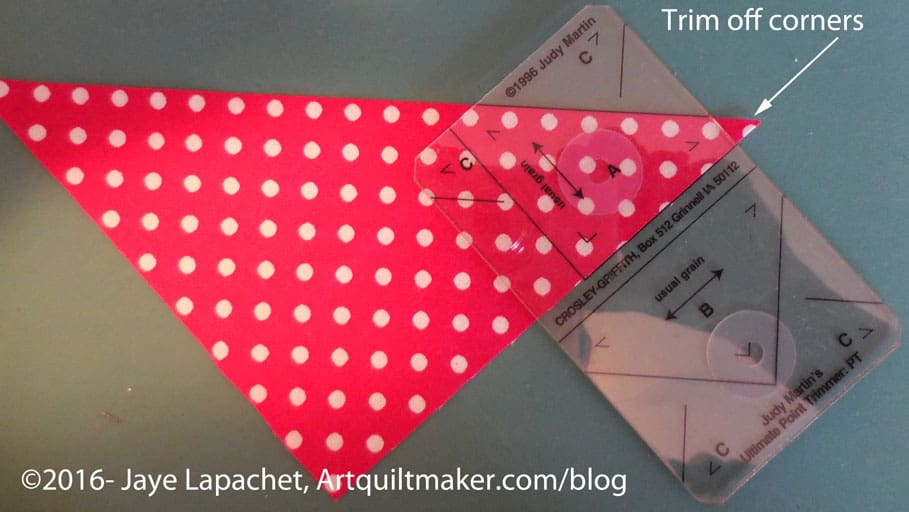
Trim off corners
26. Trim off corners of large corner triangles before you sew them on. You can trim them all at once or one at a time, which is what I do.
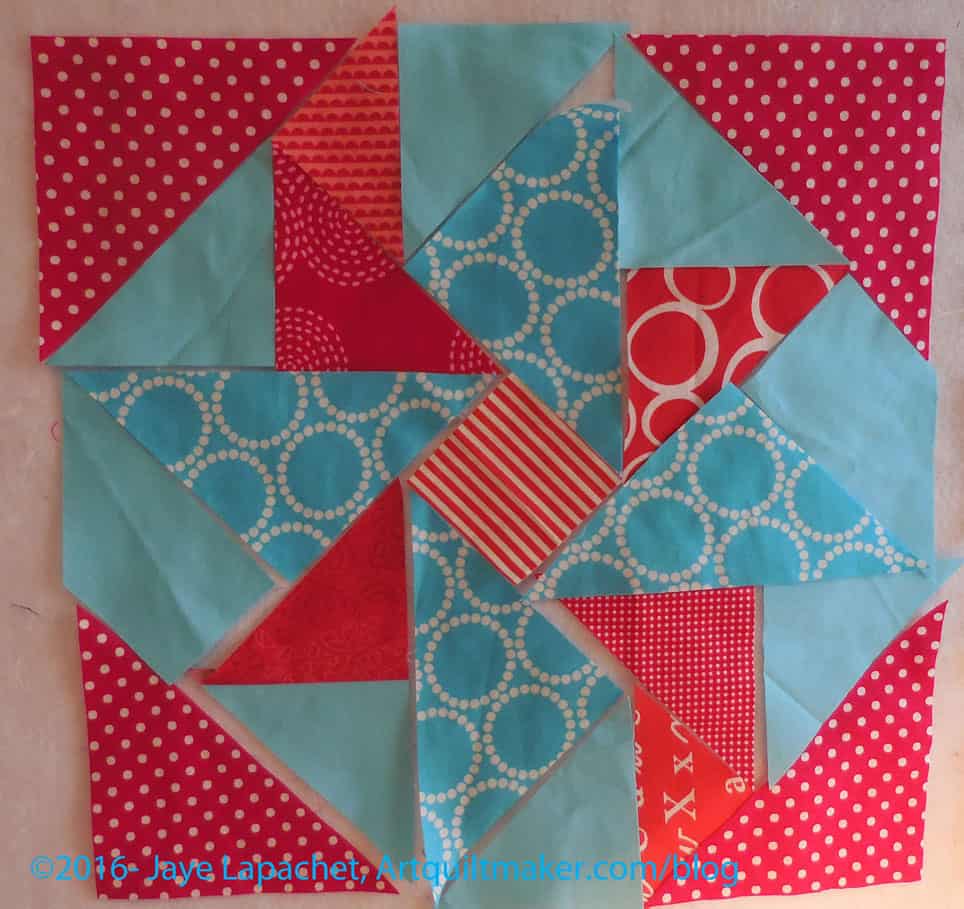
Lay out triangle on sewn section
27. Lay triangle on the sewn section, lining up trimmed corners even with edge of sewn section.
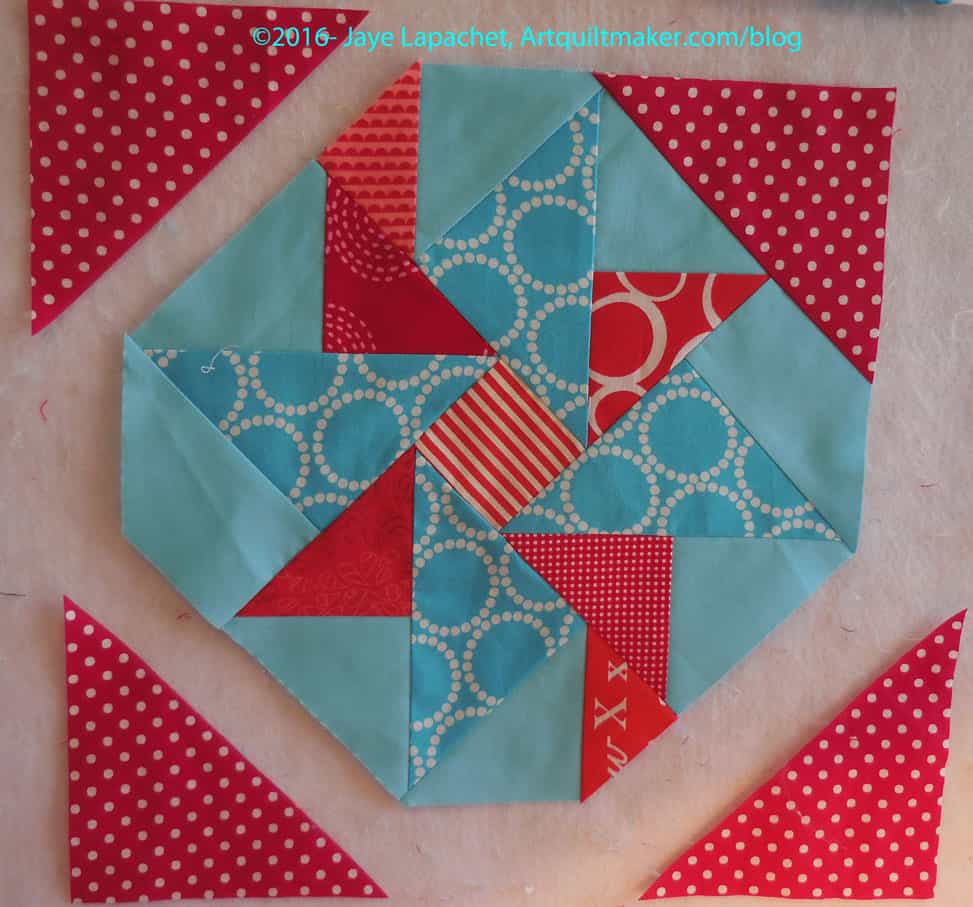
First corner triangle sewn
Your piece will look like the above image. Follow steps 26-27 for all corner triangles.
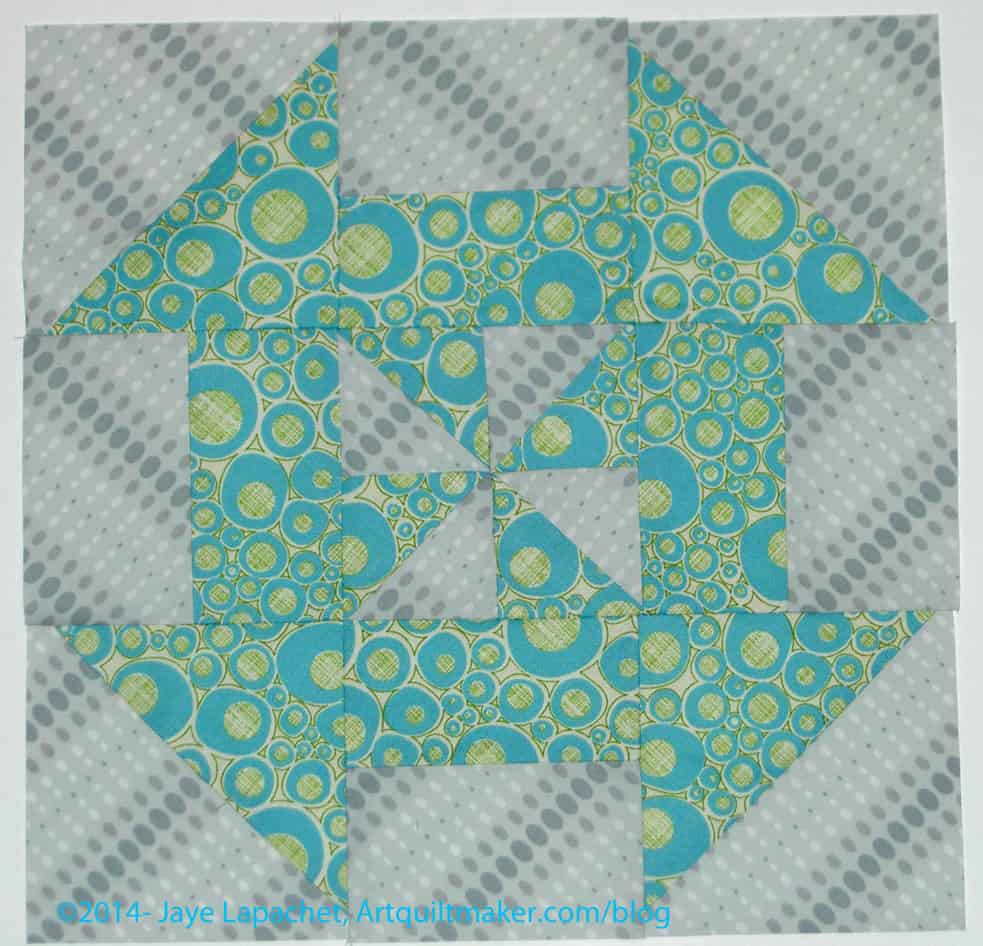
Finished Block
You are now finished! Great job!
___________________________________
Other resources and patterns regarding partial seams:
Laura Nownes tutorial on partial seams. Good tip about avoiding puckering on the last seam. I don’t agree with not pressing the seams until the end. Avoid pressing the first half seam, but press all the rest.
**Obviously, you should shop at local quilt shops and small businesses. However, if you are too busy or can’t find what you need there, I use Amazon affiliate links and may be paid for your purchase of an item when you click on an item’s link in my post. There is no additional cost to you for clicking or purchasing items I recommend. I appreciate your clicks and purchases as it helps support this blog.
In my previous machine applique’ tutorials, I used designs where the direction of the motif didn’t matter. When I went back to review the tutorial (yes, I do use my own tutorials!) in preparation for doing some machine applique’. I was preparing to applique’ letters, which have a definite right and wrong way. I realized I had omitted directions for using directional motifs (where the direction of the motif matters, such a numbers or letters) for applique’, so I had to figure out how to do them again.
In order to understand this tutorial, you will need to look at How to Applique’-TJW and the 3 Fusible Applique tutorials (pt.1, pt.2 and pt.3). All of these are part of a whole.
Paper backed, double-sided fusible web, such as SoftFuse, Steam-a-Seam 2 or Steam-a-Seam Lite. There are many brands. Use your favorite. Follow the directions.
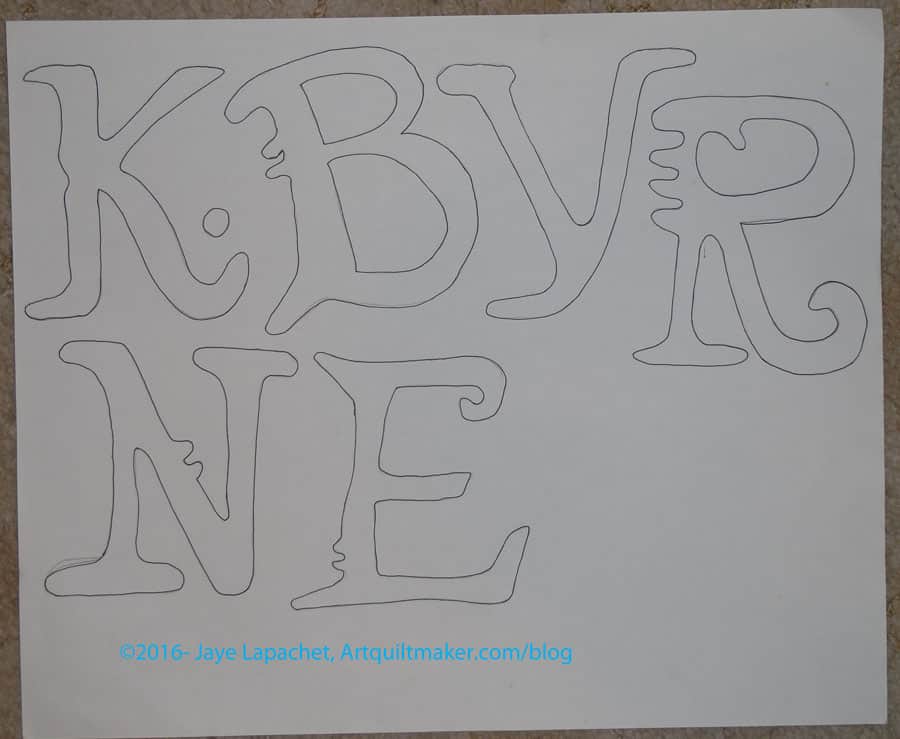
Draw out your design. I used a pattern for the letters I wanted to applique’. You can draw or print your design. There are a lot of free clipart you can use. Since I had a pattern, I laid out the pattern, placed a piece of drawing paper over the letters I needed and drew out the design using a pencil.
Trace over the pencil lines you used to trace the design with a Sharpie. The lines should be dark. Make sure the Sharpie does not bleed through to your table.
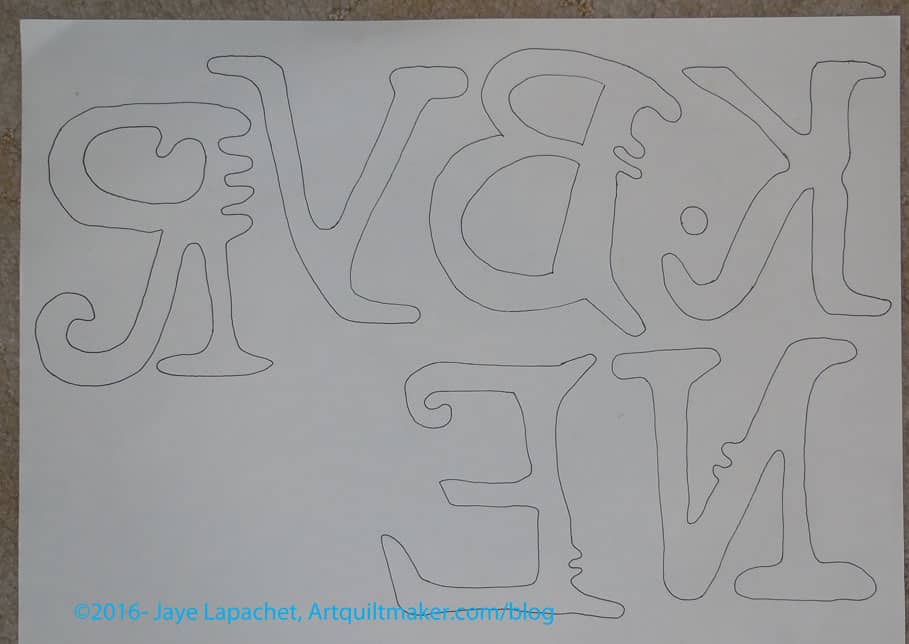
Flip your drawing paper over and put it on your light box. You can also tape it to a window or sliding glass door. The wrong side of the letters or directional motif will show through.
Directional motifs backwards on drawing paper
Using your Sharpie, trace the letters again on the wrong side of the paper. You will be tracing the backwards image of the letters.
Leaving the paper taped to the window (or laying on the light box), tape a piece of paper backed fusible, paper side UP, over your design which is on the window or light box.
Trace the backwards design on to your paper backed fusible using a Sharpie. **Nota bene: my Sharpie tended to smear on the paper of the fusible. I couldn’t find a pen that worked well, so be really careful to keep your hand out of the way to avoid smearage.
Once finished, remove everything from the window or light box.
Place the fabric you will use for your directional motifs right side down on the ironing surface. The fabric should be sized slightly larger than the fusible.
Place the fusible on top of the fabric with the paper side up. Make sure no edges are over your ironing surface.
Place your applique’ pressing sheet over everything.
Press according to the directions on the fusible package.
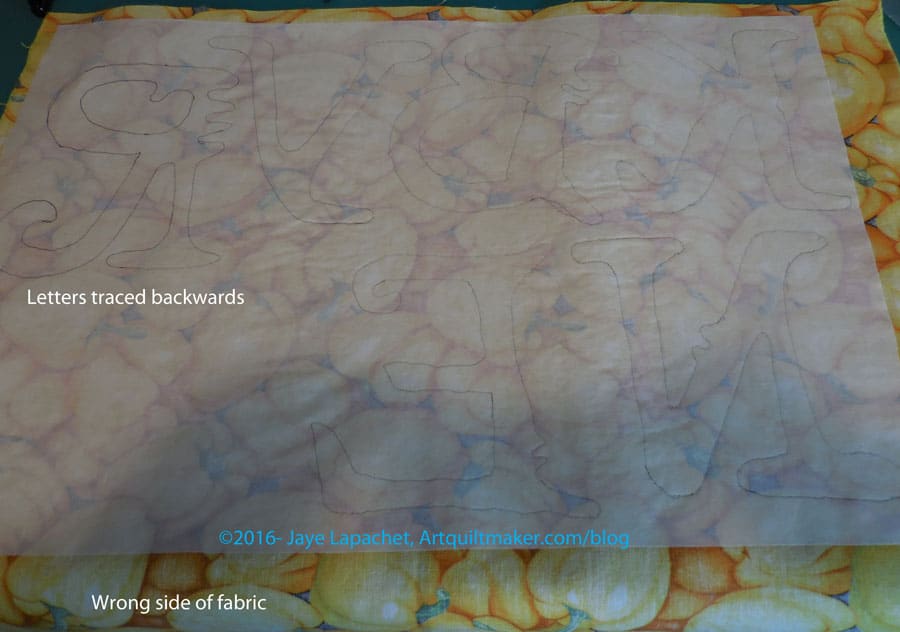
Fusible pressed to fabric
Once you are finished pressing, you will have a piece of fabric with fusible on the wrong side. The motifs (letters) should appear backwards and you will see the wrong side of the fabric.
Decide on which scissors you will use. I always have a fight with myself about this. I don’t want to ruin my Ginghers, which are super sharp and great for cutting out detailed types of designs by using them to cut through paper. I also don’t want to ruin the edges of my motif with a pair of papers scissors that will not be sharp enough to cut through the fabric. I have a pair of Fiskars that I end up using for this task. Not ideal, but the best I am willing to do.
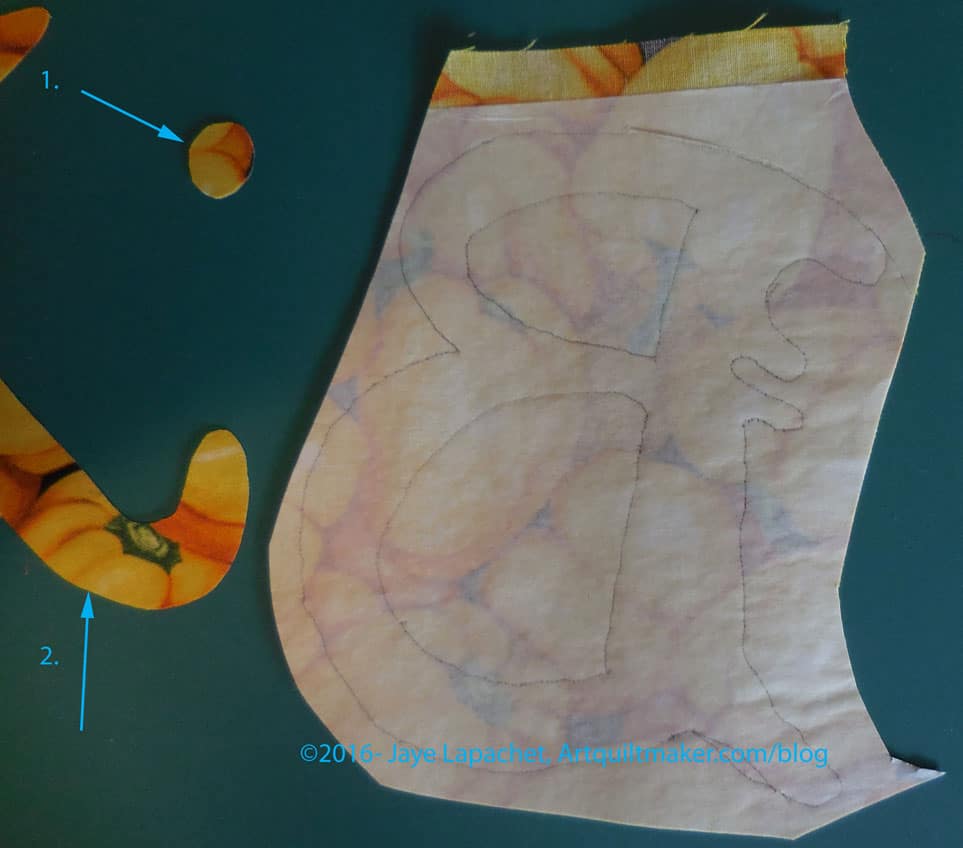
Cut out directional motifs
Once you have decided on scissors, cut out your designs (letters, in this case). First I do a rough cut, then I cut with more detail.
Cut out directional motifs – detail
Layout your background fabric on a flat surface, right side up. I use my ironing board, so I don’t have to move the motifs in order to press. If I have to sew two pieces of fabric together to make a large enough background, I press the seam open.
Take each motif, one by one, and peel off the paper. Carefully place each prepared applique’ motifs in their desired location before moving on to the next one. With motifs such a letters, I use a ruler to make sure they are straight.
You should be able to see your design correctly. If you are using letters they should not be backwards and you should be able to read the word.
Place your applique’ pressing sheet over everything.
Press your applques so that they are stuck to the background fabric.
Set up your sewing machine with the correct colored thread and a foot suitable for zigzag or satin stich.
I set the zigzag to 3.5 (width), 0.7 (density). I like my satin stitch to be a little open, but you can adjust it to your favorite length and density.
Cut a piece of tearaway the width of your motif and twice as long
Fold the tearaway in half.
Pin the double layer of tearaway to the back of the background fabric. Pins should be out of the way of the machine foot.
Satin stitch all the way around each motif, carefully negotiating curves so the satin stitch looks smooth.
Trim and/or tie off all threads.
Tear away/cut away the excess tearaway stabilizer.
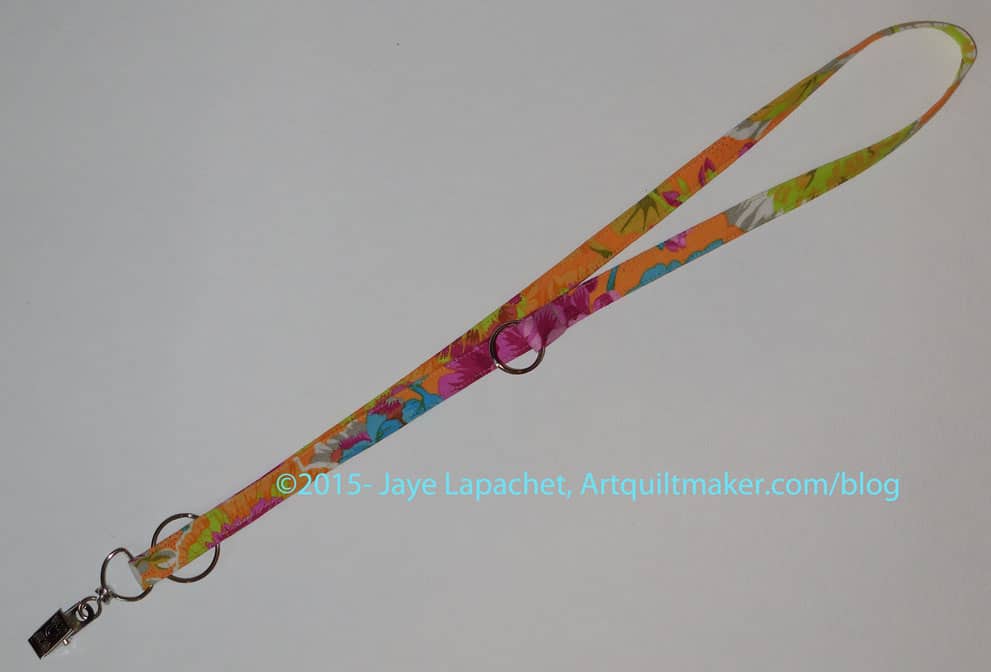
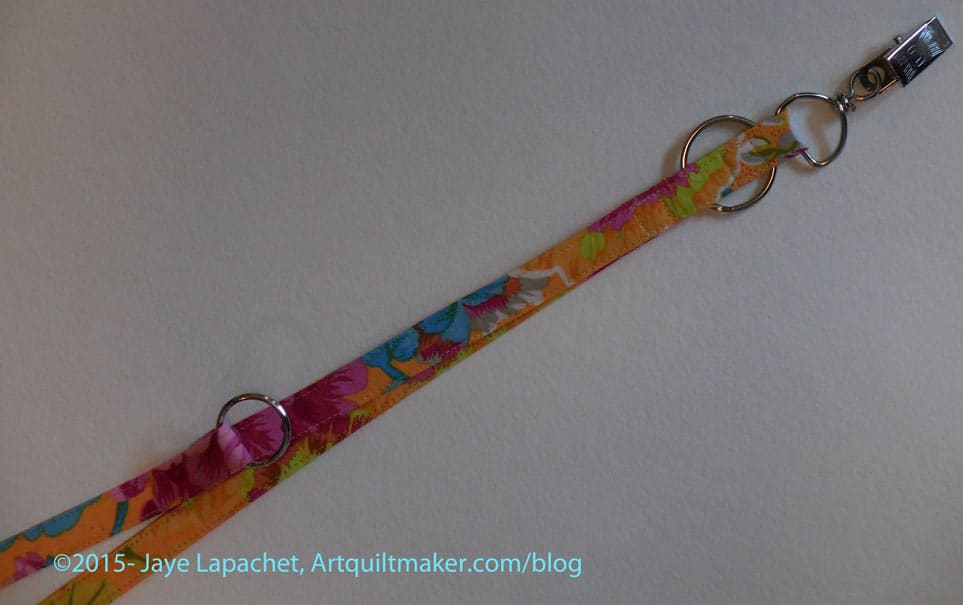
I wanted a certain kind of lanyard for my quilt guild nametag. I wanted my nametag to be near my shoulder so people could really see it. I also wanted some options to hang things from it, like a pouch for id, money, etc.
Make this lanyard fit your personality.
Supplies
sewing machine in good working order
ironing kit
thread
fabric
basic sewing kit (BSK)
pins
WonderClips
Shape Flex fusible interfacing (scraps are perfectly fine)
2 circle metal rings (D ring or similar will work also)
1 metal hanging clip
Directions
Wash and press your fabric
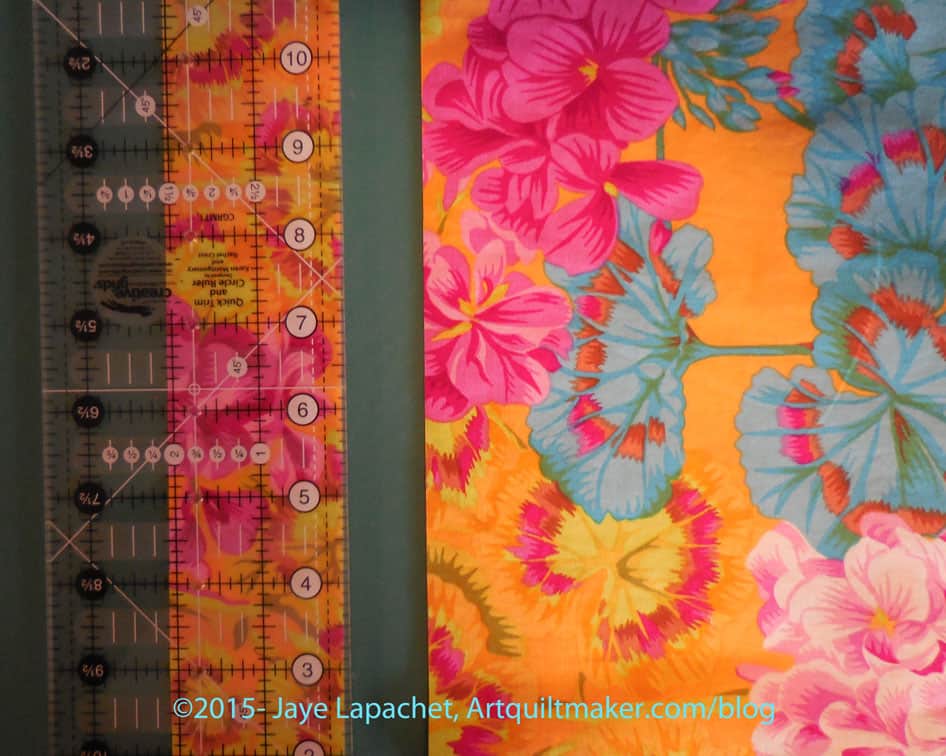
Cut 2″ strip
1. Cut a piece of fabric 40″ x 2″. You can adjust the length to fit your height, neck size, etc.
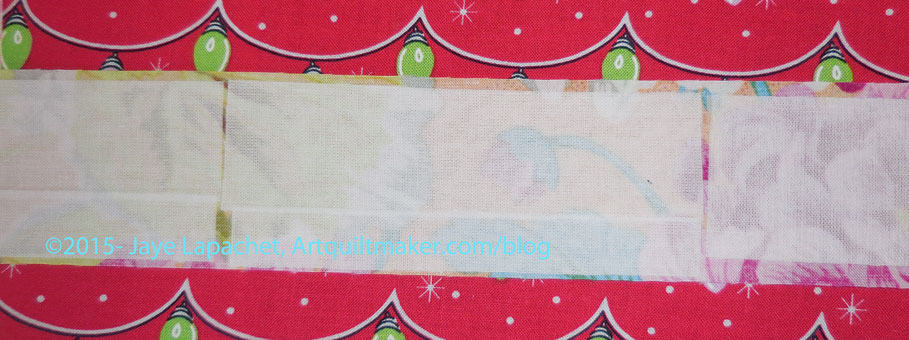
Cover with interfacing
2. Layout your strip on the ironing board wrong side up. Cover the wrong side of the fabric with Shape Flex (or similar) interfacing. I usually cut the interfacing so it only goes with about 1/8″ from the edge. This reduces bulk.
**Note the Christmas light fabric was what was laying on my ironing board at the time I took the photo.
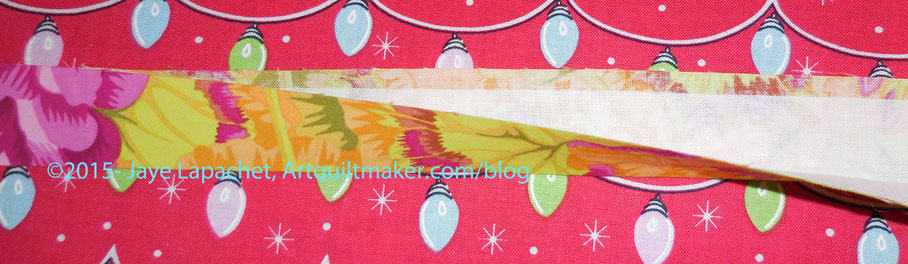
Fold in half
3. Fold your ShapeFlex covered strip in half, wrong sides together, and press so the edges match up.
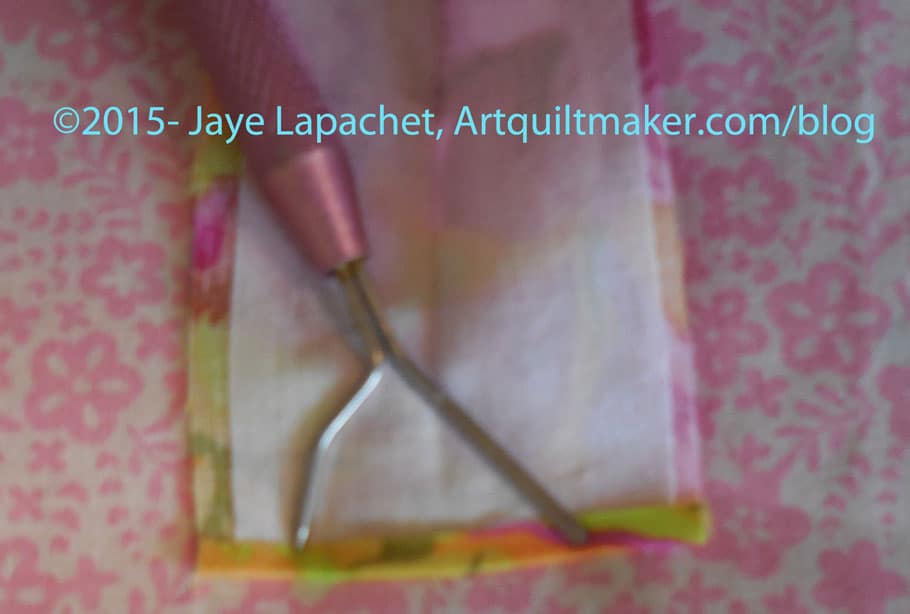
Fold ends
4. Fold both ends up about 1/8″ (WST). This will finish the ends.
**Note: I don’t know what that tool is or where I got it, but I use it to keep from burning my fingers when I iron.
5. Open the strip you have just pressed down the middle.
Fold towards to center
6. Fold both raw edges towards the center. Don’t fold past the center pressed line.
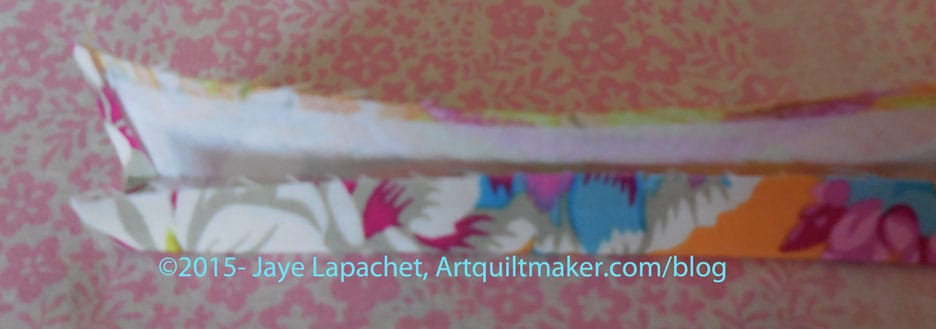
Folded lanyard piece
6A. Once you have pressed both raw edges towards the center, repress the whole strip together on the center line.
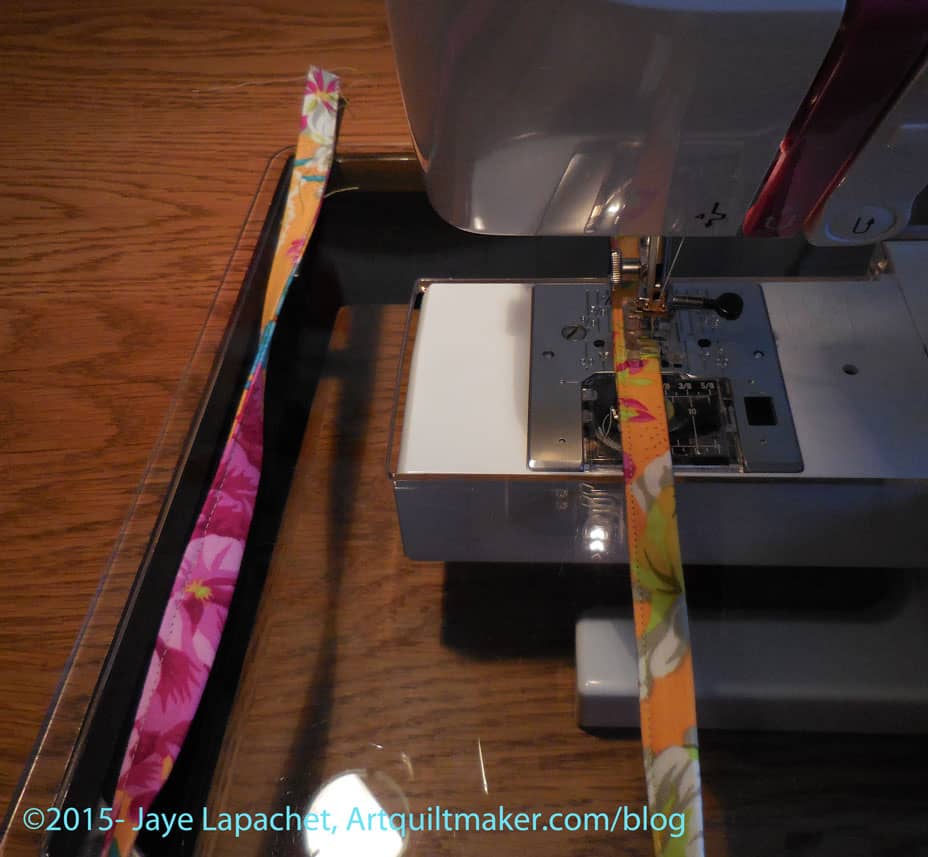
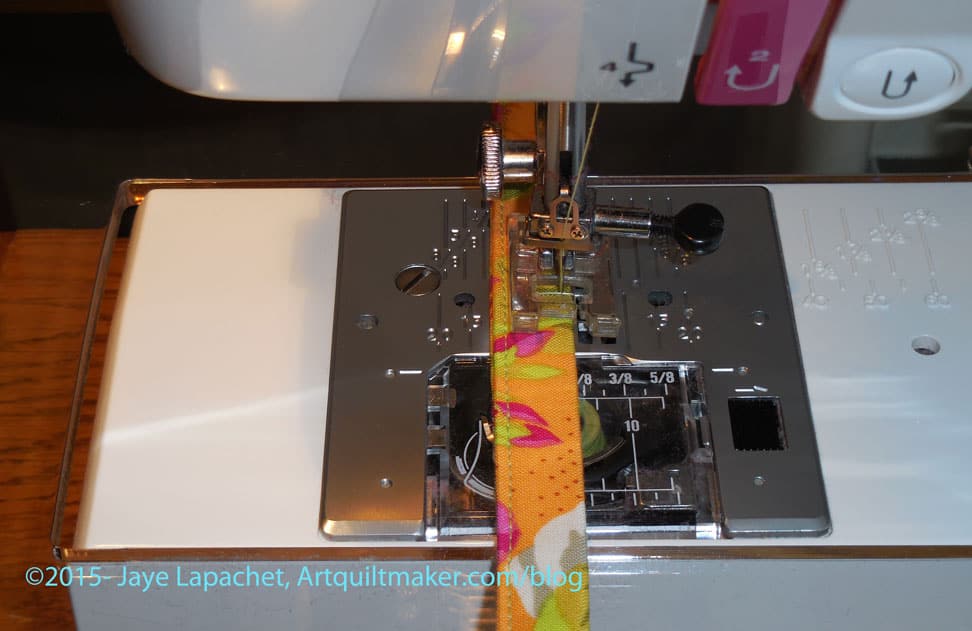
Topstitch around entire stripTopstitch around fabric – detail
7. Topstitch around the whole strip using a matching thread. Of course, you can use whatever color you want, so do that. Make the piece interesting.
Topstitching encloses the whole strip so there are no raw edges visible.
Mark with a pin
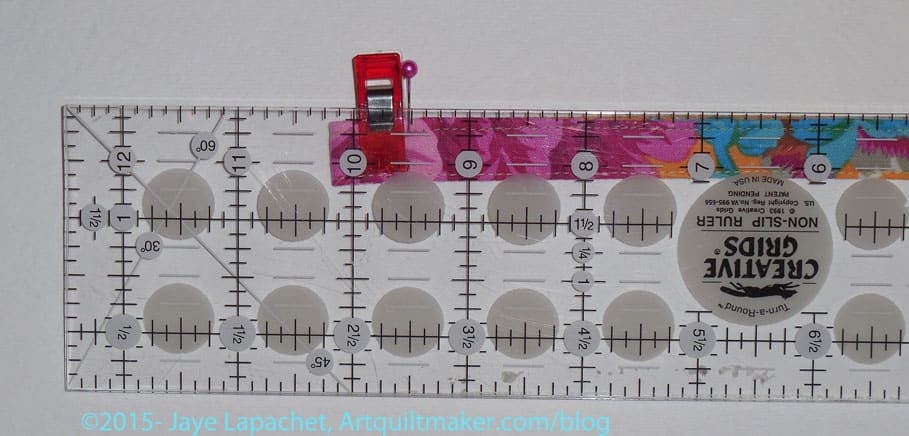
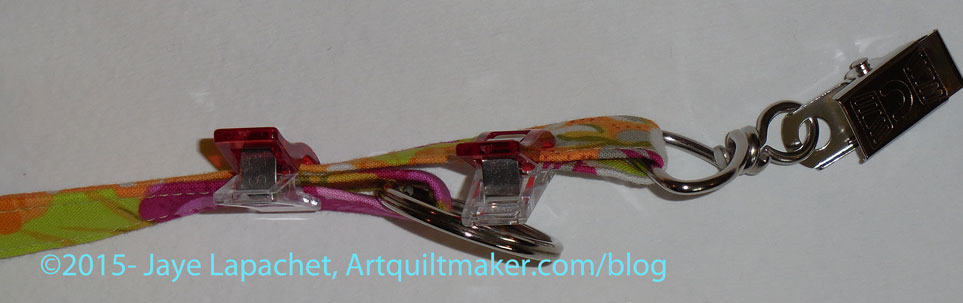
8. Mark 9.5″ up from the end with a pin. This will be your sewing line, which will create the lace to clip your name tag.
Fold at 10.25″
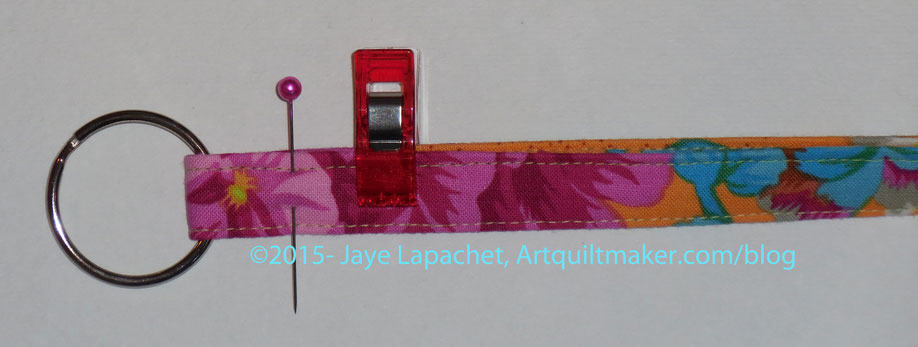
9. Fold that same end at 10.25″ and insert a ring or D Ring.
Clip to hold ends together
10. Clip piece with a WonderClip to keep everything together while you sew.
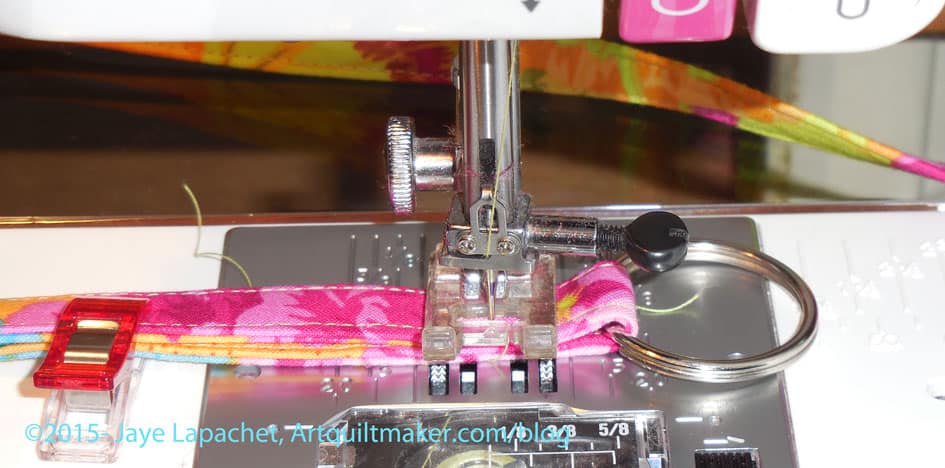
Sew on marked line
11. Sew on your marked line. I sew between the top stitched lines. The ring will need to face out so you can clip your name tag on to it and it will not be covered by the lanyard.
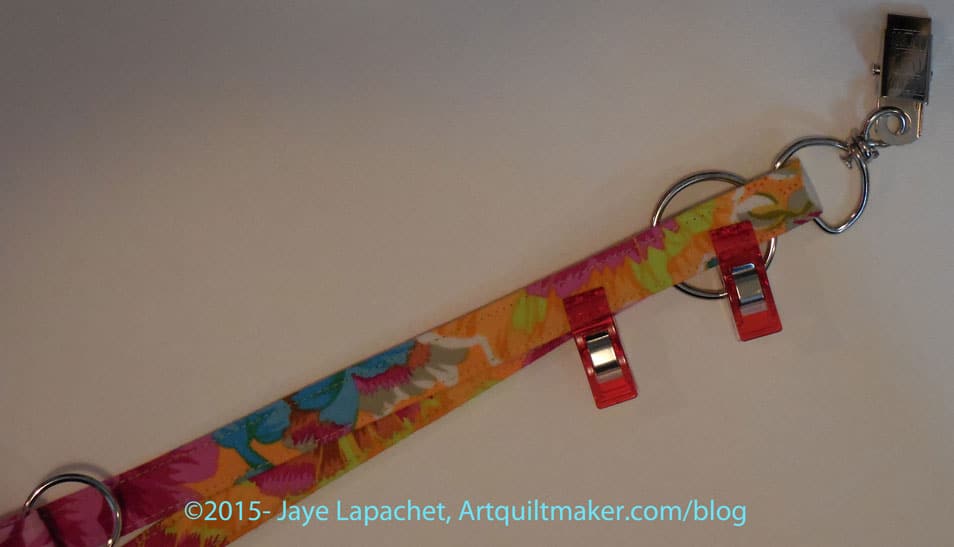
Fold ends up 1″Make sure hardware is on the same side as upper ring
12. Fold each end up 1″. Make sure that the fold on the same side as the upper ring is to the back.
Add hardwareAdd hardware and clip ends
13. Add a circle ring to one end and clip with a WonderClip.
Clip end to prep for sewing
14. Add the metal hanging clip to the other end and clip with a WonderClip.
15. Adjust the ends so the circle ring does not clank against the hanging metal clip when you wear it. If it does it will drive you crazy. If it doesn’t bother you, it will drive someone with auditory sensitivity crazy. I always adjust the hanging metal clip to be the longer end.
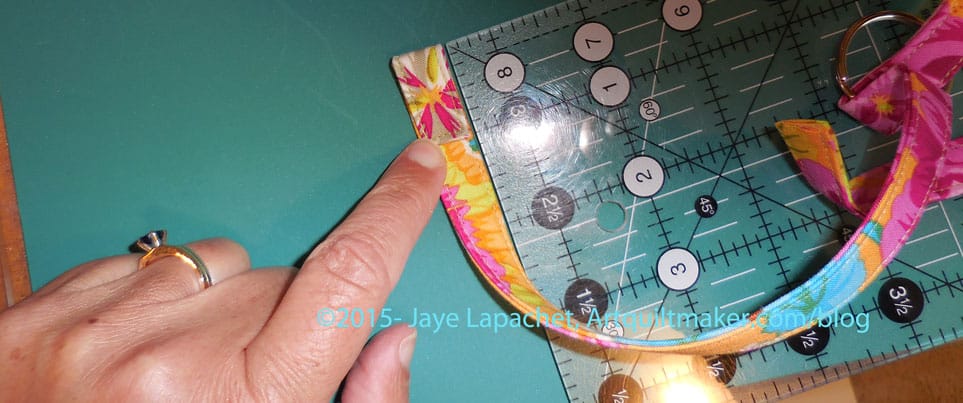
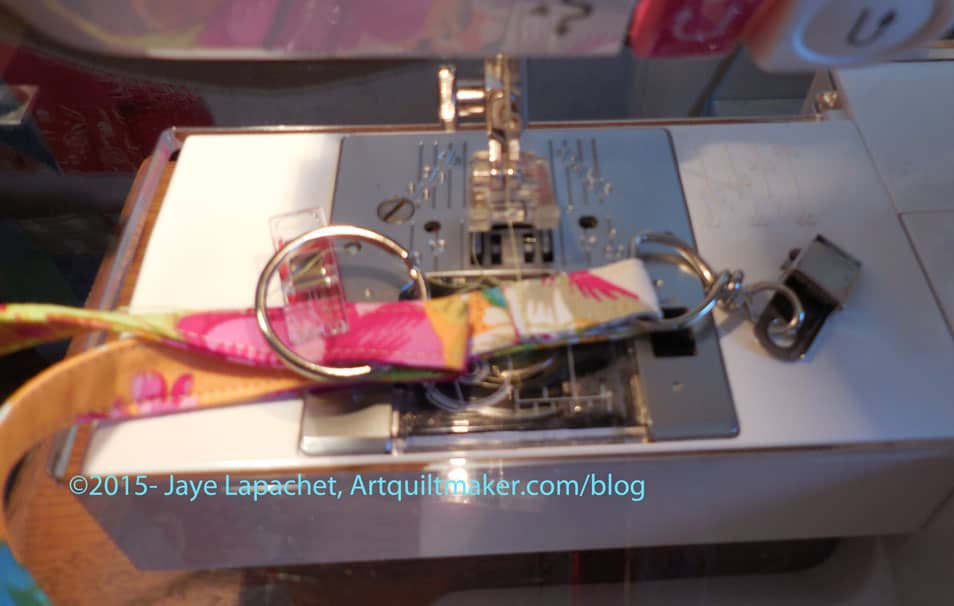
Sew First End Together
16. Sew the end of the hanging metal clip closed. Bury or clip threads.
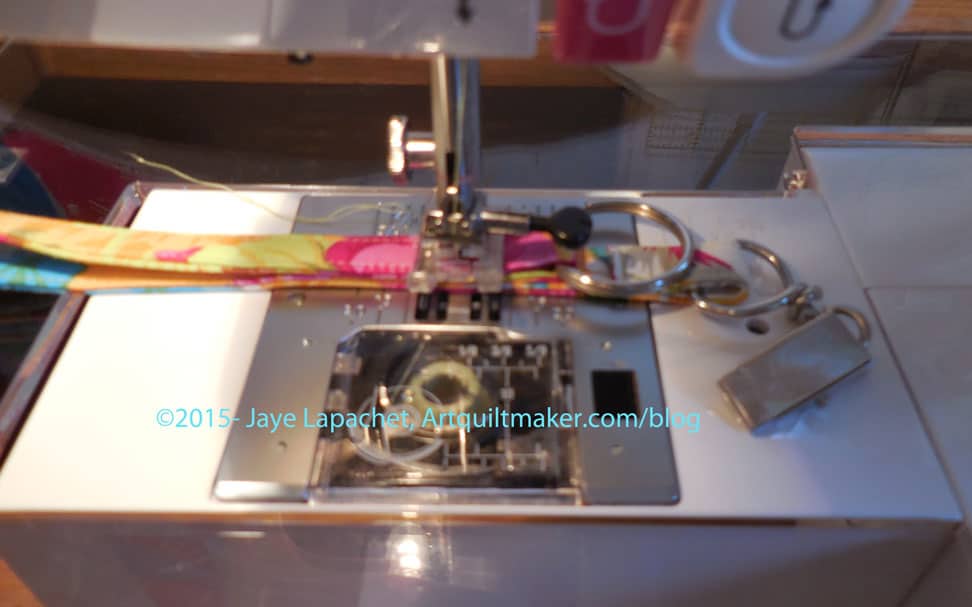
Sew Layers TogetherSew Layers Together
17. Now, carefully sew all the rest of the layers together. I sew the end with the ring using a square stitch pattern to reinforce all the layers of the lanyard.
Finished Lanyard detail
Clip your nametag on, hang your pouch and you are ready to rock.
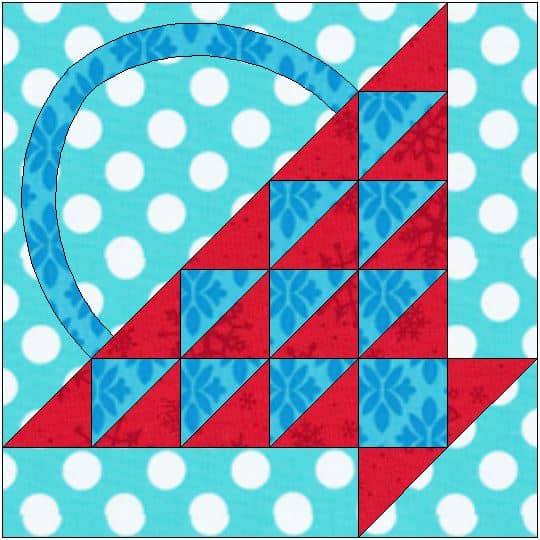
This post is about selecting colors and should have been posted after part 1 of the Basket tutorial. I didn’t think of it until I was almost done with Basket tutorial part 2. C’est la vie.
I ended up wanting the fabric choices to be similar to the EQ rendering. May seem lame or small minded, but it is what it is.
Stitch Blue
The above is fabric I used for the other half of the HSTs. I wanted to match that fabric, but it didn’t work. The stitch fabric blends into the background too much, so I had to figure something else out.
Snowflake Handle
The above snowflake fabric is good, but I was concerned that the snowflake fabric might look too Christmasy.
Completed Basket Block
The above fabric selection is what I finally decided upon. The stripe is good, because it is a different motif than any of the others already in the block. The white also stands out a bit from the blues. If I had used a blue with a white dot like the EQ rendering then one of the others might have been ok, but this stripe works well.
Frances finally let me know she was ready to move on with her sampler quilt. We decided to make the Flower Basket Block, so I sent her the pattern, promised the tutorial and did nothing.
These directions use a quarter inch seam allowance. Check your seam allowance before you begin. If you don’t know how to do that, there are resources available, including one from Connecting Threads and another from Craftsy. You can search the web for others if you don’t like these.
You will be directed to use the Triangle Technique. Make sure you have the chart as well as the instructions handy.
Respect the bias.
Templates
You really only a need a template for the basket handle. If you are using templates for all of your pieces, then prepare all the templates for pieces in the patterns as directed below.
Prepare pattern for your basket handle template by printing two copies of the pattern. I am telling you to do this first so when you get into the throes of sewing you won’t have to stop and fiddle around with templates.
You will eventually place one copy of the pattern in your binder, but keep it handy so you can use it as reference.
Nota bene: You probably know how to make templates. However, I am including a quick refresher. Look for a comprehensive tutorial soon. (I’ll update this post and link it from here)
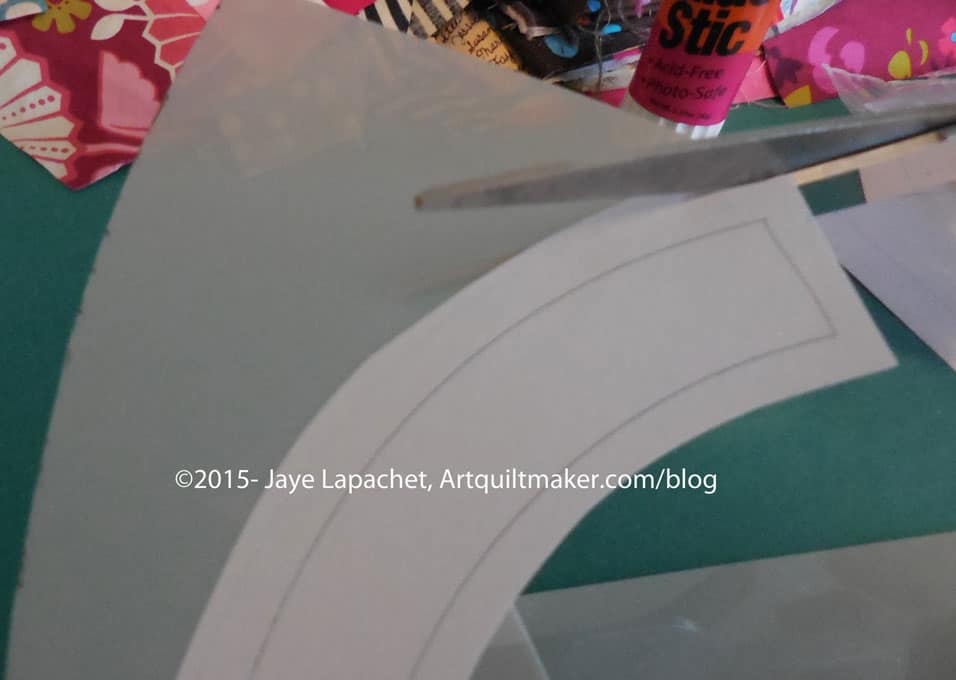
Rough cut* the handle pattern out of the second printout.
Rough Cut Pattern
Glue the paper pattern (with seam allowances) using the glue stick (or other suitable adhesive) to the template plastic.
Ok to use scraps of template plastic
It is okay to use scraps of template plastic. Put a piece of tape on seam lines to keep the joins stiff.
Fine cut templates
Fine cut** the paper pattern and template plastic you have adhered so you have an accurate template, cutting off any seam allowance that may have printed.
If you plan to machine sew the handle at all, you will want to prepare another basket handle template, in the same manner, without seam allowance.
Fabric
Gather your fabric and press it all. You can rough cut some pieces and press it with Mary Ellen’s Best Press to help deal with the bias. Consider this step for the large background triangle and the basket handle.
Cutting
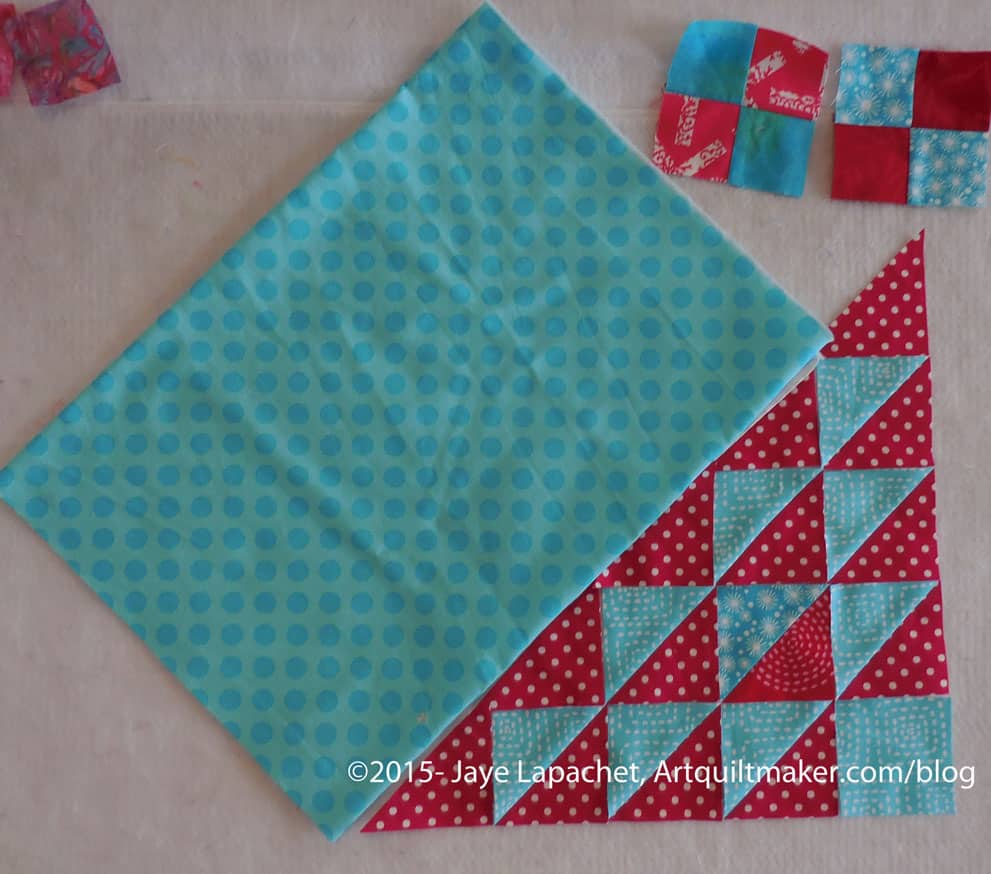
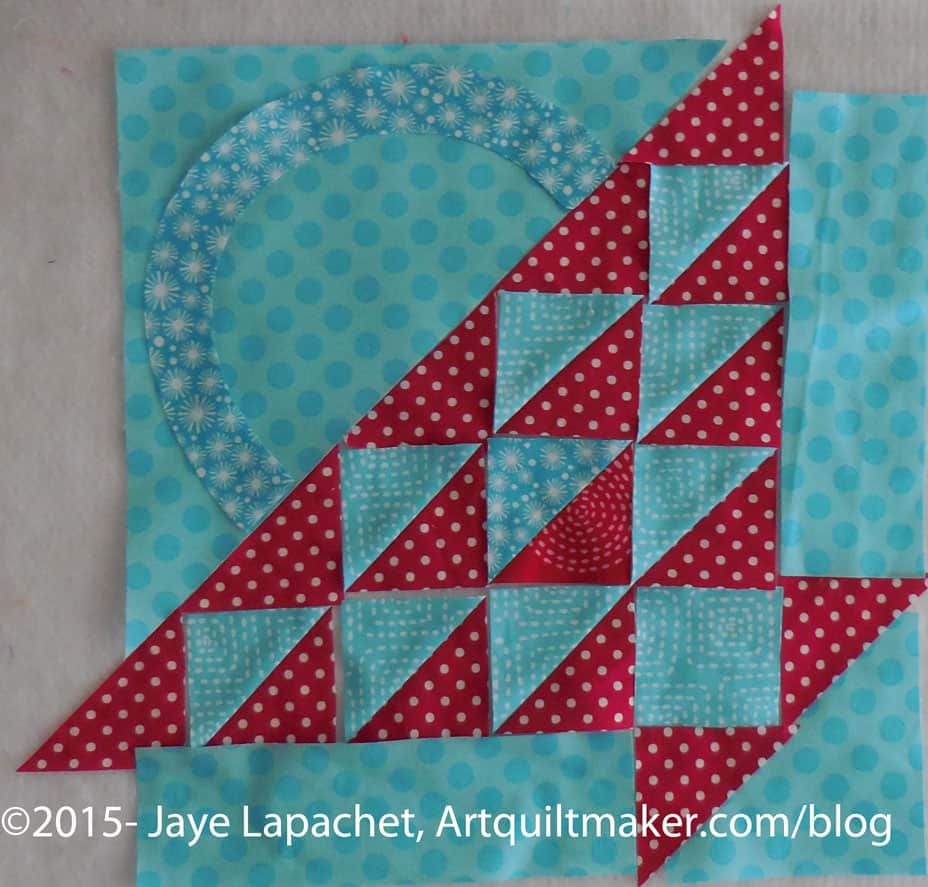
Flower Basket
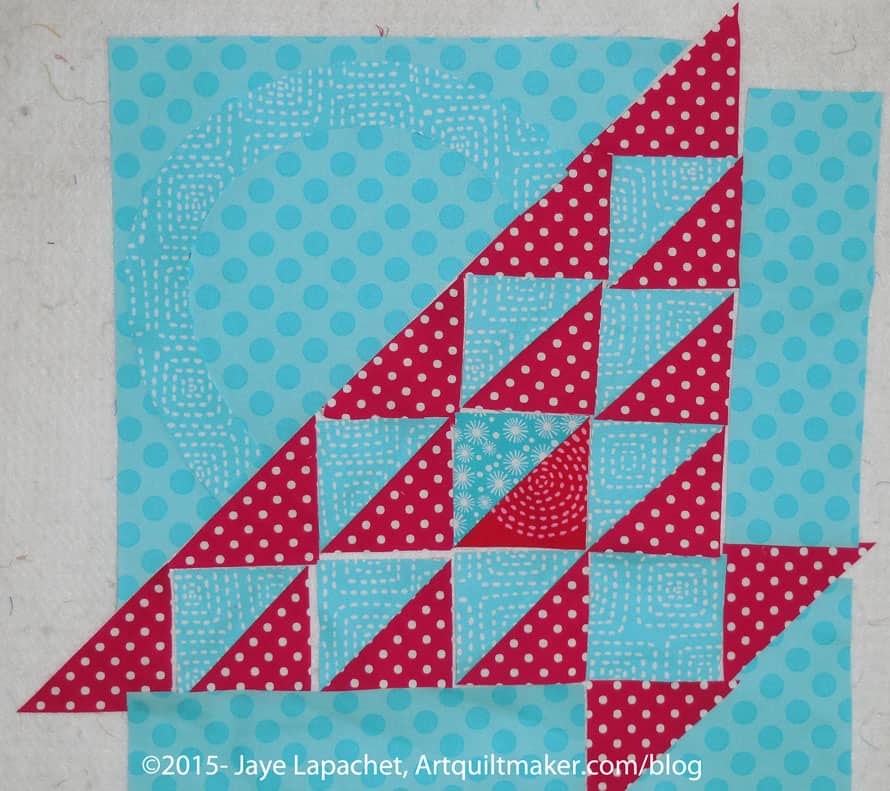
Basket Handle
In my example basket, above (same as at the beginning of the post), this fabric is the medium blue.
Lay out template piece
Draw around the template with your black fine tip marker. Rough cut a piece of fabric large enough for your basket handle.
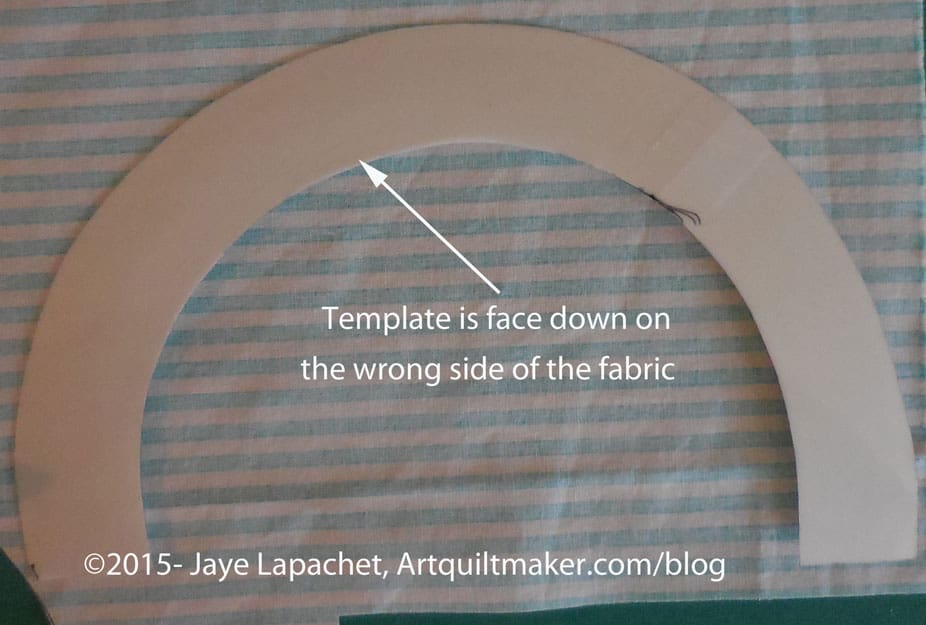
Place template face down on fabric
Place your handle template right side down on the wrong side of the fabric. Trace around the template carefully with your Pigma pen. Trace carefully without pulling or tugging at the fabric. You will be dealing with some bias on the curves. You will need to carefully move your hand along the template to keep it in place while you trace. Use the Pigma pen with a light touch.
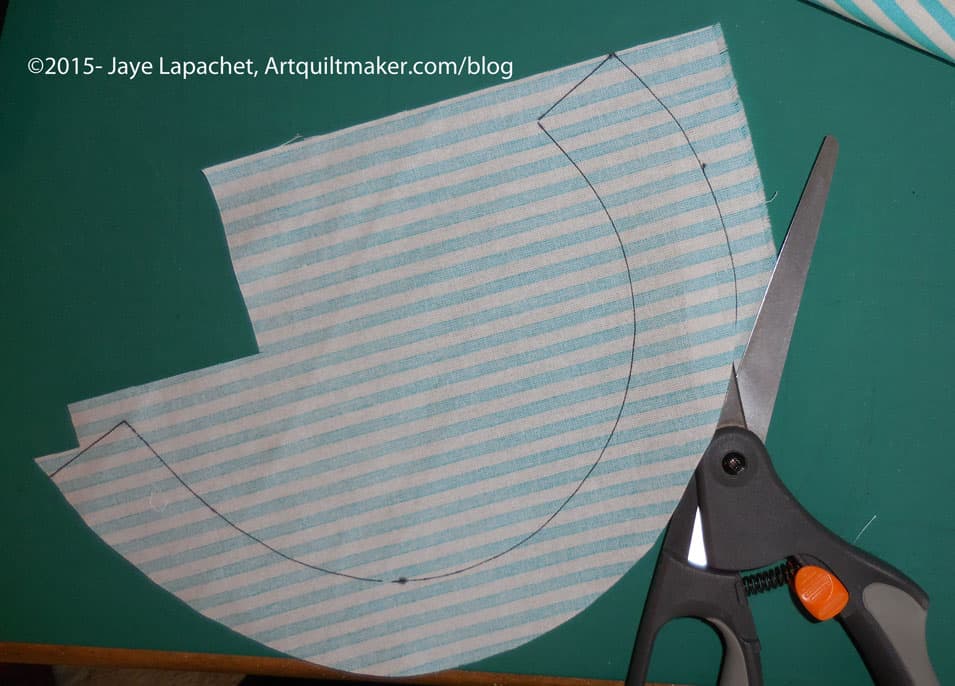
Cut out handle
Using your fabric scissors, cut around the traced image, cutting the drawn line off. If you are using a template with no seam allowance, leave approximately a quarter inch seam allowance on all sides.
Background:
In my example, above, this fabric is the blue Michael Miller Ta Dot with white dots.
Measure background
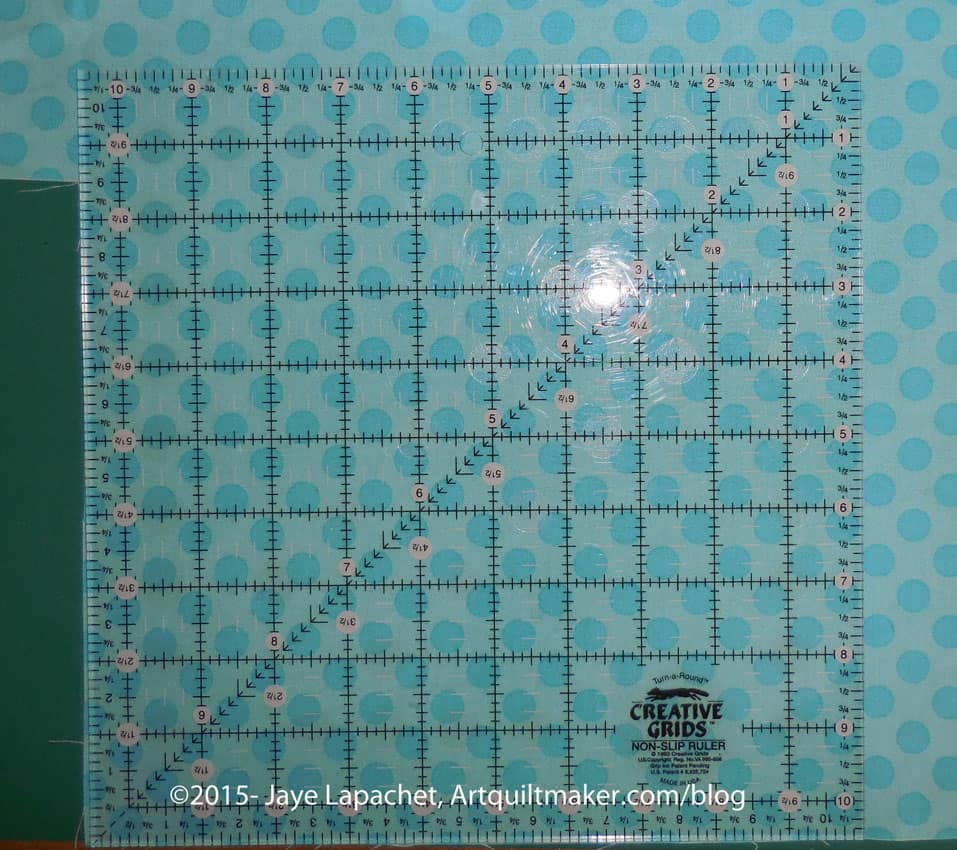
Measure the template for the large triangle of background fabric. It should be 10″ on each of the outside edges WITH seam allowance. Cut a square 10.5″ x 10.5″. You can trim it later. Better safe than sorry. Press the square with Mary Ellen’s Best Press.
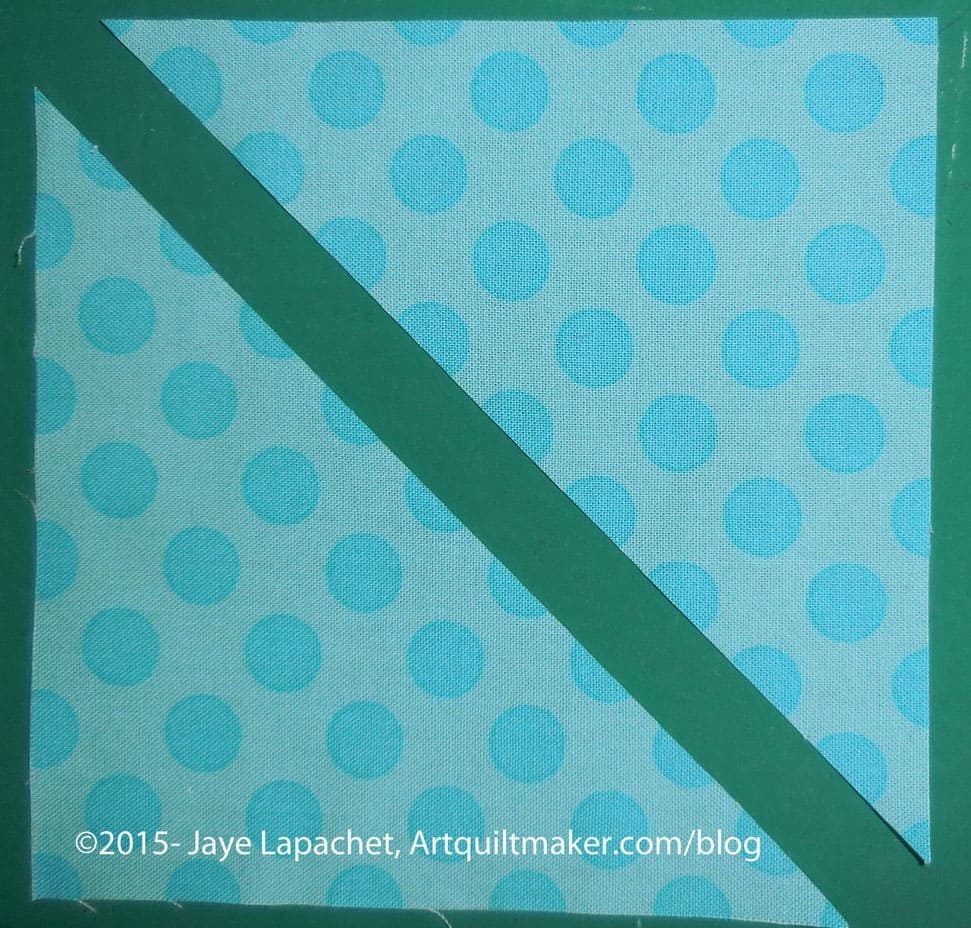
Cut square on diagonal
Cut the square in half along the diagonal.
Cut the following additional pieces according to the measurements given:
Background fabric:
2 patches: 2.5″x8.5″
Nip off Bunny Ears
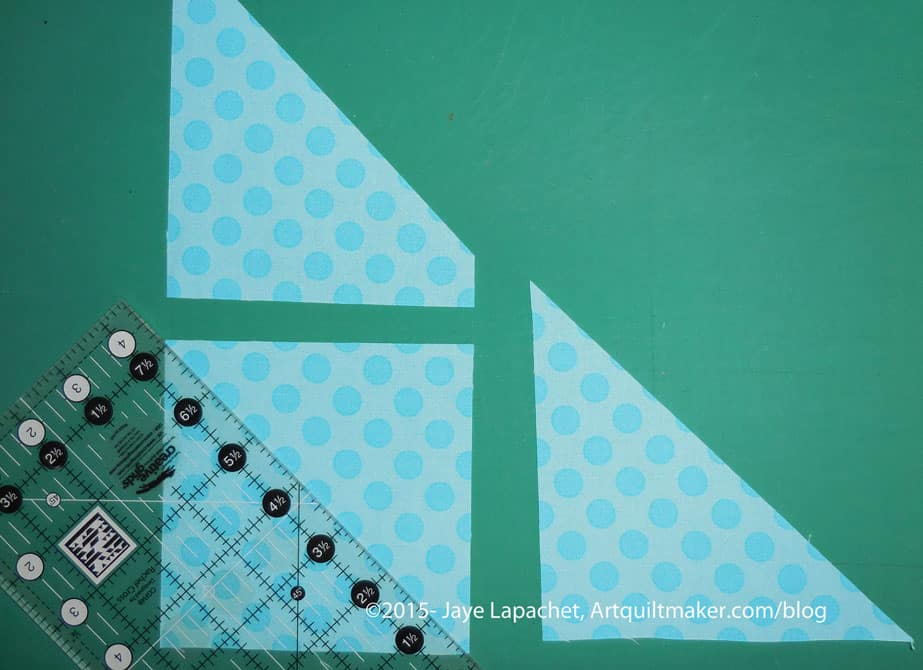
1 patch: square 4 7/8″x 4 7/8″. Cut in half. Nip off the bunny ears with the Judy Martin Point Trimmer
1 square: 5″ x 5″. Cut in half on the diagonal and set your second triangle aside
Remember: you have already cut the large background triangle
Cut some pieces from extra background triangle
You can cut some of the background pieces out of the leftover triangle.
Foreground fabric:
The foreground fabric is used for the basket. You will need at least two fabrics for this part. In my example I am using a scarlet red and a medium blue. See picture above for placement of foreground fabrics.
1 square: 2.5″ square
For the HSTs, you will need 2 squares, according to the Triangle Technique Chart, 6.25″ x 6.25″. Each square should be from a different foreground fabric. See the picture above.
Nota bene: The above Triangle Technique only yields 8 HSTs. You can make another set using the Triangle Technique directions and have some extras, or you can cut the triangles themselves
1 square 2.5″ x 2.5″
Cut trianglesCut squares in half
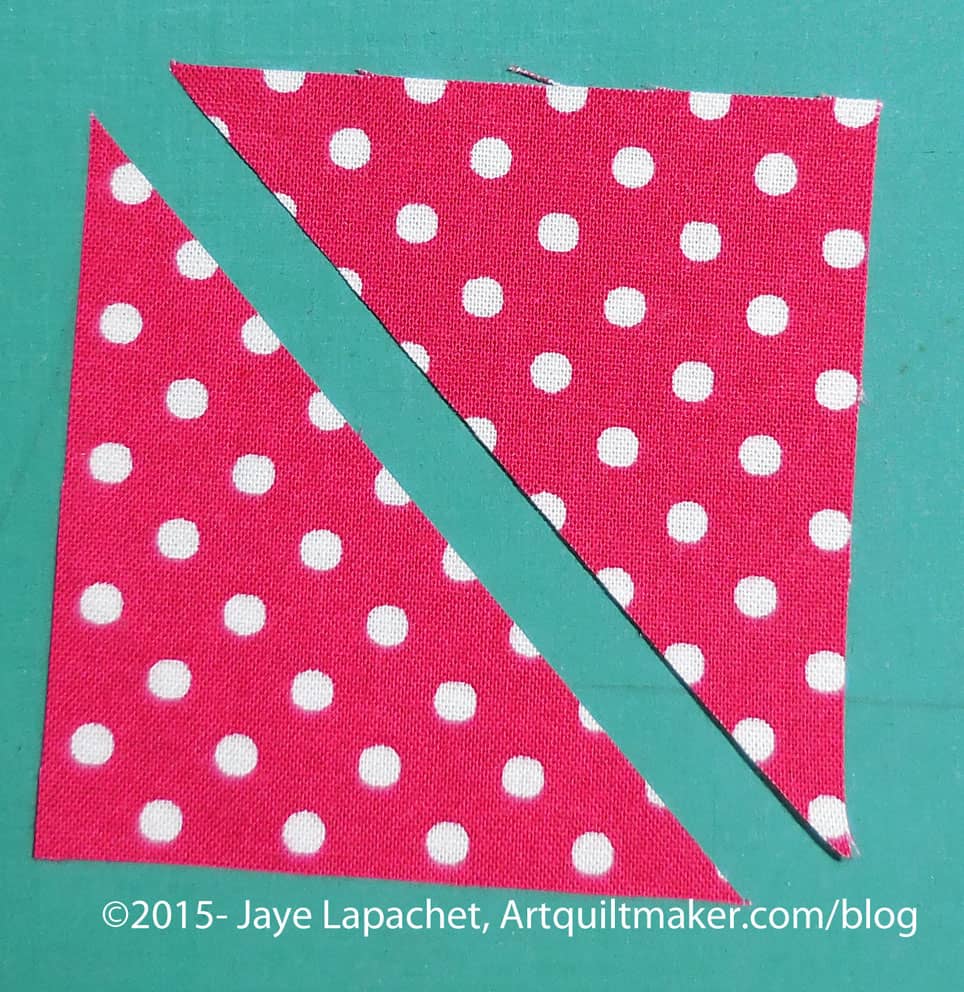
Cut 4 squares 2 7/8 in by 2 7/8 in the second background fabric (red in my project). Cut in half. These are the base and top line of your flower basket.
Cut Pieces
You should now have all of your pieces cut. Look for the next part of the tutorial on sewing the block together.
* Rough cut means that you cut around the outside line and a little away from it, leaving some extra paper. This helps to position the template properly and eventually cut it accurately.
** Fine cut means that you cut the template out very exactly and carefully getting rid of any extra paper and template material used when you rough cut. This is the shape you will use to cut your fabric so prepare this step with care.
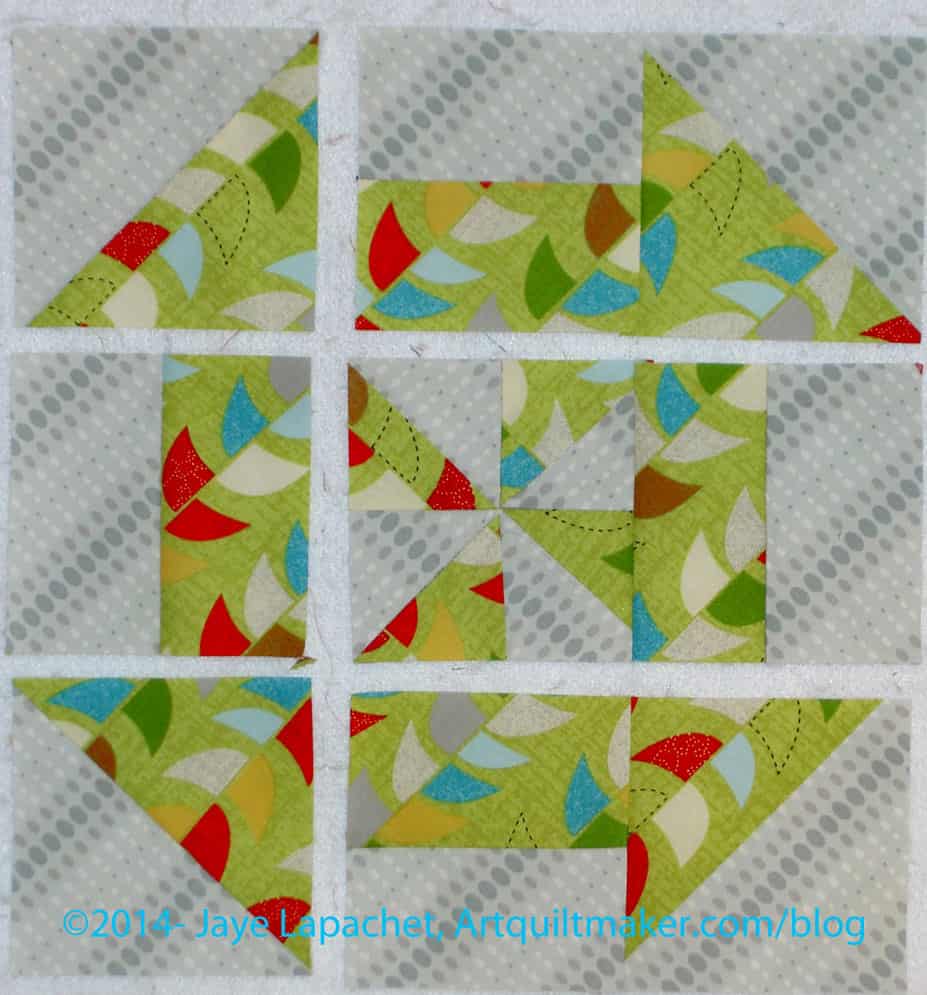
TFQ taught me this method of putting quilts together. I have adopted it as my own and use it for block-based quilts. Very occasionally I’ll put a long border on after the center of the quilt is complete, but otherwise I try to avoid the long seams required to put quilts together in rows.
Using this method, usually I have only one really long seam to sew at the very end and 1-2 mid sized seams.
This technique improves accuracy when you have sashing and cornerstones, but also improves accuracy with just sashing. If you have no sashing, then the pieces are much easier to handle.
Occasionally you will have a quilt where chunking is not appropriate for one reason or another, thus it is good to know many techniques, so you can choose the one that is most appropriate for the creative vision you have.
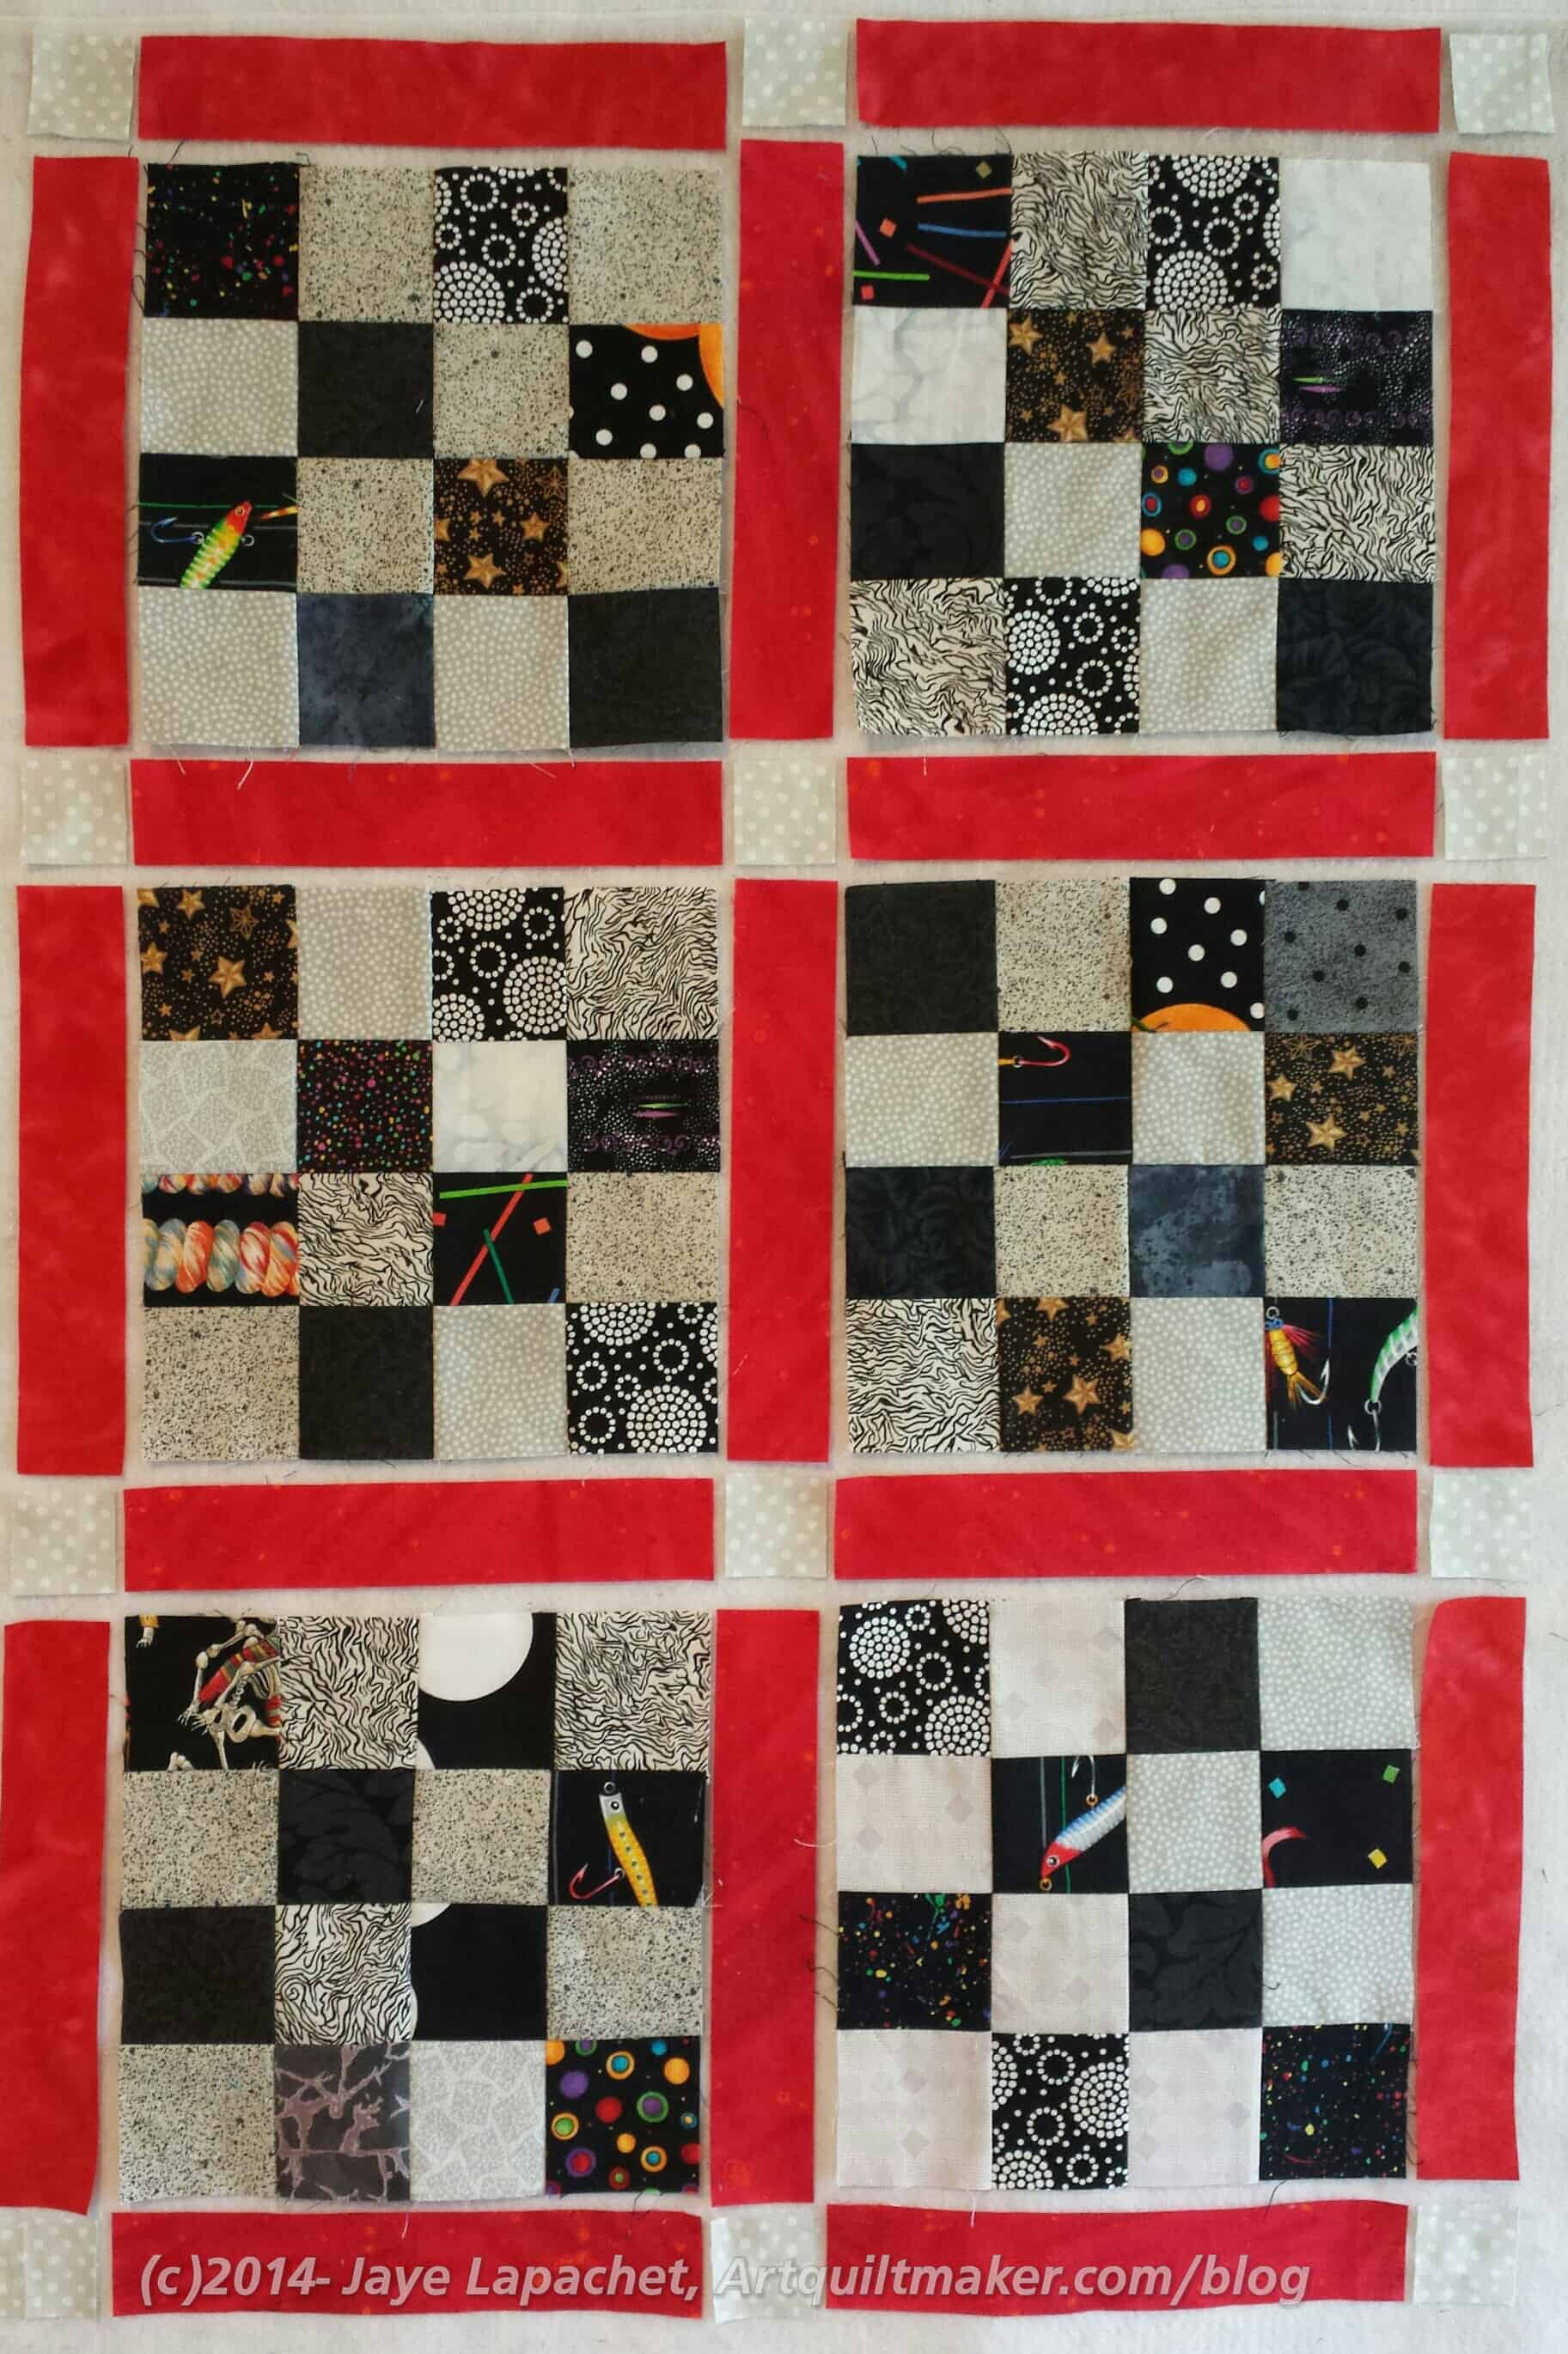
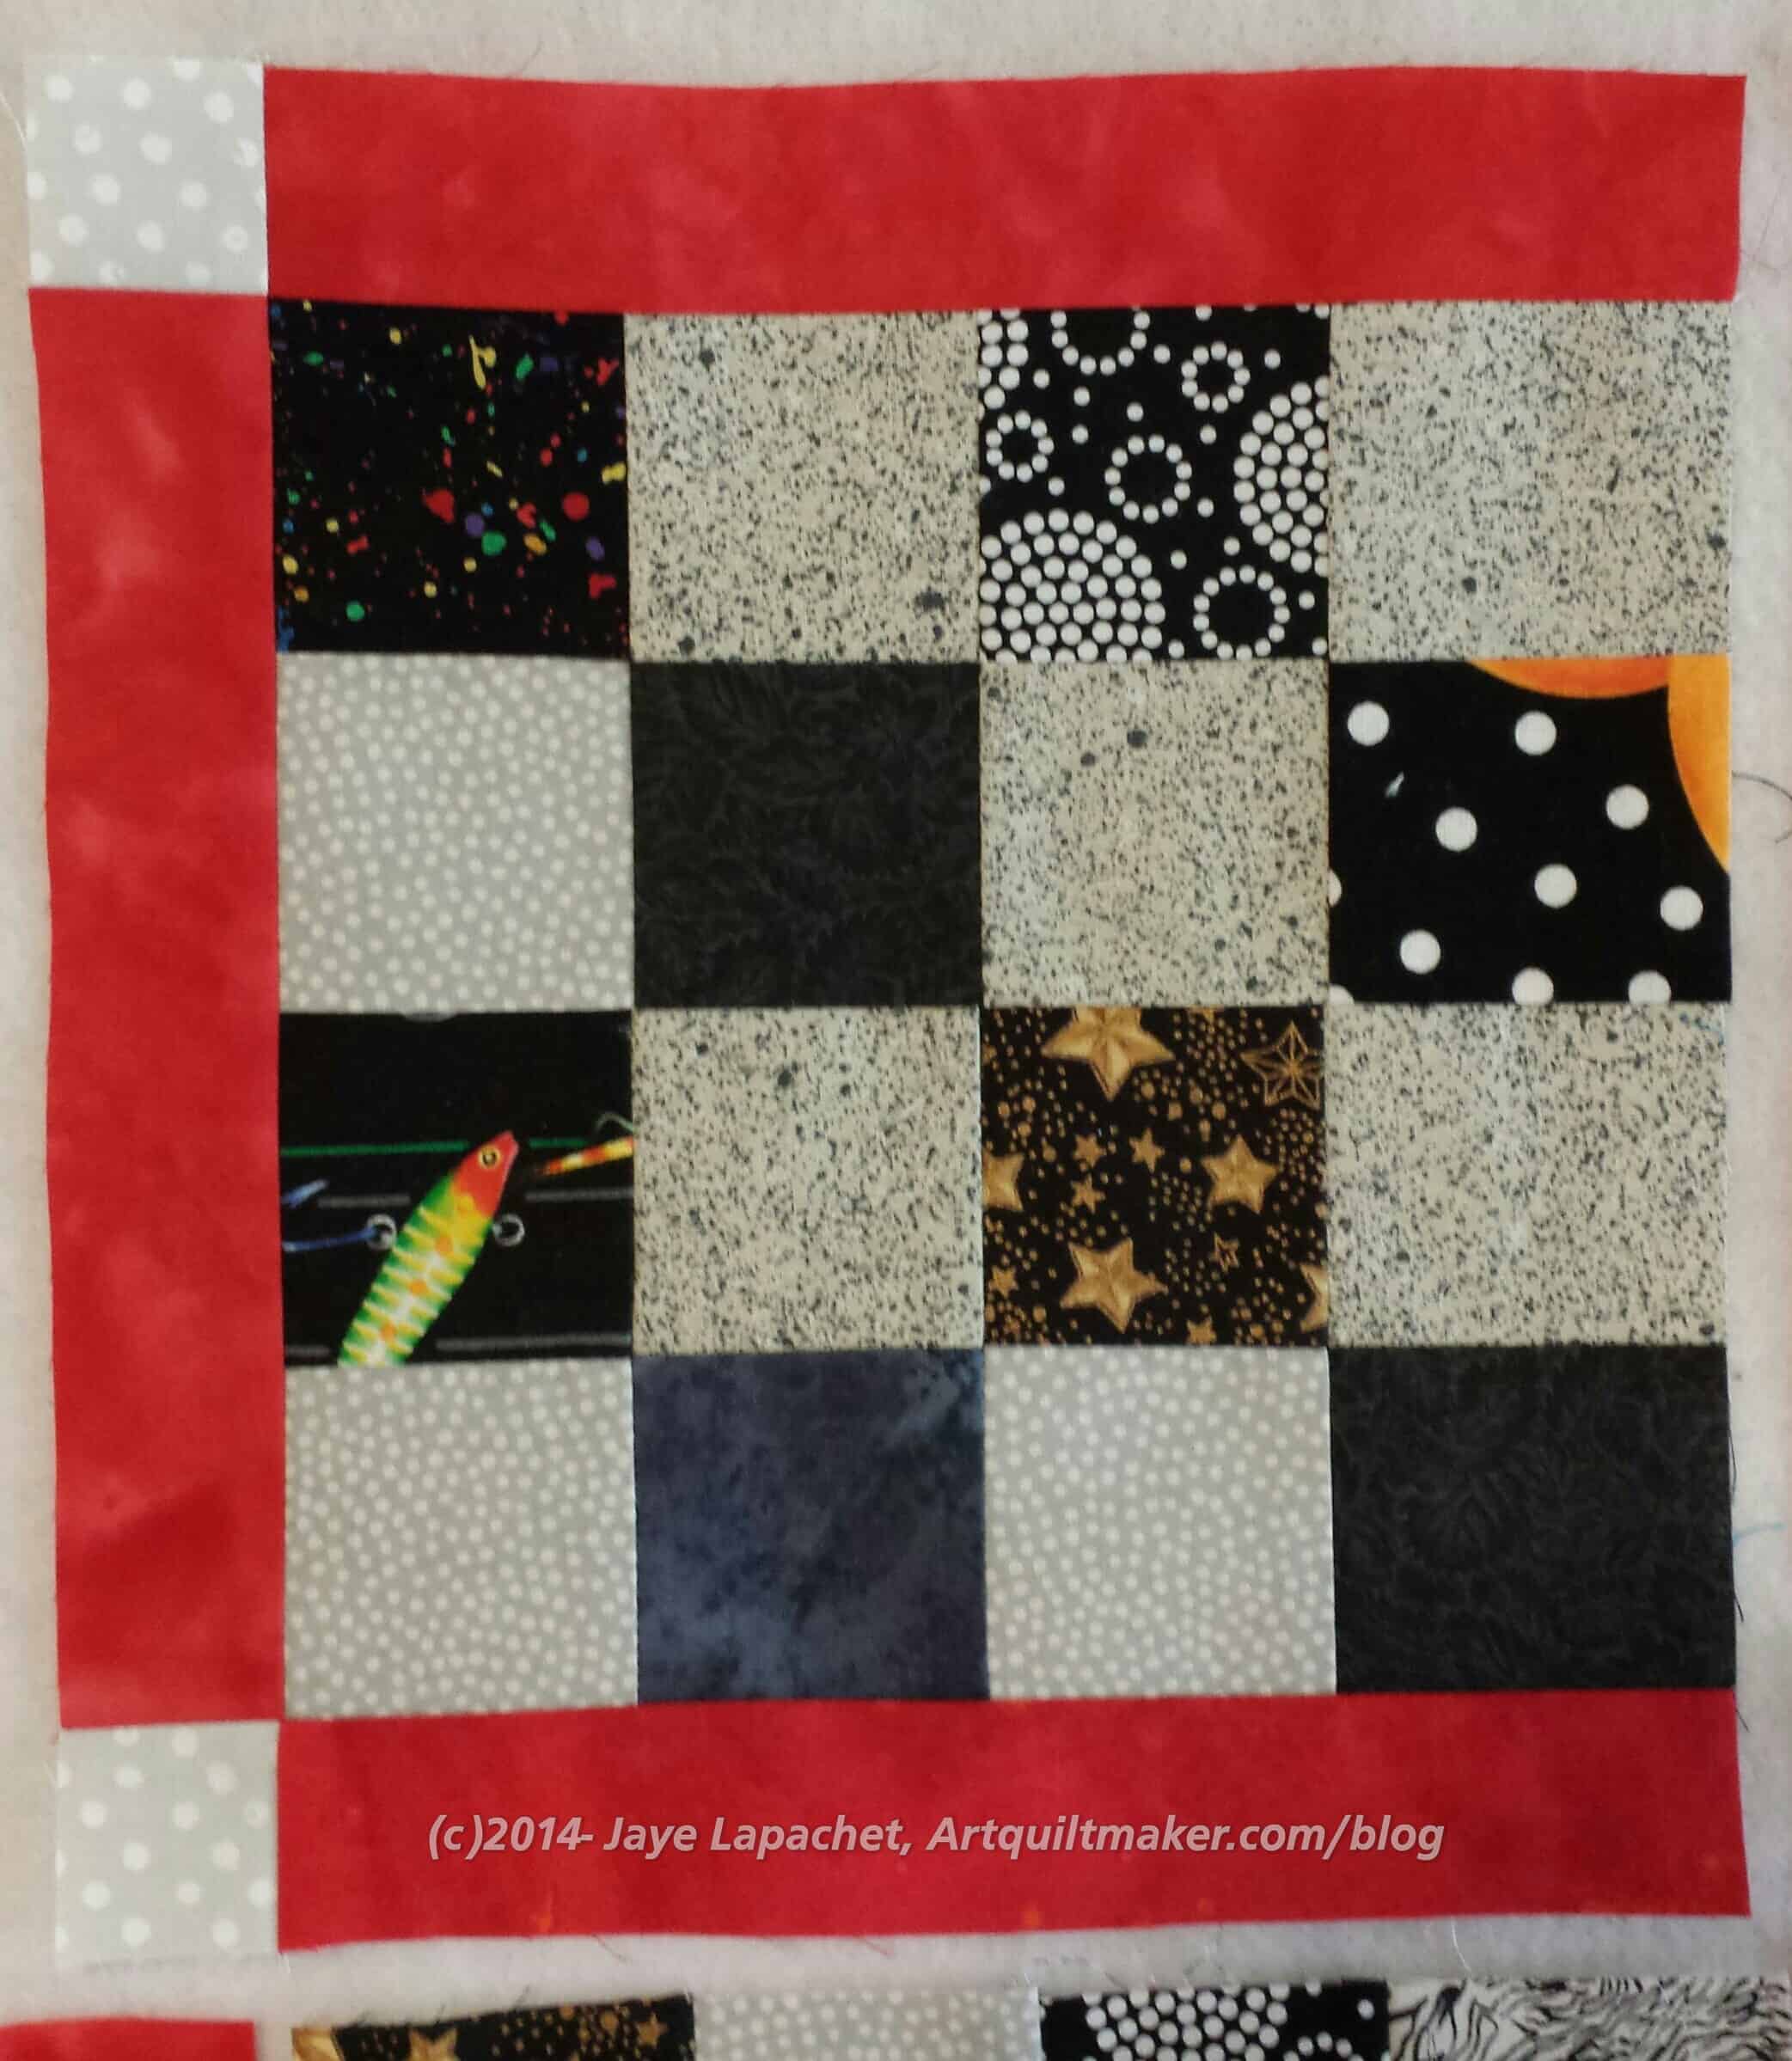
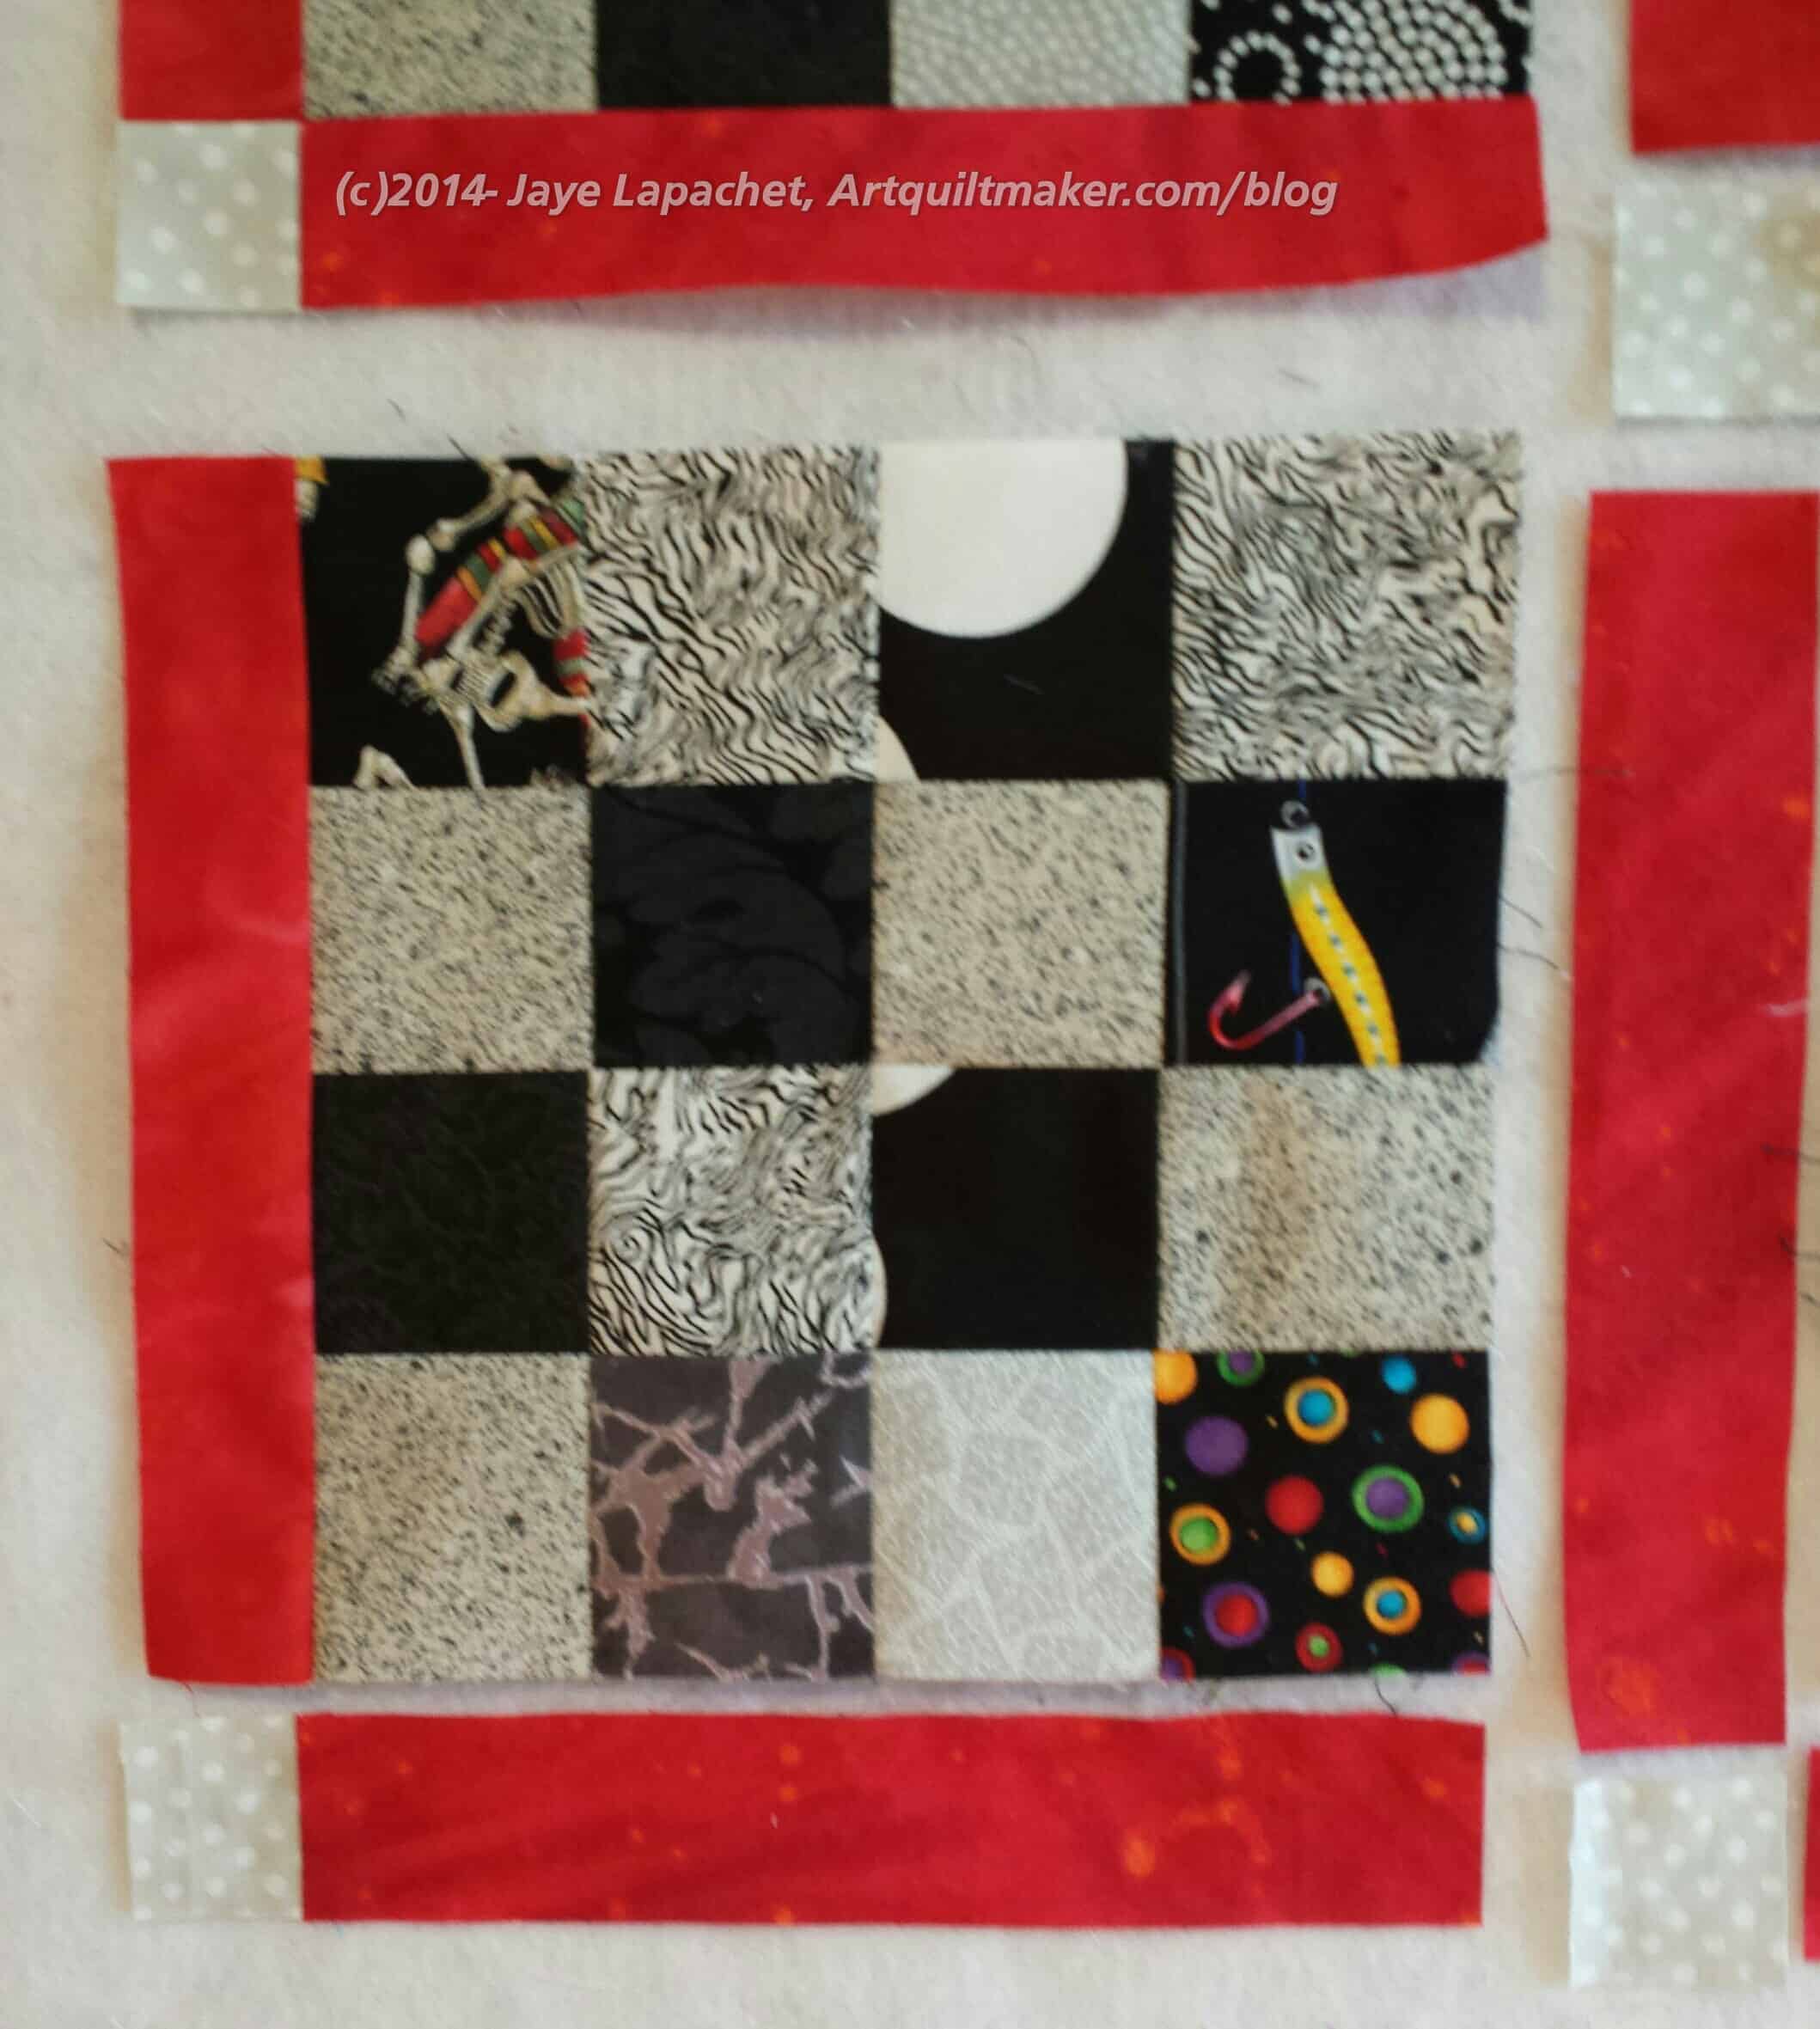
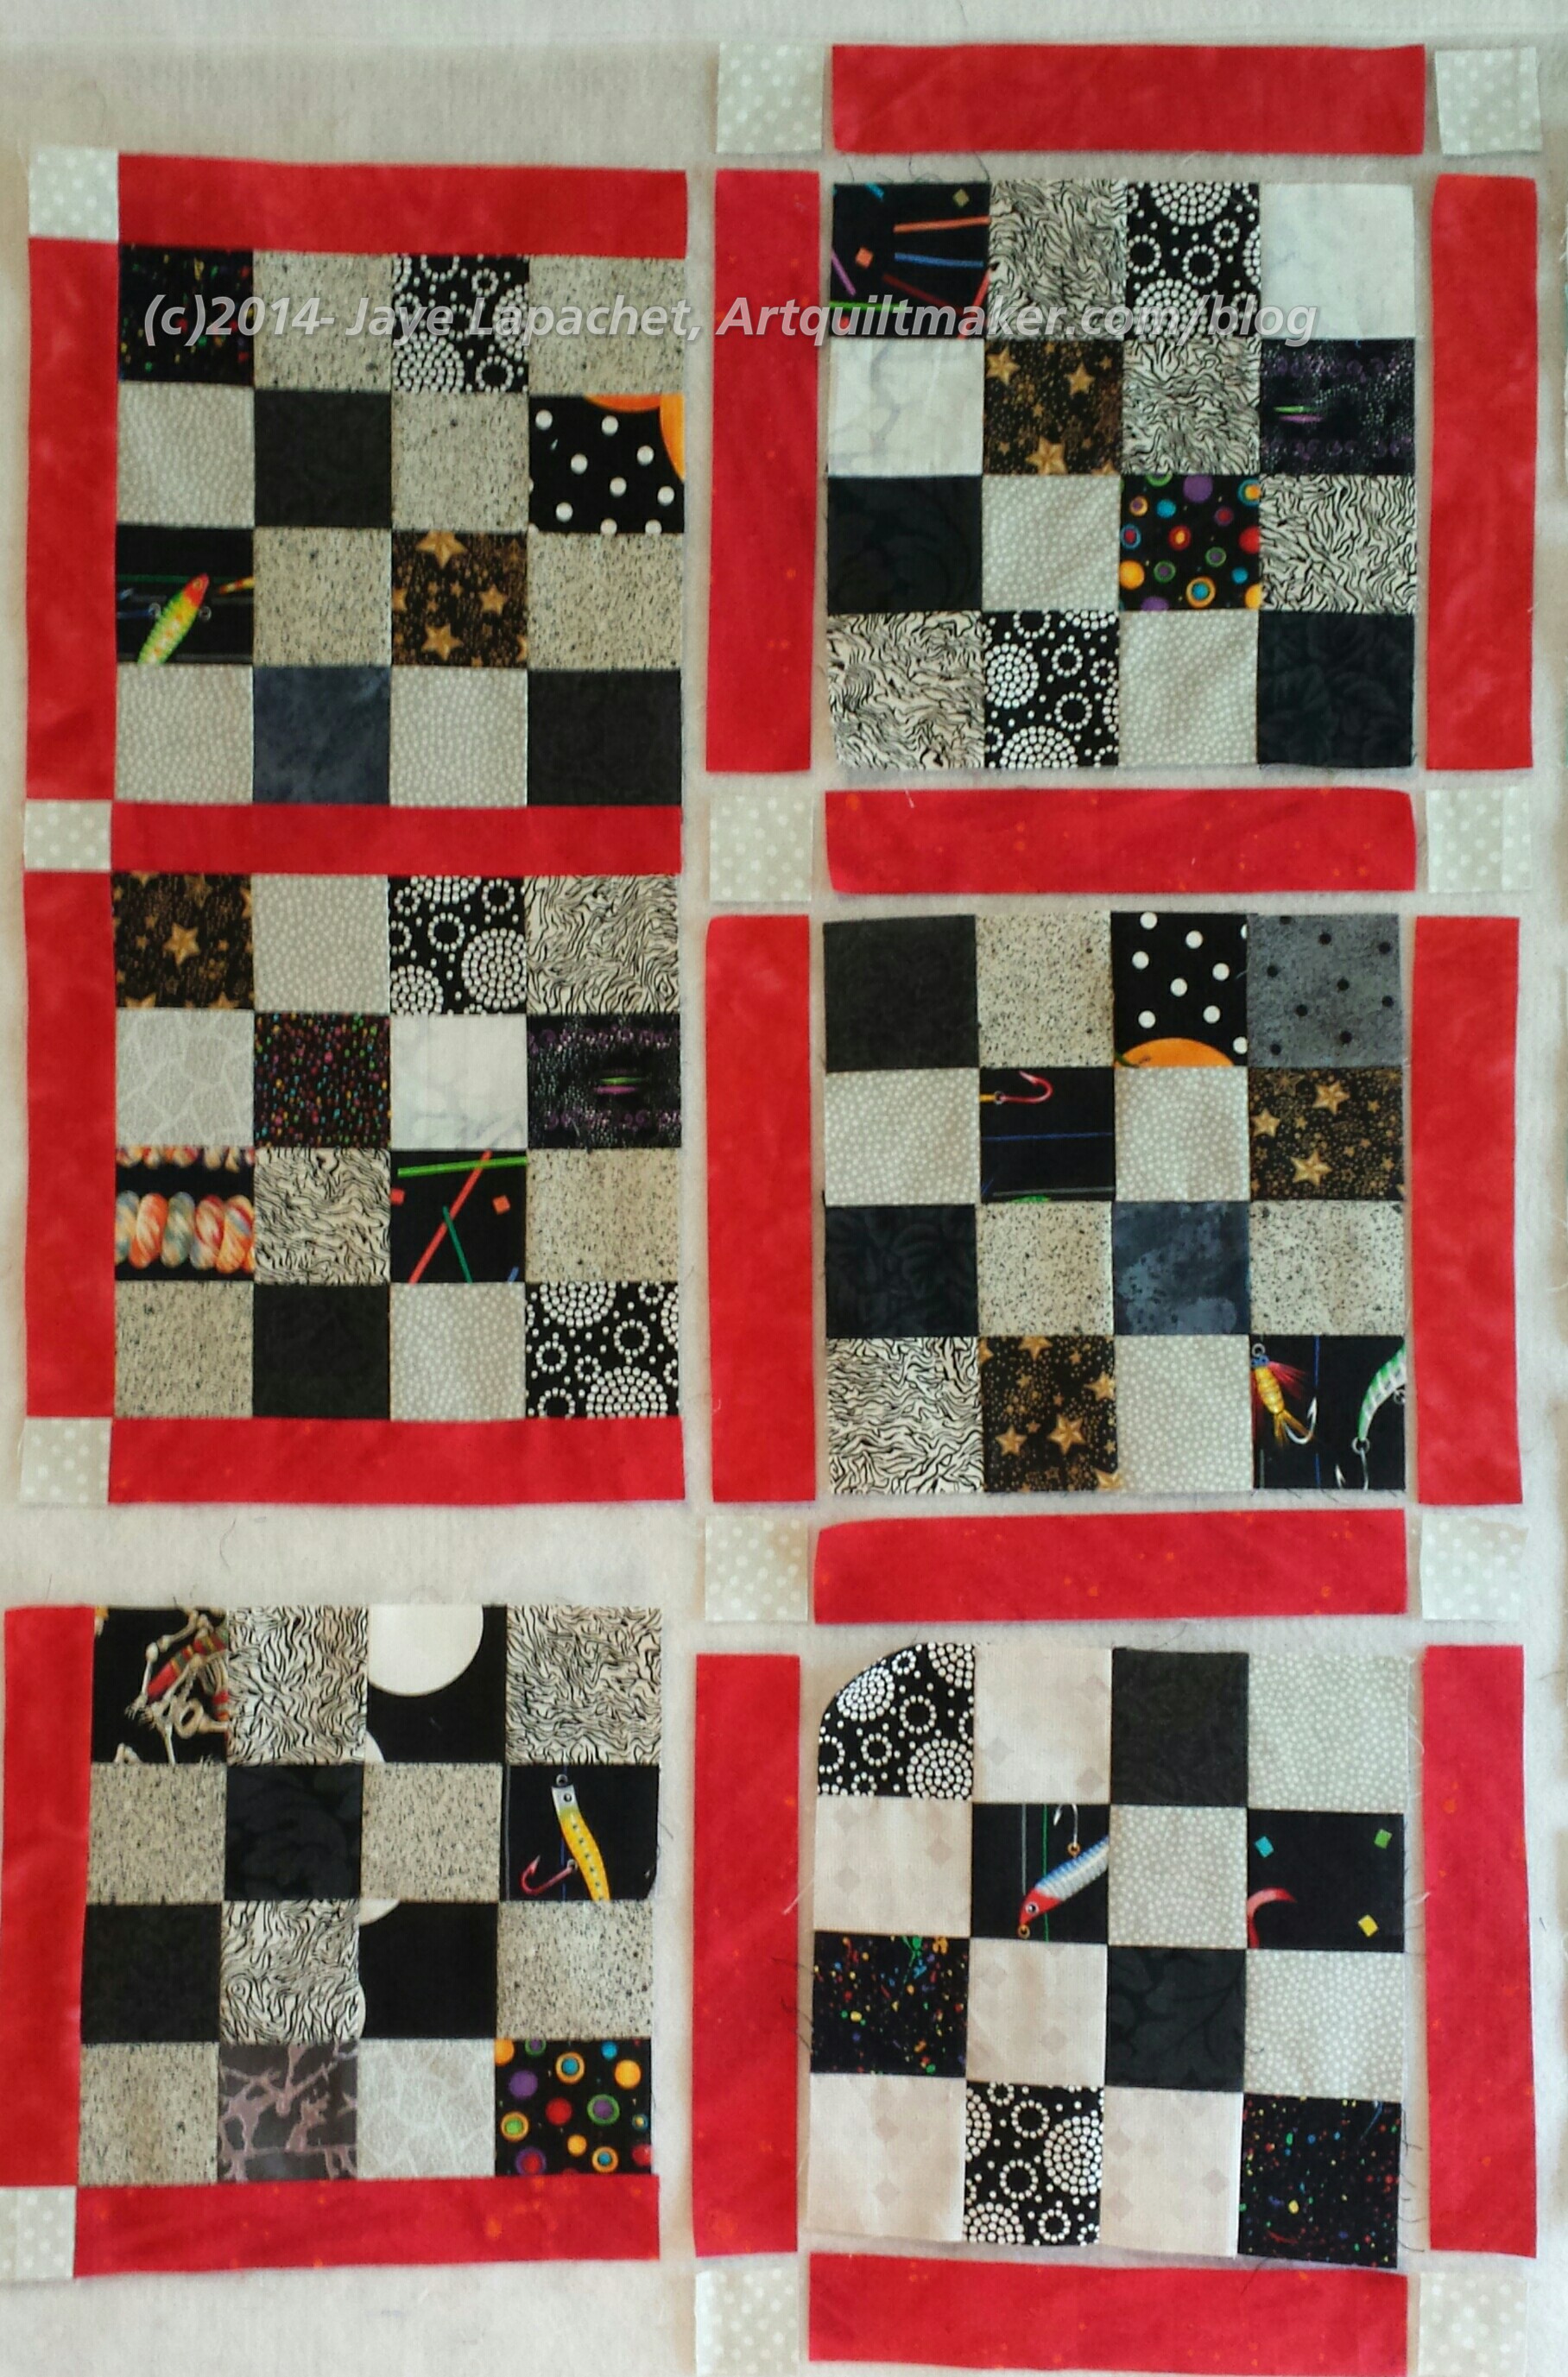
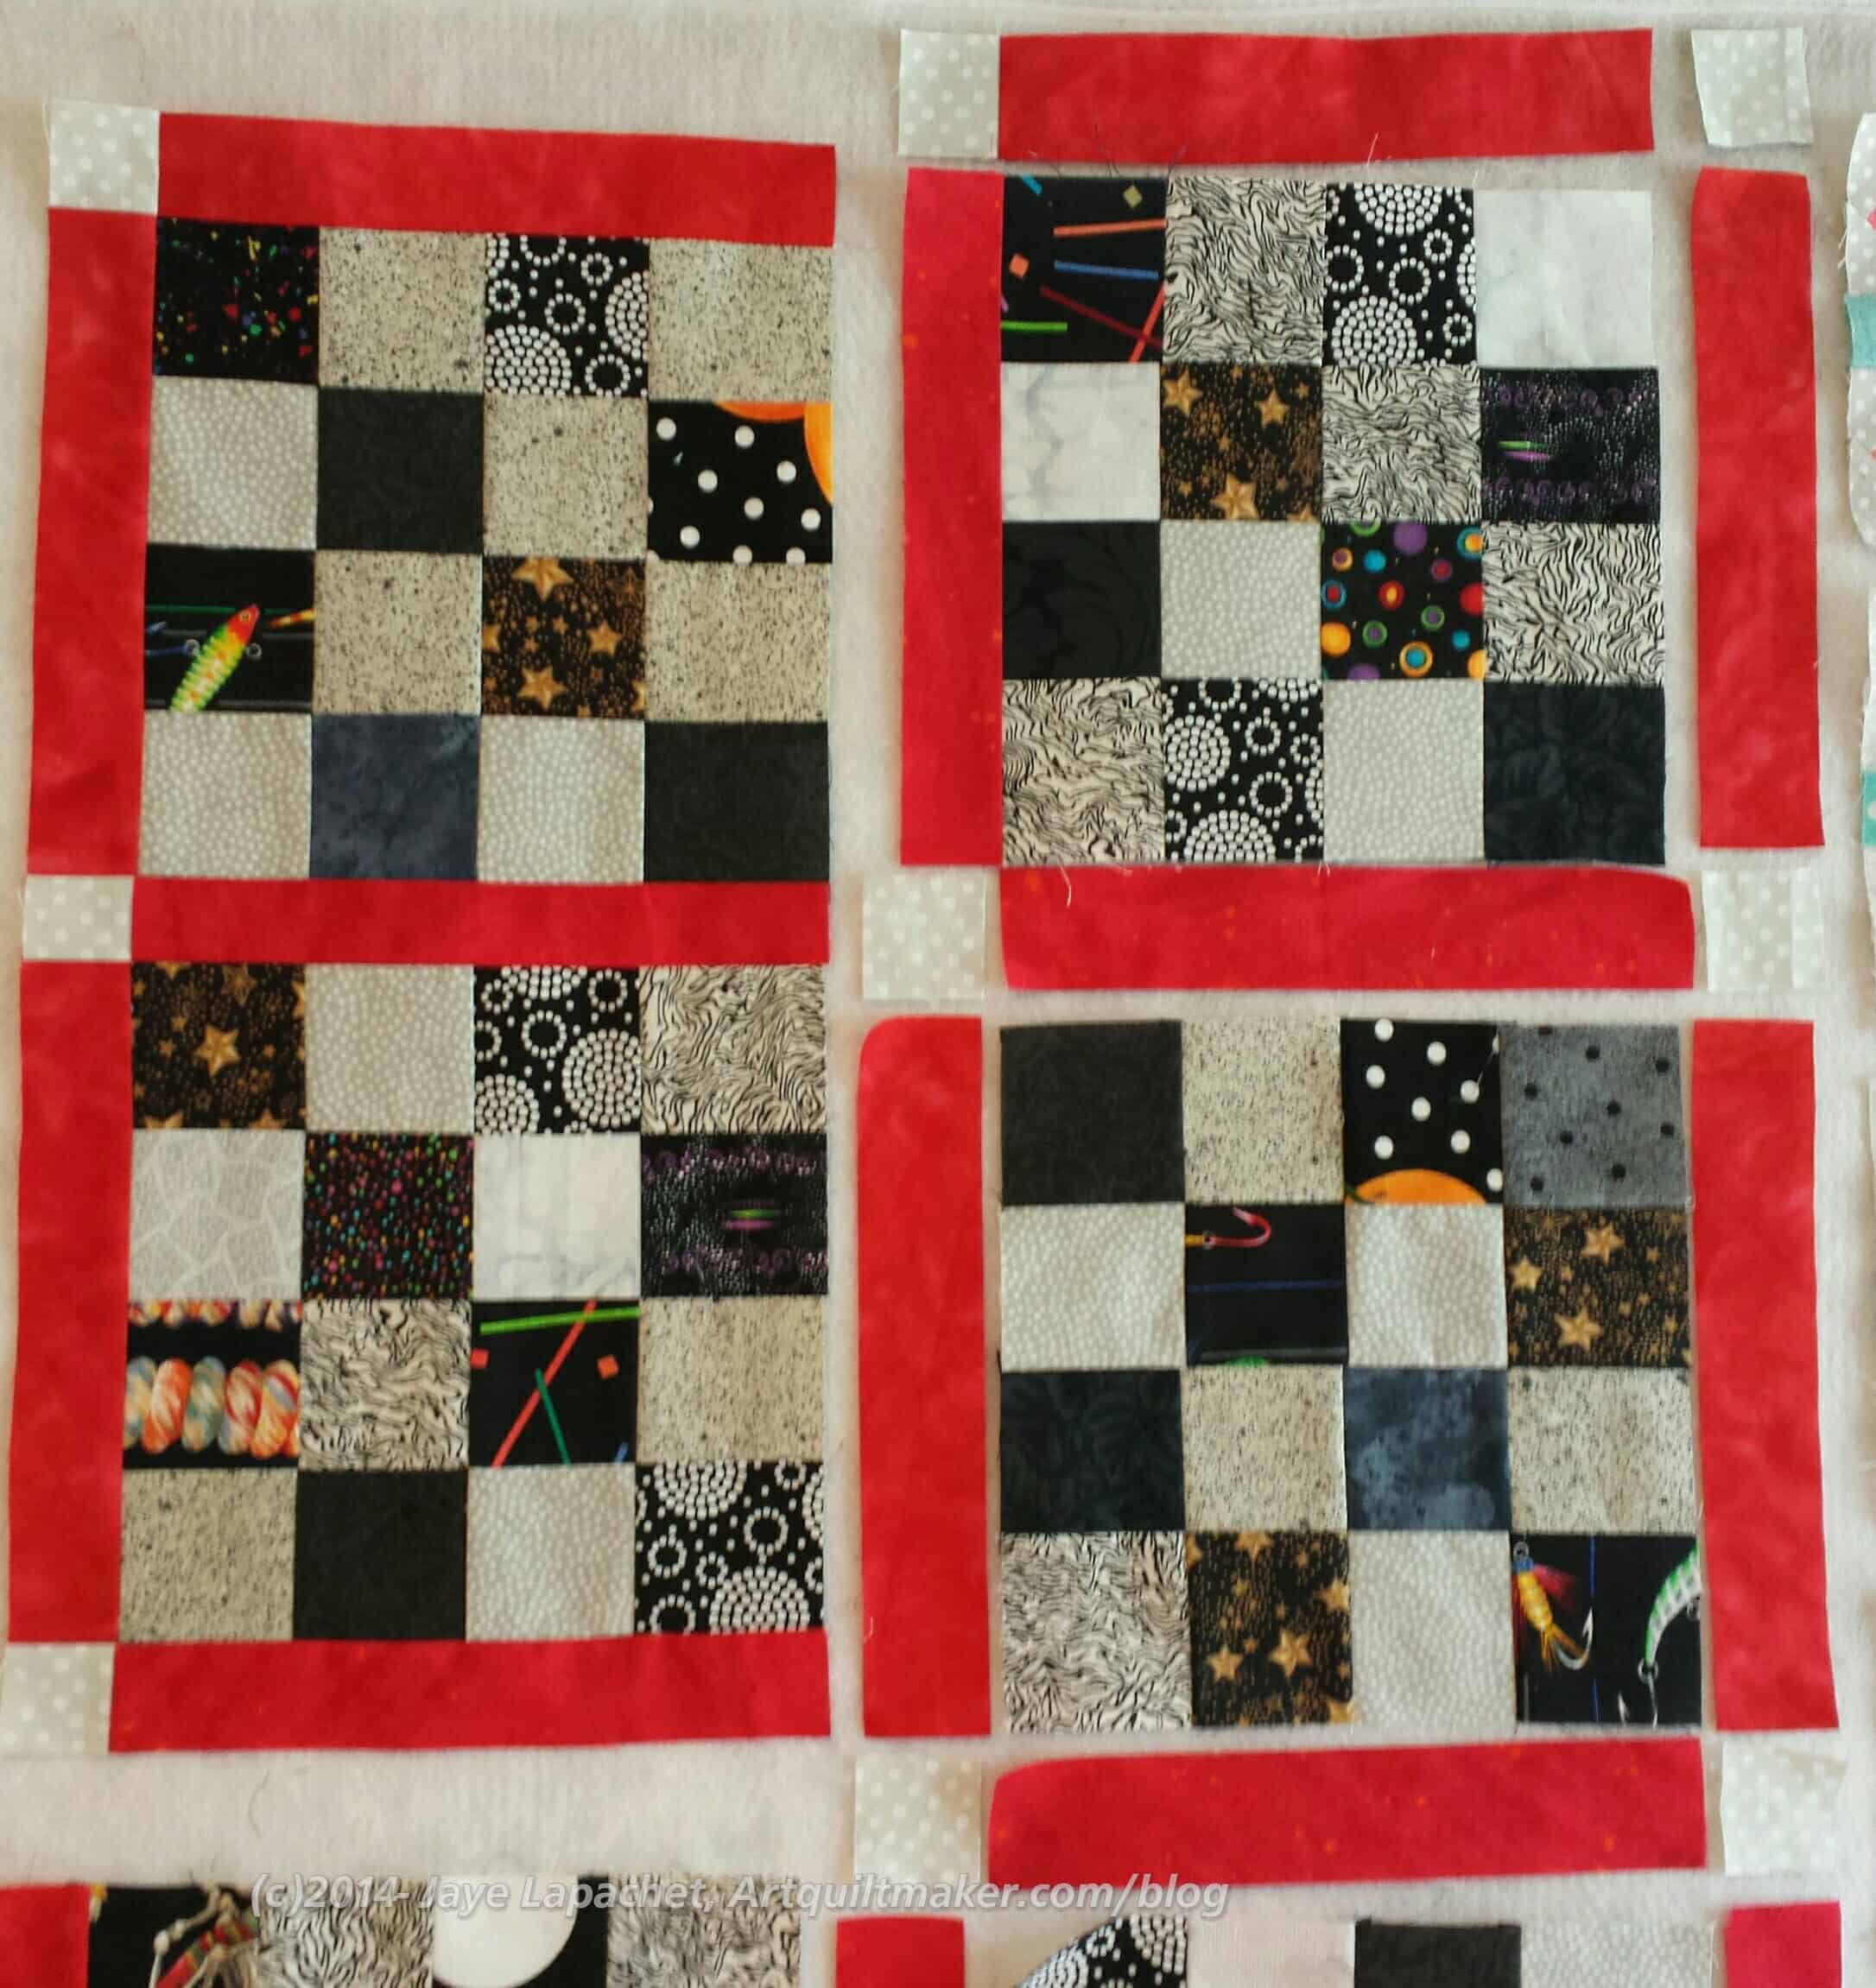
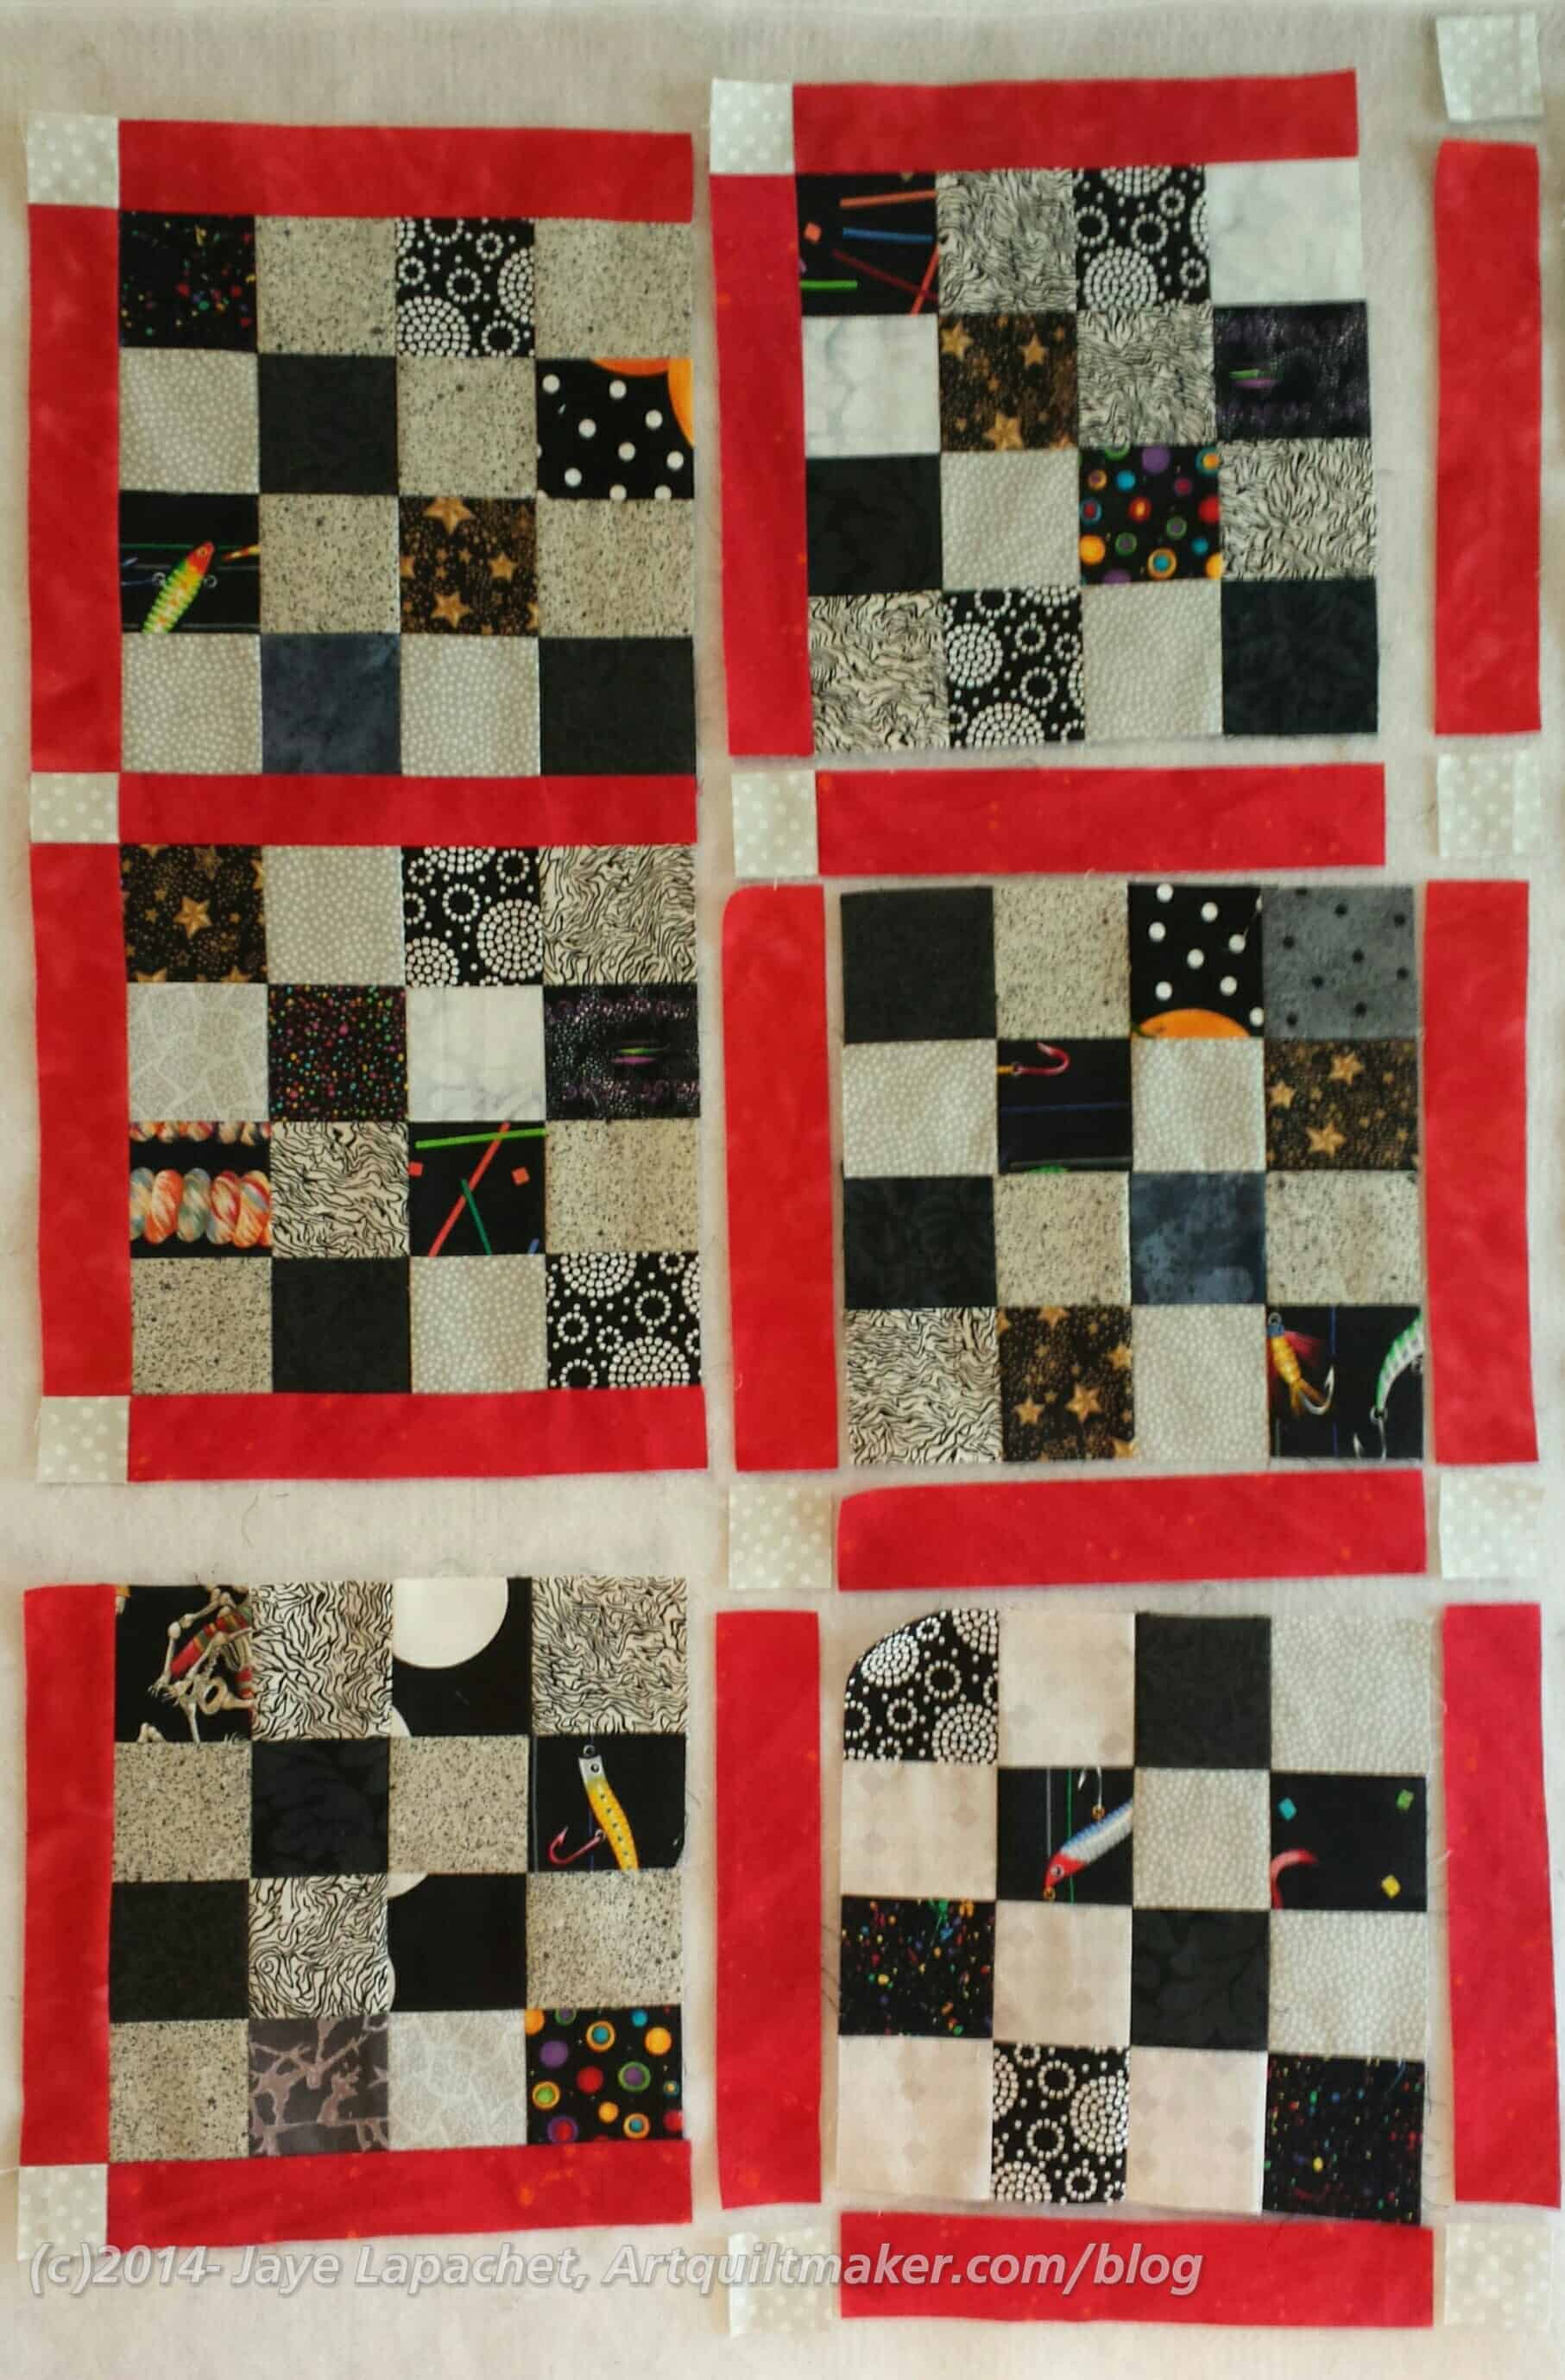
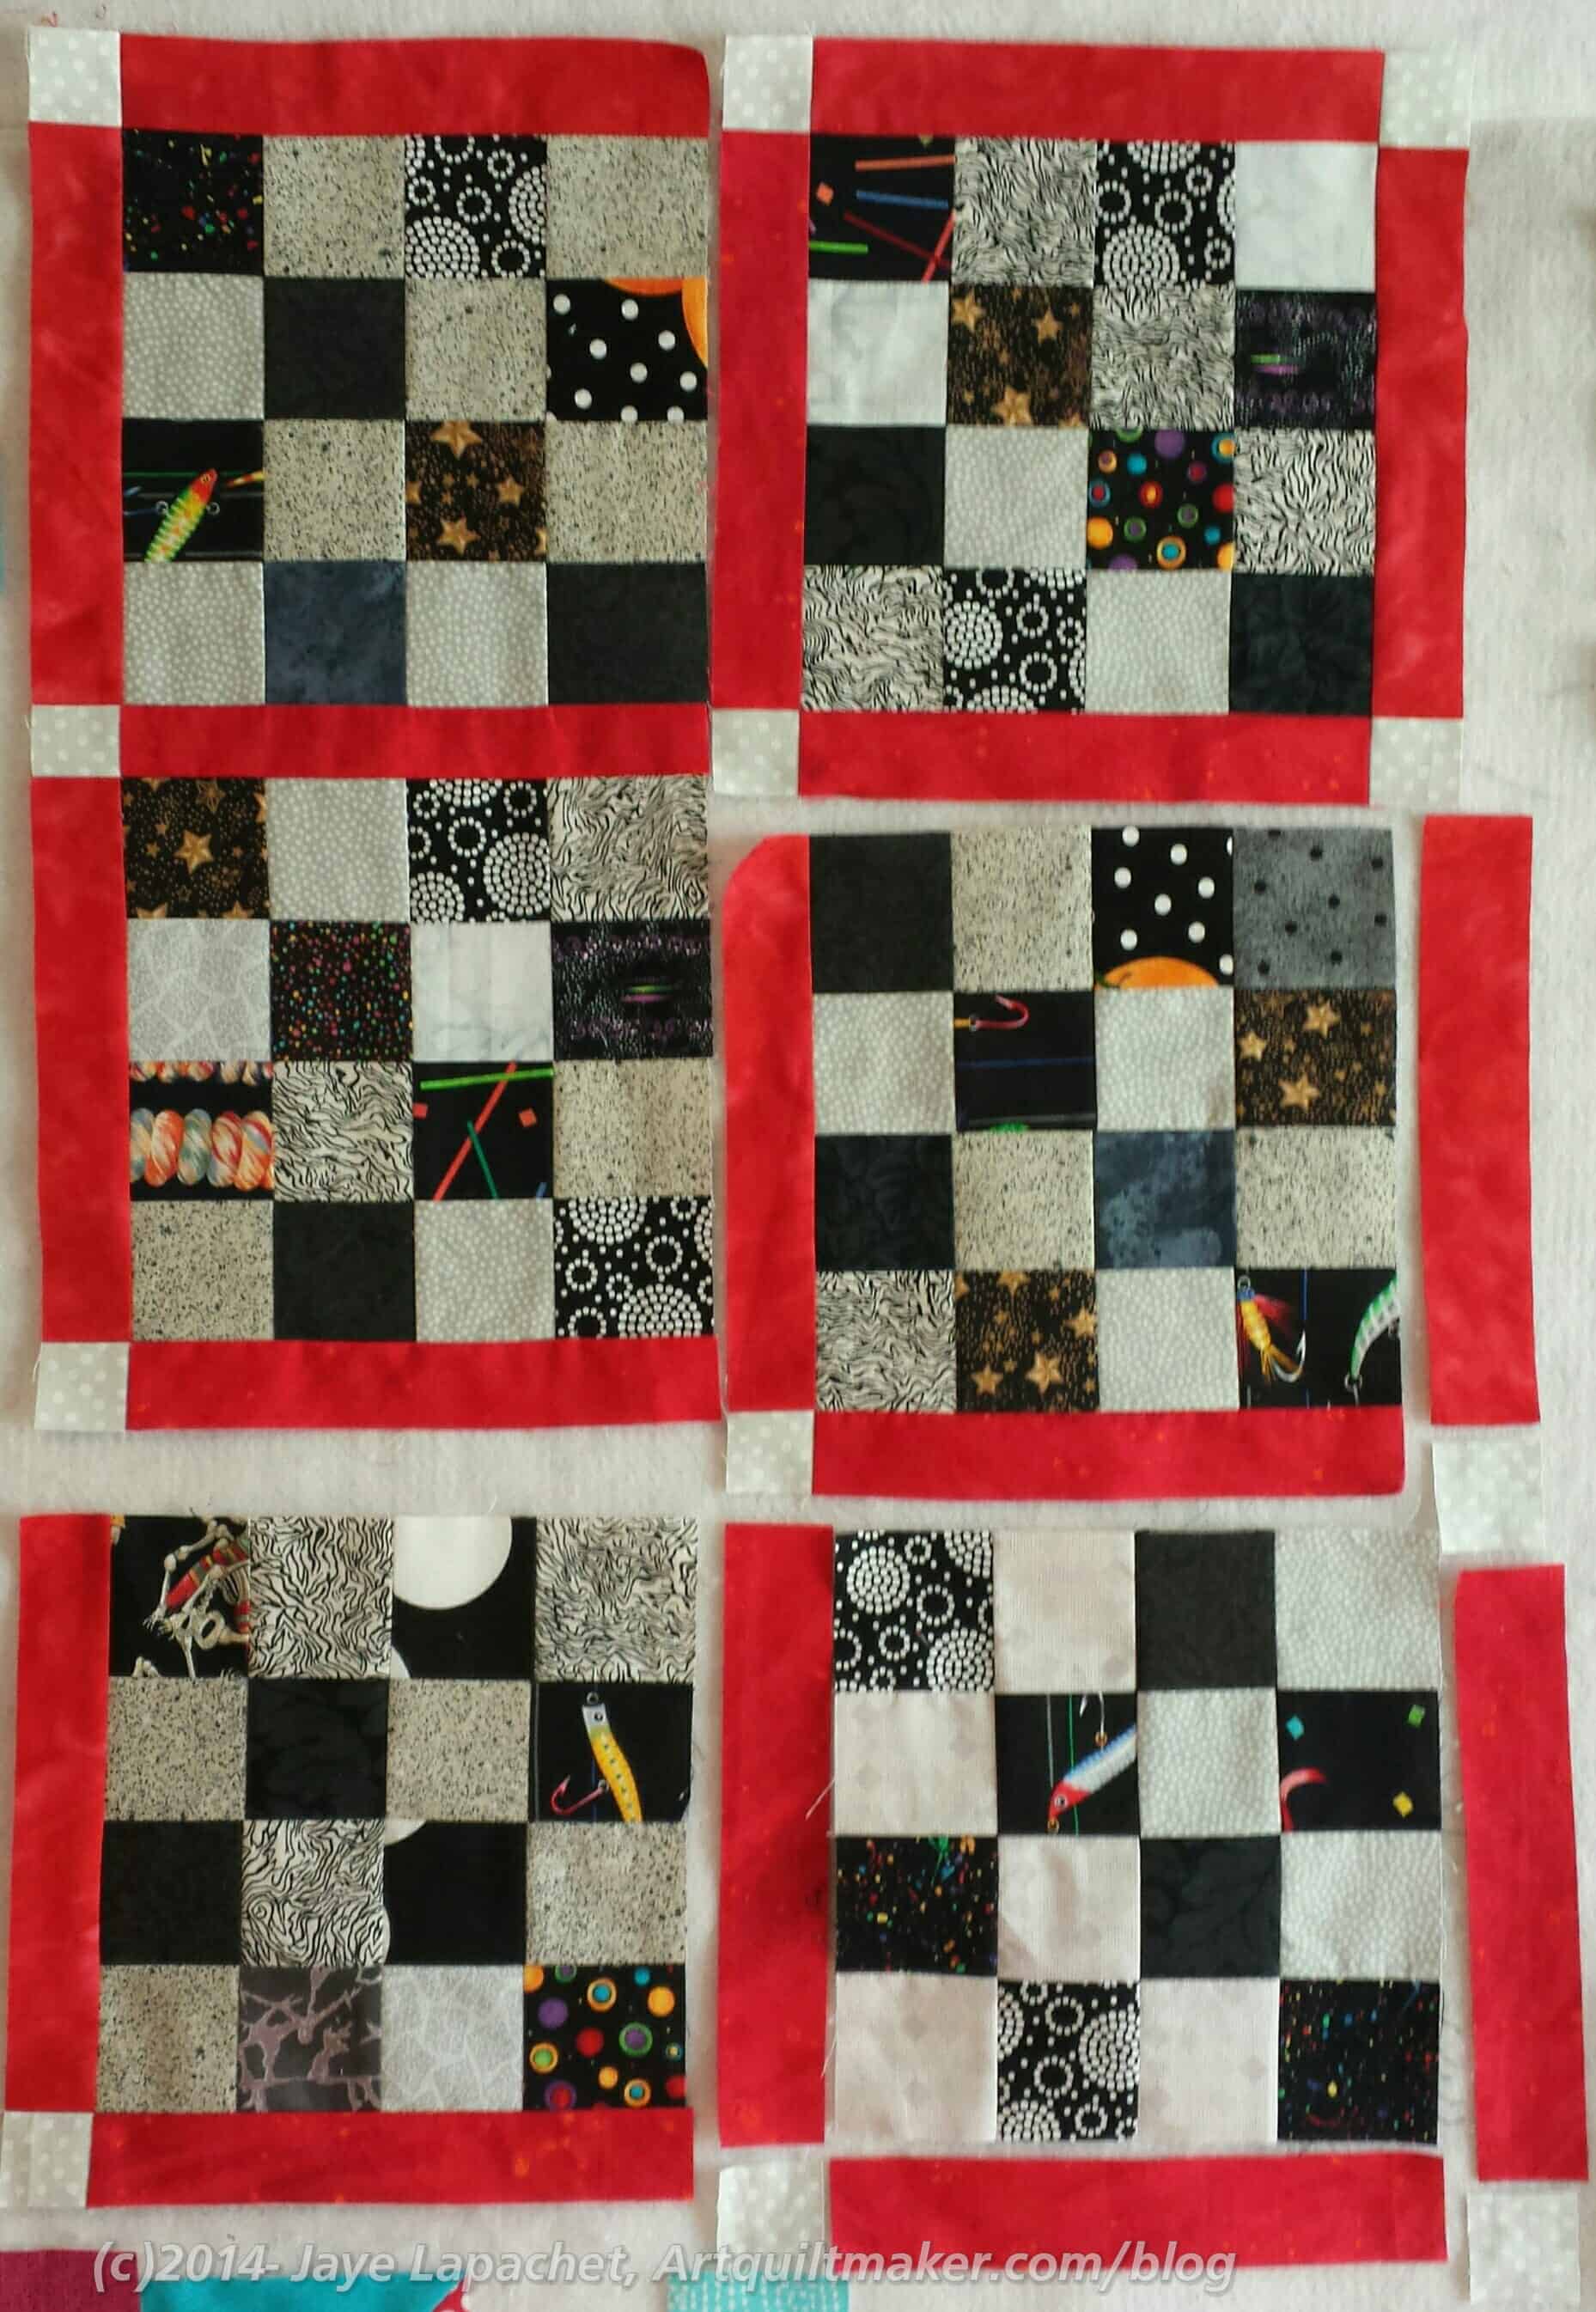
Blocks Laid Out Waiting to be Put Together
The quilt starts out as a bunch of pieces waiting to be put together. In the example above:
Blocks: grey and black Sashing: red Cornerstones: grey
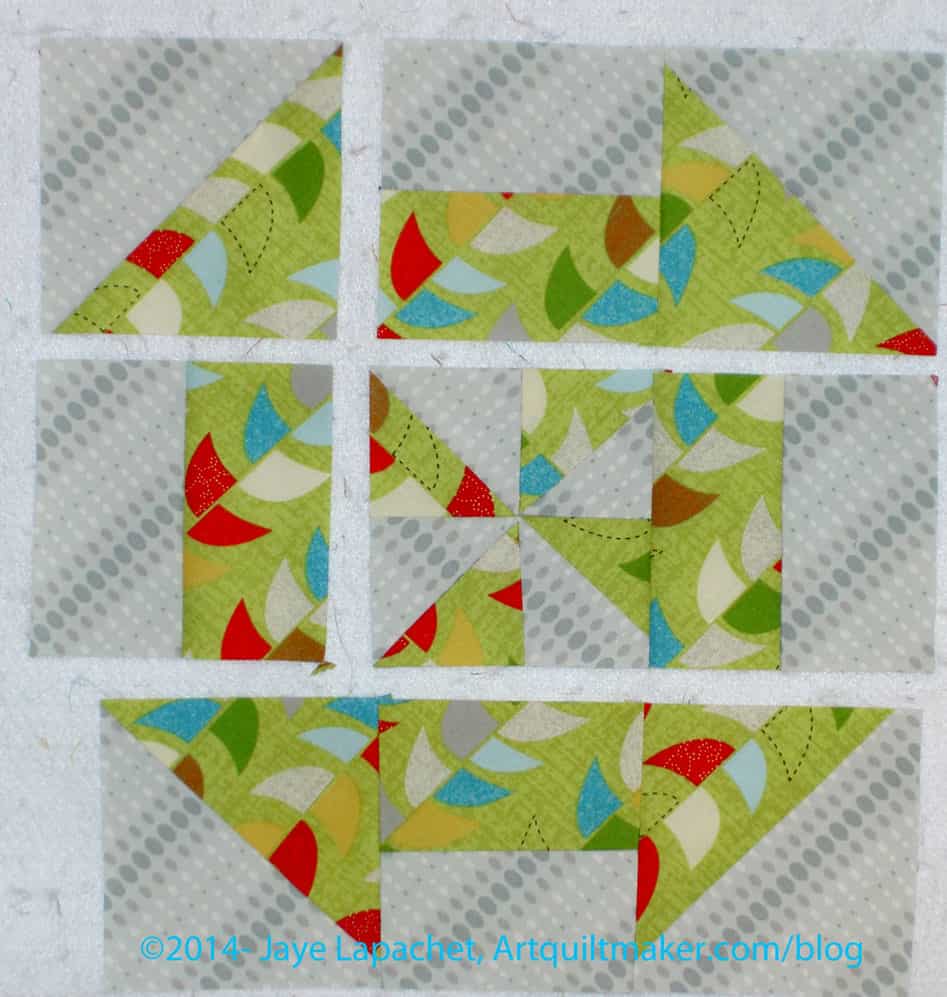
The basic idea is to put the quilt together as you would a block: sew smaller patches together to make larger sections. I avoid sewing the quilt together in rows as I think the quilt is more square and there are fewer out of line intersections than when the quilt is sewn together in rows.
In the example above, the border can be incorporated into the construction of the quilt. You won’t need to put it on after, which will also help line up the cornerstones with the sashing.
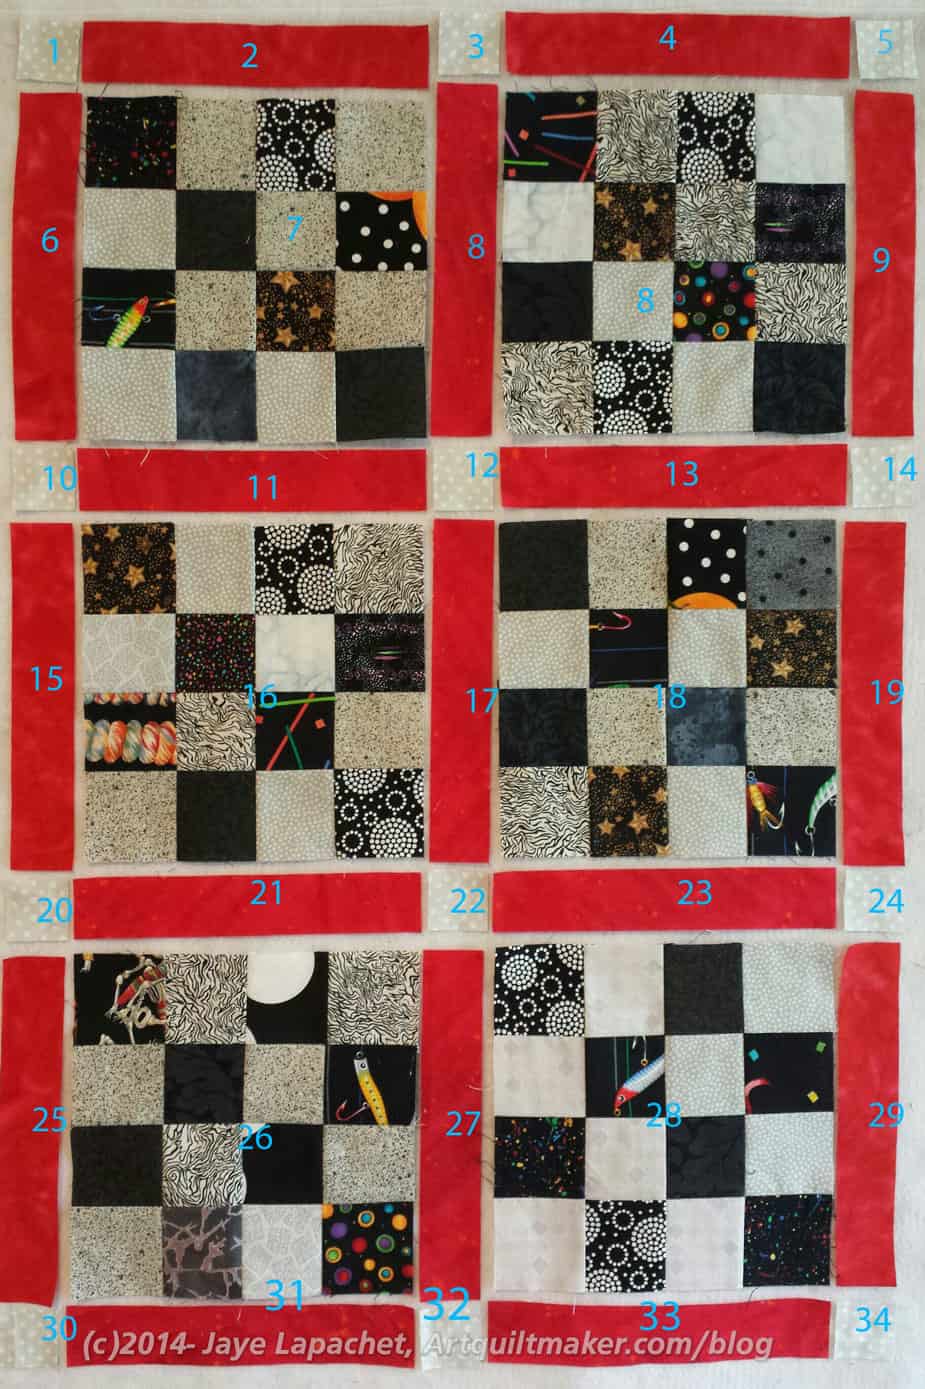
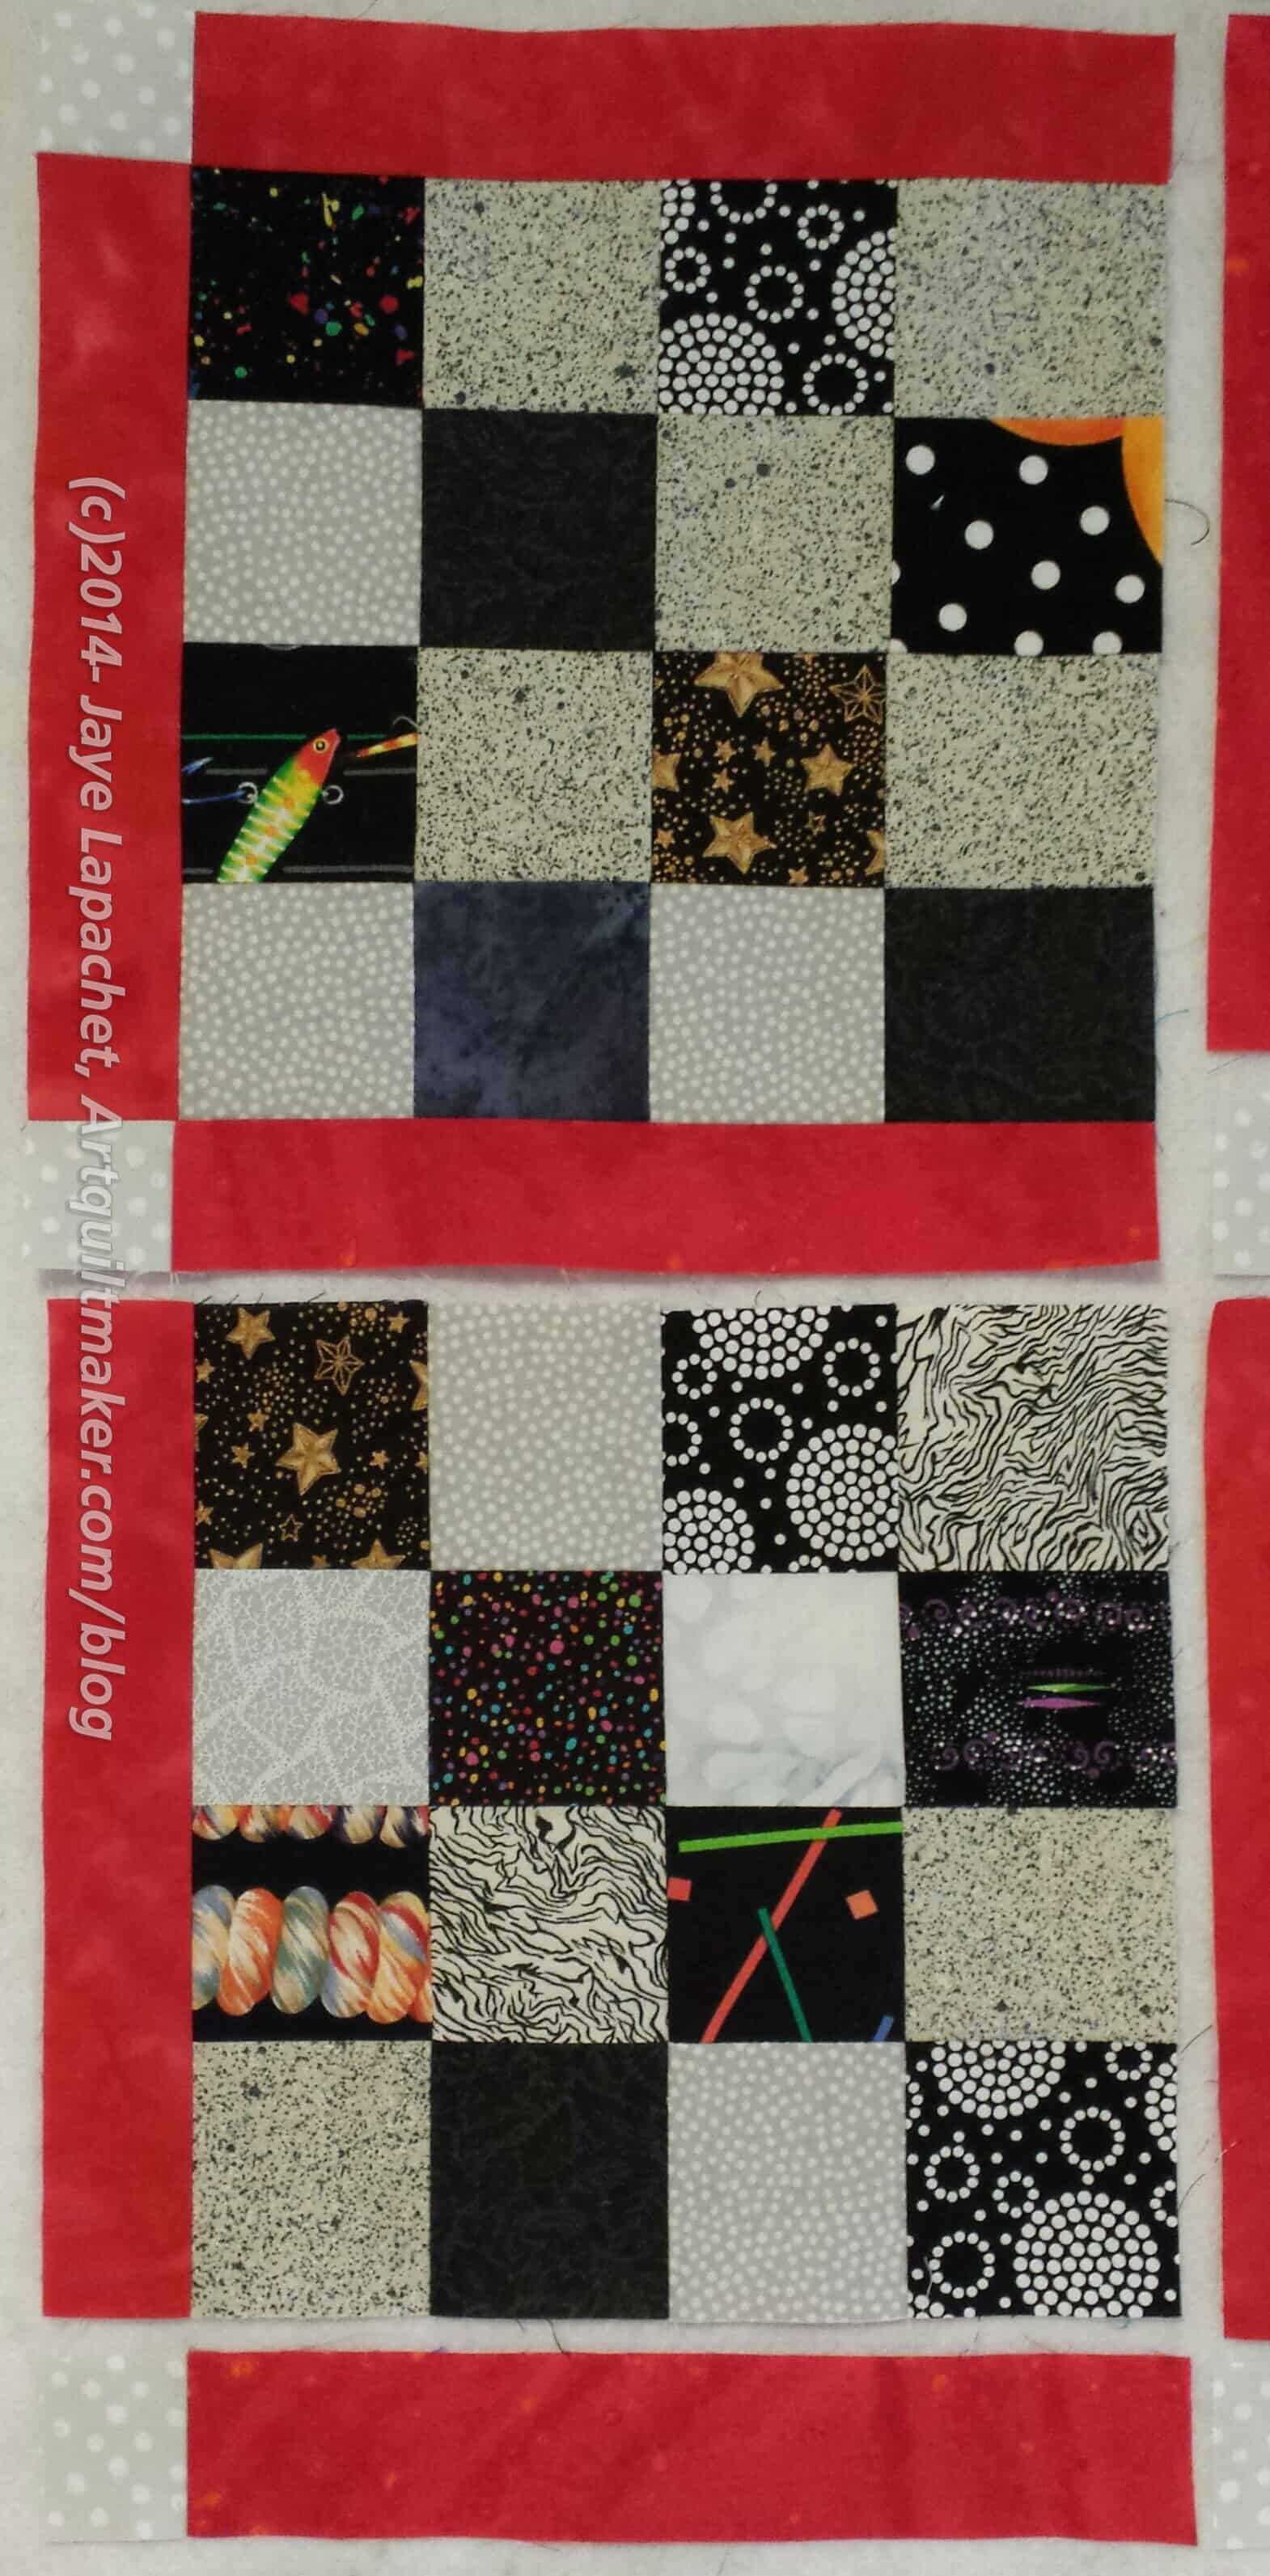
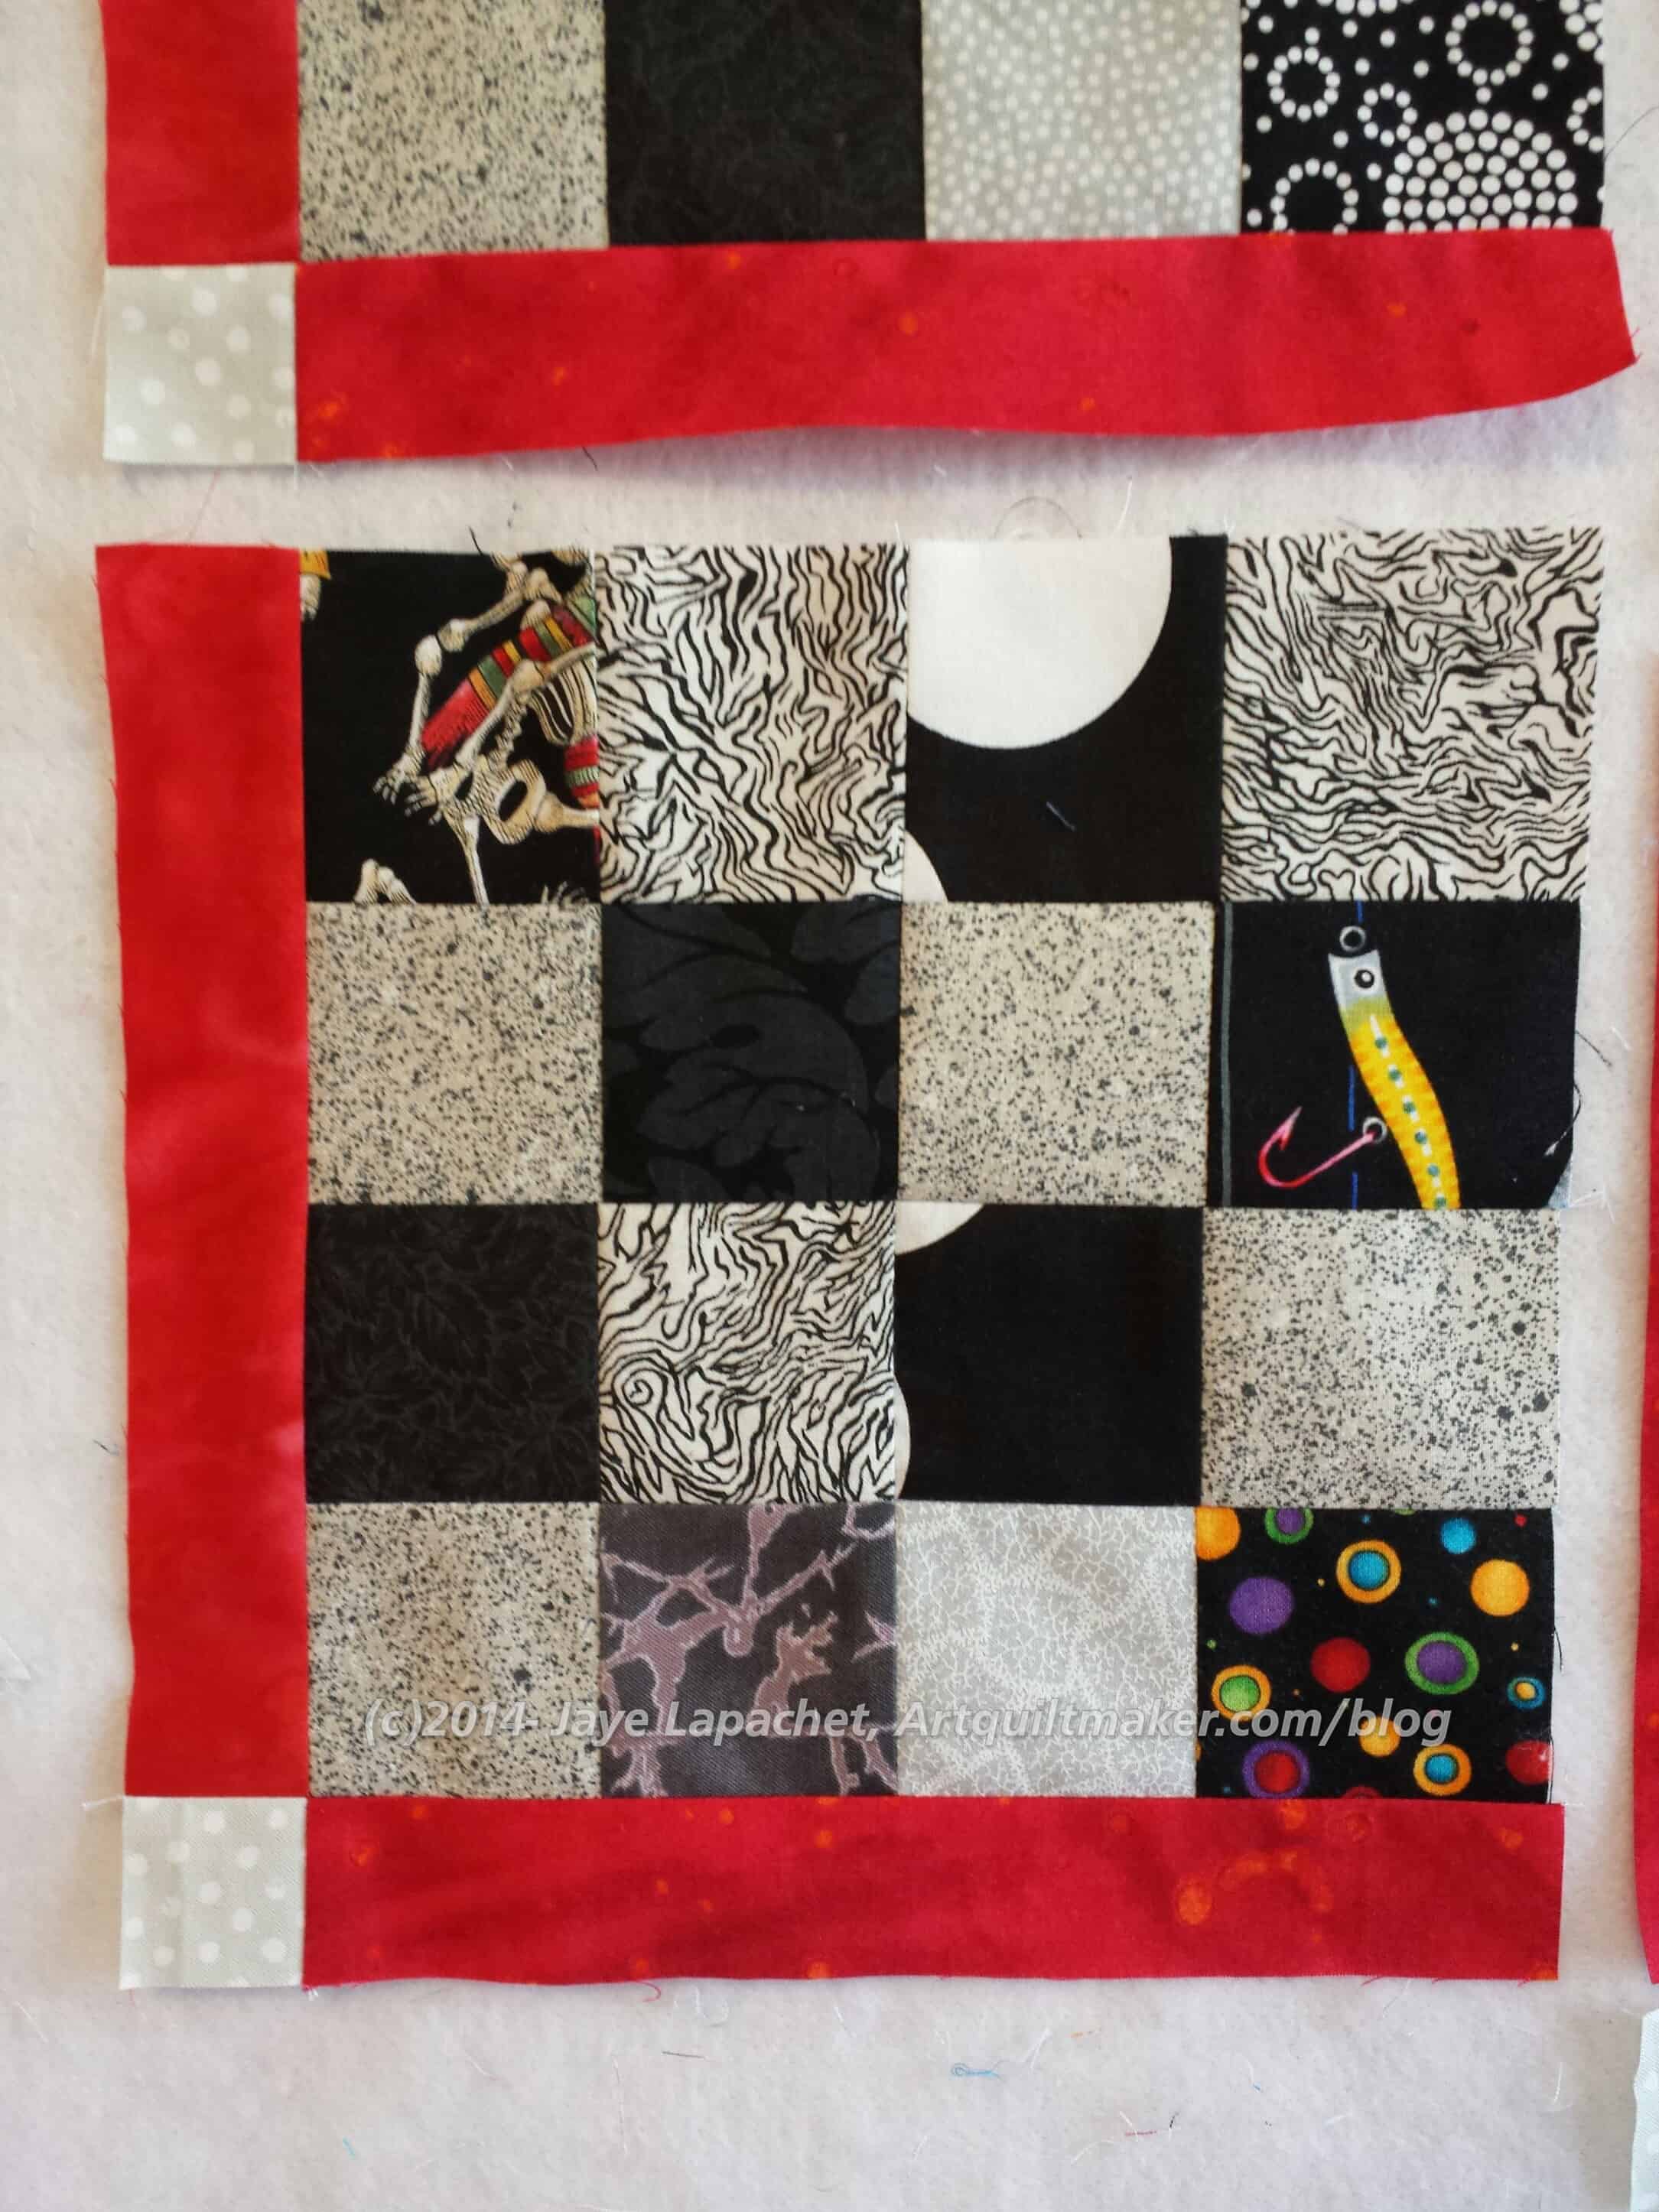
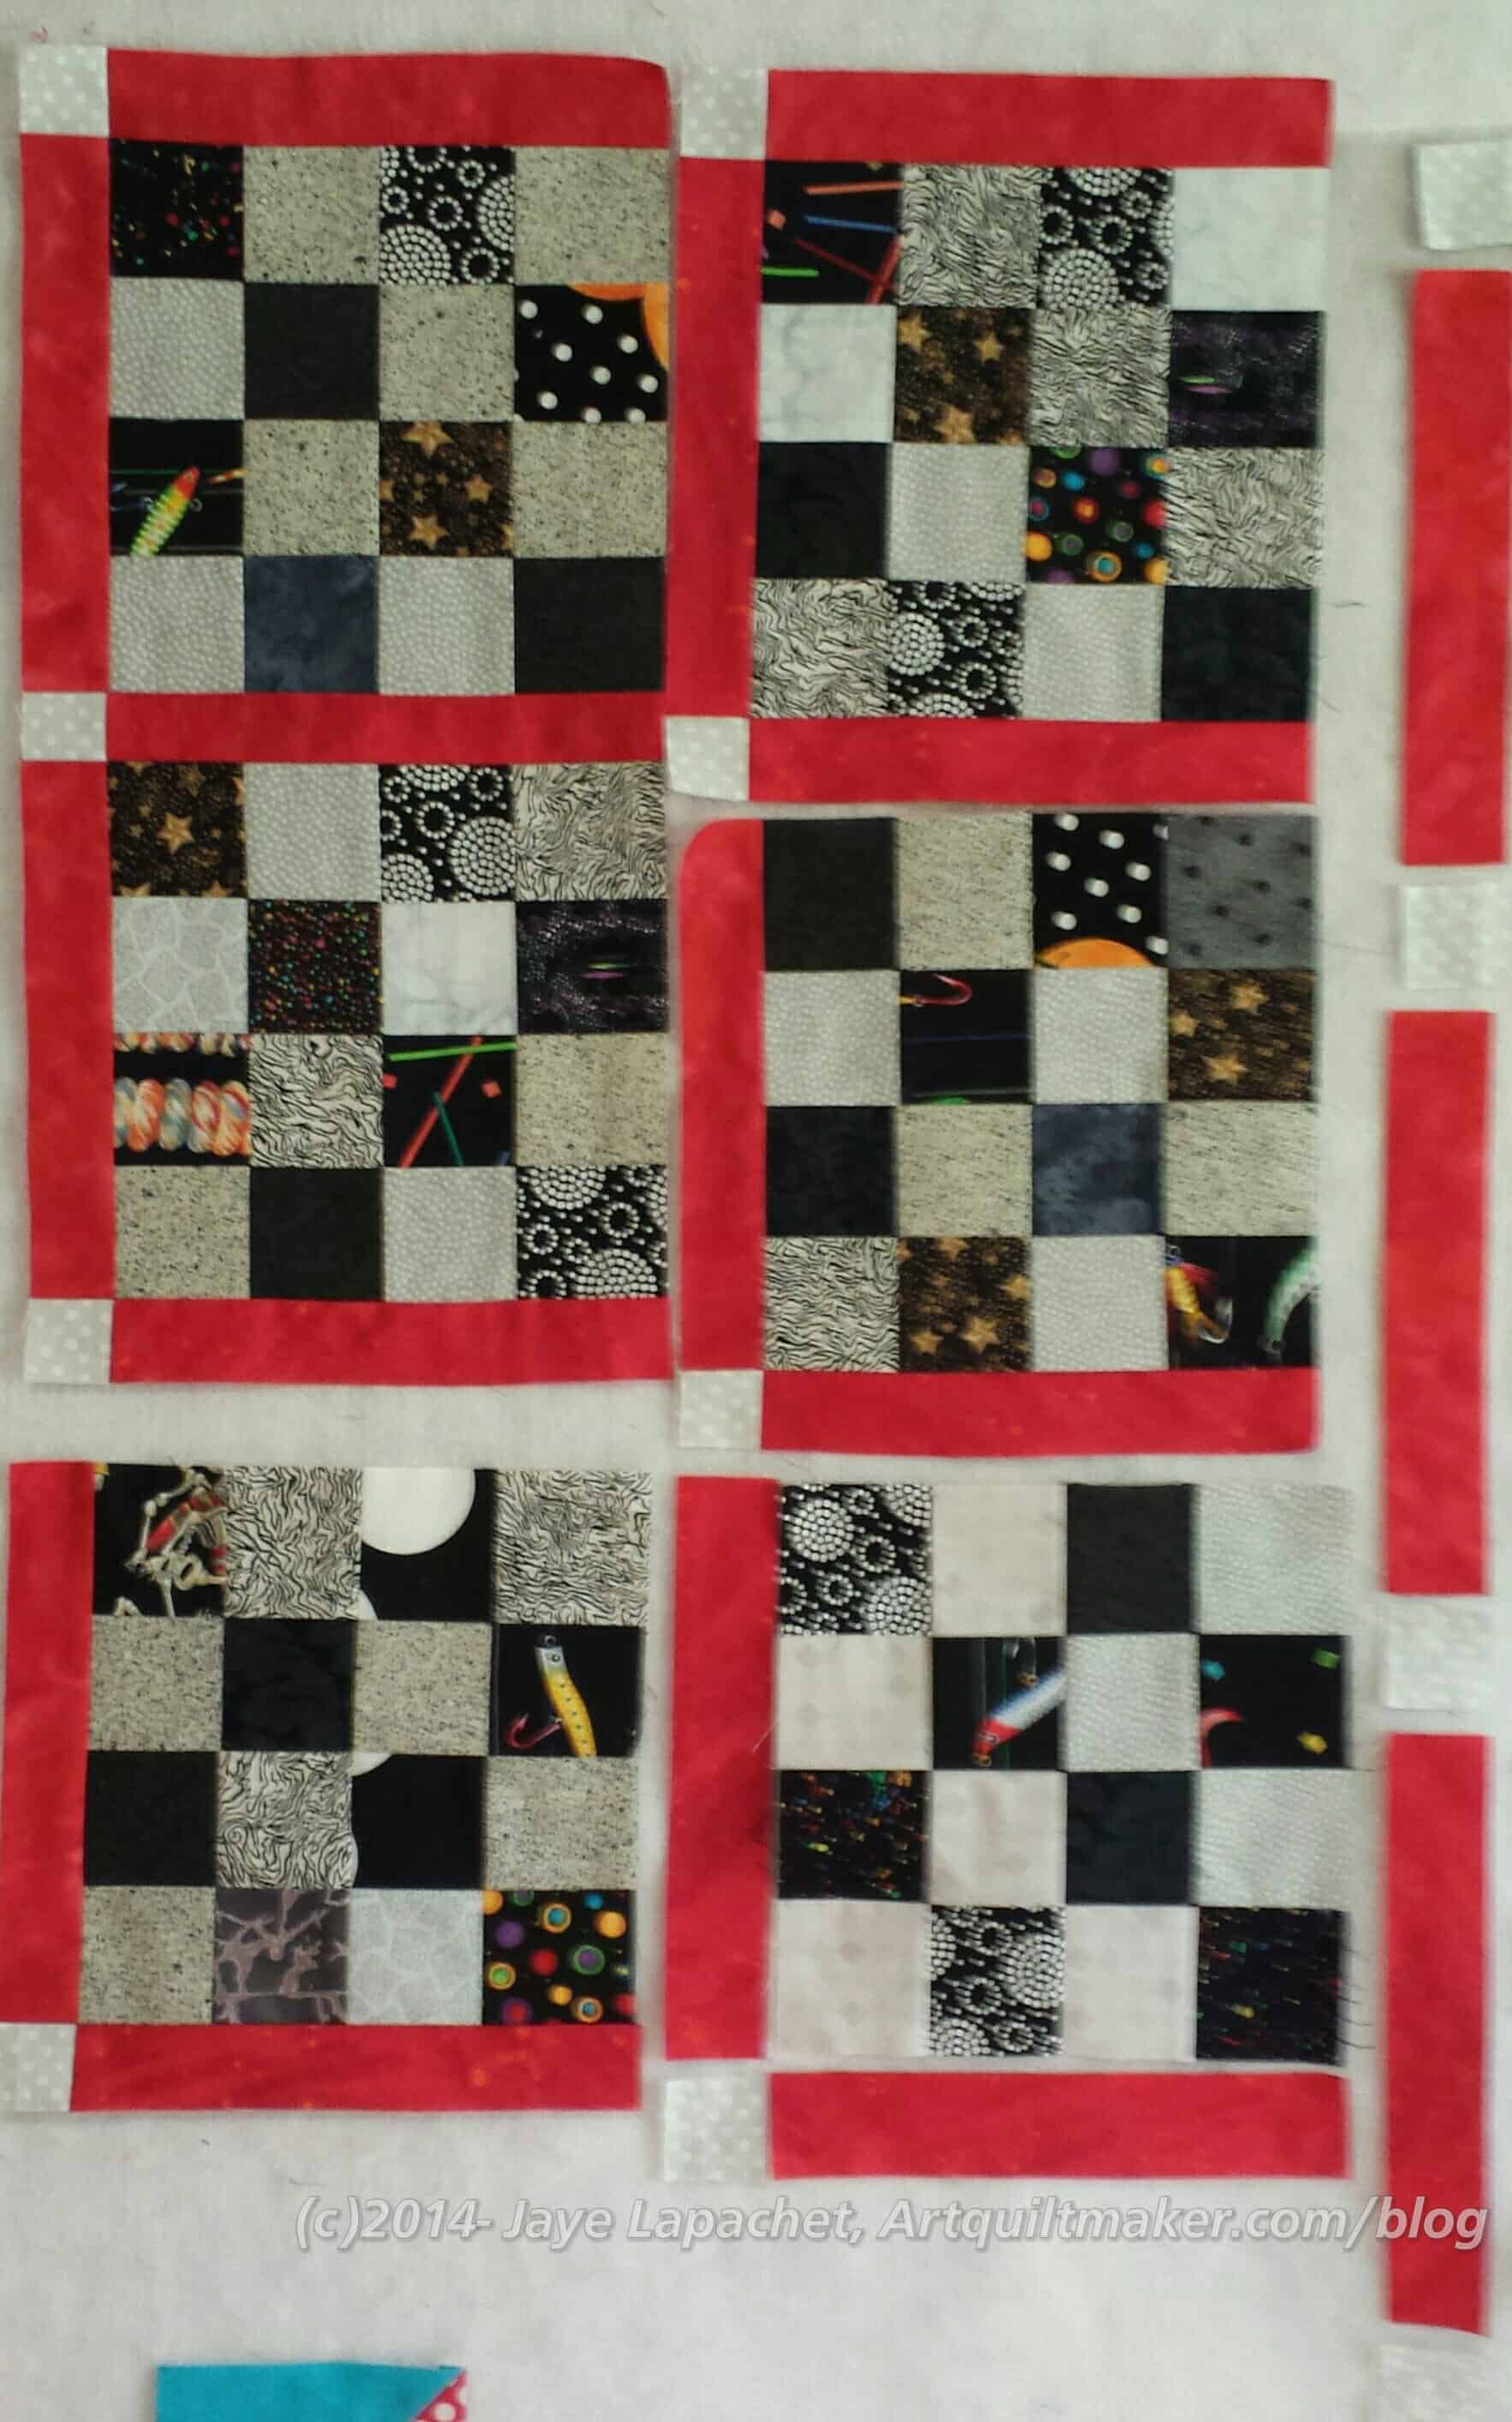
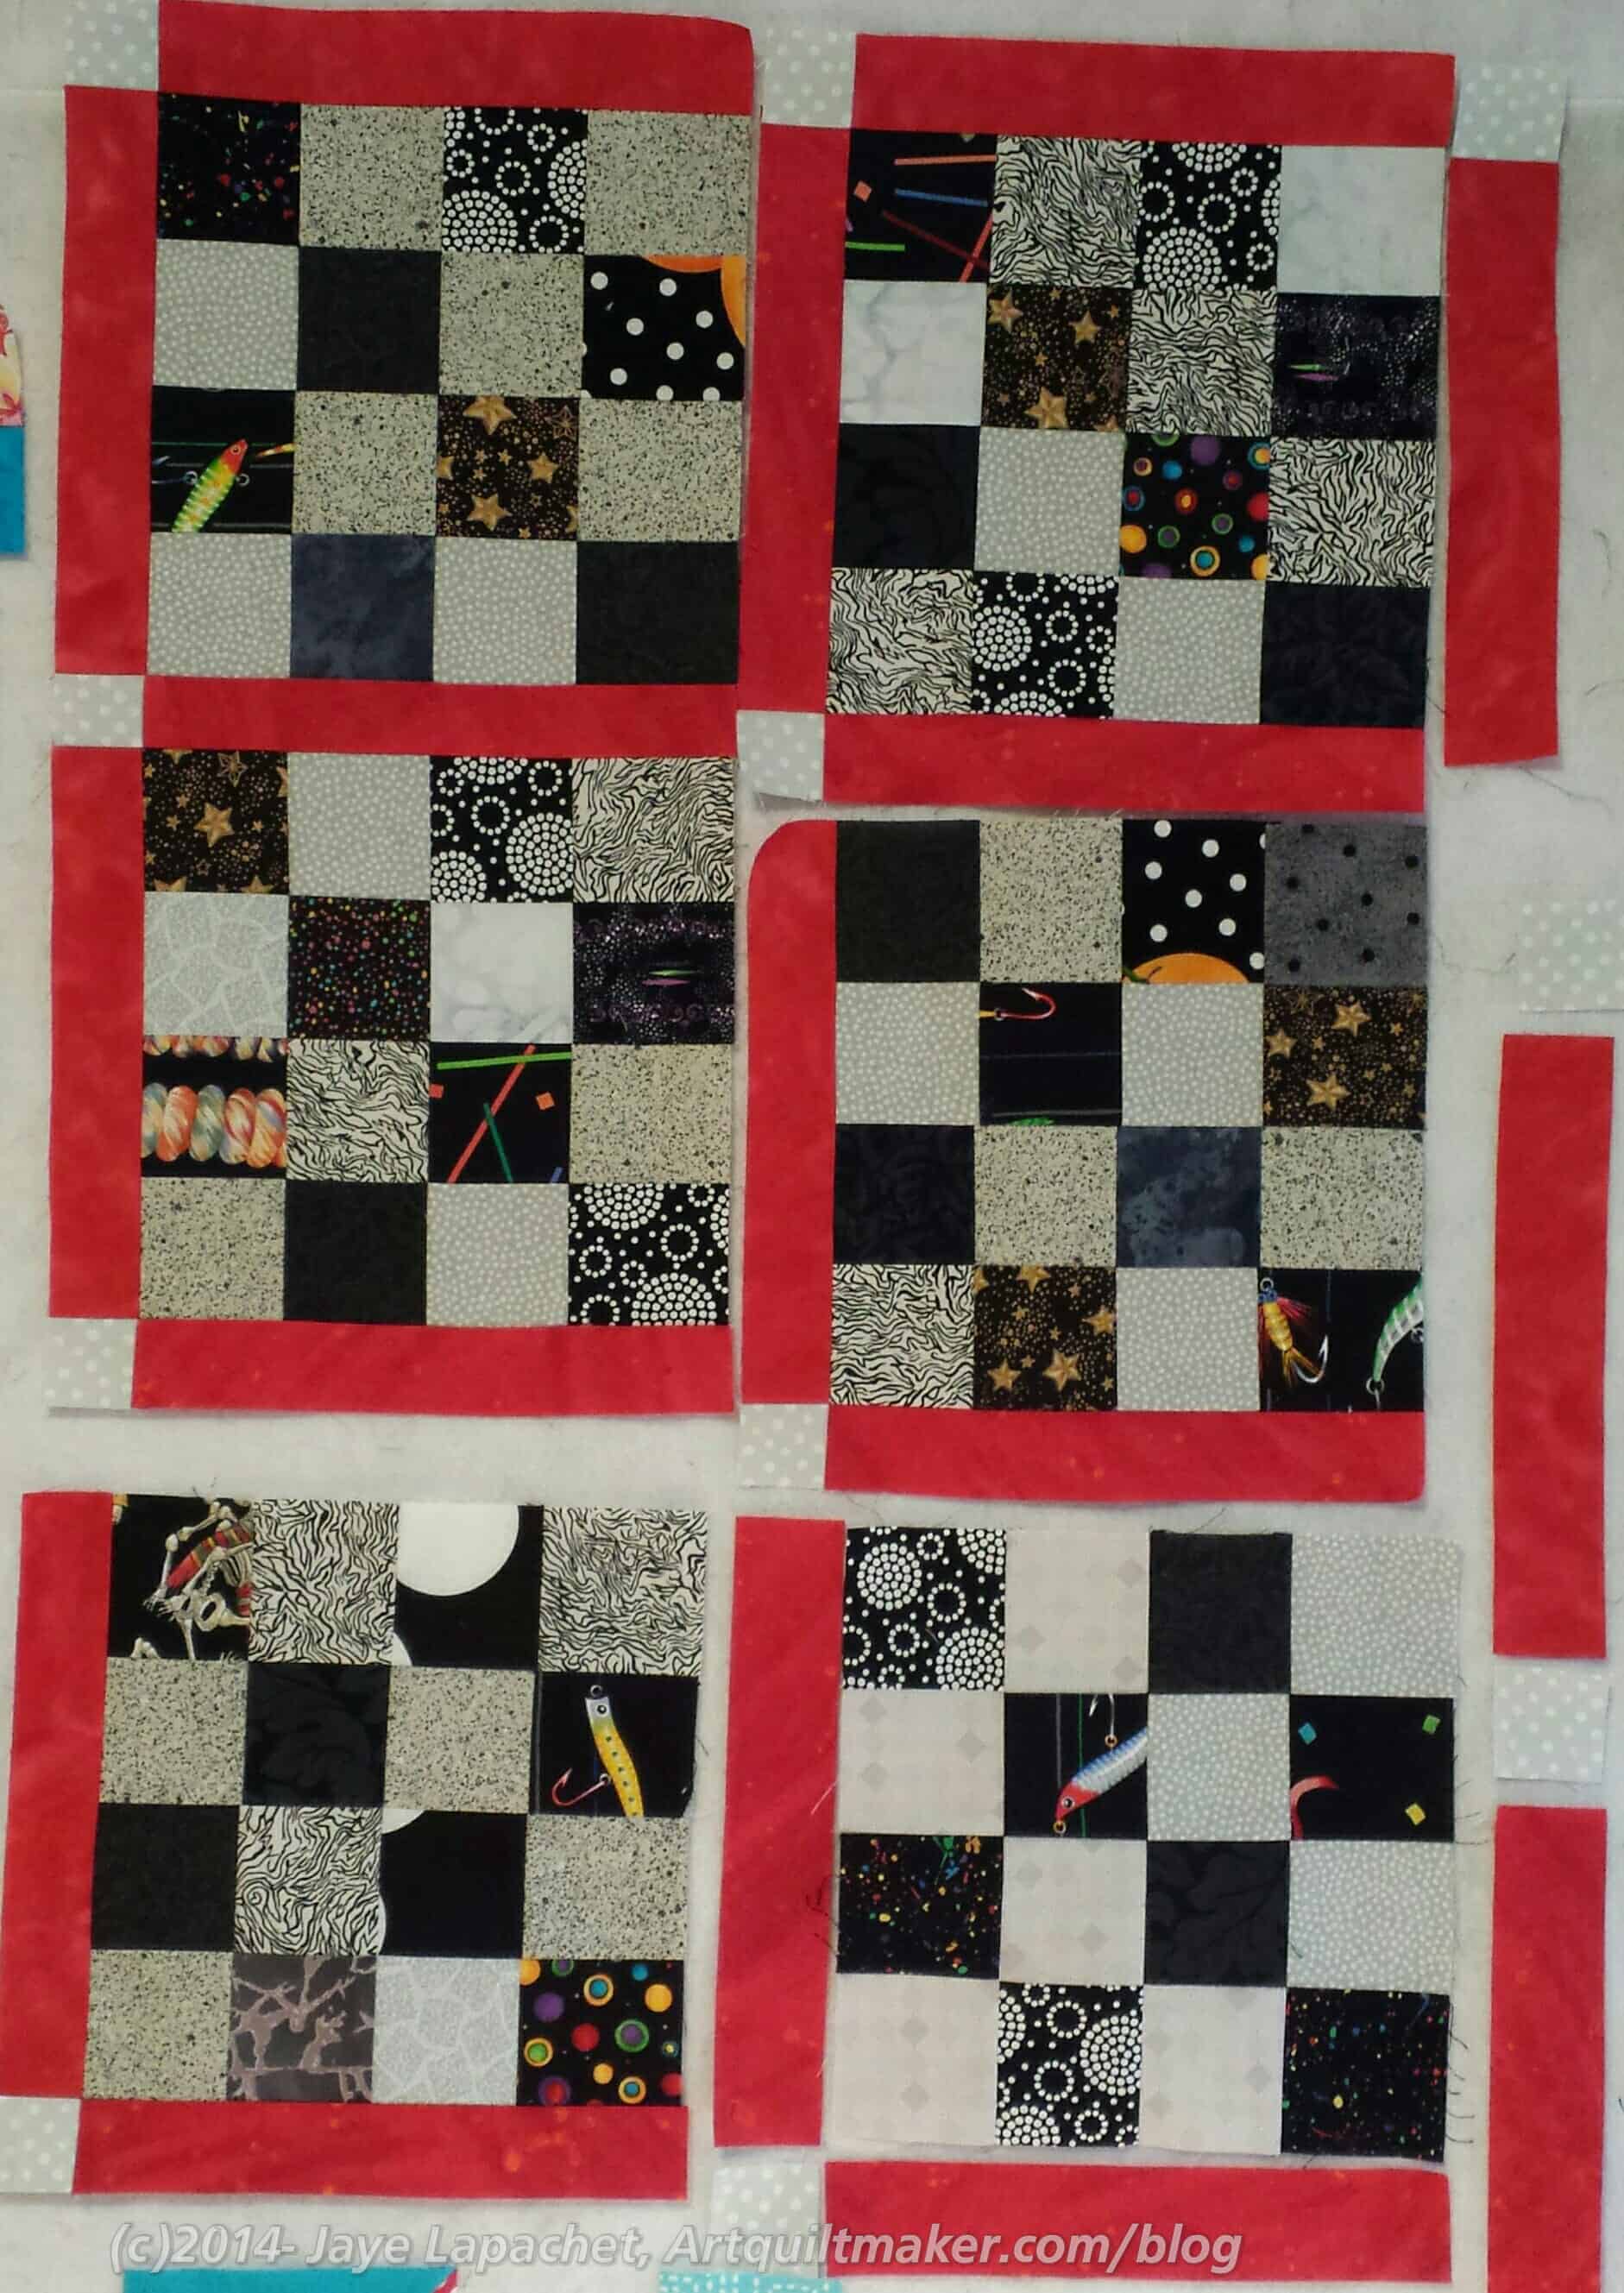
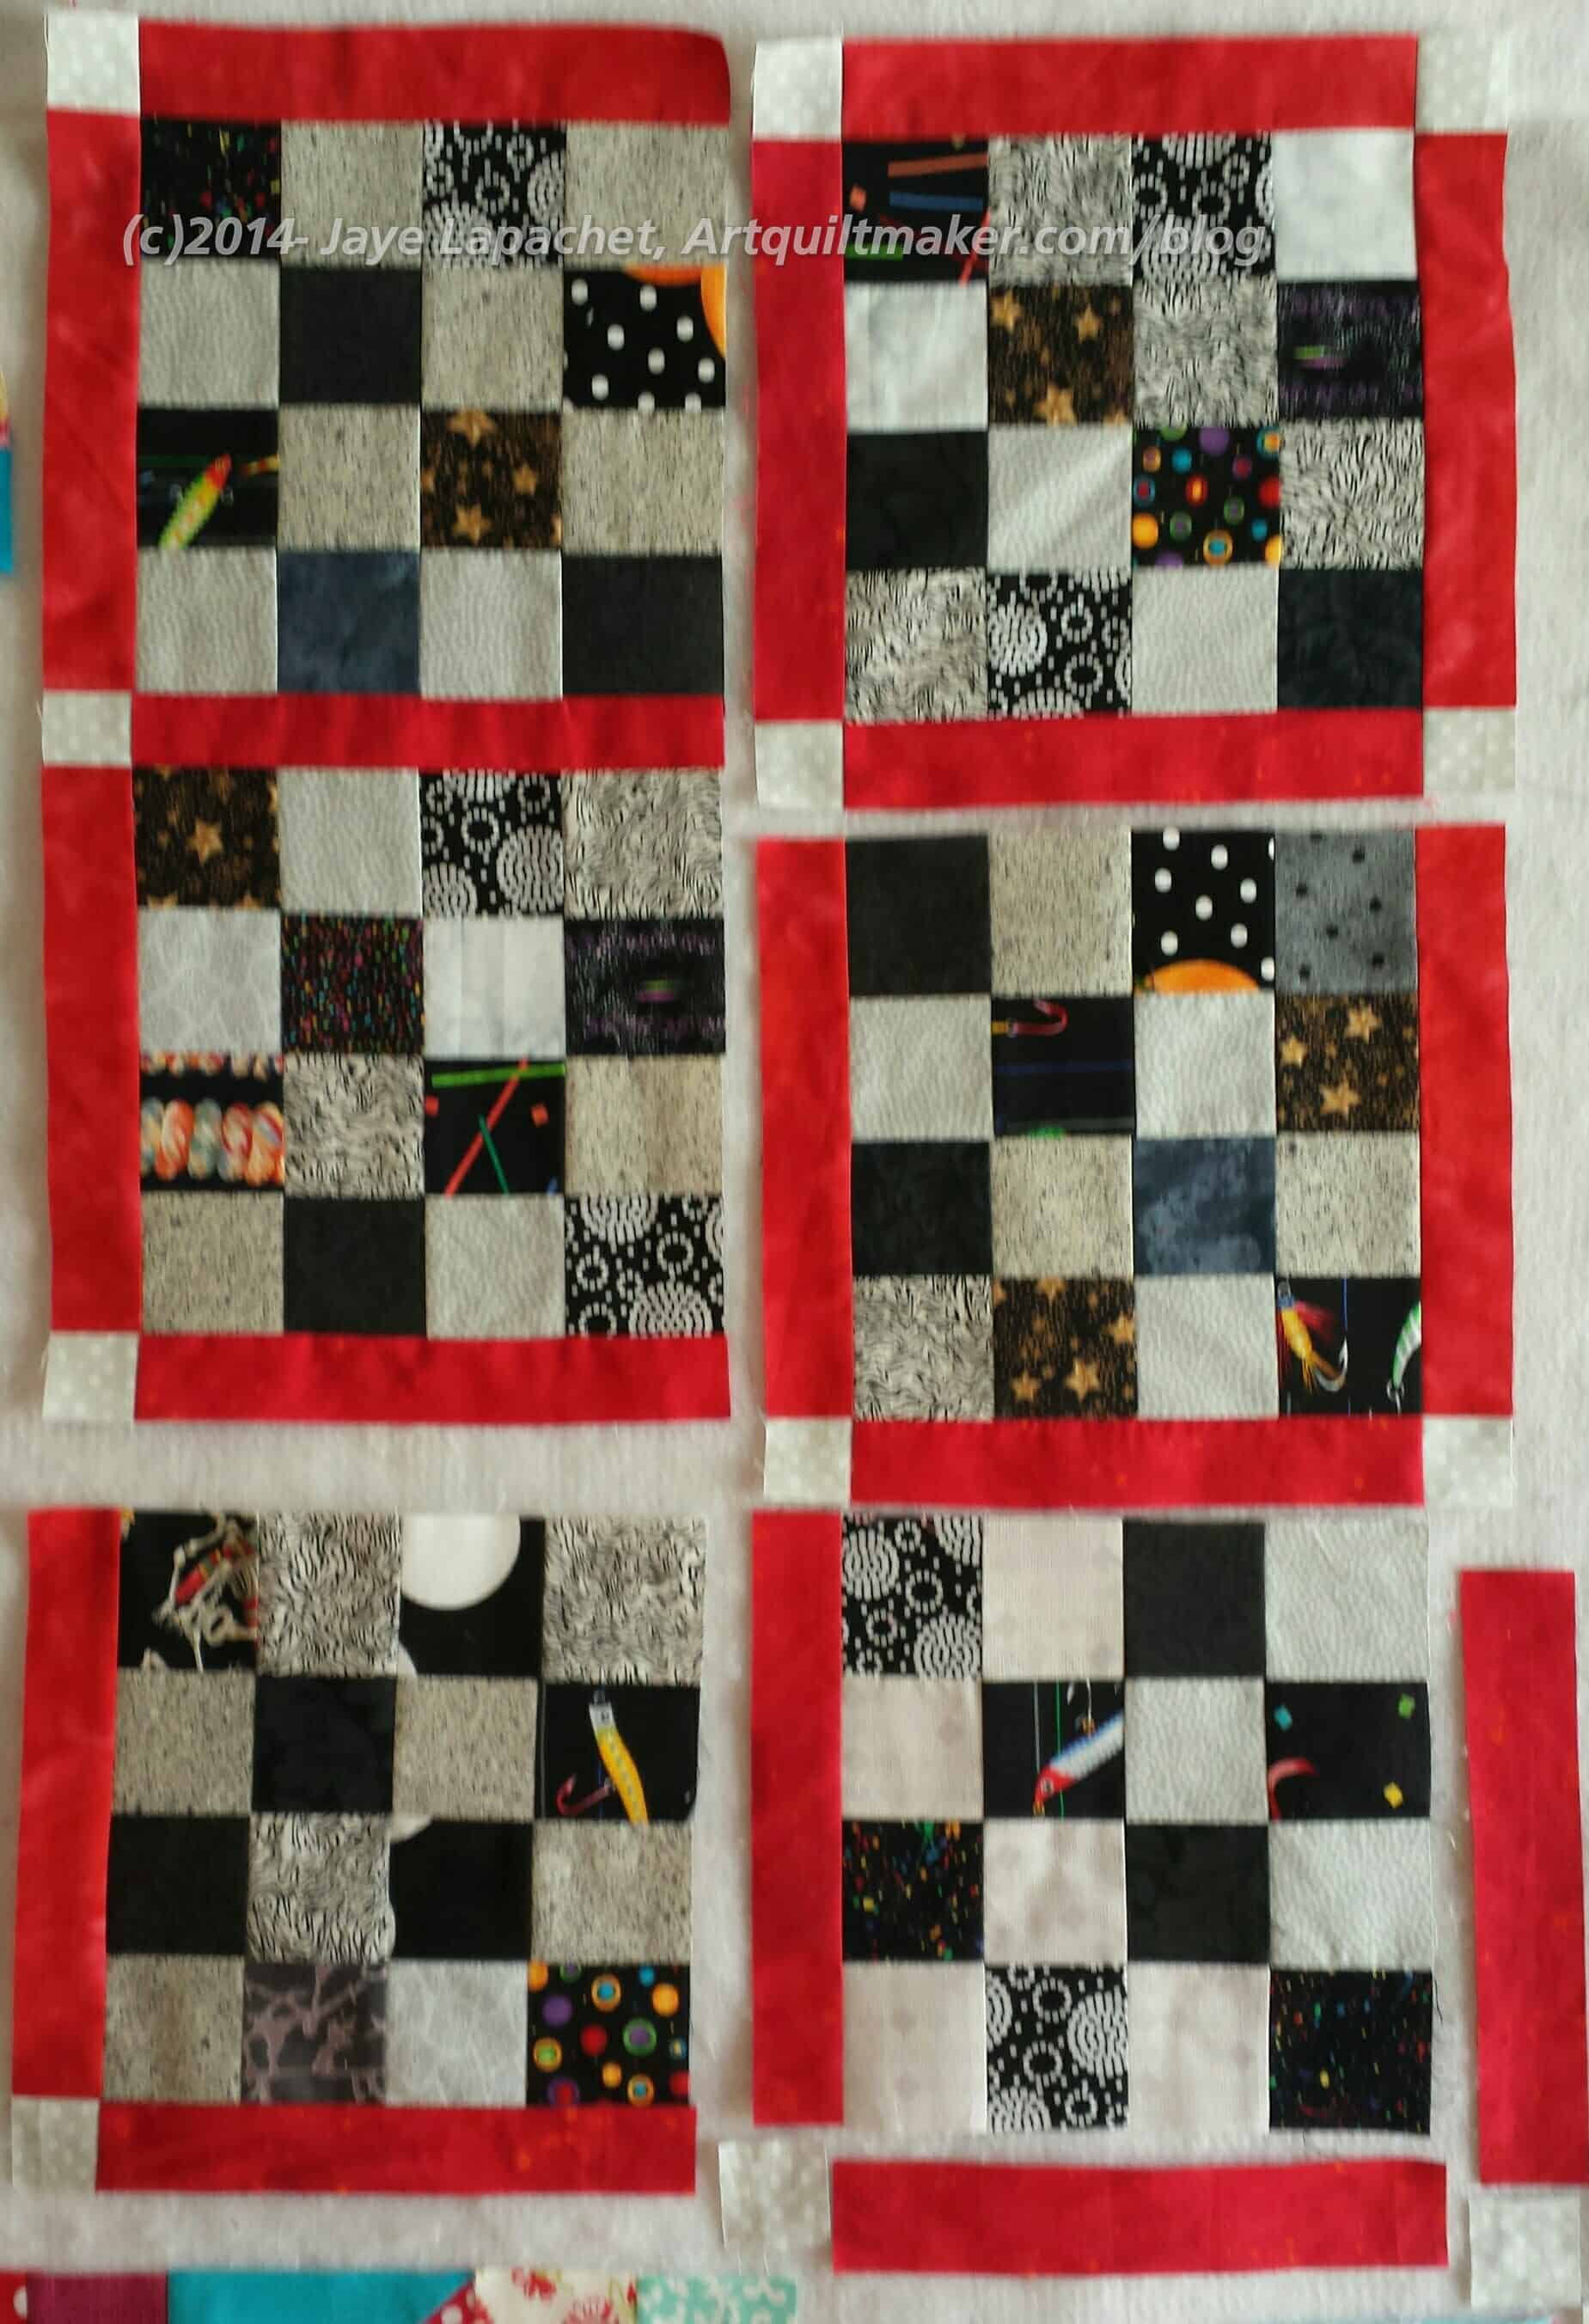
Nota bene: The picture below is numbered, so it will be easier for you to follow the tutorial.
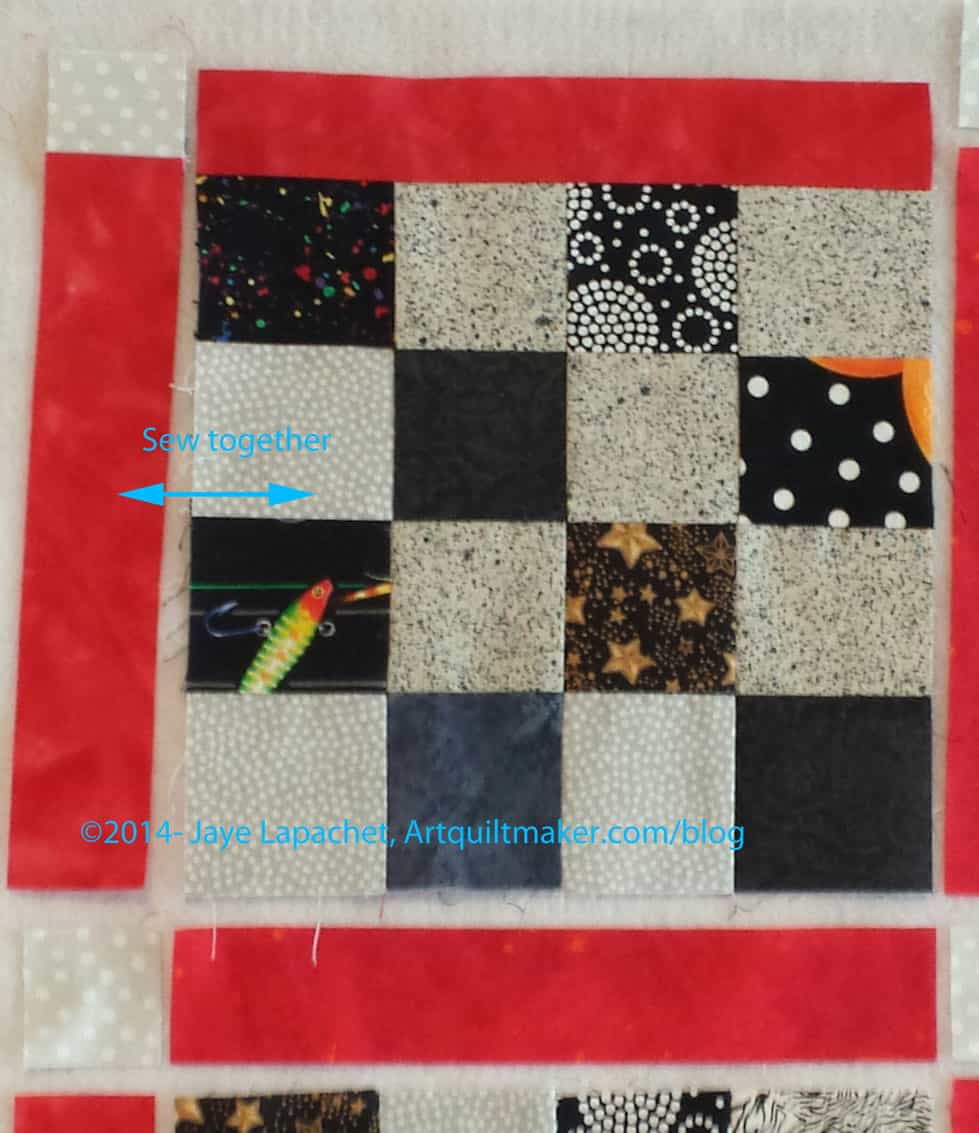
Numbered PhotoSew patch 2 to 7
First, sew #2 to #7, the top piece of sashing to the first left hand block. Press to the red piece of sashing. I press to the red, because there are fewer seams to get in the way.
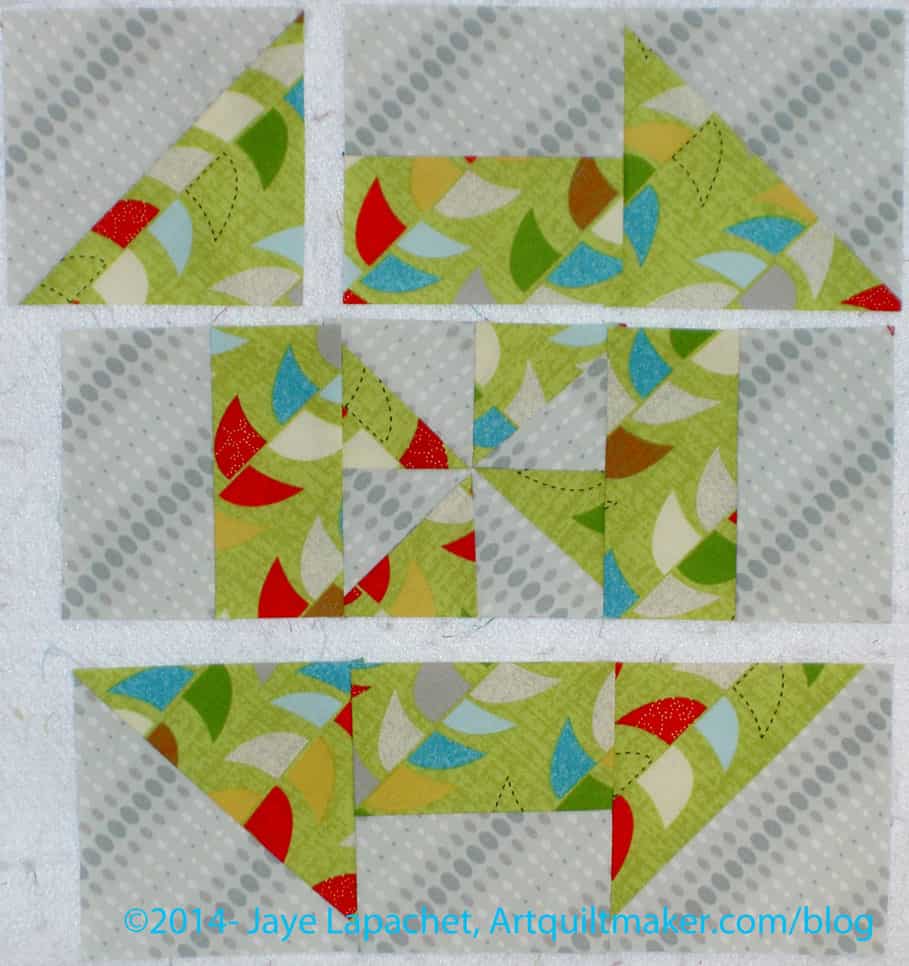
Sew patch 1 to 6
Next, sew #1 to #6, the first grey cornerstone (upper left hand corner) to the first side piece of red sashing.
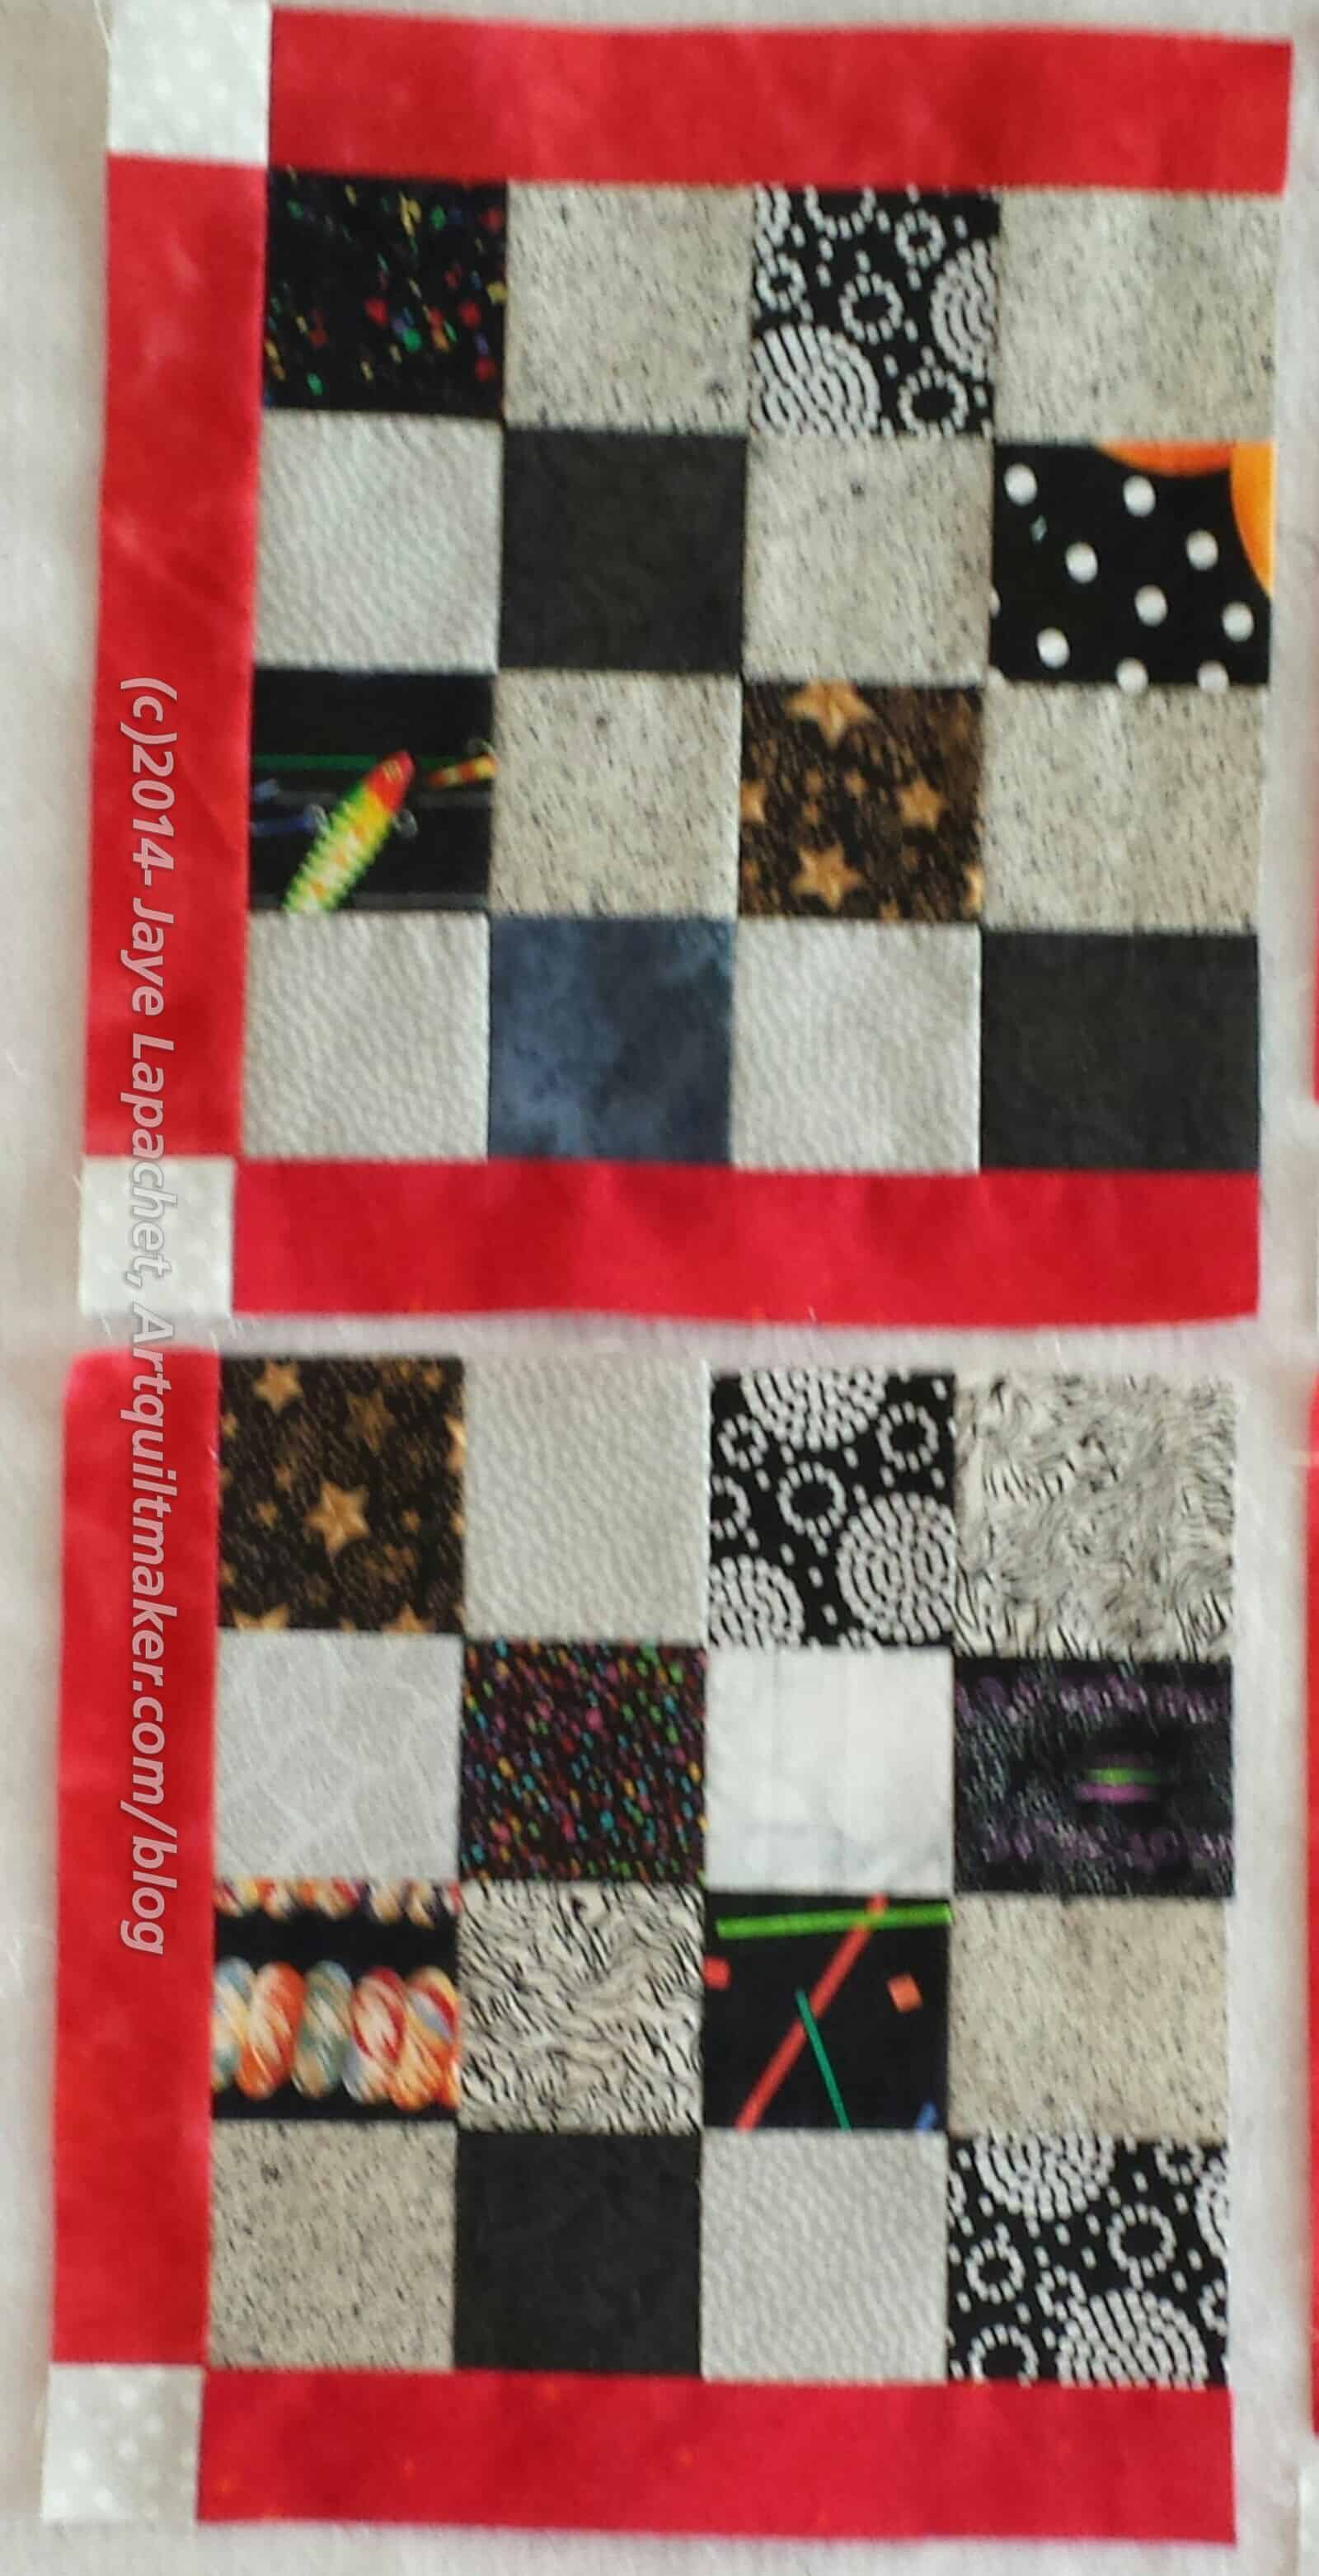
Sew first 2 sections together
Now you have two sections which you should now sew together. This is how you sew the border on. If you had a second border, you could also incorporate that into the piece, but this technique works best when the border is broken up into pieces (e.g. sashing and cornerstone). You can always put additional long borders on later.
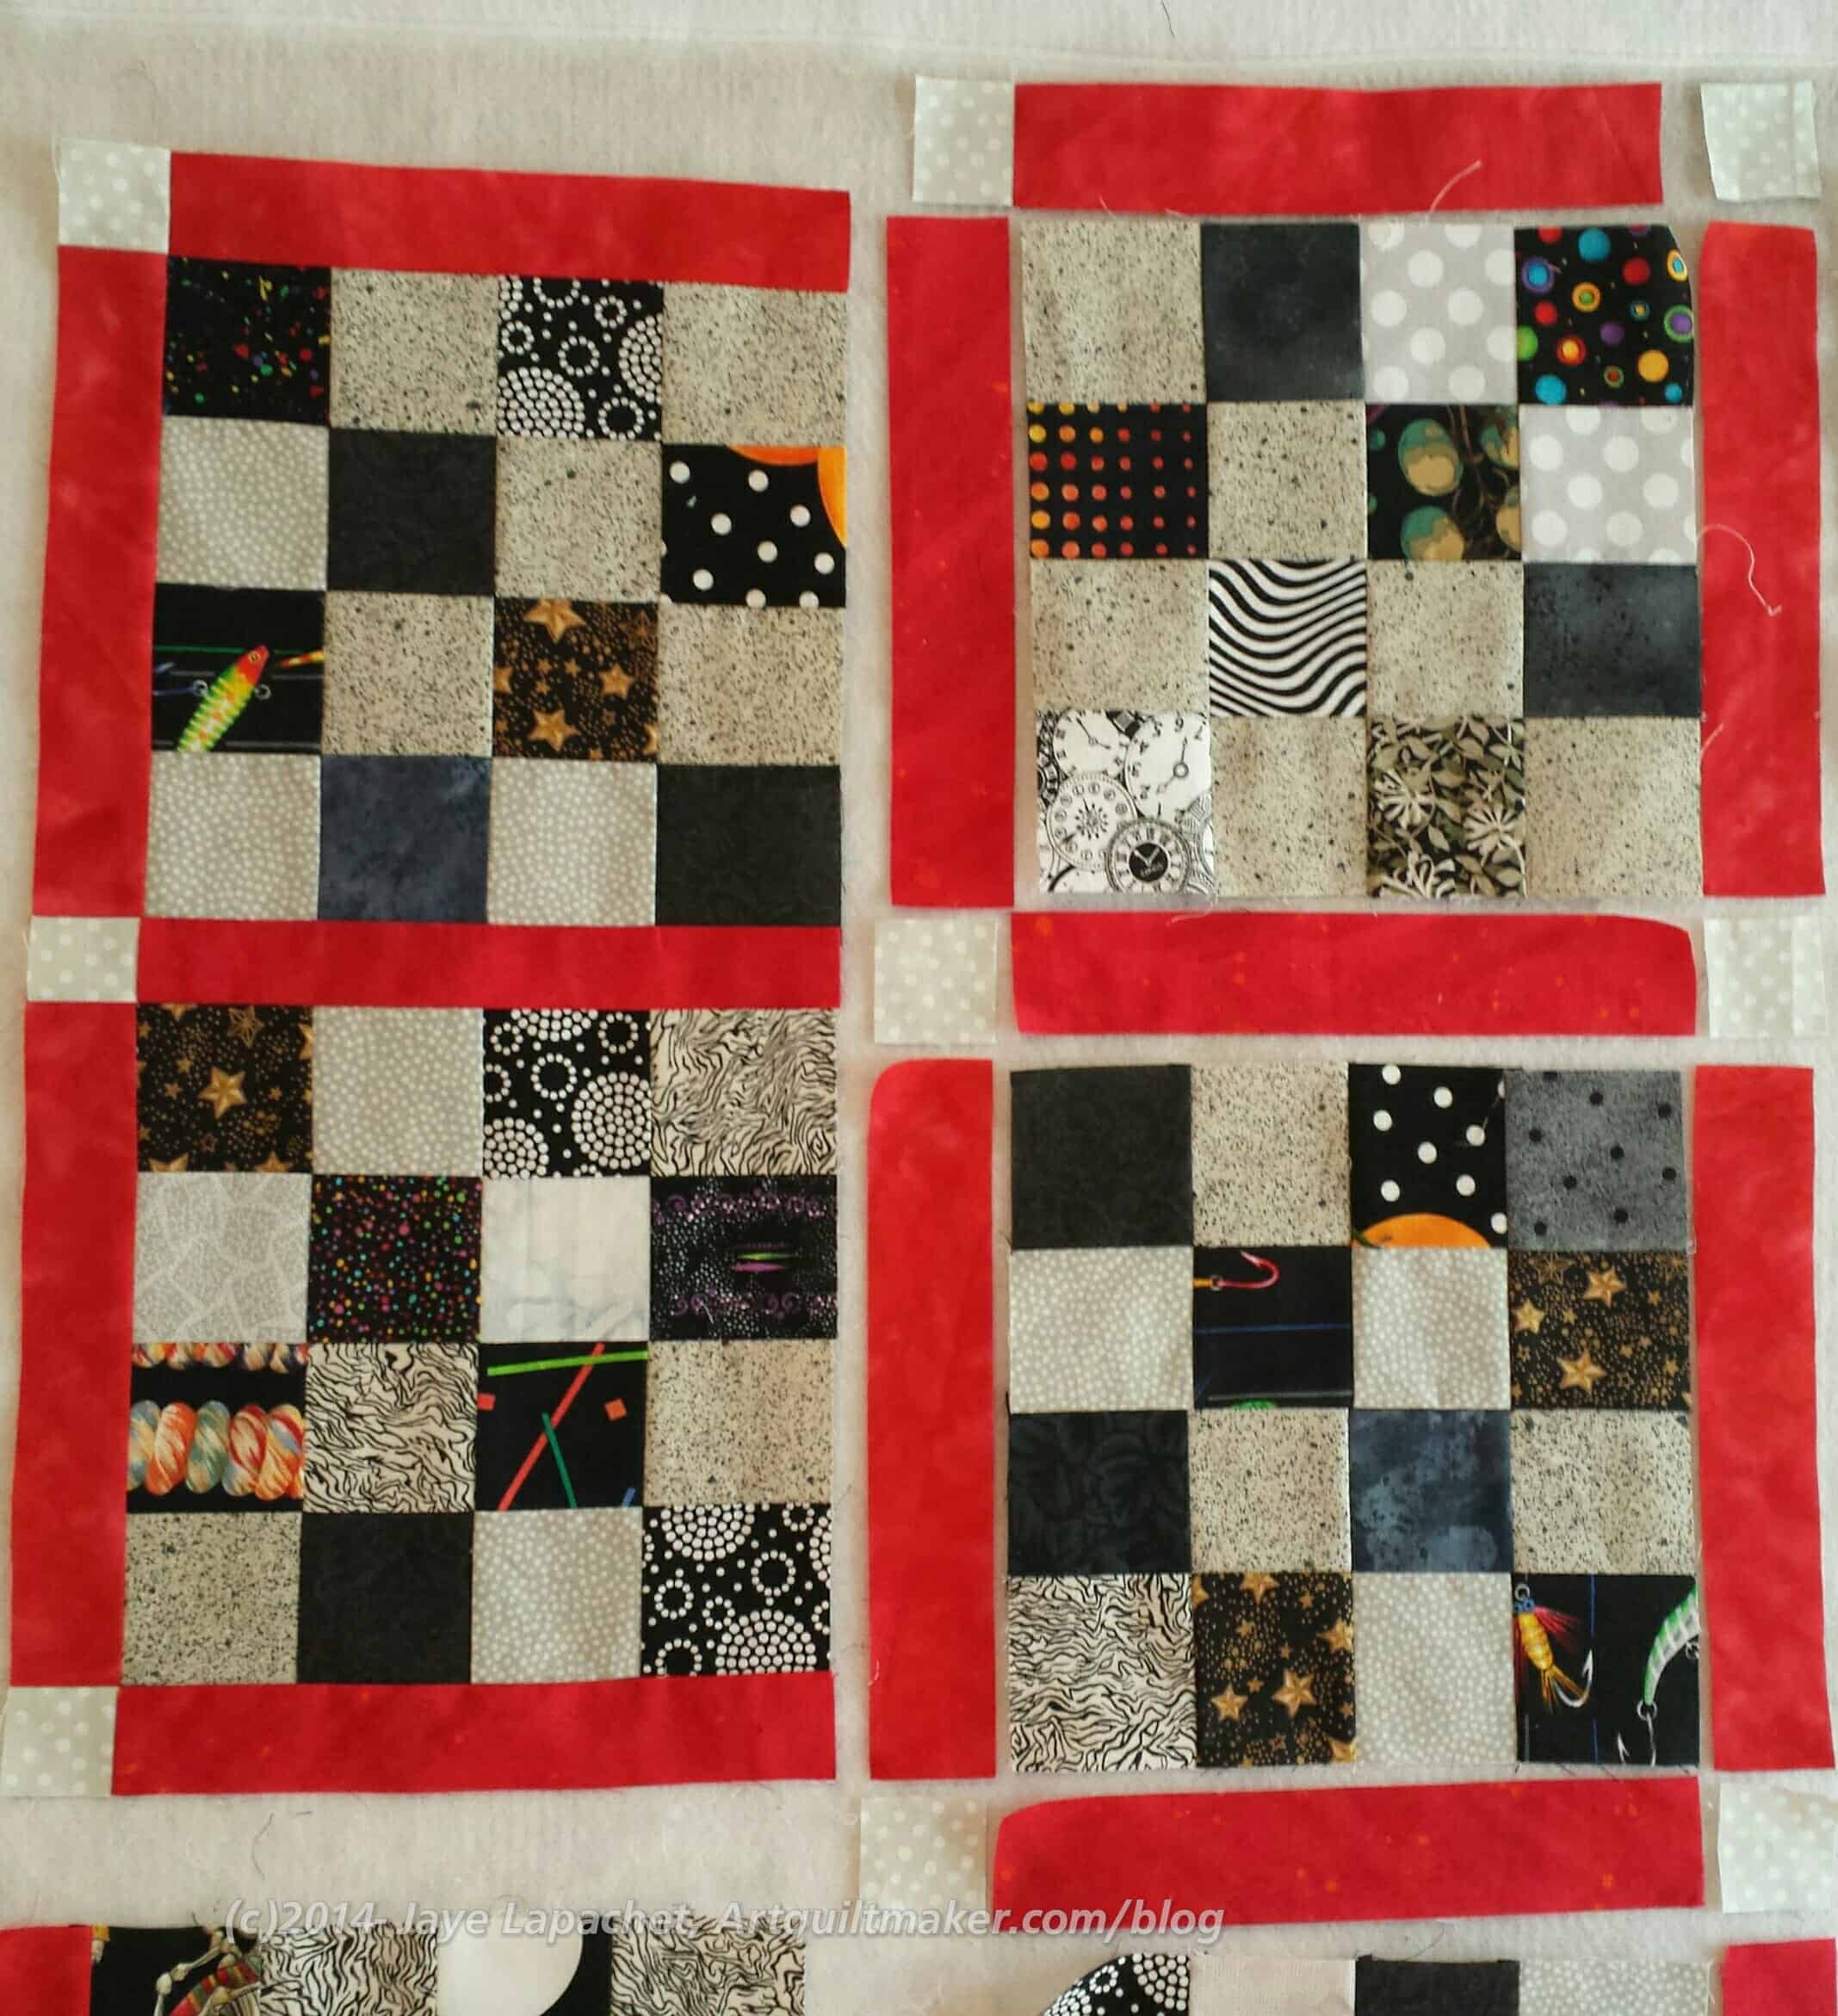
First two sections sewn together
You now have your first ‘chunk’! Hooray!
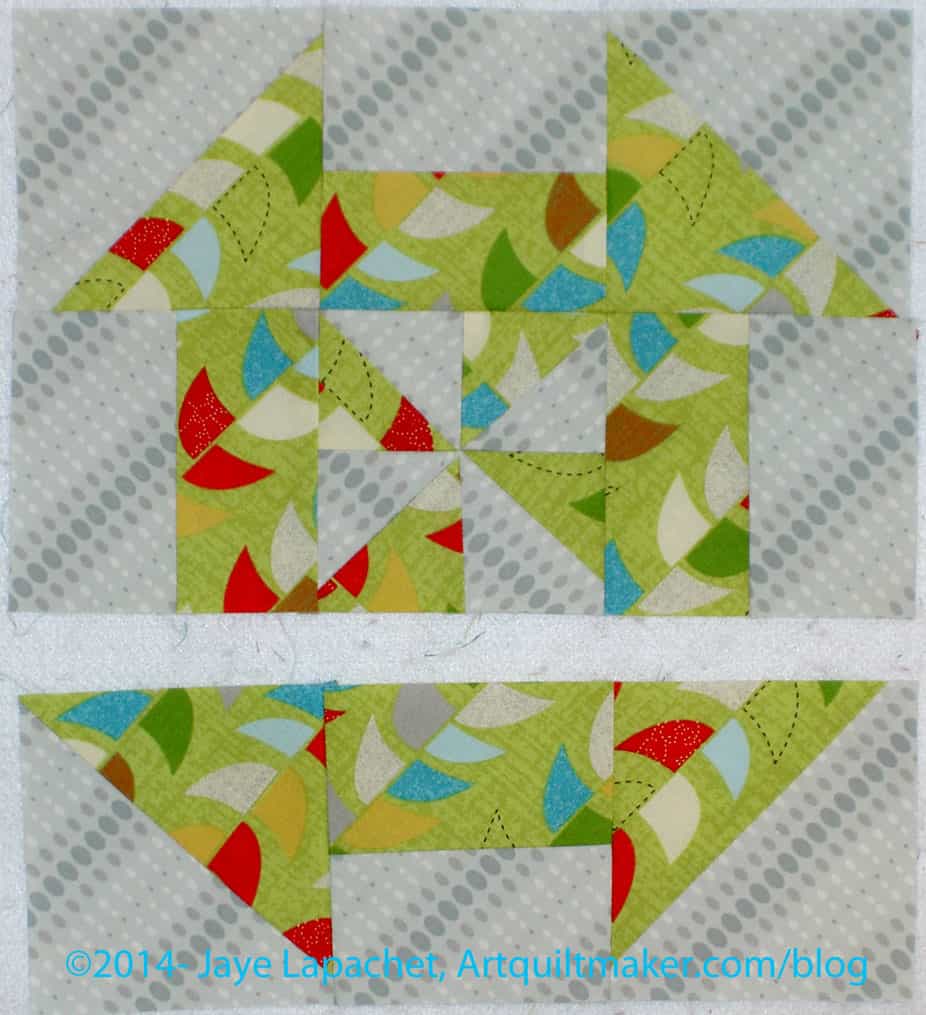
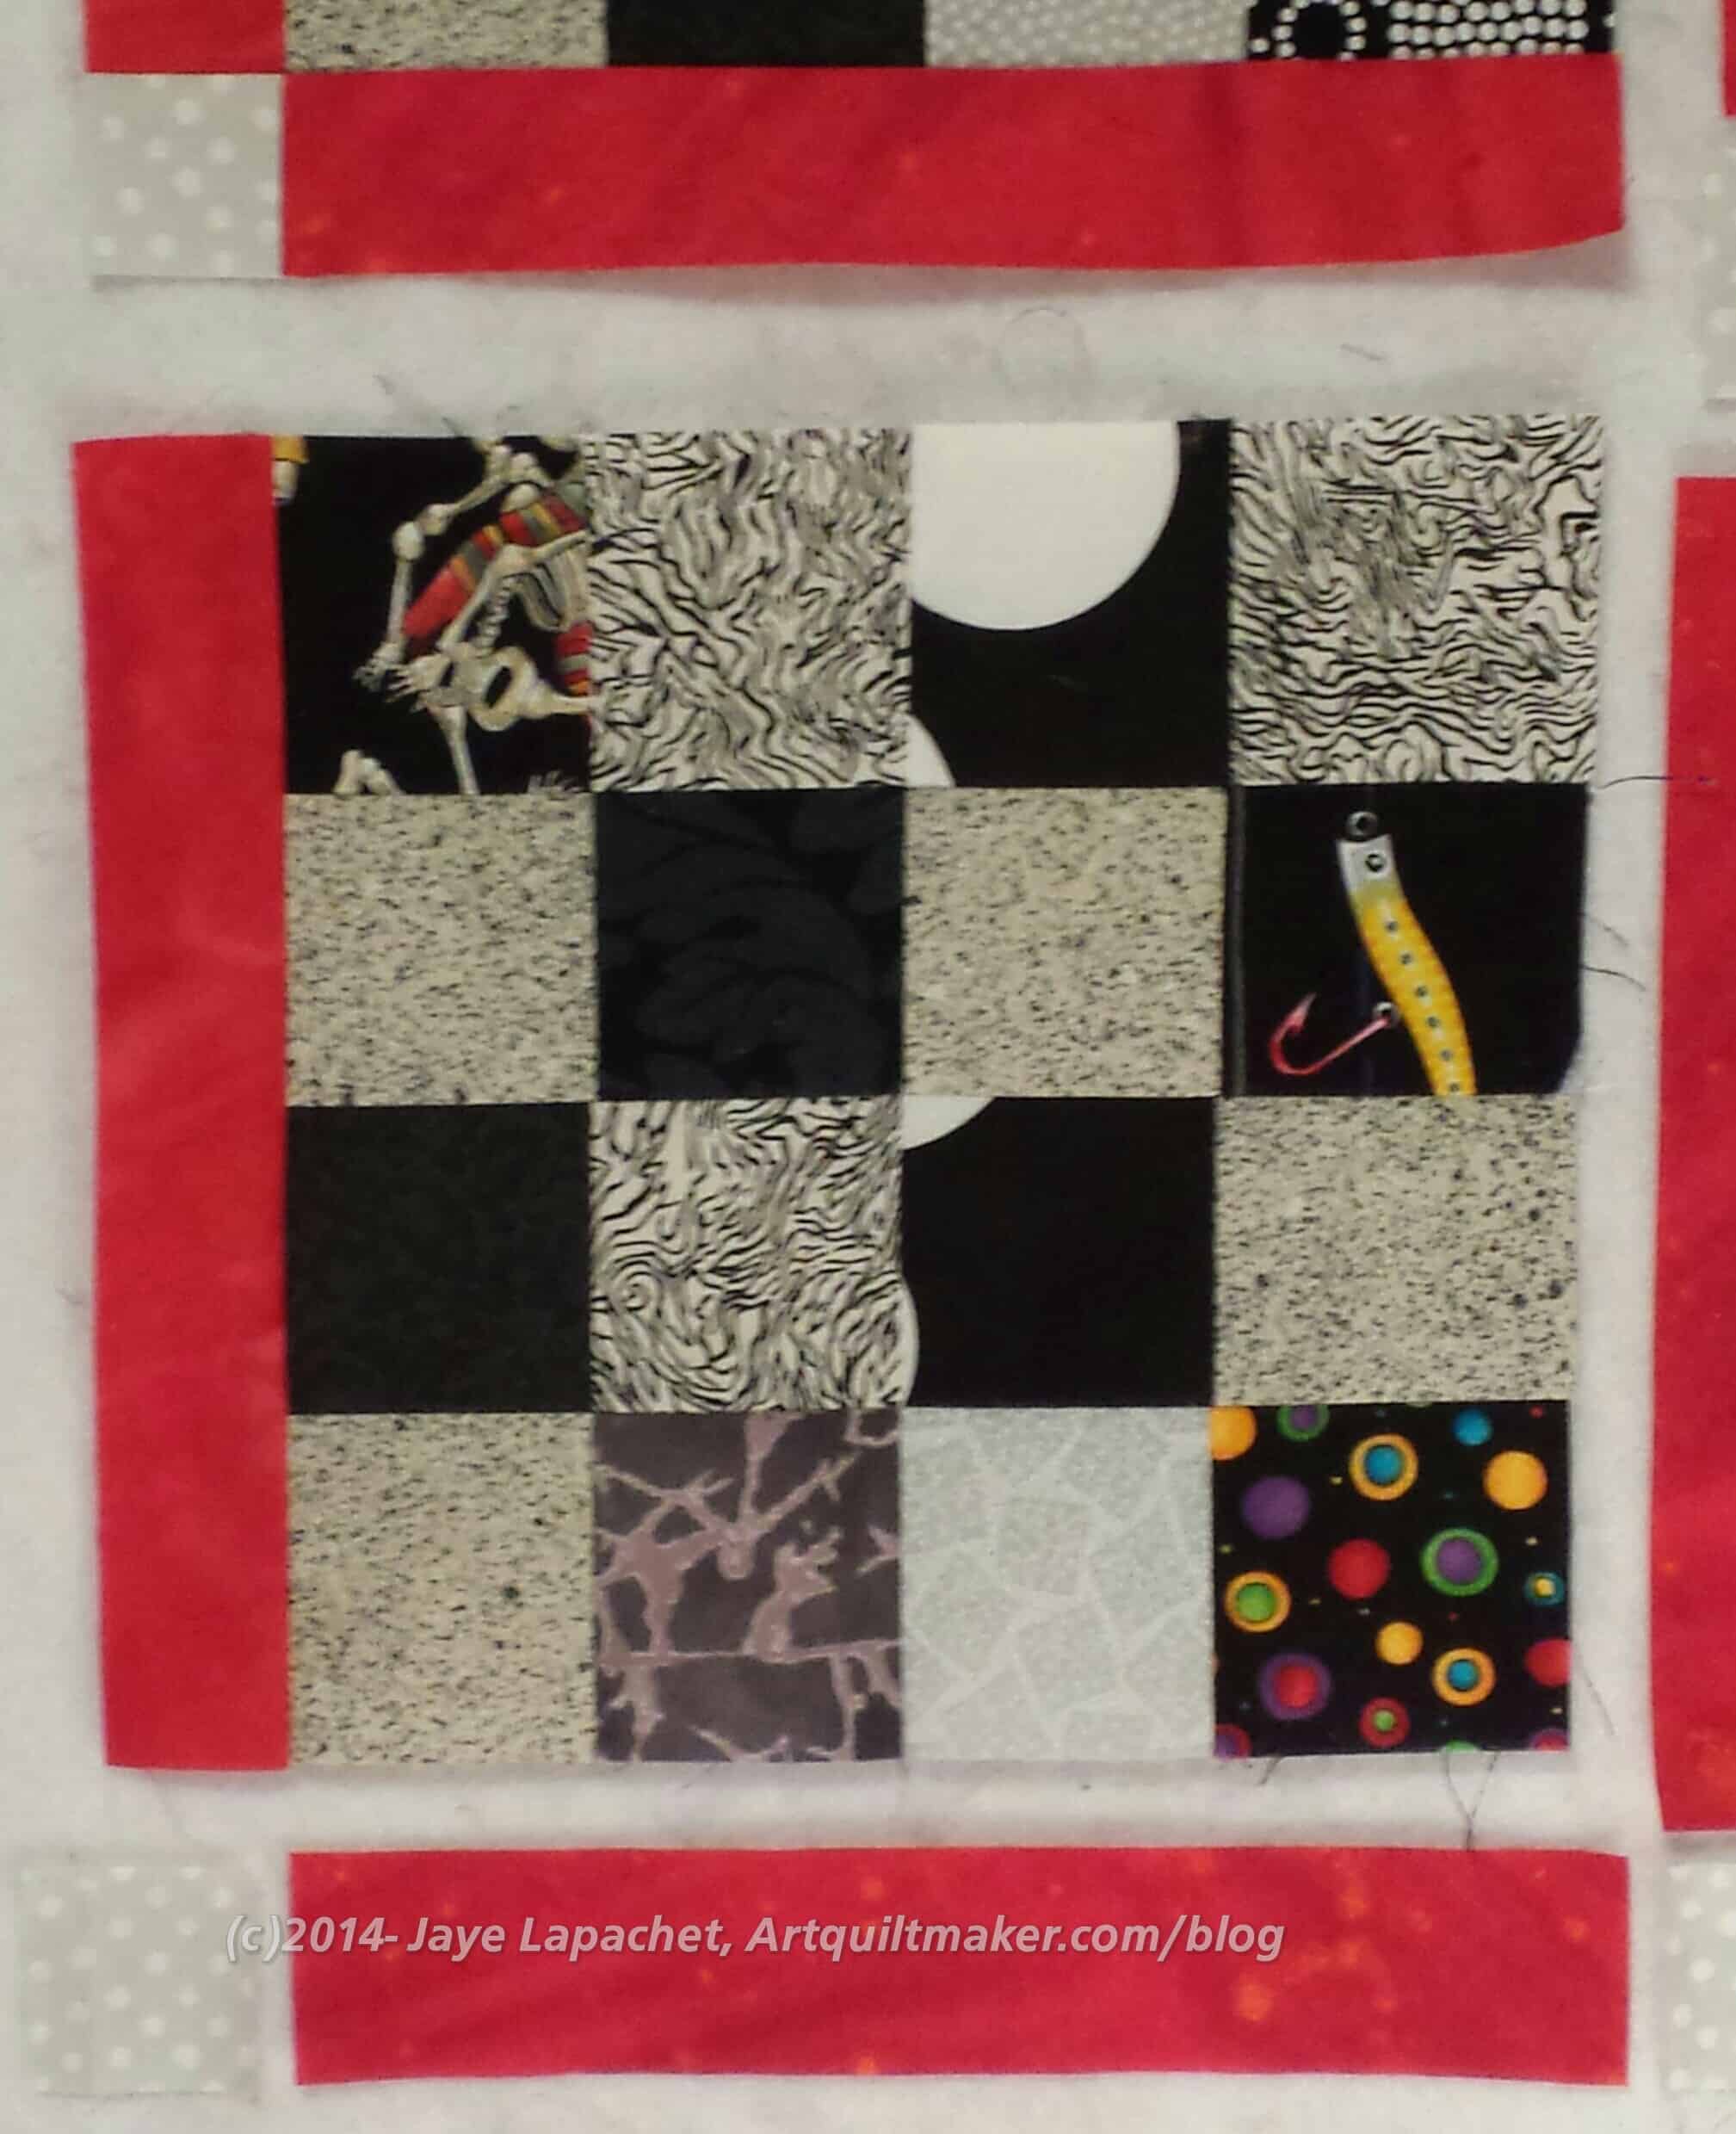
Sew bottom cornerstone and sashing to block chunk
Now sew patch #10 to #11, the bottom cornerstone to the bottom piece of sashing. Then sew that 10-11 cornerstone-sashing bottom pieces combination to the first chunk.
Almost fully bordered block
Voila! You have a chunk fully sashed!
Pin sashing piece #15 to block #16. Now sew the sashing to the block.
Side sashing sewn to 2d chunk
Generally, there will be a piece of sashing that needs to be sewn to a block alone before you can sew a sashing-cornerstone combo to a chunk. You make the ‘chunk’ by sewing a piece of sashing alone to the block.
Sew bottom cornerstone and sashing to 2d block chunk2d chunk
The center ‘chunks’ are just comprised of one cornerstone, 2 pieces of sashing, and a block. Sew the side sashing to the block. Sew the cornerstone to the bottom sashing, then sew the bottom cornerstone-sashing combo to the sashing-block combo for another chunk.
<Insert photo of 2 chunks sewn together> At this point, you can sew your two chunks together.
Now that you have two chunks sewn into a larger chunk, the next step is to prepare your next chunk. You do it the same way you prepared the two chunks above.
Pin sashing piece #25 to block #26
Pin sashing piece #25 to block #26. Now sew the sashing to the block.
Patch #30 sewn to #31
Now sew patch #30 to #31, the bottom cornerstone to the bottom piece of sashing. Then sew that 10-11 cornerstone-sashing bottom pieces combination to the first chunk.
Third chunkTwo chunks
With two pieces of sashing and a cornerstone sewed to block #26, you have your third chunk. You could sew the #25-#26-#30-#31 combo to the chunk you sewed together before, but I suggest you wait until you have more pieces sewed together.
Sew piece #3 to piece #4
Refer to the drawing of your pieces in Step 1. Now we move up to the top of the section again and sew #3 to #4.
Sew sashing #8 to block #8
Sew piece #8 to block #8**. This puts a piece of red sashing on your block #8.
Next, sew cornerstone/sashing #3-4 to sashing/block #8.
Next, sew cornerstone/sashing #3-4 to sashing/block #8.
Sew cornerstone #12 to sashing #13 and then to the block
Sew cornerstone #12 to sashing #13 and then to the block. I don’t have a picture of the two pieces sewn together before I attached them to the block, but you do have to sew them together before you sew them on the block. Now, sew that combination to the block.
Follow the same steps for block #18.
Follow the same steps for block #18 as you did for block #8. Sew sashing #17 to block #18. Press. Next, Sew cornerstone #22 to sashing #23 and then to the block.
You will have two new chunks, one with sashing on three sides and another chunk with sashing along two sides.
Sew cornerstone #5 to sashing #9
Sew cornerstone #5 to sashing #9 (upper right).
Sew cornerstone #14 to cornerstone/sashing piece #5-9
Sew cornerstone #14 to cornerstone/sashing piece #5-9. You will have a piece made from three patches.
When you press, press the cornerstone seams in the opposite direction as you have pressed the other sashing already applied to block #8. This will allow you to piece your seams more precisely.
Sew the long thin piece made up of three patches to block #8
Sew the long thin piece made up of three patches (2 cornerstones and a piece of sashing) to block #8, which already has sashing on three sides.
Sew sashing/cornerstone piece #19-24 to block #18
Sew cornerstone #24 to sashing #19. I don’t have a picture of the two pieces sewn together before I attached them to the block, but you do have to sew them together before you sew them on the block. Now, sew sashing/cornerstone piece #19-24 to block #18 (middle right).
Sew sashing #27 to block #28
Sew sashing #27 to block #28.
Sew cornerstone #32 to sashing #33. Now sew combined piece #32-33 to block #28.
Sew cornerstone #32 to sashing #33. Now sew combined piece #32-33 to block #28. This will give you a chunk that is sashed on two sides (left and bottom).
Sew sashing #29 to cornerstone #34, then sew that combined strip to block #28. Pay attention to seams so you can line them up.
You now have five chunks and are ready to sew them together.
Sew the two blocks on the upper right side together.
Sew the two blocks on the upper right side together.
Sew the two bottom blocks together.
Sew the two bottom blocks together. Now you have three chunks.
Sew the top two chunks together
Sew the top two chunks together, which is four blocks.
Sew the bottom chunk, made up of two blocks to the top chunk
Sew the bottom chunk, made up of two blocks to the top chunk, which is made up of four blocks.
I have used a small piece as an example, but the same principles apply to a larger piece. I start in the upper left hand corner and work my way to the lower right hand corner, making chunks and eventually sewing them together into larger chunks until the quilt is finished.
Let me know if you have questions.
You will have easy access to this tutorial via the link on the navigation bar to tutorials.
**Nota bene: I accidentally labeled two pieces of fabric with the number 8 in Step 1. Note that one is a piece of red sashing and the other is a block. Please look at the photos to assist you with the correct sequence of piecing.
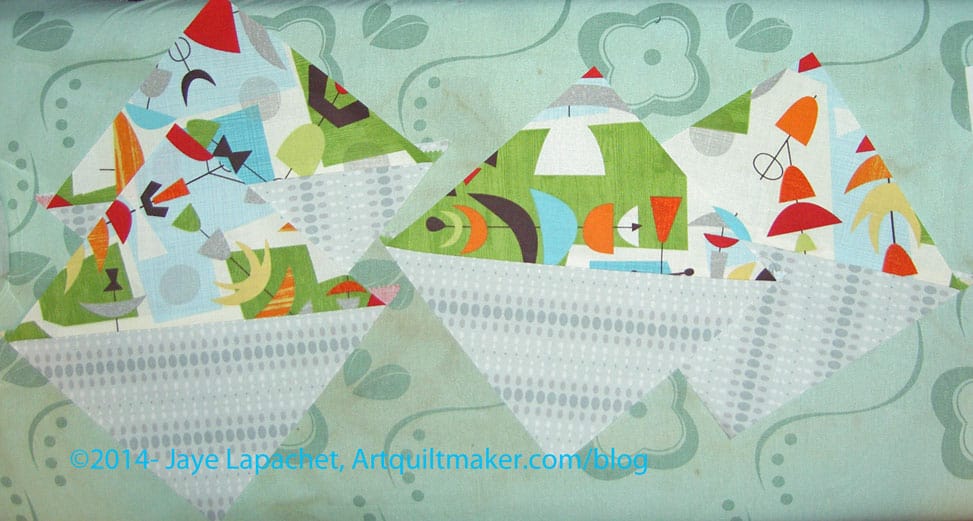
Do you remember the Corner Store quilt? I started this tutorial back in 2012 and decided that I would post it. I don’t know why I never finished it, but here it is, a blast from the past. Good topic for a Throwback Thursday, don’t you think?
I thought a tutorial might be in order for these Corner Store blocks, so you can start on your own. Why would you want to make these blocks after I felt so miserable about the top I made? Because you can choose a different background. You can make the pieces larger. You can do a better job. I have laid the groundwork. Go forth and do better!
Supplies:
Basic sewing kit
Rotary kit
Square rotary ruler in a size slightly larger than the cut size of your blocks (I used a 6″ x6″ Creative Grids ruler)
Sewing machine
Leftover triangles or squares cut in half on the diagonal. There is no particular size, though larger triangles will be easier to work with.
Background fabric to accommodate the size of your quilt.
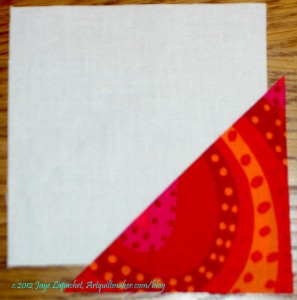
First cut some 4×4 squares of your background fabric. Note, you do not have to use white (or Kona Snow as I selected). I would, in fact, suggest something not in the white or cream realm. I think a nice light yellow or creamy kind of grey would look better. Yes, if you choose something else you may need to eliminate triangles in that color range. It will be worth it, because the triangles will show up better against a background that contrasts well.
Nota bene: The triangles you will cut are right triangles. You can take some squares and cut them in half on the diagonal.
Also, you can choose a different sized background square. You can start with a large square to accommodate very large prints in the triangle portion. The directions are the same regardless of the sizes you use. Experiment and see what look appeals to you.
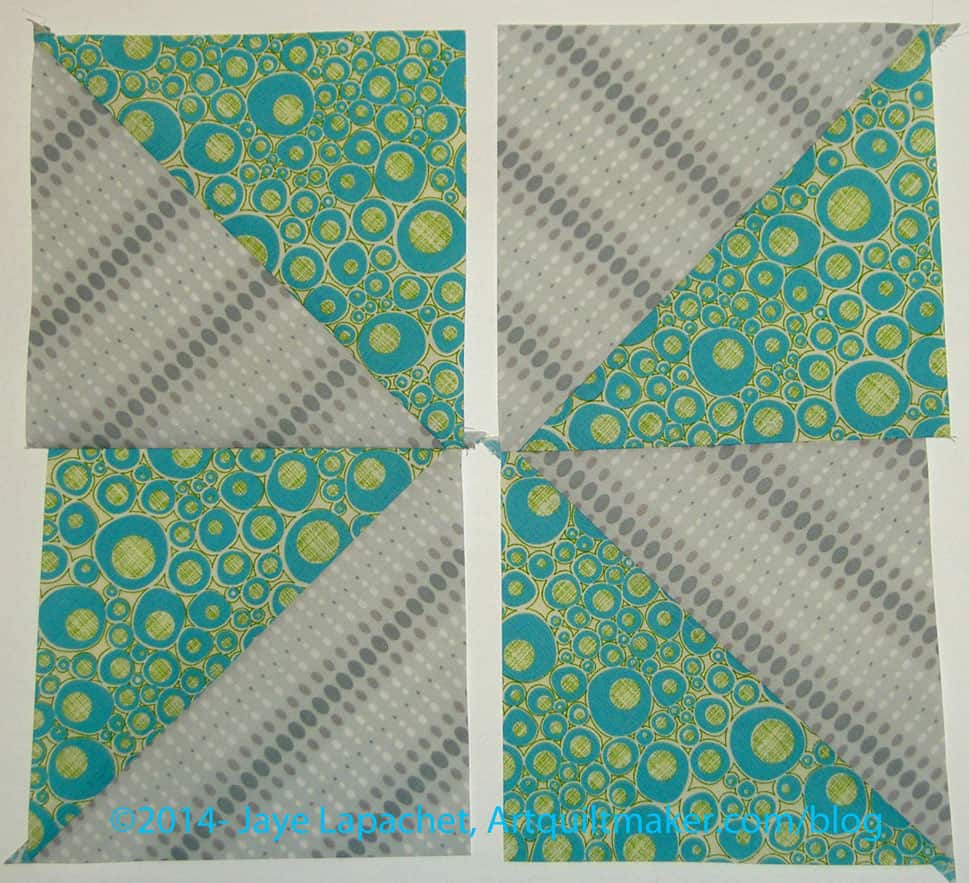
Next: find scraps or cut triangles from yardage. Cut different sized squares in half on the diagonal or use a triangle ruler to cut the shape. You do not have to be precise and there is more movement in the quilt if the triangles are different sizes. The only guideline on size is to make sure that a little bit of the background shows once you sew the triangles to the background.
Once you have your triangles and background squares, it is time to prepare to sew.
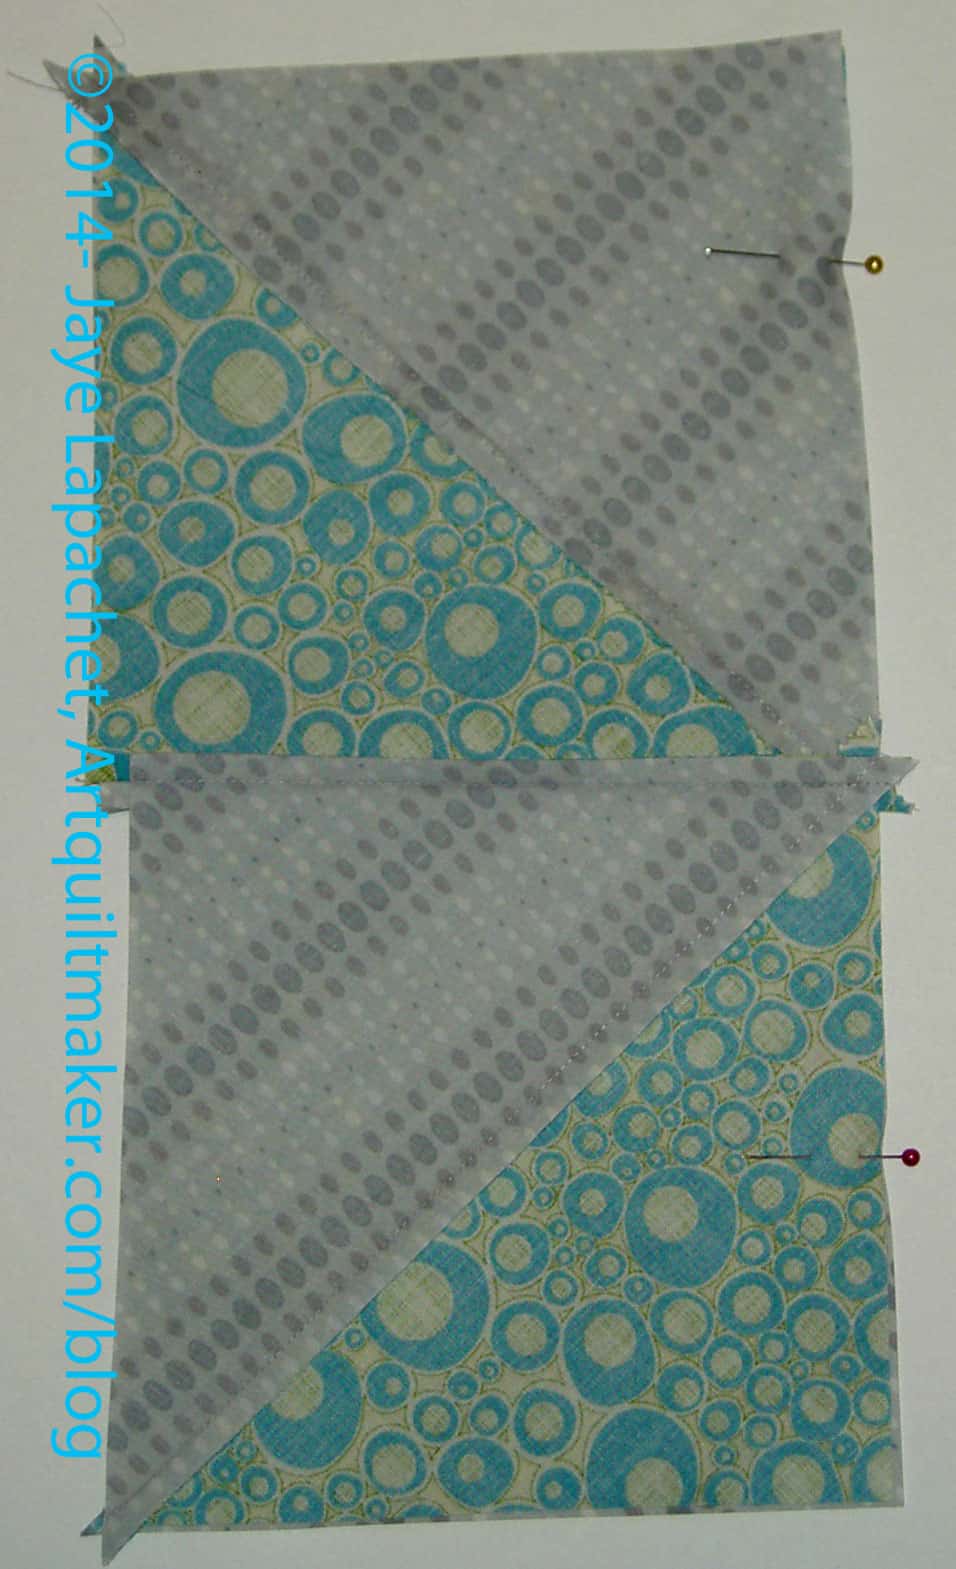
Pin Triangle to background
Next: Position a triangle on your background square, right side of the triangle down on the right side of your background fabric, and prepare to pin in place.
Before you pin, you will need to fold the triangle back on itself, approximating a quarter inch seam so you can ensure that your triangle covers the foundation/background fabric.
If the ears of the triangle are about a quarter inch over the edge of the foundation/background fabric, you should be in good shape.
If you have the Judy Martin Point Trimmer, you can trim off the ears of your triangle and position the now blunt edges of the triangle against the two sides of the foundation/background square.
Sew and press
Sew along the hypotenuse (the long side) of the triangle using a quarter inch seam allowance, then press the triangle back along the seam line.
Once you are sure your triangle has covered the foundation/background fabric, you can fold back the triangle and trim the excess foundation/background fabric away.
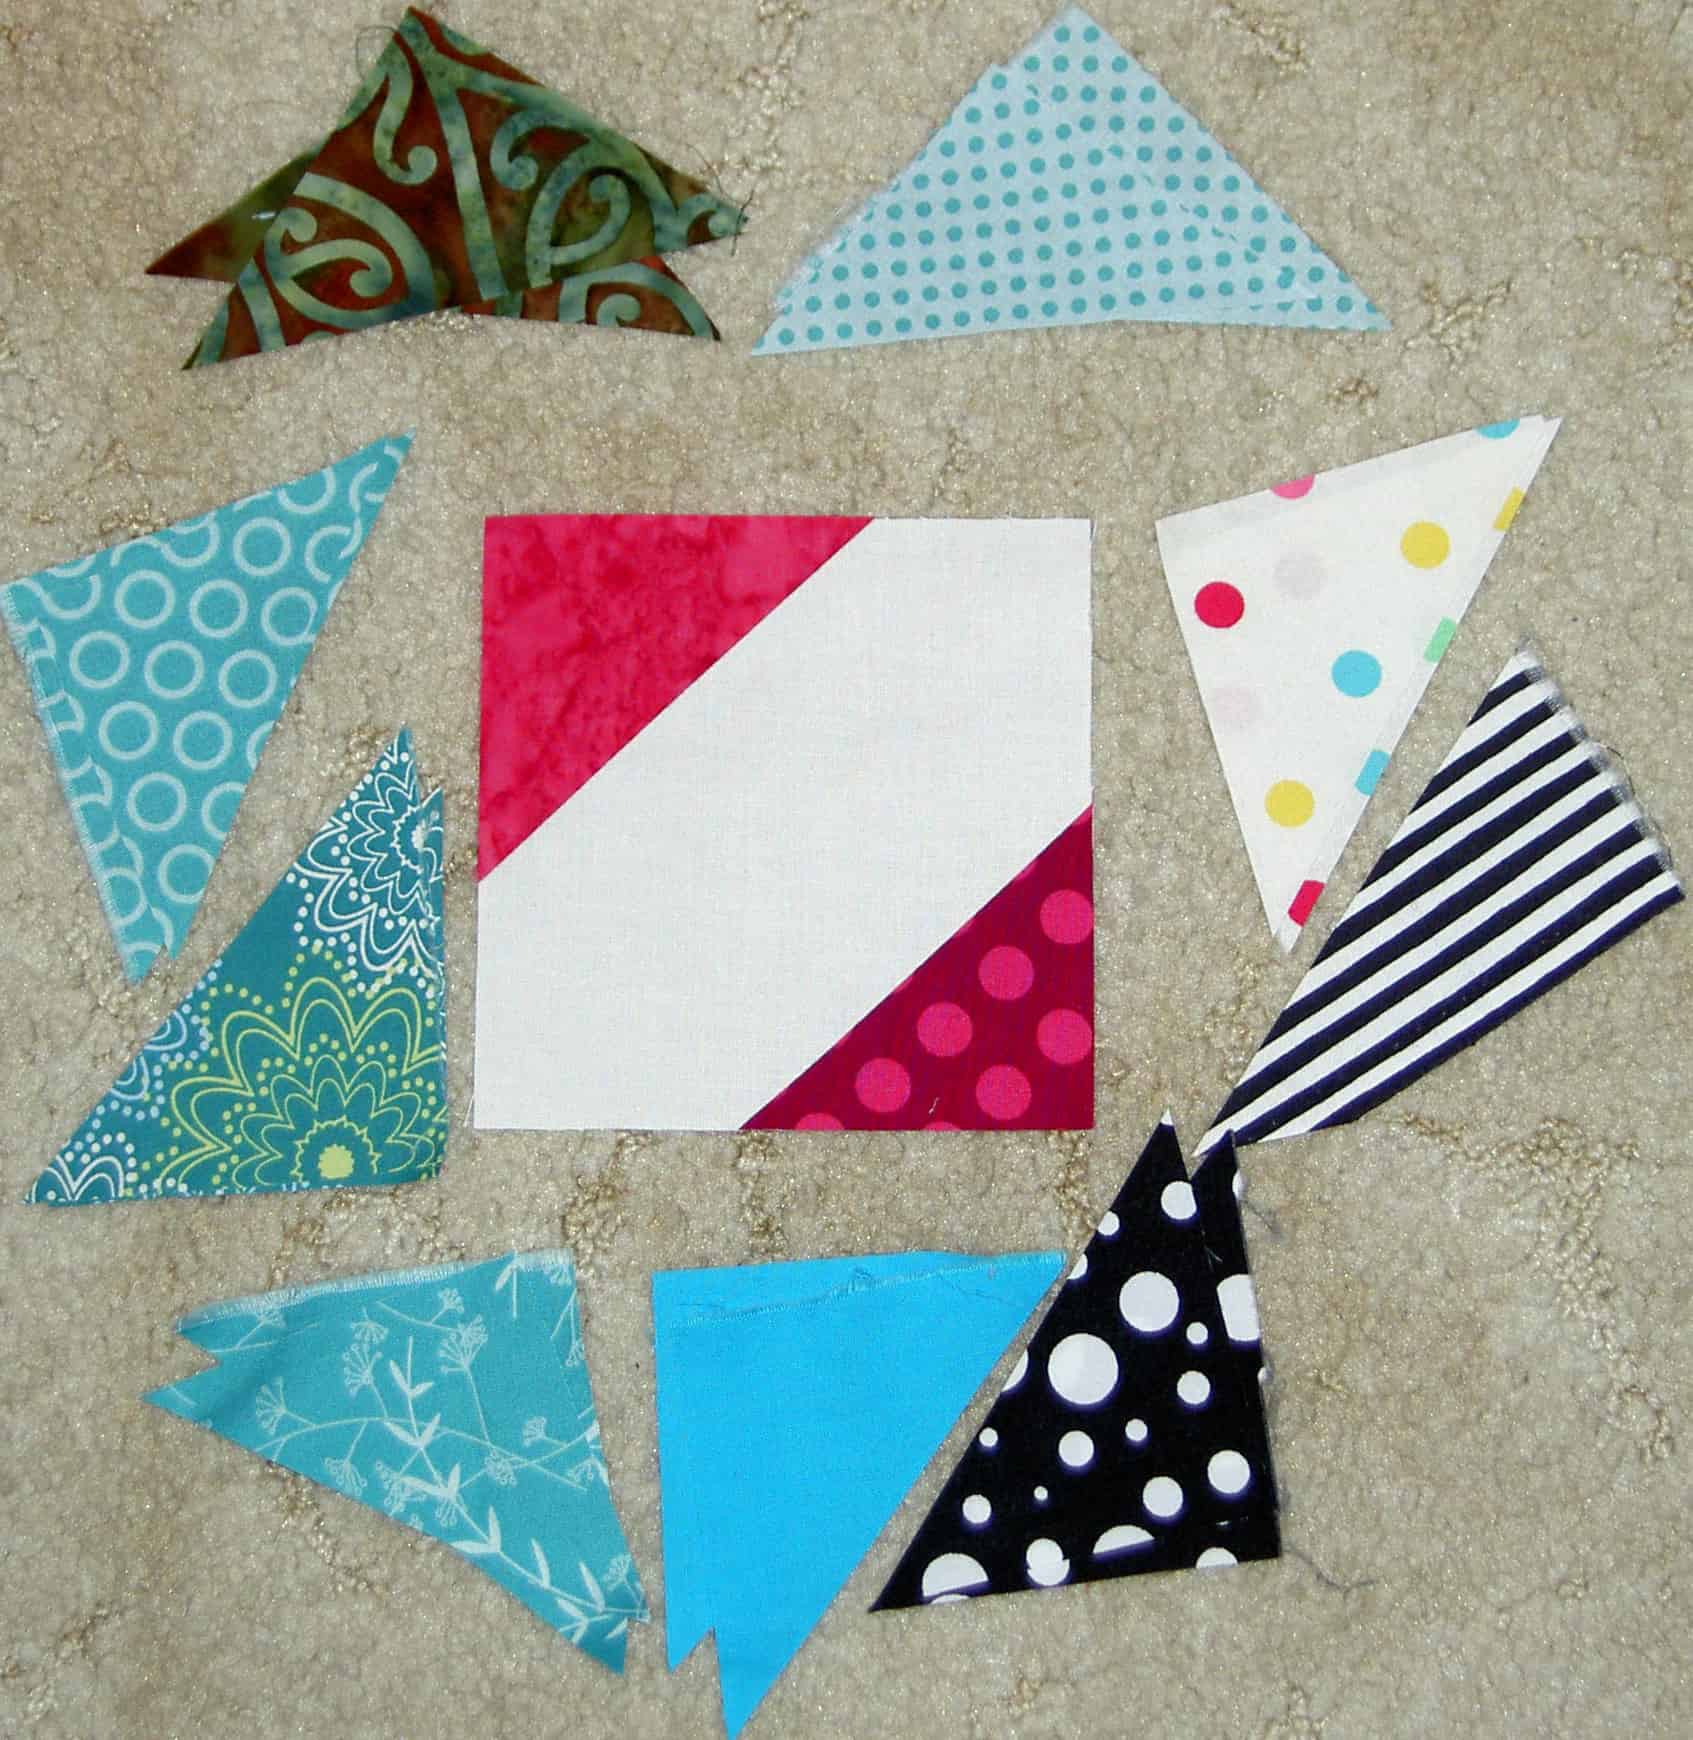
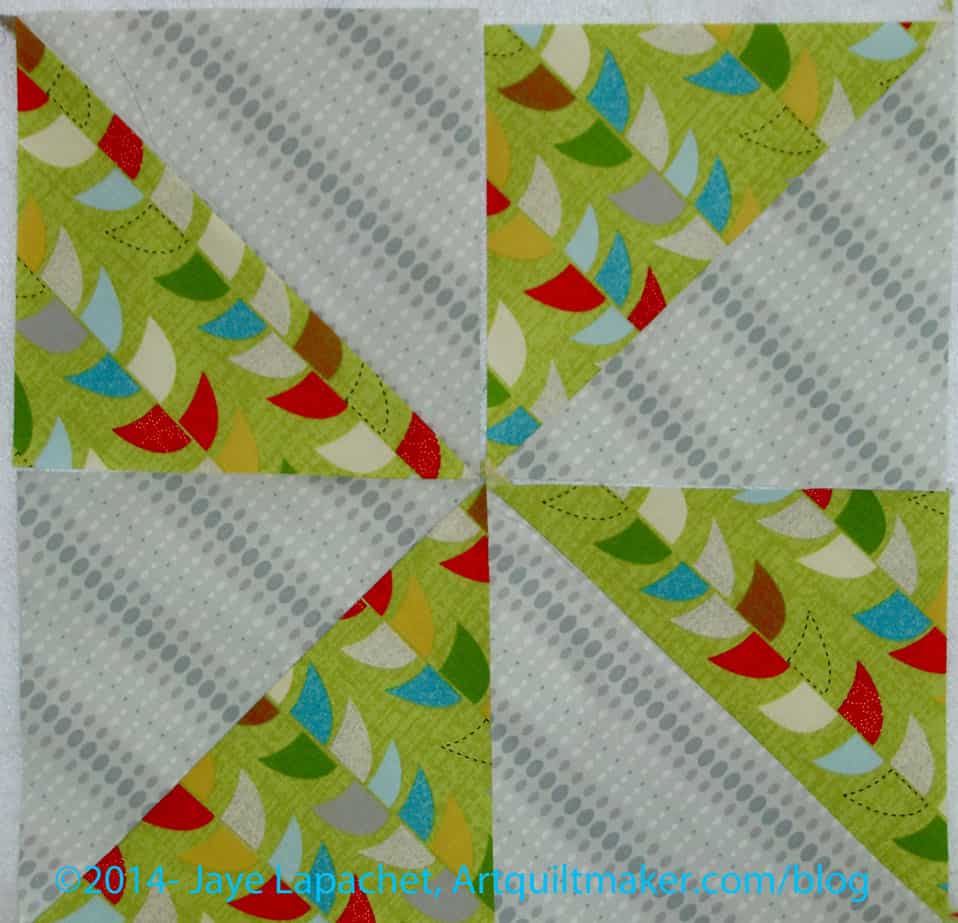
Corner Store block and patches
You will need to put two triangles on each square, so follow the directions above for the second triangle. Once both triangles are sewn to the foundation, use your square ruler.
After while, you will have a big stack of blocks. My quilt has 288 blocks. It is large enough to top a double bed, but my BIL uses it as a large nap quilt on the couch. You can make more or less blocks, depending on the size you want. (Nobody pays me to do this so you’ll have to lay out the blocks as you make them and figure out your perfect size on your own.)
Layout the blocks. Shuffle them around so different colors are touching each other and you have a pleasing layout. Using my tutorial on Chunking, sew your blocks together.
I wanted to give the quilt blocks some space, so I added an inner border that matched the background fabric and then added my outer border.
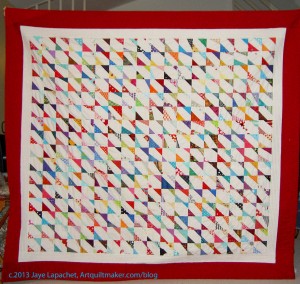
Corner Store Finished
And this is what you get if you make a whole lot of these blocks!
_______________________________________________________________________
I am linking up with Jenny over at Quiltin’ Jenny blog
This is more of a guide than a true tutorial. It is also as much for myself as it is for you.
Supplies
Fabric (3 different if you want trim, two different if you will not use trim)
Main body: 3/4-1 yard
Cuff: 1/3 yard
Trim (accent fabric): 1/8 yard (will be way too much, but you can find a strip wide enough in your fabric collection, if you don’t want to buy fabric for this part. This is optional. You can make fabulous pillowcases without trim.
Basic sewing kit
Rotary cutting kit
Pins or Wonderclips
Thread
Sewing machine
1/4″ foot
Ironing kit
Cut
Trim: 1.5″x width of fabric (WOF) strip
Cuff: 12″x WOF strip
Main body: 27″x WOF
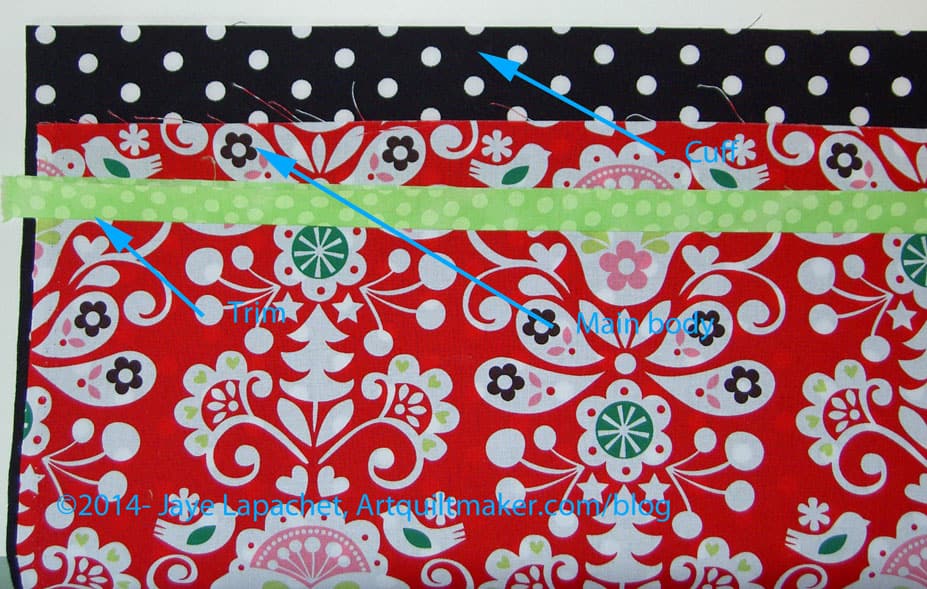
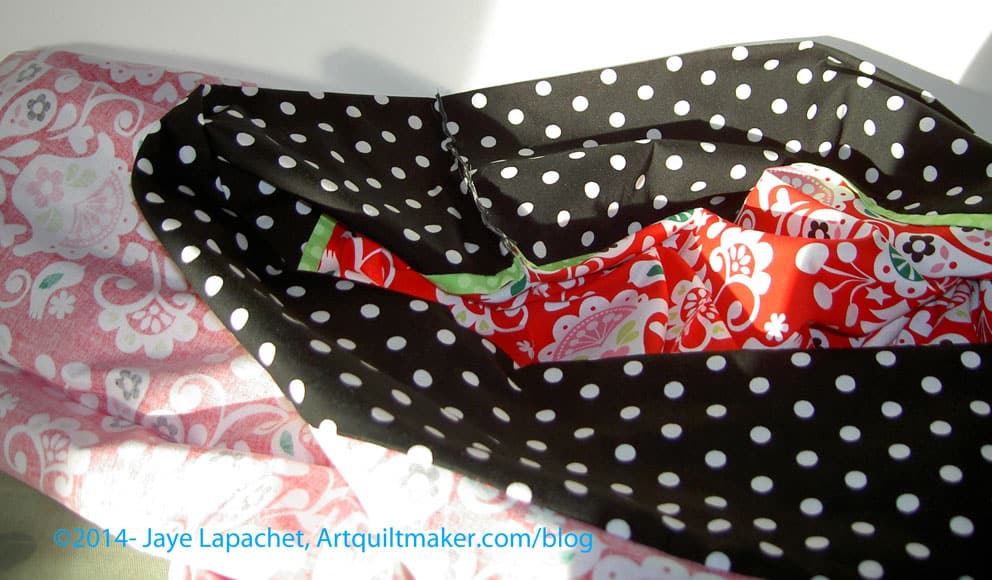
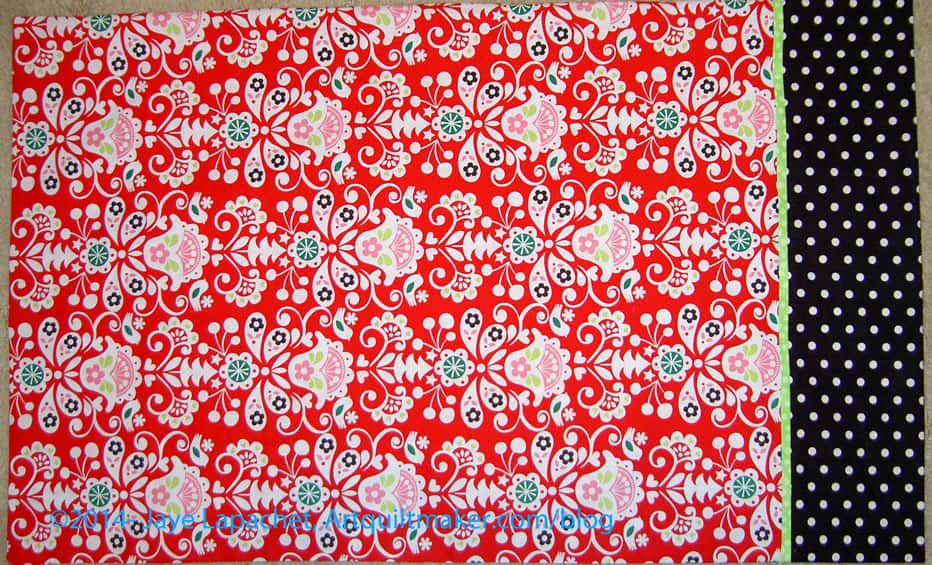
In the example below the following fabrics are used:
Trim: lime green
Cuff: black with white dots
Main body: red with white motifs
Prepare
Press your trim in half the long way, so you end up with a piece that is 3/4″ wide and WOF long.
Lay cuff fabric right side up on your worktable (or ironing board).
Lay your main body fabric right side up on top of the cuff fabric. Cut edge is up, selvedges are hanging down.
3 Layers Ready to Roll
Lay trim fabric on top.
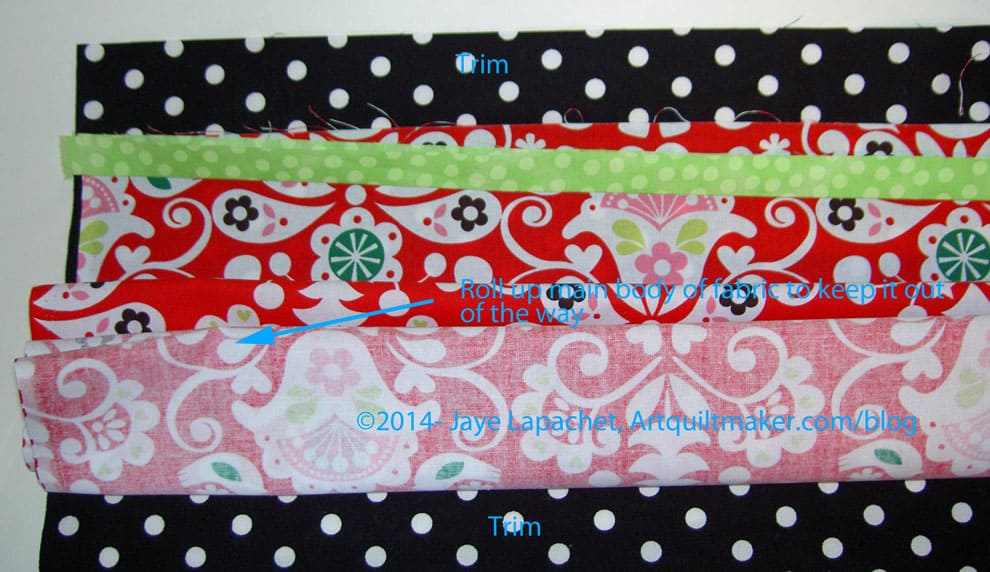
Roll up Main Body Fabric
Fold main body fabric up towards trim, keeping it well away from where you will be sewing.
Bring cuff fabric up and around main body fabric.
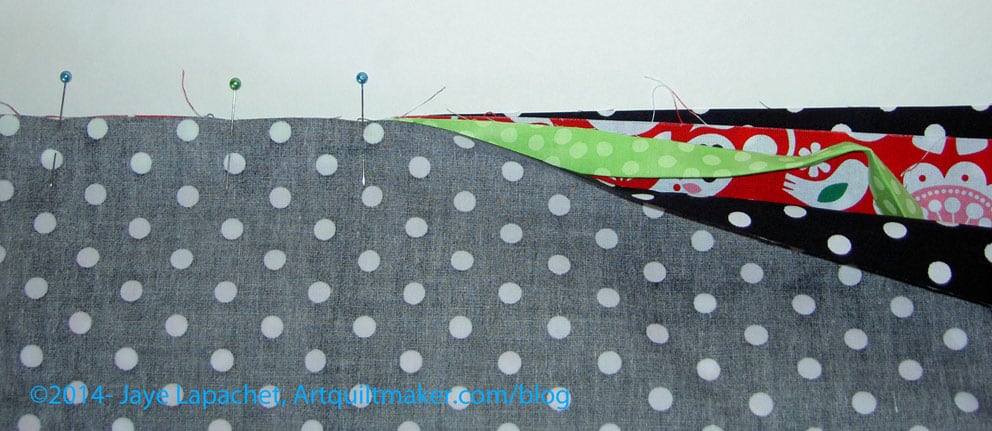
Line up all parts and pin
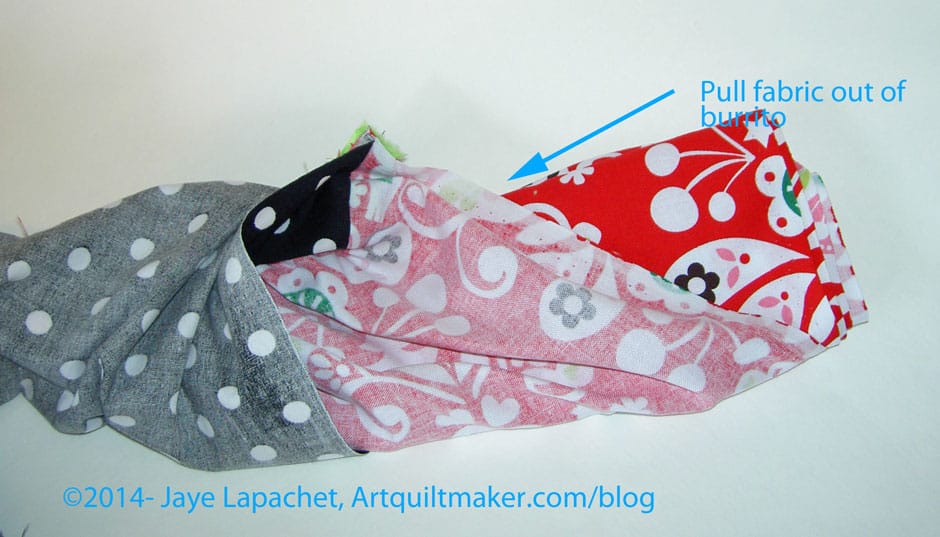
As you lay the cuff fabric on top of the trim, line up the edges of all the pieces you have layered and pin them all together. You will end up with a tube filled with fabric. The tube will look like a burrito with the cuff fabric forming the flour tortilla. All of the other fabric will be wrapped inside it.
Burrito completely pinned
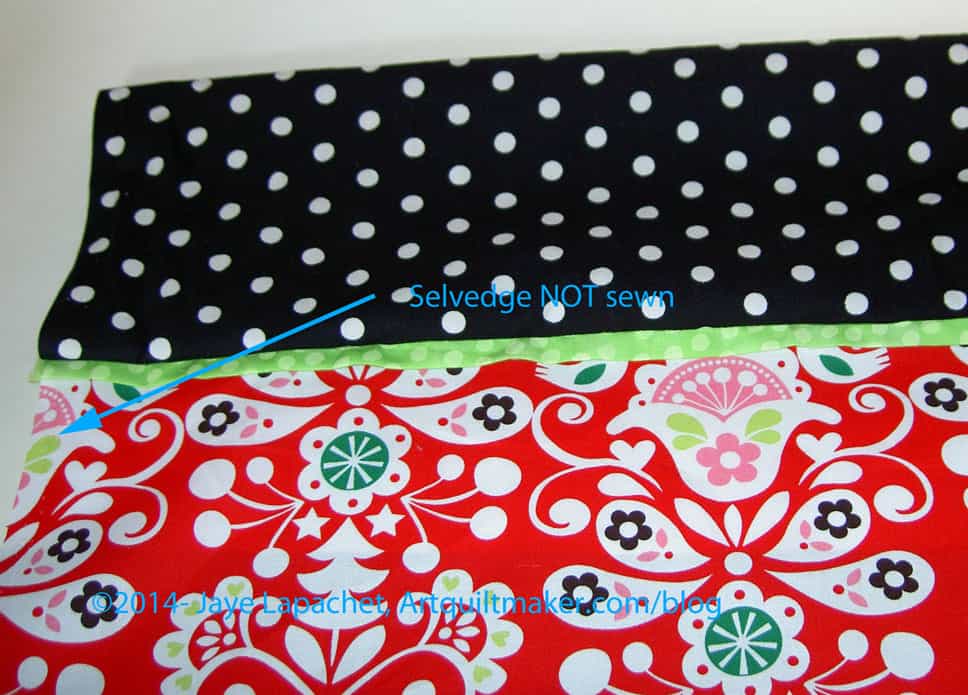
Nota Bene: the selvedges are NOT pinned
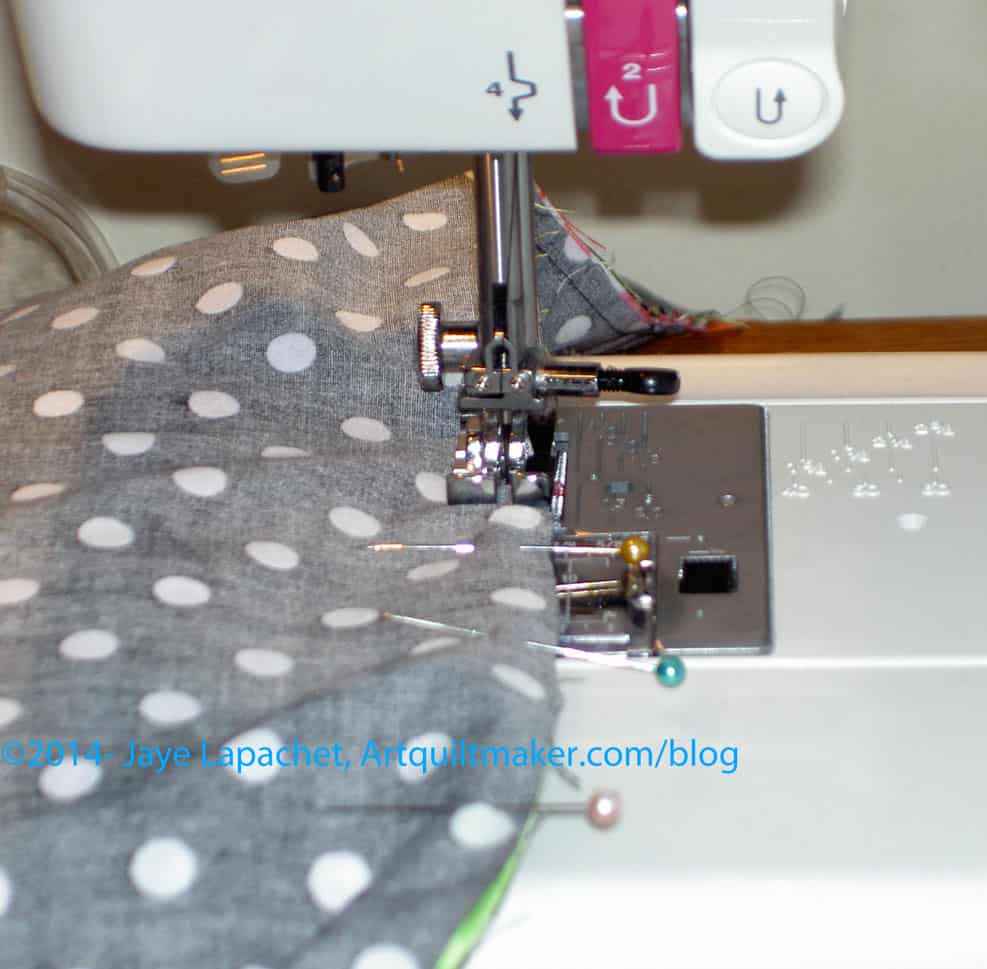
Sew
Sew ‘burrito’
Take your burrito to the sewing machine and position it so that the pinned edge is underneath the presser foot.
Starting sewing, stopping after a few stitches and backstitching, then continuing on until the entire seam is complete.
Pull out pins as you sew
Backstitch at the end to secure the seam.
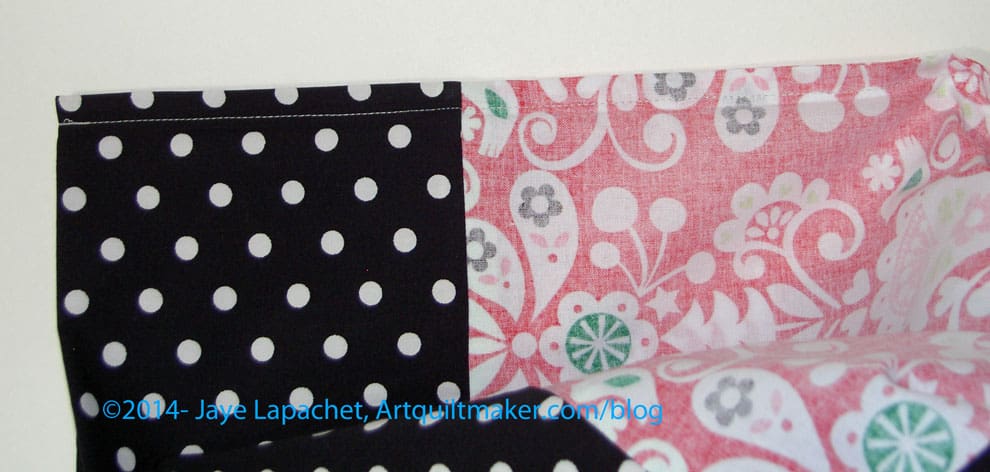
Burrito Sewn
Prepare #2
Pull Filling Out of Burrito
Carefully pull all the ‘filling’ out of the burrito so that you have a piece where the cuff, trim and main body are all sewed together.
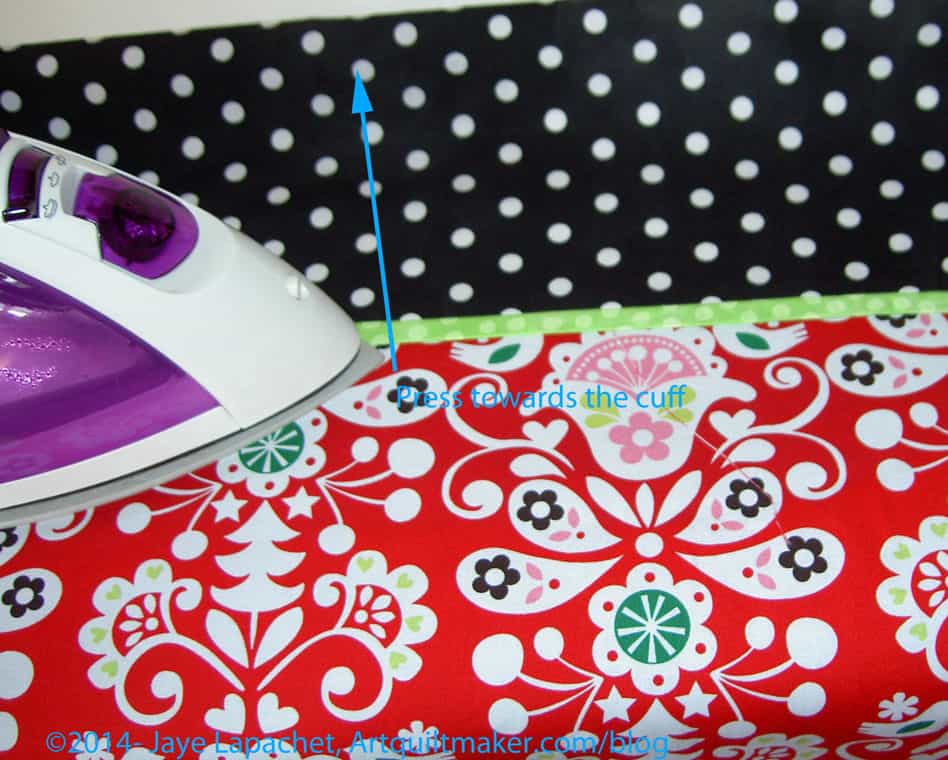
First seam sewn; case on ironing board
Lay the piece flat on the ironing board with the cuff fully on the ironing board and the main body hanging down the front.
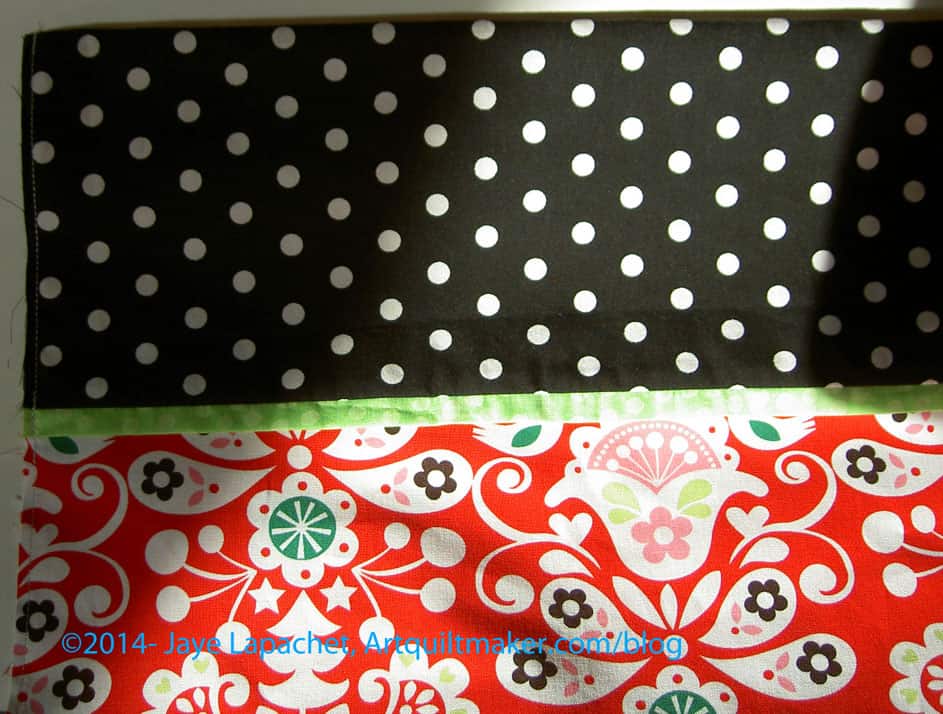
Press Towards the Cuff
Press, carefully smoothing the fold of the cuff away from the trim and the main body, so it is neat and tidy.
Fold the piece in half with WRONG sides together. The RIGHT side will be facing towards you (you will be able to see the right side)
The selvedges will now be touching each other.
Trim the main body after measuring 28″. That is the measurement of the main body fabric and does not include the cuff or trim. If you were to open the piece, your main body would be WOF x 28″. You can adjust the 28″ to fit the size of your pillows.
Pin at strategic points
Sew #2
This step will start the process of making a French seam (completely encloses the seam with no raw edges).
Using a 1/8″ seam allowance (or smaller), start sewing at the top of the cuff, down the side. I sew it this way to have the best chance at matching up the trim.
After a few stitches, stop and backstitch the top. This is important because the top seam will get a lot of wear from stuffing the pillow in and out.
Remove pins as you get close to them.
Stop at the corner and backstitch, then turn and sew the bottom of the pillowcase closed.
First Step French Seam
Prepare #3
Press the seam from the right side.
Sew from wrong side
Turn the pillowcase inside out so the wrong side of the fabric is showing.
Place the full bottom of the pillowcase on the ironing board
Smooth the fullness of the pillowcase towards the seam.
Press the seam so it is neat and tidy.
Repeat with the side.
Sew #3
This is the section where you create a French Seam, which means that you will encase the raw edge of the previous seam.
Starting at the cuff again, sew with a 1/4″ or larger seam along the side. You want to use a seam allowance large enough so that the entire raw edge that you sewed int he previous step is encased.
After a few stitches, stop and backstitch the top. This will further reinforce the top seam, so it can withstand the wear and tear from stuffing the pillow in and pulling it out.
Sew down the side neatly as this seam will be seen
Remove pins as you get close to them.
Stop at the corner and turn and sew the bottom of the pillowcase closed.
Backstitch neatly at the edge of the bottom.
Sewn French Seam
Finish
Press the seam from the wrong side.
Turn the pillowcase right side out.
Place the bottom of the pillowcase on the ironing board with the seam away from you
Smooth the fullness of the pillowcase towards the bottom seam.
Press the seam so it is neat and tidy. I often press starting on the main body of the pillowcase and moving the iron towards the seam.
Repeat with the side.
Shake out your pillowcase and show it off!
Finished Pillowcase
Good job!
Notes
Width of fabric means from selvedge to selvedge. Example: If you cut a strip 1.5″ wide for the trim, there will be a piece of the selvedge on each end of the strip.
Main body: I straighten a 1 yard piece of fabric and cut it to size AFTER I sew on the trim and the cuff. This leaves me with a strip about 6″ wide, but it keeps me from getting confused about which side is up.
Main body: the selvedges will be on the sides. Do not sew the trim and cuff to the selvedge.
Main body: I trim the selvedges from the sides after I sew the cuff and trim on.
I have used trim sizes from piping to 1″ cut. You can make the trim whatever size gets you the look you want.
Resources
Twiddletails tutorial – I like the burrito method. Print out these directions and use them as a guide. Most of the way I make my pillowcases are from this tutorial
Fabric scissors (see note on using a rotary cutter**)
thread
pins
Design wall or sandpaper board
Wooden kebab stick or similar item you can use with your iron
sewing machine
Optional
Mary Ellen’s Best Press
hand sewing needle
hand sewing thread
Important information:
Block is 12.5? unfinished, 12? finished
These directions use a quarter inch seam allowance.
You will be creating Y seams.
Chain piecing is not part of this tutorial.
Respect the bias.
Do not sew into the seam allowance.
Templates
1. Prepare pattern for your hexagon template by printing two copies of pattern.
Place one copy of the pattern in your binder, but you can use it as reference first. Rough cut the hexagon pattern out of the other pattern.
Add Seam Allowance if it doesn’t Print
Nota bene: Sometimes the seam allowance don’t print out, so you may need to add 1/4″ seam allowance to the pattern before rough cutting.
Glue the paper pattern (with seam allowances) using the glue stick (or other suitable adhesive) to the template plastic.
Fine cut the paper pattern you have adhered to the template plastic so you have an accurate template.
Gather your fabric and press it all. You can rough cut some pieces and press it with Mary Ellen’s Best Press to help deal with the bias.
Cutting
Place Templates Face Down
Place your template face down on the wrong side of the fabric and trace carefully around your template directly on to the fabric.
Cut using scissors.**
**Do not cut around your template plastic template with a rotary cutter. There is not enough protection for your fingers. I want you to be able to finish the block with no blood. A rotary ruler gives your finger some protection from the blade of your cutter cutter. If you use a rotary cutter, you may want to use a hexagon ruler, such as the Fons & Porter Hexagon ruler. The smallest hexagon on that ruler is larger than my template, but 19 of those will still fit in the 12.5″ block. You can also cut using a rotary ruler and rotary cutter by lining up the ruler on the line you drew around your template.
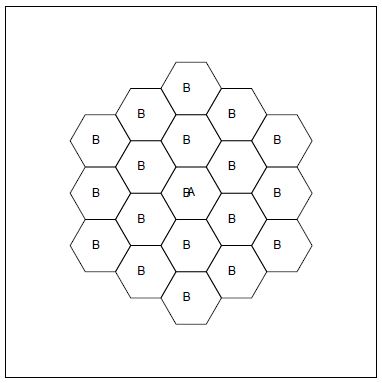
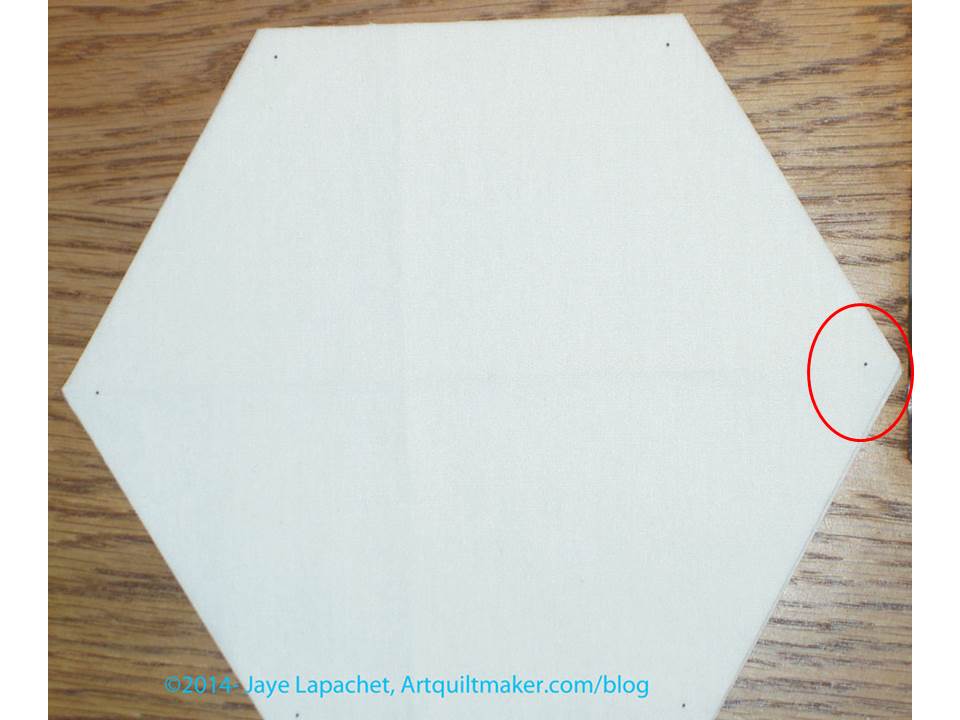
Cut 19 Hexagons
Cut 19 hexagons from your fabric.
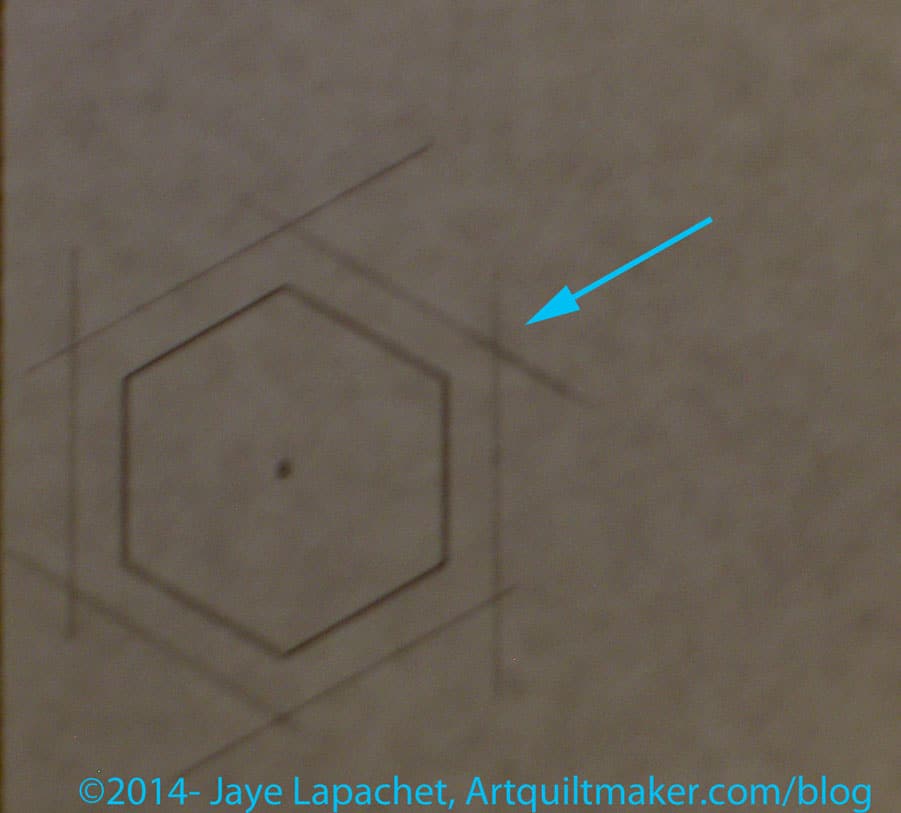
Mark your hexagons
Marking
Now, mark your hexagons so that the Y seams will be easy to sew. As mentioned in the supply list, I use the Jinny Beyer Perfect Piecer.
Hexagon Markings
Line up your ruler in every angle and in every hexagon and make a dot.
You can also make a cross at the seam allowance by lining up a regular ruler along your cut edge and drawing a line near the angle. See the tutorial called Hexagons -Preparing to Sew, which gives more information.
Sewing
Remember: you will sew between the dots only NOT into the seam allowance. This is how you sew Y seams and we have done that in other tutorials.
Arrange Hexagons
Arrange your hexagons in a pleasing manner on your design wall or on a sandpaper board.
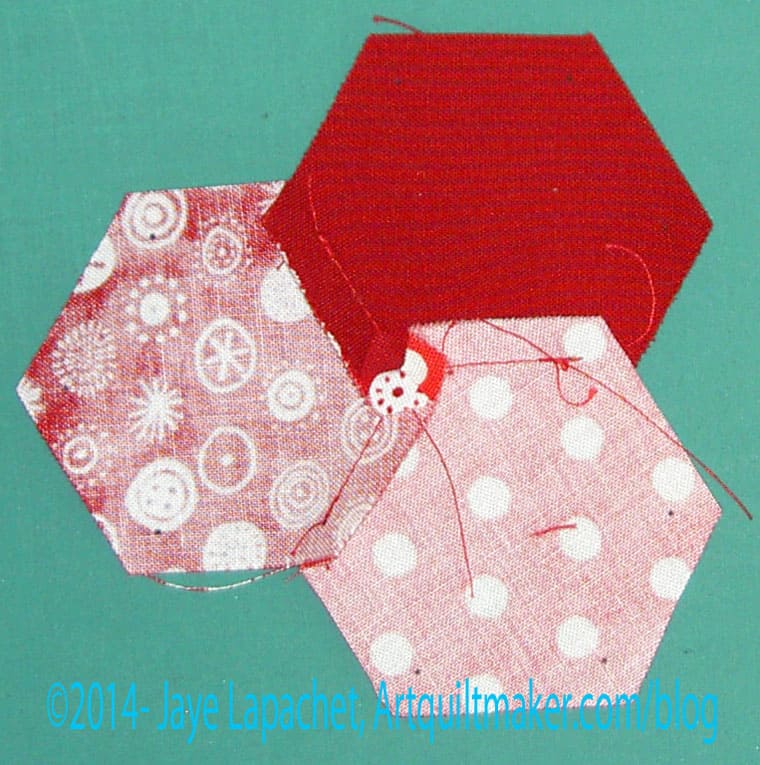
Hexagons right sides together
Take two hexagons, that will be next to each other in the final block, place them right sides together.
Put them under the presser foot, lining up your Perfect Piecer mark under the needle
Sew a few stitches, then backstitch.
Sew the entire seam to the second Perfect Piecer mark. Backstitch to secure.
Nota bene: You want to backstitch even though it is a bit tedious, because no other seams will cross the seams stitching the hexagons together. If you do not backstitch, there is a chance your stitches will come out before you get to the quilting part. You can also leave long tails and make a knot at every intersection.
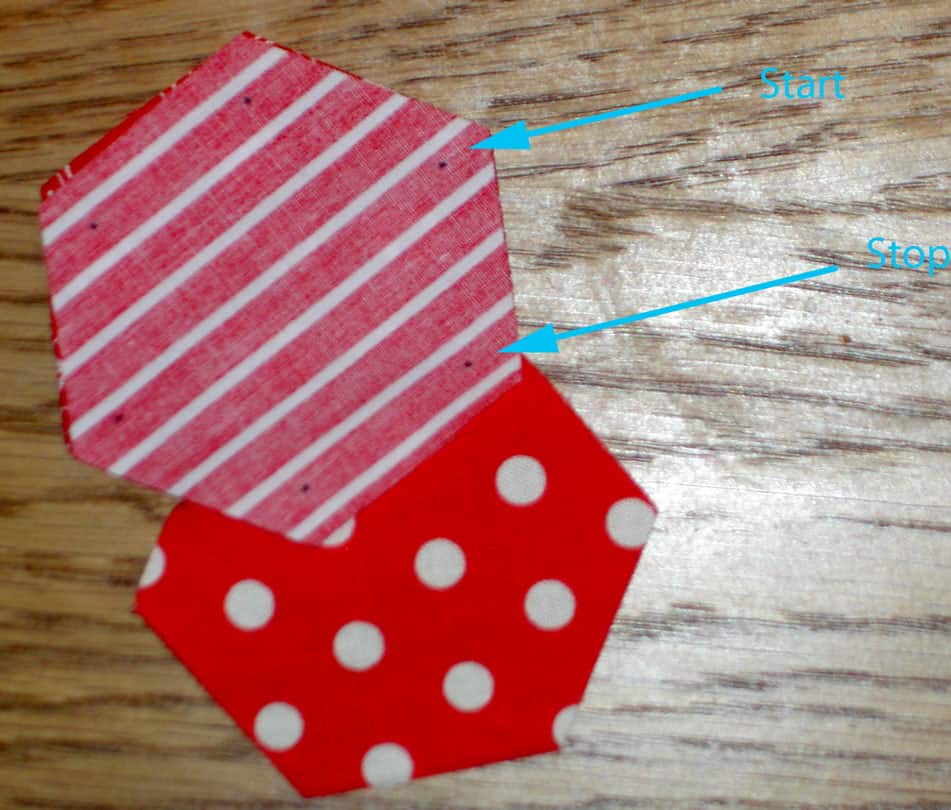
I like to to sew my hexagon patches together in groups of three, thus we will need to add the third hexagon to the two you just sewed together.
Add 3d Hexagon -seam 1
Lay the piece of two hexagons you just sewed on the table and place the third hexagon patch on top of top one, right sides together. Sew the third hexagon to the piece of two hexagons starting at the dot marked Start and stopping at the Perfect Piecer mark indicated as Stop. Backstitch as described above.
Remove from the machine and clip your threads.
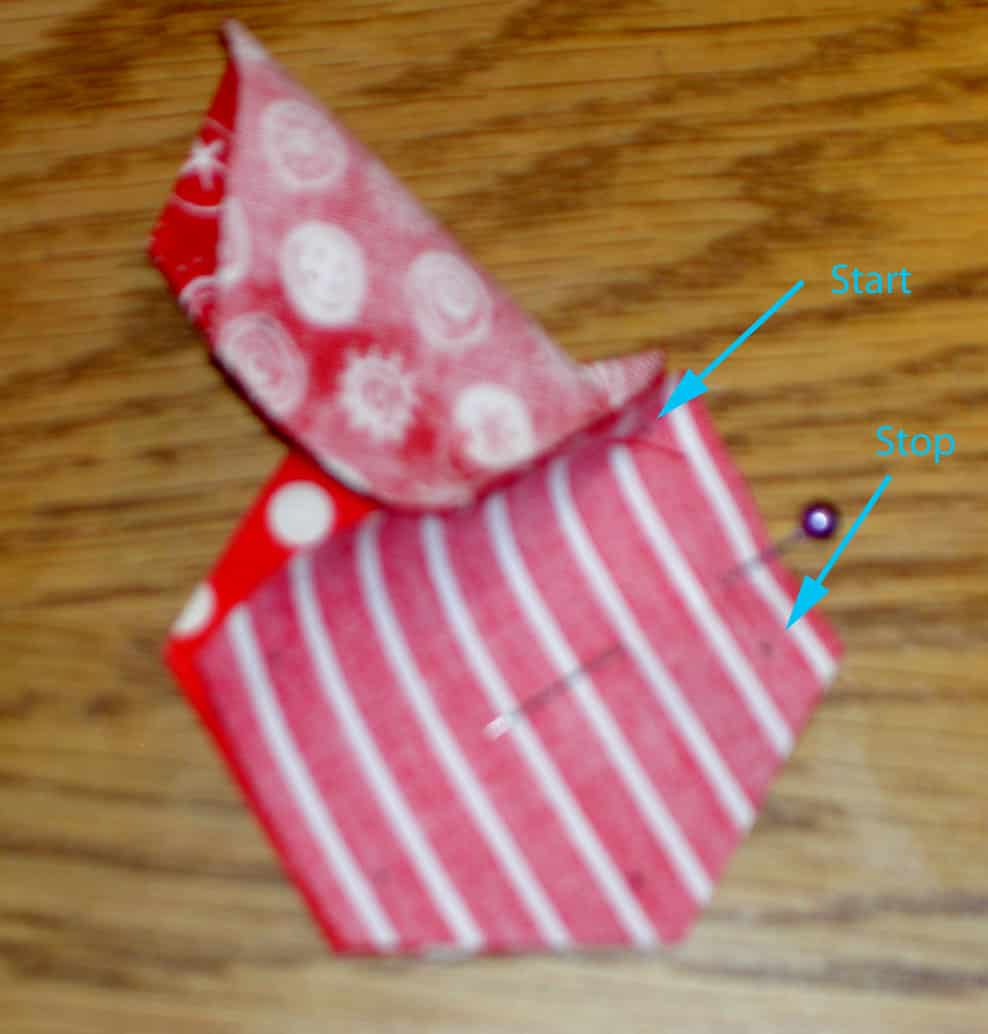
Add 3d Hexagon -seam 2
Now you are ready to sew the last seam to make a piece of three hexagons. Line up your third hexagon with the hexagon you didn’t sew a minute ago.
Pin. I put the pin in a place closer to the stop mark, so I can fit the sewing machine foot on the Perfect Piecer Start mark.
Nota bene: I don’t normally pin small hexagons, but when I am sewing the last seam it is useful.
The second hexagon will be kind of rolled up. Just keep it out of the way of the needle. You don’t want to sew it to the underside of the other hexagons.
Sewn hexagons on the design wall
I keep my pieces on the design wall (you can also use a sandpaper board) as I sew them in order to keep them in order.
Sewing patches together
Keep sewing your patches together in chunks, then into larger chunks until you get all of them sewn together. Sewing groups of hexagons together is like sewing 2 or three together. Sew between Perfect Piecer dots. You just have to be carefully to keep the other, already sewn, hexagons out of the way.
Nota bene: It is useful to have a digital camera handy and take a photo of your layout in case of confusion while sewing. You can also number your patches.
More on sewing hexagons can be found in a previous post.
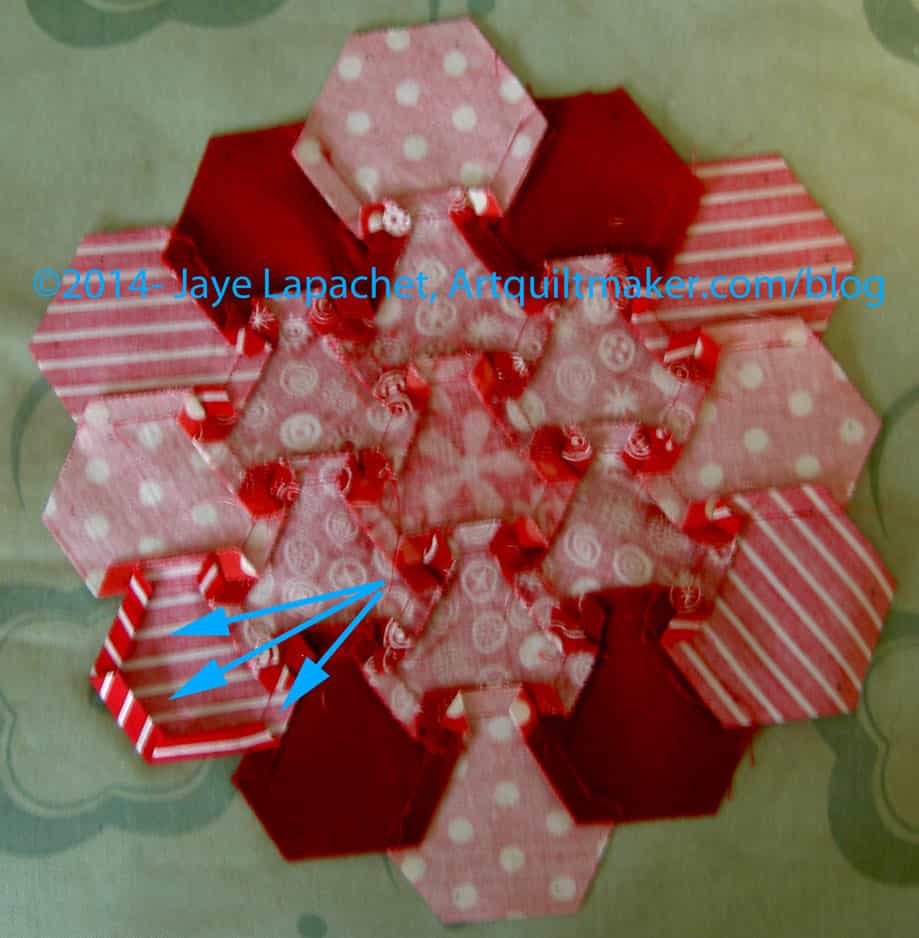
Press
For small hexagon blocks, I usually don’t press until I am done sewing all of them, because I want all the swirls to be orderly.
Press in a circular motionPress in a swirl to create mini hexagons
Press from the back, one seam at a time so all of the seams look like they are pressed in a circular motion. The center where the patches meet will look like a mini hexagon.
Pressed back of hexagon piece
When finished the block will have a lot of mini hexagons on the back.
Applique’
In order to prepare for applique’, you have to do something with the edges. If you want to do raw edge applique, you will need to trim the seam allowance off the outer edges, using the Perfect Piecer marks as a guide.
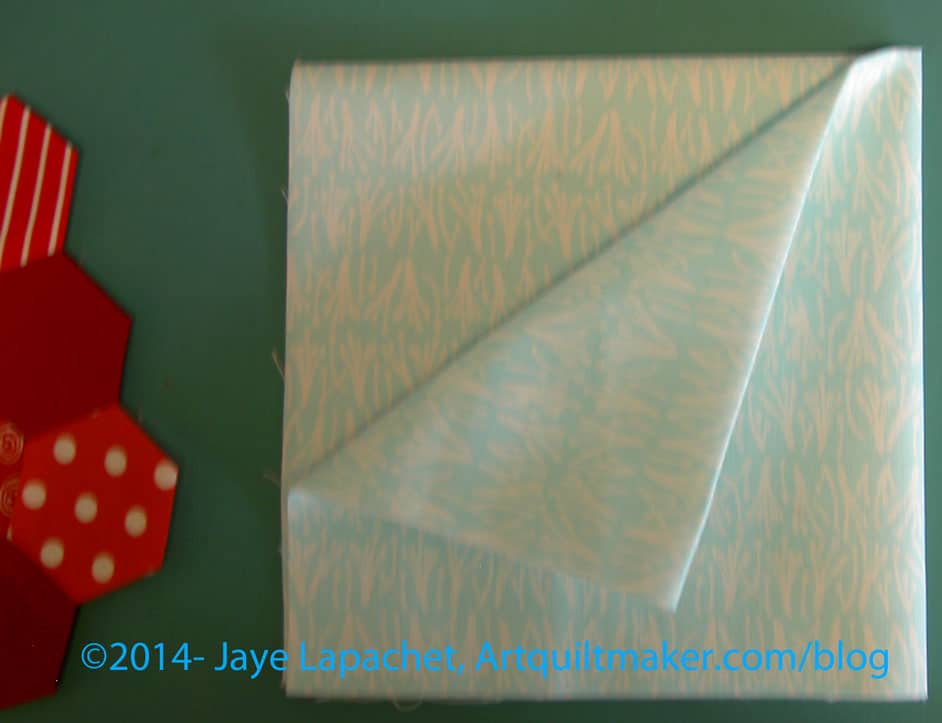
I suggest pressing the seam allowance on the outer edges in to make a clean edge.
Lay your hexagon piece right sides down on ironing surface
Lay your hexagon piece right sides down on your ironing board.
Use the Perfect Piecer marks as a guide. Fold and finger press the outer edges in.
Press edges in
Get your fingers out of the way and press using a hot iron so the edges is pressed permanently in. You a chop stick or kebab stick to hold the edge under the iron.
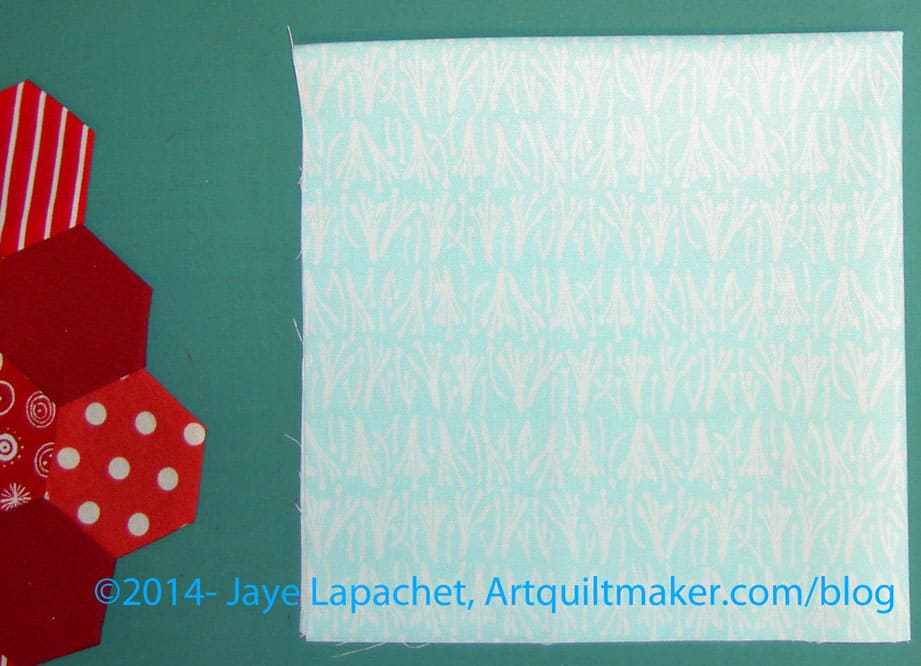
Once all of the edges are pressed under you are ready to place your piece on the background.
If you have not already done so, cut a background piece 12.5″ x 12.5″.
Fold background into quartersFold background into quartersFold background into quarters
Fold in quarters and finger press just so you can see the lines. DO NOT press with an iron.
Using your finger pressed lines, center the hexagon piece, right side up, on the background.
Tomorrow I will talk about how to make a hexagon block. I realized that I haven’t been talking about the actual blocks that *I* make for the sampler more than what is in the tutorial. I decided I wanted to talk about it a little bit.
As with the other blocks, the reasons I have my students make this block are:
More practice on Y seams
Hexagon quilts are popular and my students may want to make one one day
More practice with color is always good
More practice with pattern is always good.
You may think that Y seams are tedious PITA that aren’t worth it, but becoming comfortable with Y seams has truly expanded my repertoire of techniques. I can make so many more blocks knowing how to complete Y seams.
I never thought I would make a whole hexagon quilt, but I did. I was even shocked. I don’t think I will make another, but you never know. I also watch TFQ make one with a similar sized hexagons to the hexagons in the block above.
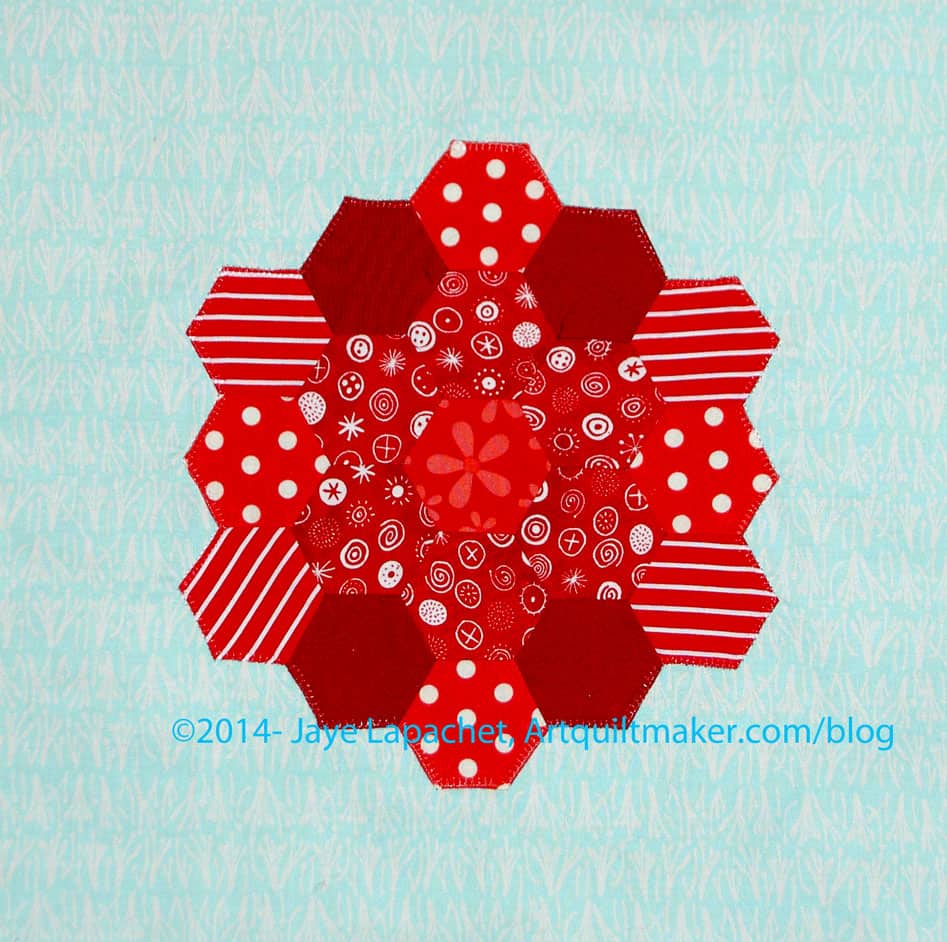
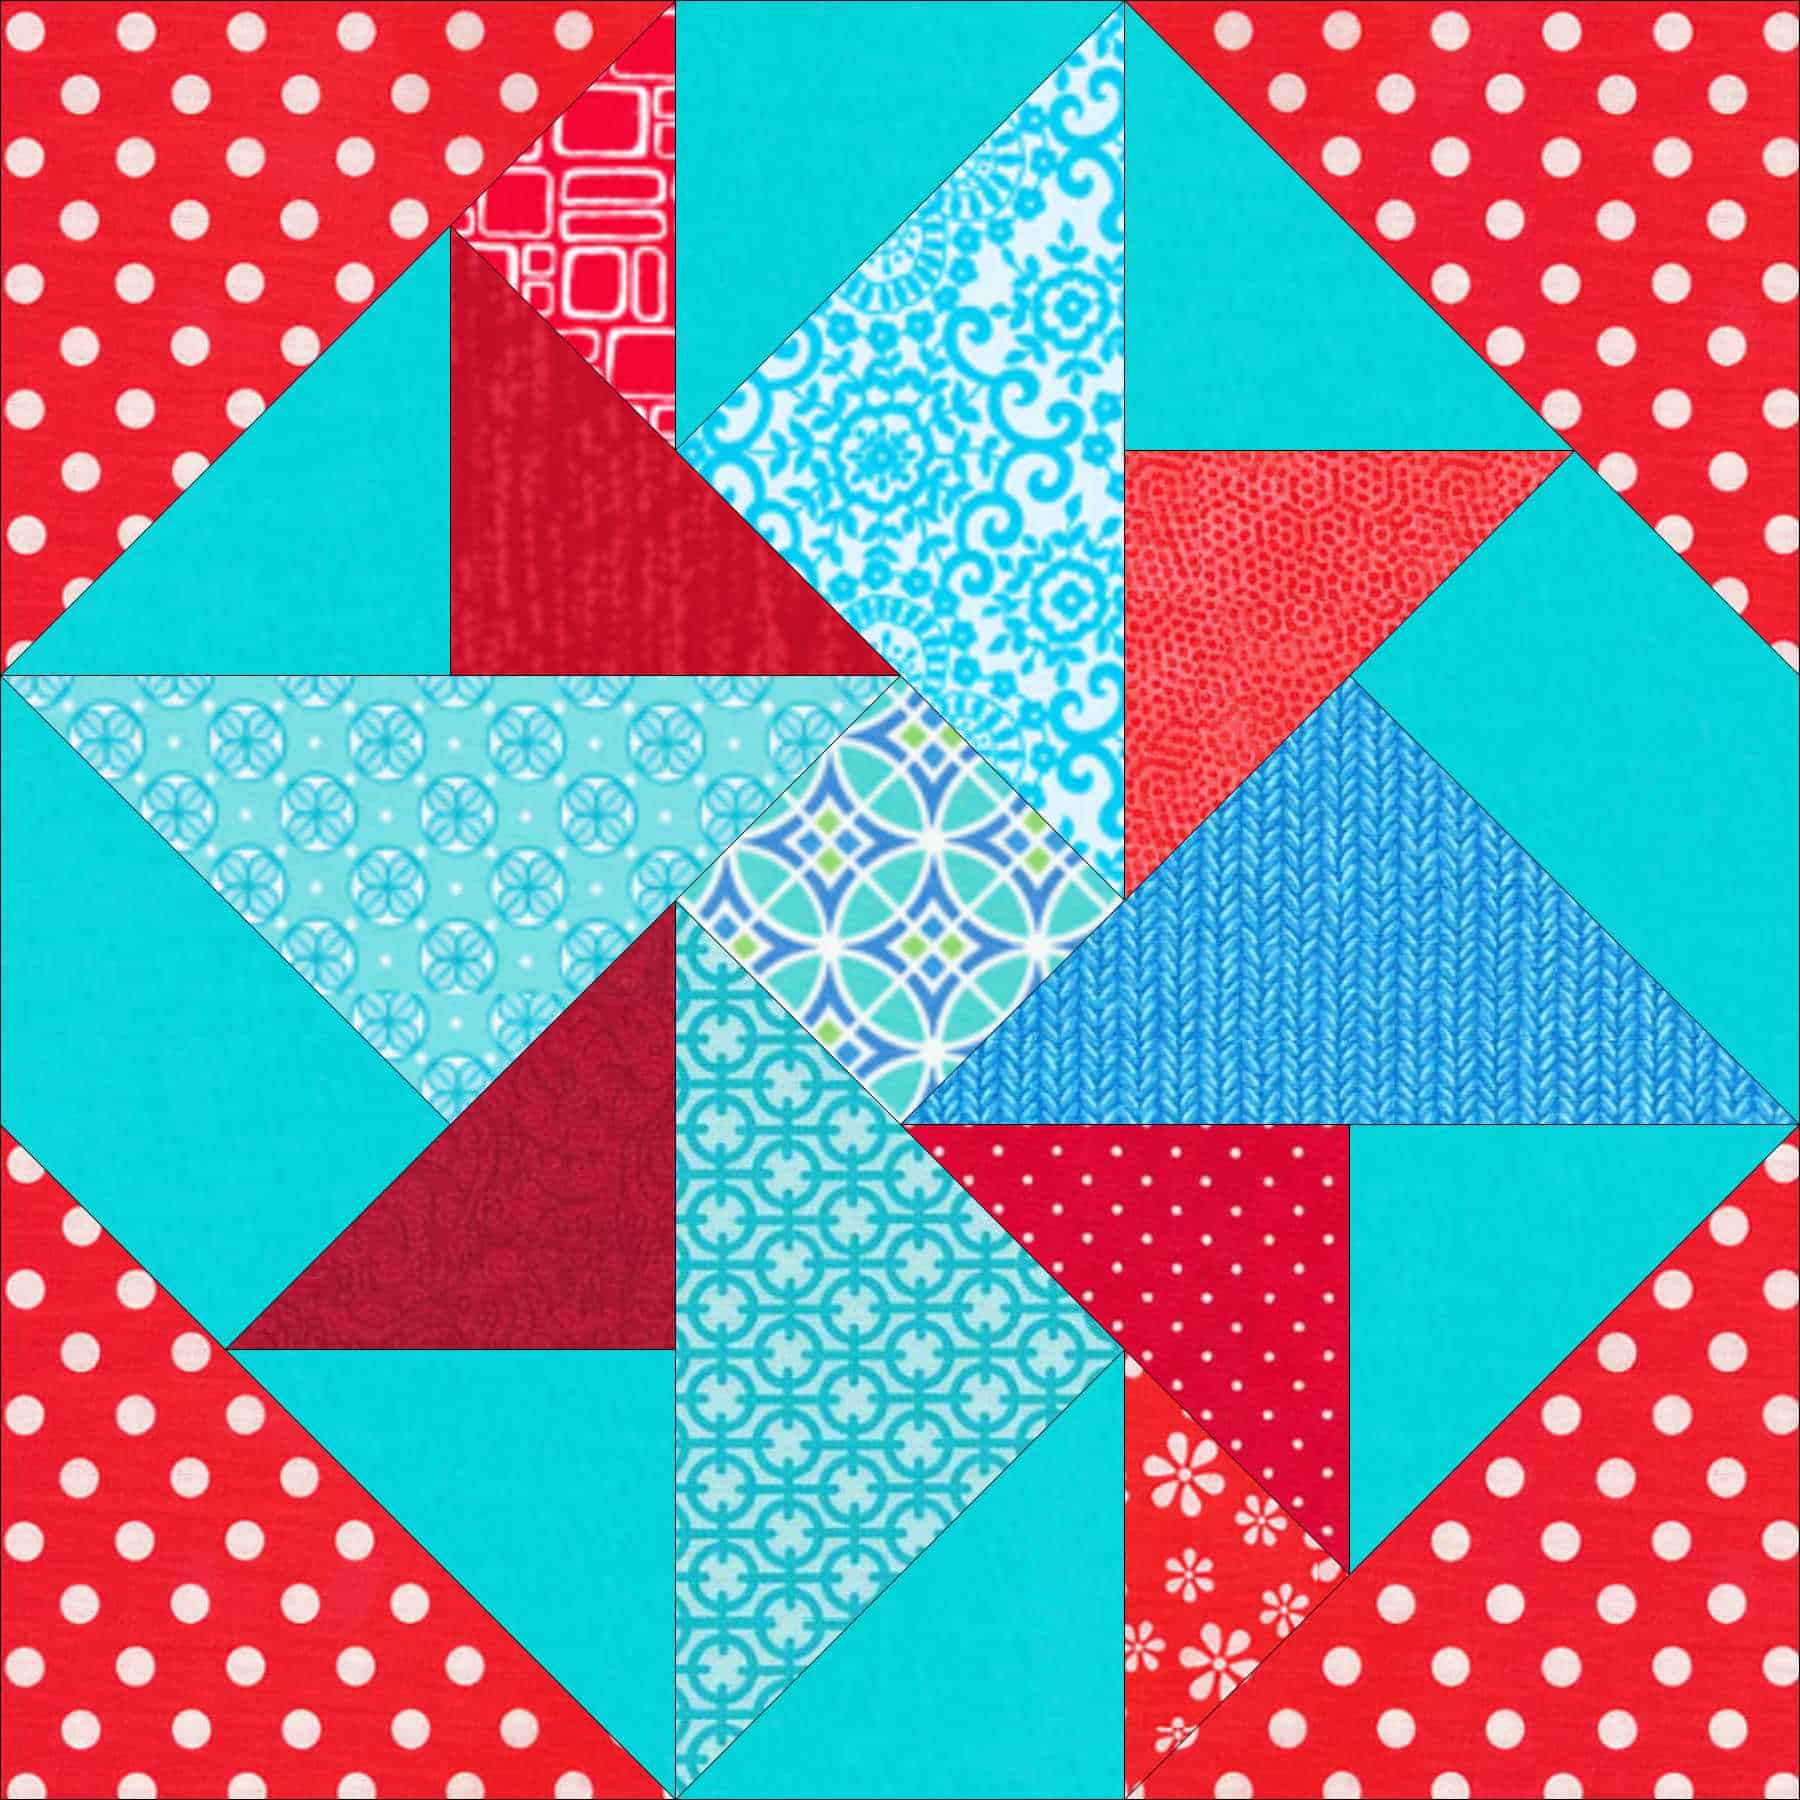
Since my sampler quilt is basically a two color quilt, I need to create contrast within that palette for each block. With all of those Y seams, you can bet that I do NOT want you, as the viewer, to see a big blob. I want you to see every single Y seam. 😉 While I am comfortable with Y seams, they are still a technique worthy of celebration and the choices of fabric that I made reflect that.
The result of using only two colors is that my color choices have already been selected. For the foreground, I am working hard to stay in the bright red arena – like scarlet. No blood red or rust red. As a result, I had mostly pattern with which to work . Using the different patterns of the fabric draws the viewer’s attention around the block.
For the background, I am trying to stay in the aqua arena. Some of my blocks have red in the background, but for continuity’s sake, none of the blocks have a completely red background and most have more aqua than red.
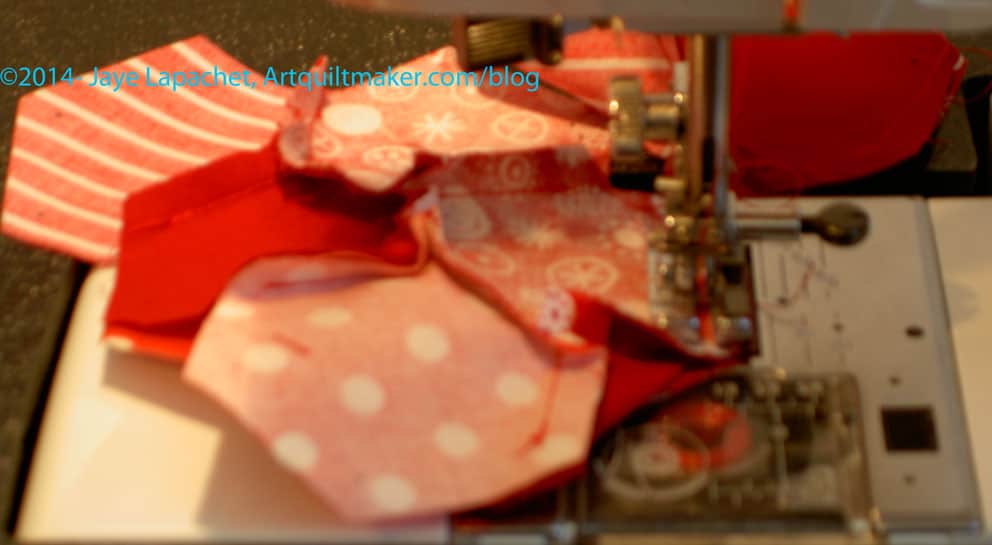
In the past I have hand appliqued the piece of hexagons to the background, but I was impatient this time. I machine appliqued it using Aurifil invisible thread. I didn’t scream through it, I sewed slowly and the blocks is pretty flat. I am pleased.
1. Select a layer cake or cut 10″ squares of foreground fabric.
2. Cut 10″ squares of background fabric. Make sure it is a good contrast to your foreground fabric, unless you want a blendy-low volume look.
Pin foreground & background squares together
3. Place 1 foreground square and one background square right sides together.
4. Sew around the outside 1/4″ from the edge. No openings are needed.
5. Starch two squares heavily. I use Mary Ellen’s Best Press. Once I have sprayed the starch, I change the setting on my iron to dry.
Nota bene: the project takes a lot of MEBP to keep the bias edges under control, so have some refills on hand.
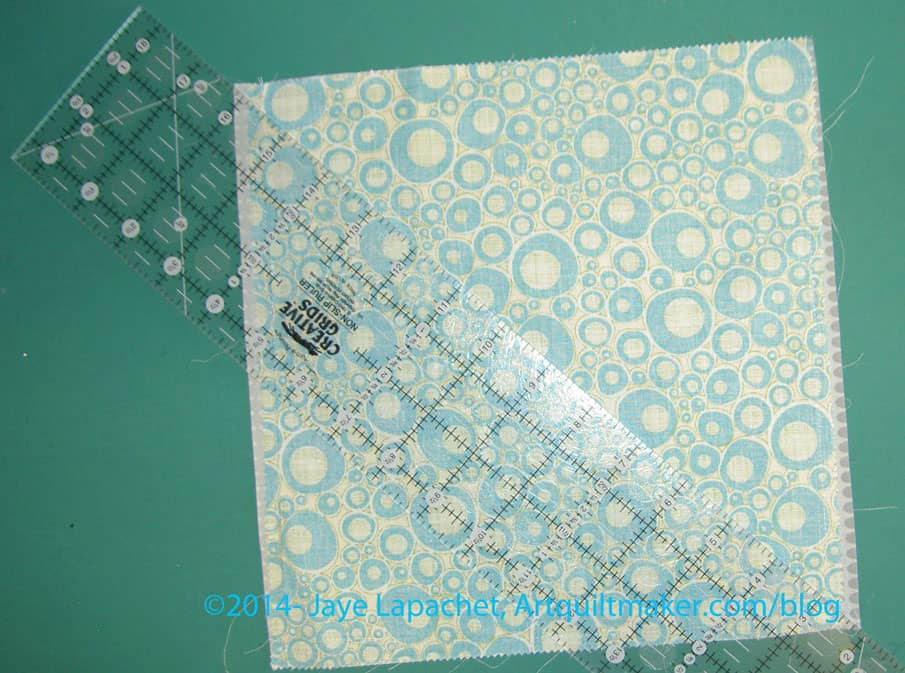
Cut sewn foreground & background on the diagonal
You will not always be able to cut exactly corner to corner. I found that when I starched, the layer cake fabric shrank. Trimming later helps square things up, so just cut to the corners of the background if you can, or line the ruler up with the sewn corners.
Cut on the diagonal
6. Cut sewn 10″ squares on the diagonal.
Nota bene: pay no attention to the different fabric in the photo above. The steps are the same.
HSTs
You will end up with some Half Square Triangles (Triangle Squares)
Layout HSTs to form a pinwheel
7. Lay the HSTs out so they form a pinwheel.
Pin HSTs to create Pinwheels
8. Put half square triangles together to make the top and bottom half of a pinwheel block. Pin the side you will sew as a reminder.
You can see from the photo above that my HSTs were not lining up with each other. I did worry about that, but finally decided that trimming later would solve a lot of sins. I nested the middle seams together to help make the point in the center of the final pinwheel.
9. Sew the HSTs together to make two halves of the pinwheel block.
10. Lay the piece down so the foreground fabric is on top.
10a. Press. I press from the front towards the foreground fabric. It doesn’t matter as long as you are consistent.
Prepare Pinwheel
11. Put squares together, once again, in a pinwheel configuration. Pay special attention to getting the center to line up.
Pin 2 halves together
12. Pin so that center nests together nicely.
13. Sew all the pieces together so you end up with a block in the Pinwheel configuration.
Press
14. Press.
14A. (Optional) Add more starch (I use Mary Ellen’s Best Press), if desired. I like my pieces and parts to feel a bit like cardstock. I get assurance from that feeling that the bias edges will be under control.
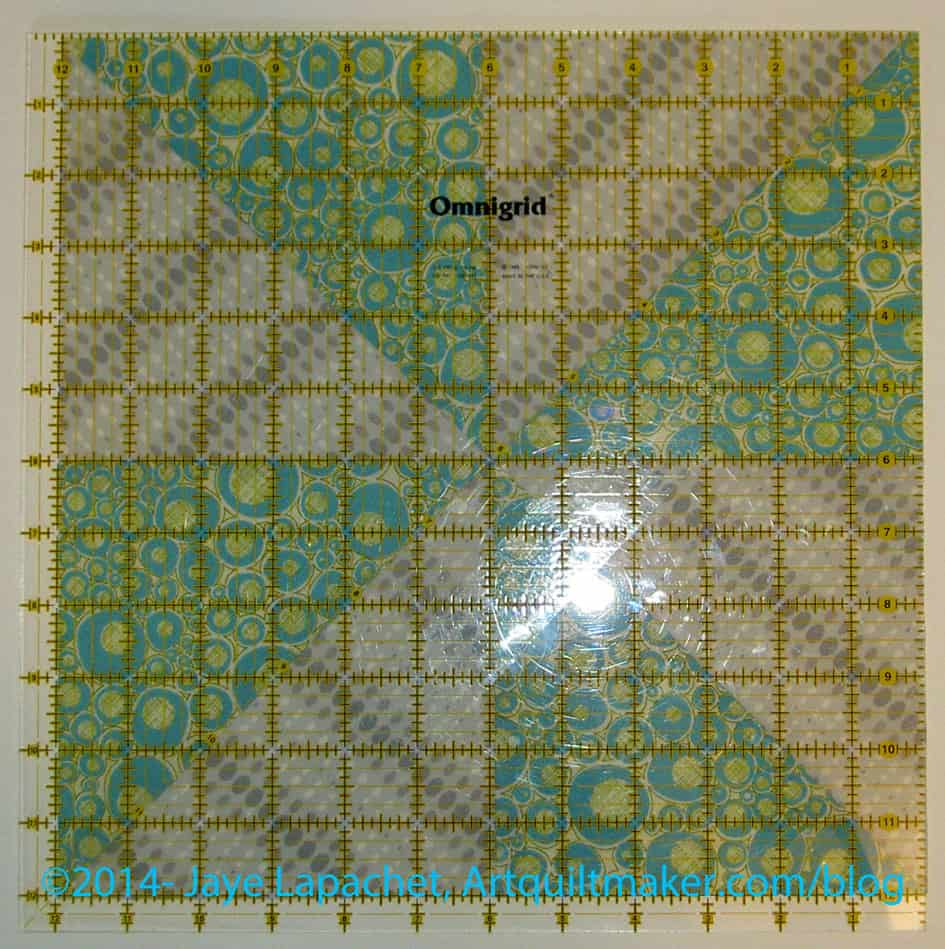
Trim to 12″
15. Trim to 12″. This will get rid of the uneven edges seen in the previous photo. I don’t know if others do this, but I decided to do it to keep my pieces square.
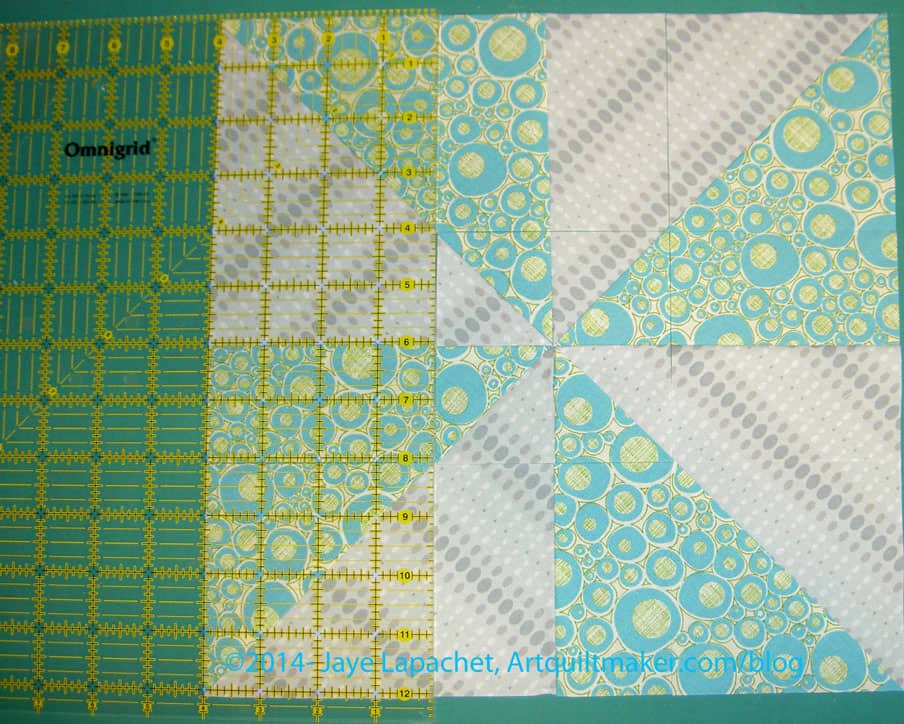
Cut into 9 Pieces
16. Since I trimmed my blocks to 12″, I used the 4″ line on my ruler to cut the block into 9 pieces. I started from the left and cut the vertical lines first.then moved my body around my cutting cutting table to finish this step by cutting the horizontal lines.
Cut into 9 Pieces
Photo above shows the pinwheel cut into 3 equal parts – 4″ each, but not yet rearranged.
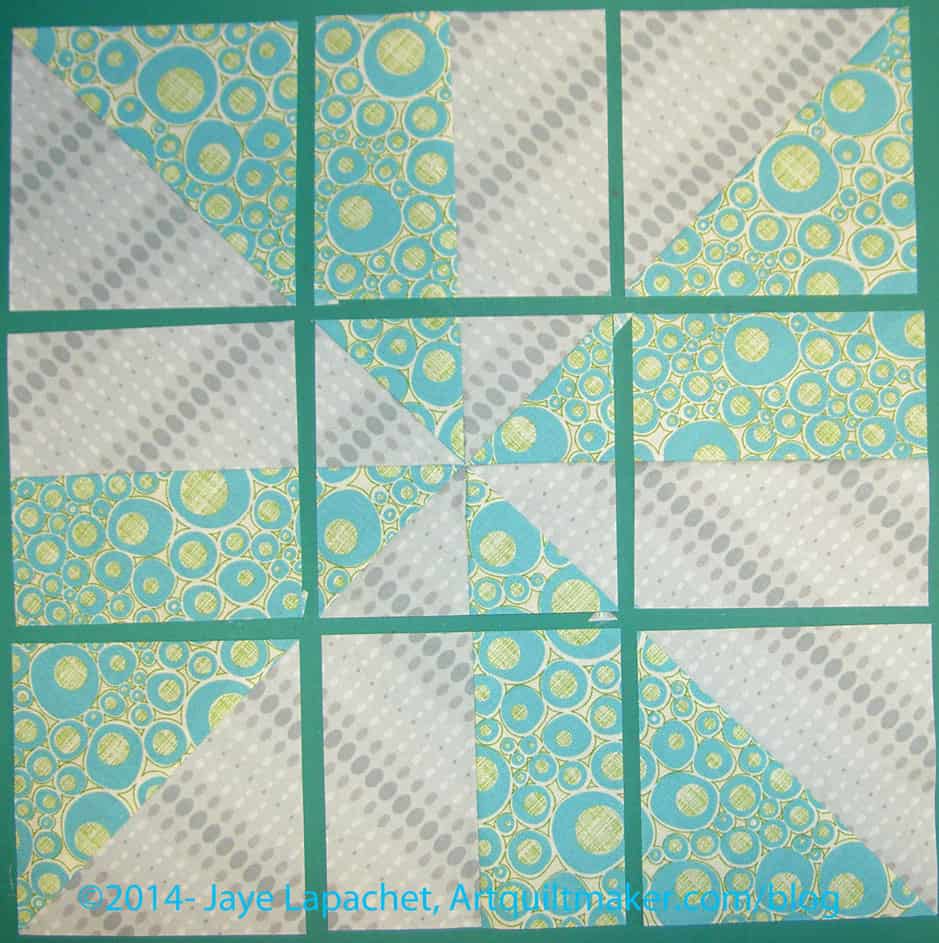
Rearrange to Suit your Tastes
17. Rearrange the 9 parts to suit your aesthetic. You can create a look of the Churn Dash block configuration above or you can switch the corners and the centers in the opposite direction (foreground on the outside) for more of a flower/circle arrangement.
18. This block is now a 9 Patch and you can sew it together like you would a 9 patch. If you do not know how to make a 9 patch, see my tutorial.
Fold part #3 onto part# 2, from chart above, on top of each other and sew inside seam. do this for the rest of the parts, like you would a 9 patch, to create the rows.
Sew like a 9 PatchSew like a 9 PatchSew like a 9 PatchThree Rows Sewn
19. Finish the rows by sewing the final part to the two parts already sewn together. You will have 3 rows of 3 parts each.
Two Rows Sewn TogetherSew 3 Rows
20. Sew three rows together like you would a Nine Patch.
In the above photo, the bottom row is not involved. Place the center row right side down on top of the top row (right sides together) and pin at the intersections, along the seam closest to the bottom row in the picture.
21. Press to the “bars.”
22. Once the two top halves are sewn,place the bottom row on top of the middle row. Pin as needed and sew to the center row.
Finished Disappearing Pinwheel
23. Voila! Good job!
I didn’t make this block up. I first saw it in a video put out by the Missouri Star Quilt Company. The tutorial above is how *I* make the block.
Other Resources
You might want to take a look at the post I wrote a few weeks ago. Included in that post is a link to a video that shows how to make a Disappearing Pinwheel by the Missouri Star Quilt Company
Nota bene: I may update this tutorial or make clarifications, changes as necessary
Well, it has been awhile since Sandy and I were able to get together, but we are back in the saddle. We worked on a new Design Series episode last week. You should be able to hear all about Emphasis/Focal Point today!
You can find the other episodes and companion blog posts by searching the Design Series tag.
_______________________________________________________
I have dominance listed separately in my outline for this series of podcasts, but we cannot really talk about Emphasis and Focal Point without talking about dominance, so consider this episode related to the upcoming episode on Dominance.
Definitions:
An emphasized element of your design is a focal point (Pentak & Lauer, pg.46)
“Emphasis creates a focal point in a design; it is how we bring attention to what is most important. Emphasis is what catches the eye and makes the viewer stop and look at the image. Without emphasis, without getting the viewer to look at the image, communication cannot occur.” (The Elements and Principles of Design, pg. emphasis)
This can happen pretty easily with standard block quilts. If you have nothing to draw the attention, e.g. you use the same fabrics for each block and the size of the blocks is all the same, you may have nothing in the quilt to create a focal point.
Emphasis can be achieved through the use of color, value, intensity, size & scale as well as other design elements.” (Color & Design, pg. 125)
Emphasis gives “interest to one entity or area over others present in a design field, however a focal point is not always formed.” (Color & Design, pg. 125)
Focal point: “attracts viewer as a point of emphasis, encourages viewer to look farther.” (Quilter’s Book of Design, pg. 154)
“A focal point results when one element differs from the others. Whatever interrupts an overall feeling or pattern automatically attracts the eye by this difference:
when most of the elements are dark, a light form breaks the pattern and becomes a focal point
when almost all the elements (whether light or dark) are vertical, a diagonal element is emphasized
In an overall design of distorted expressionistic forms, the sudden introduction of a naturalistic image will draw the eye for its very different style
when many elements are about the same size, similar but unexpectedly smaller ones become visually important
when the majority of shapes are rectilinear and angular parallelograms, round shapes stand out
the list could go on and on…
a change in color or a change in brightness can immediately attract our attention.” (Pentak & Lauer, pg.48)
Emphasis on Isolation (Source: strose.lunaimaging.com via Jaye on Pinterest)
Using Emphasis/Focal Points:
“An unnatural contrast of scale in your quilts can also be used to achieve interesting effects. Surrealists such as Salvador Dali used wildly confused internal proportions to intentionally create uneasiness in the viewer. One element that is purposefully out of scale with other elements within the quilt will attract the viewer’s attention and become a focal point.” (Art+Quilt, pg.65)
If you have a large Mariner’s Compass in the middle of a quilt, the Mariner’s Compass will be the focal point.
“A problem for the quiltmaker is how to achieve both variety and unity. Just adding different elements to the composition may destroy its unity. Adding elements that are similar, but different from each other, can add interest without upsetting the unity of the whole. If one of the variations of the chosen elements is in high contrast to the rest of the piece, it can create a focal point. ”
(as an aside, I don’t mean that you are only allowed to use contrast as a focal point; the author means using something to differentiate that area or section from the rest of the piece) (The Quilter’s Book of Design , pg,27)
Emphasis by Contrast: “Very often in art the pictorial emphasis is clear, and in simple compositions (such as a portrait), the focal point is obvious. But the more complicated the pattern, the more necessary or helpful a focal point may become in organizing the design.” (Pentak & Lauer, pg.48)
Emphasis by Isolation: an element alone in part of a design immediately gets our attention even if there are many of the same shape in another part of the design. (Pentak & Lauer, pg.50)
“…a focal point that is too close to an edge will have a tendency to pull the viewer’s eye right out of the picture.” (Pentak & Lauer, pg.50)
Emphasis by Placement: “If many elements point to one item our attention is directed there, and a focal point results. A radial design is a perfect example of this device” (Pentak & Lauer, pg.52)
Imagine a Mariner’s compass with a Fleur de Lis in the center circle.
Emphasis by Value: “Value contrast can be used to create a focal point in the composition. High contrast will attract the viewer’s attention.” (The Quilter’s Book of Design, pg.66)
Structure: There are four different major types of structure. (you might remember this from a brief overview we did in the Balance segment)
Focus Structure: Focus structure has to do with placing elements of a design in such a way that the eye of the viewer focuses on it. You create focus by establishing the difference between the featured shape and its setting. (Adventures in Design, pg.117)
Circular Structure: “… a central design is the main focus and everything else plays a lesser role, accentuating the beauty of this central design.” In this structure, the artist must ensure that there is “enough continuity between the inner focus and the outer support so that the eye can move throughout the design.” Circular structure uses a circular design “skeleton to move the eyes around the design in a clockwise manner.” (Adventures in Design, pg.118)
Triangular Structure: The basis of your design, in a triangular structure, is a triangle (Adventures in Design, pg.119)
L Structure: In an L structure “the major design focus should be along one of the arms of the L.” The best placement in this kind of structure is to place the major focus close to the intersecting point of the L.” (Adventures in Design, pg.119)
Horizontal and vertical structure: use a “horizontal or vertical line as your structure. This directional structure can be used over the entire design surface” (Example is Layers of Time by Sylvia Naylor- see it on pg. 38 in Adventures in Design or a Chinese Coins quilt design) (Adventures in Design, pg.119). One of the ‘coins’ in a Chinese Coins quilt would have to stand out in some way (be fatter than the others, be a wildly different color, etc in order for this structure to be used to focus attention on one part of the quilt.
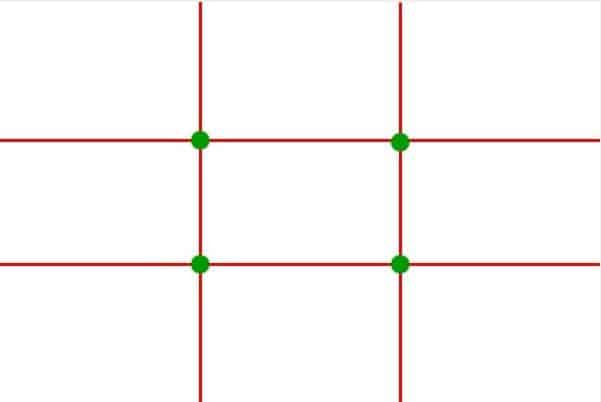
Rule of Thirds (Source: http://photoinf.com/Golden_Mean/Michael_Fodor/Photo_School_-_Rule_of_Thirds/ruleofthirds.jpg)
Rule of Thirds: Joen Wolfrom says “The rule of thirds is an easy way to find a focus range. Simply divide your design into thirds, horizontally & vertically. Four intersecting points will appear. Place your” focal point “in the vicinity of the most appropriate intersecting point.” (Adventures in Design, pg.117) I think you need to place your focal point where it helps you to communicate the message you want to get across to your viewers.
Notes:
“A focal point, however strong, should remain related to and a part of the overall design… In general, the principle of unity and the creation of a harmonious pattern with related elements is more important than the injection of a focal point if this point would jeopardize the design’s unity.” (Pentak & Lauer, pg.54)
“Giving dominance to, or emphasizing one design element or area will counteract confusion or the risk of monotony.” (Color & Design, pg. 125)
A definite focal point is not a necessity in creating a successful design. It is a tool that artists may or may not use, depending on their aims.” (Pentak & Lauer, pg.56)
“How does the designer catch a viewer’s attention? …Nothing will guarantee success, but one device that can help is a point of emphasis or focal point. This emphasized element initially can attract attention and encourage the viewer to look further.” (Pentak & Lauer, pg.46)
“You create focus by establishing the difference between the featured shape and its setting.” (Adventures in Design, pg.117)
“In past centuries when pictures were rare, almost any image was guaranteed attention. Today,…all of us are confronted daily with hundreds of pictures. We take this abundance for granted,” and have even trained ourselves (sometimes unknowingly) to filter out imagery that is unpleasant or distracting, “but it makes the artist’s job more difficult. Without an audience’s attention , any message, any artistic or aesthetic values, are lost.” (Pentak & Lauer, pg.46) This is why I rail a bit on drawing the viewer of your quilt into the design field and then rewarding them with small stitches or beadwork as a result of looking closer. At a quilt show, you need to get people to look at your quilt in the midst of hundreds of them.
There can be more than one focal point. Sometimes secondary points of emphasis are present that have less attention value than the focal point. These are called accents.” “…the designer must be careful. Several focal points of equal emphasis can turn the design into a three-ring circus in which the viewer does not know where to look first.” (Pentak & Lauer, pg.46)
“…provide a variation in order for our eyes to be attracted to the focus area.” (Adventures in Design, pg.117)
“Scale and proportion are closely tied to emphasis and focal point. Large scale, especially large scale in proportion to other elements makes for an obvious visual emphasis.” (Pentak & Lauer, pg.60)
“Emphasizing one element or letting one area dominate others sends an invitation tot he viewer to come in and take a closer, longer look at the work.” (color & Design, pg. 125)
Exercise:
Type “focal point” examples into Google or your favorite search engine and look at the images. As you look at the images, try and figure out what the focal point is.
A few weeks ago a group of us had a Black Friday Sew-in, mostly on Twitter ( you can read the old tweets by searching for the #BFSI hashtag). I asked you a bunch of questions in order to give you the opportunity to win a bunch of books compliments of Lark Crafts. I thought it would be fun to recap your comments and think about them further. You can find the original post that coincides with this review on Friday November 29. You can also find more about the Black Friday Sew-in on the introduction post.
Question #6 was a two part question:
If you had to teach someone how to do one quiltmaking technique, what would that be?
Here are the answers:
accurate cutting technique
quarter inch sewing/art of the scant quarter inch (this was mentioned a couple of times)
pressing (this also got a couple of mentions)
fabric selection as to type (cotton or blends) and quality, and grain lines.
foundation paper piecing (a couple of people mentioned this)
how to join your binding ends when they meet
how to thread a needle
liberated quilting techniques
how to buy fabric
I think it is so interesting that very basic techniques were mentioned most of all. The answers make me wonder if the way we, as a quiltmaking community, are being taught how to piece is not adequate? I realize that many people teach themselves, which is great, but it is hard to know what to learn when you have nobody showing you the little things. Perhaps there is an opportunity for a self-paced module based program that people could follow along themselves.
I have long been a proponent of learning using the making of a sampler quilt. I like that method, because if you go through the basic sampler blocks (see my quilt class tutorials for more information), you will learn almost all the techniques you need to to know to make almost any block in the future.
I know the problem in learning using sampler blocks -is that they take a long time to make into a quilt. The class I took was 18 weeks long, one block a week, plus an introduction, a couple weeks for quilting, binding, etc. I know it is good to harness the enthusiasm of someone who wants to learn, get them in front of the machine making a project as soon as possible so that they see success quickly and continue to sew.
Perhaps there is a happy medium?
What are the best tutorials for beginning techniques that you have found?
If you are a beginner, what would you want someone to teach you?
how to free motion quilt
machine applique
how to do nice mitered borders
learn to hand-stitch binding in person
Daisy W mentioned that learning to hand stitch a binding was hard to learn watching a video on YouTube. I haven’t watched any videos on binding, but I can imagine. I finally got binding down (making to stitching) one year when I finished 10 or so quilts. I did all the bindings and doing that made the details of the techniques stick in my head.
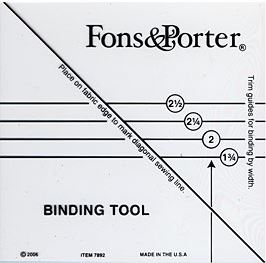
F&P Binding Tool
One part of the process with which I still struggle is the matching up of the ends. This is not something I learned in my beginning quilting class. I, actually, never knew it was possible until I saw a Fons & Porter Love of Quilting tool in a demo at BAMQG. Now I do that all the time as it makes the ends of the binding look so nice. There are no more giant lumps at the ends. I really struggle with getting it right. The directions are difficult and confusing.
Other skills people mentioned want to learn are:
how to join your binding ends when they meet
Jen wrote in a comment “I would really like to learn “quilting for show”, not necessarily because I want to enter shows, but because I’m always hearing how the binding has to be just so, and knots need to be buried, and judges get out their magnifying glasses and rulers, etc. What they are actually looking for exactly is beyond me and I would like to know.” I talked about this in the podcast with Pam (Episode #148). Why is it a secret what judge’s want in binding. I always get called out on my binding – miters aren’t up to snuff and my binding isn’t filled! ERGH! It makes me crazy, because I just don’t know what they want and I really do try and do my best.
continuous line free motion quilting
There are a lot of people who want to learn FMQ and I think there are a lot of tutorials, books and classes out there. I have heard good things about a Craftsy class on negative space quilting from various podcasters. I know my problem with FMQ is that I don’t practice. I think practice makes perfect.
For me, practice is hampered by my machine, my space, to a certain extent, but those are not excuses for not practicing.
Someone also mentioned not being interested in taking classes. I enjoy taking classes, because sometimes they are fantastic and send me spiraling off into a new direction, or solve a problem for me. Other times, I learn one new thing or learn I don’t want to do whatever they are teaching. Regardless, classes expand my horizons and I think they are valuable.
This segment discusses sewing the block together. In order to get to this point, you should have completed parts 1 and two and three as well as part four.
Like piecing all other blocks, you want to sew smaller pieces together to make larger pieces, then sew the larger pieces together to complete the block. In part three, you should have cut any fabric for templates that did not have matching fabric patches. so, inventory your templates and make sure you have a fabric patch for each template. If you don’t, go back to part three.
In part 4 you also pinned:
Remember that the edges are not quite as smooth on the other (blue) side, but that is ok. Just remember to sew slowly and carefully.
Outer patches sewnOuter patches sewn – blue side up
Once those two patches are sewn, they might look a little rumpled, but once you turn them both right side up and press the section, they will look great.
Outer sections pressed
Press which ever way you think will work best for your block.
Section D
Next, we will sew the corner section to the small pieced strip (Section D).
Nota bene: if you did not foundation piece the small strip, follow the directions in part 4 or part three to do so. If you haven’t done any foundation piecing you might want to start with this piece as it is smaller and less complex than the pointy triangles section.
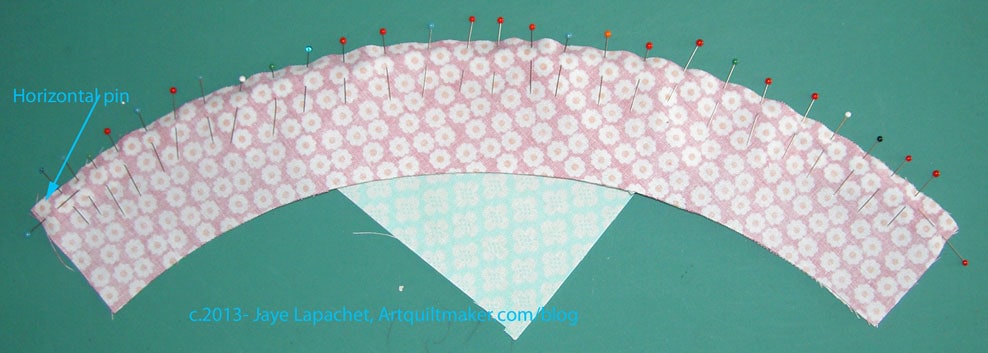
Again you will need to pin. This time you are pinning your quarter circle corner piece and your small foundation pieced strip.
Pin ends horizontally
Take your quarter circle corner piece and your small foundation pieced strip and pin them together. I, first, line up the straight edges on the ends and pin them together (horizontally). I make sure the horizontal pins are out of the way of other pins and the sewing machine foot. they are used just to make sure my piece is in place while I put the other pins in.
I use a lot of pins. It works for me. I know there are other tutorials that are pinless or use minimal pins, but I want precision and pins give me precision. Put these two pieces together the way it works for you. Remember: you only have two hands.
Sew 2 patches together
Once you are happy with your pinning, get ready to sew. I put the non-pieced corner quarter circle on the bottom and the pieced part on the top. I try to make this a habit, though it doesn’t matter with this particular foundation pieced section. In some sections, like our spiky triangle section, it matters.
You can rip off the paper before you piece or not. I was having some other problems, so I ripped it off, but normally, I would leave it on until the very last second I could, e.g. before I took the pieced top to the quilter!
Attach your quarter inch foot and sew your small foundation pieced strip to your corner quarter circle. If you don’t know how to sew curves, take a look at the curves tutorial.
Corner with 2 sections
Once you are finished, press carefully. I press to the side with the least number of seams, or to the side that the fabric seems to be naturally inclined to lay. Your corner will look gorgeous like the one above.
Once you have the small foundation pieced strip attached to your quarter circle, you will sew it to your spiky triangles piece. You will, again, pin a lot, using the horizontal pin trick to stabilize the piece.
Sew Sections Together
Again, as shown in the photo above, I put the foundation pieced part on top. In this case, you are sewing two foundation pieced sections together, so you can choose which you want on top. I chose the spiky triangles section to go on top, but it doesn’t really matter, since there are no points to worry about cutting off.
Next sew the two remaining sections together, press, again, towards the piece with the least number of seams and you should have a piece like the one below.
Finished: Foundation Pieced Block
After all that work, you have a beautiful foundation pieced block. Pat yourself on the back!


 4x4 squares")