More about Machine Quilting

One of the things I did to prepare for my longarm day was to doodle. I got out the sketchbook and did some doodling in it. It wasn’t true doodling, because I used some reference materials, including some designs from a Melody Johnson class I attended in 1999 as well as some worksheets and the book from a Sue Nickels (nice little bio) class I took sometime later, perhaps around 2002 or 2003. This was all before Diane Gaudynski exploded on to the scene.


The paisleys and little 3-petal flowers would be too difficult for me at this stage, but perhaps later. Still, the whole idea is to get your muscle memory into shape. That flowing doodling kind of motion is what you want to achieve when longarming.


You can see how into those sashing curved designs I was. I really wanted them to work. I may still use them in another quilt even if they aren’t perfect.

One of the things I did when I was in the machine quilting groove was make a worksheet of designs for my quilt class. It has some basic designs and ideas on it. I still need to make the other class information, but at least this part is done.

I know I haven’t mentioned it in a while. Frankly, they all kind of bailed on the basting part and I don’t know if they will continue. It is a little disheartening, but I have an idea in my mind to teach a class like this elsewhere at some point (no plans at this time), so perhaps the work won’t all be wasted.

Longarm Day of My Own

So, yesterday was the big day. I went to Always Quilting and quilted a quilt on my own. The short version: it was good, it was hard and I needed help.

During this foray into the world of longarm quilting I was able to complete the quilting for a quilt and a practice piece. I am thrilled to haven gotten this far on a quilt on my own! It has been awhile since I quilted anything larger than a journal sized quilt.

One experience/feeling I wasn’t expecting was that I felt like I learned a ton! I always feel that it is a good day when I learn something new and this was an even better feeling, because I learned something related to quiltmaking. Neither of these pieces will win any prizes, but I really feel like the experience was successful.


Above are the two finished pieces. They were sewn together to make it easier to get them on to the longarm machine. I cut them apart before I came home. I sewed the top patchwork piece to the quilt (bottom) in order to have a practice piece to work on before I got into the quilt itself. I always warm up when I machine quilt at home and I didn’t think this longarm adventure should be any different.

For the practice piece, I pulled out some old blues and sewed them together. I do like that Nancy Crow leaf fabric, but was never very successful at using it in a quilt.


Two details of the Crazy Test quilt. The line of stitching you see at the bottom (upper photo) is basting and I will need to pull it out. I think the flower stitching on the bottom photo looks ok. It is an all over pattern, but I don’t think it competes with the sashing or the blocks. In the blocks, it is nearly invisible.

Above is a detail of the first bit of quilting that I did. I quickly learned that this kind of fabric has two problems:

  1. I couldn’t see the stitching as I sewed
  2. I still can’t see the stitching


When I have someone else quilt a quilt, I focus on the piecing. I want the quilting to blend in and not take away from the piecing. Thus, I was surprised to find that I wanted to see the stitching. It makes sense to be able to see the stitching as you actually stitch! I found that when I was done with a section, I wanted to be able to see what I had done. Above, I don’t think the stitched flowers, as a design element, look that good on top of the leaves. The two design elements compete with each other.


The stitching in the leaves is the stitching that I also did in the blue and white striped fabric at the top. It shows up a lot better on the black and was a lot easier to see as I stitched over the Nancy Crow fabric. I had planned to use that pattern (from a 1999 Melody Johnson class) in the sashing. I like the way it came out, but if you examine it closely, you will find that the lines are not parallel and the ‘legs’ are different sizes. I think I will have to practice more before I can use that one on a real quilt.

Contrary to the flowers over the leaves that I mentioned above, I don’t mind the parallel lines over the leaves in the photo above.

My general preference when viewing quilts is to see the quilting compliment the elements of the quilt. For example, I usually like to see different quilting in the sashing than I do in the blocks. What I found after yesterday’s session was that those differences in the quilting pattern require lots of practice. Longarming in general requires a lot of practice. If you think you can go and buy a longarm and start quilting for other people, more power to you. After doing some of the math, I fiure that I can quilt 10-12 quilts for less than $500. This means it would take me years to pay off even a Handiquilter, which runs about $8,000.

After realizing that my planned designs were not going to work, Kit suggested a flower pattern. The bottom section is the all over flower pattern that I decided would be fine for my first longarm project. The section in the blue RJR Christopher Columbus fabric (bottom left, above) is the right size. As you can tell from other photos, I stitched smaller and smaller motifs as I moved through the quilt. As a result, the quilting took a lot longer than I anticipated. I think the flowers show up pretty well in the photo above. This was my first attempt at them. Somethings I had to think about while learning this process and trying out a new pattern:

  1. Consistent stitching speed – the more variable your stitching speed the more inconsistent your stitch size would be
  2. Don’t get caught in a place you can’t get out of
  3. Try to stitch within an imaginary triangle

I like the above photo, because it shows the quilt rolled up on the machine. You can also see the flowers pretty well.

Longarm Class 1/9/2009

I want this to be a year of creativity. I can’t say that this is on my to do list, but it is in the back of my mind. One way to do that is to sew as much as possible.

To that end, I took the longarm certification course at Always Quilting on January 9, 2009. As a result, I am now a certified longarmer at Always Quilting. Don’t be too impressed as this certification only gives me the privilege of renting their longarm to quilt my quilts. Still: YAY!

After seeing the demo in November with the CQFA team, I signed up for the class. I was curious about the whole longarm process and because I wanted to see how I could incorporate the longarm as a tool into my repertoire.

That being said, I learned a few things about longarming:

  1. Using the machine takes practice and people who machine quilt well should be admired greatly
  2. There is much more to learn
  3. I will never be Colleen. I also don’t want to be her and will still use her fabulous services for some of my quilts
  4. I am not going to quilt all of my quilts myself
  5. Using a pantograph is hard
  6. Taking the class will improve the quilts I prepare for someone else to quilt

I really enjoyed the class. It was an expanded version of what we learned at the demo. It was great to hear some of the same information again as it helps to cement it into my mind. Some of the information she gave about preparing quilts, especially, applies to the computerized machine they use to quilt quilts for customers. It is a large computerized machine.

One thing I learned was that the longarm professionals vary, but if you understand some of the background and the way the process works, you can work with your longarm professional of choice much more effectively.

Always Quilting wants you to have square corners. No lopped off edges or strangely shaped corners, because you use the corners to pin the quilt to the machine. Oh! Now I get it. Better fix that I Spy quilt.

Kit also suggested practicing good pressing habits in order to reduce bulk where seams meet. The centers of pinwheels and 8 pointed stars can be a challenge for the machine. I was surprised to learn that the machines have a hard time going through selvedges! I’ll have to look at some of the quilts that Colleen has quilted for me to see what she does in this circumstance.

  • The Always Quilting staff wants the backs 6″ wider than the quilt and had several suggestions for the back. The back needs to be longer than the top, but they don’t care how long.
  • It is ok to piece the back, but they don’t encourage it and the same rules about bulk and bulky seams apply.
  • Kit suggested using large pieces of fabric rather than piecing a second top for the back.
  • She also said to consider pressing seams open on the back and using a larger seam allowance to help reduce bulk.
  • Both top and back should be square and FLAT. Kit reiterated that quilting does not cure all evils. She gave some tips about measuring the top before one cuts and attaches borders that were really interesting, especially to make sure that there isn’t more fabric in your border than in the quilt top.

Always Quilting prefers batting such as Hobbs Natural and Warm & Natural, both of which they carry. A quiltmaker can bring her own batting but they reserve the right to not allow you to use it. Apparently, batting with scrim works best. As you know, Colleen has quilted my quilts using Hobbs Organic for awhile with no problem, so I am not sure what I am going to do about that.

Kit said that they want a quiltmaker to use the shop thread, because of the way it interacts with the machine. Again, you can bring your own, but they reserve the right to not let you use it. They use Signature, King Tut by Superior and Permacore, which is their preference. The Permacore is polyester wrapped in cotton. Bad thread can incapacitate the machine, which is why they encourage quiltmakers to use the shop thread. They have hundreds of colors.

To put the quilt on the machine:

  1. Put the back on first, right side DOWN. You could put a quilt on the machine sideways. This orientation works well for row quilts because it is easier to quilt different things in rows.
  2. Find the center of the back by folding it in half.
  3. Pin the back to the leader about 1/4″ down from the edge of the leader. There are notes in Sharpie on what attaches to what leader. There is a black mark in the center. Pin from the center out.
  4. Ask your helper if the machine has been oiled
  5. Brush the lint out of the bobbin area. There is a very important disk in the bobbin. Hold on to it when changing or cleaning the bobbin.
  6. Line up batting on backing right below the pins on the leader.
  7. Use a single stitch to baste the batting to the backing.
  8. Baste top to batting, lining it up just under the batting.


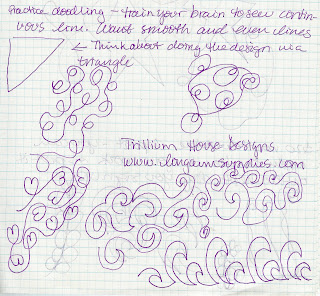
I have found it important to doodle a bit before going to class. It seems to train your brain to sew a continuous line. It helps with practicing for achieving a smooth, continuous line. I assume this would be rule for going to quilt as well. It gears up your muscles for the quilting motion. Above are doodles I made during class. They are my own variations inspired by designs from the various books the shop had. I wasn’t able to try them all out on the machine.

One of the books we were able to look at was one by Trillium House Designs. They have a set of three books called Pocket Guides to Freehanding containing a multitude of quilting designs. Kit said Always Quilting didn’t carry them, because books 2&3 were too advanced and the company did not sell book 1 separately. The price for the set is also $55, which is a bit steep.

I think that there are a lot of continuous quilting designs out there you can use as a guide for your own quilting. It would pay off to start collecting some of those designs and practicing them with pencil and paper before renting the longarm.


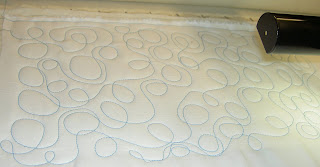
My section of free motion quilting loops. This is the pattern they encourage their students to use for most quilting project. They also encourage people to use this size of pattern when quilting.


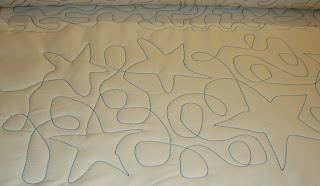
My attempts at using the pantograph (above). It was very hard to get the shapes smooth and I thought I would have an easier time posting the design on the wall and following it with my eyes, rather than trying to trace it using the laser.

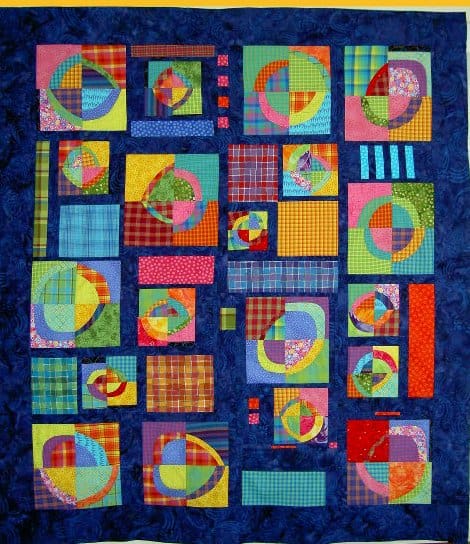
I am scheduled to quilt one of my own quilts on February 6. I am planning to quilt the Crazy Test. I was planning to quilt the hexagon/I Spy quilt, but decided to do something I didn’t care about much before quilting something I did care about. I do have to make the back before I can quilt it. The longarm doesn’t work very well without a back!

I was really pleased with this class. I thought it was well run and thorough.

Longarming a Tree Skirt??

As I mentioned, I have had longarming on my mind lately. One of the things I have been trying to work out is how to use different colors and different machine quilting designs in one quilt. I don’t want my quilt to look like I didn’t think about the quilting design and just Pantographed over the whole thing. Quilting Arts has a pattern for a tree skirt and it occurred to me that this might be the PERFECT project for the longarm. I could sew several pieces of coordinating fabrics together, longarm it and then cut out the tree skirt. They suggest stamping and painting and embellishing, which is a good idea. Another project to think about!

Thinking about Longarming: Lava Beach


Lava Beach
Originally uploaded by cjb_roe

I saw this quilt in the Denyse Schmidt ‘Pool’ (DSP) on Flickr. The DSP is a group of photos of projects made from DS patterns or fabrics. It is interesting to look through and see the different projects people have made. I saw a couple of things, as I mentioned earlier in the week, that were inspiring.

TFQ asked for more information about the longarm demo I attended last week. As a result, I have been writing about in a letter to her, thus it is on my mind. As I was going through the photos on the pool, I saw this quilt and thought that the quilting design was interesting enough to note. One thing that Kit, from Always Quilting, said was that one needed to doodle designs to be prepared to draw them with the longarm.

Mom confirmed this when she went to try out her friend’s longarm. She said she thought it was about muscle memory.

This picture serves two purposes: the one above, obviously, but also to move me along in a task for my quilt class. I have been putting off creating the machine quilting design sheet for my beginning quilt class because they have totally lost interest and have not basted their quilts. I would like to teach more people to quilt, so it is worthwhile for me to create the worksheet for the future. Seeing this great design gives me a little incentive.

Saturday Project

I brought two projects to the CQFA meeting yesterday and didn’t even finish one. Better safe than sorry, I say!

The first was the Pamela project that I started at EBHQ in a class with Pamela. I want to get this done before she comes out for the next class in April. If I can also finish the flower garden, that would be great.

I had worked on it, as you know, during the summer. I did mostly handwork. I came to a point where I decided I needed to machine quilt it and that sent the project to a screeching halt. This sewing time with CQFA seemed like a good time to get that machine quilting out of the way. I got about 2/3s of the way done yesterday and finished up the quilting today.

I always have a couple of issues when I am contemplating machine quilting something. Getting started is primary and the biggest problem. I never want to do it, don’t think I will be good enough, haven’t practiced in a long time blah blah blah. On this project’s machine quilting, I just went for it. I used a simple design and my regular open toe foot and just pretended I was sewing. The second problem comes up after I get going on the quilting. I start to see the quilting add to the design and some of the motifs not being quilted pop out. This makes me want to do more and more quilting.

I can never envision how the quilting will look while I am piecing and I always think of it as interfering with my great piecing design. It usually turns out just fine.

Here is some of the detail of the quilting part way done.

Quilting Quilts Not So Painful

The quilts are in the good hands of the quilter. I picked out a varigated green-blue color for the quilting on Feelin’ Blue, Too. It is difficult to pick the color of the thread. I always like the thread to disappear unless you get up close. I really like the piecing to be the predominant design feature. With all of the different colors and fabrics I use in a quilt, the thread tends to shriek at me on either the light or the dark, depending on whether the thread is light or dark and the fabric is light or dark. Light thread on dark fabric=bad; Dark thread on light fabric=really bad.

I picked out a berry color for The Eye of God. The purple border was a problem with the yellows in the center, thus choosing something completely different seemed like a good idea. It won’t scream on either the yellows (lights) or dark purple.

So much for handwringing. I should have more faith in the universe, because CG said that she would probably have the quilts done by the end of the week. That would rock! It would, however, mean that I really need to get going on the binding and the sleeves.

In other news, the hand quilt is back on the design wall. I need to get that quilt done by Christmas. It is already a year overdue. Appliqueing the hands is such a drag, even with fusing. I have to follow the classic Nike ad and JUST DO IT.

After the hand quilt, I need to do something of my own design. We’ll see. It may be time for more bullseyes by then.

Quilts will be Quilted

Finally, the indecision is over and I will be taking the quilts, Feelin’ Blue, Too and The Eye of God to be quilted tomorrow.

Eye of God Top
Eye of God Top

I need to figure out how to quilt them as well. I have some ideas, which I have not drawn out, but should. I also can’t decide whether or not to have them heavily quilted. They are the squarest quilts I’ve made, but are still a bit off. Having them heavily quilted will make them hang better. Still, I am not sure the design requires it.

I was promised that they would be back by August 15th. Assuming that date, I looked at the calendar and that gives me two full weeks to get them bound and sleeved. Though enough time, I will be a lot better off if I get the sleeves and binding ready in advance. I’ll find out the timing for sure tomorrow. And for better or for worse, that is the plan.

I took the measurements today and found the last bits of purple fabric for The Eye of God, so, theoretically, I should have no problem making the sleeves and the binding before the quilts come back. I MUST work on this project every night so I am not ripping my hair out at the last second. I probably will be, though, as I always do. I swear not to, but it never works and it is something I need to work on. I have lots of other issues to work through, however, but I’ll put this one on my list.

I was reading in Robbi Joy’s new book, Free Expression: the art and confessions of a contemporary quilter (BTW, the website is a little unwieldy, but you can find the book on page 5 of the book area), and she has a different technique for creating sleeves. She makes the sleeve doubled and then does some kind of folding trick which prevents the hanging rod from bulging out. I do that, too, but not in such a sophisticated manner. I like the idea of making a doublesided sleeve. Even if I can’t figure out her technique, I can use the doublesided sleeve regardless.

I will have to review before I try it. IF I try it. We will see.

No Progress on Feelin’ Blue, Too

I am worried about the quilting. My quilter is gone until the end of the month and I am anxious that I won’t get the two quilts back in time to bind and sleeve them for the show. I am so worried that I have been contemplating quilting it myself. Not sure the body can handle it, though, so I haven’t actually committed to the quilting process. And before I decide, I have to doodle my quilting idea for awhile to see if it will actually work.

My mom assured me that she would help me finish the quilts no matter what time it got back. Why can’t I have faith? This is a theme lately and it tells me that I am in the wrong space.

Sitting down and doodling the quilt design, working on the sleeve and the binding would all help me move forward. I need to break the process into baby steps and JUST DO IT. I could also decide to forget the whole thing.