Weeks writes “Aim high and ignore what other people are doing. Following the crowd will not teach you as much as figuring out how to combine you interests with your skill set. Where do you want your quilting to take you?”
One of the best things about quiltmaking is figuring out how to get something done. once I had to figure out how to put beads on a quilt — a lot of beads. I also had to figure out the best way *for me* to attach French ribbon to the quilt. I didn’t know of a class; I didn’t think to look on the Internet (though I think I started that quilt before blogs were prevalent. Not sure about that) and I was confident I could figure it out.
I want to make a kind of curved Pickle Dish, Double Wedding Ring looking quilt. I saw a picture of a little part of a quilt in a magazine. I cut it out and will try and make it someday. I won’t buy the the kit because I want to use my own fabric choices. I like making hard blocks and hard quilts. I don’t necessarily want to do it all the time, but I want to make things that others think are impossible.
Image Courtesy of The Modern Quilt Studio, Bill Kerr and Weeks Ringle; *No copyright claimed to Modern Quilt Studio’s chart of points.
WOW! I have reached over 90,000 visitors to my blog! Not unique visitors (don’t have really sophisticated software monitoring), but people coming by to read. Thanks for reading!
Special Notice!
My mom, Mary Carroll, will be teaching a Color Class called COLOR MATTERS on March 22, 2013 at QUILTERS QUARTERS 4343 PACIFIC AVE., STOCKTON (209-462-0161).
Learn how to get away with almost anything in color! Using the five primary color system developed for fabric and yarn make your quilts zing! Mary is an artist, quilter and teacher who recently relocated from the Bay Area. Join her in making a colorful wall hanging which you design yourself!
Call now to sign up! 209-462-0161
What I am reading: I just finished The Rose Garden by Susanna Kearsley. It is the second time around for me with that book and it was like reading comfort food.
Current Project(s): finishing up Calm, more blocks for the Star Sampler, getting ready to do some cat beds.
Software & Technical Stuff
Join in on the National Quilting Day Sew-in on Twitter today. Quiltin’ Jenny is the hostess.
In time for National Quilting Day, the Quilt Index now as an iTunes/iPad app in the App Store. Cost is $0.99 and the proceeds support the Quilt Index, which provides thousands of quilt images online and, now, at your fingertips. Can you say “inspiration in your pocket?” I tried to download it, but it didn’t work. I’ll have to try again later.
Barbara Brackman has a mini tutorial on how to use Blockbase to see how a block would look in a quilt. Great feature. It is a good day when I learn something new.
Threadbias has posted some tutorials for the new design tool they announced at QuiltCon.
Darla, over at the Scientific Quilter, is doing a March-a-Long, which is 15 minutes of quilty stuff per day. Yes, it has already started, but you can still join in. She has some great graphics in the post and there will be prizes. I wonder if washing and ironing fabrics count?
Do you have monkey mind before bed? Lisa Fulmer has some ideas for quieting an overactive mind before bed.
Lazy Gal Quilter has a post on Quilt Mush. It is, essentially ,about color and how to make a quilt where you can see the parts. Well worth reading.
She Can Quilt has the winners from QuiltCon, parts 1 and 2.
Quiltin’ Jenny has a short review of the Crafty Garden Mom podcast. That is one of my favorite podcasts, but I haven’t taken the time to write a review, so I am glad Jenny did!
Great Projects
Have you seen Little Bluebell’s Swoon bag? I love the colors and the fact that she resized the block to make it fit her project.
I need another bag pattern like a need a hole in the head, but I don’t think I can resist the Petrillo bag by Sara Lawson at Sew Sweetness. It is a ~12″x15.5″ vertical bag, which I have been looking for. The blog post shows the bag in a number of different and very current fabrics. I am thinking it would look great in a Philip Jacobs print. I wished she showed the inside and asked about that. Sara ran outside and took some photos of the inside and emailed me back right away. GREAT customer service. As an added bonus, Pam over at Hip to be a Square podcast liked the bag, too, so it looks like we will do a Bag-a-long. Head over to Sew Sweetness and buy the pattern if you want to join in.
Jill, over at the Quilt Rat (and sometime participant in the CPP) has been snow dyeing. She dyed some thread as well as fabric THEN she made a project with it. She made a gorgeous Dragonfly pillow. I love the design of the dragonfly. It is stylized and has a kind of Aztec (?) or Art Deco (?) look. I am not sure, but I like it. I am wishing ‘Dragonfly’ had been the prompt last week, because then I could take some credit for Jill’s project’s gorgeousness. I can’t though. Jill is an awesome artist without me. 😉
Fabric, Rulers, Tools and Notions
Aurifil Club Offering
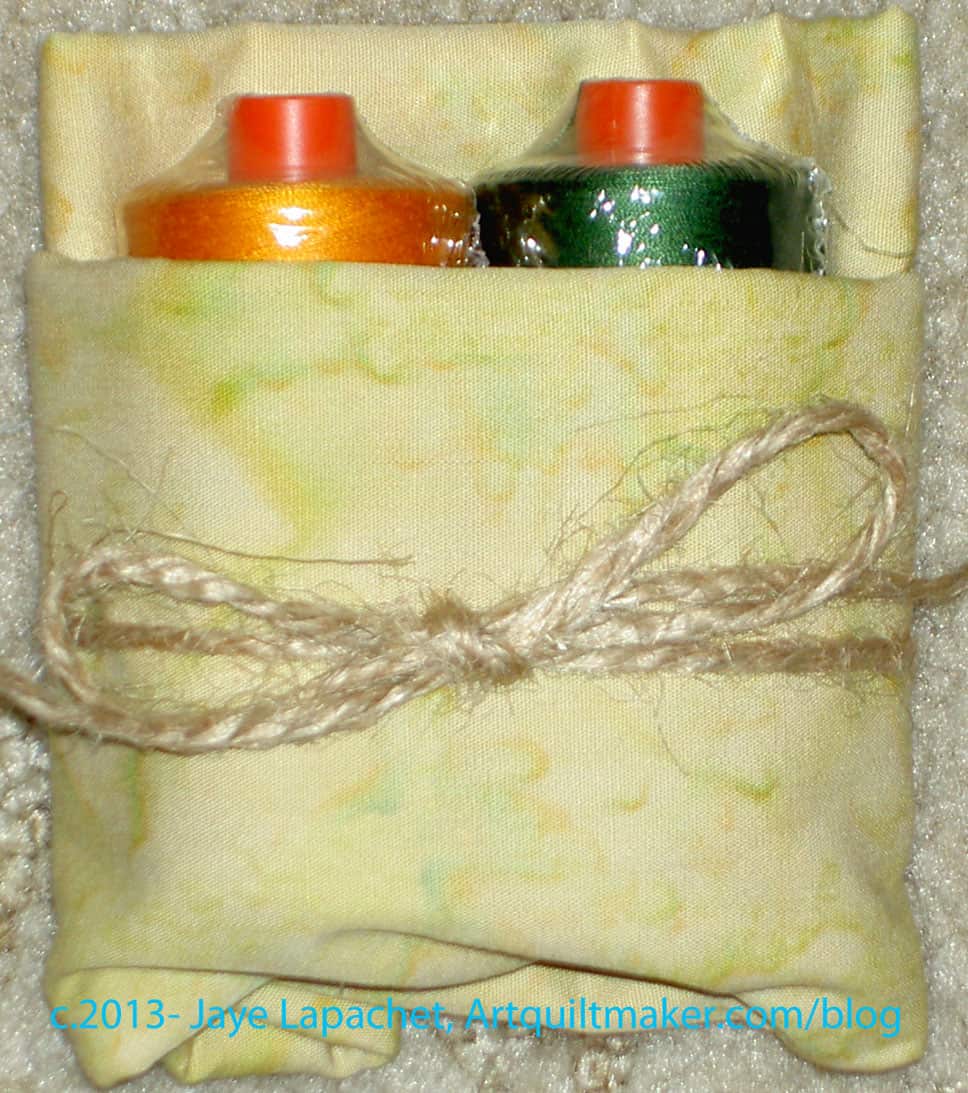
I joined the Quilt Bear Aurifil Club. That gives me two spools of thread each month. I have asked for brights, because I don’t want a hundred spools of beige. this month I got a green (#2892) and a yellow-orange (#2145). I wasn’t sure how I would like it, ,so far, I am really enjoying it and find that it is well worth the $20/month. The Quilt Bear folks always send a little treat with the thread. This month it was a yellow-green fat quarter. The packaging is also very nice.
Hey! Nobody told me Moda was coming out the Nancy Drew fabric! I loved Nancy Drew as a girl. Who wouldn’t love a girl who was smart and independent? I had to find out from Quiltin’ Jenny. Good thing I read her blog, do you? She is part of a Nancy Drew blog hop and shows the two great projects she has made. I don’t know what I would make with Nancy Drew fabric, but I have to make something! I have patches and things from when I was a kid. With thos random memories, I was thinking of making a quilt called “My Life as a Quilt”. Perhaps the Nancy Drew fabric would work on the back? This means, of course, that I actually have to make the quilt!
Simple Sew made a wonderful dress form out of the Nancy Drew fabric. I would love one of those, but have no horizontal space, so I am glad she posted it and I can admire it from my computer screen.
There were a lot of totes that I saw on this blog hop. One that I liked was from Sewing by Moonlight. She made a normal looking tote except one side had some Nancy Drew fabric and the other had, what looked like, a paper pieced book block! Great!
While looking at the Nancy Drew projects, I saw this wonderful bag. Mostly I love the white on red dots. The combination of the red and white dots with the yellow is a very effective combination.
Camille Roskelley’s Scrumptious
And if all that weren’t enough. Camille Roskelley has shown her new line, Scrumptious. I wish I had designed these fabrics. Just getting bundles and bolts in the mail would be so exciting!
She and Bonnie are back to their Ruby feel. They got rid of that dark blue, which makes me happy. This will be shown at Spring Market and available in September. If you didn’t get me a birthday present, September is not too late. 😉 Otherwise, I’ll have to save my pennies.
Bonnie & Camille’s Scrumptious dots
Part of this line includes a fabulous set of dots. Don’t tell me I have enough dots. One can never have enough dots and I am making an effort to use them this year. [As an aside, I’d like every project I make this year to include enough dots for people to day “Hey! Dots! Cool!” It isn’t really a goal or resolution; just something in the back of my mind.]The color combinations in this line might be her best combination ever. It is hard to say, but it is a thought that occurred to me.
Quilt World News
Today is National Quilting Day. Quiltin’ Jenny and the other Tweeps are hosting giveaways and a sew-in. Use #nqdsi as the hashtag. Check out Jenny’s post with all the fun and games. To add to the fun, The Quilt Show is offering 140+ shows for free this weekend. I am not sure of the link, but try this one. Otherwise just go to the Quilt Show and I am sure you will be able to find it there. The shows are good. I don’t watch them as often as I would like, but I always learn something.
The quilting world lost one of its favorite stars: Patricia B Campbell, beloved teacher and appliqué artist recently.
The San Jose Museum of Quilts & Textiles has a new lecture series called FiberTalks, which will benefit the museum. Join in on March 24 from 2pm to 4pm for: Inspiration! How the Fabric of Ethnic Culture inspired my Quilting. Yvonne Porcella, a Quilter’s Hall of Fame artist and legendary quilter, will show slides of her work and be in conversation with Lilia Aguero, Director of Education at School of Arts and Culture. Select pieces from the collection will be on view. Porcella is Founder and served as President of the Board of Directors Studio Art Quilt Associates from 1989-2000. She was also a 16 year member of the Board of Directors of Alliance for American Quilts and served 2 terms on the Advisory Board of the International Quilt Study Center, University of Nebraska. Yvonne is currently serving on the Board of Directors of the San Jose Museum of Quilts and Textiles. In 1998 she was inducted into the Quilters Hall of Fame in Marian Indiana and she was the 5th recipient of the Silver Star Award at Quilt Festival in Houston, Texas. Michigan State University selected her as a Quilt Treasure for an Alliance for American Quilts documentation project archiving the history of American Quiltmakers. She was filmed for a one hour segment honoring the 2010 quilting”Legend” by The Quilt Show, hosted by Ricky Tims and Alex Anderson, shown on their subscription internet program. A major retrospective exhibition of her art work shown January to April 2012 at the new Carnegie Art Center in Turlock, CA., curated by Rebecca Phillips Abbott showcased the depth of her artistic endeavors.
Other programs will include:
Sunday, June 23, 2 – 4pm Roberta Horton and Mary Mashuta, Internationally Recognized Quilters
Sunday, September 29, 2 – 4pm Leilani Bennett and Marcia Manzo, Wearable Art Creators Sunday,
December 1, 2 – 4pm Pam Moore, Artist and Lace Knitter
Each program: $20 Members/$30 Non-Members/$15 Students and Seniors Member’s Discount: $65 for the entire series if purchased by March 24. No refunds, No exchanges. rsvp@sjquiltmuseum.org / 408-971-0323 x. 14 PURCHASE TICKETS HERE: https://secure.acceptiva.com/?cst=3850cd
Nota bene: The museum is in dire financial straits and needs a significant infusion of cash by the end of this month. Please give as much as you can. They have posted a link to information about the museum’s situation.
Other/Personal
Kathleen, over at California Doodles and Designs, has posted 2-3 times about her adventures at QuiltCon. She writes well and has some interesting observations. Go take a peek. You might have to scroll down.
I celebrated my 24th wedding anniversary (DH did as well) a few weeks ago. We didn’t do anything super exciting. I was still suffering from my infection, so we just went out to dinner at a local restaurant that we like. We took the Young Man. He was home and we like him and he needed to eat, so what the heck? I think he came with us last year as well. I was thinking about how fortunate I am have to have such a great husband. It isn’t always easy, but we have worked through the hard parts. I like to think of our relationship as him walking down the street with a big red balloon (me) in his hand. I float and bounce around and he keeps me anchored. And there is a brilliant blue sky behind us.
Hope your day, week, month and year are going well!
Post the direct URL (link) where your drawing, doodle, artwork is posted (e.g. your blog, Flickr) in the comments area of this post. I would really like to keep all the artwork together and provide a way for others to see your work and/or your blog.
We are also talking about this on Twitter. Use the hashtag #CPP
The Creative Prompt Project, also, has a Flickr group, which you can join to post your responses. I created this spot so those of you without blogs and websites would have a place to post your responses.
: to bring a bodily part into contact with especially so as to perceive through the tactile sense : handle or feel gently usually with the intent to understand or appreciate <loved to touch the soft silk>
2
: to strike or push lightly especially with the hand or foot or an implement
3
: to lay hands upon (one afflicted with scrofula) with intent to heal
4
archaic
a: to play on (a stringed instrument)
b: to perform (a melody) by playing or singing
5
a: to take into the hands or mouth <never touches alcohol>
b: to put hands upon in any way or degree <don’t touch anything before the police come>; especially: to commit violence upon <swears he never touched the child>
6
: to deal with : become involved with <a sticky situation and I wouldn’t touch it with a 10-foot pole>
7
: to induce to give or lend <touched him for ten dollars>
8
: to cause to be briefly in contact or conjunction with something <touched her spurs to the horse> <touched his hand to his hat>
9
a (1): to meet without overlapping or penetrating :adjoin(2): to get to :reach <the speedometer needle touched 80>
b: to be tangent to
c: to rival in quality or value <nothing can touch that cloth for durability>
10
: to speak or tell of especially in passing <barely touched the incident in the speech>
We are working on learning foundation piecing (also called paper piecing) using a pattern called New York Compass. If you are just finding this tutorial, go to part 1 to see the supply list and learn how to prepare your pieces.
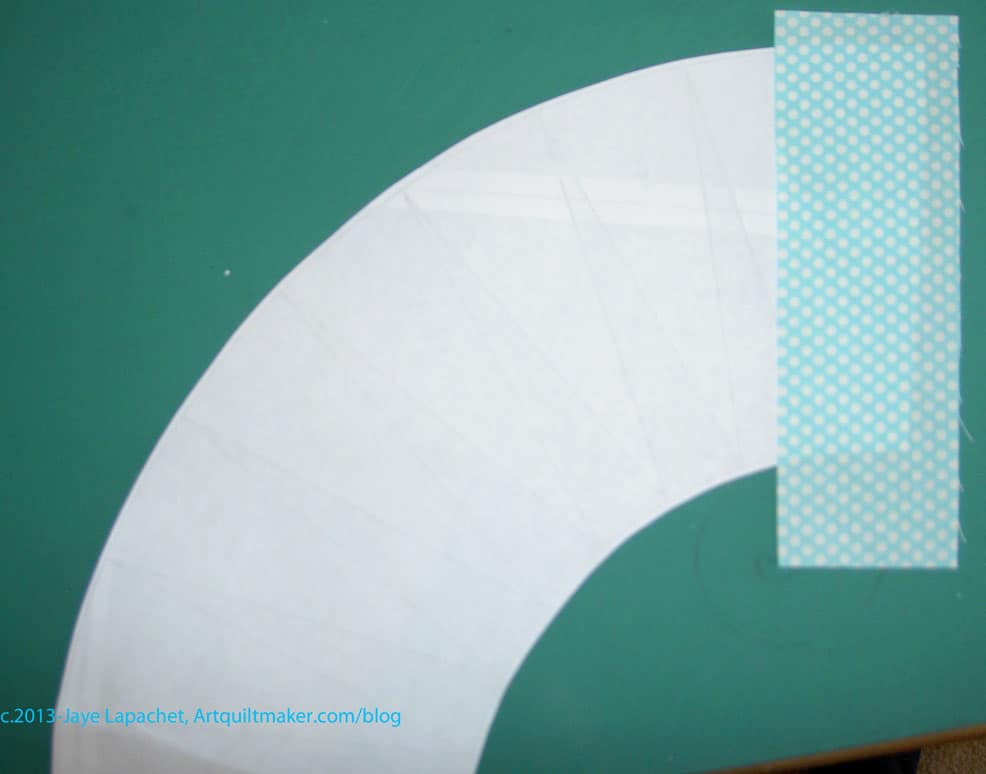
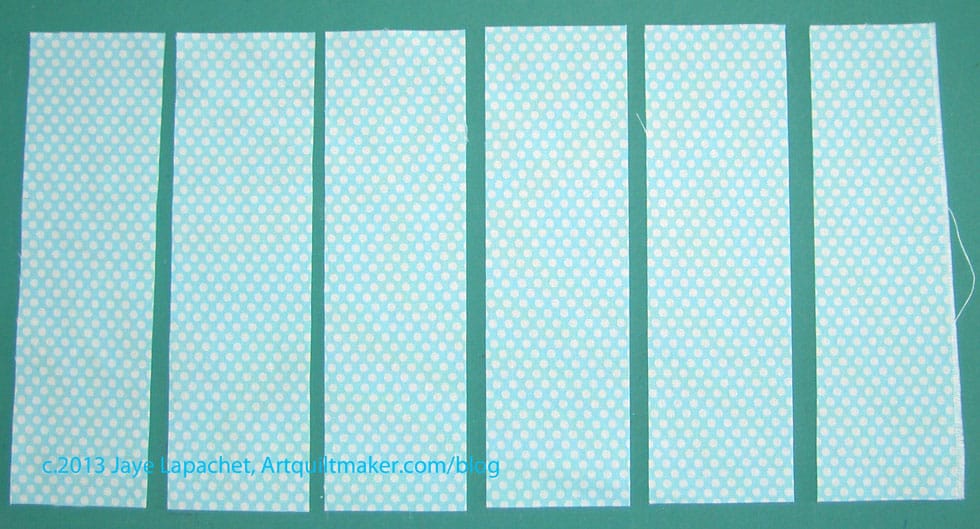
I am using an aqua with white dots for my background and a red with white dots for my foreground. You should have already cut your rectangles for both foreground and background at 2.5″x6″. If not, do it now, as you will need them almost immediately.
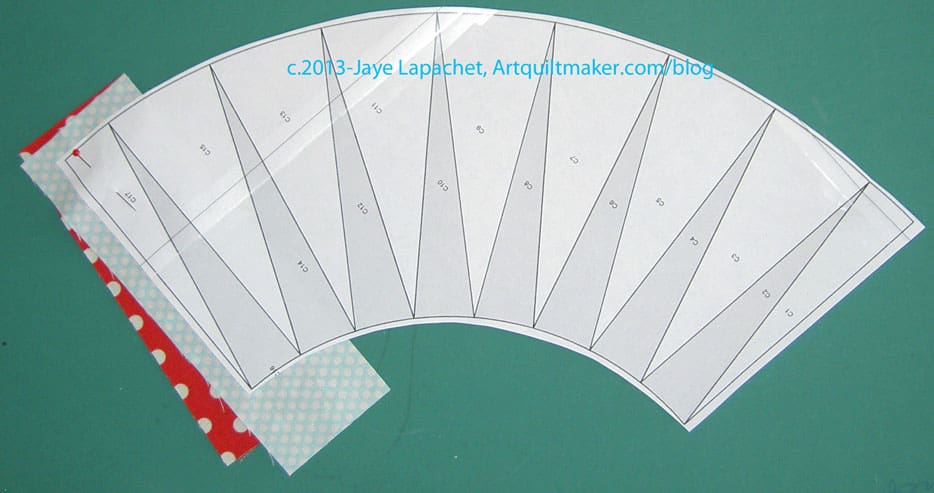
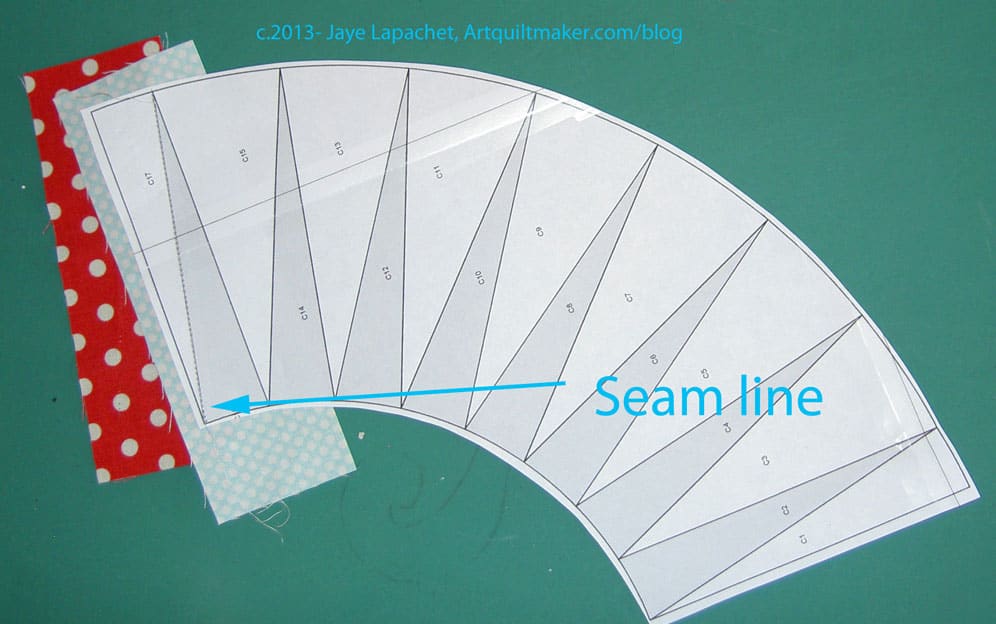
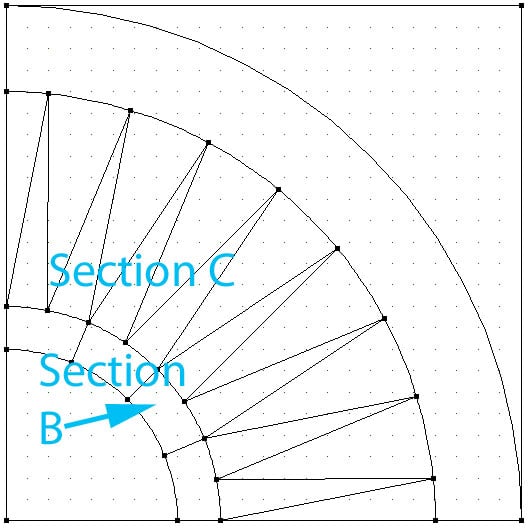
The sections of Section C are marked in the order in which you should piece them. Start with C1. Odd numbers are the background and even numbers indicate you should use the foreground fabric.
You will be piecing from one side (C1) towards the middle to the other side (C17).
Set up your sewing machine with an applique’ foot or similar. You will not need your quarter inch foot for the foundation piecing part of the process.
Shorten the stitch length. If you can’t shorten the stitch length, remember to backstitch at the beginning and end of each line of stitching.
If you are a speed demon, and the option is available on your machine, slow down your machine a little bit. You will need to control the speed at the beginning and the end of the stitching lines.
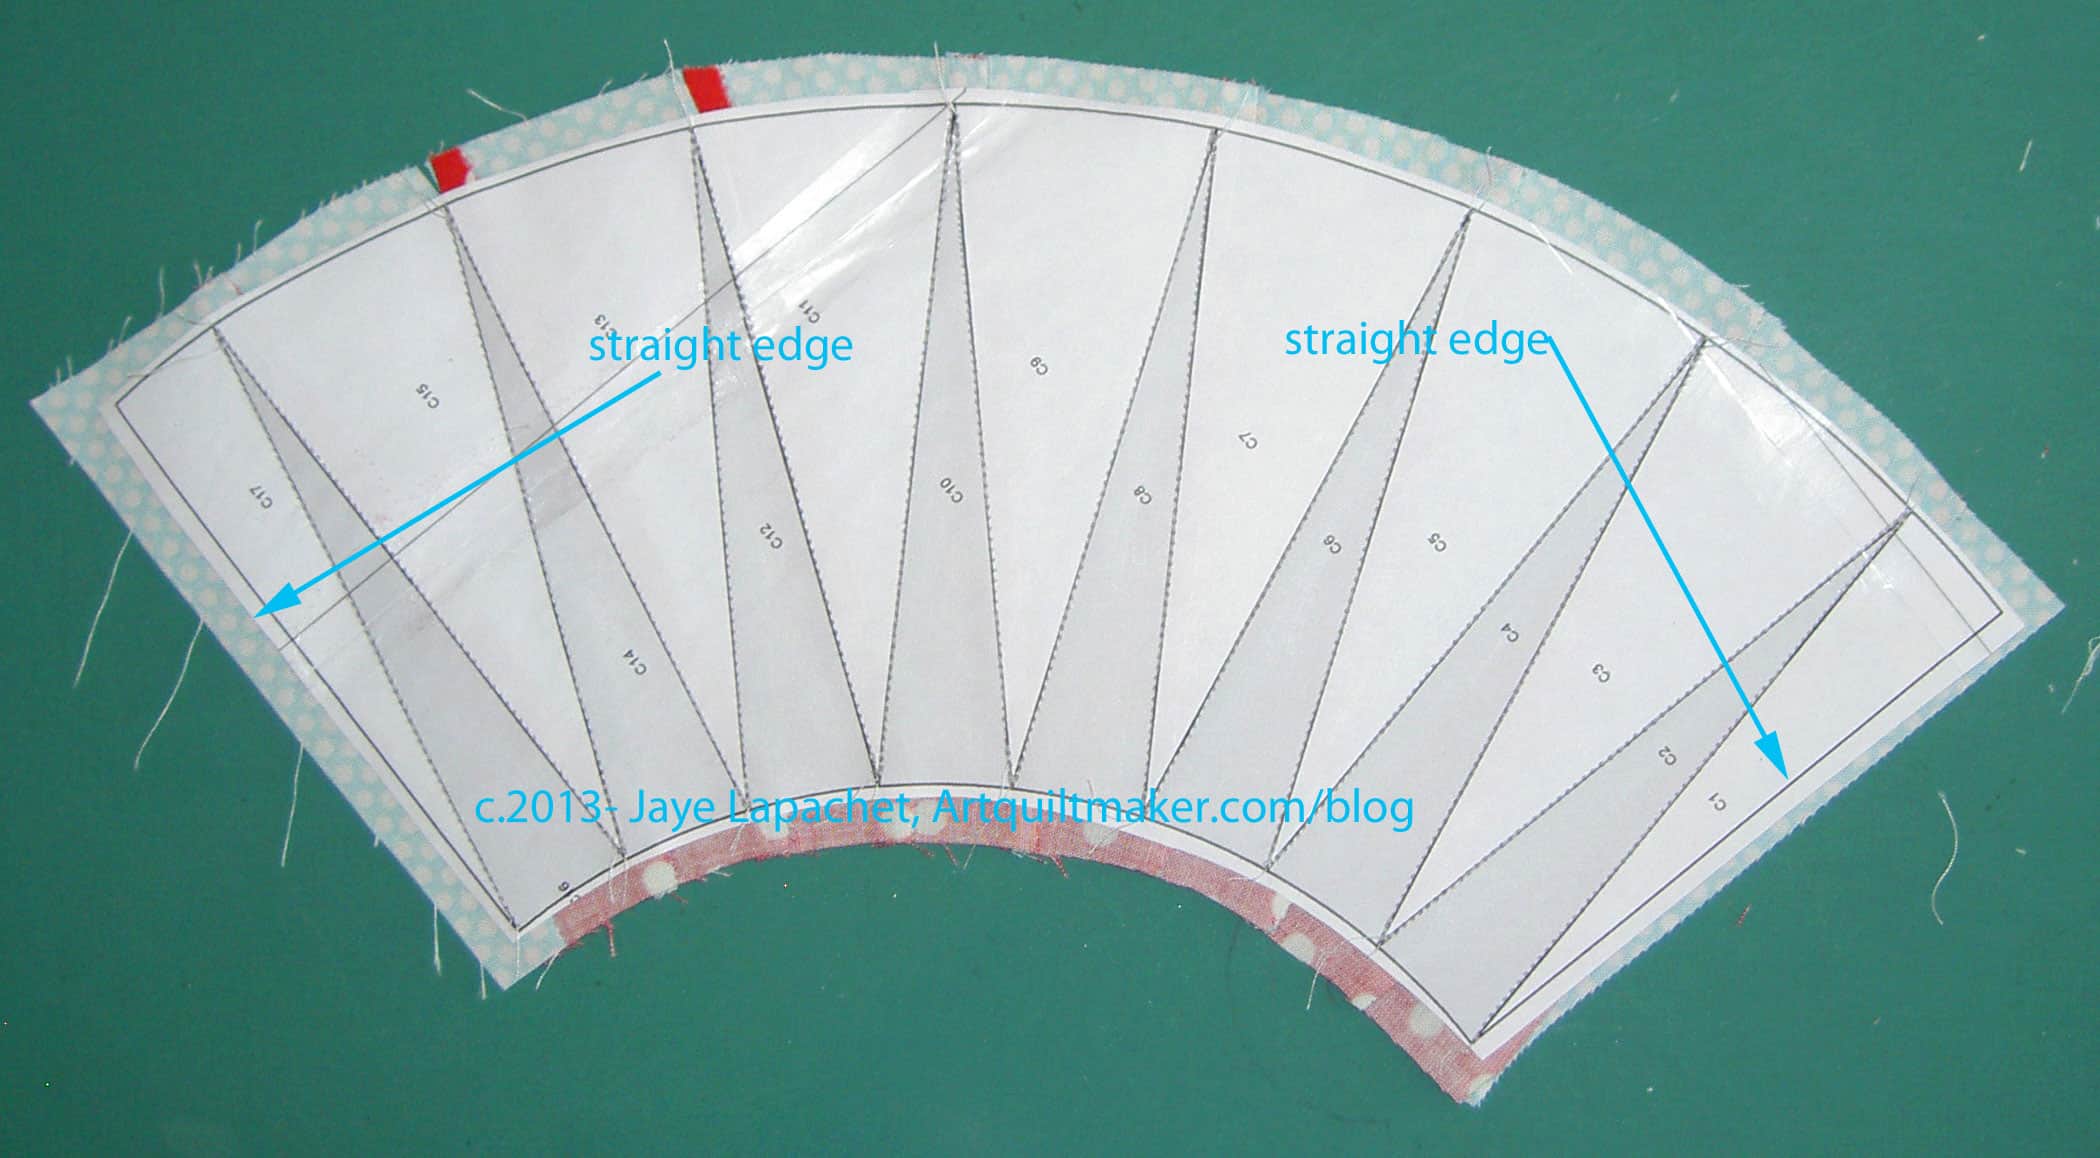
Place your Section C pattern face down on a flat surface.
Lay Section C Face Down
Cover piece C1 with one of the background rectangles you cut in Part 1. Place the fabric so there is at least 1/4″ of fabric around each piece. You get extra bonus points if you line one long straight edge with the straight line at the end of the pattern.
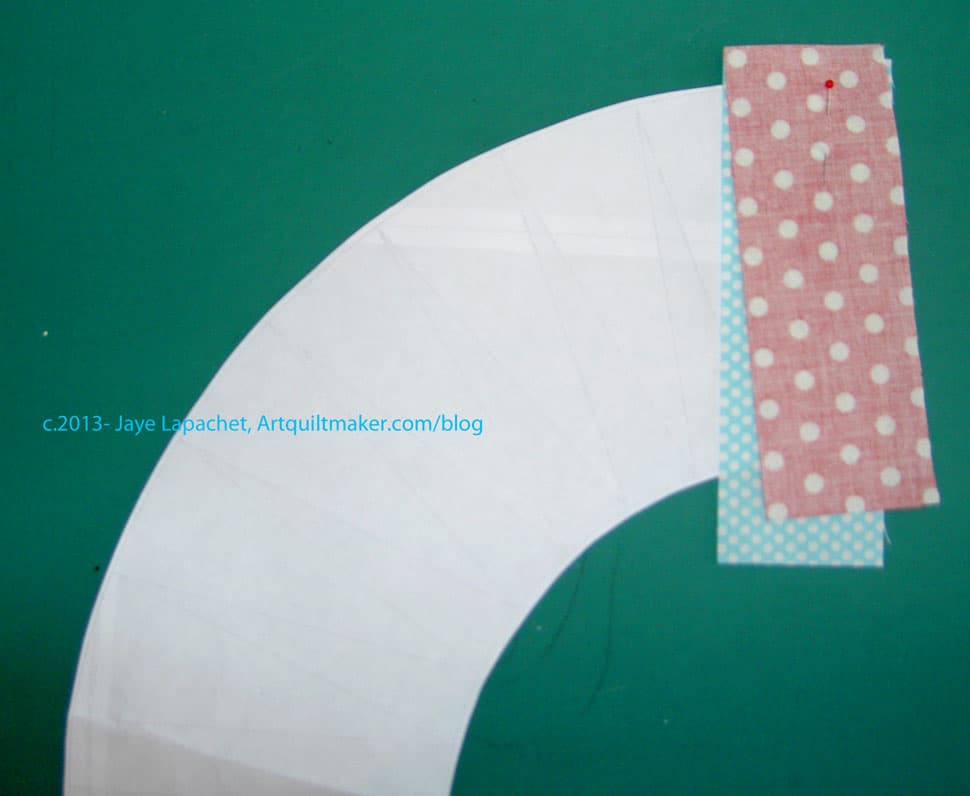
Now, hold these two pieces in one hand (optionally you can clip them together with a WonderClip) and hold the whole piece up to the light (facing a window or a lamp or on a light box). Take note of where the line is between C1 and C2.
Add second fabric
Still holding your pieces up to the light, take one of your foreground rectangles and place one of its edges 1/4″ from the line between C1 and C2. This will be the seam allowance and that quarter inch should hang over the line into C2.
Put all the pieces carefully back down on your table.
Pin the two fabrics to the paper, keeping the pin away from the line between C1 and C2. You want enough space so the pin doesn’t interfere with the foot on your sewing machine. I like to pin on my cutting mat so I don’t damage the furniture.
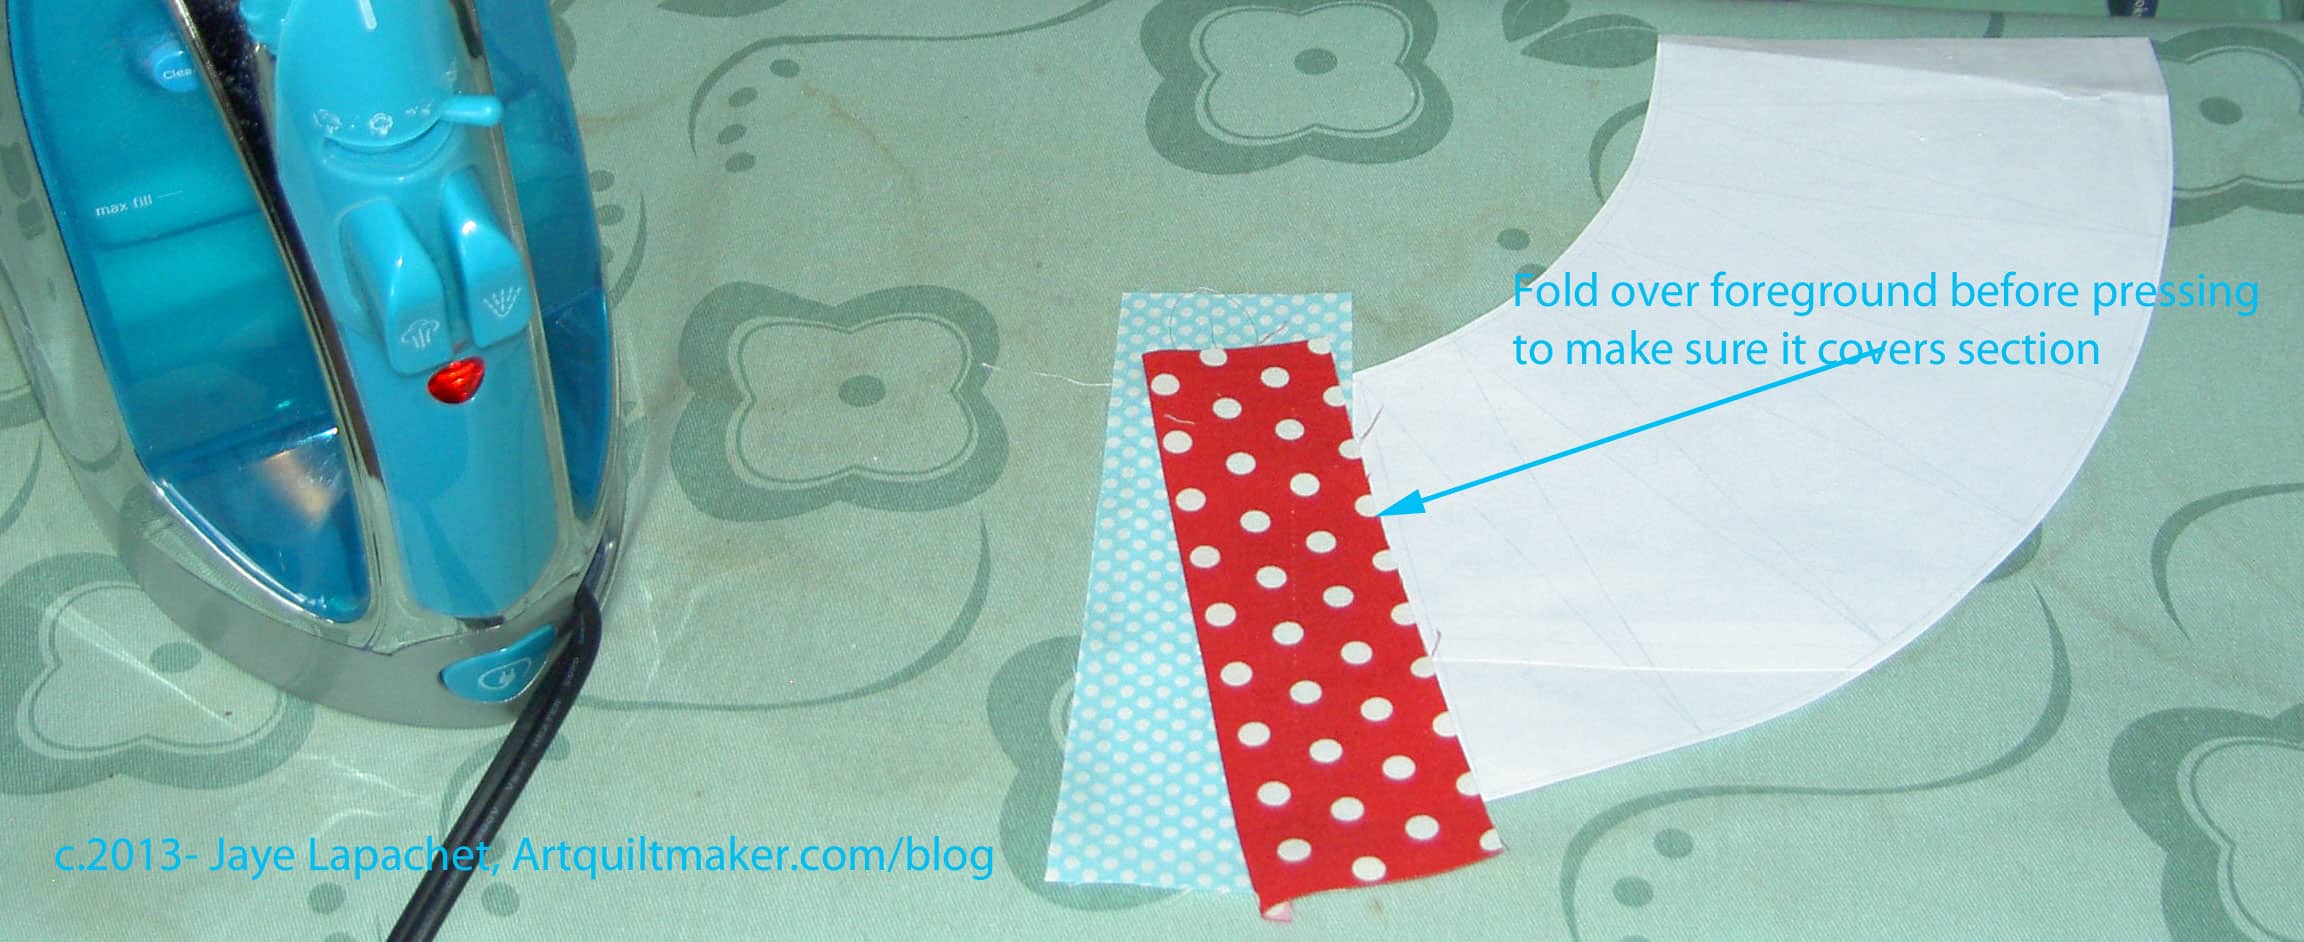
Fold the foreground piece back to make sure that it covers C2. You will fold it on the line between C1 and C2. That will be your sewing line. You can move the pins to the front if you want to make for easier sewing.
Flip the whole thing over
Flip the whole thing over and take a look.
Once pinned, check again to make sure that you have at least 1/4″ all around C1 (background) and C2 (foreground).
Take your piece to the sewing machine and sew on the line between C1 and C2. Do not go over. Only sew on that line.
Stitched on line
Back stitch at the beginning and the end. One backstitch is fine.
Fold over to check coverage
Remove the piece from under the presser foot and fold your foreground over to check and make sure it covered C2.
Why you need to trim
You can see the foreground fabric through the background, which is why you need to trim. Depending on the colors you use, this may not be the case, but you don’t want to build up so many layers that you cannot quilt through the piece.
Take Section C back to your cutting mat and place it so the paper part of the pattern is on top.
Fold the paper back
Fold the paper back on the seam line so the excess seam allowance is exposed. You are going to cut this off, so it is worthwhile to take a minute and make sure you are not cutting off the wrong part (the part you need to cover your background and spikes).
Trim Excess Seam Allowance
Line up your ruler with the 1/4″ line on the seam line and trim the excess seam allowance.
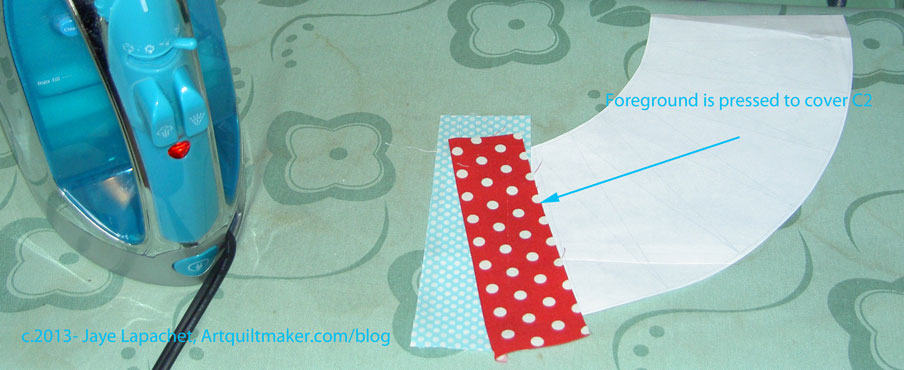
Press
Take your piece to your ironing surface and place it with the paper down. Press towards the foreground, so you get rid of as much of the “bump'” from the seam as you can. Press towards the middle of your pattern. You want the foreground fabric to be as flat as you can get it. Pressing is very important. It is possible that there will be a bump when you put the next piece over the previous one, if you don’t press well.
Your foreground piece should cover the line between C2 and C3 and give you a 1/4″ seam allowance.
Once you have pressed the foreground flat, you are ready to put on the next background piece.
Take one of your background rectangles and place one of its edges 1/4″ from the line between C2 and C3, smoothing (without stretching) the foreground piece you sewed, so it is as flat as possible. Again, this will be the seam allowance and that quarter inch should hang over the line into section C3. You may need to hold it up to the light again to position the piece correctly.
Once you have the correct placement, pin in place.
Once pinned, check again to make sure that you have at least 1/4″ all around C2 (background) .
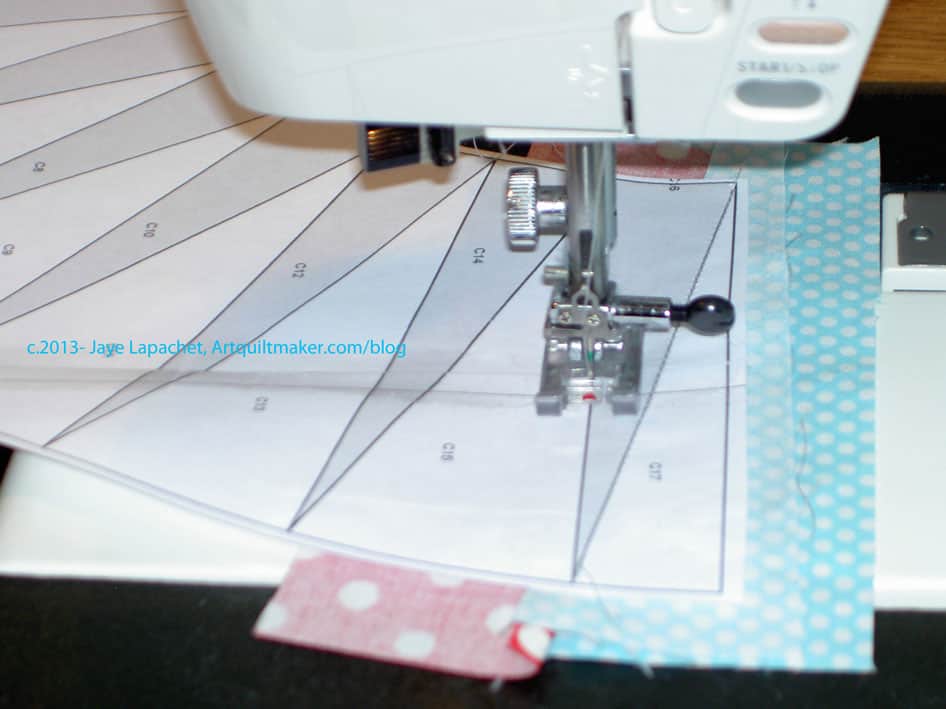
Sew on black line
Take your piece to the sewing machine and sew on the line between C2 and C3. Do not sew beyond the end of that line. Only sew on that line.
Repeat
Repeat this process, alternating between foreground and background until you reach the other end of Section C. As you move down the pattern, your Section C will start to look like something you could put into a block.
Trim Straight Edges
Use your rotary cutting kit to trim the straight edges of Section C.
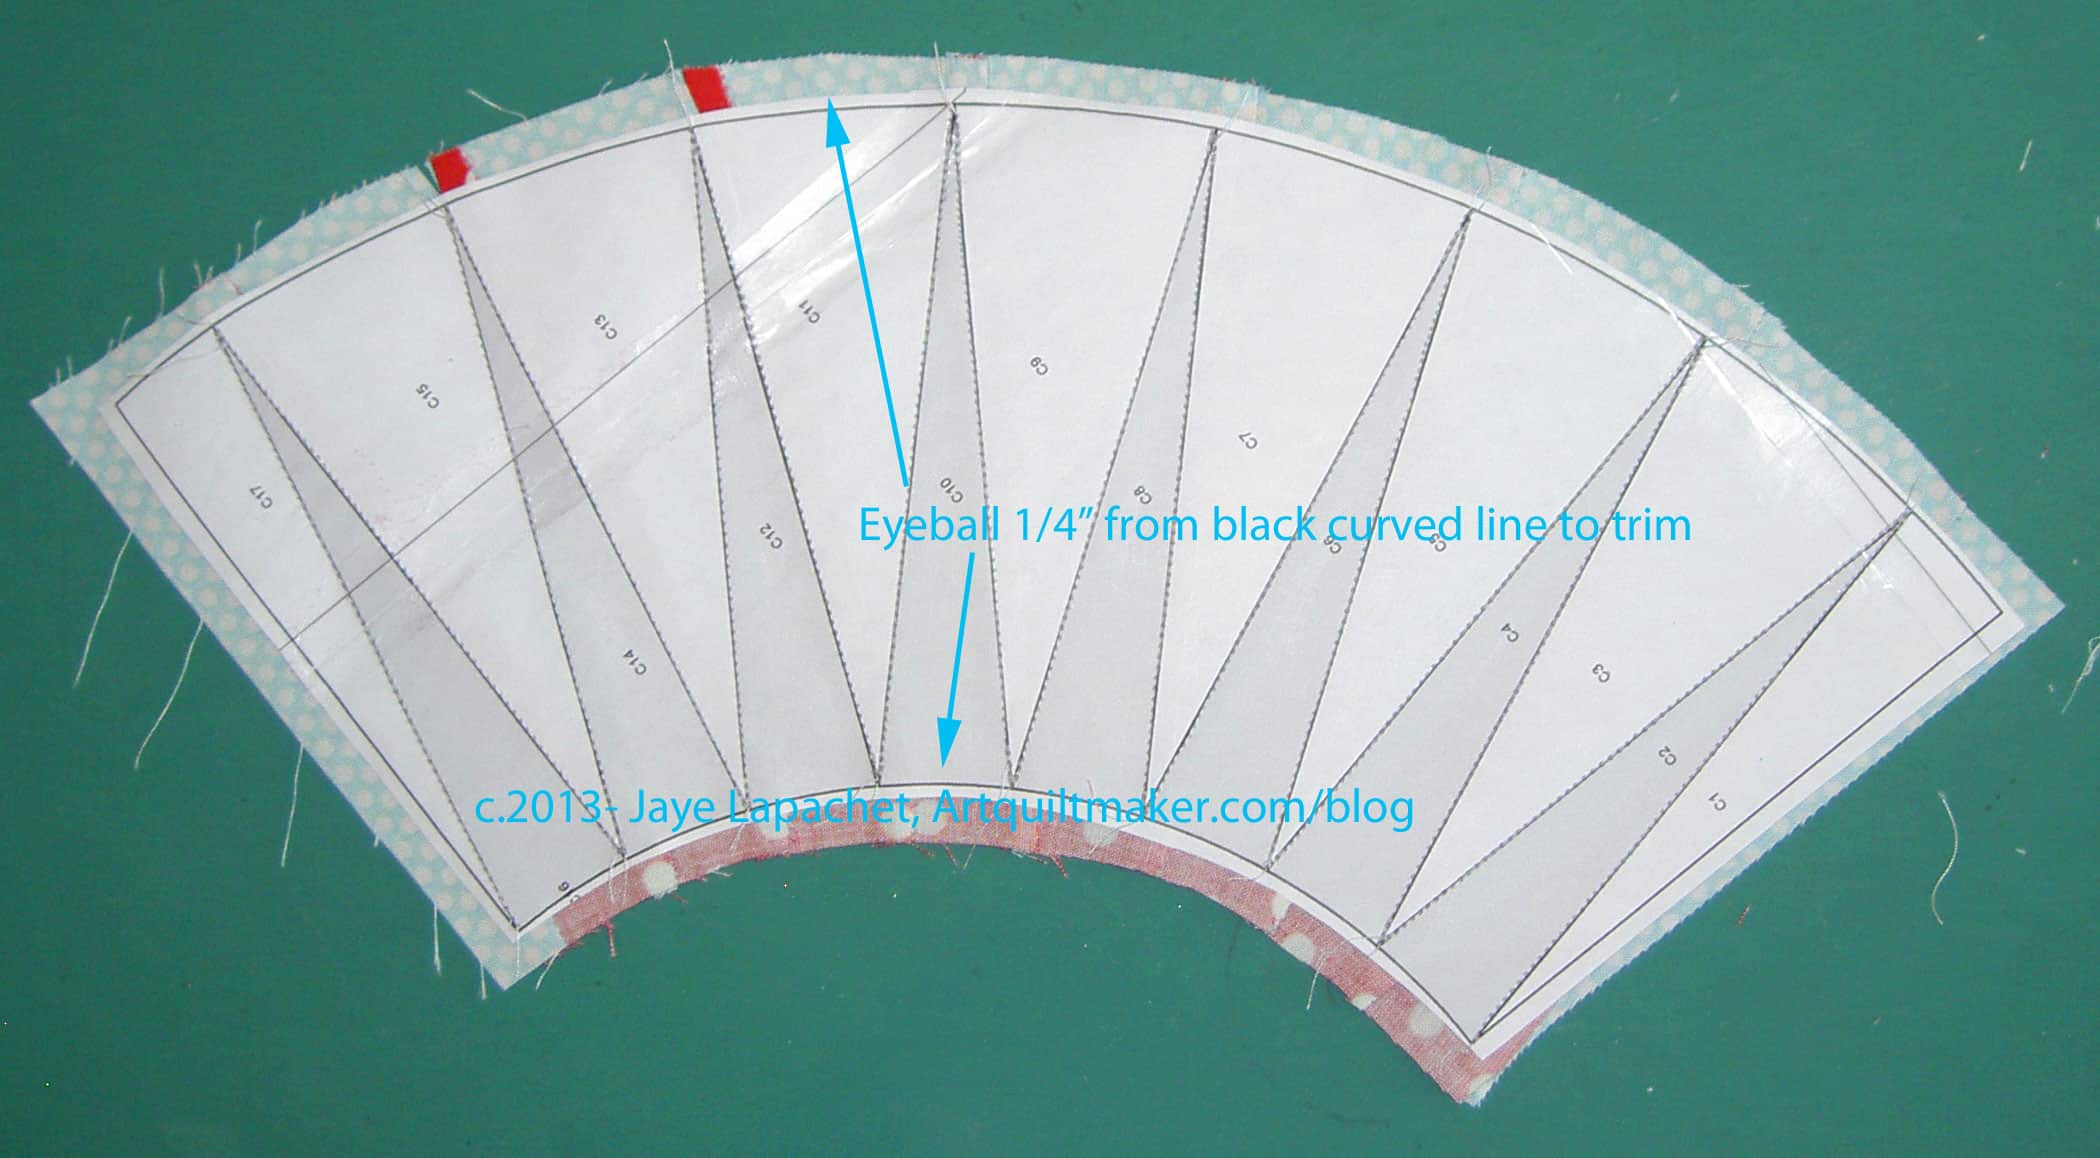
Trim with Sharp Scissors
From the paper pattern side of Section C, I eyeball a 1/4″ and trim the curves with very sharp scissors. There are some serious layers here, so I am not fooling when I say sharp.
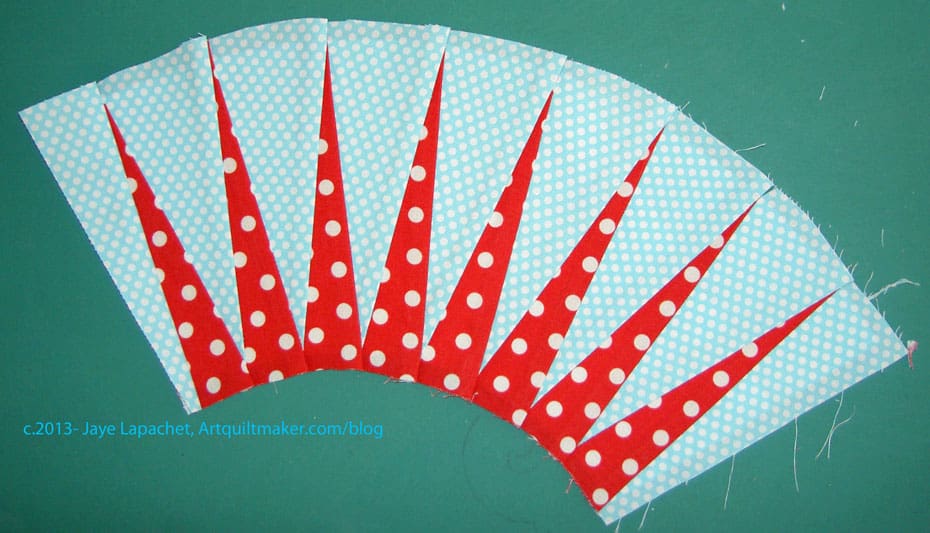
Finished Section C
The finished Section C is a sight to behold. Even after making several of these sections, I amazed each time it comes out relatively normal.
Tips:
If you have to rip out stitches, rip them out from the fabric side, not the paper side.
Pay attention to putting the next piece on the foundation.
Weeks Ringle issued some homework in her lecture at QuiltCon and then posted it to her blog for the rest of us. In a recent Various & Sundry post, I briefly mentioned the QuiltCon homework. I glanced at it first and thought I would pass it on, which I did in that post.
Then I went back and looked at it further and thought it would be a good exercise. I thought I would print and paste the homework into my journal and maybe write something about each section and make myself a better quiltmaker.
I decided that I would do it here for all of you to read. Won’t you join me?
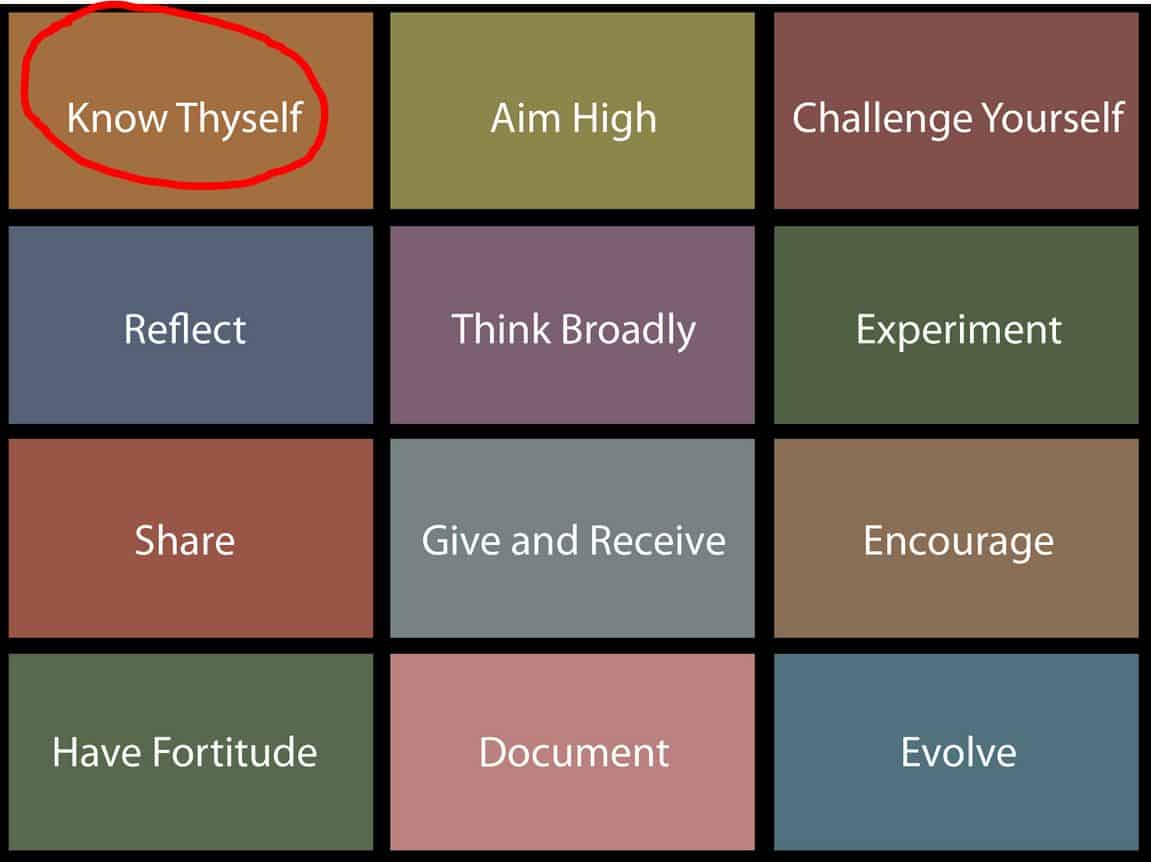
Weeks Ringle’s Quilt Con Homework #1
#1 is Know Thyself
Do you know yourself as a quiltmaker?
Weeks writes “Know thyself. Make a list of what you’re good at – use your strengths to develop your own techniques and your own pattern. Now make a list of things that you don’t know how to do – then figure out how to whittle away at this list to expand your skill set”
In order for me to make a list of what I am good at I first need to make a list of what I like and what is important to me about quiltmaking and relate it to myself.
I like bright colors, so I work in bright colors. It might be good for me to try out some beiges, but I don’t like beiges. I have bought some chocolate browns lately, so I am considering that to be expanding my horizons into the realm of depressing colors because there is no way I am making beige quilts.
I want to make cheerful quilts. I want to make quilts that make people sing in happiness. I want to make quilts that make people smile when they look at them. So what if they aren’t dignified?
I don’t believe in the adage “buy ugly fabric, because it makes your pretty fabric look prettier.” To me, ugly fabric is just ugly. I have been down that road and refuse to do it again. Fabric is getting to be too expensive to buy what I don’t like.
I like good technique, because *I* think bad technique can take away from the look of the piece. If that means making my half square triangles 1/8″ larger and trimming, so be it.
I like to make well made pieces, because I don’t want my pieces to fall apart. I take my time in finishing and I rip out seams a lot.
I don’t want to be categorized as making a certain kind of quilt. This is such a hard thing to explain. I want to make the quilts that I want to make in the style and fabrics I want to use. I don’t want to be a traditional quiltmaker, I don’t want to be labeled a modern quiltmaker or an art quiltmaker (ironic, huh?). I want to make the quilts the my mood dictates.
I like to work on projects that I like. This is my hobby/passion/vocation, but I don’t get money from it, so I want to make what I want to make.
I like to reshape ideas into my own. This might mean that I take a block from the 1930s and make it over in Martha Negley and Philip Jacobs prints.
I think knowing quilt history is important. Kind of like that old saying “knowing history prevents us from repeating the past.” I like to remind myself that women came before me and have done all this before. I appreciate different ways of doing things and different tools to get the job done, but I have no illusions that I am doing anything brand spanking new that nobody has done before. I have block books, so I can try and figure out who did it before and where I might find more information on how they did whatever the task is. To recognize those quiltmakers who came before me makes me feel like I am part of something.
I think it is important to step up. People before me shared tips and tricks. I have some knowledge and I might as well share it. The blog makes it easier. That is why I work with Sandy on her podcast, post tutorials, etc.
It is important to support the community. I don’t mind sharing my tutorials. I want everyone to make quilts, buy fabric. Perhaps some of that karma will come back to me someday.
I don’t like it when people steal from my blog. It hurts when I have spent a long time working on a project and taking the time to post.
I find it important to use part of my quiltmaking time for charity. If I can’t make a quilt, I’ll make a quilt top. If I can’t make a top, I’ll make some pillowcases. There is always someone who needs to know that someone else cares. I think charity/donation quilts should be pretty. While I am making them, I can learn something new or try out a new pattern I normally wouldn’t work on.
As a result of the above, here is my to do list. These are not resolutions; these are things I will work on over the next 50 years.
To Do:
Be more patient
Practice curves
Don’t let my fabric sit around.
Get back to that Pineapple quilt.
I am sure I will think of more, but this is a start.
*No copyright claimed to Weeks Ringle’s chart of points.
Frances talked about foundation piecing in one of her recent podcasts. I am nothing if not an accommodating 😉 teacher, so I thought we would tackle a foundation piecing pattern next. This is called New York Compass, a variation of the New York Beauty pattern. It is a little more complex than the patterns we have been working on, but I decided to throw caution to the wind and nudge Frances to step up. She has done curves, so I am confident she can do this one.
New York Compass
In part 1, we will prep everything.
Supplies:
Notebook for notes
Pen to take notes 😉
Sewing Machine
applique’ foot (preferably one with a mark showing where the needle will stitch)
1/4″ foot
thread
fabric
fabric scissors
paper scissors
foundation piecing paper like Toni’s Disappearing Paper or Carol Doak’s Foundation Paper
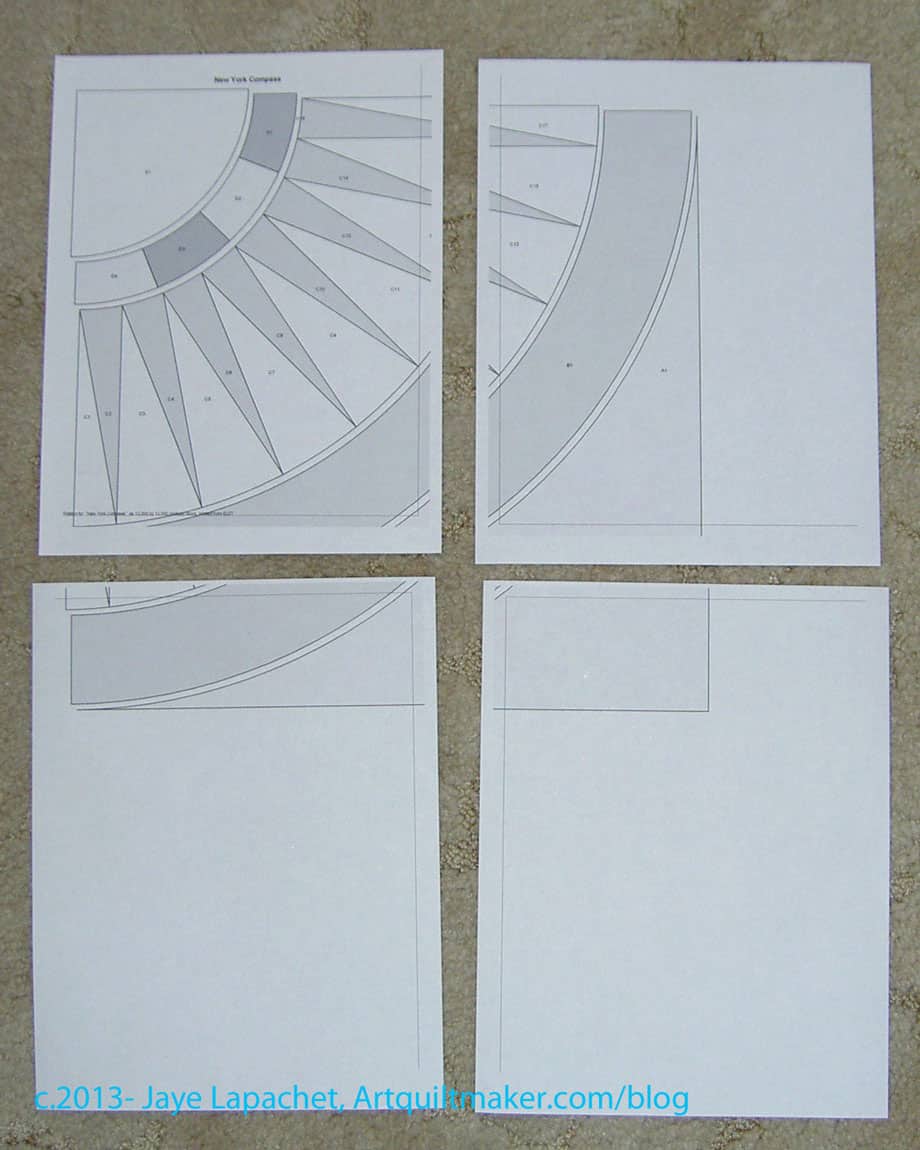
Print the pattern sheets (all 4). I only have 8.5″x11″ paper so the pattern comes out on 4 sheets. Use some kind of foundation piecing paper to print the pattern. Nota Bene: I keep a folder for all of my projects, so I like to print at least 2, if not 3 copies of the pattern. One I use to make the templates, one I will tape together and keep whole (you can use regular copy paper for this one) and one I will use for the foundations.
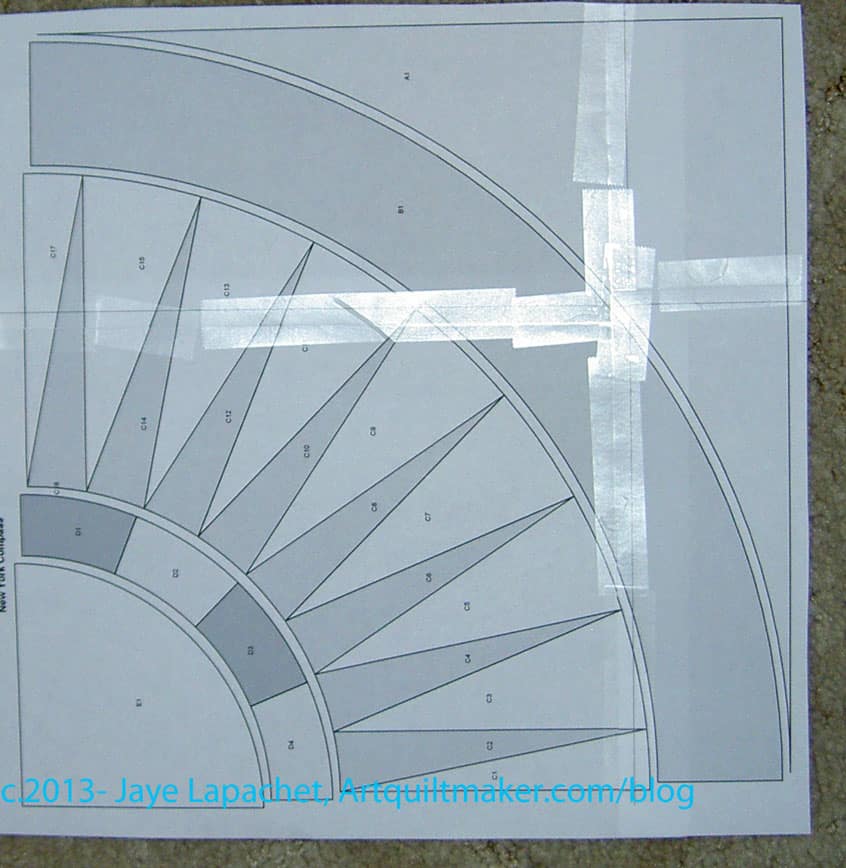
Tape pattern together
Trim off the margins and tape the parts together. Note, the tape will not play nicely with your iron when you press the foundation pieced parts so USE A PRESSING CLOTH. A scrap of fabric or ugly fabric work great. Guess how I found out?
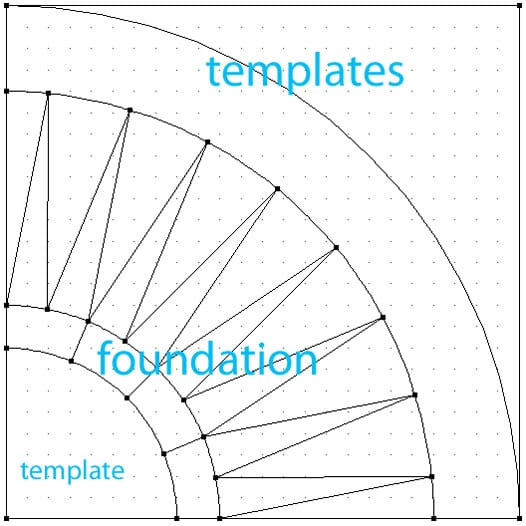
NY Compass Templates
Above is how the templates shake out: 3 regular plastic backed templates and two foundation templates.
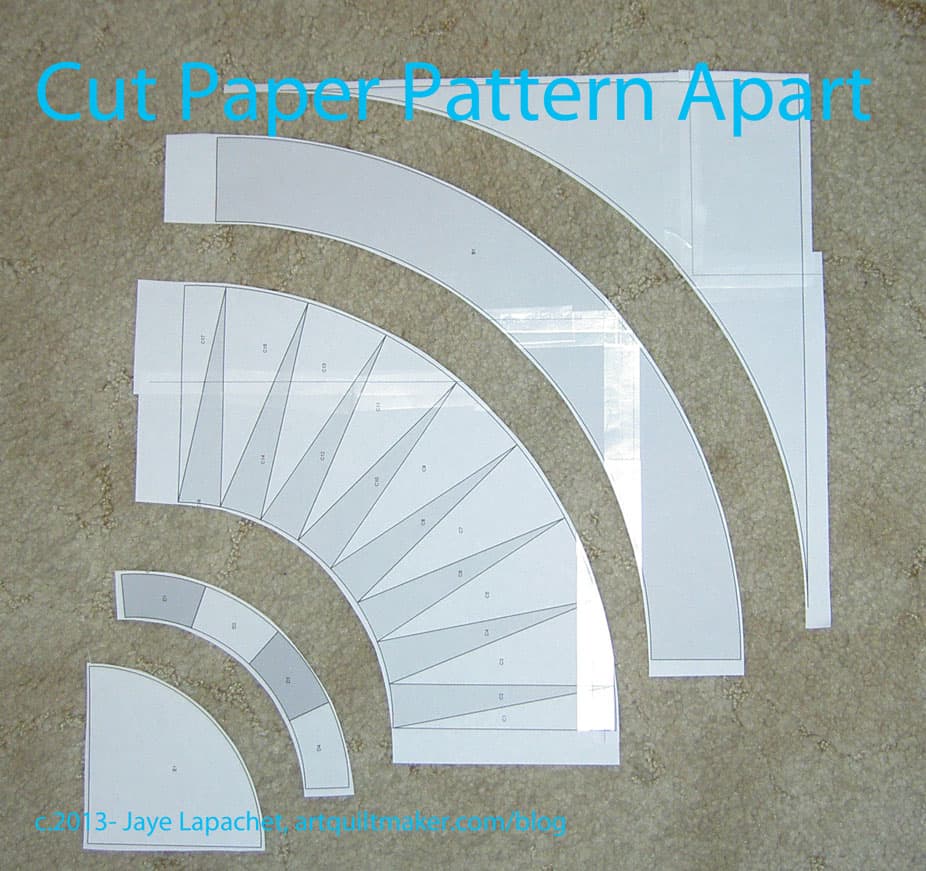
Cut Paper Pattern Apart
Rough cut the parts of the pattern apart. You will have 5 parts. Two of them will be foundation piecing patterns and 3 of will need to be made into regular templates with template plastic.
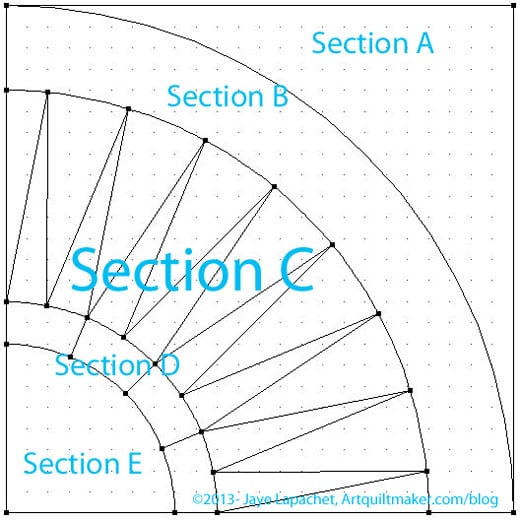
NY Compass SectionsNY Compass Outline
I am going to refer to the skinny spikes piece as Section C. Section C is in the middle.
Make your templates. You must add a quarter of inch to your paper templates (not the ones that will be foundation pieced. If you don’t know how to make templates with template plastic, refer to my tutorial on Machine Applique’ Part 1. Make sure you put the plastic on the correct side (wrong side of fabric).
Cut rectangles for foundation piecing 2.5″
Cut rectangles for foundation piecing 2.5″x 6.5″. This is a generous rectangle. You aren’t going to save any fabric with this technique and you should worry more about coming up short, because ripping out stitches is a real pain.
There is one tricky part about these templates. You will need to add a 1/4″ to the curve. The way you do that is to: A) glue the paper template to the largest piece of template plastic you have (you may have to piece the template plastic). B) Take your ruler and start at the left end of the paper template. Line the ruler’s 1/4″ mark up with the dark outline on the paper template (you should still have a rough cut paper template before you glue the paper to template plastic). C) Make a mark with a template plastic friendly pen at the 1/4″. D) Move your ruler slightly to the right and make another mark at the 1/4″ point. E) Follow the curved line of the paper part of the template with your ruler until you reach the far right side of the ruler. F) Cut along the dots you have made in as smooth a motion as you can using your paper scissors. You should now have a quarter inch seam allowance along your template. Repeat for all curved templates.
Cut your fabrics. Nota Bene: When you cut the fabrics for Section C, cut rectangles for these spikes at 2.5″.
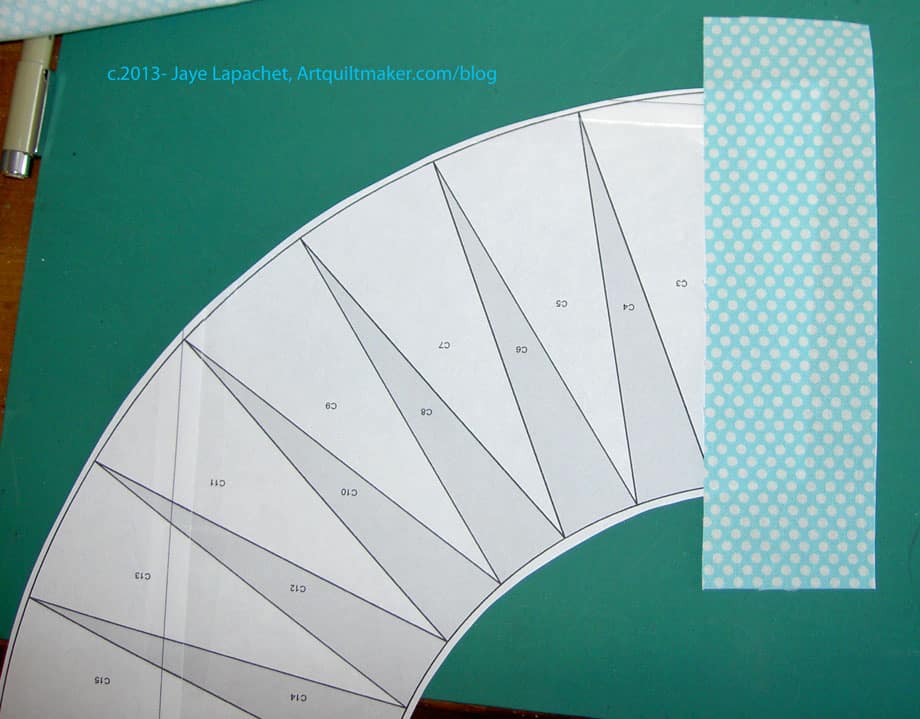
Check fabric strips
Check to make sure you have cut your rectangles large enough. Take your Section C and lay it face up. Cover the first section (labeled C1 on my pattern) to make sure your rectangle covers the entire section C1 plus 1/4″ seam allowance around all sides.
Now go to Part 2 to learn the actual foundation piecing.
Tips:
If you have to rip out stitches, rip them out from the fabric side, not the paper side.
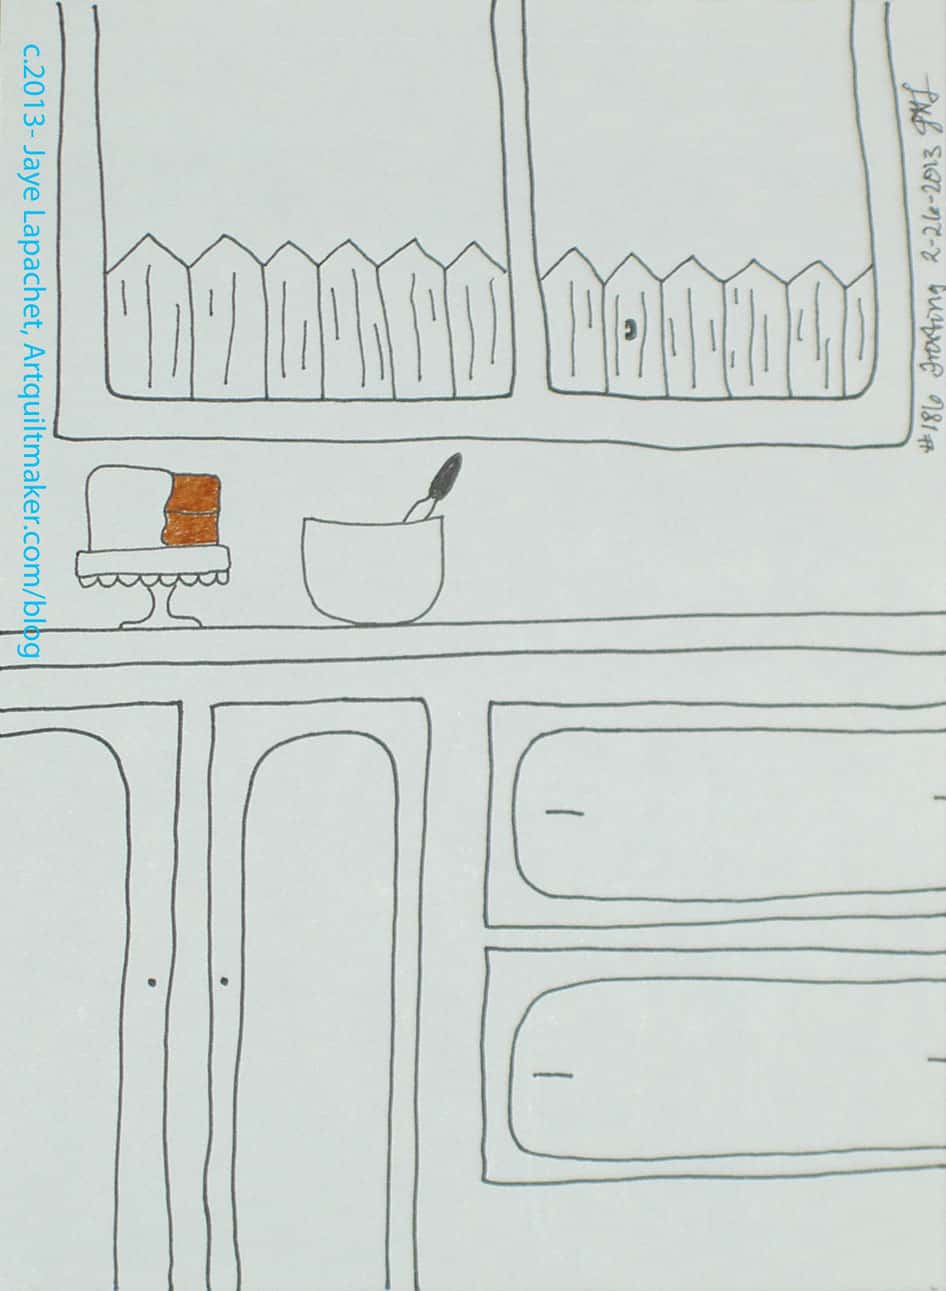
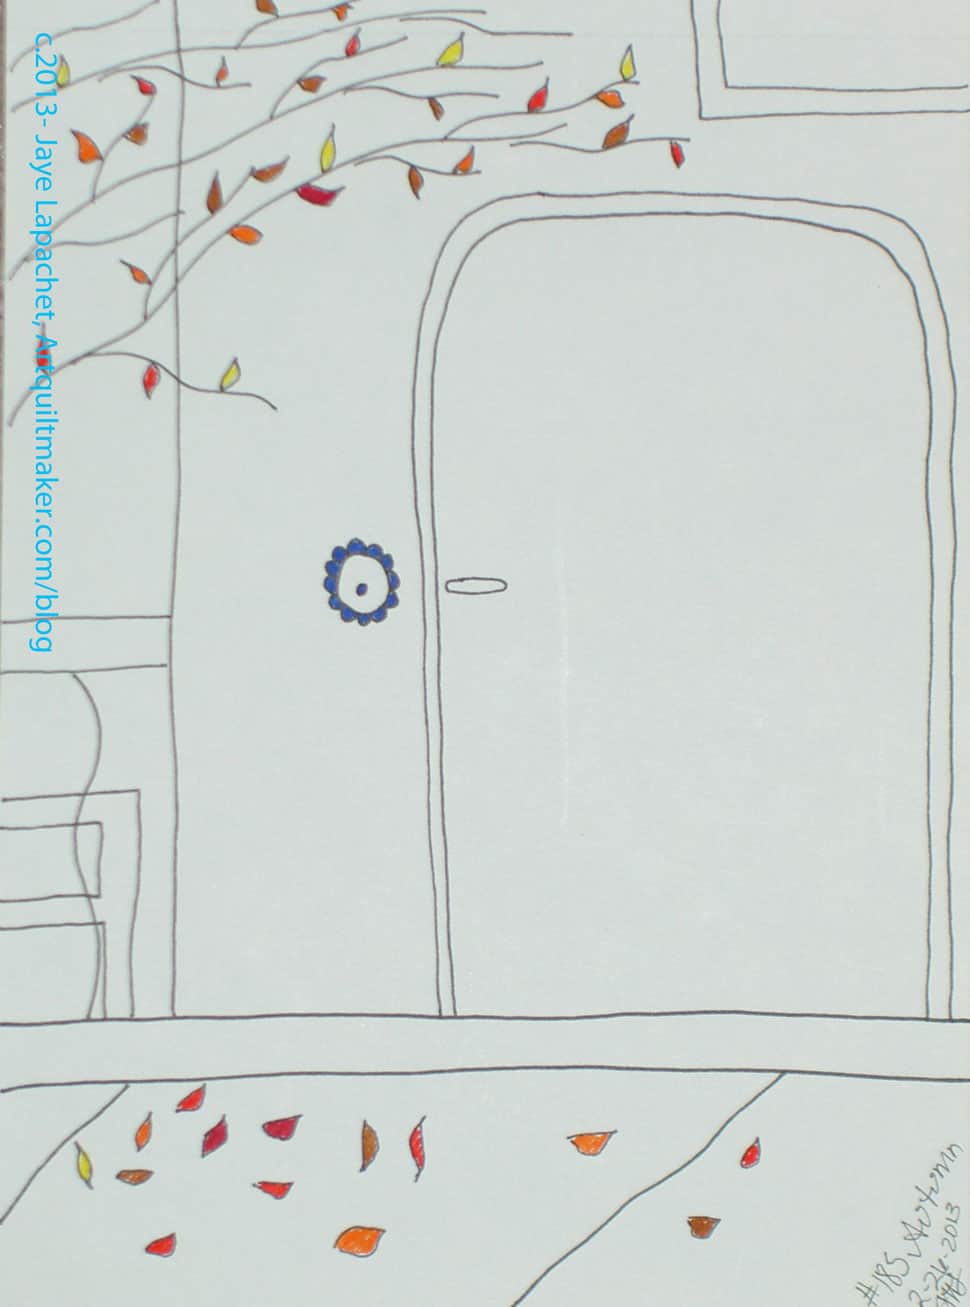
Autumn is long gone at this time, but I am still about 15 responses behind. This response was easy to do. I don’t know why, but it just flowed out of my pen.
Take a look at the original prompt and create a response of your own.
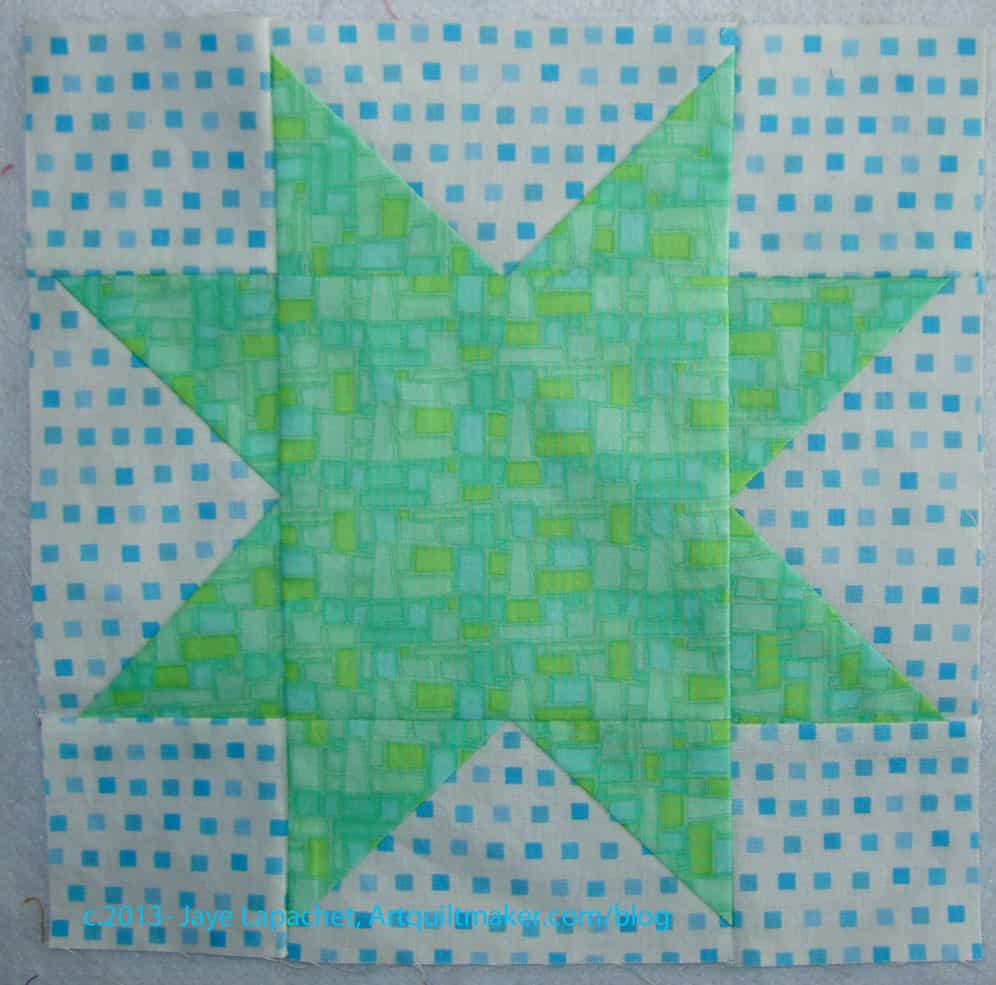
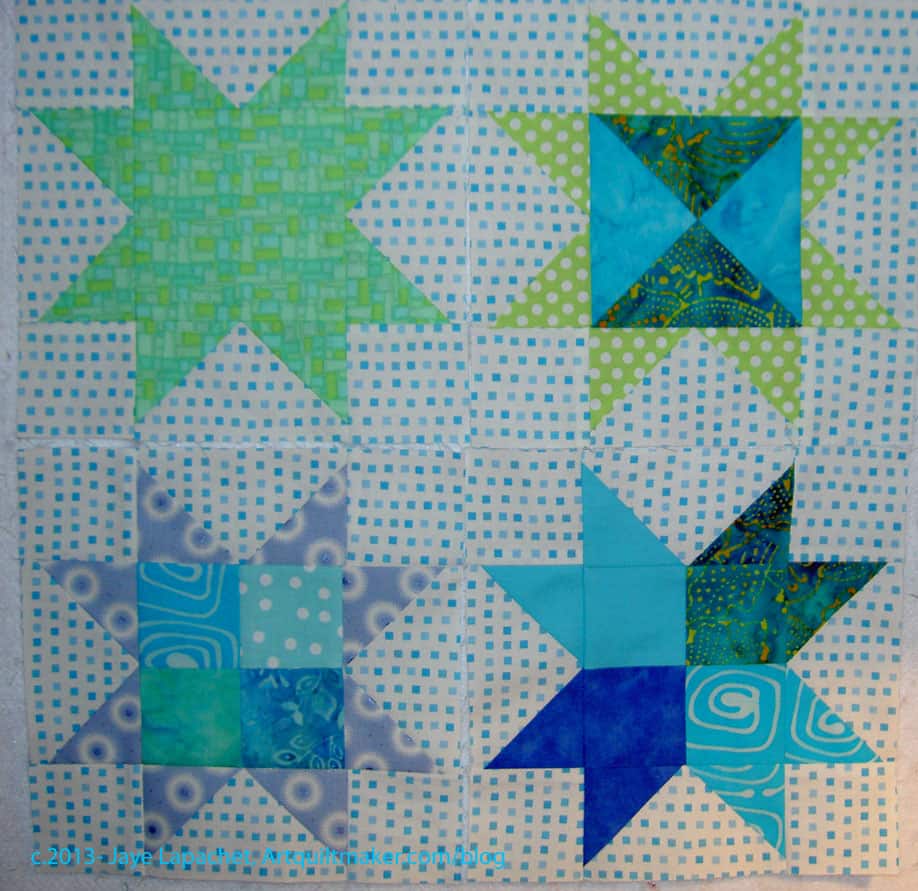
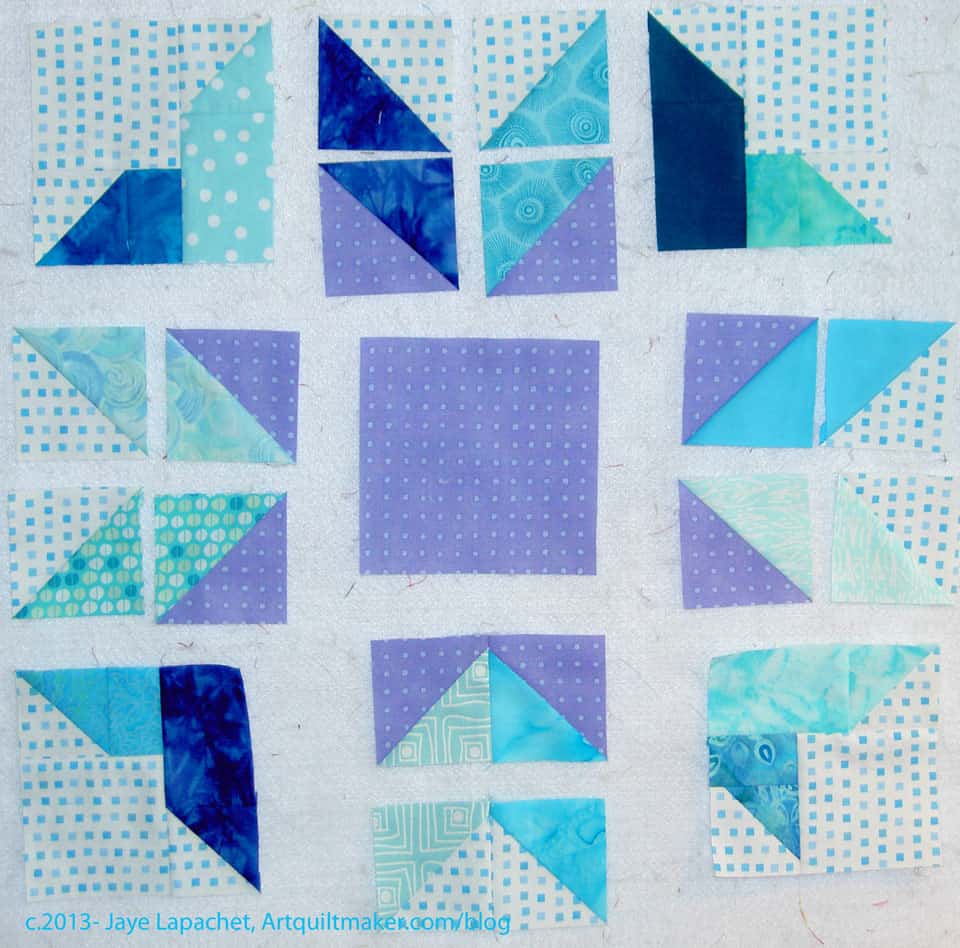
We have started the 8″ blocks this week. We are doing 4 each week and one of them will be a Basic Star. Being honest, I did the green one as a test when we started talking about the project.
Four 8″ Blocks
I was able to finish the other three blocks this weekend. I am pleased with them. I have added a couple more lavenders. I am not sure about them, but I will use at least a few more pieces so they don’t look odd.
I chose the blocks this week and they are Basic Star (top, left), Hourglass Star (top, right), Four Patch Star (bottom, right), Four Patch Variation (bottom, right).
We have 40 total of these blocks to make and I might make some of the Basic Stars in advance.
I have been doing some prep of the 4″ blocks, cutting the backgrounds and the corners in readiness for when I need some leaders and enders.
I finally got this block together. I made it differently this time; I used half square triangles instead of rectangles and squares. I don’t like the look of so many seams, but I couldn’t get the piece together in the correct size doing it any other way.
I am not giving you the pattern this time, because even in EQ, it wouldn’t come out right. I don’t want you to be frustrated either.
The other thing is that TFQ and I had a disagreement about the grid of this block. I drew it on the same grid as the other Sawtooth Stars. I found, though, that she was right once I started to make it. It is really a 9 patch. I shouldn’t have disagreed. She is usually correct about such things.
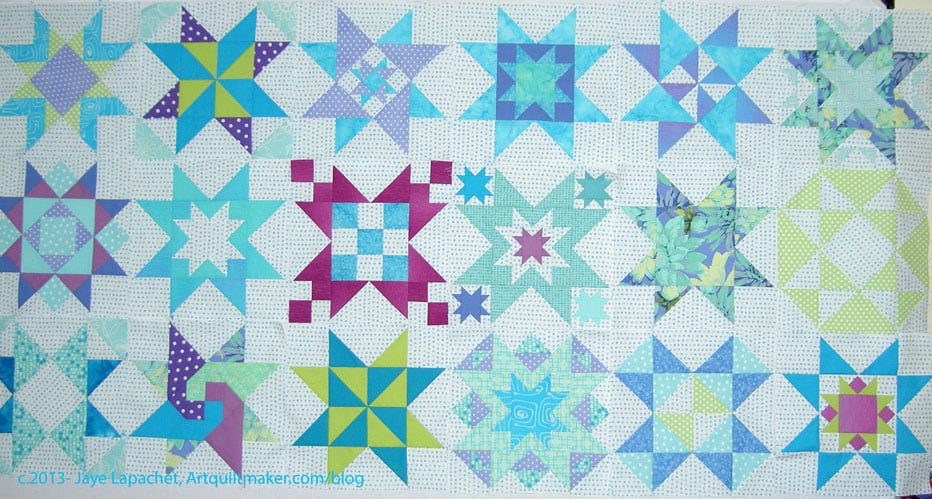
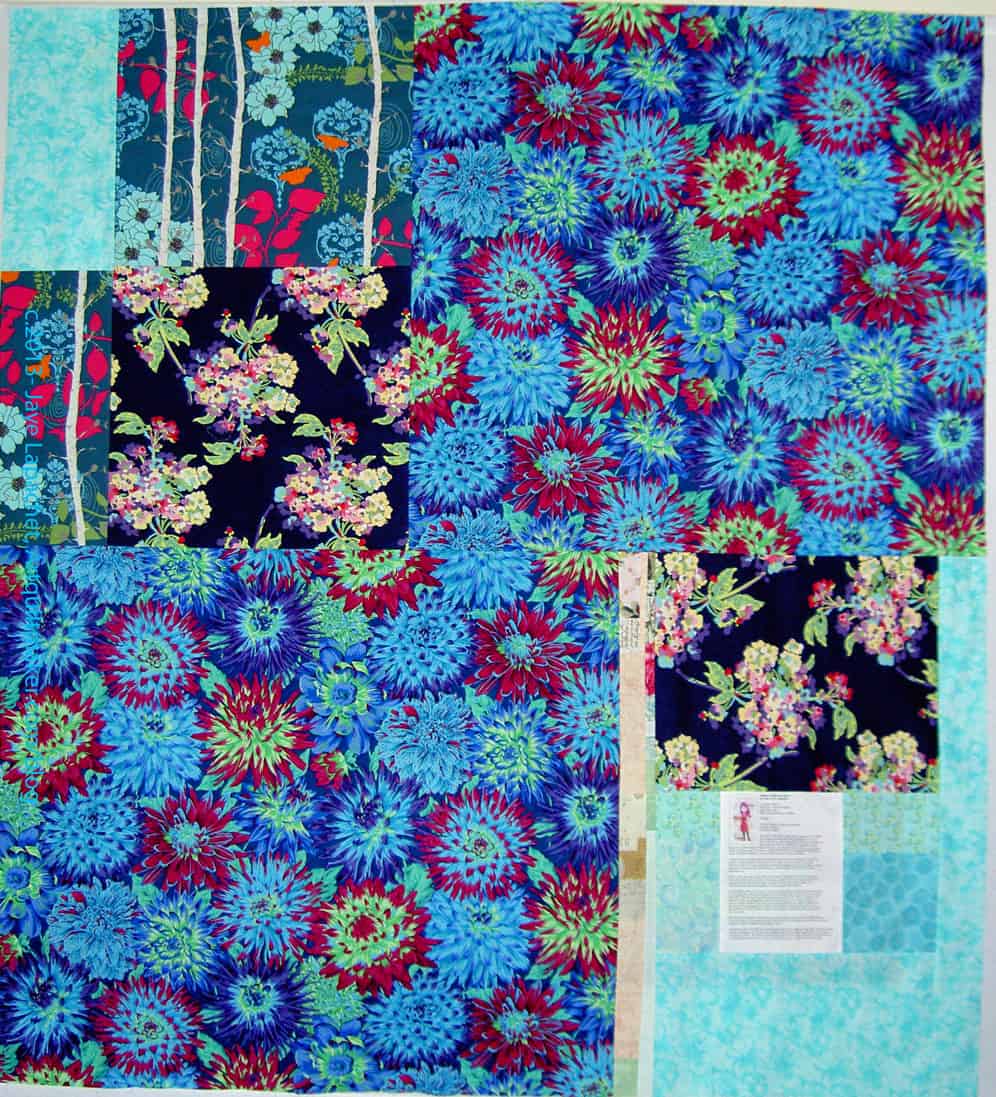
All, except one, of the 12″ stars finally made it onto my portable design wall. I finally finished the back of FOTY 2012 and was able to take the pieces and parts off the design wall.
Star Sampler blocks
While I was waiting for space to open up, I layered the blocks one on top of the other on my smaller design wall, so I could keep track of the blocks. This is unsatisfactory as I like to see what I am working on, compare fabrics I am considering for use against what I have already used and get a sense of how many times I have used a fabric. That doesn’t work well when I have to layer the blocks.
It couldn’t be helped, though, as the blocks are large and there are a lot of them.
Post the direct URL (link) where your drawing, doodle, artwork is posted (e.g. your blog, Flickr) in the comments area of this post. I would really like to keep all the artwork together and provide a way for others to see your work and/or your blog.
We are also talking about this on Twitter. Use the hashtag #CPP
The Creative Prompt Project, also, has a Flickr group, which you can join to post your responses. I created this spot so those of you without blogs and websites would have a place to post your responses.
a: to cleanse by or as if by the action of liquid (as water)
b: to remove (as dirt) by rubbing or drenching with liquid
2
: to cleanse (fur) by licking or by rubbing with a paw moistened with saliva
3
a: to flush or moisten (a bodily part or injury) with a liquid
b (1): to wet thoroughly :drench(2): to overspread with light :suffuse
c: to pass a liquid (as water) over or through especially so as to carry off material from the surface or interior
4
: to flow along or dash or overflow against <waves washing the shore>
5
: to move, carry, or deposit by or as if by the force of water in motion <houses washed away by the flood>
6
a: to subject (as crushed ore) to the action of water to separate valuable material
b: to separate (particles) from a substance (as ore) by agitation with or in water
c (1): to pass through a bath to carry off impurities or soluble components (2): to pass (a gas or gaseous mixture) through or over a liquid to purify it especially by removing soluble components
7
a: to cover or daub lightly with or as if with an application of a thin liquid (as whitewash or varnish)
b: to depict or paint by a broad sweep of thin color with a brush
8
: to cause to swirl <washing coffee around in his cup>
9
:launder 3 <how the mob washes its money through corrupt bankers — Vincent Teresa>
intransitive verb
1
: to wash oneself or a part of one’s body
2
: to become worn away by the action of water
3
: to clean something by rubbing or dipping in water
4
a: to become carried along on water :drift <cakes of ice washing along>
b: to pour, sweep, or flow in a stream or current <waves of pioneers washing westward — Green Peyton>
5
: to serve as a cleansing agent <this soap washes thoroughly>
6
a: to undergo laundering <this dress doesn’t wash well>
b (1): to undergo testing successfully :work 4 <an interesting theory, but it just won’t wash> (2): to gain acceptance : inspire belief <the story didn’t wash with me>
— wash one’s hands of
: to disclaim interest in, responsibility for, or further connection with
Arroyo (creek), also called a wash, a dry creek bed or gulch that temporarily fills with water after a heavy rain (Wikipedia)
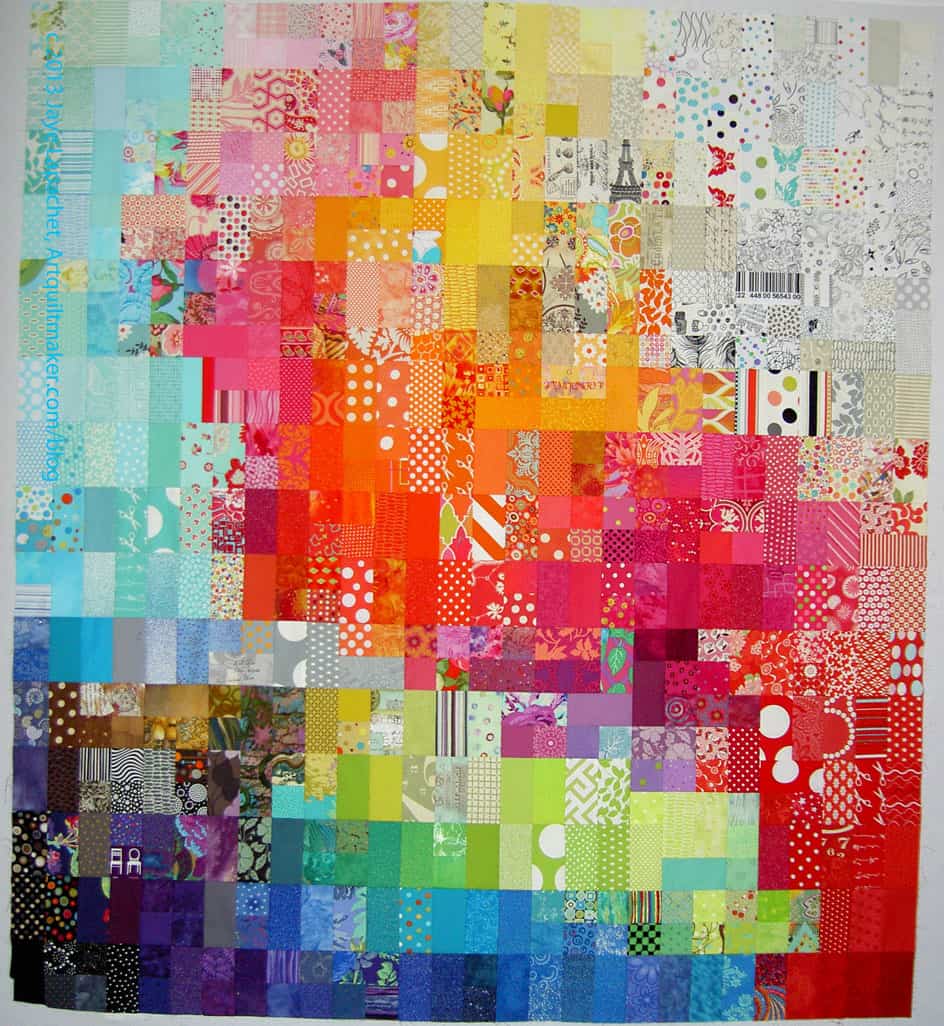
I decided to show the front again, one more time, as I don’t know how long it will be before I have it back from the quilter finished.
I have used another Philip Jacobs prints for the back. It turns out I had two pieces that worked well for opposite corners. I was surprised, though, to find the yardage in two pieces as I usually don’t cut up large pieces until I need it. Still, I may have bought it on sale and was only able to get to large pieces rather than one. Alternatively, I could have bought a piece and then decided to buy more. I don’t remember.
I was pleased to take the parts for the back off the design wall. I like the front of this quilt so much and it was great to see it one more time.
FOTY 2012: back
My only concern with the front is the border. I didn’t put one on and I am pretty sure it doesn’t need one, but still, I wonder.
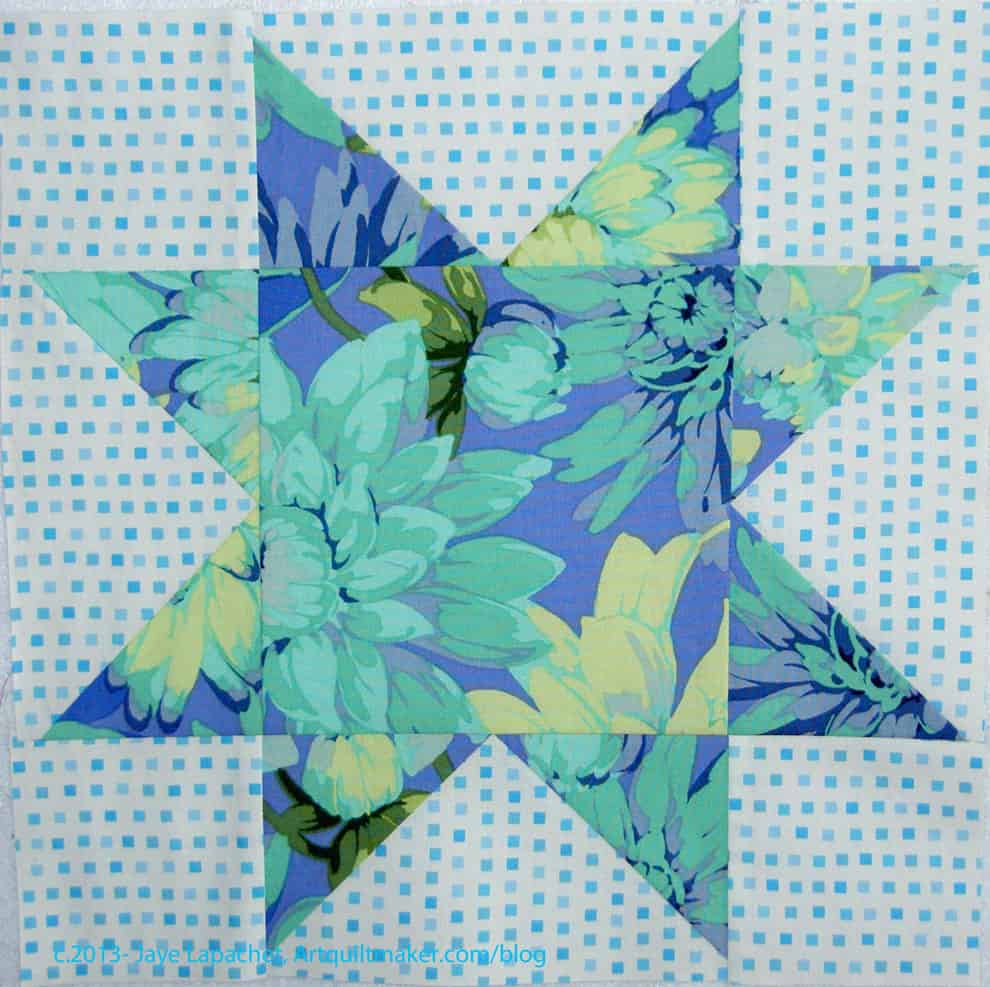
This block might be a little bit disappointing for you after the wonders of all the other complex blocks. I am posting it rather than just quietly putting it in the quilt, because I think it is a good example of how to use special fabric effectively.
Yes, I have used the Martha Negley fabric in small doses in other blocks, but I really wanted to show off as much of blooms as I could. Perhaps I could have fussy cut a little better, but I wanted to use the fabric in a reasonable way and I liked the off center nature of the fabric in the large square.
I can always make others in the 8″ size, if I want to use more of different sections of the fabric. Here’s the Basic Star pattern.
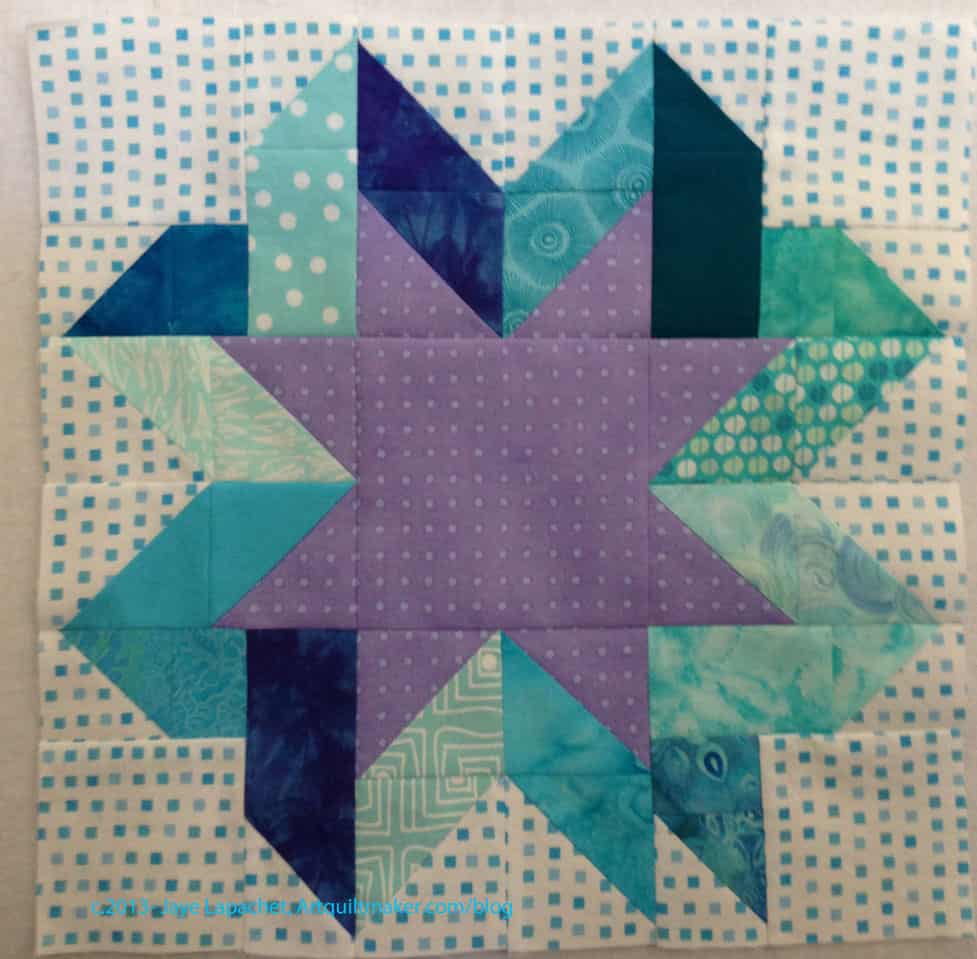
This block was kind of a pain to make, but the effect is really good. I am glad it came out well in terms of contrast, because if it had been a pain and looked bad, I would have been really disappointed.
I think it was a good choice to use the background fabric in the center of the larger star around the smaller star as it sets off the smaller star.
If you’d like to make one of these, here is the Star Sampler: Shelburne Star pattern. You can also find it in EQ7. Check out the Oh My Stars! Flickr Group to see all the other renditions of the final project. You can see all the posts on this topic by searching the tag “Star Sampler.”