The earrings at the beginning of the book have a design stamped, I assumed without reading any further, that could be a free motion quilting design. This book is about upcycling and eventhis purple earring projects sets that intention from the very beginning.
Again, Kristal Wick‘s book has an illustrated table of contents, which gives the reader an overview of what to expect. The thumbnails set out an ambitious and appealing agenda.
Ms. Wick has a 2 page introduction, which extolls the virtues of beads and metal clay. She gives a taste of what the book will include with a sense of competence and enthusiasm.
The ‘Basics’ section (pg.10-37), includes pictures of her favorite materials as well as a description of different things. Or so I thought. I leafed through the pages, looking for the end and found an unbelievably complete ‘Basics’ section. Kristal’s ‘Basic’ section includes the above as well as metal clay tools and materials, a Metal Clay Toolbox, metal clay fundamentals, firing the metal clay, how to create patinas, embellishments, jewelry components and tools, a section on bead strings and stitches and basic wire techniques.
After 30+ pages of detailed instructions, the projects start. I am pretty sure I wouldn’t wear most of these pieces, but I would pick them apart and put them on some of my art quilts! I really liked the textures and shapes of the different designs.
I have to say that an appealing part of these patterns is the variety of textures included int he same design. In the first project, the Birdhouse Necklace (pg.38), there is metal clay, charms, crystal and metal beads and everything works well as a cohesive whole.
Throughout the book, the author shows very clearly how to put the bits and beads together to make the various projects. Quiltmakers could easily apply components of these projects to a quilt project in the same manner and achieve a great look. This book can also be used as a good source of inspiration as it has detailed images of different textures used.
Each project has a good description of the supplies required along with the nice photos. Variations are mostly shown, though not always described. The reader can get a brief idea of what the project looks like in slightly different colors.
The end of the book has a gallery of projects, by different artists, as well as a short index.
Enjoy the colors and textures as inspiration from this book. Thanks to Lark Books for sending it to me.
Post the direct URL (link) where your drawing, doodle, artwork is posted (e.g. your blog, Flickr) in the comments area of this post. I would really like to keep all the artwork together and provide a way for others to see your work and/or your blog.
We are also talking about this on Twitter. Use the hashtag #CPP
The Creative Prompt Project, also, has a Flickr group, which you can join to post your responses. I created this spot so those of you without blogs and websites would have a place to post your responses.
Definition: “A latte (/?l??te?/ or /?læte?/)[1][2] is a coffee drink made with espresso and steamed milk. The term as used in English is a shortened form of the Italian caffè latte or caffellatte (pronounced [?kaffel?latte]), which means “milk coffee”. The word is also sometimes incorrectly spelled latté or lattè in English with different kinds of accents, which can be a hyperforeignism (a mistake) or a deliberate attempt to help customers realize the word is not pronounced as this combination of letters would normally be interpreted by native speakers. In northern Europe and Scandinavia the term ‘café au lait‘ has traditionally been used for the combination of espresso and milk, but this term is used in the US for brewed coffee and scalded milk. In France, ‘caffè latte’ is mostly known from American coffee chains; a combination of espresso and steamed milk equivalent to a ‘latte’ is in French called ‘grand crème’ and in German ‘Milchkaffee’ or ‘Melange’. Variants include replacing the coffee with another drink base such as masala chai (spiced Indian tea), mate or matcha, and other types of milk, such as soy milk are also used.” (Wikipedia)
I am sure Pam will explain this to me: “latte software for counting lattice points and integrating polynomials over polytopes”
From the Urban Dictionary: A coffee with milk, which costs 5 times as much as a coffee with milk.
Latte Mama: Unique Swedish and British fashion for newborn to 6 years. (HUH?)
gotlatte.com: BuzzTale enables businesses and media to create real-time, visual, branded stories.
Latte bowls
Glam Latte: Fashion Inspiration from the City of Angels
Latte is inspired by the old synthesizers from the past and is able to produce powerful synth sounds, fat basses, expressive leads, crazy sounds and more.
Pumpkin Spice Latte
World Latte Art Championship 2013. 26-28 June 2013 • Nice, France
ProjectLatte.com: Despite our name, we’re not all about lattes. But if you enjoy milky espresso drinks, we can help. We love the cafe experience and are interested in helping people discover the best coffee shops, whether they’re looking for a place to hunker down and work, a spot with a nice backyard, somewhere to talk with friends, or some other criteria entirely.
Try the Latte Factor Calculator Find out what investing your small savings can do for you.
When I was down at Grama’s I had a stack of quilt magazines with me. I hadn’t brought a lot to do, because I was supposed to be at a conference and didn’t want to feel like it was a waste to have lugged a bunch of stuff down with me only to lug it straight back home.
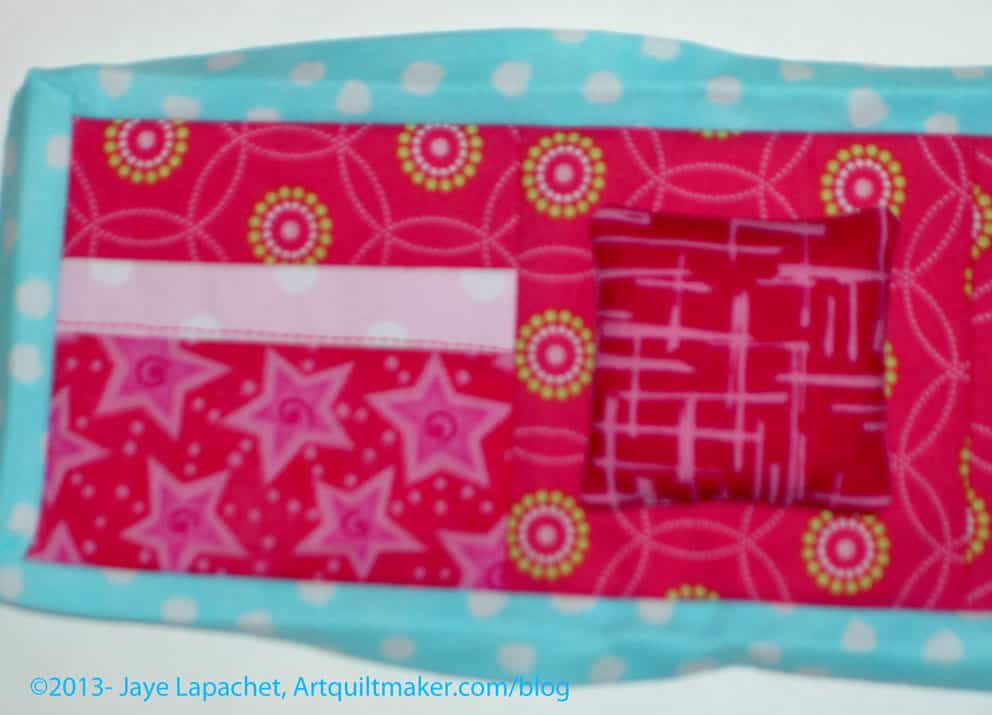
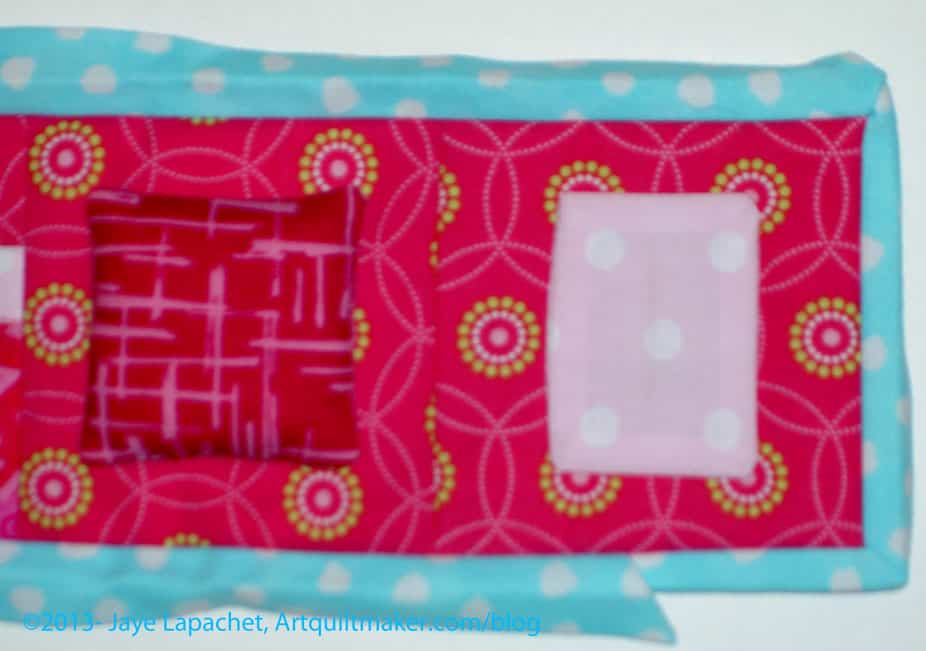
As you know, I ended up at Grama’s, racing around like a crazy person before dropping into bed exhausted, looking at two pages of quilt magazines and falling asleep with the magazine on my face. Two pages, however, is progress. While looking through the magazines, I found a needle case pattern in Modern Patchwork. I decided to add it to the shopping bag for my BAMQG Secret Santa. As soon as I finished the machine part of the shopping bag (I still have a bit of hand stitching to do), I started in on the needlecase.
Needle Case #1 Open
The pattern is by Rashida Coleman-Hale of the I Heart Linen blog and I, initially, had a hard time with the way the pattern was laid out in the magazine. Remember, I am much better at being shown how to make something than I am reading directions and following them. I began reading the directions and couldn’t figure out what to do first. The pattern started with “Create the Pocket.”
Huh? What pocket?
Needle Case #1 Open detail
Finally, I realized I needed to cut all the pieces out first, even though the pattern says nothing about that. Step 1 should be “Cut out pieces (see Sidebar)”, but it wasn’t. Also, the list of pieces of fabric that need to be cut is on the right hand side of the page and I was looking on the left (we read from left to right), which happened to be instruction #1 of the pattern.
My heart sank. I didn’t want to do a project that was so hard to understand that it wouldn’t come out well. The project is small enough to use scraps, so I decided to cut out the pattern pieces and try one more time. Miraculously, as soon as I cut the pieces, step #1 of the directions made complete sense.
I am skeptical of magazine instructions, but these were ok, after my initial confusion, for a not very complex project. I am not quite done with the project, but the one thing I would do differently is sew the cording (I am using a ribbon) on before I sew on the binding. I think it would look neater and be stronger. I might also figure out some other closure, but I haven’t thought that far ahead. Live and learn.
Needle Case #1 Open detail
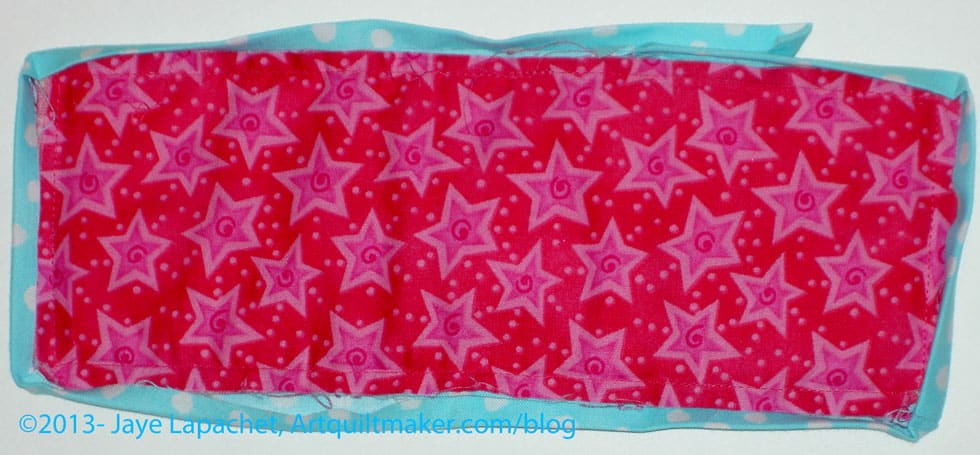
I used fabric scraps from the shopping bag and also a few others. The the two Secret Santa pieces will match, but not be matchy-matchy. Cute, huh? I did not use the linen. I used regular quilting cotton.
If I made this project again, I would give the outside pieces some body by lining them with ShapeFlex (LOVE that stuff!).
I didn’t have any Fiberfill to fill the pincushion, but if I had been thinking I would have used the roving I bought for the other pin cushions I have been making on and off. I just wasn’t thinking so I cutting up some batting scraps to fill the pincushion. It is small, so I think the batting will be ok.
Needle Case #1 back
My Secret Santa likes pink, so I am going all out on the pink. I really hope she likes what I have made. This needle case really did not take me very long and I think I might make a few more for friends. We will see.
As I mentioned in the last post about this project, Kathleen and I got together at the last Sew Day and worked out what we were going to do with these blocks.
I saw somewhere that Kathleen had finished sewing her donation top, so the project was nagging at me. I had the blocks and decided after working on the needle cases that I would put the top together, then I decided to put the back together. As I write this, I am about to think about a binding, but it might be too late and I might be too tired.
Sarah was kind enough to ask me to participate in this blog hop. Although I did write a bag review for Purse Palooza at the request of Sara over a Sew Sweetness, I feel like this is a different kind of thing. Thus I am sticking to my guns and saying that this is my first blog hop! Please be kind! I am so thrilled to be part of this blog hop. There are so many great artists who did the September round and now another group of fabulous artists doing the November round.
Bonus and Prizes
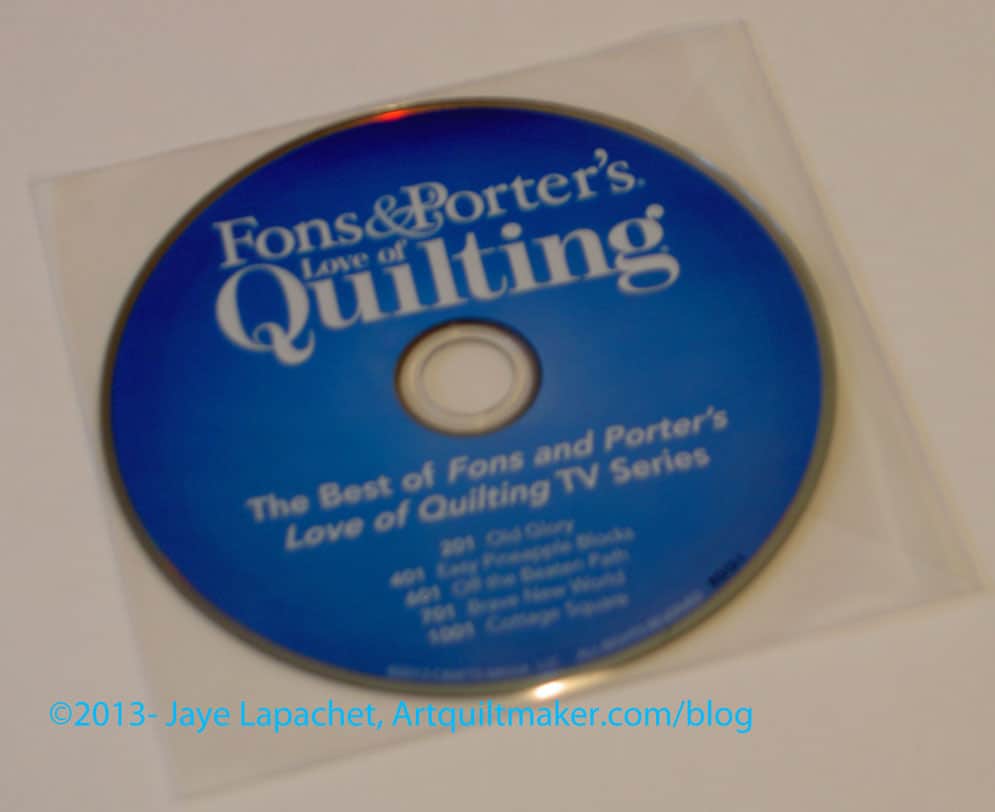
There will be a giveaway on my blog. I have one DVD to give away thanks to Sarah and Interweave Press. You can win this DVD by leaving a substantive comment (e.g. ‘s,ign me up!’ will not work), such as telling me what you thought of the video if you saw it or a clip, telling me what you thought of the review or something else. Sarah may read the posts and comments as well, so throw the girl a bone. 😉 You must leave the comment on THIS post.
UPDATE: COMMENTS CLOSED. WINNER HAS BEEN CHOSEN
I will pick the winner, contact the lucky winner and then send the contact info to Sarah who will get the DVD to the winner.
Sarah will be having a Grand Finale at the end, sometime in late November or early December (I’ll let you know), which will include additional goodies to win from MistyFuse and Havel’s Scissors!
Background and Purchase Details
I have known Sarah for awhile, mostly through an online group to which we both belong. I have enjoyed watching her career and cheered her on as she has reported her quiltmaking successes. This DVD/online workshop is just the most recent in a long line.
The following is from the Interweave email announcing her video, which I thought was a great description: “According to Sarah Ann Smith, not creating would be like not breathing: not possible! Sarah learned to sew after a neighbor girl made an apron for her doll when she was 6; when she found quilting, she knew she had found her passion: art and sewing. A former US diplomat, she draws on her years living in South America, Africa and North America, as well as her travels to Asia and Europe. She specializes in machine work and coloring with thread. Sarah is the author of ThreadWork Unraveled, lives in Hope, Maine, and has a husband, two sons, four cats, a pug and too many ideas!” Sarah’s website is a gateway to all things Sarah Ann Smith. You can reach her blog, store and a gallery of her quilts as well as tutorials, videos, her free bibliography, class supply lists and much more. Her site is very well done.
The video is a workshop which teaches you her “collage process, from selecting the best photo for your first effort at this technique, to fabric selection, patterning, fused collage, to threadwork at either the top or quilting stage.”
Digital download or DVD
Available from Interweave
Available to international quiltmakers
1 hour 16 minutes in length (first 30 second or so are the FBI warning)
Meat and Potatoes
The first thing I noticed was that the video started in my browser kind of suddenly after I clicked on the link in the email. I don’t watch a lot of videos-I have to actually watch them, which interferes with my sewing productivity, so I prefer audio only so I can sew while I listen-so I don’t know if this is normal. I was able to stop the video with the normal type of computer video controls, so it was no problem. I am thinking that this is a setting on my computer that I would do well to adjust.
I was under the impression that this was a free motion quilting video and was pleasantly surprised to find that it was so much more. Students learn how to:
Select a photo for your composition.
Choose fabrics, prepare them with fusible web, and alter them with textile paint.
Create the working pattern.
Fuse the quilt top.
Use free-motion machine quilting to bring the fused design to life.
Discover Sarah’s strategies for creating an artful machine-stitched fabric collage!
The workshop starts out with an interview with Sarah. One thing that stuck out in my mind, from that interview, is that she says to “learn and be proud of every project you do.” This is absolutely right. You cannot get better without practice. Sometimes the practice means ending up with projects that are not as successful as your next one will be.
The interview sets a tone of encouragement. The tone is positive and upbeat and made me feel like I could do whatever Sarah taught. This tone is continued throughout the video.
The next section discussed materials. After a brief introduction Sarah gets right into the discussion about the supplies, starting with the photo. I liked this part, because she doesn’t just say “take a photo”; she tells us what makes the photo good for her process, the things to look for in a photo and what to avoid. Even in this early stage of the video (2:03), I get the impression that she has thought a lot about the process.
I am skeptical when people describe products which they would like me to use. Do you know how many specialty items I have from classes and projects? I always wonder if I have to have that particular brand or if I can use something I already have on hand. When describing the materials, Sarah tells you why she likes a particular product. She mentioned Saral (remember I told you about that in one of my tutorials?), but also mentioned something similar called Transdoodle (3:58). In the discussion about the two products, she gives the pros and cons. One thing she said about Transdoodle is that it had a heavier chalk layer. That means that I can get more uses out of one sheet. I may have to get some and try it out.
Five minutes in, Sarah is showing the student her method of selecting fabric and giving some hints on painting on fabric. Sarah talks about commercial prints, batiks and hand-dyes. She gives her preferences, but doesn’t disparage the use of any types of fabrics (6:10).
The fabric selection includes modifying fabric using materials such as paints, pencils and judicious cutting to get the right shades and textures. Throughout Sarah tells us why a particular fabric works or doesn’t for the piece.
I also liked it that Sarah gave some practical and useful tips on fusing (9:30): why she uses a certain type of iron, what she uses to clean it in case of a fusing mishap and maintenance of her pressing sheets. The whole time I watched I was thinking of Pam and her Miss Jingle quilt and SherriD with her Unicorn quilt. I am sure they could have used some of the techniques that Sarah shows. I was really impressed with the amount of detail included. It was really useful. It made me think that fusing wasn’t so bad.
Design and composition follow fabric selection (17:55). This is the longest section of the video and really gets into making the bones of the piece. The first part of this section talks about the photo. Sarah gives some examples of variations of the photo she eventually started to use. I was pleased to hear her use terms that we have learned about in the design series.
I was also very interested when Sarah talked about the light in relation to how the light source was positioned and how our eyes perceived the light (20:50). I think that little tips like this, even if I never do her technique, will help me be a better quiltmaker.
Sarah shows two methods of creating shapes (~30:00) for your composition. This is a great addition to the video, because not all of us learn or work in the same way. Having a variety of methods from which to choose makes the video more useful. I also think that there is an appropriate amount of detail. Not too much so as to be boring and not allow for creativity, but enough so that the viewer can make the project while having a bit of leeway to inject what s/he knows about art quiltmaking.
Sarah’s Thread
Remember I said I thought this was a free motion quilting video? Well, Sarah doesn’t disappoint in the free motion quilting department (43:08), though she does not show you in detail how to FMQ. She gives an overview of the important parts in relation to her workshop: needles, thread, FMQ design. Her information will be helpful in conjunction with some of the other FMQ workshops, books and videos out there.
The beginning of this section is really appealing, because of the way she has the thread laid out. During the thread preparation section, she reiterates the issues with the darks and lights that she brought up at the beginning. She also talks about her process, including describing how she works at the machine. For those of not used to working with a lot of thread changes, this conversation is very helpful.
I was pretty impressed with her stitching. She uses a darning type foot (not hopping) and has set the feed dogs to the down position. With these parameters, her stitch quality is excellent. The stitches are small, but not microscopic and relatively even in terms of length. I was also impressed with how a fabric blob suddenly turned into a shadow with nothing more than a little stitching over the top of the fabric. The stitching really smoothed out the lines of the fabric pieces.
The last part of the video is called Gallery and Conclusion (1:10:30) and this is the place where Sarah talks about moving on to your own photo. Using some of her quilts, she explains what she did to make certain quilts work, including where she used precision vs blob fabric pieces. I liked her tip on quilting with light thread in the background to enhance contrast.
Throughout the video, there are hints. Some include such things as protecting your furniture, features of products, details of using particular products and things to watch out for when using her preferred products. Sarah gives examples from particular pieces of her work in relation to the tips. She also gives alternatives, where possible, for tools and supplies that the viewer may not own and may be too expensive or too specialized to purchase. While some of them may seem like pure common sense, the way she interjects them at just the right moment makes the tips and hints even more helpful. They are in context, which helps me remember them when I am actually doing the same action. Something along the lines of muscle memory, I think. This workshop reminds me so much of being in an EBHQ class!
Clearly the techniques take practice if the viewer wants to get as good as Sarah, but she takes the fear out of a lot of the steps with her clear instructions and tips and tricks.
Technical Difficulties
When watching a video, I find that my computers stops and downloads/processes in the middle of the video, which degrades my viewing experience. As a result, I have learned to let the video download and then start watching after most (or a lot) of it has downloaded. I had some trouble with this video. I really think that it had something to do with my computer or the user (me!). This has nothing to do with the production or quality of Interweave/Quilting Arts products. I downloaded the video twice and even after turning off the sleep and hibernate modes on my computer, I wasn’t able to download past about 55 minutes within my browser (Firefox). I was able to fix this by going to my Interweave account, finding the download link and saving the video to my computer. The video took about an hour to download, but then I was able to watch the last 20 minutes.
Wrap Up
I was reluctant about this video in the beginning, but also determined since I committed to helping Sarah with her blog hop. I was pleasantly surprised. This is a great video and I don’t think you would be disappointed. From early on in the video, I felt that not only that could I do Sarah’s collage technique, but that I wanted to do it. Throughout the video, I added some of the supplies she mentions to my Amazon Wishlist and felt excited about using some of the products that had inspired some reluctance in me in the past.
Mean Mom Stuff
The giveaway will be open for 3 days only. It closes officially on Nov.22 at 6pm PDT, so leave a substantive comment NOW. I may not actually get to choose the winner until November 23, but no whining if you can’t leave a comment at 6:01pm.
November 28: Sarah Ann Smith Sarah writes “Yep–it is US Thanksgiving that day…I’ll write mine up in advance! Or maybe I should do mine on Black Friday (the beginning of the holiday shopping season the day after…)” Sarah claims this will be The Grand Finale including goodies from MistyFuse and Havel’s Scissors!
Nota bene: I have included some time codes where appropriate as a kind of citation. I hope this is helpful.
I went back and forth about whether or not I should post this on my blog before the BAMQG party, but I have so little to post these that I decided to go for it. I don’t know all of you as well as I would like, but I don’t think the recipient is a reader. Perhaps she will be after receiving the gift.
I agreed to make a Secret Santa gift for the BAMQG Holiday Exchange. It was hanging over my head, so I decided that Saturday would be the day to start. I actually cut out all of the pieces on Friday night and put most of the interfacing on as well, so the sewing went pretty easily.
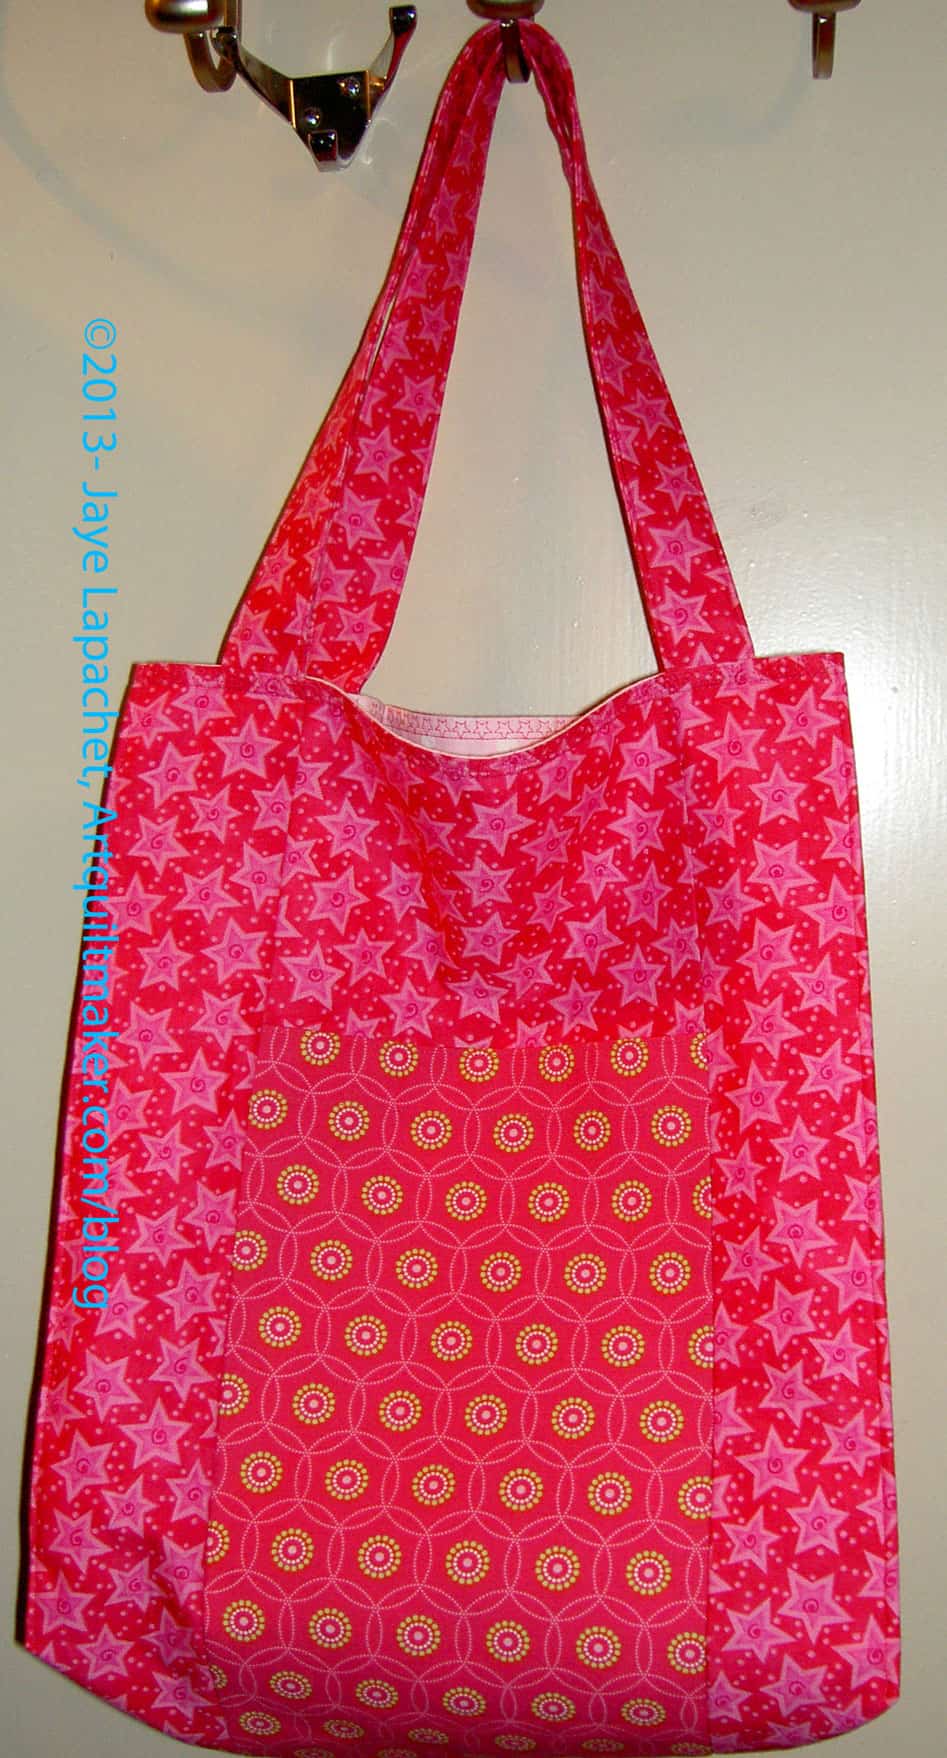
I decided to make another Jane Market Tote for the gift. It is a good pattern – useful and nicely shaped. I am also familiar with it since I made over a dozen of them since I bought the pattern. The other bonus was that a shopping bag was on the giftee’s list.
Perfect.
As I said, I cut out the pieces on Friday night. I also decided to try adding some ShapeFlex stabilizer to see if that would give it some body.
As an aside: Have I said how much I like ShapeFlex? I love it. It is so easy to work with. It is not thick. Now, I am almost out again and am now thinking of buying a bolt. Crazy?
Anyway, I was able to put ShapeFlex over all the pieces except one, so I was really ready to sew on Saturday morning. So, Saturday morning, which was really about 11am since I slept so much, I sewed. The bag went together really well. I tried very hard to make it look nice. I used a star pattern on my machine to finish the top of the bag. I also put the handles inside rather than outside after the bag is finished, as the pattern suggests.
It is a nice bag, but I also decided to make a little needlecase and put that in the bag as well. I know it is not necessary, but I have some leftover scraps from the bag. I also found a pattern in Modern Patchwork for a needlecase that doesn’t look too difficult. Stay tuned for that.
I spent the day home alone yesterday. DH is at a retreat for the Natives and the Young Man had a band review.
I got up up at 4:15 to get the Young Man to his 5:30 call time for the last band review of the season. DH usually does this chore, but we made it and did ok together.
I was kind of shocked, but when I got home at about 5:45am, I went back to bed and slept for another 3 hours, fitfully, but slept. I am usually not good at going back to sleep if I have been woken up in the morning. It was still pretty dark out, so perhaps my body thought it was still night?
It is kind of strange that I am getting some days home alone. I have always had one here and there, but they are getting a lot more frequent now that the Young Man has a life. The day was also a lot better than my last day home alone. I worked steadily on sewing projects, which was great. I made quite a bit of progress — perhaps not the progress I have made in the past, but I feel like I am really back in the saddle.
The bad part of the day was that my back hurt so I kept a hot pack on it all day, which meant I kept going down to the kitchen and heating it up. While the hot pack was heating up, I would do 2 minutes worth of dishes. Now my kitchen isn’t a huge pigsty from the massive pot of sausage soup I made.
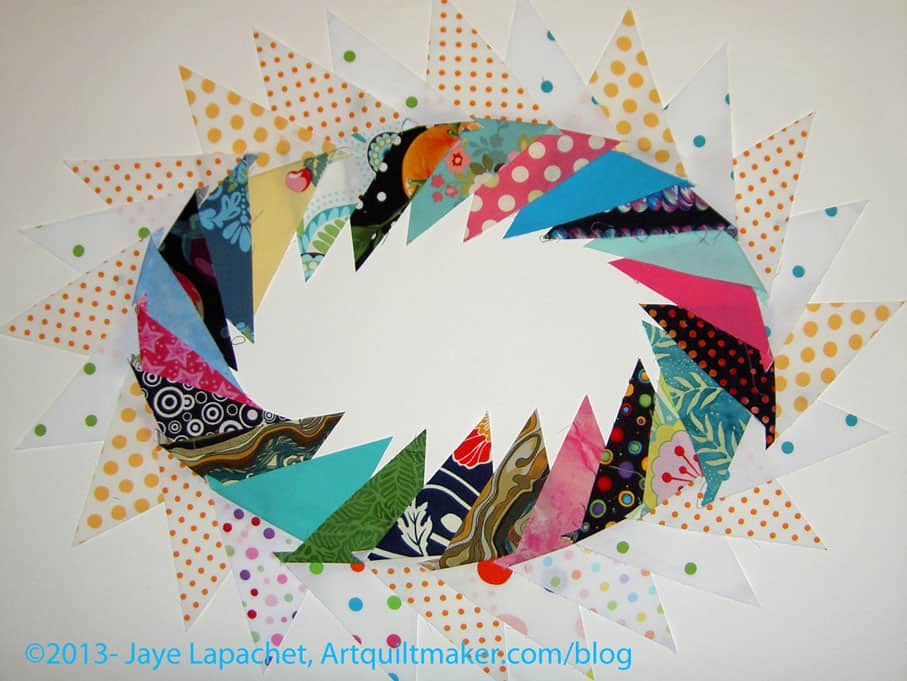
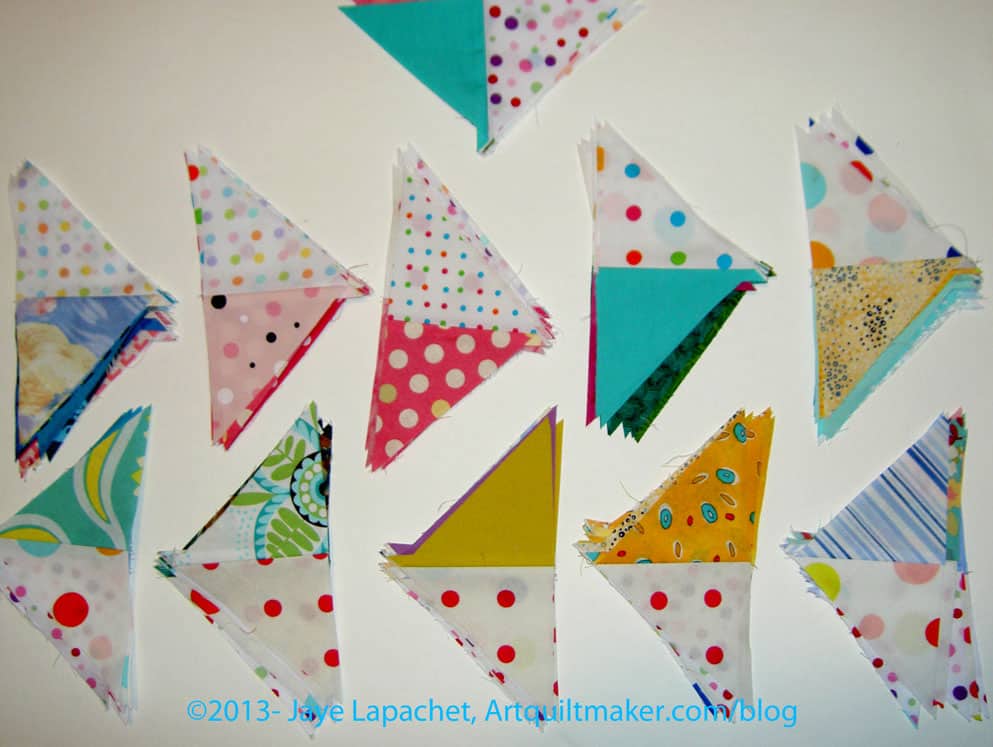
I finally finished all of the triangle segments for Scrapitude. The photo above shows the last 24 or so, which took me forever.
I heard through the grapevine that Scrapitude Clue #3 is posted. I just went and took a look at Sandy’s blog and it is true! One of the things about not cutting everything up front is that I am not ready to go on the next step. I do get to break up the cutting with sewing, though.
I missed the BAMQG November meeting. I wasn’t really up for it after my family emergency. I think I will miss the December meeting as well. Bleah, but we’ll see.
HOWEVER
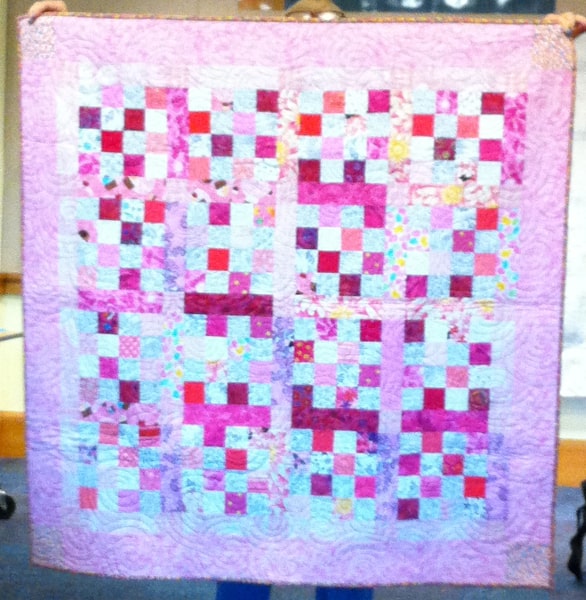
Pink Donation Quilt
I looked at the photos and two of the quilt tops I made were turned into quilts. I was thrilled to see them.
This is the pink one I finished in August 2012. If you click on the photo and make it bigger, you can see the circle quilting, which looks great.
Looking at the piece finished makes me re-evaluate the design again. I think I would take out the dark sashing pieces if I could have see it finished as I was piecing.
Impossible, of course, but a lesson for another day. still I hope that someone really enjoys it and I am so glad that a BAMQGer collaborated with me on this piece.
I haven’t made as many donation tops this year, but I can always try again next year.
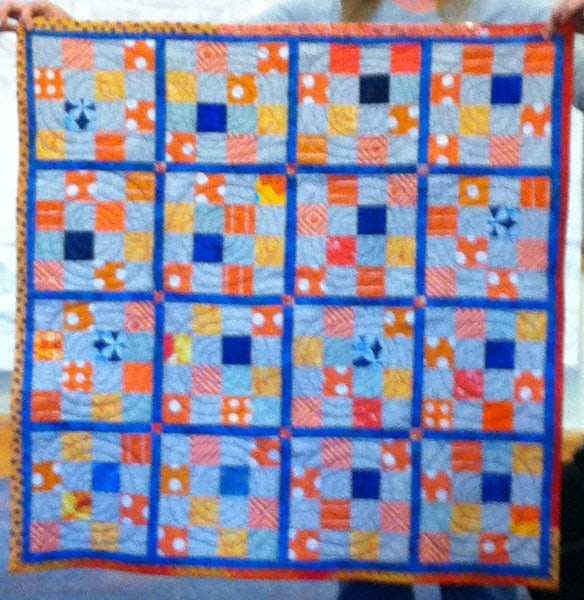
Orange & Grey Donation quilt
Someone also finished the Orange and Grey donation quilt. Again the circle quilting is awesome. I am so pleased to see how well this quilt turned out. It is so great to see my tops turned into something I really love the collaboration!
Thanks to the BAMQGers who finished up these quilts.
One of the first things I noticed was the extraordinary drama of the first piece in the book. It is large, paired with the right clothes and the model is looking straight at the reader daring him/her to object, or, perhaps, say anything. This led me to the table of contents, which is illustrated with thumbnails of the various projects. Many of the pieces, including the Panel Collar necklace (pg.52), the Waterfall Necklace(pg.97), the Royal Vines Necklace(pg.101), and others are all quite large. The first piece and these supporting ‘actors’ tell the reader that this is a designer with whom to be reckoned.
My first impression is supported by the first line of the Introduction, which reads “One of the premises I live by is ‘Life is too short to wear ordinary jewelry.’ and I am sure many of you agree.” I have always wanted a mantra like that! These two things set the stage for the book. The pictures of all the pieces throughout the book are dramatic and make the pieces look large, though some idea of actual side is implied in the pattern instructions.
This book has 29 projects, but these projects are further expanded by, in some cases, several variations. The nice thing is that the variations are included right in the table of contents. While the reader may not want to go straight to the variation after opening the book, their inclusion in the table of contents gives the variations some stature, prominence. With the variations, the total project count is 45.
The ‘Basics’ section in this book is called Basics of Design and Construction, which includes design as an important element. The design piece has a few exercises to get you started. Design tools are, then, combined, somewhat, with construction. Prominent in this section (pg.12-13) is the use of neck forms and collar forms. The contents of a Standard Necklace Kit is briefly discussed and then the Basic sections goes to The One.
The One (pg.16- ) is described as the star of the show, a single focal point that is described as “a beautiful simplicity to a single focal embraced by bead embroidery.” In this section, the reader is back on to design with some definitive examples. This section is filled with tips such as “use your closet and the colors inside to help with your design choices.”
I was slightly alarmed when I found that the above section was immediately followed by projects without very thorough directions. First, there is an instructional section at the back of the book (pg.149-154) and all of the patterns have a variety of types of instructions.
Throughout the book, the author tips on different aspects of the projects, including how to execute certain stitches and hiding thread when beading around corners. Most of the patterns are 2-3 pages. The supplies are clearly enumerated. The focal beads look quite special in these pieces and I think the reader might have some concerns about matching the quality of the imagery. The focal beads and color are integral to the success of the project. I am sure that readers will have fun seeking out the special beads!
Picking my favorite project was difficult. I don’t wear these types of pieces. I found aspects of various pieces drew my attention. With some, I was attracted by the colors. Others had appealing shapes.
as I started to look through them.
The end of the book has a small gallery of projects, by different artists. There is also a comprehensive index, which also warms my librarian heart.
Use the colors and shapes from this book for inspiration and thanks to Lark Books for sending it to me.
I must be in a ‘B’ mood – Bloom last week, Butter this week, Blossom a few weeks ago.
Post the direct URL (link) where your drawing, doodle, artwork is posted (e.g. your blog, Flickr) in the comments area of this post. I would really like to keep all the artwork together and provide a way for others to see your work and/or your blog.
We are also talking about this on Twitter. Use the hashtag #CPP
The Creative Prompt Project, also, has a Flickr group, which you can join to post your responses. I created this spot so those of you without blogs and websites would have a place to post your responses.
Butter is a water-in-oil emulsion resulting from an inversion of the cream, an oil-in-water emulsion; the milk proteins are the emulsifiers. Butter remains a solid when refrigerated, but softens to a spreadable consistency at room temperature, and melts to a thin liquid consistency at 32–35 °C (90–95 °F). The density of butter is 911 g/L (56.9 lb/ft3).[1]
It generally has a pale yellow color, but varies from deep yellow to nearly white. Its unmodified color is dependent on the animals’ feed and is commonly manipulated[citation needed] with food colorings in the commercial manufacturing process, most commonly annatto or carotene.” (Wikipedia)
I also have Kelly’s piece and it is time for me to work on it. As soon as I tidied Kathleen’s piece out of the way. I need to keep Kathleen’s piece for a little while as Kelly is still working on setting up her studio.
I put her piece up on the wall so it has a chance to speak to me. Nothing yet. I thought Chris’ piece needed space. I wanted to retain the freshness of Kathleen’s piece and Kelly’s piece…..
I don’t know. There is definitely personality. There is definitely movement. Kathleen’s Flying Geese really add a lot to this piece. This is a rich piece as in it has a rich look. The idea of a Persian rug comes to mind, though it doesn’t look like a Persian rug, and that isn’t quite right, but I think the closest I can describe is that it just has the feel of a Persian rug.
There is also an element of a royal banner. i can see this piece on a long pole being carried in front of a large group of men on horseback wearing the royal colors.
I don’t think it needs space. I think the richness needs to be continued, and perhaps some more points. I am just not sure how. I’ll keep looking at it and see what I think about.
This review has been on my To Do List for a long time. I know the Farmer’s Wife project is no longer the rage in the quilt community, but I think it is an interesting book, and well worth your time.
I like all block dictionaries. I like them because I can always find a new block and each new block starts me on a fun creative adventure. The Farmer’s Wife Sampler Quilt: 55 Letters and the 111 Blocks they Inspired is no exception and it includes letters! I love letters even reading other people’s letters!
The introduction is called The Changing American Culture of the 1920s and discusses “a time of political and technological changes.” It is an interesting and tantalizing way to begin a quilt book, especially for someone who enjoys quilt history. This page mentions the Farmer’s Wife magazine, a source of some of the quilt block patterns mentioned in Jinny Beyer’s The Quilter’s Album of Patchwork Patterns, which I reviewed a few weeks ago. I commend Krause Publications for allowing Laurie Aaron Hird to include it.
The Changing American Culture of the 1920s is followed by a page called 1922 Farmer’s Wife Contest. I have read quite a bit on quilt history, but don’t remember this contest being mentioned, probably because it was not a quilt contest. It was a contest asking for people’s opinions about being a farmer’s wife. The interesting part is that the organizers asked women to “talk it over with your husband, your children and your friends. Consider not only financial side of the question, but the moral and physical viewpoint and the things that make for real happiness.” The way I read this is that the organizers, and I am not looking at the complete list of directions and rules, assume that their readership is smart and their opinions worth knowing. I love that!
The responses are summarized VERY briefly on page 12 and then the author launches into “How to Use this Book” which is followed by the letters and the quilt blocks.
The first few sections are short, interesting and well worth taking a few minutes to read. The response letters are concentrated in the middle section of the book followed by some minimal piecing directions in the back.
This book includes a CD, but I don’t know what is included as mine is broken so I can’t look at it. (Nota bene: It broke after I got it; the book didn’t come with a broken CD).In the introduction the author says she includes “larger versions of the quilt assembly instructions” and “…you can print templates from the CD-ROM that accompanies” the book. (pg.13)
The author describes the respondents to the contest as “articulate, optimistic and visionary…” (pg.12). After reading a few of the letters, I have to agree, even though I know they were putting their best foot forward in order to win the not insubstantial prize money.
I do have a few problems with this book. The idea is that you make these blocks with templates. The author made her quilt by hand piecing all the blocks. I really have no problem with templates or hand piecing. You all know this is true after reading about my adventures with the Flowering Snowball. The problem is the crazy way I have heard of people using templates to cut pieces for this project (which has taken hold in the Modern Quilt community). I heard and seen quiltmakers make templates and then rotary cut around a thin piece of paper and a bit of template plastic. I am scared of my rotary cutter as it is. This sounds like a recipe for disaster to me.
The basic problem I see is that there are no rotary cutting instructions (though you can buy an EQ6 or EQ7 CD with all the patterns on it and print the rotary cutting instructions). I am not against templates or hand piecing. I understand the need to slow down, quilt more slowly, take your time. However, in this day and age, I think it is important to include rotary cutting instructions, because almost everyone cuts with a rotary cutter. Quiltmakers just do not use scissors to cut out pieces very often anymore.
There are also no line drawings of the blocks. I think this is a problem, especially for beginners. People need to be able to see the pieces without the colors or fabrics the author chooses. Fabrics can interfere with seeing the shape of the pieces or how the pieces fit together. While the maker may want that after a block is pieced, it is important to make that choice. Yes, the reader could look up the line drawings in Jinny Beyer‘s book, but why not just have a small line drawing available with the color pictures of the blocks? Cost probably.
I am not that fond of the fabrics used and would love to see an alternate color way included in the book. It can be done in EQ7 (with the add-on CD) pretty easily, but it would have been a nice bonus.
I like the idea of this book and think it is an easy and interesting way to dip your toe into quilt history. I would like to make this quilt, but with more Jaye-like colors – lots of pinks and turquoise, I think. 😉
In my last Scrapitude post, which seems like I wrote it an eternity ago, I talked about making the triangles more scrappy using a special ruler. I am glad I decided to make it scrappier, because even the few fabrics I used multiple times seem like I used them too much. Once I see what these sections will be used for, it might make no difference. Or I may need to remake some. I’ll just have to wait and see.
Don’t get me wrong, I don’t want the new sewing part of Scrapitude posted, because I haven’t finished the last step and I still have cutting to do. Read that last sentence as I am behind. I still really want to know what the blocks will look like so I can make better decisions about fabric choices. This is the ‘fun’ of a mystery quilt, I suppose. I am enjoying the fabric choices I have made so far.
I spent some time on Saturday sewing the segments together. I have 104 of these triangle segments, which means that I need 24 more. I have some foreground fabric, but all of it has been used several times, so I think I need to cut some different ones. I am probably in the same position with the backgrounds, though I know I haven’t cut enough yet.
Once I am done with the triangle segments, I’ll get back to cutting. I think I have some more 2-7/8s squares to cut. My cutting plan got interrupted when I left town and now I don’t know where I am with any project, which is why it was easy to get the Round Robin done. I could start and finish.
I saw that Daisy posted some photos of her Scrapitude progress on her Flickr stream. Good fabric choices. I like the triangle segments she has made. Her photos reminded me that I still need to do those segments with the squares and two triangles. Sigh.
After recent events keeping me away from my machine and last weekend’s fiasco of sewing and ripping, I decided that I would make progress this past weekend. I decided I would sew and make progress.
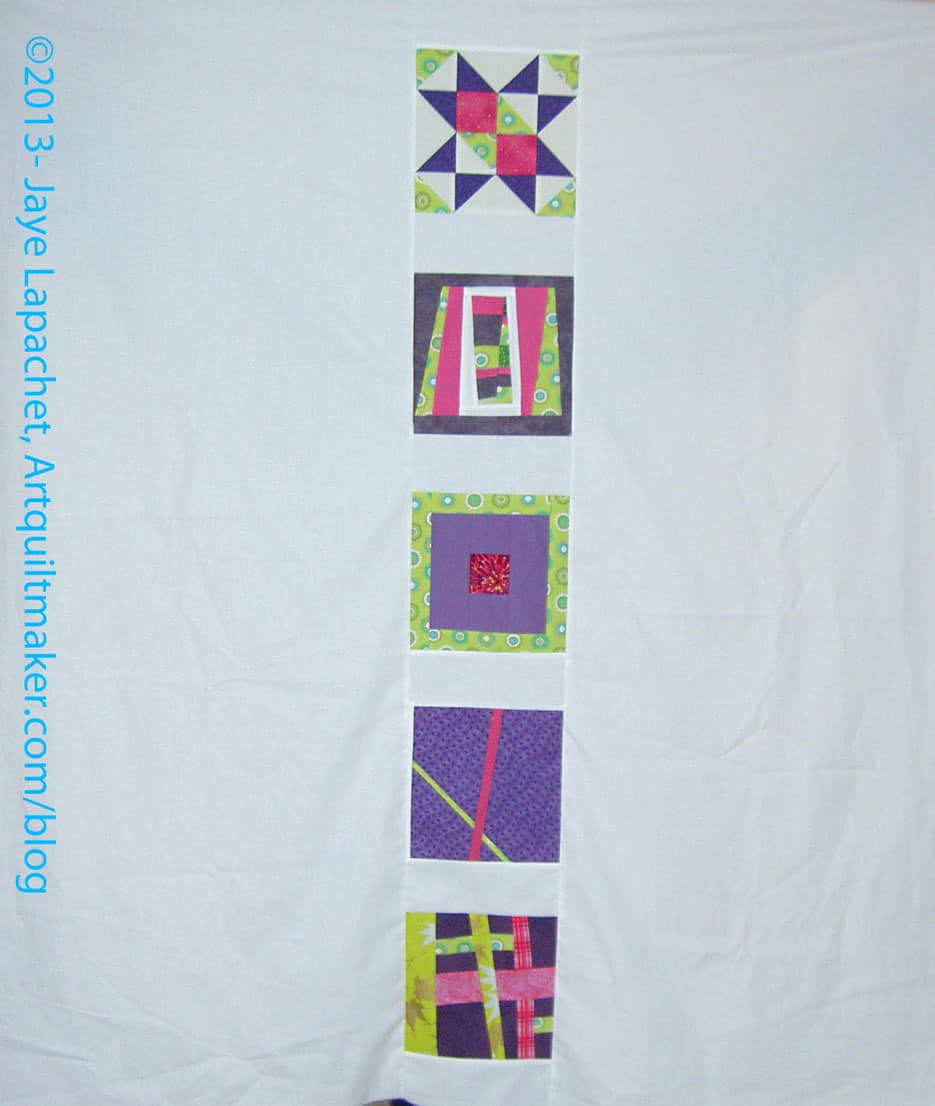
I did make progress. Small progress, but we have to rejoice in the small successes, right? I finished my part of Kathleen’s Round Robin piece. I am really pleased with how it looks. For one, I am pleased I was actually able to do something. Two, I think I did a good job echoing the shapes from the center.
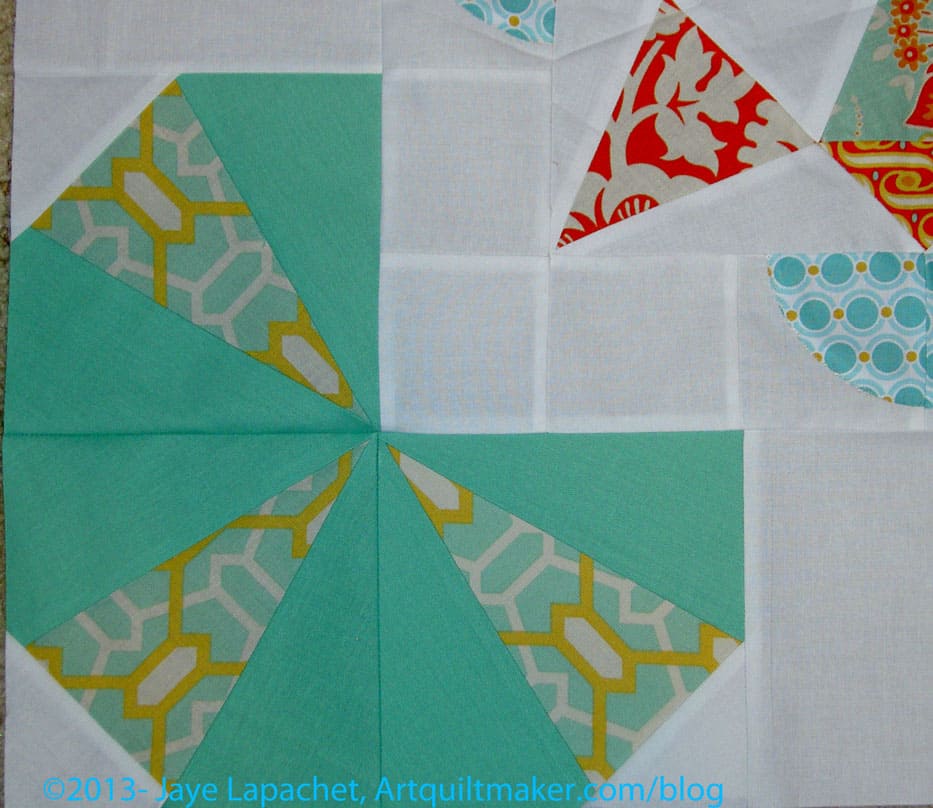
I hung the piece I got from Chris up on my design wall so I could look at it. It spent a few weeks up there and as I was looking at it, the Kaleidoscope shape in the center stood out, especially those long thin triangles. Also, the fabric with that jade green in the Kaleidoscope in the very middle caught my attention. From those two thoughts, I worked on my design and fabric choices.
Kathleen’s Round Robin in Progress
I used foundation piecing for the blocks for the corners in my round. I designed the corner blocks using EQ7 and then printed the foundations out. The Carol Doak paper I got some time ago is great. I printed right on to it and it worked like a charm. I was able to rip out paper with a minimum of torn stitches. It might not be the most cost effective (I don’t know) but for the limited foundation piecing I do, it worked great.
You can see from the ‘in progress’ photo that I used three blocks to make up the corners and then filled the middles of each side in with white. I had a hard time figuring out the measurements. They weren’t standard so the center white piece is different than the blocks. Not everything lines up nicely either, but I think that can be the nature of round robins. I think it will look fine once finished and quilted. I don’t think Kathleen will mind. At least I hope she won’t
Kathleen’s Round Robin detail
The detail shows the fussy cutting of the green, gold and white fabric very well. After I finished, I thought that replacing the green (closest to the white) with white might have kept it fresher, but I think it would have had the problems I mentioned above.
After doing all the piecing, I decided I like the way, viewed from some angles, the center piece looks like it is on top of the part that I added. I also think the corners look a bit like stylized flowers.
I think that the next person will need to get back to the orange – well, I should say that if I were doing the next round, I would use some more orange. I can’t tell you how tempted I am to add some orange.
It didn’t turn out exactly as I imagined and I am thinking that that green makes it look a lot more 1930’s than anticipated. I also think that more white might have been better, but I paid special attention to fussy cutting the alternate fabric in my corners and I wanted it to show. If I had added some white to the corners, that gold, green & white fabric would not have stood out as much as it does. I am pleased with the way it came out.
I am terribly behind on podcasts and I don’t know when I’ll be able to catch up. This means I haven’t heard whether any of the podcasters are organizing a Black Friday Sew-in.
BFSI Giveaway?
I will not be shopping on the 29th, so I will be tweeting while I am, hopefully, sewing.
I have a couple of gifts I will be giving away and I will be working with Lark Books to see about giving away some books as well.
As with my other giveaways, my request will be substantive. In a way, I guess this is fair notice about the potential quilt games I may be playing with you. One thing I will probably do is ask you something about your UFOs. That means that you may want to count up your UFOs, think about the status of them, how you might be stuck, etc.
FQ Pack
This is not completely selfish of me. Yes, I am interested in what your are doing, but I also think that your comments could start a discussion that could result in renewed interest in your project.
 Metal Clay 101 for Beaders: Create Custom Findings, Beads, Embellishments & Charms by Kristal Wick