Rethinking Scraps

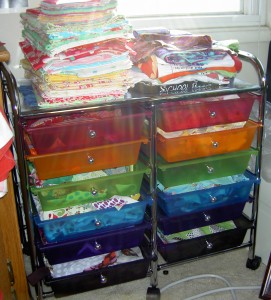
I was reading Pam’s recent Sunday Stash post after listening to her podcast and thinking that perhaps I should rethink my scrap storage. I bought a little drawer system some time ago, which works pretty well.

Scrap Organization
Scrap Organization

Still, random sizes of scraps doesn’t work that well except for mosaic piecing. Piles of scraps shoved in a drawer are not fun.

Pam and Bonnie Hunter cut their scraps into certain sizes. Pam has talked about the sizes she uses, which differ from Bonnie’s slightly. Bonnie calls her system the Scrap User’s System, which is a good moniker. I have just never embraced that method, because I never seem to have the right project for some of the sizes. And I don’t want to make projects just because I have certain sizes of patches.

Bonnie Hunter Scrap Saver Systems:

  • strips in sizes of 1.5″, 2″, 2.5″, 3″ and 3.5″. These are strips 12″ or longer.
  • Patches 1.5″, 2″, 2.5″, 3.5″ squares
  • bricks in 2″X3.5″ and 2.5″ X 4.5″

Bonnie Hunter writes “*Note* Just for your information, did you know that you could get three 1.5″ strips, three 2″ strips and three 2.5″ strips all from a 1/2 yard of fabric and it would be out of your nagging stash, into your strip bins and ready to be used? If you really want to slice up larger pieces, this is the way to go. Cut a few slices of different sizes and feed them into their bins! You’ll be using those strips in no time.”

Pam’s Scrap System:

  • 2″, 3 1/2″, 5″ and 10″ squares
  • 2 1/2″x WOF strips
  • random 2 1/4″ strips (since I got rid of strings I will keep 2 1/4″ wide strings to use for scrappy bindings)

As I was cleaning out my magazine pile, I came across the magazine I bought last year and was reminded of Joan Ford’s system. It is a little different and much simpler than Bonnie Hunter’s. I did a pretty thorough review after I bought the magazine. With this system we have the following sizes:

Joan Ford ScrapTherapy / Scrap+1 System:

  • Squares: 2″, 3.5″ and 5″

Of course, I do cut certain sizes from new yardage and have let that practice bleed over to some scraps as I make them. I don’t usually go to the scrap bin later and do a bunch of cutting, though I do think that would be a good idea. Generally, I cut the following out of new fabric:

  • 1.5″ squares – all colors
  • 2″ blue, purple and green squares
  • 2.5″ squares – all colors
  • 3″x3″ squares – used fabrics (for FOTY)
  • 5.5″x3″ rectangles – new fabric (for FOTY)

I do use the scraps from the actual scrap bin for various things. I sew my scraps using the mosaic piecing method to make journal covers and other small items. I also fill in weird places on the backs of quilts using scraps.

If I make a scrap quilt, I want it come out like Scrapitude in its cheerfulness and fun style. I do NOT use Bonnie Hunter’s method of just grabbing any color and using it. I want my quilts to look good and that means choosing pieces carefully. That is designing.

I do believe in using up my fabric. I have a working collection and not just a collection so the above would make sense for fabrics that I like, but aren’t going to be used for a project.

The other sad part is that my scraps are bugging me and I need to do something about them. Pulling all of these systems together

Origami Starburst Wreath Again

Fresh Cuts Origami Starburst Wreath

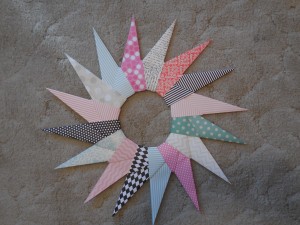
The other day I posted the Origami Starburst tutorial with a second wreath picture at the bottom.

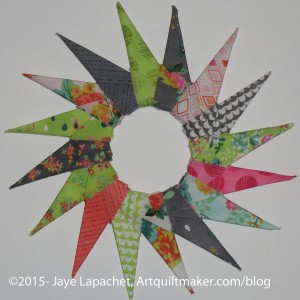
The top picture was made out of paper and very straight forward. After I made several starbursts out of paper, I couldn’t help wondering what would happen if I made one out of fabric.

The Starburst in the photo is made from charm squares from the Fresh Cuts line of fabric. You can use any size square of any 16 fabrics as long as the squares are allthe same size. It took some special maneuvering to get it to work.

You make the legs the same way you do the paper legs except you need to back them with some kind of interfacing like ShapeFlex. The interfacing makes the squares less floopy. Once your 16 Charm Squares have interfacing only to within a 1/4 or 1/8 inch from the edge, spray each square with Mary Ellen’s Best Press, so the squares are quite stiff. Once the squares are stiff, you are ready to start folding each square of fabric per the tutorial. After each fold you will need to press each fold. Press each fold really well and, then, spray each fold with Mary Ellen’s Best Press or something similar to keep them stiff and in place.

Once you start to put the legs together, you need to glue with Aleene’s or Elmer’s glue as you do it, being very careful to only put the glue on the tips of the legs. Let the piece dry thoroughly before trying to pick it up.

The paper starbursts stay together even if not glued, but the fabric starbursts are too heavy and too floopy, so glue them right away.

The fabric starbursts are much more three dimensional, much more fragile and much heavier than their paper counterparts, so decorate with and use them with care. They make great gifts.

Pinkalicious Progress

Pinkalicious Stitched, Not Finished

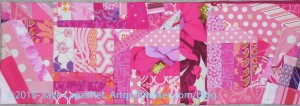
After I wrote about this journal in the a blog post, this piece got lost in a big cleanup I did and I didn’t find it again for several weeks after another mini-cleanup. The other morning I decided I needed to make progress and decided that I could finish this journal cover in a short amount of time.

I set to it, getting as far as the second to last step. Then I realized I was out of journals. This would create a panic except that I just started a new journal so I have some time get another. I sewed as much as I could without a journal and will finish when I get one.

There are some pieces I like about this cover. I am finding that I am still learning about what fabrics I like and what fabrics I don’t. Or perhaps that is constantly changing?

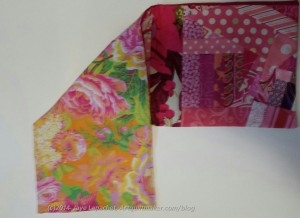
I used a piece of Philip Jacobs fabric for the back. I won’t see it all the time, but I will get glimpses of it when I use the journal. I might as well use my good fabric and I only had a small piece of it so it wouldn’t have worked for a backing.

Pinkalicious Back
Pinkalicious Back

Creative Prompt #325: Vise

Definition: “A vise or vice (see spelling discussion) is a mechanical apparatus used to secure an object to allow work to be performed on it. Vises have two parallel jaws, one fixed and the other movable, threaded in and out by a screw and lever.” (Wikipedia)

grip like a vise

bench vise

The Wilton ATV All-Terrain Vise mounts to any standard 2-inch tow hitch for jobs away from the workshop.

fly tying vise

Vise magazine

Doris & Harry Vise University Library at Cumberland University

he Vanderbilt Initiative in Surgery and Engineering (ViSE) is an interdisciplinary, trans-institutional center whose mission is the creation, development, implementation, clinical evaluation and commercialization of methods, devices, algorithms, and systems designed to facilitate interventional processes and their outcome.

The center facilitates the exchange of ideas between physicians, engineers, and computer scientists.  It promotes the training of the next generation of researchers and clinicians capable of working symbiotically on new solutions to complex interventional problems, ultimately resulting in improved patient care.

Vise captures a hand-blown glass globe within brass claws machined to follow the gentle curvature of the glass.

Vise pocket tool

Wood Vise Screw Kits

The blacksmith leg vise or “solid box vise” is one of the most important tools in the blacksmiths shop.

axle vise

milling vise

Opti-vise IT is a managed services provider that specializes in backup and disaster recovery solutions, Network Management and business continuity.

caught in a vise

Melissa Vise is a historian of medieval Europe with a special interest in the religious and political history of the Italian peninsula.

Daniel de Visé is higher education reporter at the Washington Post and author of the College Inc. blog.

Vise bowling bags

saw vise

Post the direct URL (link) where your drawing, doodle, artwork is posted (e.g. your blog, Flickr) in the comments area of this post. I would really like to keep all the artwork together and provide a way for others to see your work and get familiar with your blog or website.

The Creative Prompt Project, also, has a Flickr group, which you can join to  post your responses. I created this spot so those of you without blogs and websites would have a place to post your responses.

We are also talking about this on Twitter and Instagram. Use the hashtag #CPP

Finishing the Tuffet

Sewing the drawstring

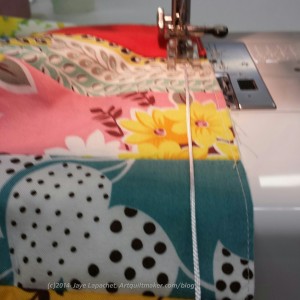
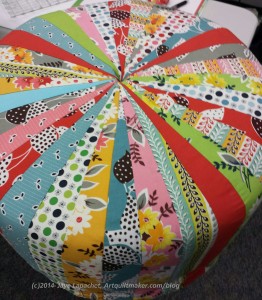
As you may remember, I had a lot of work to do on the tuffet at home in between classes. With some drama, but not major drama, I got the tuffet top together except for the drawstring.

I misunderstood (all me not the teacher) the directions and used the drawstring cording to make the button. This left me short for the drawstring.

I got another piece of cording from Robin and sewed the drawstring in class. I also remade the button, taking out some of the cording and redoing the tightening part with upholstery thread. Robin was very patient with our foibles from between class and that is a great quality in a teacher.

Cover on Tuffet Structure

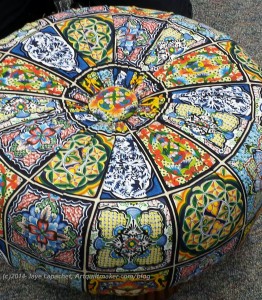
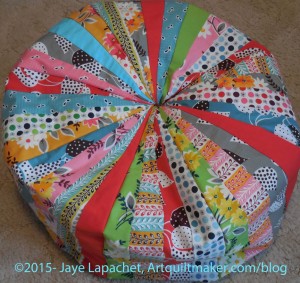
Once the drawstring was on, I was able to put the top (or cover) over the structure of the tuffet. I know this picture looks the same as the photo I posted in my previous post when I stuffed random bits of batting under the top so the photo would come out better. Trust me when I say that there is a big fat piece of foam and a piece of plywood under that cover (picture right).

Nota bene: Robin was kind enough to put my tuffet structure together. I wasn’t really able to wield a hammer or the staple gun very well with my hand. This was very frustrating for me. If I had known that the class required wielding tools, I might not have taken it, thus I am very pleased that Robin was willing to help me with the difficult parts.

I was completely thrilled when I saw the tuffet like this and would have been, mostly, satisfied with it, but it wasn’t finished and Robin was definitely encouraging us to finish. It wouldn’t have stayed together either.

Tufting the Button
Tufting the Button

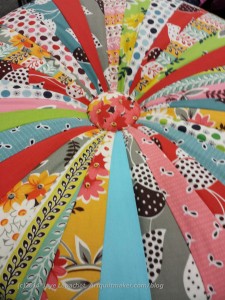
The next step was to add the button and make the tuffet look like an upholstered piece of furniture. Not only is Robin funny and encouraging, but she is also smart and the steps of the class are well thought out. She had an ingenious way of tufting the button through the 2 feet of foam. GENIUS! It was fun and not difficult.

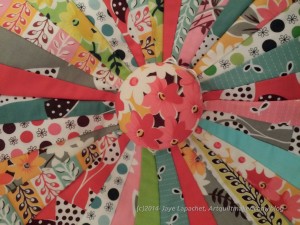
Using the cording (which is like cording for blinds), I made the button look like a jelly fish. After the button was in, I tightened it to correct tufting levels 😉 and tied the button off on the bottom using the jelly fish “arms” and a surgeon’s knot to tie the button and tuft the tuffet. We had some fun talking about ‘jellyfishing’ our buttons. I know that making nouns into verbs is the path to destruction, but the whole class found ‘jellyfishing’ to be quite hilarious and I, at least, couldn’t help laughing over it.

Bottom of Tuffet
Bottom of Tuffet

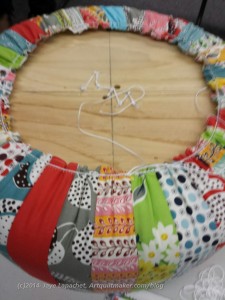
Next I tightened the cover and drew up the drawstring to keep it tight. The cover was long enough (intentionally) to fit over the bottom of the tuffet, which was a thick piece of plywood.

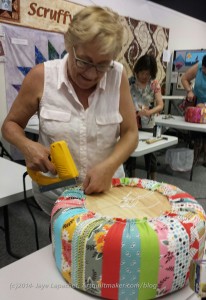
We marked where the feet were to be inserted (there are holes drilled in the plywood that are covered by the tuffet cover) and stapled the cover to the plywood. Robin, again, helped with mine, though I was able to do a bit of the staple gunning (I am right handed, but had to use my left hand, which isn’t as good at tasks as my right, so I was a bit of a danger to myself and the class, thus the assistance. ) Julie helped as well.

Robin Stapling my Tuffet Cover

I am pretty sure that I would have been reluctant to staple through my cover (All that work!!!), so I think it was good that Robin did most of it for me. Nobody died in the stapling of the cover and I lost my feeling of preciousness over it.

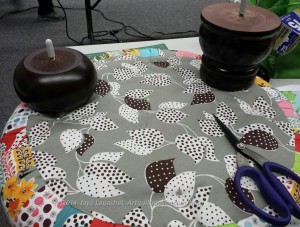
I cut dime sized holes in the cover and cut away the batting and foam so that I could insert the feet.

I also made the bottom. Stitching it down started a long discussion, because many of us were whip stitching our bottoms about various methods of speeding up the whip stitching, which took a lot of time. Katrina, an awesome quiltmaker (I took the Pineapple class from her), who works at Scruffy Quilts suggested that we use Steam-A-Seam in the 1/4″ tape version to keep the bottom in place and then whip stitch at home. Robin hadn’t thought of that and since she is still reviewing the process, to a certain extent, thought that might work, but wanted to try it. I plan to make another tuffet (perhaps two) and will try it. I enjoyed sitting there and stitching, but it is a step I could have easily done at home. One of our classmates tried the  Steam-A-Seam and it seemed to work out very well.

Auditioning Feet
Auditioning Feet

I went back and forth on feet quite a bit. Robin’s source stopped production while they retooled their factory (or something), so her inventory was a bit low. At first, I thought I wanted white feet. That would have meant finishing them myself, which I knew was not going to happen. Then I decided I wanted the feet to match my furniture, which has a cherry color. I took some that were a more beigey brown kind of wood that I thought would match (make visual decisions visually!). I compared them with my other furniture and found that they were not the right color.

Robin didn’t have any that were the exact shade. I looked at all of her feet and finally decided on the bun feet (shown right). They are darker than my furniture, but have a tinge of red and on the bottom of the piece, they are ok.

Once the bottom was on, we carefully put in the feet and the tuffet was finished!

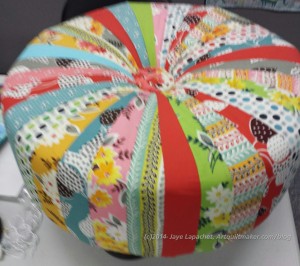
Completed Tuffet
Completed Tuffet

It was such a thrill to take home a completely completed project. That is one bonus of doing the stitching in class: I went home with NO additional work to do.

The class is a little on the expensive side because of the finishing kit, but it is worth it to get the finishing kit from Robin (West Coast Tuffets), because everything is there and in good order and well documented.


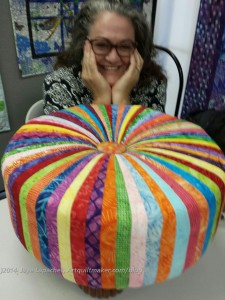
Julie's Tuffet
Julie’s Tuffet

I love Julie’s Tuffet. She used a batik jelly roll and it really fits her personality. It is so cheerful and this is a gorgeous picture of her!

Robin's Tile Tuffet
Robin’s Tile Tuffet

Robin brought a few tuffets to show us. She made a great, rich looking tuffet from a whole piece of fabric. She gathered the center under the button rather than cutting the fabric into almost-points and it looks really amazing. I think some experience with gathering or making a few tuffets first would be required before doing this kind of tuffet. I do like the idea of whole cloth tuffet. Can you imagine one with some Philip Jacobs fabric?

All in all, I really liked this class and want to take another one. I want to make a tuffet in the colors of the Stepping Stones blocks even though it will do with nothing in my house as well as another for the living room so I can put my feet up.

Go forth and make tuffets!

Tutorial: Paper Wreath

Origami Paper Wreath

I was so thrilled to find a tutorial on the origami starburst (paper wreath). It is a great tutorial, but I like to do my own, as you know. I made several of these and have enough paper to make a few more. We might use these to give out as gifts at the Ladies Lunch at DH’s Grand Parlor. These make great hostess gifts.

Supplies

  • 16 pieces SQUARE paper (any size) – almost all paper is suitable except very thin paper. Super thick paper will be hard to fold
  • bone folder
  • glue (Elmer’s or Aleene’s are both fine)

Nota bene: you can use fabric. If you do, you will also need the following items:

  • Mary Ellen’s Best Press
  • ShapeFlex or other lightweight interfacing
  • 16 square patches (any size)

Directions:

Make legs:

Fold square paper in half

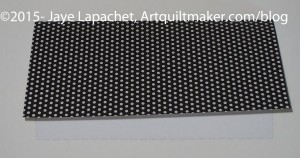
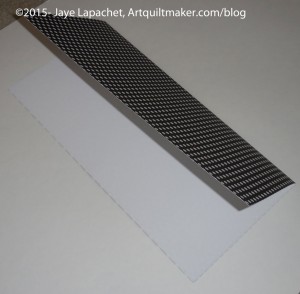
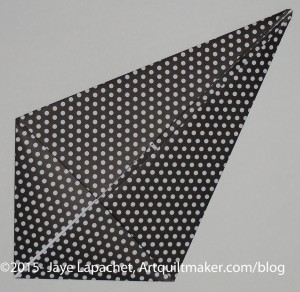
1. Take square piece of paper and fold paper in half.

Fold square paper in half

2. Open and fold in half the other way

Fold corners into center

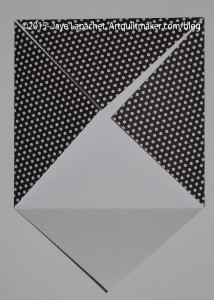
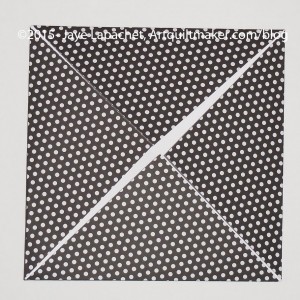
3. Fold corners in to center point

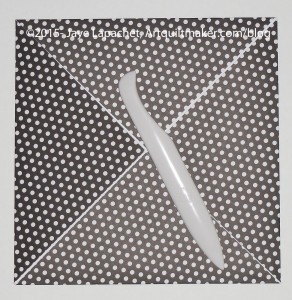
Use bone folder
Use bone folder

4. Use your bone folder to make the folds nice and sharp

With a point facing you, fold the bottom half up to meet the center crease.

5. With a point facing you, fold the bottom half up to meet the center crease.

Fold to a kite shape

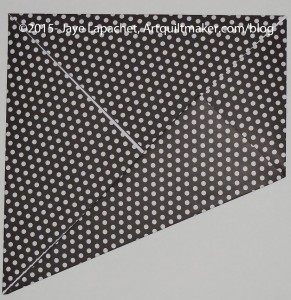
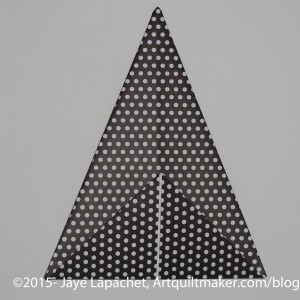
6. Do the same to the other point. Now you will have a piece that looks like a kite.

Fold bottom of kite up

7. Flip the piece so the open bits are face down. Fold the short piece so you can see the open spot between the folded piece again.

Fold in half
Fold in half
Fold in half
Fold in half

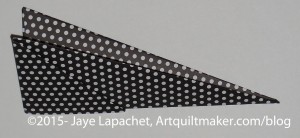
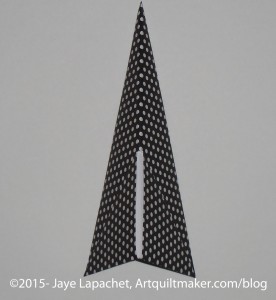
8. Fold leg in half with short side out. That opening will be where you put the other legs.

Make Wreath

1. Make 16 legs (directions above)

2. Put a little glue on to the tip of one leg

3. Insert each leg into 2 holes in another leg to make four quarters

4. Glue tip of each leg until you have a circle or wreath.

5. Before the glue dries, arrange the wreath so the inner circle is smooth.

Now you can carefully hang your wreath on the wall

Fresh Cuts Origami Starburst

Mom’s Work

16 Patch Baby Throw
16 Patch Baby Throw

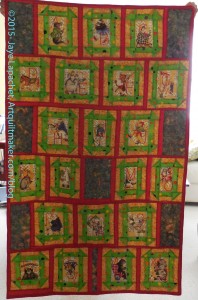
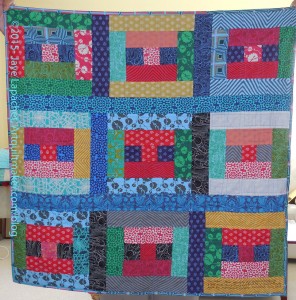
Mom and the Big Guy went to Port Townsend, Washington for a few weeks to see her BIL/ Big Guy’s brother. She brought her Featherweight and sewed like a demon while the Big Guy and his brother visited. She came home with a number of baby quilts/throws. She hasn’t been updating her blog, so I decided I would show you her work.

Alphabet Baby Throw
Alphabet Baby Throw

The BIL has about 13 children. Many of them are grown and having babies of their own. Mom enjoys using her fabric to make baby quilts and throws. She came upon a technique that using no batting and Minkee to make throws and that is the technique she used.

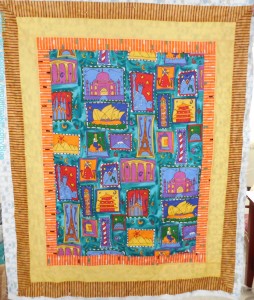
She took the fabric in the throw with the gold border from me. It has colorful scenes from various world cities and I just couldn’t imagine why I had purchased that particular fabric. I think I bought it to give to Mom so she could make this great throw (below).

Mom's Panel Throw
Mom’s Panel Throw

The colors she chose for the borders, etc really pick up the colors in the panel and make this a very successful piece. It makes me wonder why I gave it to her, but I don’t think I would have thought of doing this and the fabric would have sat in my fabric closet for eternity. I am glad it will go to a good home.

The other great thing is that she got practice and is feeling a lot more confident about her skills especially in machine quilting.

Mom's Scrappy Log Cabin
Mom’s Scrappy Log Cabin

I hope, now that she is home, that she will continue making such great progress.


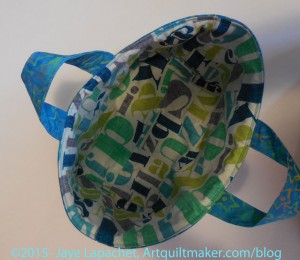
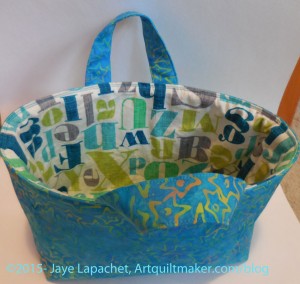
One Hour Basket #2

One Hour Basket #2
One Hour Basket #2

I wanted to make some progress on something. I felt like I wasn’t making progress on anything, so I got out my To Do list and looked up what I felt like doing. The first thing I did was make progress on the Pinkalicious Journal Cover.

Once that project was well on its way, I made a second One Hour Basket. I don’t think it took me an hour, even if I subtract the time it took to sew pieces of Soft & Stable together. It didn’t take much longer, though. I was pleased to get something finished.

Sewn together Soft & Stable

I had some weird pieces of Soft & table leftover that were on the small and thin side. I decided I had enough to use as stabilizer for this pattern. I sewed them together much like I would sew a piece of Frankenbatting together. I was able to use most of the leftover S&S, which pleased me.

The pattern is free on Craftsy, I think and the directions are fairly good. The weird part is that the pattern uses 3 different seam allowances for this one pattern. I think there is something off as the lining seems a bit baggy when the whole piece is finished. It is fine for my purposes, but if I were going to give it as a gift, I might use a slightly larger seam allowance for the lining. If I make more I’ll have to play around.

One Hour Basket #2
One Hour Basket #2

I am pleased that I got something done and have something I can cross of my list.

Improv Progress

I am still feeling like I am in some weird in between place with my projects. There are projects where I am at a strange point that seems to be stopping me. I have to count up all of the FOTY squares and figure out how big I need to make the quilt. I need to cut some more squares for the Octagon Nine Patch, which has been languishing for, what feels like, a long time.

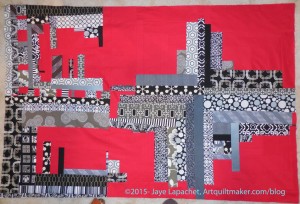
Improv Top in Progress

I decided to work on the Improv quilt again and get that project farther along.I finished a second ‘B’ and decided to sew it, along with the first ‘B’ block on to the quilt. I like what is happening and I can see where I go next, to a certain extent, but I think those 2 blocks look heavy. I might put them on the bottom, but I will see if I can lighten them up with more red on the three sides.

One idea I had from looking at the photo above is to make sure some red meets the red on the bottom and continues over almost to the corner. That will mean making that part of that corner side block last and making sure I remember. I think if I do that, there will have to be a bit of one of the black and white prints in the corner – or a strip of red alternated with black and white prints.

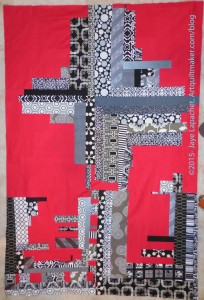
Improve top - turned
Improve top – turned

I also thought of making those blocks the bottom. Heaviness works on the bottom. The photo (left) is the same one as above, just turned so you don’t have to turn your head.

It looks ok, but I remembered that there will be other blocks on each side of those new ‘B’ blocks.

Yes, all the blocks are sewn together. I just wanted them sewn.

I am a Tuffeteer!

Completed Tuffet
Completed Tuffet

Yes, I finished my Tuffet in class on Thursday. I can now call myself a Tuffeteer. It is awesome and I love it. There were squeals of delight in the class as people finished. Mostly I am not a squeal in delight kind of person, but these Tuffets inspire squeals of delight.

Everyone really liked the way mine came out except the Young Man, but he has little no sense of cheerfulness in fabric.

I intended to make this a super long post telling you all about finishing the tuffet, but I will save that for another post. This post will just be about sharing the delight!

Creative Prompt #324: Violin

Stradivarius

A Rarity Reclaimed: Stolen Stradivarius Recovered After 35 Years

violin concerto, Op. 35 by Tchaikovsky

Suzuki method

Violin Monster

violin solo

violin teacher

The Violin Society of America

The Violin (2005 movie)

fiddle

The Violin Channel – The world’s leading violin, strings & classical music news source.
Vaccine Investigation and Online Information Network

Fastest violin player (Guinness Book of World Records)

Definition: “The violin, also known as a fiddle, is a string instrument, usually with four strings tuned in perfect fifths. It is the smallest, highest-pitched member of the violin family of string instruments, which also includes the viola, and the cello. The modern word is derived from the Italian word violino, literally meaning ‘small viola’.

Someone who plays the violin is called a violinist or a fiddler. The violinist produces sound by drawing a bow across one or more strings (which may be stopped by the fingers of the other hand to produce a full range of pitches), by plucking the strings (with either hand), or by a variety of other techniques. The violin is played by musicians in a wide variety of musical genres, including Baroque music, classical, jazz, country music, bluegrass music, folk music, metal, rock and roll, and soft rock. The violin has come to be played in many non-Western music cultures all over the world.The violin is sometimes informally called a fiddle, regardless of the type of music played on it.

The violin is first known in 16th-century Italy, with some further modifications occurring in the 18th and 19th centuries. Violinists and collectors particularly prize the instruments made by the Stradivari, Guarneri and Amati families from the 16th to the 18th century in Brescia and Cremona and by Jacob Stainer in Austria. According to their reputation, the quality of their sound has defied attempts to explain or equal it, though this belief is disputed.[1][2] Great numbers of instruments have come from the hands of “lesser” makers, as well as still greater numbers of mass-produced commercial “trade violins” coming from cottage industries in places such as Saxony, Bohemia, and Mirecourt. Many of these trade instruments were formerly sold by Sears, Roebuck and Co. and other mass merchandisers.

A person who makes or repairs violins is called a luthier. The parts of a violin are usually made from different types of wood (although electric violins may not be made of wood at all, since their sound may not be dependent on specific acoustic characteristics of the instrument’s construction), and it is usually strung with gut, Perlon or other synthetic, or steel strings.” (Wikipedia)

The Violin Making School of America in Salt Lake City

Cremona

Geige

kerman

Composite chordophone sounded by a bow (Wikipedia)

The stroh violin is self-amplified variation on the classic violin design with a resonating metal body and horn.

The American Federation of Violin and Bow Makers provides standards for the string instrument community including standards for violins and the bow family.

Violin Craftsmanship Institute

The Wandering Violin Mantis is one of the most amazing looking mantis species. It is a large mantis with amazing camouflage.

Black Violin is the blend of classical, hip-hop, rock, R&B, and bluegrass music.

Violin Memory transforms the speed of business with high performance, always available, low-cost management of critical data and applications.

Post the direct URL (link) where your drawing, doodle, artwork is posted (e.g. your blog, Flickr) in the comments area of this post. I would really like to keep all the artwork together and provide a way for others to see your work and get familiar with your blog or website.

The Creative Prompt Project, also, has a Flickr group, which you can join to  post your responses. I created this spot so those of you without blogs and websites would have a place to post your responses.

We are also talking about this on Twitter and Instagram. Use the hashtag #CPP

More Tuffet

Tuffet in process (3/4 view)

I was so nervous about the fabric selection, but I am so pleased about how it turned out. I hope it will fit well with my living and dining room. My dining room is a rich red and my living room is a butter yellow, so this piece isn’t a perfect match, but it is an interesting combination of motifs.

My issue from the other day was seam allowance. You know that I have hard time actually reading directions and understanding them and the Tuffet directions were no different (all me, not Robin). I always assume a 1/4″ seam allowance, which, as a quiltmaker, is normal. As a real sewist it is absolutely not normal. In this case, the pattern had the seam line on it or I could use a 3/4″ seam allowance.

I had to unpick all the stitching that held the tuffet top together, but when I resewed, it looked like Robin’s description of how it should look.

Tuffet Button Cover
Tuffet Button Cover

I was running up and down the stairs, doing as much as I could while chatting with my Mom as she cooked (she was cooking the Y.M.’s last meal with her and the Big Guy and preparing a meal for us for later in the week. She is awesome!). One of the things I was able to do was make the button cover.

I fussy cut some flowers out of one of the Flea Market Fancy prints. The button blends in, which I might not do again, but I kind of like it.

I was thinking that Robin should print the patterns at Spoonflower and then people could just buy them without having to make the foundations as part of the class. I do think that there is an element of “becoming one with the pattern” that you get from drawing out the pattern, but printing them off of Spoonflower would be much easier and it might be less expensive than some of the other pattern choices Robin described.

I am thinking that I will make another so both DH and I have one to put our feet on. We will see since the class is tomorrow and I have to see how it goes.

Year of the Dragon

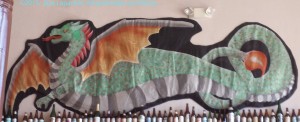
Full dragon
Full dragon

Earlier this year we went, again, to the North Coast. While there, we visited a restaurant called the Lost Coast Brewery. It had excellent food, including a gluten free menu. There was a bit of a hippie feel to it and part of that was the decoration. They had some kind of sculptural device that moved and bobbed when the door opened. Periodically, other things would move and I got the sense of fun and entertainment — like a carnival show. Along with the food and being on a date with my husband, it was fantastic.

One thing they had on the wall was a dragon banner. I was born at the very end of the Year of the Dragon and it is a powerful symbol in Chinese astrology. I sometimes need power, so I embrace it on occasion.

I have been looking for the right kind of dragon imagery, which is difficult. I wanted the right kind of proportions and not too much cartoon. I like the dragon in Sleeping Beauty, but there are parts of it I don’t like. The jaw is too large, the wings too small. Some of the traditional Chinese dragons are just too….something. I need to start somewhere and create my own image that works for me.

I found that the banner in the Lost Coast Brewery was one I could use to make my own. I don’t know what I will make – possibly a banner. Not a quilt, I don’t think. definitely a large applique with embroidery. I really am longing to do some embroidery on a piece like Beach Town or the Flower Garden. I thought about the Tarts Come to Tea this weekend and doing embroidery on that piece, which is still half quilted. The Serendipity Lady also has potential for a bit of embroidery. I don’t know how smart it is to line up several projects that need embroidery, but we will see.

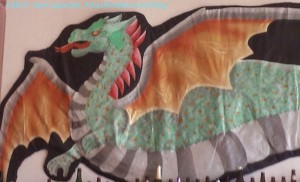
Dragon detail
Dragon detail

Anyway, this dragon is a good start. I will need to adjust the size of the head, wings and feet, but the shape is a good one.

Tuffet Progress

I was naughty and didn’t work on my Tuffet at all last weekend. The class is Thursday, so I got to it a little during the week and then seriously on Sunday.

Tuffet Class Work
Tuffet Class Work
2 finished panels
2 finished panels

I came home from class with some work done, but not enough. I finished 2 panels and sewed 2 strips (one seam) on the 6 other panels. Respectable work, but not a finished top. I still had work to do.

Making the Tuffet uses foundation piecing, so all I needed to do was place more strips on the foundations and sew.  For some stupid reason I was reluctant.

This is new to me. I didn’t want want to ruin it. I wasn’t 100% sure of my fabric choices. Blah Blah Blah. Fear.

I decided to just take one step at a time. So, last Thursday or so, I laid out the foundations in the photo above and looked at them for a few minutes. I got my stash of project strips and laid them out. I moved them around and then I sewed one strip on. Nobody died.

Yesterday I did the same with the last strip on each foundation. Because I am using 3″ strips, I didn’t need as many as those using 2.5″ strips. That made the process go a little faster for me.

Panels ready to sew
Panels ready to sew

I also trimmed all the excess fabric and stay stitched the edges. This means that the panels were ready to sew into a 3D bubble.

So, I am making progress. I will, for sure, be ready by Wednesday night. There is no choice about it.

Book Review: Personal Geographies

Personal Geographies: Explorations in Mixed-Media MapmakingPersonal Geographies: Explorations in Mixed-Media Mapmaking by Jill K. Berry

I bought this book because of Maureen and Nancy and their work in creativity. I am also interested in mixed media – in doing mixed media projects, but don’t have the space right now, so I don’t do much. I carried this book around for a long time, dipping in and out and not really getting it. Finally, something nudged me towards it again and I picked it up and began to seriously read it, starting from the beginning.

This book is self described as containing maps of the physical self, maps of experiences and dimensional projects with a cartographic theme (pg.5). Aside from these brief words of description, the book begins with only a few paragraphs of thoughts and inspiration. The best quote is “maps make known our relationship to the world at large” (pg.4).

The introduction is followed by a section called “What is a Map?” There is a quote from Miles Harvey, who wrote The Island of Lost Maps, which expresses the potential of creativity, to which, I think, the author is aspiring. The quote is “A map has no vocabulary, no lexicon of precise meanings. It communicates in lines, hues, tones, coded symbols, and empty spaces, much like music” (pg.6). I love this quote think this expresses quiltmaking as well as cartography. This section has several other quotes which really express the creativity and sense of map making.

The quote section is followed by the start of the projects. The author, Jill Berry, eases the reader into the projects by asking, first, inspirational questions to help start to define the maps you might want to make (pg.7). She also provides some encouragement and inspiration around what a map could be. She writes “you can make a map of nearly any journey, place, day or experience, however menial it might seem. Maps can be intricate and personal, or grand and inclusive. They can be a ritual way to journal your day, or a permanent and elaborate illustration of your life’s journey” (pg.7) This is a section that could be used for inspiration with a variety of creative pursuits or media.

Examples of different maps start on pg.8. Explanations of parts of a map follow (pg.10). Ms. Berry explains the cartouches, types of creatures that appear on maps (though not the why), the legends, neatlines, paths and places, water features, etc.

She also says that all maps need a compass rose and the text purports to tell the reader how to design one. More accurately, the author gives resources for finding one to use (pg.12). I would like to have seen more information on truly designing a compass rose. As quiltmakers we can design our own using skills learned in Judy Mathieson‘s books. There are also directions on creating a cartouche (pg. 13).

After the introductory and background inspiration, we are presented with a list of general supplies (pg.14-15) and the meat of the book starts. Chapter 1 has to do with mapping the self. “The process and results are for personal enrichment…” (pg.17). A sidebar talks about the inspiration for this project and gives a template, specific supply list and step by step instructions. The projects also provide an example of a completed variation. The directions are very general and suitable for a confident maker to fly within. I think the how-to is good, but I would like to see a selection of symbols and some ideas to spur on content creation. I think such aids would spark the imagination and make this book more successful.

Chapter 1 includes a body template and project, a hand template with project, an ‘articulated self’ project (like a paper doll), a heart project which also includes variations. There is a gallery of works by other artists that were inspired by the templates in this section of the book. These examples expand the content for the reader so there is more scope to consider when thinking about making a project. I can see using some of the templates for appliques on art quilts.

My favorite piece from the ‘Self’ section is the Hand Map (pg.54). I like the idea of documenting a day out with parents and it has the most meaning for me. I can follow the idea and it seems like a good memory to celebrate. It also reminds me of a Hamsa necklace I saw in a  catalog once. The image grabbed me and I want to do something with that image sometime. I also liked “My Heart Belongs in Wisconsin” (pg.52). I like the idea and the look of the piece.

Chapter 2 is called Mapping your Experience. “[T]hese maps are about the experiences of your soul” (pg.57). This chapter seems to me to be about preserving precious memories. One thing the author suggests is “to limit the amount of time you spend on planning and to go with the first thing that comes to mind…” (pg.57). There is a lot to be said about this advice in almost any creative endeavor. However, I found it hard to imagine what to map. As an interesting addition, in this chapter, the author shows the reader how to fold a map in an interesting way in order to take up smaller space and add interest to your art (pg.62).
As I read this book, I was having a hard time imagining how to make my own map until I saw ‘Your Artistic Journey’ (pg.64-65). My first thought was about my first quilt class, which was, then, followed by a Mary Mashuta class on story quilts. The trajectory popped into my head. I rewound a bit and thought back to grammar school and projects I made there as well as experiences in art that led me to that first quilt class. I can now see making a map from this thought process….or journey of thought.
Collaborative maps, narrative maps are also included along with another gallery of experiential maps. This gallery has maps that I can actually imagine making. They are not perfectly rendered and look like something a novice would make.

Chapter 3 covers plans, projections and possibilities and the projects are designed to use ephemera (pg.97). My favorite drawing is the Warning Map of Fort Worden (pg.98. I love the squid!

Overall, my favorite project is the book of postcards. I can imagine buying postcards, using the backs for journaling and then making them into a book when I got home (pg.120-121).

One thing I noticed about this book was that it made me aware of details in other, non-art, maps such as road maps. I noticed details such as scale, different colors for different types of roads and byways. I also noticed the lack of explanation provided (is it readily available and I have not noticed??) on online maps such as Google Maps. Would it enhance, detract, or confuse Google Maps users to have a sea monster pop out of the ocean on their app?

As with the introduction, the projects have a little information on motivation or inspiration, There is a lot of how-to information, but not as much why. I am interested in process so I would have liked more about how the author came to these projects.

In going through the book, I see the projects become progressively more complex. I also see a progression of mapmaking. There is an undertone of encouragement to the reader to make all of the projects in the order presented in order to improve skills and progress through the book. I don’t think that course of action is really realistic outside of a classroom setting, except for those looking for a path to follow or someone who is extremely motivated in this area. It would be hard for me to stay motivated.

Throughout the book pieces of art from other artists are placed to fit in with the projects. Towards the end of the book is a more complete gallery called’ More Maps of Possibility’ with more maps and items from other artists int he back.

It was hard for me to pay attention to the beginning as I was eager to read this book, but the beginning is the best part. I went back and read it again. I would have liked more inspiration, more process (as opposed to how-to) and more of why she designed these projects. I haven’t found any book, except Inspiration Odyssey by Diana Swim Wessell that talks much about inspiration. This book also makes me want to investigate the history of mapmaking in a little more depth.

The book is beautifully designed and has an index.

View all my reviews