The travel for NSGW with DH is starting up in earnest now. We spent the weekend after my birthday in Oroville at the Discovery of Gold event.
DH had board meetings. I visited quilt shops. 😉
“Oroville” Quilt Shops
The first thing I did was search Google when I got to the hotel. My search was (without quotes) “quilt shops oroville ca”. I was thrilled that I found quilt shops, but confused that none of them had towns listed. Could that mean there were a ton of quilt shops in Oroville mere steps from my hotel?
Too good to be true. There were no quilt shops in Oroville listed in the Google search results. All of those listed in the box (image above) were in different towns. I found one called Mary Jane’s, but I couldn’t actually find the physical place and all the images seemed to be bedspreads so I didn’t go and don’t know what that was about.
I decided to visit three shops. The driving would be about an hour. Sadly, no other NSGW wives seem to be interested in quiltmaking so I am on my own in these endeavors. Two of the shops were in Paradise and one was in Colusa. There were a few more in the surrounding areas, but I thought three was enough was enough to visit in one day.
As soon as I saw DH off, I headed out. It was raining, but not too bad and the drive was easy. I did make on wrong turn, but got to the first shop with no problem.
Morning Star Quilt Shop
Morning Star Quilts, Paradise
Of all the shops I visited, this was my favorite. The samples and the fabrics on offer were my style. I wasn’t expecting much when I got out of the car, except to get out of the rain, but I was very pleased. The place was big, bright and airy and the ladies were friendly. The store was also clean – to the point of gleaming!
I remembered that I saw them vending at Quilts in the Garden in Livermore a few years ago.
Morning Star Quilts, main room
I saw a lot of organization in that store. There wasn’t stuff laying around and very few bolts of fabric just around. Of all the samples they had on the walls, each one had a tag that said that there was a kit available. I am not a fan of kits, but many people are and they are great for stores. Also, most of the fabrics seen in the samples was still available. I didn’t ask whether they took down the samples when the kits and fabrics were no longer available but it seems like the kind of place where that practice would be standard.
There were other samples besides quilts as well: little girl dresses, pillowcases, embroidery and wool felt projects.
Crabapple Hill Studio
The embroidery projects were very intriguing. The ones that really caught my eye were from Crabapple Hill Studio. I actually don’t know if the shop had other brands’ embroidery designs. I don’t really do embroidery so I really just glanced at these. After I got home I looked at the Crabapple Hill Studio website and the designs really make me want to do embroidery. There is a sense of the traditional embroidery designs that we learned needlework on as children, but with more color and a little more whimsy. The pattern shown as an example gives you an idea of the style.
Morning Star Quilts: Front to back view / front of storeMorning Star Quilts: Back to front/ front of storeMorning Star Quilts: Purse hardware, notions/ front of store
The front of the store had batiks and bags. I know that sounds great, but they also had fat quarters and Aurifil. 😉 Morning Star Quilts had organized their batiks together in the front of the store. On the other side of the front of the store were purse and bag patterns as well as bag hardware. I was impressed at the number of bag patterns and equivalent samples.
View of Morning Star shop main area
That was something that Morning Star did really well: patterns with samples. I mentioned this along with kits above, but it was impressive how well this was done. The color sense was also excellent. I loved the fabrics they used in the way they put quilts together.
They had a small curtain in the window, which was a light diffuser. I didn’t see a pattern, but I liked the idea. You can see it in the photo directly above in the upper left hand corner.
Morning Star Quilts long arm
I saw a long arm, but I don’t know if they rent it out or if they do long arm quilting for customers.
You can see a lot of embroidery floss behind the longarm. Some of this is Cosmo, which I have never seen in that quantity before. I was thrilled and it was very hard not to buy it all.
Morning Star Quilts: Seating area
Nobody was sitting in this little seating area, but it is cute and this was the area where they had wool felt patterns and supplies.
You can also see the light diffusers in the windows at the top of the photo.
I would recommend that you visit this shop if you make it to Paradise. Definitely go out of your way to visit this shop if you are anywhere nearby.
Want a BB8 quilt? There is a free pattern posted at the Hunter’s Design Studio site. I am not a fan of the part of the quilt that depicts Ray, but the overall design makes sense. I can’t tell you anything about the directions as I have not made the quilt or read the pattern. Let me know.
Louisa at SewMotion has some pointers to tutorials on inserting zippers into the backs of cushions. Knowing these tutorials are there, and after getting a lot of zipper practice making the Sew Together Bags, I may try insert a zipper closure on my next cushion or pillow cover.
Charlotte, of Scrapitude fame, has another mystery quilt up: Scrappy Stars Around the Corner. I missed the cutting instructions. She recently released the first sewing clue so I had better get busy if I intend to make this quilt. I haven’t decided, but I am saving the directions.
Other Artists
Jennifer Landau,a CQFA pal, has a spread of her work in Art Quilt studio magazine.
Mark Lipinski has a thank you for all the help and support he received during his illness. You can still Help him with medical bills and lost wages via a donation at the GoFundMe site set up by Meg Cox and Liza Prior Lucy. Over $25000 has been raised. Any amount helps. The goal is $75,000. Mark was in the hospital for over 2 months. He has recently returned home and wrote a post about his journey.
Exhibits and Events
Get ready for National Quilting Day. When I was poking around the Quilt Alliance website I found the following information: “National Quilting Day 2016 25th Anniversary Year! Celebrate the 25th Annual National Quilting Day … on March 19, 2016. The Quilt Alliance is proud to be the new coordinator of this special day! [They] are so proud to take over this tradition from the National Quilting Association and promise to continue providing fun and meaningful ideas for celebrating National Quilting Day, graphics you can use to publicize your own NQD events and a home base for this important day to honor and promote quilting! Click here to view” the NQD 2016 page.
From ResearchBuzz: “Lithuania is getting a new modern art museum in 2019, but in the meantime it’s getting an online museum. “[Viktoras] Butkus has collected about 4,000 works of art, mostly over the past six years. They include paintings by surrealist Mikalojus Povilas Vilutis, by Augustinas Savickas — vaguely reminiscent of Chagall — as well as sculptures by Ruta Jusionyte…. Painter Patricija Jurksaityte said the museum would offer a complete map of Lithuanian art unlike the country’s National Gallery, which often displays just a single work from any artist.” The museum’s Web site has an English version (look for the EN link in the upper right corner) so I poked around for a while, and now I really, really want a print of Gintaras Znamierowski’s Victory Boogie Woogie.” (Jan 24, 2016)
Websites, Blogs and Other Artists
Jill, an amazing artist who blogs at the Quilt Rat, now has a YouTube Channel. Jill has participated on and off in the Creative Prompt Project (still going strong!), but also does Scherenschnitte and Zentangle like quilt and embroidery designs.
This quote make feel greedy, but I still love it. See the original.
Patrick Lose has a video on binding a quilt, which is part of a 12 part series from QNM. This video shows only the corners. He uses a slightly larger than quarter inch seam allowance – opposite of a scant quarter inch! The basis of the technique seems to be reducing bulk. I look forward to trying it out.
Organization
Need a new organizational system for your life? Take a look at the Bullet Journal. TFQ told me about it. I can’t/ don’t want to do it all, but I do like the index and the page numbering. Brilliant. With the turn of the New Year not very far behind me, I still think about my ‘traditions’ (superstitions?) for the turn of the year. The Yearly Migration blog post on the Bullet Journal blog was very interesting, in light of these thoughts.
Housekeeping
I redid the spreadsheet Pam uses to track her fabric usage. TFQ helped me update it so that I track by project or instance and not by week. Regardless of how it tracks, I need to finish some projects, because I am way up on adding fabric and way down on using fabric. I can say that I am doing a lot of hunting and gathering, but I still need to finish up some projects.
Post the direct URL (link) where your drawing, doodle, artwork is posted (e.g. your blog, Flickr) in the comments area of this post. I would really like to keep all the artwork together and provide a way for others to see your work and get familiar with your blog or website.
The Creative Prompt Project, also, has a Flickr group, which you can join to post your responses. I created this spot so those of you without blogs and websites would have a place to post your responses.
We are also talking about this on Twitter and Instagram. Use the hashtag #CPP
lack of color
Blackbeard
Definition: “Black is the darkest color, the result of the absence of or complete absorption of light. It is the opposite of white (the combined spectrum of color or light).[1] It is an achromatic color, literally a color without color or hue.[2] It is one of the four primary colors in the CMYK color model, along with cyan, yellow, and magenta, used in color printing to produce all the other colors.
Black was one of the first colors used by artists in neolithic cave paintings. In the 14th century, it began to be worn by royalty, the clergy, judges and government officials in much of Europe. It became the color worn by English romantic poets, businessmen and statesmen in the 19th century, and a high fashion color in the 20th century.[3]
In the Roman Empire, it became the color of mourning, and over the centuries it was frequently associated with death, evil, witches and magic. According to surveys in Europe and North America, it is the color most commonly associated with mourning, the end, secrets, magic, force, violence, evil, and elegance.[4]” (Wikipedia)
Black Founders is an organization dedicated to diversity in tech. Our mission is to increase the number of successful black entrepreneurs in technology.
blackboard
color of mourning
Black Beauty – an 1877 novel by English author Anna Sewell
black pearl (also a ship in the Pirates of the Caribbean movie)
Jack Black
black hole
black gold
black friday
BeagleBone Black is a low-cost, community-supported development platform for developers and hobbyists.
Black & Decker
Orphan Black
Black Girls Code-STEM education San Francisco, Technology training for girls, diversity learning, Social Entrepreneurship in San Francisco
Black Sabbath
Black Bar Hollywood
The Black Keys
The Black Lips are a self-described “flower punk” band from Atlanta, Georgia.
Country music star, Clint Black
black jeans
Black Hat
Black Lives Matter
The Black Swan is a standalone book in Nassim Nicholas Taleb’s landmark Incerto series, an investigation of opacity, luck, uncertainty, probability, human error, …
black cat
Black History Month
Cara Black is the New York Times Bestselling Author of the Aimee Leduc Mystery Thriller Series of novels set in Paris, France.
black and blue
Black Hills
Ladysmith Black Mambazo – all-male South African a cappella singing group.
The Black Crowes
Orange is the New Black
documentary photographer Matt Black
black box
Black Rebel Motorcycle Club
People
Black people, a population group identified in some countries
I sought out this book after I saw a quilt, which referenced the book at the Tuleberg Quilt Show and after I saw Gerre bring her fantastic quilt to show and tell at a recent BAMQG meeting. I have Material Obsession in my library, but it hasn’t filtered to the top of the stack for a review yet.
As I was preparing to write this review I was thinking about what attracted me to Doughty’s style. I am really interested in the layering of color, design motifs, e.g. quilting, embroidery, embellishment, and the juxtaposition (almost clashing) of fabric/color motifs in quilts. You know how Kaffe Fassett has a riot of fabric prints in his quilts that somehow seem to work? That is what I mean.
You can see some of my experiments in this area in the Red and Black Improv quilt, but looking at Scrapitude Carnivale is what really made me think more about the successful combinations of different fabrics.
While this type of combination of fabrics and colors seems common today, Doughty curates her fabrics more carefully. She does not seem to be of the mind that more is better and the more you have the more will go together, unlike some other quilt teachers.
The book starts with an introduction, which says “The lives and voices of the makers are sewn into a composite piece of visual delight that evocatively joins color, technique, and style into a long lasting memory.”
This is only part of an introduction that is a delightful essay about making and some of the thoughts quilts evoke in people. It sets the tone for the book. After reading this, I had a dark thought that went back to my post on quilt labels, which was that unsigned/unattributed quilts break the connection of the maker to their quilt.
The intro is followed by a section on Kathy Doughty‘s quilt journey (pg.6). After giving a brief description of how she came to write the book, own a shop, etc, she reminds us that “just as important as the how of making the quilt is the why.” I think about the ‘why’ a lot and find that most quilt authors don’t discuss it very much, if at all.
The author brings the reader into the circle with the next section, “You and the Book” (pg.7). She says “simple fabric selections, basic patterns, and obvious designs gave way to more mature, thoughtful designs.” You have to walk before you can run. This section outlines how the author intended the book to be used. She encourages readers to use their stash.
Kathy Doughty suggests asking yourself “what do I want to say?” at the beginning of each quilt. This question stopped me. I almost never ask myself this I often start a project because I want to try a technique or teach myself a skill. I never think of infusing my quilts with a message or starting at a point with a message in mind. As I scroll through the quilts I have made in my mind, I know why I made most of them and only a couple of them have messages, or started with messages.
As with most quilt books, the intro sections cover the basics. A message about creativity (pg.8) is one that I would like to copy and put up on my inspiration board.
Doughty encourages readers to use our stash fabrics and gives some ways to think about your beloved fabrics.
All of the sections in the Tools of the Trade chapter are infused with Doughty’s creative and positive style. La de dah creativity is great, but good technique is important as well. Thus, I was pleased that she said “however, it is also important that the quilt lies flat, that the seams join, that lines of the design are distinguished, and that in the end the quilt is square – not to mention sewn together in a manner that will stand the test of time and wear.” (pg.11). I think that good technique gets short shrift a lot of the time, but I believe that it is amazingly important and am glad a well respected shop owner, author and designer like Doughty agrees.
I have never seen a section on Rulers and Templates (pg.12-13), but the author has one in this book. She is also the first person I have seen who recommends Creative Grids half and quarter square triangle rulers. In the photograph (pg.13), I see a few rulers that I have, but a number that I do not. In this section, Doughty’s reasoning and comments are included with the picture. The picture is followed with a Tips section, which describes techniques such as cutting strips (pg.14), cutting wedges from strips as well as from a wedge ruler (pg.15), and using the specialty rulers (pg.16-17). There are also a few pages on other tools (pg.18-19).
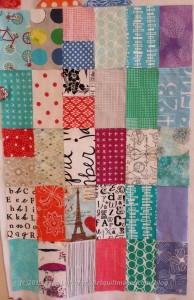
Finally, we get to Chapter 1! It is called “Working the Stash”. Doughty writes “The simple act of collecting is a favorite pastime for many of us. As a shop owner I have heard many stories about stashes. I am often left with a curious feeling: Why collect if it is never to be used?” I have no interest, cause or reason to judge why people buy fabric and whether they use it or not. If a quiltmaker collects fabric for the joy of collecting more power to her (or him!). Yards of fabric are no different than salt & pepper shakers or 50s style Pyrex baking dishes. We all collect something. Still, I am glad Ms. Doughty brought this up. When I buy fabric it is with the intention of using it. Whether I do or not is a different story, but my intent is to cut it up and put it in a quilt or bag. I have found that when I put ‘special’ fabrics into my quilt I enjoy them even more.
The author acknowledges that selecting fabrics for a quilt can be a challenge, but that it should be a fun process. Her tip is to find a link, an idea with which I agree. She points out that a stash that is not used starts to look dated. I have found this to be true as well. I have found that my tastes change if a fabric languishes or I am not interested in the project for which I bought the fabric after awhile.
She talks, in general, about scrap organization in this section as well.
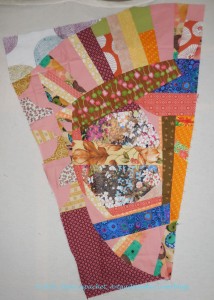
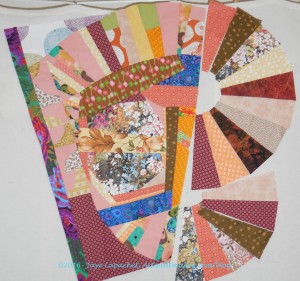
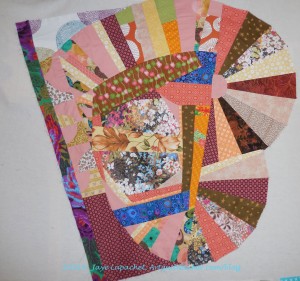
Right after that one page chapter 😉 come a few projects related to the text of the chapter: stashes and scraps. Of these projects, I am quite fond of Vintage Spin (pg.22-27) . As I said, my friend Gerre made a version of this quilt and I loved her piece.
Each project has a short section oh how the author started, construction, assembly and how she finished. The directions are adequate, but only a few pages. I think a maker would do well to have a few quilts under his/her belt to make these quilts. Even a confident beginner could make some of the projects.
Chapter 2 is called “Working with Templates (pg.59). Kathy says that she loves to cut all kinds of shapes with templates, because they are efficient. Material Obsession has a line of templates for many of the projects in this book. These rotary cutting templates are featured throughout the book in the various photos. They are listed as optional in the book’s supply lists.
Big Wedding (pg.86-91) is my favorite pattern in this section, though I would use a different color palette.
“Working with Scale” is the title of Chapter 3 (pg.93). Modern quiltmakers love to blow up one block design to cover a whole quilt top. Doughty has done this, but in a fresh way.
She points out that making blocks really big means that you can use large print fabrics (like my man, Phil’s 😉 fabric lines!!!) to great effect. Why didn’t I think of this?? This is an excellent point, which goes beyond ‘making it modern’. My mind is zinging!
Kathy Doughty mentions “The puzzle in this process was how to maintain the feeling of tradition while exploring the blown-out size structure.” I think that is an important question, because no matter how hard we try 9 patches and Churn Dash blocks have been around for awhile and are considered classic blocks. The joy of quiltmaking, for me, is taking something and making it new and my own,which includes classic blocks.
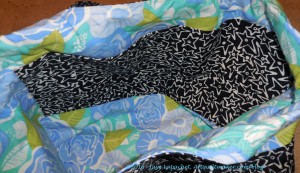
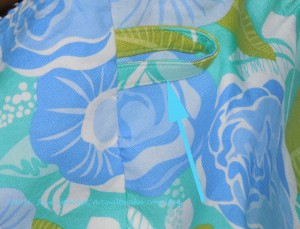
I like most of the quilts in this section or had some feeling about each one. I really like Basket Case (pg.94-101). The name alone is worth the price of admission! The finished version of Lily Field (pg.102-109) was very appealing. The infinity look of the Mega Churn Dash (pg.110-115) was fun, but the fabrics were dull and uninspiring. I would have added something to the quilt as it looks like something is missing. Perhaps it would have been more appealing to me if the background had been mosaic pieced? The good thing about this quilt is that it would be a fast gift.
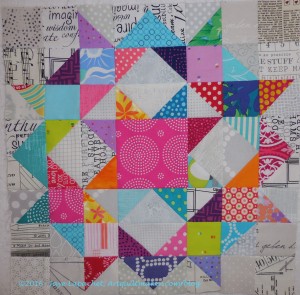
Super Nova (pg.116-121) may be my favorite quilt in this section. I am yearning to try it with some of my Philip Jacob prints!. I love Sawtooth Stars and the off center design offers a lot of movement. The different sizes of blocks also adds to the movement. The opportunity to use large scale prints might be too good to pass up. I bought a charcoal dot print recently that would be an excellent background for this quilt, so I am on my way! 😉
Star Man (pg.122-126) may be a good design for one of my nephews while not being boring to sew.
The last piece of the book is a relatively detailed bio of Kathy Doughty. This is followed by a packet of template pages in the back of the book.
Dates: Saturday, March 19 and Sunday, March 20, 2016
Hours: Saturday: 10:00 A.M. to 5:00 P.M.
Sunday: 10:00 A.M. to 4:00 P.M.
Admission: Two-day advance purchase tickets are $10 until February 29, 2016; tickets purchased at the door are $15 and children 12 and under are FREE.
Location: The Craneway Pavilion, 1414 Harbour Way South, in the Marina District of Richmond, California. With its huge windows, panoramic San Francisco Bay views and natural light, The Craneway Pavilion makes a spectacular venue for the vibrant quilts and fiber art that will be displayed at Voices in Cloth.
East Bay Heritage Quilters present Voices in Cloth 2016, Extraordinary Quilts by the Bay. Highlights of the two-day show include an exhibit of more than 200 new quilts and wearable art made by guild members; quilts by kids; a stellar lineup of 37 vendors, offering textile and eclectic wares; a Guild Marketplace of Fine Fiber Art; free demonstrations of quilt-making techniques including new ruler-free cutting techniques by Sherri Lynn Wood; bed turnings by the San Jose Museum of Quilts and Textiles showcasing quilts from the museum’s permanent collection; engaging activities for children and introducing new children’s titles from C&T Publishing; and great door prizes.
Voices in Cloth 2016 will as also feature two special exhibits:
“Off the Wall: Maverick Quilts from the Julie Silber** Collection”
Well- known and highly respected quilt authority, Julie Silber curates this special exhibit of 20 of her favorite quirky antique quilts. The pieces all have in common an unusual twist on the ordinary, a certain verve, and a gritty individuality rarely found in more studied and self-conscious quilts. These playful pieces demonstrate that all over America original works of art may be as close as the blankets under which we sleep. Julie Silber will lead a personal tour through the exhibit each day at 1 p.m.
**Julie Silber is best known locally as curator of the world-renowned Esprit Quilt Collection , which was on display at the Esprit Company headquarters in San Francisco in the 1980s. She is the owner of Julie Silber Quilts where she offers a wide range of antique and vintage quilts made between 1800 and 1950. She wrote Hearts and Hands: The Influence of Women & Quilts on American Society, and Amish: the Art of the Quilt.
“Tell Me a Story” A Cloth Doll Challenge
For the first time, Voices In Cloth presents a special exhibit of 36 cloth doll sculptures and their stories. The Challenge is curated by Sondra Von Burg, a local doll artist, teacher and lecturer on the Art of Cloth Doll Making. She states “Dolls traditionally were made to represent the human form in miniature. Contemporary dolls are moving closer to sculpture, but often continue to represent humans beyond just the form and all dolls have a story to tell.” Sondra will be demonstrating “Cloth Doll Finger Turning” during the show and has a vendor booth exhibiting her work.
East Bay Heritage Quilters is a non-profit, all-volunteer organization based in Albany, California. The guild focuses on preserving and continuing the traditions, culture, and history of quilting and textile arts. A significant contribution EBHQ makes to our community is the Deanna Davis Community Quilt Project, through which our members and outside volunteers make and distribute over a 1,000 quilts a year. Recent recipients include First Place for Youth (a home for aged-out foster teens), and survivors of the Lake County fires. In 2016, EBHQ will make monthly deliveries to a Neonatal Intensive Care facility.
There are two Opportunity Quilts that will be featured at the show. Winning tickets in the raffle will be drawn on Sunday, March 20, 2016. Photos and descriptions of Bay Windows and String Theory can also be found at http://www.ebhq.org/quilt-shows/vic2016/vic2016quilts.
Bay Windows
42 inches by 46 inches
Raffle Quilt designed by Nancy S. Brown
Appliqued by Nancy S. Brown, Meg Cupman, Cynthia Demidovich Winn, Linda Gavin, Sue Gragg, Linda Gruber, Andrea Hong, Jenny Kolbusz, Liisa Lyon, Lily Pang, Laurel Putnam, Melissa Quilter, Valerie Sopher, Katie Spangler, Carolyn Weil.
Quilted by Laura Lee Fritz.
Photography by C&T Publishing
String Theory
80 inches by 84 inches
Raffle Quilt by Barbara Ramsey
Quilted by New Pieces in honor of Deanna Davis
Photography by C&T Publishing
East Bay Heritage Quilters, P.O. Box 6223, Albany, CA 94706
Next on the IRR list was Claire’s piece. Claire was in my original group so I wanted to make sure I worked on all of those quilts. I received her piece at the January BAMQG meeting.
Claire’s IRR was a challenge. The colors are perfect for Claire, but they are not my colors. Also, many of the fabrics had been used up or smaller pieces were left. This is why the project is called a challenge! I did not let these things discourage me.
I put the piece up on my design wall and tried to see the focal point or the place where Claire started. I couldn’t really tell, so I looked at who had worked on the piece and still couldn’t tell what might have been Claire’s start.
Trying out the Grandmother’s Fan idea
I put the focal point aside and looked at the piece. I saw some good curved lines and thought something like the Grandmother’s Fan block might work. I cut some blades and put them up on the design wall.
I really did try to keep, mostly, to the 20 minute rule. I find that rule to be hard as the pieces get larger. Of course, cutting is still a challenge. Also, the curves on Claire’s were not an easy design element. And, right on cue, life got in the way and the piece sat on my design wall for a week or more.
Claire’s IRR – continuing the curves
As I walked in and out of my workroom I decided I did like the curves. At one point, I adjusted the fans so the existing curves would be continued — or give the illusion of being continued.
In the photo, I tried to point out to you, in a very obnoxious color, what I thought of as ‘continuing the curve’. No, the blades aren’t all the same size, but the curve seems to be the most important in terms of design. I hope the curves I added work with the existing curves to create a focal point.
The bad part is that I didn’t square off the fans. I know I should have, but I just didn’t feel like it. I know I can offer to do it later, if push comes to shove. I am hoping that someone else will square them off down the road.
Claire’s IRR with my addition
I am happy with what I did. I gave the piece to Michelle on Thursday and will look forward to seeing what she does.
Finally! I made a Sew Together Bag for myself. I haven’t filled it up with my English Paper Piecing materials as of this writing, but I will have done by the time you read this.
I am not sure why I chose the paint can fabric for the outside. It was waiting to be ironed and it kept beckoning me. I couldn’t resist and it was perfect. It feels like a good outside for a working bag. I also think I won’t wonder why I chose it.
I didn’t mean to match the top, but I did a pretty good unintentional job, don’t you think?
Jaye’s Sew Together Bag -some fabric choices
I chose the inside fabrics very carefully. I wanted fabrics that I loved. A lot of these are new or new-ish fabrics, but have the feel of old favorites. All the choices has to be light for the inside so I can see the tools that fall to the very bottom. I did choose one dark violet/magenta Karen Lewis fabric. It isn’t light, but I think it will be fine.
As I mentioned the other day, I made this one at the same time I made TFQ’s. After I cut all the pieces I sewed the steps for one and then the next until the end when I had to get TFQ’s done because she was coming to visit and I needed to gift it. I finished mine in a few quiet half hours over the weekend after the fun and games with TFQ.
My Sew Together Bag – open
I added a couple of pinks for the inside of the pockets, but they are hard to see unless you have the bag with you.
Jaye’s Sew Together Bag – closed, side view
I tried one thing on mine to try and cover up the stitching of the side panels to the lining. (If you look at the photo above, the area I am talking about is a vertical line of binding on the ends just in from the curvy handle). At the end of the process, when I was putting on the binding strips, I sewed the binding to the bottom first then wrapped it around to the top. I still had to deal with the thickness, but I was able to see where I had stitched and could make an attempt to cover it.
Sew Together Bag with zipper pull
I received a zipper pull for Christmas and decided to put it on the bag. Why not? I had it. It would make the long zipper easier to pull and it would look cool. Also, I wouldn’t have a random zipper pull floating around the house.
It fits perfectly and looks cool (at least to me!). One problem is that the zipper pull is one sided. When I open the long zipper to access my EPP materials, the zipper pull ends up on the other side of the bag upside down. I know this is silly. It would be better to get a two-sided zipper pull. Since I already had this, I am going to continue to use it but I would advise you to get a two sided zipper pull if you are out buying one.
I have an idea of making one using beads for the next STB, but we will see.
Upside down zipper pull
I filled the bag on Friday. I took my regular handwork bag and put some items from that bag into my new Sew Together Bag. I took all of the stuff I might need for English Paper Piecing. I may have mentioned that I intended all along to use this for my English paper piecing project. Two problems I had in the filling: would I get a second pair of Gingher snips to put in my regular handwork bag? I also forgot thread. I meant to go upstairs and get another spool and I just forgot, or got distracted. That forced me to go to quilt shops over the weekend. 😉
Sew Together Bag in my lap
In using the bag in the car, I found the best part to be the ‘tray’ that the bag formed in my lap. With my old handwork bag, it didn’t open as far as this one so my lap was my tray. Also, everything was sorted into pockets. As I got used to where my tools and supplies were located, I found I could work relatively quickly. I finished on two EPP stars in the car, placing the bag with the pincushion towards me. I found it to be very useful and convenient.
Some Observations
I think the strips for the long zipper would lay better if they were on the bias.
The bag needs some feature to which Wonder Clips can be clipped.
I tried a few different things and cannot get the top stitching to look good where there are many, many layers.
WonderClips are a godsend for making this project. I used about 12. They are not listed on the supply list, but I think they are essential for this bag.
Make the pincushion (mine is a little too large on this one) and the exterior at the beginning of the bag making process. It is such a hassle to stop and do the fiddly bits when you are so close to finishing.
Use a two sided zipper pull
I have an idea for one more that I want to make, but it isn’t a requirement and I think I will let the feeling lie for awhile.
After making this bag 4 times, I am tempted to try the Bionic Bag just to see the differences. I am trying to restrain myself. I need another bag pattern like I need a hole in my head.
A week or so ago, I wrote my first Various & Sundry post for 2016. In a comment, BAMQG pal, Annemarie, asked about quilt labels. It occurred to me that I had been meaning to write about quilt labels for a long time and I hadn’t yet done it.
First, I think quilt labels are VERY important. They document the work of women who are not being paid to make things. While you may think that women and their work are valued, I think that we have a long way to go to have handwork (even by machine) valued as much as something such as, for example, a technology infrastructure or a new and successful app.
Second, I think quilt labels are important because they can tell the story of your quilt, if you want. Even if the story includes only:
maker
date
recipient
It is a small story, but a story nonetheless. It can be the starting link of a chain.
Label for Small Items
Third, for bags and small projects, I have a small label I print out in batches of about 20 on a page. It is not personalized to any particular project, but it lets people know who made the item. I even put these on ATCs. While simple and not unique, they can link a small item to my larger quilts. These would be perfect to make on Spoonflower and I might just do that.
Fourth, ALL quilts are important even the baby quilt you whipped up overnight for a baby who came early. The child will look at the label, wonder at and ask about it when s/he is old enough.
I did a little meditation on quilt backs a few years ago. Since I put my labels on the back, is relevant for this post. You may want to take a look.
What to Include
When I make a quilt label, I start with a Word document and save it to the folder on my computer (Google Drive or similar would work as well) that has all of the notes and images for the project. I include the following:
a picture of myself or my avatar
the name of the quilt
the size of the quilt (this is helpful when entering shows as I don’t have to measure the quilt every time)
details about materials and construction, such as if I have embellished the quilt or used special materials. I always put the content of the fabric and thread. Most of my quilts say 100% fabric and thread, but this is the place to put other content information, if relevant
my name, address and phone number
the name and address of my blog
Name and company of the quilter who quilted the quilt for me, starting with “Quilted by” or “Longarm quilted by”. Sometimes my name is in that spot. I feel it is important to differentiate the piecing from the quilting.
If this is a gift, I also include “Collection of Jane Doe”
If many people worked on the quilt, I include their names. This may help historians build connections between me and my guild mates in the future.
Sometimes I will include the pattern name.
If I got the pattern from a publication, I will include that and note changes that I made.
If the quilt was made for a show or exhibition or in response to a challenge, I put it on the label. Again, it helps make connections.
The story, process and inspiration for the the quilt. This is often the same, or similar, information I use on the quilt’s webpage. This information may include why I gave the quilt to this particular person. If I used special fabric or a particular line of fabric, I may include the information in this section. I also include why I made the quilt. It may have been specifically for a person. I may have started it in a class or wanted to try a technique or process
washing instructions, especially if the quilt will be a gift
Yes, the above is a LOT of information. My labels are frequently very large – taking up most of an 8.5″ x 11″ sheet. This is the information I would want to know if I came across a quilt in an antique store.
I often write up the label as I go along, so I only have to do some editing when I am ready for it.
How to Make a Quilt Label
There are as many ways to make a quilt label as there are to make a quilt. You can:
use my process and print on fabric
write with a permanent pen on a plain piece of fabric and sew on to your quilt
write directly on the quilt (watch for bleeding!!!!)
hand or machine embroider
applique’
use stitch lettering on your machine to write out label information directly on to the quilt.
Get sheets of labels already printed on fabric and fill them in with a permanent marker
Use Transfer Artist Paper
Write up your label in Word (or another word processing program), then trace on to fabric with a permanent pen
Create on Spoonflower
Buy personal, pre-cut woven labels (like the ones in your clothes) with your name, blog name, a short message, etc
Insert a triangle of fabric into the binding with your information written on it
embroider (watch for floss that bleeds)
I love the front of a quilt. Sadly, I am happy for the the fairies and magical animals to finish the rest for me. By the time I get to making the back, I want the quilt to be done. My method for making labels is relatively quick, in the grand scheme. Some tips:
print a test page on a piece of paper to check for color and clarity.
Make sure you ink cartridges are at your desired level
Sewing and More Information
My mom’s car was broken into and my niece’s quilt, which was coming to me to be bound was stolen. It had been made at a shower for her mom and many people had drawn, colored and written messages for my yet-to-be-born niece. The quilt was a wonderful scrapbook of heartfelt love and was never recovered. It is one of the saddest events in my quilty world.
I sew my quilt labels into the back of the quilt before the quilt is quilted. I do not applique’ labels onto the back after the piece is quilted. Yes, that means piecing the back. Yes, the quilting can make the words look weird, but I want people to know the maker and owner of the quilt. If the quilt is stolen, then the thief will have to destroy the quilt to remove the label. I think this is unlikely, but in a sick kind of way, I would rather have that then someone passing my work off as their own. If they don’t care, then perhaps every time they see the label, they will feel a little bit ashamed.
Confession Time
I have one quilt that is unlabeled and there are no photos of it. It isn’t a horrible quilt or anything and I do keep meaning to do it. I just don’t seem to get around to it. If I die before I do it, nobody will know anything about it, which is sad.
I really dislike making labels and quilt backs. I do it, because I truly, deep in my heart, believe it is important to document my work. If you don’t feel that labels are important, then you don’t have to make them. The above is not a call to arms, but information on how and why *I* label *my* quilts.
Resources:
This is a small sample of the myriad of information available. For more resources type “quilt labels” into Google and look at the massive amount of resources and images that are retrieved. Everyone has a different process. Find what works for you.
I know you have to be wondering if the gift madness ever ends. One thing is that I know LOTS of fantastic people with birthdays in January. I don’t give all of them gifts, but the ones for whom I do make gifts mean the ‘holiday’ season seems to stretch well into January. It is easier just to continue the numbering of the gift posts as the making often starts in December or before.
For this particular bag, the making started last week. The planning, hunting and gathering started well before, but the actual making had to wait until I had finished some other projects.
TFQ Sew Together Bag – closed
I wanted to make 2 more Sew Together Bags, including one for me, so I decided I would make both at one time. After the cutting, which still seems to take me forever, but was easier doing two at a time, I got started. I was surprised to find that I plowed through the same amount of work on two STBs in the same amount of time as I had on the second STB. Don’t get me wrong! I referred frequently to the Quilt Barn Sew-a-Long posts as the process is complicated and not firmly ensconced in my head. Seriously! Those posts are life savers.
I wanted this Sew Together Bag to match the Multi-tasker Tote I made. One birthday – a set of gifts. As I mentioned, I didn’t have any more of the black batik. I decided to use the Multi-tasker Tote lining fabric as the outside. I used the dark for the Multi-tasker Tote, because it doesn’t show the dirt as much, but with the Sew Together Bag, it probably would just stay at home with handwork materials in it and not be on the floor of the bus, etc.
Pocket Panel Showing Fabrics
In addition to the lining fabric, I chose the fabrics carefully. I wanted them to be really pretty and interesting. I also wanted each section to be different, so that the differences would provide visual cues when searching for supplies or tools. I am particularly pleased with the fabrics I chose for this STB.
The violet fabric on the left has a bit of an Asian feel, which is not normally my style. I was particularly attracted to that fabric when thinking of TFQ. I was pleased that she like it as well.
I still had trouble with the thickness of some of the steps. I tried not sewing all the way to end of the side panels so I could flatten them out. The idea was good, but the flattening didn’t work out. I also thought of trimming the batting away from the edge of the exterior. By the time I got to that point, it was impossible to trim the batting. Foiled on both attempts! TFQ suggested using ShapeFlex instead of batting next time (will their be a next time???). I thought it might not provide a sturdy/thick enough exterior, but I might try it.
TFQ Sew Together Bag – open
I am pleased with this version, especially with the colors of the pocket panel. I hope it is useful.
The Library Information Literacy Advisory Committee (LILAC), established by the Council of Chief Librarians and the University Librarian in 2004, grows out of an ongoing interest and responsibility in promoting information literacy across CUNY.
National Lilac Rabbit Club of America promoting Lilac Rabbits. [Lilac rabbits???]
Lilac Patisserie – A dedicated gluten free bakery and café on State Street in Santa Barbara, CA.
Lilac City Grille – Rochester, NH
Pine Mountain Clubs Annual Lilac Festival
Definition: “Syringa vulgaris (lilac or common lilac) is a species of flowering plant in the olive family Oleaceae, native to the Balkan Peninsula, where it grows on rocky hills.[1][2][3] This species is widely cultivated as an ornamental and has been naturalized in other parts of Europe (UK, France, Germany, Italy, etc.) as well as much of North America. It is not regarded as an aggressive species, found in the wild in widely scattered sites, usually in the vicinity of past or present human habitations.[4][5][6]
Syringa vulgaris is a large deciduousshrub or multi-stemmed small tree, growing to 6–7 m (20–23 ft) high, producing secondary shoots (“suckers”) from the base or roots, with stem diameters of up to 20 cm (8 in), which in the course of decades may produce a small clonal thicket.[7] The bark is grey to grey-brown, smooth on young stems, longitudinally furrowed and flaking on older stems. The leaves are simple, 4–12 cm (2–5 in) and 3–8 cm broad, light green to glaucous, oval to cordate, with pinnate leaf venation, a mucronate apex and an entire margin. They are arranged in opposite pairs or occasionally in whorls of three. The flowers have a tubular base to the corolla 6–10 mm long with an open four-lobed apex 5–8 mm across, usually lilac to mauve, occasionally white. They are arranged in dense, terminal panicles 8–18 cm (3–7 in) long. The fruit is a dry, smooth brown capsule, 1–2 cm long, splitting in two to release the two winged seeds.[1][8” (Wikipedia)
Lilac Bijoux believes in carefully curating their fashion to make sure they bring you the best casual-chic flair your can find.
The Mackinac Island Lilac Festival is a 10-day celebration, June 5 through 14.
“The story of lilac, according to Greek mythology, begins with a beautiful nymph named Syringa (lilac’s botanical name). Captivated by her beauty, Pan, the god of the forests and fields, chased Syringa through the forest. Frightened by Pan’s affections, Syringa escaped him by turning herself into an aromatic bush – the flower we now refer to as lilac.
The 8th wedding anniversary flower and the state flower of New Hampshire (symbolizing the hardy character of the Granite State’s citizens), lilacs are frequently considered a harbinger of spring, with the time of their bloom signaling whether spring will be early or late. In the language of flowers, purple lilacs symbolize the first emotions of love, while white lilacs represent youthful innocence.” (Teleflora)
Post the direct URL (link) where your drawing, doodle, artwork is posted (e.g. your blog, Flickr) in the comments area of this post. I would really like to keep all the artwork together and provide a way for others to see your work and get familiar with your blog or website.
The Creative Prompt Project, also, has a Flickr group, which you can join to post your responses. I created this spot so those of you without blogs and websites would have a place to post your responses.
We are also talking about this on Twitter and Instagram. Use the hashtag #CPP
I put this Multi-tasker Tote on my list in 2013 or even 2012, maybe. It feels like it has been on that list forever. Fortunately, it doesn’t matter, because the pattern worked the same in 2015 as it did when I made it last time.**
I couldn’t carry my machine and prepping projects seemed like a good idea. I decided to cut out the bag when I went to Reno. Cutting out bags is very time consuming for me. I found it hard. I felt sad and depressed after I finished the cutting, though having Julie, Kathleen and Mrs. K there made it better.
The following weekend, Thanksgiving weekend, for #BFSI, I started sewing this bag together. The Multi-tasker Tote pattern is such a great pattern and it is a joy to make (the sewing part, not the prep part). I felt so much better after I started it. You should click on my link, buy it AND make it!
I worked on it late at night and within a short amount of time, the bag started to look like something. It was such a thrill.
Large inside pocket
I did a couple of things differently. First I made a the inside pocket really large. I wanted the pocket to accommodate a journal to keep it safe and away from a water bottle or other wet things.
I wanted contrast so I made the pocket out of the outside black batik. I really like the black batik, though I might have thought differently if I had made the matching Sew Together Bag first (see post about that soon). I didn’t have enough of the black to make the outside of the Sew Together bag, which was a disappointment. I have a thing about making sets of matching items.
AMH MTT key ring loop
I also made the key ring flatter. I wasn’t sure why beyond not wanting to sew through so many layers of fabric and interfacing. It turns out that TFQ can clip some of her zipper bags (she is making them now and selling them at select craft fairs and by order), using a carabiner or a key ring clip or something to this bag. I have a sprongy chain so I can clip my keys to my handbag and I may try and make something like that with a piece of elastic in a later bag. We’ll see.
I used quite a bit of Shapeflex to give the bag some structure. You know I don’t like floopy bags. It looked stiff, though, which wasn’t ideal.
I gave TFQ the bag for her birthday on Monday and she liked it, or I thought she liked it. I’ll look forward to seeing how it works for her when it softens up a bit with use.
**Nota bene: I don’t actually know if the link to the bag is the last time I made a AMH MTT. It seems like a long time ago and I thought I had made one more recently.
I was finally able to finish this pink (the center is pink so I think of it as the Pink Carpenter’s Wheel) Carpenter’s Wheel block. While I was working on the Sew Together Bags, I didn’t have a quarter inch foot on the machine, so I did barely any quilt work piecing. Very sad as that means very little gets done.
But the Sew Together Bags are done for the moment and I got quite a lot done over the weekend.
This one has more HSTs. I put some in the center, outside the Sawtooth Star, to try and get the look of a ring going. Not sure if I succeeded, thought I do like the look and the opportunity for additional color more HSTs provides.
I am still interested in the low volume background and am adding more of my own fabrics to the mini-charm packs I bought in Corvallis.
I cut and laid out another Carpenter’s Wheel block. I didn’t do it because I wanted an even number. I did it because I had another idea for a variation.
Mom came over and spent the night a few weeks ago before she drove the Young Man back to school. We had some time to talk and happened to be doing it in my workroom so I cut and pressed fabric while we chatted.
I’ll do a bit more cutting and pressing and plan to start arranging this quilt towards the beginning of February.
TFQ came to town for a visit and heard about AVFKW. She wanted to visit. She has been knitting a lot more than quiltmaking 🙁 lately and loves new yarn. I didn’t mind at all. Who doesn’t love yarn? I don’t really knit anymore and I really enjoyed looking around the shop.
A Verb for Keeping Warm (photo from April)
A Verb for Keeping Warm is a yarn and fabric shop in the East Bay. I wouldn’t say it is exactly a quilt shop, but it is worth a trip to take a look at their fabric. There are interesting fabric choices available. < the photo was taken on an April day; I forgot to take one and it was raining. >
Yarn Wall – A Verb for Keeping Warm
This is my second trip and I was pleased to see that the shop had been rearranged. It was much more open this time and was a very appealing space. The colors of the yarn and fabric were a nice foreground to the natural wood shelves and furniture, brown paper packaging and soft lighting.
The place was packed! There was a knitting class or group going on at the table in the back. There were people looking at yarn, fabric and everything else and one patient husband/boyfriend waiting for his sweetheart.
If I had to decide, I would say that AVFKW is mostly a yarn shop. Still, they have a lot of other stuff. One GIANT ball of roving was particularly interesting – and very soft. There were a number of different items on offer:
Supplies and Products
Fabric Wall
The items for sale seem to be carefully curated. The goal is, clearly, to supply makers of yarn items and fabric items. There are scissors and a variety of measuring tapes. There were kits for socks and materials required for dyeing. I saw stitch markers and knitting needles. Swiffs, spinning wheels and a variety of clubs are also available.
There was a natural dyeing section, which had dye supplies, things to dye and kits for dyeing a small project. TFQ told me later that the owner wrote a book on this subject later.
We saw a scarf that we both liked. It is called the Nightfall Cowl. We talked to one of the saleswomen about it and she said that the pattern can be found on the shop blog.
TFQ found a beautiful yarn that was a blend of wool and silk. It was so nice to touch! She could not find colors she liked, so she did not buy any despite wanting to very badly.
The staff was also quite cheerful and helpful. If you want interesting, but not tons of fabric or yarn, then this is a good place to visit.
We are well into the school year and, as you know, the YM is back at school after the Christmas break. He is finishing up week 1 of the semester. He talked about taking an extra pillow back to school with him. That was the only thing he felt he was missing.
September– Done
Theme: soft
Fabric: Minkee and flannel
Theme: Back to School
Fabric: Timeless Treasures Fun #2306
September College Pillowcase
Back-to-School Pillowcase
As I said in my previous post, I was tempted by a “School Daze” theme, but I didn’t want to send him something that will embarrass him. I also want him to use the pillowcases. I decided to make him a really soft pillowcase, which I did. Then In Eureka, I saw the Timeless Treasures fabric. I texted him a picture and he approved so I bought some fabric and made the pillowcase when I got home from dropping him off. It went into his first care package.
October – Done
Theme: Halloween
Fabric: skeleton fabric by Timeless Treasures for the body. The cuff is an old P&B Fabric.
Halloween Pillowcase for YM
This is a gimme. Very easy fabric to choose and I am pretty sure the YM will like it.
I was disappointed I couldn’t find a cornucopia fabric, but this fabric looks very Thanksgiving-y.
December
Theme: Christmas
Fabric: not purchased
YM’s Christmas Pillowcase
January – Done – UPDATE!
I didn’t send this off to him, though I still have time if I want to send him a January care package.
Theme: Pokemon
Fabric: Robert Kaufman licensed from Nintendo
Pokemon Pillowcase #2
I had the fabric on my ‘to be ironed’ pile and the YM saw it. I didn’t say that it was for a pillowcase for him and asked him if he would want a pillowcase out of it. He, very tactfully, said I should make one for someone else, so I made one with red fabric for the body and a cuff from the Pokemon fabric. I have another pillowcase with a Pokemon body and think I will give it to his cousin, who is 11.
February – DONE – UPDATE!
Theme: Valentine’s Day
Fabric: Moda
Valentine’s College Pillowcase
I really wanted to send him a Valentine’s themed package, so I made a Valentine’s pillowcase and will send it off towards the end of the month. I think the grey (Julie’s suggestion) makes it not too sweet. The color is heading towards pinky red..The original theme below will have to carry over to another month or end up as a gift for one of the nephews.
Theme: Video games
Fabric: Angry Birds
March
Theme: St. Patrick’s Day?
Fabric: ?
April
Theme: Easter?
Fabric: ?
May – UPDATE!
The YM will be home in May (the dorms close on 4/29), so no pillowcase for May.