More on the Sad Quilt

After my recent post, I thought more about this quilt and decided that the Jacob’s Ladder pattern wasn’t going to work at all. I tried different ideas, different colors, but it just isn’t the right idea for my friend.

First, I really shouldn’t call it the Sad Quilt. Not a great start. I can’t help how sad I am, though.

Frolic!
Frolic!

Second, as an interim solution, I sent off Frolic! to her. I am glad I have some quilts around I can just send off to people in need.

I love this quilt and had a good time making it, so there is a lot of good karma/energy associated with it. My friend lives in Hawaii, so it wasn’t cheap to send. It was totally worth it since I can’t be there to hug her in person.

In the meantime I am still working on a design made specifically in memory of my friend’s daughter. I am thinking that I will repurpose the Tilde fabrics I bought on vacation into this quilt.

Country Revival QCR pattern

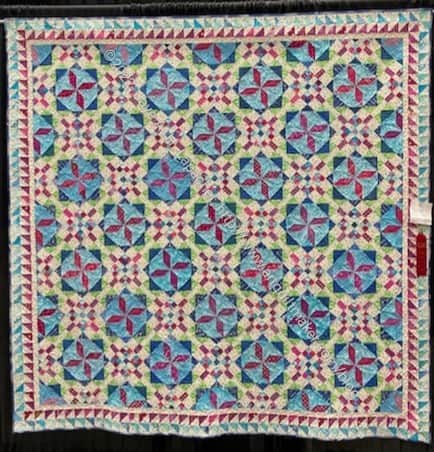
A pattern occurred to me that I bought awhile ago, but haven’t yet tried, Country Revival. I don’t know why it is called Country Revival, because it doesn’t look ‘country’ at all to me.

The QCR (etc) patterns I have made, Metro Twist and Metroscape, have come out well, so I think the end result would be successful. At least is has a chance of being successful.

Tilde Fabrics
Tilde Fabrics

Obviously the Tilde fabrics would give it a different look than the quilt on the cover. I think I need to find a common fabric I could use in the center to bring the whole quilt together. I think pink would work, even different pinks. I also have that weird blue, which might work.

Also, the example quilt is small. I would want to make it larger, maybe 9 blocks. Still work to do to bring it together, but I feel I am on the right track now.

Gift Post: Stella Pouch

We are thanking Laura, a longarmer in Half Moon Bay who has been longarming donation quilts for us for a year or more. Carrie is gathering gifts to make a nice basket for her.

Stella Pouch for Laura

After seeing the Center Street Quilts video on IG showing the making of a half vinyl pouch, I decided to try and make one. I actually made two. One will be for a guild swap. I thought I could probably make the pouch after watching the video, but decided to buy the pattern, the Stella Pouch from Center Street Quilts just to make the process a bit easier.

Stella Pouch for Laura - vinyl side
Stella Pouch for Laura – vinyl side

I looked for more specific directions on the Flying Geese and the vinyl, but didn’t find any. Even with the pattern, I still had plenty of figuring out to do. I knew I could do it. That is one reason I enjoy making bags. There is always something to figure out.

I think I forgot to trim the height, so the pouch is taller than the pattern states. Still, I think it will be useful. Small project bag?

One of the good things about using vinyl for this bag is I was able to use a very pretty lining fabric. Having a good fabric show through the vinyl is an added bonus.

I made a pattern in EQ8 for the Flying Geese portion. This pattern is for the large sized pouch. Make sure you print it on thin paper, or special foundation paper piecing paper**. If you don’t know how to foundation paper piece, check my tutorial. You can find all 5 parts on the Quilt Class page.

I think I might have a few more of these pouches in my future.


**N. B. : Obviously, you should shop at local quilt shops and support small businesses. However, if you are too busy or can’t find what you need there, I use Amazon affiliate links and may be paid for your purchase of an item when you click on an item’s link in my post. There is no additional cost to you for clicking or purchasing items I recommend. I appreciate your clicks and purchases as it helps support this blog.

New Donation Top: Ends n.19

Ends n.19 start
Ends n.19 start

As I work through some sewjo challenges, I decided to make another Ends donation top. I have already handed in two donation tops this month, but an empty design wall doesn’t work for me.

I had various ends laying around the workroom and slapped a few up on the wall to see if I could make anything.

Ends n.18 was finished in September, so it is time for another one. I want to use a background fabric with the pieces shown, but I haven’t decided what color yet.

Jane in the Wild

Barb's Jane Market Tote
Barb’s Jane Market Tote

I received an email from DH’s cousin last week saying “i was canvassing for kamala in both reno and racine WI for 5 and 7 days in october, respectfully, just home this wednesday…..i needed a shoulder bag that would hold the door hangers we were distributing….i looked in my closet and found the bag you had made for me one christmas….it worked perfectly through many days of heat and rain!!!…just wanted to let you know you came along with me!!!”

This bag is from 2011! I am so thrilled to see it again. I didn’t remember giving it to DH’s cousin, however I am really glad it was useful.

Sad Quilt

My friend’s daughter died in a car accident. She was 17.

I have known my friend since 1981 or 1982. We were teens together for a very important year. We are not in contact every day, but she is a sister of my heart. Immediately, I thought I wanted to make her a quilt. Of course.

For a long time I have wanted to make a Jacob’s Ladder quilt – or a Jacob’s Ladder variation. The original idea for the Stepping Stones quilts came from the Pam & Nicky Lintott book, Layer Cake, Jelly Roll and Charm Quilts.  Of course, I made some variations.

I went to the Stepping Stones posts and looked at the EQ project file, but decided that it wasn’t quite right. I want to make another version of this quilt sometime, but today is not that day

Jacobs Ladder for Kathy

I looked at blocks in EQ and designed a Jacob’s Ladder type quilt.

This was my first attempt at color, using the Sweet & Plenty charm pack I bought at Ocean Waves in Eureka as a base. I went through a lot of iterations of color, placement of groups of color, etc.

This design wasn’t working for me. It didn’t feel right for the purpose. I thought about forcing myself to make it. I have a date with Colleen in a couple of weeks and would like to get a quilt to her to speed the process along.

I decided I needed to make the right quilt. I am going to keep trying.

I will look through the quilts I have made and see if there is one that will stand in for a fit for purpose quilt.

Finished: RwS Tote

I finished the Running with Scissors tote the weekend after I returned from Portland in October.

Running with Scissors tote - front
Running with Scissors tote – front

The time I spent in Portland working on the Running with Scissors tote was well worth the time. I am pleased with how it came out.

I used the foam that Colleen quilted for me and that made the whole project go a lot quicker.

The pattern calls for a border on the front, but I like the large flowers of this Philip Jacobs print so much that I didn’t put it on. Both the front and the back look similar, but I don’t mind.

Running with Scissors tote - inside
Running with Scissors tote – inside

The inside looks really great IMO. I forgot to cut all of the zipper and pocket bindings. Fortunately, I had the turquoise stripe with me and it went well with the zippers and the general overall look of the bag.

I customized some of the pockets for my tools. For the mesh pocket, I divided it into a very large section and a small section. The large section will be used for a rotary cutter and the small section will be for Sewline pencil refills.

Running with Scissors tote - outside
Running with Scissors tote – outside

I thought the webbing I used for the handle would hurt my hand, but I think the bag won’t get heavy enough to be a problem. I do like the glitter of the webbing. Perhaps having a little sparkle in my life is a good thing.

I was surprised at how small this bag is. I think of it as being much larger. I wonder if I could enlarge the pattern. The pattern is so complicated that I think it would be difficult.


Take a Stand & Running with Scissors

This bag is designed to be used with the Take a Stand bag**. I made a Take a Stand bag for myself awhile ago. As soon as I was finished with this RwS tote, I tried it with the Take a Stand bag and I was so pleased with how it looked.

Now I need to fill this bag up and take it to Sew Day.


**N. B. : Obviously, you should shop at local quilt shops and support small businesses. However, if you are too busy or can’t find what you need there, I use Amazon affiliate links and may be paid for your purchase of an item when you click on an item’s link in my post. There is no additional cost to you for clicking or purchasing items I recommend. I appreciate your clicks and purchases as it helps support this blog.

Finished: Rectangle Donation Quilt

Finished: Rectangle donation top

I am pretty pleased that this quilt is done.

My brown and beige bin was out so I used a beige dotty sort of fabric that has been hanging around for a long time. The sashing uses various cream fabrics, so I thought it would coordinate. The backing was another plain brownish and white fabric. Nothing special, but a large enough piece so I only had to piece one seam. My stash of large fabrics is getting low, so borders and backs are becoming more work.

More Ribbon Friendship Stars

Ribbon Friendship Stars - second batch
Ribbon Friendship Stars – second batch

I said I would make a few additional Ribbon Friendship Stars to make up where someone bailed out. I was supposed to make another 5, but only had the fabric for another four. I hope that is good enough, though I can whip up one on the special Sew Day next week if we need an extra.

Rectangle Quilt Progress

Rectangle donation quilt - no borders
Rectangle donation quilt – no borders

I made good progress on my Rectangle quilt, though it does seem to be taking forever.

I am not sure why I am sewing so slowly, but I am. I plan to put a border on this one. I haven’t decided what kind of border or what color yet.

I like the idea of using larger scraps for this type of quilt. I might start collecting such shapes again as I come across larger scraps. It’s a good way to use them up.

Finished: Sun Hat

Sun Hat - top
Sun Hat – top

In my job there is a concept called ‘MVP’. It means minimum  viable product, which is part of an iteration process that promotes getting something out and eschewing perfection. In the quilt world, I like to say ‘there is always more fabric’.

I finished my Sun Hat. It is a MVP.

Sun Hat (Heather Handmade) - side view
Sun Hat (Heather Handmade) – side view

I thought I had done everything properly. I was unsure about my progress, so I had Mary C help me at a recent Sew Day. I redid the brim piece after leaving the seams out meant the brim was too big for the crown. Still, there was so much adjusting and redoing that the hat just doesn’t look right. The side parts of the crown fold in too much on the top and I had to ease in the size when I sewed the pieces together.

It didn’t come out as well as I had hoped, but it isn’t terrible and someone will wear it and like it. I want to try again. I bought the Sew Hungry Hippie Bardot hat pattern. I haven’t started it yet, but may try to get it done soon.

Sister Quilt

Kelly's quilt
Kelly’s quilt

My youngest sister contacted me about buying a sewing machine. It turns out she broke her machine  ($100 Singer) free motion quilting! She is making a quilt! I am thrilled.

This looks like a baby quilt to me and I think it is an awesome first effort.

Kelly's quilt - detail
Kelly’s quilt – detail

I told her I was impressed by her attempts at free motion quilting. She told me that is what broke her machine.

I gave her some tips and she ended up with a used Brother Innovis NS80e. She got it from a  dealer who offers a 25 year warranty on the used machines they sell!

I am not familiar with that model, but looked it up. It has a lot of features and stitches for a starter machine. My niece is going great guns making projects from the One Yard Wonder book. I am pretty excited to have them both sewing.

Bird Holland Pouch

Bird Holland Pouch
Bird Holland Pouch

Despite my objections to the zipper installation, I decided to make another Holland Pouch. While I was in Portland, I went to Modern Domestic and bought some fabric, then went back to my AirBnB and made the pouch. The second time it only took me about 4 hours from cutting to completion. I couldn’t make these for a living, but I was pleased with how fast I did it.

Bird Holland Pouch Interior

I have been buying a few Charlie Harper bird prints lately. I don’t know why as I don’t usually make projects out of novelty prints. I bought this particular print because Amanda loves animals. The print is sophisticated as well. Most of Charlie Harper prints have a bit of humor as well as some sophistication.

The inside of the bag is made from a Ruby Star scattered star print. The color doesn’t exactly go with the outside, but choices were limited at Modern Domestic. I think the variation looks nice.

I also couldn’t wash the fabric (AirBnB and all), but for a bag, just this once I was ok with it. I was concerned about the smell from ironing the fabric, but I didn’t smell anything and didn’t have any breakouts, so it was all ok. The Charley Harper fabric is organic, so maybe that makes a difference?

Quilting Bird Holland

This pattern requires quilting the exterior, foam and lining fabrics together. Instead of quilting on each side of blue tape only, I put down a piece of blue tape, measured 3 inches to the right and put down another piece. I did that on both sides of the center piece of blue tape until I ran out of space. This means that my quilting isn’t as close together as in the Oxbow tote. It also took less time and I didn’t get as irritated.

Holland Pouch side
Holland Pouch side

The quilting went faster, but it means there is a 3 inch gap between some of the quilting lines. You can see that there is a dearth of quilting lines on the side towards the top, because of the 3 inch gap. I probably should have turned the fabric around, so there was more quilting on the top. 

I also had a bit of trouble keeping the fabric taut, so the 3 inch spacing may not have been the best interval. Oh well. Live and learn.

Bird Holland pouch top

This bag has a bit of an accent around the zipper, which I think looks nice in this bag.

This is a very quick bag to make and I am pleased with the outcome. I was more pleased that Amanda loved it. She really helped me during the visit and this was a small token of my gratitude.

Another RwS Tote

RwSt pre-assembly
RwSt pre-assembly

I have wanted to make myself a Running  with Scissors tote for awhile. I made one for my mom, and one for a friend, Mrs. K. I thought I had made another one, but I guess not. This photo is one I took in Portland after I had done most of the prep.

Shockingly, the prep all went very well except for the pressing pad. The directions had some nonsense about double Soft & Stable**. I ended up ignoring it, because I didn’t think it mattered and I couldn’t understand what they were trying to tell me anyway.

I realized after I had cut the tote out that I am in overdrive in terms of finding a new solution for taking my tools to Sew Day. Crafty Carrier, Hildegarde, Kit Supply Tote and now the Running with Scissors tote**. What am I thinking? Clearly I am not thinking; I am just making bags for myself. I have made a lot of bags for others so I think this is ok for now.

I really thought this bag was much harder and was kind of dreading it even though I wanted one. I think it helped that I used the pre-quilted foam that Colleen quilted for me. Much less fussing around at the beginning. Still, it didn’t feel hard at all and it has been awhile since I made the last one, which was in 2020.

I thought I had cut out everything, but I hadn’t cut out all the pocket and zipper bindings once I got to that step. Fortunately, I had some turquoise striped fabric that worked very well. I think it will look good.

This will go with my Take a Stand bag and my A Place for Everything bag.


**N. B. : Obviously, you should shop at local quilt shops and support small businesses. However, if you are too busy or can’t find what you need there, I use Amazon affiliate links and may be paid for your purchase of an item when you click on an item’s link in my post. There is no additional cost to you for clicking or purchasing items I recommend. I appreciate your clicks and purchases as it helps support this blog.

Monsters Pillowcase

National Park Monsters Pillowcase

I am on the fence about whether this pillowcase encourages travel or not. I thought the fabric was entertaining, so I bought it and now it is off to be encouragement for the youngest nephew. Fingers crossed.

Friend Julie told me that most of these monsters are made up to give each National Park a monster (or legend?).

I found an article on a site I have never heard of called “6 Mythical Beasts and the National Parks They Call Home.” The article tells you what equipment you’ll need to stalk them.

There is also a calendar of National Park monsters.

Holland Pouch Progress

I am making good progress on the Holland Pouch.

The one objection I have to Center Street Quilts patterns are that she doesn’t cover the zipper with the lining. I know this is super petty and have been told so by people to whom I have mentioned this quirk. After all, zipper tape doesn’t fray and if you use a matching thread, the thread doesn’t even show.

Binding the Holland Pouch

I didn’t have a lot of thread colors with me, but I had one that matched the zipper I chose.

The picture (right) shows how the pouch is finished when the lining and exterior fabrics are quilted. You have to bind the edges from boxing the corners. I have done this by hand before. This time I did it by machine. Again, with matching thread, it would look better. I need to practice this.

I am almost finished. This will be a Christmas gift for the YM.