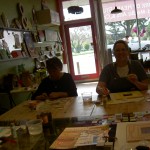
My sister went to A Work of Heart last week. She asked me to go, but I had stuff to do, was tired and thought Spoon jewelry would look lame.
WRONG!
I should have known that between my sister and Andrea, the owner of AWOH, that something wonderful would come out of the class. These necklaces are really nice looking. I probably couldn’t wear them because I am allergic to nickel, but I can still admire them.
My rating: 4 of 5 stars
I heard about Rebecca Yaker and her book, One Yard Wonders, from Jennifer Ackerman-Haywood of CraftSanity. Jennifer did a podcast interview with Rebecca and I ended up with the book from the Library!
First, I love the look of this book. It is lay flat spiralbound with a hard cover. It is well designed in terms of color. Each page has a bit of fabric on the edge to add interest. I wasn’t that excited about the fabric chosen for the projects. It simply is not my style, however I found that the fabric chosen went well with the design and layout of the book.
The table of contents is pretty detailed. Each chapter is defined by the list of projects or elements included. I like that as I was able to flip to projects I wanted to look at immediately because of the detailed table of contents.
Second, the writing style has a sense of humor. The chapters are named things like ‘Dwell Redux’, ‘Household Affairs’, ‘From Head to Toe’, ‘Accessorize Your Little One’, etc. Yes, I like to be entertained!
The book has the obligatory chapter on equipment, notions, and sewing. I do like the stitch terminology section, which talks about what exactly the stitch means. That is useful. I never knew what a staystitch was, and this book defines it. “A staystitch is most often used when a fabric piece is cut on the bias or on a curve. it is a single stitch line on a single layer of fabric. Typically, a line of longer stitches is made at or just within the seam allowance, and helps to stabilize the fabric to prevent it from becoming stretched or distorted later when attached to another piece.” This section is 14 pages long and because of the length, I don’t mind it as much. I would have like to have seen some mention of where the reader can go to get more information.
I would have liked to have seen the chapter pages/section introduction include a list of the projects as well the text. It isn’t difficult to flip back to the table of contents.
The reason I have to put this book on my list to buy is that there are a number of projects that I want to make or use to modify something I already have. Some of the projects on my list are:
Framed Tack Board – I would use this project to modify some bulletin boards I already have
Lined Bookcase – (brilliant!)
Folding Chair Pinafore Cover – I would take the idea and modify it to fit my older dining room chairs
Organized Bed Pocket – great gift!
Smocked Pillow in the Round – would like to learn some of the techniques used to make this pillow.
Granny’s Clothespin Apron
Kitschy Kitchen Apron – I already used the specifications from the Kitschy Kitchen Apron to make the Petal Apron I donated to the CraftSanity Apron Challenge
Hey Hot Dish
Obi-Inspired Hot & cold Pack – I cannot make one of these soon enough and I also think it would make a great gift.
Hanging Wall Pocket
Origami Organizer – I would add a lid to this project
I wasn’t much interested in the clothes. I think that the clothes one can make with one yard of fabric are not the clothes that fit my style. Some of the pieces would be great gifts for my nieces or for friends who have babies and small children.
Another bonus is that this book has a pack of patterns rather than telling you to blow pieces up at the copy center to 5000%. I like the packs of pattern sheets better. I didn’t take them out of the envelope since this is a library book, but will once I buy (or receive as a gift!) the book. You do have to enlarge a few of the applique patterns, but they could be free hand drawn to a larger size as well. Yes, even those of you who do not consider yourself proficient drawers can do it with a little graph paper!
There is a glossary with more terms defined. The resource section includes fabric, inspiration, trims and forums, etc. I was glad to see the contributor bios section. The book was put together with the help of people around the blogosphere contributing projects and it is nice to see their names, a brief bio and a link to their website or blog. I was confused about why that section is organized by first name. Perhaps that is how the authors know the contributors?
There is also (YAY!) an index! Thank you, Storey Publishing for spending the money to include an index! This is the same publishing company that published the Sew What Bags by Lexis Barnes.
If you like to sew for your home or for gifts, I would recommend this book to you.
The progress I am making on the next Orphans.org scarf. They like them to be 60″. I am on the second hank of yarn and not even at 30″ yet, so I am not sure I will make it.
Sue, a CQFAer, suggested I not cast on so many stitches and make the scarf more like 25 stitches wide. I will try that on the next one. I like doing this because I feel like I am doing some good for the world. It might be a small thing, but perhaps it will make a difference
I went to A Work of Heart for a half an hour last week. I know it sounds crazy to drive an hour for a half and creativity session, but I had to go to the neighborhood anyway. Half an hour was about all I could spend, but it was enough. Andrea, the owner, was there by herself working, so she set me up and I embellished the front of the journal.
I worked on the journal that I originally made (and wrote about) at A Work of Heart with CQFA back in October. I never do this kind of work at home so it really felt like play time to me. I didn’t feel pressure and I worked as though I couldn’t screw up.
Many in the blogosphere have talked about their own personal Word of the Year projects. I think I first heard about it through the Creative Mom Podcast. I have watched these discussions for the past couple of years with interest.
I have seen mention that Christine Kane started it, but I am sure someone was picking a word of the year before she promoted it. I have friends who have been choosing a Word of the Year for the past few years. Julie puts all the words into a vessel and picks one.
Julie’s process didn’t seem right for me. I never picked a word until this year.
Purpose Journal
Then, recently, the word Purpose came to mind and that seemed right to me. All the pieces started to fall into place. Now I have a list of questions to explore and this journal in which to write.
In a way it is an exploration via non-quilt media as well as via writing. I don’t know yet what I want to accomplish, but I have a great journal in which to accomplish it!
Jennifer at CraftSanity is running in a race for charity in May. She is part of a special training group called the Road Warriors. The Road Warrior team members get training mentors, have a blog and train together. She has been paired with a domestic violence shelter. In order to be part of the Road Warrior team, she needs to raise a certain amount of money for a charity. Instead of going door to door to gather donations, Jenifer is organizing an apron exhibit. To do that she needs aprons. I decided to make and send her one.
Apron Right (Tarty view)
I had listened to the Patchwork and Pacifiers podcast just before listening to Jennifer’s newest CraftSanity podcast that mentioned the apron contest. The P&P podcast is one to which I just started to listen. On that day, I heard Jennifer Ruvalcaba (P&: host) briefly mention a petal skirt her daughter had. Then, when Jennifer Ackerman-Haywood (too many Jennifers doing podcasts??) mentioned the apron contest an image formed in my mind. Then, I was looking the One Yard Wonders book. That combined with the various other sensory inputs and I was off and running.
The Kitschy Kitchen Apron from One Yard Wonders was a big help with sizing and length of the straps. I had a good time working on it as well, though I found it to be quite a solitary endeavor.
Apron Front (Supermodel view)
One of the requirements of the exhibit is to add a piece of tie fabric to the apron. I wanted to put a flower made from the tie fabric on the apron, so I had to go and find a pattern, which, through the power of the ‘craft’ web, I was able to do quite easily. I found a site, Tip Junkie, which had a number of different patterns. I ended up using Pink Paper Peppermints Rounded Petal Fabric Flower pattern to make my flower. The tie fabric frayed quite a bit, so it wasn’t a particularly fun process, but I learned how to make fabric flowers. I could have used Fray Check, but I was afraid it would stain the fabric.
Apron Side
I spent most of the weekend working on the apron. I had actually been thinking about making one for awhile for no particular reason.. This was the perfect opportunity. It isn’t a quilt, but it may have gotten that particular wish out of my system.
I didn’t take pictures of all the steps. It just didn’t seem right. I feel good making the things I have for charity lately. I feel like I am doing some good in some small way. I hope you will join in and send an apron to Jennifer at CraftSanity as well. If you can’t make an apron read the post to find out other ways to help.
You might remember about a week ago I talked about selecting bag fabrics. I just couldn’t decide so, instead, I started on a different bag, the Anna Maria Multi-tasker Tote, where the selections were already firm in my mind.
AMH MTT in Progress
I really enjoyed working with these fabrics. I loved the colors and the feel. I finished the bag on Saturday and took it out with me on Sunday. I have to admit that even if I give bags away, I try most of them out. I intend to keep this one, but tote bags flow through my life so quickly that who knows?
These are fabrics that I bought in Ferndale and the large flower print is by Martha Negley. I do love that color, a reddish pink tending towards salmon. It is a cheerful color.
This is the first time I have made the pocket panels the same color as the exterior of the bag. They are the pieces right under the dot fabric you can see peeking out of top left and right.
It made the fabric selection process a lot easier. The pocket panels aren’t highlighted at all; they look like part of the exterior. I don’t know yet if that bothers me. I did a lot of work on the bag and wonder if I need people to see the pocket panels? I’ll have to think about it and let you know.
I like to make the inside of the bag a light color, so I can see what is hiding inside the bag. I really like that dot fabric! I got some a long time ago with a chartreuse-y / olive background. This colorway works very well for the inside of a bag.
I realize that this is another non-quilt project. Yes, I have quilt projects; I just don’t seem to be working on them. Two quilts, Chocolate Box and Passionate Purple are ready at the quilter and I haven’t gone to get them yet. I also finally called for a longarming date. I could have had March 26, but have to work that day, so FOTY 2009 will be quilted on April 23. Don’t give up! Some quilts are coming.
What I want to do is get more organized in my workroom. It is difficult, because my budget for redoing this room is virtually non-existent. Other house rejuvenation priorities come first. I had all the makings of a bulletin board ready to go last week. I took a coupon to Beverly’s and bought a large stretched canvas. I had found a piece of batting leftover from a quilt, which would be large enough. I found some fabric that I didn’t want to use for a quilt and was ready to go.
I needed DH’s help, because it is a two person job to stretch the fabric and batting. The staple gun is pretty hard to squeeze as well. I convinced him to help me yesterday and it worked out really well. I had fun working with him. Now, perhaps, I’ll get to that tuffet!
I saw this project at Beverly’s. They had one hanging about 5 feet above my head. I looked at it, but didn’t take notes or anything. I talked to one of the ladies at the store, briefly, and she seemed to think I had the right idea.
First, after unwrapping the stretched canvas, we staple gunned the batting tightly to the wooden stretcher bars.
I thought about adding another layer of batting, but didn’t have one and wanted to keep the momentum going.
Then we staple gunned this fabric over the batting to the wooden stretcher bars. We pulled it tightly and were careful to avoid previous staples. They are easy to feel with your fingers through the fabric and the batting.
After the fabric was on, we stapled ribbons randomly to the wooden stretcher bars. Of course, at Beverly’s they had precisely aligned diamonds. I thought what I did was more fun.
I dug around in my button box to find some interesting buttons and the above are the ones I chose. They are buttons that were approximately the right size. They are also buttons that I want to look at above my desk for awhile.
I bought the sea themed buttons at the EBHQ show two years ago. Glad I am using them before the next show in April!
I started sewing the buttons on last night and will, hopefully, finish soon.
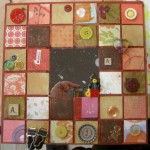
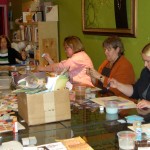
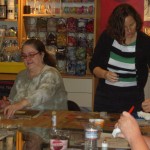
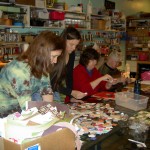
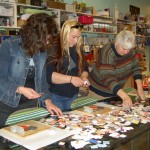
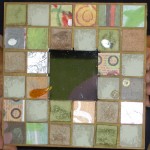
I went to A Work of Heart on Sunday with a group of friends to belatedly celebrate my birthday. I LOVE LOVELOVE that place! I love the space, the creative energy, Andrea (the owner). I want that creative wonderland to be down the street from my house. Really, I want to live there, but I would settle for it being down the street from my house.
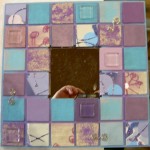
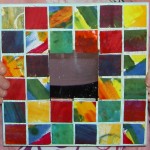
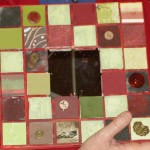
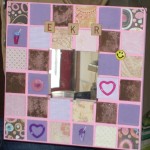
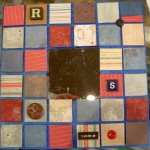
I invited some non-crafty people so Andrea the Awesome suggested the Altered Mirror project. I wasn’t that excited about that project, but went with it and am very pleased at how mind came out (top), how successfully everyone was able to work and how well all the mirrors came out.
Adrienne’s
Valerie’s
Kathy’s piece
Step Near the End: Embellishing
Step 1: Paint the Frame
Step ?: Distress Some Squares
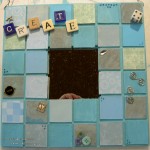
Creativity Mirror
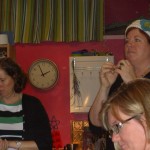
Maureen, Andrea, Sharon, Julie etc
Mary & Maggie
Helen, Adrienne, Maureen
Julie & Sharon
Kathy, Kim, Terri & Bron
Valerie, Helen & Bron
Kim & Jaye
Andrea, Maureen & Sharon
Helen’s
Bron’s
Mary’s
Maureen’s
Terri’s
Camille’s
Maggie’s
Kim’s
Kim’s also
Sharon’s
Julie’s
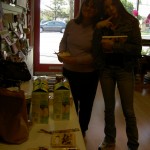
The place is great and all of the supplies you see in the backgrounds of the above photos are available to use.
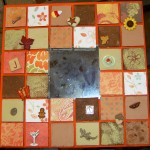
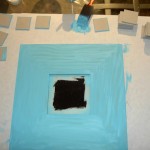
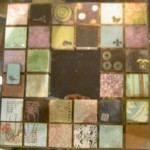
Step 1: Paint the Frame
The first step was to paint the frame and the little chipboard squares. I ended up painting all of them (top and sides). Above it shows the squares as I was painting the sides.
The color scheme I chose was to coordinate with the way we are going to paint our bedroom. I didn’t mean to put ‘CREATE’ as the message, but creativity is on my mind lately and it seemed like the right thing. I don’t know if the mirror will end up in our room ultimately, but we will see.
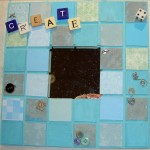
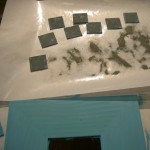
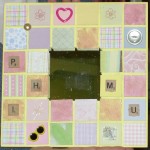
Step ?: Distress Some Squares
Each of the squares has something done to them: cover with paper, paint with crackle paint, ink, etc. Above I was using distressing/embossing powder on some of the squares. BLECH!!! I sincerely disliked how they came out and the effort was not worth the result. Live and Learn, though. I am glad I tried it and now I know.
Step Near the End: Embellishing
Above I have lined up all of the squares and glued them to the frame. I have also started to embellish. Andrea has FABULOUS glue and I only had to stick down some of the papers a little bit. The glue used to stick the squares down is different from that she suggested I use to apply the embellishments.
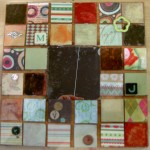
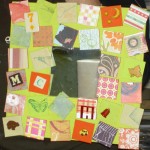
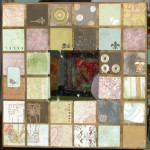
Kathy's piece
Kathy, from Everyday Bliss, wrote a great post about the day. She expresses some self doubt in the post, but I didn’t see that at all. I saw her start looking at the paper and dive right in. Kathy’s piece, with its orange base, reminds me so totally of her. It has whimsy and a little reality check (see the martini glass? She is the parent of a 2YO, after all) and a fabulous girly, but elegant girly look. Check it, and her project out, at the Everyday Bliss blog.
One of the great things about the afternoon, as I mentioned, was that everyone was successful. Everyone worked on their mirrors and created beautiful pieces. Everyone seemed happy and to have a good time. There was a nice creative and relaxed feeling that permeated the event.
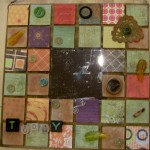
Julie's
I love Julie’s message. Her message of “Today” makes me think about not looking to the future too much. It is a good reminder to be in the moment – or to balance planning for the future while living in the moment.
Helen's
Helen seemed really uncomfortable when she started. I don’t know what Helen’s creative experience is to date. She did the most amazing work. I love the color scheme and her selections of paper and embellishments. It was so fantastic to watch her work.
Bron's
Bron’s embellishments came across to me as delicate.
Mary's
Mary knew not getting the squares straight would drive her crazy, so she made the squares wonky. That small changed added movement and now the straightness is not an issue. I adore her background color.
Maureen's
Maureen used her hand dyed fabric instead of paper to cover the chipboard squares. It reminds me of a painting I saw at the SFMOMA. I’ll amend this post if I remember which one it was.
Terri's
I love the red that Terri used for the background color. Her piece has a bit of an Asian feel.
Camille's
Camille insisted that she was not crafty. Her piece, for her daughter’s new bedroom, tells me otherwise. I had a pink and purple bedroom when I was a girl, so I am partial to this piece.
Maggie's
Maggie wanted to make a piece to commemorate our sorority. I love it that she used yellow to to prevent the pink from getting to sickly sweet. This piece is very cheerful.
Kim's
Kim has more experience than anyone with the various tools and supplies. If you look closely at her piece, you can see where she used a rubber stamp and then embossed. The embossing actually came out well on hers.
Kim's also
I think the above photo reflects the colors she used a little better.
Sharon's
Sharon’s piece reminds me of sailing and code flags. She says that she chose a color scheme that would coordinate with her duvet cover.
Adrienne's
Adrienne, or AJA, is one of the quiltmakers with whom I do the Bullseye Project. She came all the way from Tucson to be at my party. I was so happy! She and Julie and I went to dinner after the party. I love the way she used the bottle cap and the garter hooks.
Valerie's
Valerie and I see each other once a year. We met in the baby class when we were both pregnant and our kids used to play together when they were small. Now we see each other about once a year, but it is great. She is a great sport at being creative with me.
I am thinking of having my birthday there again next year.
Update: 9/12/2011: due to spam this post no longer allows comments. Sorry!
When we went to the North Coast, I also brought along this scarf, which I discussed before. I only had a few rows to knit before I was ready to bind it off.
I knitted a few rows and started to bind it off. When I had about 10 more stitches to bind off, I realized that I didn’t have enough of a tail to finishing the binding off. I was in a patient mood, so I unbound what I had done and unknitted a row, then bound the scarf off.
This was a really good reminding experience. I have knitted a few things and once I get going, I am ok. I liked the stitch, especially since the edges don’t curl. It is no great masterpiece, but I enjoyed working on it.
I didn’t measure it, but you can see the approximate length (25″??) because the charm pack is 5×5″.
I would like to get more yarn and make another scarf. I don’t think this one is long enough, so perhaps I will use 2 skeins next time. Perhaps I have a knitting needles roll in my future?
Thanks to Michele and Ginny for getting me going on this project.
I am thinking of using this combination of fabrics for my next pencil roll. I will center the main part of the back around those two feathers and the teal and chocolate will be the inside and the pocket piece. I thought I would start this the first weekend in Feb, but kind of tanked and didn’t do it.
The upholstery fabric is another FabMo fabric. I already pried off the tags and removed the staples.
Our Internet connection at home slowly came back up over the course of the week. Hooray! We had one computer working early in the week, but the WiFi wasn’t completely up and running until Thursday. I wasn’t sure if I would be able to post this weekend, so I prepared posts through the weekend, so you wouldn’t feel sad and lonely. 😉 It is a good thing I am resourceful otherwise it would have been 2 weeks between blog post.
Welcome Magic Carpet Riders! If you would like to join the drawing, please leave a comment on the One World One Heart post. I hope you come back frequently and join our little community.
The Magic Carpet Ride/One World One Heart is interesting. I have gotten over 120 comments on the post mentioned above. they aren’t coming as fast or as furiously as they were, but people are still wanting to sign up for the giveaway. Some people just say ‘enter me’ others stay for a minute and tell me where they are from. That is really nice. I have also visited a few of the blogs, sadly not anywhere near all. After leaving a few comments, I can see where typing a lot of info would get hard if you were intent on visiting all the blogs.
I have always liked the name Susanna. There is something about it that makes me smile. The name is what attracted me in the massive list Lisa keeps updating for OWOH. As I look at the list of all the blog participants, I find that I have no way to judge them except by name and that is what is turning out to attract or repel me.
I stopped by Susanna’s Sketchbook and left a note on her OWOH post so I could win. Then I looked around at some of her other posts. The tone is wonderful and she has a list of the Simple Things in Life, which is really nice. One item on her list, which caught my attention was “receiving the daily, 11am phone call from J“. I was reminded (after my rant about Internet access) that there are other things in life for which to be thankful
Another blog I liked was called Coral Seas. Actually, I liked the pendant she is giving away, but I also liked the banner image on her blog. She seems to have a variety of posts from birds to cooking.
Paper from the Heart is another blog I visited. She is giving away layered cards made from different paper designs. She has some interesting Valentine’s cards.
I do think that the people at the beginning of the list get the most comments. Some towards the bottom (700+) haven’t even made it to 100 comments yet. I would never ask Lisa to organize the list, but would love to know which are the sewing and quilt blogs, so I could look at them first. If you look through the list and see any, let me know.
Julie is blogging again! Hooray. She has put up a number of posts this week and it is a pleasure. A number of these pieces were at the retreat and I guess we had too much other stuff to talk about, because I didn’t ask about the stories.
Have you taken a look at SherriD’s blog lately? I really liked her procrastinating post. I am not sure how she can say she is procrastinating when she has so many projects in the works. She has completed another U is for Unicorn block. I am in awe of that project, because of the detail work involved. I like it that she talks about both hand and machine projects. My favorite part of this post was the view out her studio window. Lovely! Thanks, SherriD!
Have you seen the needlecase over at Quilt Rat’s blog? It is a gorgeous black and white piece. I am in awe of Jill, because she says that she just sat down and designed as she went along. Kathy over at Finishing Lines did this with the pencil roll she made, which was also fabulous. I want to be like these women!
Have you see the magazine Quilts & More? The magazine is pretty project oriented, but the projects are pretty good. They usually have a tote bag, which I love! The thing I like about this magazine is the color. Bright, cheerful, happy colors grace this magazine. As you have probably guessed I am not one for murky colors. To each her (or his) own, but they are not for me. Thus, I like Quilts and More.
I am friends with them on FB. Earlier this week they posted a link to their All People Quilt website with photo ideas for organizing your sewing room. Talk about happy colors! The ideas for organization are great, too. They make me a little depressed, because this person’s sewing room must be huge. Their buttons are gorgeous (and organized), they have way less fabric than I do, etc. Still, the colors are wonderful and if I can implement one of the ideas, I will be happy.
My friend, Kathy, of the Everyday Bliss project had an interesting post this week. In it she talks about getting started, about what is art, her own doubts, etc. She posts some interesting works. I think it would give you some food for thought. Go and take a look and leave her a comment. Let me know what you think.
Design Explorations for the Creative Quilter by Katie Pasquini Masopust: I am reading it and really liking it. I wasn’t optimistic when I started it after reading the thin Ruth McDowell book. There are a very few elements of dumbing down, but many of the comments and exercises in the book are just fantastic and not complicated. I will definitely do a full review, but thought I would give you a little taste.
I have been listening to podcasts. One of the bad things about no Internet is that I cannot update my iPod. I was smart last time I updated it because I downloaded a lot of ancient episodes. I am getting sick of some of the podcasts, though. Sometimes I can only listen to a few of one and then I need to listen to another producer’s podcast. I haven’t been able to do that so I am just clenching my teeth and powering through. I suppose I could listen to some non-quilt/craft podcasts!
Zazzle
I came across a cool design in Zazzle. The design is screen printed tea cups and I first saw it on a OWOH blog. I like it so I went to look, never having heard of Zazzle before. It looks a little like Cafe Press, but seems to have cooler options on which to print. The purchaser, apparently has some options in the design of the card. Sadly, one card was $4.50, which is a little out of my price range right now. I do have some rubber stamps, however. Perhaps I will get inspired?
I went to the Berkeley City Club on Tuesday night with my family to receive an award. Even though I lived in Berkeley for about 4 years and have been there zillions of times, I had never been to this building. It was designed my Julia Morgan, the architect of Hearst Castle and it is gorgeous! they have lots of meeting rooms, a garden courtyard, a pool, hotel type rooms and also people can live there. Perhaps I will live there when I am an old geezer?
And Now a Brief Aside
From Flickr's Roadside Pictures
For some reason, I wasn’t able to link to this Flickr photo directly, which I much prefer to do. Go visit it and its siblings in their native habitat at: http://www.flickr.com/photos/roadsidepictures/244926428/
I’ll be honest this is a sign in Las Vegas for a strip club,. However, I like the idea of people celebrating librarians with a neon sign. Let’s just pretend all librarians are knock outs (not just in looks) and people cannot stay away from the library, ok?
Dolores, a member of CQFA, faithfully arranges a retreat every year. Every year it is better and better. I had in my mind that I would make her a pencil roll as a thank you. After last week, I didn’t think I would have the time, but, I started it on Sunday, thinking that I could finish it at the retreat and she would be none the wiser.
I didn’t do any piecing on this one, which made it go very fast. I think it took me less than an hour and a half from start to finish. I may be dreaming, though, as I didn’t really time myself.
Pencil Roll - back
I am not sure what colors Dolores really likes. She has been working in neutrals and especially black and white, so I chose a black and white FabMo upholstery fabric for the back. The FabMo upholstery samples are a good size. I think you could make two smaller ones from one of the samples. I had a good sized strip left over that may make its way into another pencil roll that I need to piece.
Pencil Roll - strips
I thought some red and black and white for the inside strips and the front pocket would be great. I just couldn’t do all neutrals. I had to add some color. I think it looks really nice and am pleased with how it came out.
I am concerned that I will run out of friends who need/can appreciate pencil rolls! I see some blog giveaways in my future!
Pencil Roll Closed
I forgot to put a label on it. Either I will forget it or try to hand sew one on.
Unrelated notes:
* I have no Internet at home at this time, so if I am a little slow responding to comments, I apologize! It makes it a challenge to get blog posts up as well!


")
")