I thought I would work on the Corner Store as my next project. It was calling to me during the dark time while I pieced the Renewed Jelly Roll Race. As soon as I turned my attention to it, it held no interest for me.
I worked a bit on the Garden, as I mentioned, but floundered a bit on Saturday. I made a couple of QuiltCon blocks, did a bit of piecing on the Swoon #6, but finally took myself in hand on Saturday night and planned out my Sunday.
On Sunday, I worked pretty steadily on the Flowering Snowball. Aside from some math issues, e.g. not being able to count, the process went pretty well. I had little to no trouble putting the hand pieced blocks together by machine. I do need a few more blocks, so I can’t finish the chunking until those are pieced. If all goes well, and I have counted properly, I should have them done by the end of next week. We’ll see. Don’t hold your breath.
I feel like doing another version of this pattern by machine with pink or aqua background. It has to wait, though, until many other projects are completed.
My camera seems to be taking fuzzy photos. I wonder what that is about?
I am progressing well on the Flowering Snowball. I seem to be able to sew about a block a night. These are hand pieced, which is why they take so long.
I am trying to decide how to put the blocks together – by machine or by hand. I am thinking that I will put them together by hand and then go over them by machine. I am hemming and hawing because the hand stitching isn’t as precise in terms of seam allowance, so I have to sew on a line rather than lining up the seam allowance. I’ll try it out and see how it goes.
I am pleased with the progression and glad I took it up again. I am really liking the way the side and corner blocks look. Another good example of self bordering success.
The top and back are done. The binding is made and I took the quilt to the quilter on Friday.
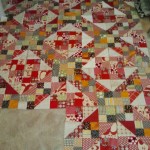
You will have to click on the photo to see the border I put on. It is relatively small – 3″ or 4″, I forget- and mostly it is there to stabilize the edges of the piece. I think it gives the diamonds some breathing room.
When I look at this piece, I see a lot of movement. I first thought the rows and columns weren’t lined up, but the variety of fabric makes the piece look like it is moving rather than misaligned. At the moment, the top is 61″x61″ approximately.
I decided to use most of the rest of the diamonds on the back. I still have a few left, but they will end up in some other project another time – perhaps in a pencil roll or gift bag. Hhhmmm….
Renewed Jelly Roll Race - back
Again, I decided to try not to make myself crazy. I used a large piece of purple Moda Marble for the sides of back. Around the diamond is some random solid I had and I had to throw in a few other pieces to make the back large enough.
I felt bad having so little to show at BAMQG, but next month, or in June, hopefully, I will will have a lot. I do like those finishes.
I have decided to give it to my aunt as a gift. She is doing something really nice for me for which I can never thank her.
Yes, I am working on the Flowering Snowball. It is a hand project (as I designed it to be) and I work on it when I watch TV.
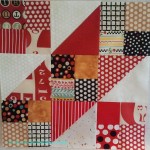
I did a lot of cutting a few weeks ago, as I mentioned and the result is that I am putting segments together until there are none left and then putting other segments together until I can start sewing blocks together. At the moment I am working on sewing a foreground piece (the printed, colored fabric), which has been joined with a black on white piece to a different foreground piece that has been attached to a small black square.
So far, I have done three. When I looked at them the word ‘florets’ came to mind. Yes, like broccoli, but not broccoli. Nicer than broccoli-not that there is any thing wrong with broccoli, but fabric is much better. So I am calling these joined segments florets.
One of the things about this method is that I put all the squares together at once. I sew the same segments to each other until all of the blocks are done and then I move to the next segment. When I start finishing the blocks, they will be done quickly.
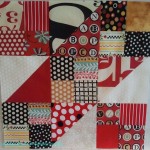
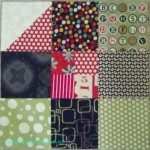
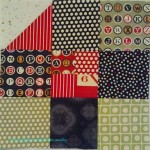
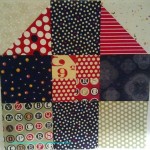
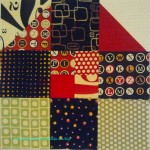
I haven’t done anything with Fabric of the Year 2012 yet. I decided that I would go even more simple than last year, but would keep one of the elements of FOTY 2011. I decided that I would go with squares and rectangles. I will cut squares out of fabrics I have used this year (but not bought) and rectangles out of the new fabrics.
A lot of the fabrics in the photo are from the Flowering Snowballs foreground. I only used one piece from each of the fabrics in the Flowering Snowball blocks, but I figured it still counted. They are all great fabrics, aren’t they?
FOTY 2012 Squares - March
I really like the scrappy look, but think it will be even better when I start arranging the fabrics at the retreat in 2013. Seems like a long way off, but here it is already March, so I know it will be here sooner than I think.
From my brief comment, you might have inferred that I am also working on the Flowering Snowball. I am. More on that later.
It is at this point in the process where I just want someone to take me out of my misery.
Obviously, I am being dramatic, but really, I don’t want to do this project anymore and I wonder why I thought it would be a good idea. I have already made 2 diamond quilts (the Eye Spy is essentially a diamond quilt and how could I top FOTY 2010?) – aren’t two enough.
I feel like I barely accomplished anything on Sunday, though I did sew most of the right side into large chunks.
Still, I have it in process and I will finish it before I move on to the next project. I may need to intersperse a new project into the queue before I tackle another UFO just to keep my sanity. The Corner Store, however, is quite appealing.
In the book, Pretty Little Mini Quilts, I saw a small quilt similar to this. At the time, I was cutting up diamonds for FOTY 2010 and ending up with boatloads of triangles. I thought this project would be perfect.
I cut up some 5″ foundations and started to sew diamonds on to them. I sincerely disliked how much white was on the piece and how it overshadowed the scraps.
I started ripping the scraps off of all of the foundations and cut the foundations down to 4″. The other night, while I was watching TV, I pinned diamonds on to the newly trimmed founds and they are all ready to sew and trim again. I can use these pinned pieces as Leaders and Enders.
I have the little bit up on my design wall. It is making me excited about moving on to it as a quilt.
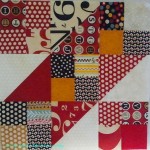
After cutting what seemed like a zillion diamonds last week, the picture(left) is what resulted. There are a lot of diamonds. As I mentioned, about 158. It would be nice if that left corner was filled with diamonds as well. I know I can’t have everything, though, and I am not about to sew another Jelly Roll Race top!
DH figured out how many I will need to make a quilt top as well as the layout. YAY! So glad I married someone who can do math. I was thinking of putting the question (whether there is a formula for laying out diamond quilts) to The Young Man’s Geometry teacher, but haven’t yet.
Leftover from Jelly Roll Race strips
The only scrap of any size at the end, aside from shards, was the weird wonky shape I show on my cutting mat.
I was ready to move forward and just toss the scraps when it occurred to me that I could piece together the scraps, mosaic quilting style, and make a few more diamonds. I might need them. I might not need them. You never know. The scraps might just be fun to sew together or I could make some cool do Donation blocks. A little too wild? Look for more on that.
Jelly Roll Diamonds
Saturday, I flailed around. DH and I went around a few times about the number of rows and columns. His first calculations rendered a verdict of 10 rows by 9 columns (remember that the second and every other row would have 9 rows and 8 columns), which left me with a really long skinny piece, though I wasn’t sure HOW long or HOW skinny, because I hadn’t put sashing on yet. I was also sick (yes, again!) and tried to take it easy. I don’t feel like I really accomplished much on Saturday, but it was required for the process, I think.
Sunday Work
Sunday went much better. I didn’t have a headache, which was a bonus. The corner is the hardest part to figure out and the fact that I was adding sashing added to the trickiness. I bought a 1.5″ strip cutting die for my Go! cutter and cut 1.5″ strips from the Pure Elements linen I had. Good thing, because I have a lot of it and used up about 1.5 yards so far. Julie of Intrepid Thread will be getting some business from me to replace that fabric. I need it for the A-B-C Challenge.
The photo, left, shows sections of the quilt sewn together. It is going much more smoothly after getting the weird shapes on the right hand side mostly finished. I was sorely tempted just to sew the thing together in long rows across the piece from right to left, but know I would be hating myself midway through, thus the chunks.
Sashing on diamonds
And for those of you who are curious about the sashing, I put it on to many diamonds at once. Cutting the strips with the Go! Cutter really made my life easier. I cut 5 strips at a time and then sewed as many diamonds as I could to each strip. It isn’t that I can’t cut strips; of course I can. The Go! Cutter just made my life a lot easier.
Once I had strips of sashing, I lined up the first diamond, folding back the sashing to make sure I had placed the diamond low enough on the strip so that the sashing would fill the entire angle.Then I sewed, one after another as close together as possible so I would waste as little background fabric as possible.
[BTW, that is my hideous ironing board cover. If any of you have a store nearby that carries Polder ironing board covers with a grid pattern, leave a comment or let me know. This one I got off Amazon and it is too thick aside from being not my color. I will be your new best friend if we can work out some sort of arrangement for you to get me one.]
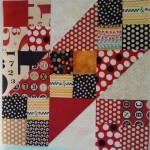
Right Corner detail
As usual, I wanted to get a lot farther along. I am past the flailing point; I am past the figuring point and now I am just matching seams and rearranging diamonds. I’d like to be done with this project. I will finish it, but I am so ready to move on. No more Jelly Roll Races for me!
I have been hard at work figuring out what to do with the Jelly Roll Race background. I tried the Ta Dot Grey as someone suggested.
I love that fabric, but think it fights with the fabrics in the actual diamonds. Not a good fit.
I don’t have enough of any one pale grey solid to make the sashing and I don’t want to go out and buy more fabric. (really, I just don’t want to go out) Also, grey is very hip and chic right now and I don’t want this quilt to be easily identifiable as being made in 2012. Kind of like 1980s hair. I want to avoid that look.
SherriD's backgrounds
SherriD, the ever helpful did some Photoshop magic to show the contrast between chocolate, black and white backgrounds. This is a good example of another way to “make visual decisions visually.” The darker colors do make the diamonds glow a bit. When I saw this rendition, I thought about the black. I pulled out some black from Pat Bravo’s Art Gallery/Pure Elements solids and laid out some diamonds on that to get a better view.
Diamonds on black
I wasn’t that excited when I saw the effect.It isn’t horrible or anything, but not the look I am going for.
I decided on white. I am using the Pat Bravo Pure Elements Linen. If you haven’t tried Pat Bravo’s solids, they have a gorgeous hand to them. They feel very silky, but with the stability of cotton. Lovely fabrics.
I cut some 1.5″ strips and worked a bit on sewing them together on Friday. Check back for more details on that process.
This is the piece that I started with. As you might remember, I wasn’t very happy with it. It doesn’t have enough interest to continue with it as a quilt. Still, I suffered through all of those long seams, so I didn’t want to discard it. And the fabric is nice.
Jelly Roll Diamonds
Not sure why, but I decided to cut the piece into diamonds. I worked on that over the weekend. I now have about 158 diamonds, which I intend to sash with something and then resew together.
I also was able to use my diamond ruler again. I got good use out of it for FOTY 2010, but since then it has been languishing.
Now that all of the diamonds are cut, my next task is to figure out a sashing color. I want something that will be different enough so that the diamonds don’t bleed into the sashing. I want them to be distinct.
I won’t be able to achieve that goal completely, but I was thinking white and the portable design wall does a good job showing how that will look. I did a FB poll on my page and on the Artquiltmaker.com FB page(are you a member??) and on Twitter. So far, people like the white, but chocolate and black have also been suggested. Not sure I have enough of a chocolate fabric to sew the whole piece together, but I definitely have enough for a test. I also have a nice piece of black from the Pure Elements line that I can try.
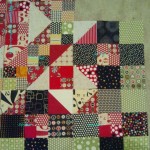
The Stepping Stones top is done. It is quite large and my quilt hanger was not able to hold it to its full width. I am pleased with how it came out, though I think I will add a quilting border to preserve the pattern.
I used the leftovers to make the back, which is even larger.
Stepping Stones Back
I don’t know when it will be quilted as I have not heard from my quilter and have not found anyone suitable to step in.
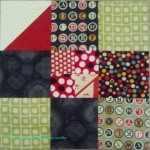
Stepping Stones Corner
In the corner photo you can see the modifications I made to the pattern.I am pleased with how it came out and how the green in the center works with the green border blocks.
Monday was the Boxing Day Sew-in, which was organized by Sandy and contributed to by various other podcasters and quiltmakers. I have to say that I jollied myself along to get involved and am glad I did, because I had a great time watching the tweets scroll past AND making major progress on the Stepping Stones.
Somehow the Stepping Stones project was well on it’s way to becoming a chronic UFO. I don’t know why. Somehow it just became a chore. I think that starting it around Thanksgiving and then not having my usual sewing time to devote to it contributed to the feeling.
Spending time on it on Monday and getting cheers from others participating in BDSI was the shove I needed. The support felt great and the project is well on its way to completion.
Starting Point
This is where I started. Looking at it now I find that I had made good progress. My whole problem was my attitude. Perhaps I am a fickle creature and if I cannot work on a project intensely, I become angry at it and want to move on?
During the day, we were all tweeting our progress and I was using my cell phone to take pictures. I hope the pictures are acceptable quality.
Center Done
By 10:30 or 11am, I had finished the center part of the quilt. I was able to start in on the border. As you may have seen in the previous post, I decided to modify the border so it looked more finished. As such, I needed 4 corner blocks that were slightly different from the side blocks and then 20 side blocks.
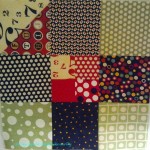
Corner labeled
Again, I was able to finish the corner (4) blocks and 2 of the side blocks. This allowed me to take a look at the way the corner would look and if my design had the desired effect. The quilt top always looks different once sewn together, but I think it will suit me.
Yesterday, I sewed several big chunks together. this is another monster quilt, so it is taking me some time to get it sewn together. I would like to have the top and back done by the time I go back to work on the 2nd. I had really big sewing plans and the holidays got in the way.
Now back to listening to my audio book and getting this baby finished!
The only quiltmaking I have gotten done in the past few days is in my head and on EQ. I decided I would rather have a self border on Stepping Stones. I thought the border they had looked nice, but a bit unfinished. This is the current border I am planning on making.
TFQ pointed out that the green in the border looks good in the border, because I have more green in the center blocks in the EQ drawing. I have to make sure that I have enough green in the actual quilt.
I am at the difficult point in this quilt where I am over it, so I need to make some progress so i don’t have to add it to the 26 Projects list. I hope to make some progress, even a miniscule amount today or tomorrow so I feel like I am actually sewing. There is a possibility since all of my houseguests are gone until Christmas Eve and it is some kind of rule that I can’t sew on Christmas, so it is ok that they will be here. They may not even sleep in my guest/workroom since they hate walking up the 3 flights of stairs. Perhaps I’ll pretend I am doing last minute wrapping and go sew. 😉
One thing I have learned (or hope I have learned)is that projects get stale for me. This means that I need to focus on them, get them done and move on. Have I said this before? I think so. I am reiterating it here.
I have a stack of various sized strips I have been saving for this project. The longer they sit around, the easier it is for me to forget why I am saving them and the other day I thought I would just send them off to Katie. Then, I remembered why I am saving them and the big problem with finishing this quilt.
1. I have too many blocks. What do I do? Make a giant quilt that comfortably seats 12?
or
make a normal sized quilt and put the extra blocks in the Children’s Quilt Project bin at EBHQ?
2. The border. I want to use the self bordering technique, but I need to sit down and figure out how that will work with this pattern and paper piecing. I just have to do it. I never seem to do it.
This is an old photo of the original bullseye. I have made several bullseyes since I started this blog: Seeing Red, Feeling Blue, Passionate Purple. Still the original bullseye that started this whole crazy series is undone.
This quilt, and the Spiderweb are two that I want to finish! Perhaps in 2012? We will see.


")