Various and Sundry Late November 2008

It is entirely possible, though kind of unbelievable to me, that I haven’t breathed a word of the Cross Blocks (Flowering Snowball) since September.


This is the block that I finished this week. it is the first one where I took the Child’s advice and used some calmer fabrics.

The two above were taken on 9/29, but I didn’t see them posted. There are some calmer fabrics in them and I like the layout of the block on the right better than the the layout of the block above. It looks more balanced to me. How do you like that handbag black and white fabric I found?

And on another topic….

Following up on the longarm demo CQFA had earlier this month, my mom came over and showed me what she had done. She went to a friend’s house. The friend has a Handiquilter and they worked on the HandiQuilter.

This is the quilt top Mom quilted. She has no idea where she got it, but it has a wide variety of fabrics. Some of them are not 100% cotton. There is a lot of interesting texture. I ended up sewing part of hte binding on for her on Pie Day.

Here is some of the quilting she did. Mom said that she spent all week, while on public transportation, doodling and that really helped her feel comfortable with the motions of the machine.

Flower motif.
Little house. She had some issues with the tension here, but was able to figure out what the problem was. Mom said that she is not going to take the longarm class at Always Quilting; that she is just going to use her friend’s machine. I am still taking the class on Jan 9.

Puzzling Through the Eye Spy; Progress

The first order of business this week (after all the cooking and tidying, of course) was to, once and for all, decide how I was going to put the quilt together. Below, you can see I have arranged the ‘blocks’ (two equilateral triangles and a hexagon) two different ways.

On the right the blocks were oriented with the triangles on the top and the bottom of the hexagons (Option A). On the left, the blocks are arranged with one triangle in the upper right hand corner and one triangle in the lower left hand corner (Option B).

I discussed previously that I thought the edge would be a problem. I finally decided that I would go with Option A. Mostly, I decided that I could better figure out how to make the edges straight using the diamonds. With Option B, the side edges seemed like they would really be a problem and I would end up hacking them off, which I didn’t really want to do. You can see the edge that seemed to be a problem on the photo above left.


I stood staring at the above piece for a long time trying to figure out what do next and how to deal with the edges. I decided that I would only hack parts off as a last resort and I was looking at pieces for the edges to see which motifs wouldn’t be compromised if I cut them in half. That still left me with the problem of how to finish the edges so that they could be bound in some normal manner. As the picture above shows, those points on the top and bottom don’t qualify as easy to bind. As an aside, I have no problem with doing difficult bindings, but there has to be a design purpose as in Pink Spider Looking at the Stars from my early days of quiltmaking.

This is a close up of one section so you can better see the connections between the pieces.


This is one unit. After finally deciding on a plan to put the blocks together, I began to look at a unit and see what it needed to create a flat top edge. One thing I did with a hexagon was to sew one triangle to the bottom only. That creates one unit with a flat edge.


Having successfully created one flat top piece, I sewed a triangle on to the bottom of another. It wouldn’t butt up to the unit I already created, so I sewed a triangle to the side. Doing this made me realize that I needed to decide on which angle I would be sewing the units together. Once I made that decision I would have to strive to sew triangles to the top pieces to make straight lines to match that angle.

By sewing the black and beige unit to the larger diamond unit, I was able to to make the flat top longer and keep the straight line angle for sewing additional units together in place.

My challenges didn’t end there, though. I had to work out the next section. The way I started (above) obviously wouldn’t work if I wanted to avoid set in seams.

In the overall scheme, the above depiction might work, depending on the way I sewed the piece together and how the rows lined up.

I sewed another red triangle on to the opposite side. This gave me a straight line. With this succeeding, I started to realize that I only needed to sew a triangle on to the bottom and the left side of each top piece. You can see how the black and beige piece fits with the tropical drinks patch.

Above you can see the macro view of how I will sew the lines of the units together. I will sew from left to right.

I still have to make the rest of the top and that is what I am working on now. Stay tuned!

Puzzling Through the Eye Spy

This week was kind of crazy week work-wise for us. As I result, last night was the first time I got back to the Eye Spy. I spent the time with a bit of sewing, a bit of cutting and lot of puzzling. I am puzzling through the best way to put it together. As you may know, I like to jump right in and start sewing. This gets me into trouble sometimes, but I do enjoy just sewing. Puzzling through problems isn’t so bad as I can’t always visualize the whole process. Of course, if the problems become too problematic then the quilt pieces usually go back into the closet.

I started working on the sewing on that Sunday where I introduced the piece but I didn’t take the edges into account. I am very much into my self bordering technique and would like to use it here. I used it on the Interlocking Triangles quilts and some others. Essentially it means that I don’t like to hack off bits of a border block to end the quilt.


I attempted to work on this yesterday while I was sewing triangles to hexagons. My dilemma, defined, is that I really don’t want to just randomly hack off the edges to make a straight side. Nor do I want to apply a binding to an edge that needs a miter every two inches.

First, I broke the hexagons I have sewed into two groups. Left, the pieces are arranged in a way where the triangles are pointing up. In this orientation, there are no straight edges. The side edges could be okay with a slightly irregular edge made by putting the piece together in chunks using diamonds (see far left).

The top and bottom edges would be a piecing nightmare, however, because I would have to inset triangles somehow. I can imagine that this would be a top that ended up becoming a permanent member of the UFO/ WIP list.

Right, the hexagons are arranged in a way where the triangles are pointed to the left. This is the way that Simply Quilts suggested putting this top together and what the directions on the package of templates suggest. Still, hacking off the edges to make this work makes me cringe. I was considering putting fabrics that were allover prints on the edges so the mutilation wouldn’t be as brutal. I don’t know.

Options:

  1. Hack off the top & bottom or the sides, depending on layout.
  2. Choose to piece the quilt in chunks using diamonds and do inset piecing to make a straight edge along the top and bottom.
  3. Deal with very uneven edge in the binding process.
  4. Add some other shaped pieces to the edge in a uniform color (more red?) to make the edge square.

Left is a detail of the corner of the piece with the section I have sewn together and arranged with the triangles placed pointing left.

I’ll have to troll the web and look at what others have done.

Judy Martin’s QOM

I think I need to make a shrine to my favorite quiltmakers. Judy Martin is one of them.

She, periodically, posts a Quilt of the Moment (QOM) and the one she has now is gorgeous. You must go there right NOW and download the pattern, then come right back! Once the pattern is gone, it is gone forever; she doesn’t repost them or archive them or anything, so time is of the essence. It reminds me of my Spiky Stars quilt (must do something about that crappy picture!). It has that whole ‘the center is not the center’ thing going, which I really like.

I will post a picture here for anyone who makes a quilt from this pattern. Judy is also giving a prize to people who make a quilt with this pattern. Check out her site for specific details.

Sunday Work

The dishes and laundry are waiting and I am having another Manderly kind of day. Not as bad as the other day, but still kind of unfocused. The tab with my blog has been staring at me all morning making me think, as I have been plowing through some work, that I should write something. This was actually a good thing, because it spurred me on to go upstairs, turn on the sewing machine and sew. After sewing some hexagons, I took the Cheerful Baskets off the design wall so I could put the hexagons up. The photo on the left is my production today, though I did start sewing some of the triangles on earlier in the week. The big piece that I showed previously is also in there. I was really amazed at how fast these little hexagons turn into a hexagon with two triangles. Very satisfying. I always liked the Grandmother’s Flower Garden with diamonds in between and it just occurred to me that this is what I am making now in just a slightly different scale.

I don’t work with conversationals very often and now I know why. It is almost as though my eyes have a hard time focusing on so much visual stimulation in one piece of fabric. I don’t think that is what is happening, but that is what it feels like. The pieces that attract me the most are the ones that have a fairly clear and consistent background (one color). I don’t think that the entire piece looks horrible or anything, but it is a different kind of project to work on.

Below and right is my total progress. I put the pieces up so I could see what I had accomplished. I just put the pieces up on the design with very little rearranging. I did take care to place the monster pieces, of which there are several, far from each other. I’ll move the other pieces around as I get to it.

My next task is to figure out the normal size of a quilt. I don’t know if I will go for a full or twin yet. Some of it depends on how many hexagons I have (I haven’t counted, but I know I have a lot). I also don’t want to make the quilt three times the shape of my design wall, which I did with Thoughts on Dots last year, because that is a weird shape.

Following that, I have to cut more triangles. I went through all those that TFQ and Julie sent to me. I did start cutting more already and I have a great deal of respect for my friends, because they are a bit of a challenge to cut.

I found that my larger rotary cutter moved smoothly next to the triangle template. However, it felt too big, so I tried the smaller rotary cutter that TFQ usually uses. It didn’t roll quite as smoothly, so I’ll have to figure something else out.

One good thing about cutting triangles is that I get to look through and select red fabrics to use. I need to find a variety so I don’t use the same combinations over and over. So far I have cut batiks without hauling any bins down. I’ll get to that next.

Bullseye Back (Purple)

I am waiting to get an appointment to deliver my quilts – YES, quilts plural!!! – to my quilter. I have to call her and get a date. Last time I tried she was out of town on all the days that would have been convenient for me. I almost finished a third top last night, so I may wait to add the last two borders, and get the back done before I make the appointment.

Above is the back of the purple Bullseye. I was really pleased with how well this back went together. The whole quilt really went together well, but the back was especially easy. The fabrics I used are much lighter than the front. I wanted to use some fabrics that I owned and liked and had also been around for awhile yet hadn’t yet made it to the front of a quilt.

It is really a thrill to have three quilts (almost) ready to go to the quiltmaker. Sadly, two of them were not on my 2007 UFO list, so that list won’t be much smaller unless I get really busy.

Bullseyes – Major Progress

The last update I gave you on the Bullseyes was on September 8 and I was slowly working through the trimming and sewing the patches together to make blocks.
I went through this process kind of slowly because I was enjoying the fiddliness and taking my time. Above shows the quilt top as it was sometime in the last week or so. You can see that patches are sewn together to make blocks and some blocks are sewn together to make. During the past week I have been sewing chunks together and this morning I had only seven seams left. I finished this morning after wrestling with those last seams.

Finished top!! Hooray.

I hope to be able to finish the back today as well. I already made one piece of it with some leftover quarter circle/triangle patches.

One of the things I tried on this quilt was sewing the seams open. I saw in the Kerr/Ringle color book that they press the seams, on all of their quilts, open. I thought this would be a good project to try it. I was pleased with how easy it was to deal with several seams meeting at one central point. Because of the layers of applique’, it was a little tricky to get all the little bits to lay flat. I also found it easier to press from the back when pressing the seams open. My points matched up pretty well (at least no worse than normal). I did use pins to help that process. All in all, I liked pressing the seams open. I’ll have to read a little more of what Kerr/Ringle say about their reasons and report back.

Switchplates….

I have been looking at my switchplates and cringing…well my whole house, actually, but the switchplates are totally doable. I happened on to PCS and found this post. Thanks!

clipped from pinkchalkstudio.com

Switchplates

Switchplates were the March 2008 theme for my Out of the Box creativity challenge. I took some in progress photos but not a full-blown tutorial. I even forgot to take a stylized photo of the one I traded that night, very unlike me! Fortunately making these are extremely addictive so I had plenty more for that purpose. Guess which is Leil’s and which is Caitlin’s?

blog it

Happenings in the Workroom

I am a little busy right at the moment. Too much to do over the weekend, so I didn’t get to catch up, so here is a quick post for my faithful readers.

This is what is on the Design Wall:
Here is what is on the floor:
I recently spent some time cataloging my books and the above are the newest.

Here is some progress on the Flowering Snowball (Cross Blocks):

Moving Right Along

I have been trying all week to get a few free moments to show you some pictures. I am off on a trip tomorrow and don’t know if I will get to posting until the first weekend in March, which is why I want to post!
These are the retail therapy fabrics that I bought. I have already washed and ironed them do I could use them in the 2008 Fabric of the Year quilt (see below). I was pretty disappointed in the quality of the fabric in the whole top row except for the multicolored dots on the light background (right). The green and yellow fabric with the white dots are really, really thin. You can see through them and I am sure the seams will show through if I press towards.

I found the other two by searching for violet on the site that shall remain nameless. It turns out that the fabrics are very, very dark. Not violet at all. At least not my definition of violet. [I could go into a whole dissertation on taxonomies here, but I’ll spare you. I’d like to keep a few readers.] That wasn’t the main problem with these fabrics. When I tried to press them from the front, the iron kept getting caught on the fabric. I don’t know if ‘caught’ is the right term, but I couldn’t smoothly move the iron over the front of the fabric. I had to turn the fabric over to press it.

The color is printed on the front and something about the ink makes it not smooth. I love shopping online, because I don’t have to leave my house, but this is a good example of one of the pitfalls: I can’t feel and look at the fabric before I buy it. I could return the fabric, but I have already washed and cut into it. When it is cut into smaller pieces, I am sure it will be no problem.

Here are the two newest members of the Pineapple family. They are both a perfect… 14″. Sigh. They are supposed to be 12.5″. I made these so carefully, I don’t think it is possible to have been anymore precise. I measured each strip to ensure it was 1.75″. I also made sure the blocks were square as I sewed each row on.

I am bringing all the blocks with me this weekend and will work on them when I have time. I also spoke with TFQ about them and some possibilities are:

  • the new iron
  • the service on my sewing machine last fall.

I decided that I would finish this quilt even if it meant making all the blocks over. Blocks never go to waste, so I could make a lot of pillows!
Here are the new fabrics that I cut for this week.

Here they are all sewn together and integrated into the blocks I made last week.

Quilt Activities for the Week

I spent almost all week engaged in quilt related activities. First, I picked up my Nosegay from the quilter. She did a fantastic job. Photos to follow as it is such a monster I have to move furniture to get any kind of photo.

I also picked up some quilts from the photographer so I can update Artquiltmaker.com. The quilts are older, but it turned out that I didn’t have good photos of these quilts.

I also spent a few days this week at PIQF with the JCN, The Fabric Queen (a new moniker for an existing Artquiltmaker character by request). I took a lot of pictures, which I will share in another post. I didn’t take as many as I would have liked as I was having camera difficulties. We went down early and went to the preview on Wednesday night. The quilts were available for viewing and the vendors were open for business.

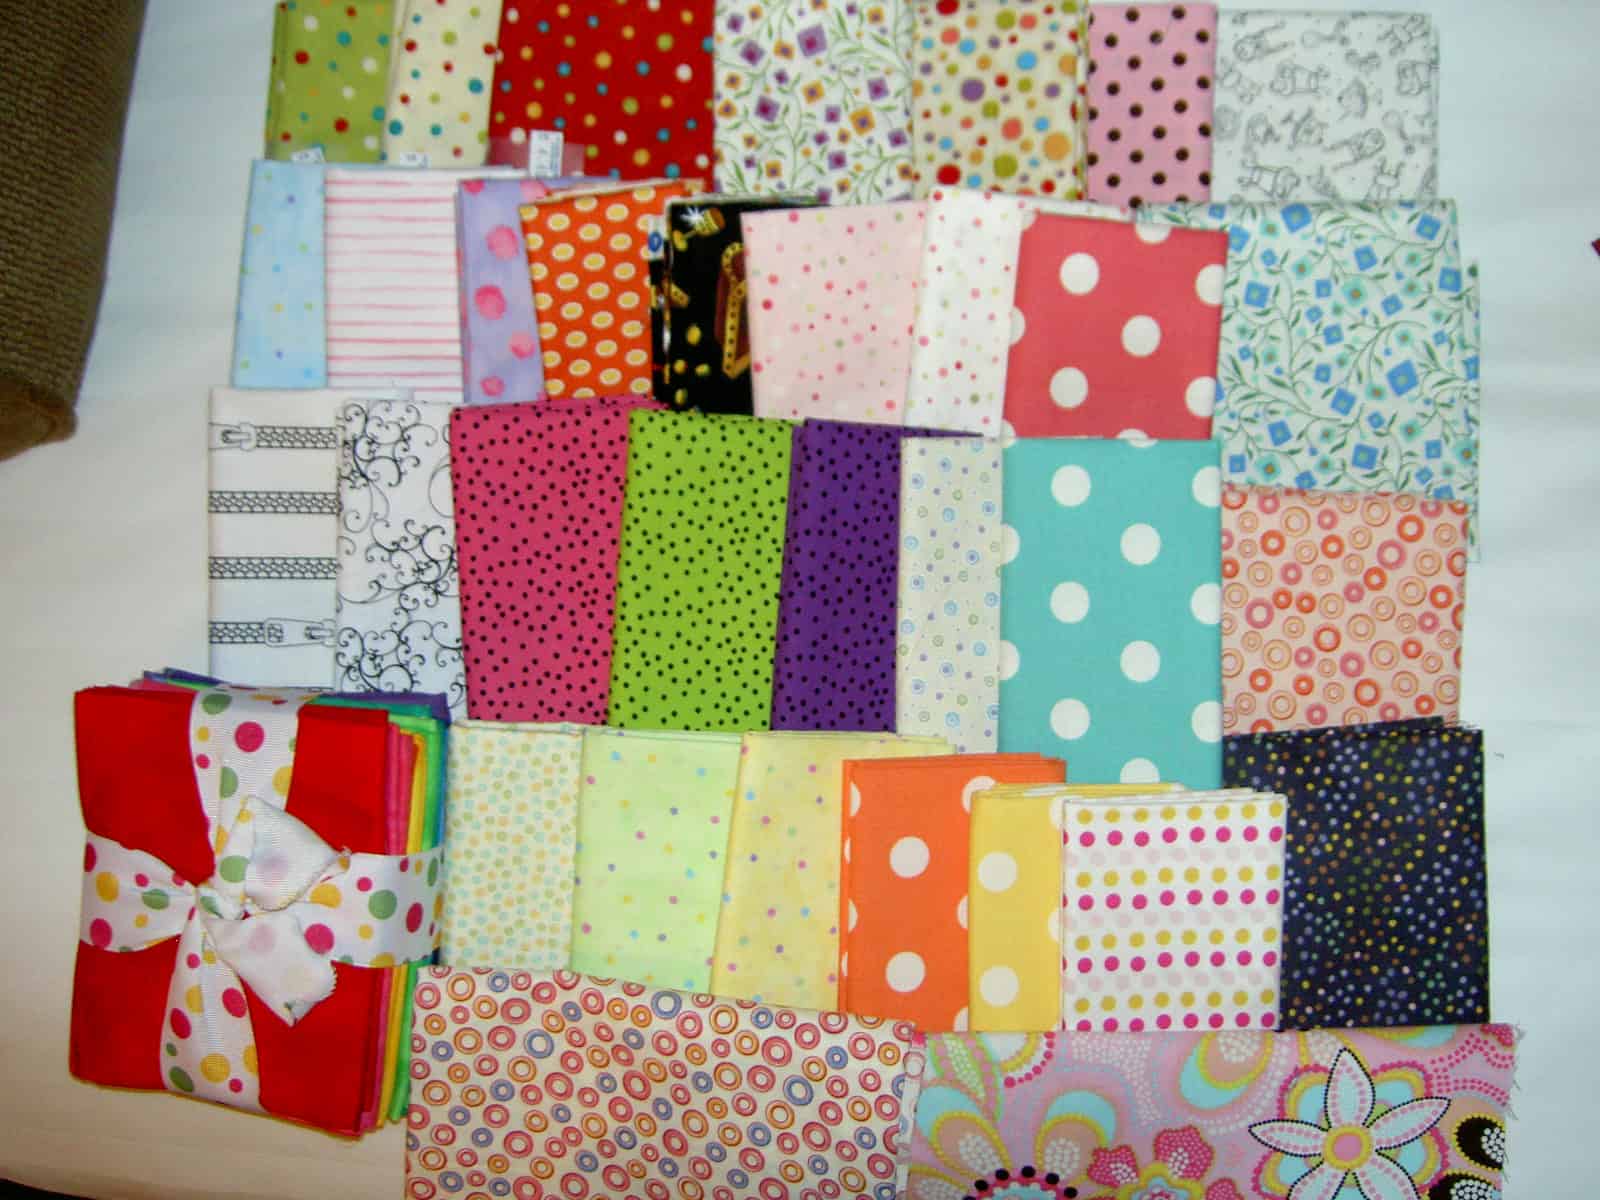
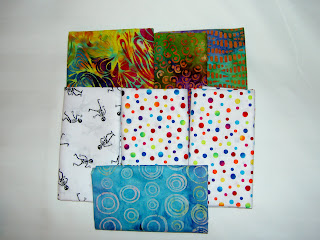
I found a couple of fabrics that I can use. The three batiks were just there and gorgeous, but the skeletons are for the Flowering Snowballs quilt (I seem to be getting a sense of humor with the background for this quilt), then, of course, there are dots for the Pineapple.

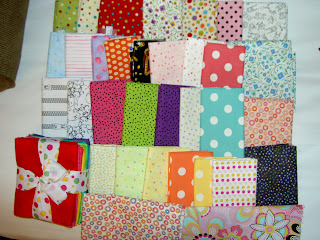
Additional new fabrics.

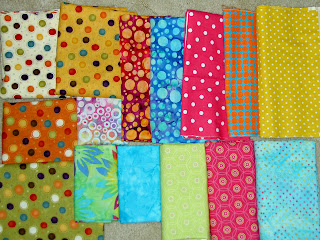
We went to Eddie’s Quilting Bee after leaving the show. They moved about three weeks ago and it was right on our way, so we stopped. It is a nice, large, open and light filled shop (even in the pouring rain), but they didn’t seem to have a lot of fabric, probably because most of the fabric was at the quilt show. I found a couple more dots that I can use in the Pineapple. 😉

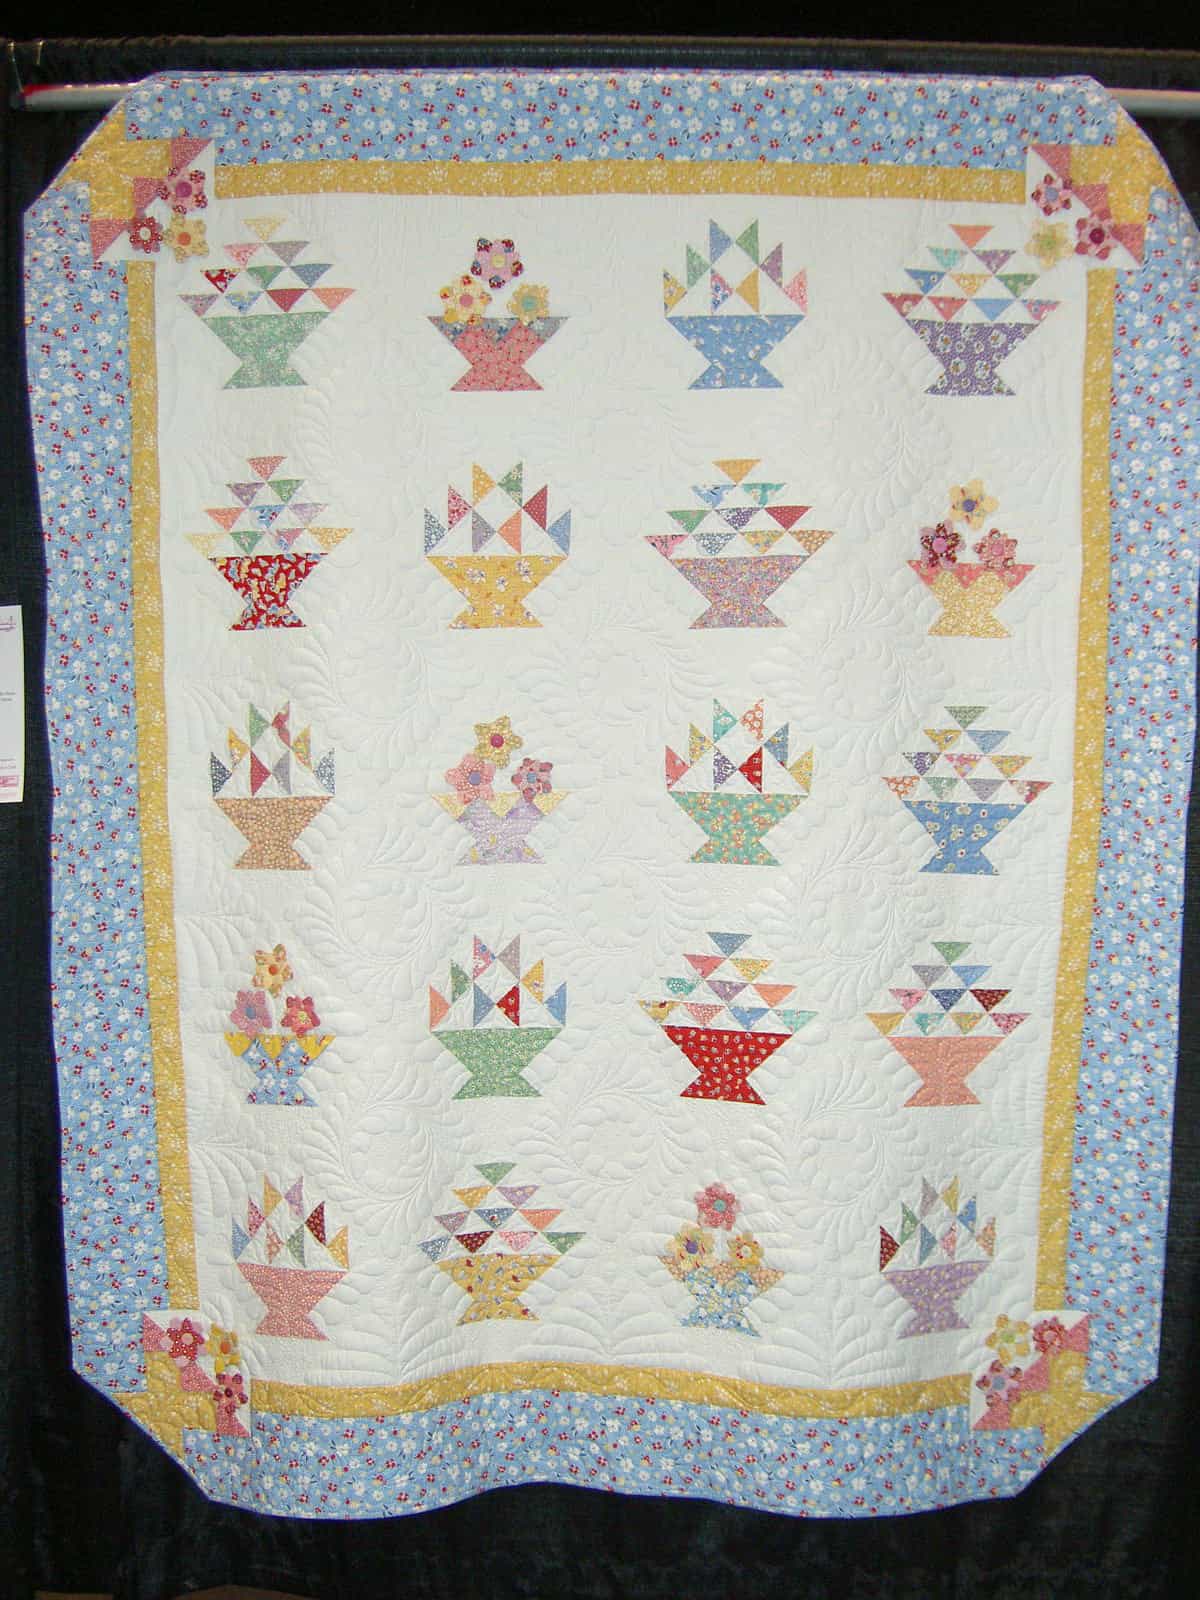
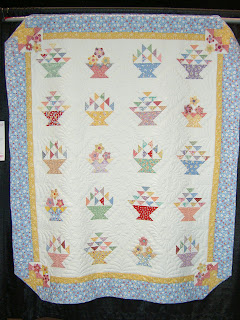
This is one of the quilts in the show. There were a number of great basket quilts, but one block inspired us to get sewing.

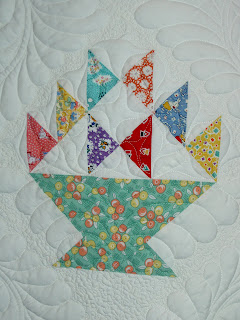
It is pretty much a normal Flower Basket block, but the little Bow Tie in the middle gave it a little extra zing.

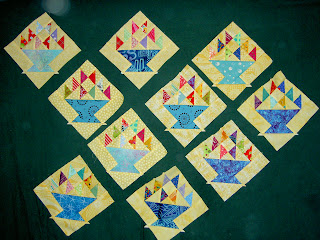
Since my design wall is covered with Pineapple blocks, I used The Fabric Queen’s bed as a design wall. The green flannel wasn’t as sticky as I like and the green, though warm, was not that attractive for a background.

Not sure what to use for the background, so I was trying a bit of a print. Not so good, IMO.

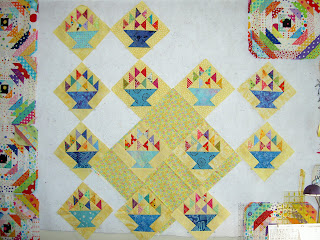
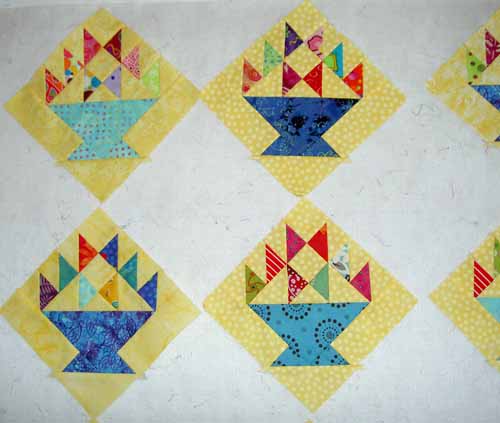
I took the Pineapples down (don’t have a cow, they are going back up tomorrow!) in order to put the baskets up. They look much better on white.


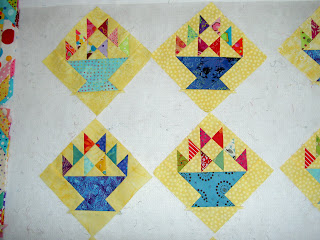
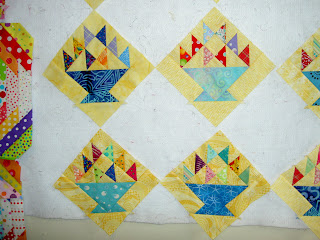
Some details of the blocks.

This is how I piece when it is too late at night.

We decided that we would work on this quilt together, so I will take the blocks next time I go up to visit or the Fabric Queen comes here. TFQ is going to work on some alternate blocks in a chain to see if they work. I know I hadn’t planned to start a new project, but it was good to get some baskets out of my system and I am sure I will be refreshed for the Pineapples, which I am reinvigorated to work on.

Apologies for the large photos. I wanted to get something out to you sooner rather than later. More soon.
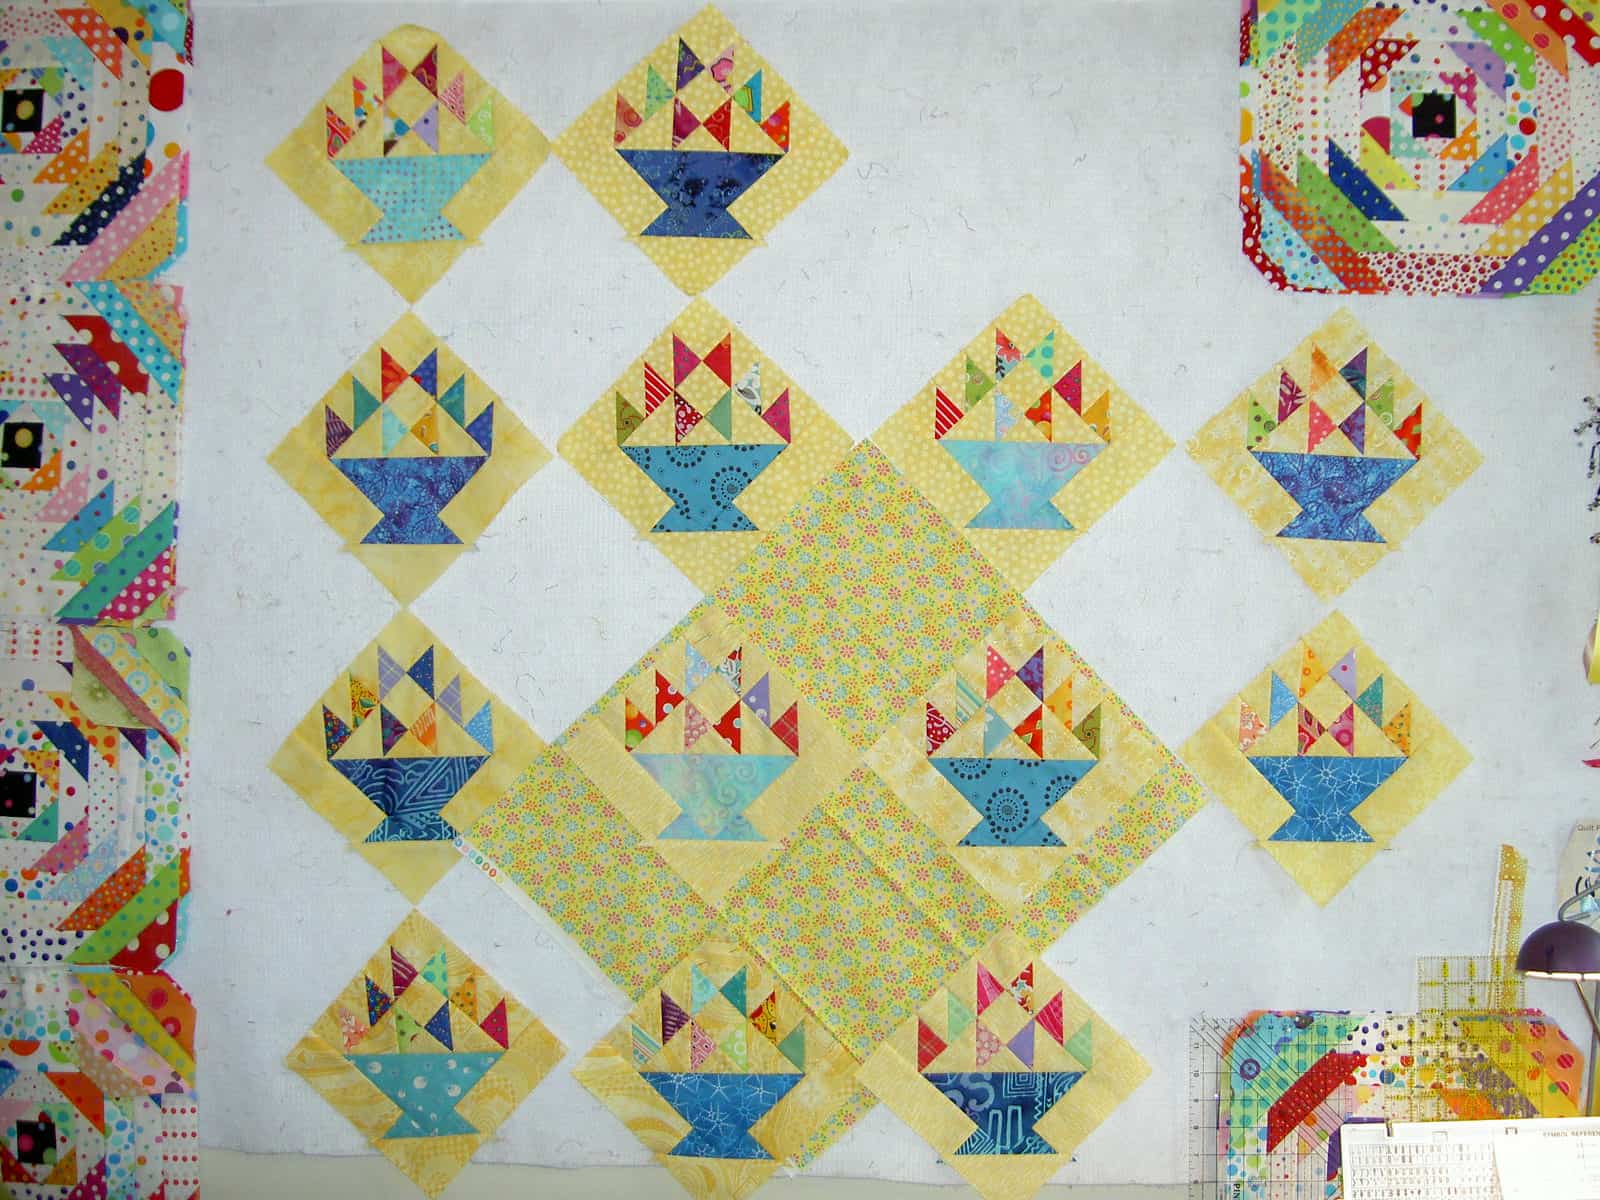
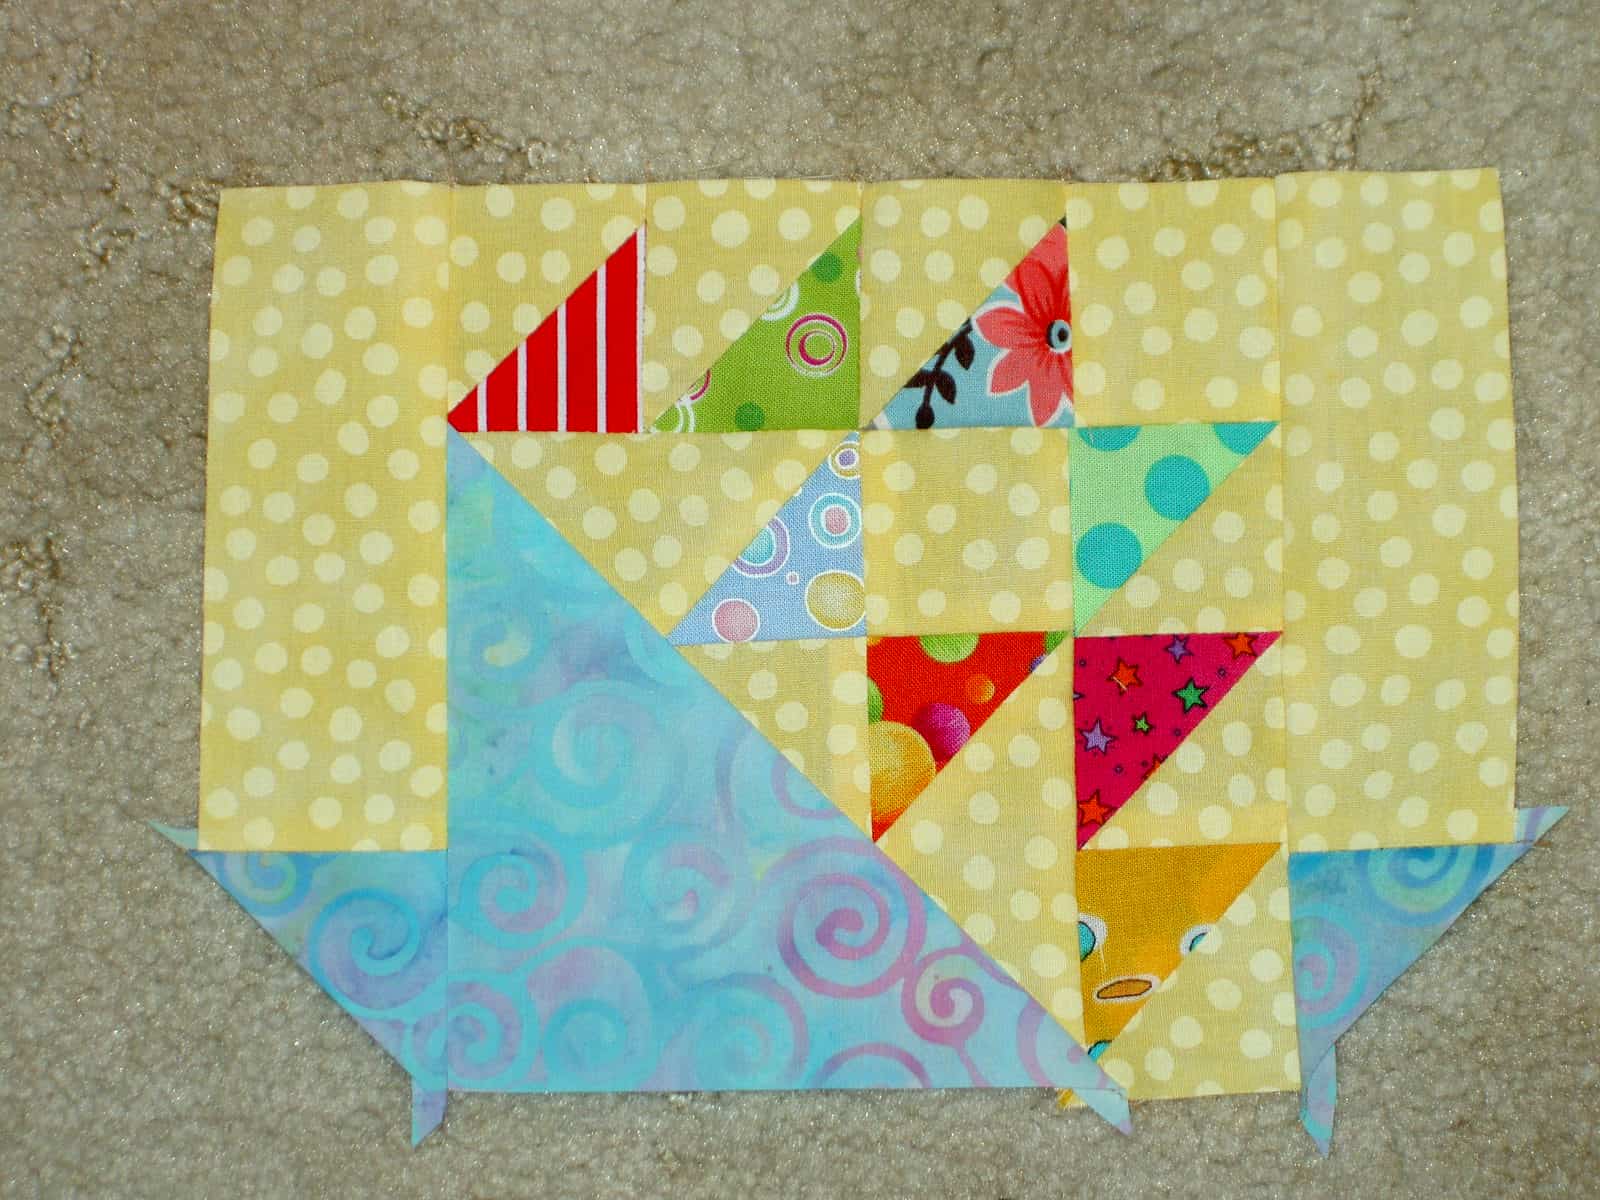
More Weekend Work

Making strange mixed media works all weekend didn’t feel comfortable to me, so I sewed on Pineapples while the paint and various layers dried. I completed three more side border blocks. I wanted to make three more on Monday, and think I could have done it, but I had to work on the house a bit, so I did that: 2 days fun-work; 1 day: work-work.

More new fabrics. The two on the top left are replacements, but the others are new. Enjoy.

A Little New Work

Wayne Thiebaud said in a City Arts and Lectures * show, and I am totally paraphrasing, that he did his work and he would let history judge whether he was an artist or not. I have decided to take that tact as it makes me uncomfortable to say that I am an artist. As a librarian I know I am creating a library with library services. With quiltmaking, I can’t say if I am creating art. It is one of the types of work I do and one which I enjoy. That is it. If it is art, great. If not, that is ok, too.

To that end, as I mentioned in a previous post, I haven’t done much work lately, but I keep reading and trying to put a few stitches into various projects. Craft Night will be here tomorrow, so I will have a bit of time to make a few more stitches.


Here is my latest Cross Block (Flowering Snowball). I was pleased to receive a request from CamillaKnits for the templates. She has become enamored with the pattern, which is great. I love these old blocks that are not quick pieced blocks and am glad I am spreading the joy. If you don’t have a copy of Barbara Brackman’s Encyclopedia of Pieced Quilt Patterns, go buy one as soon as you stop reading this post. It is great for inspiration (tiling your bathroom?) even if you do not love piecing or blocks.


I also realized that I had not taken a photo of the entire Pineapple recently, if ever. Well, here it is in all of its glory PRE-border. Yes, I have decided to make that maniacal pieced border using the self-bordering technique. I am already lamenting my carefree-ness and all of that lost free time (HA! As if I ever had any). I am gearing up for the long piecing road ahead and the glory of it being finished.


Here, in the annotated picture, you can see blocks blocks 18 and 19, which still have three rows to go. I thought I would put them up there so they would feel like part of the crowd. Block 20 is in the machine and had a stand-in. See that Cross block? The poor block behind the sewing machine doesn’t get to shine at all. I’ll have to haul it out and take a photo of it.

*I adore City Arts and Lectures, but they claim not to record their lectures and you can’t get a copy, much less a transcript to save your life. I even know one of the directors who I begged to ask for a copy of the Wayne Thiebaud lecture. They wouldn’t even give him one. I know they are lying, because I have heard rebroadcasts of previous lectures. Ergh!