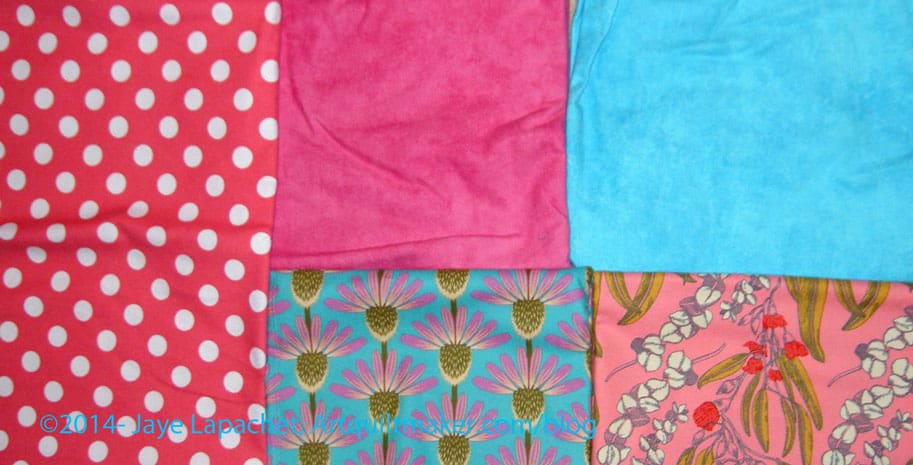
I have a new baby niece named Lauren Elizabeth. I hope she likes pink because I have a lot of pink ideas. 😉
My mom is also thrilled to have another grandbaby. My Young Man is leaving for college too soon so Lauren will be a good distraction for her.
Last weekend I made receiving blankets, my gift of choice for newborns.
I bought the pink and turquoise tone-on-tone at Always Quilting a month or so ago. I thought I would find some other flannels to go with them. As I perused the wares at Hawthorne Threads, I saw the Pretty Potent prints in flannel and that large dot. Perfect!
While I was hemming the edges I listened to an interview with Anna Maria Horner on Modern Sewciety (Episode 37, I think) where she talks about her inspiration for Pretty Potent. I was thrilled to know her inspiration for the fabric with which I was working.
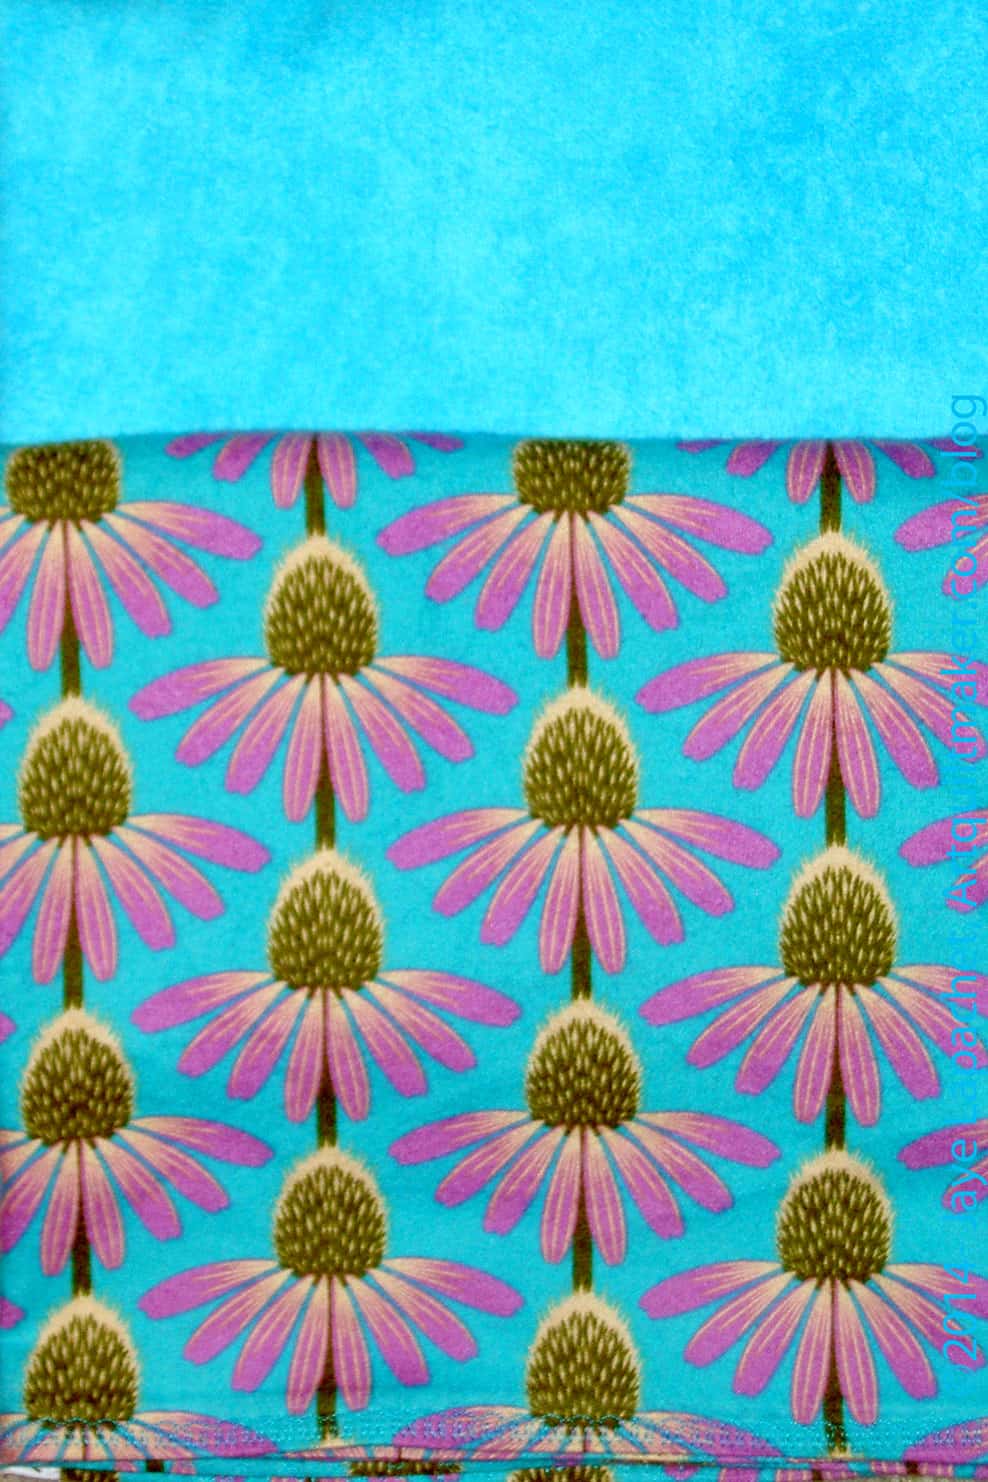
Receiving Blankets in Blue
I really like the Coneflower (Echinacea) print. I think it is a little hard to use in quilts, but it is perfect for this receiving blanket.
I have the card written and just need to wrap the gift and send it off.
Microfinance transparency – Promotes transparent pricing in the microfinance world by collecting interest rate data and publishing educational information about how interest rates work.
Investors should steer clear of companies that lack transparency in their business operations, financial statements or strategies.
Definition: Transparency, as used in science, engineering, business, the humanities and in a social context more generally, implies openness, communication, and accountability. Transparency is operating in such a way that it is easy for others to see what actions are performed. It has been defined simply as “the perceived quality of intentionally shared information from a sender”.[1] For example, a cashier making change after a point of sale transaction by offering a record of the items purchased (e.g., a receipt) as well as counting out the customer’s change on the counter demonstrates transparency. (Wikipedia)
Amazon original series
Trust and transparency have become popular workplace demands as employees seek to be aware of what is real and true.
power of transparency
invisible man
transparent CSS
So to help you better understand whether your emails are protected by encryption, we’ve launched Safer Email, a new section in the Transparency Report.
Welcome to transparent.utah.gov, a website dedicated to the transparency and accountability of government finances.
Transparent aluminum armor
The Transparent Speaker design blends in effortlessly into your bookshelf and sits nicely with any decor.
Transparent Airfares Act of 2014 – Declares that it shall not be an unfair or deceptive practice for an air carrier or other covered entity to state the base airfare in an advertisement or solicitation for passenger air transportation if it clearly and separately discloses: (1) the government-imposed taxes and fees for the air transportation, and (2) its total cost.
With transparent caching, Caching is a simple concept: store the most popular Internet content and deliver it from the operator’s network, rather than always retrieving it from the remote source. The operator benefits through reduced bandwidth consumption, and the content owner and subscriber benefit through better quality of delivery.
Post the direct URL (link) where your drawing, doodle, artwork is posted (e.g. your blog, Flickr) in the comments area of this post. I would really like to keep all the artwork together and provide a way for others to see your work and/or your blog.
We are also talking about this on Twitter. Use the hashtag #CPP
The Creative Prompt Project, also, has a Flickr group, which you can join to post your responses. I created this spot so those of you without blogs and websites would have a place to post your responses.
Definition (from Google): (of a material or article) allowing light to pass through so that objects behind can be distinctly seen.
I have an ever changing list in my head of projects I want to do. Some of them have patterns, some have fabrics. Somehow they haven’t quite gotten up to the top of the list. I decided to make a list of projects I want to make in the future and what state they are in. They may never get made, but at least I won’t forget about them if I write them down.
Some of these come from the Current Projects list (Hunting and Gathering section). I don’t know if I will keep them there or move them here. Lots to work out, so stay tuned.
Art Institute of Chicago Fusible Quilt
Pattern: Original
Fabric: Blue and red
Steps: need to fuse a bunch of turquoise to something
Thoughts: I like the challenge of piecing this quilt
Food quilt #2
Pattern: Disappearing something, probably 4 patch or 9 patch
Fabric: RJR Food prints. Will use a different color for the non-food print section than I did for the Young Man’s version.
Thoughts: Gift for son of good friends for graduation
Food quilt #3
Pattern: Disappearing something, probably 4 patch or 9 patch
Fabric: RJR Food prints. Will use a different color for the non-food print section than I did for the Young Man’s version.
Thoughts: Gift for nephew for graduation
Music Quilt
pattern: Don’t know
Fabric: music prints and tone-on-tones
Thoughts: The Young Man has requested this quilt as his graduation quilt
Pineapple
Fabric: dots. Have most of the strips cut. Will be much more selective about which strips I use.
Pattern: Pineapple log cabin
Thoughts: I haven’t given up on a Pineapple quilt despite my frustration with the previous attempt. I bought a different ruler: a Creative Grids Pineapple ruler in hopes that it will work better for me.
Fabric: Bonnie & Camille fabrics Bliss, Ruby, Vintage Modern: made two test blocks, but still in the thinking stage while I decide on the background colors. I want the contrast to be good.
Pattern:
Stepping Stones #3
Fabric: Macaron pre-cuts from Hoffman. It isn’t started, but I have all the pre-cuts and think they would make a really fun version of this quilt.
Fabric: Still hunting and gathering. I will use a grey for the background, because if I use more of the cut fabric patches, the pattern will be lost. The pieces are too oddly shaped and I don’t want to lose the pattern in a mass of scraps.
Pattern: Come Quilt with Me Rotary templates
I don’t know if this will be a regular feature, but it might be.
I bought this pattern a couple of years ago at a shop in Mt. Airy, Maryland called Patches. I finally dragged it out, as I said, to keep my clothes clean.
I took out the apron pieces I cut out last week, thinking I could whip at least one apron out on Saturday afternoon. Sigh. the first step has to do with making pockets and is virtually unintelligible**. I had no idea what I was supposed to do, so I did what I thought was best. I am sure the pockets won’t look as cute, but at least the apron will have pockets.
What I have accomplished
Sunday, I managed to understand step 2 and make the ties.
I also read through all the directions and just sighed again. How am I ever supposed to understand this pattern?
My mom came over yesterday and I asked her to read through the step for the pocket and she had to explain it to me about 5 times. I think what is wrong with the step is that it is stupid. The top of the pocket is turned down and then you are supposed to zigzag over the raw edge. That means the trim of the pocket isn’t finished. I like my stuff finished and I don’t have a serger. Mom said that the way I did the pockets will look better and stuff won’t get caught on the raw edges. I might turn over the top so that the text fabric shows on the top of the Phillip Jacobs print and visa-versa.
**Nota bene: I do much better when someone shows me how to do something, but I did turn off the podcast, slow down and read each sentence carefully, after which I let it sink in. I still had no idea what the heck to do with these pockets. ERGH!!!
You probably remember me bringing home the 9k. It worked and I was really happy except that the needle looked out of alignment and the light bulb was burned out.
I called the place that repaired my machine. I felt like an idiot when she, very kindly, told me I could move the needle position.
Oh.
I had never done that before.
Then she explained that she had had to do a factory reset when she re-soldered all of the connections. This meant that the machine was back to what it was like when I bought it. I didn’t remember ever changing the needle position but that was then and this is now. The machine works well. I don’t have to buy a new one; I am happy.
Except for the light bulb. I have an auxiliary bright light over the machine, but it does not shine on the needle. The little sewing I have been doing has been somewhat dark. I asked her about the bulb and she said she would send me one if I told her which one. I was at work; I had no idea.
Later that night I looked at the bulb, which I had to find first. I never had to change the bulb before. That may have been the original bulb! I took a photo and meant to call and tell her, but was too busy at work. My last days mean that projects are being heaped on my that nobody ever thought important before.
On Friday morning I decided I would drive down to the shop and pick up the bulb so I would be ready for sewing on Saturday. When I got there, I showed the photo. The nice lady, Angie, asked if the bulb had two prongs or a roundy sort of connection. I didn’t know. I just stared at her thinking I’d have to go home with no bulb and sew in the dark on Saturday. She gave me one with prongs.
I slotted it in when I got home and turned on the light. It worked and now everyone is happy(mostly me, but also my DH who is happy that I have stopped muttering to myself about incompetent machine repair people and damn light bulbs).
Update: sad news. The machine is on timeout again. I sewed on and off all day on Saturday with my new light bulb, my newly positioned needle and life was good. Sunday all hell broke loose. The machine started running super fast and then giving me an error message about a bent needle or something caught in the needle area.
I changed the needle. No help.
I rethreaded the machine. No improvement.
I rewound a new bobbin. Same problem.
I took off the sole place and cleaned the whole area. It was pretty clean already. Nothing.
I took out the bobbin case and cleaned out under there. The problem persisted, so I put the machine on timeout and took out the backup machine again (no knee lift- BAH).
I feel like I am in an abusive relationship and this might be the last straw. I am going to look and see if there are any contests at which I can win a new machine.
I love to read and periodically I subject you to lists of books I am reading, which I am not going to do today. I did want to point you to a really interesting discussion of what people should read and who is an arbiter of reading/literature. If you have a chance, listen to Books on the Nightstand #286.
Tutorials
Jeni Baker of In Color Order and Love of Patchwork & Quilting magazine has a tutorial on machine binding a quilt. Her machine binding looks really good. she also shows how to put the ends together with the Fons & Porter ruler, so if you don’t want to buy a specialty ruler check out this tutorial. She makes me actually want to try to machine bind a quilt.
You have heard me swoon over process. A recent post over at Be*mused blog is another commentary that makes me swoon. It is all about choosing background. Some of you might say “kill me now” and just pick a fabric, but this detailed description of picking a background denotes that it is an important part of the process of getting the quilt right.
Do you want to know the impact that quiltmakers have in the economy. 13 Spools has an infographic and commentary (over a couple of posts) on the astounding amount of money quiltmakers spend, which contributes to the economy, job creation not to mention all the quilts that get made. It occurred to me that they (whoever ‘they’ is) could have added a question about the respondent’s own perception of his/her dedication to quiltmaking. Those answers would have added a whole layer of meaning that could have been reported to the data.
Tweet about creative work
One of the things I love about Twitter is the random gems that arrive in my Inbox. I love this one, because I believe that creativity has an element of work – a joyous element of work, but work nonetheless.
Mark’s Slow Stitching Movement got a mention on the DMC website. Check out the article and let him know you saw a mention here!
A recent Modern Sewciety podcast (#35) has a FANTASTIC interview with Weeks Ringle and Bill Kerr. It is one I will listen to over and over, because their philosophy is so sensible. I also enjoyd the interview with Malka Dubrowsky. Go listen to it as soon as you are done commenting here. 😉
Tina (WeezyWorks) has a new podcast. It is available on iTunes, so go check it out.
Judy Martin’s Quilt Show game is now available on her site.
Fabric and Supplies
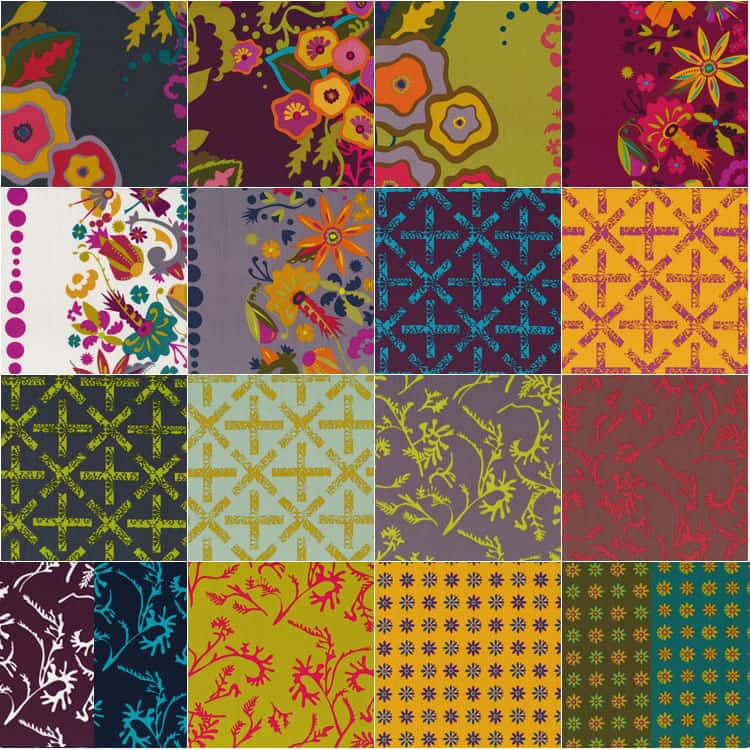
I am not sure if I like the range of colors together or if I like the individual dots. I haven’t seen these to purchase anywhere, but I keep seeing them on Instagram and on various blogs.
Field Day
Field Day. Hhm. I like it, but it has so much brown. I want it, or at least I think I do, but it has so much brown. Are you buying it? There is something rich about the overall look of the colors.
Other Artists
Libby Lehman continues to improve. The classes that I have taken from her were some of the best I ever took and hope she will be able to quilt and teach again.
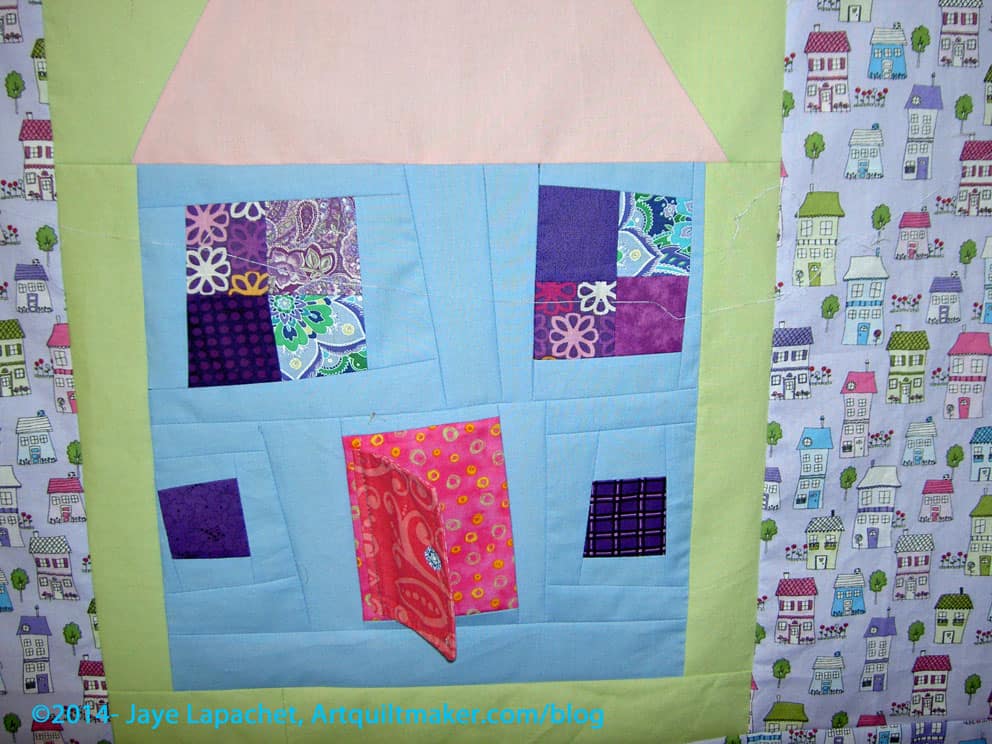
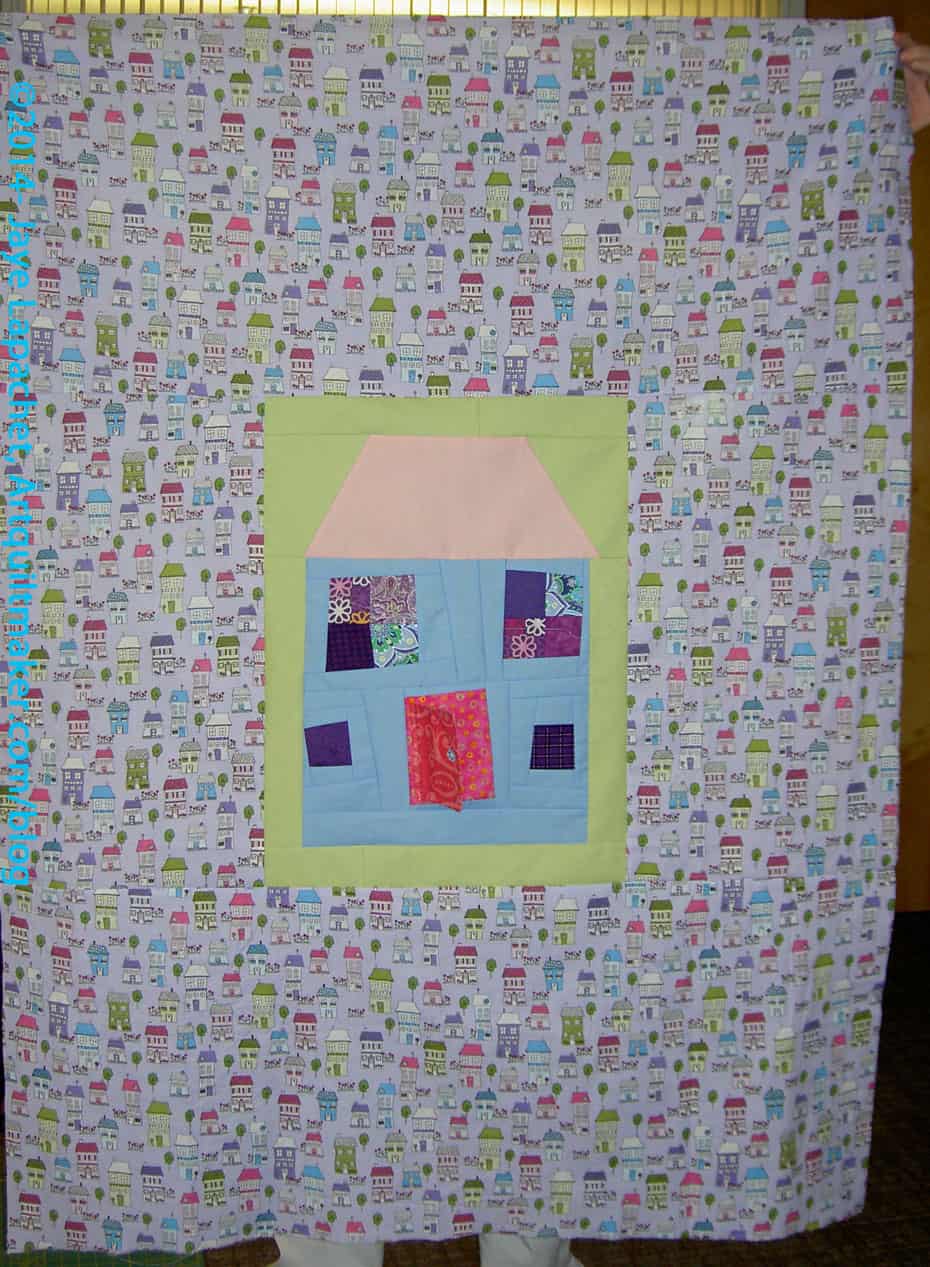
Rhonda’s House Block Quilt detail
I couldn’t help, after posting about the Charity Sew Day, showing you a close-up of Rhonda’s house in her House Block Quilt. I love the way the door opens. It would have been cool to put a novelty fabric in there.
Projects
Are you going to do the Banned Books Week challenge this year? I wasn’t planning on it, but I got some new fabric, then was listening to BOTNS and got an idea. Perhaps I will! Regardless, I always enjoy the interpretations!
I haven’t made a lot of additional progress since my last City Sampler/Tale of Two Cities update, but I have made a little. Frankly, I haven’t been at the machine much, so little progress has been made on anything.
City Sampler no.21
I was able to sneak in some of the background fabric on this block (No.21), because that one square is surrounded completely by other fabric. I am interested to know how those bits of background will look once I have all the blocks done.
As I look at it, I remember Sue’s (from CQFA) Eat, Play, Sleep, Repeat baby quilts. Blown up this might make an interesting baby quilt. Not that I made baby quilts.
City Sampler No.22
I also made it to No.22, after a couple of tries. AND, Patti and Nicki will be pleased to know that I used strip piecing! I didn’t really get it that the strips needed to be different sizes for different parts of the block. Sometimes I wonder about my brain.
I really hate to admit it, but I think I have too many projects going on that are in a similar stage.
Lots of piecing, no shortage of leaders and enders means that only a little is getting done on any of them.
More blocks was a bit ambitious of a title, but hope springs eternal.
I have been thinking of freshening up the blog looks. I like the colors and the bright white, but too long wearing the same dress seems boring. I tried out the WordPress ‘Sketchpad’ theme.
What do you think? A bit too beige? What about the posts only have a paragraph or two?
When I receive an email like the one below, it makes all this blogging even more worth it. To really find that someone gets value from my work is fantastic!
I got an email with the gist of the information below last week. It came from my dear, dear friend, Mrs. K. and made my heart sing.
________________________________________
My morning ritual includes reading your blog. I have loved the charity quilts. Then you shared about leaders and enders. I had the book, but hadn’t applied the lesson. So I started with Kona Snow and a bunch of mostly blue 2-1/2 inch squares. I was amazed how fast the pairs and then the quartets got sewn! I really had not noted how many starts and stops happen when sewing… like shortening pants and mending, and bag making.
Leaders and Enders Block
I finally decided I’d better get them sewn into blocks to see what I had. Well, I had enough for 34 blocks!
I like sashing between the blocks so I auditioned a bunch of things. Under your influence, I have been collecting some nice grays and I liked how they looked.
Then I went to my LQS (for something unrelated). I was the only one there and had a chat with the quilter/associate there. As I was leaving I had to walk past a large wall covered in all kinds of rulers (uh-oh). I mentioned that I am something of a ruler fanatic and the lady got all excited. OHHHH! you must try THIS one… The Cutting Corners Ruler.
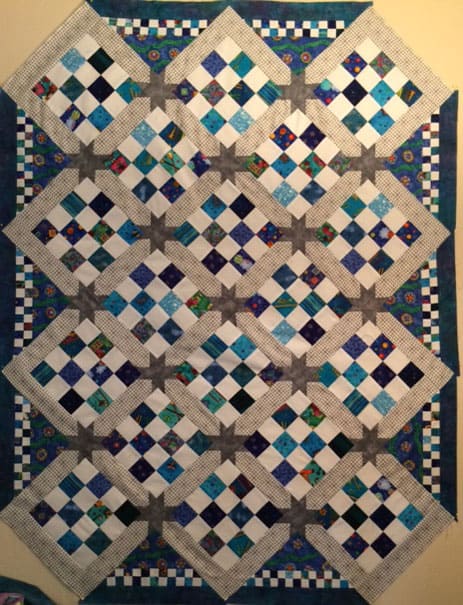
She had a notebook with her from a class she had taken from the author. She showed me what she was doing and it is pretty clever. So, of course, I bought it for several reasons. I wanted to practice setting the blocks on point. And I loved the idea of the stars in the sashing. With her instructions and the ruler, it was easy to fashion the stars.
Also, the author shows how to do the setting triangles in a more interesting way…not just a big plain triangle, but with it divided into sections…
So I thought I’d give it a try. The problem for me, as it always is, was choosing the fabrics. I had wanted to continue incorporating some of the Kona Snow, but it was too bright. So I got the grand idea of making checkered fabric by cutting up the extra blue and white squares. I began working with 1-1/4 inch squares.
Top in Process
The Ruler author has a very clever way of figuring the math of the setting triangles and cutting the corners on the pieces. But it didn’t work for me because of the ‘elasticity’ of my checkerboard strip. But I managed it differently.
<Photo right shows the setting triangles in place.>
Later I made the corner triangles. It is clever how the author divides the triangle into two so the design makes a square corner. It was only as I was sewing them onto the quilt top that I figured out a better way to have done the checkerboard stripe. I will consider redoing that tomorrow…. or maybe leave them.
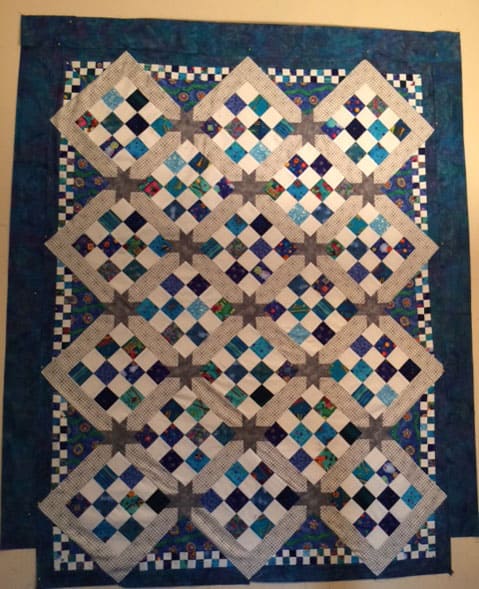
Next I need to sew on the last border. This is the one that, I hope, will make the design ‘float’.
Top Mostly Complete
Here it is on the design wall with pieces pinned. I like it.
So there you have my current project. It has been fun to make something to learn new skills. No deadlines, no focus on anything buy enjoying the process. I might even keep this one!…of course I still have the back and then the quilting to do.
Thanks for your inspiration!
Susan
___________________________________________________________________________________________________________
This makes my heart sing.
One thing about leaders and enders, to which Mrs. K alludes, is how much thread goes in garbage when you start and stop (not using leaders and enders method**). I was testing my machine last night and found at least 6″ worth of thread between the needle and the thread cutter as I was working. That thread could have been holding squares together to make pairs that would have ended up in a charity quilt if I were using leaders and enders. I know that a few inches of thread isn’t that expensive, but in a quilt such as one of the FOTY quilts, I can’t do a lot of chain piecing. I need something in between each set of FOTY shapes so that I can keep them in order unless I just want to cut the thread after each pair are sewn. That adds up to a lot of thread.
Mrs. K’s blocks look really bright in the closeup, but the whole quilt looks cohesive when we are shown the whole quilt.
I haven’t tried the ruler, but I am very interested in it. I have a couple of setting rulers and it takes me forever to figure out how to use them. Perhaps this Cutting Corners ruler would work for me?
**Nota Bene: I didn’t think up this technique. I am just a huge fan of the leaders and enders method. I first heard about the leaders & enders method from another quiltmaker who referred me to Bonnie Hunter’s website. She also has a whole section on her blog on Leaders and Enders, which includes detailed how-tos, photos of quilts made using this method and books, such as Adventures in Leaders & Enders and More Adventures with Leaders and Enders, on the topic.
Definition: “A girl is any femalehuman from birth through childhood and adolescence to attainment of adulthood when she becomes a woman. The term may also be used to mean a young woman.[1] The word is also often used as a synonym for daughter.[2](Wikipedia)
Girl Scouts
Girl Genius
Batgirl
Girl power
New Girl
1998 movie
Hey Girl!
Girls’ Home
Girl Up
Girl Rising
Girls Inc.
Girl Meets World
Gone Girl
Grammar Girl
Girl Talk
early girl tomato
Gluten Free Girl
Powerpuff Girls
means girls
bad girls
Rainbow Girls
Girls’ Life Magazine
Material Girl
Post the direct URL (link) where your drawing, doodle, artwork is posted (e.g. your blog, Flickr) in the comments area of this post. I would really like to keep all the artwork together and provide a way for others to see your work and/or your blog.
We are also talking about this on Twitter. Use the hashtag #CPP
The Creative Prompt Project, also, has a Flickr group, which you can join to post your responses. I created this spot so those of you without blogs and websites would have a place to post your responses.
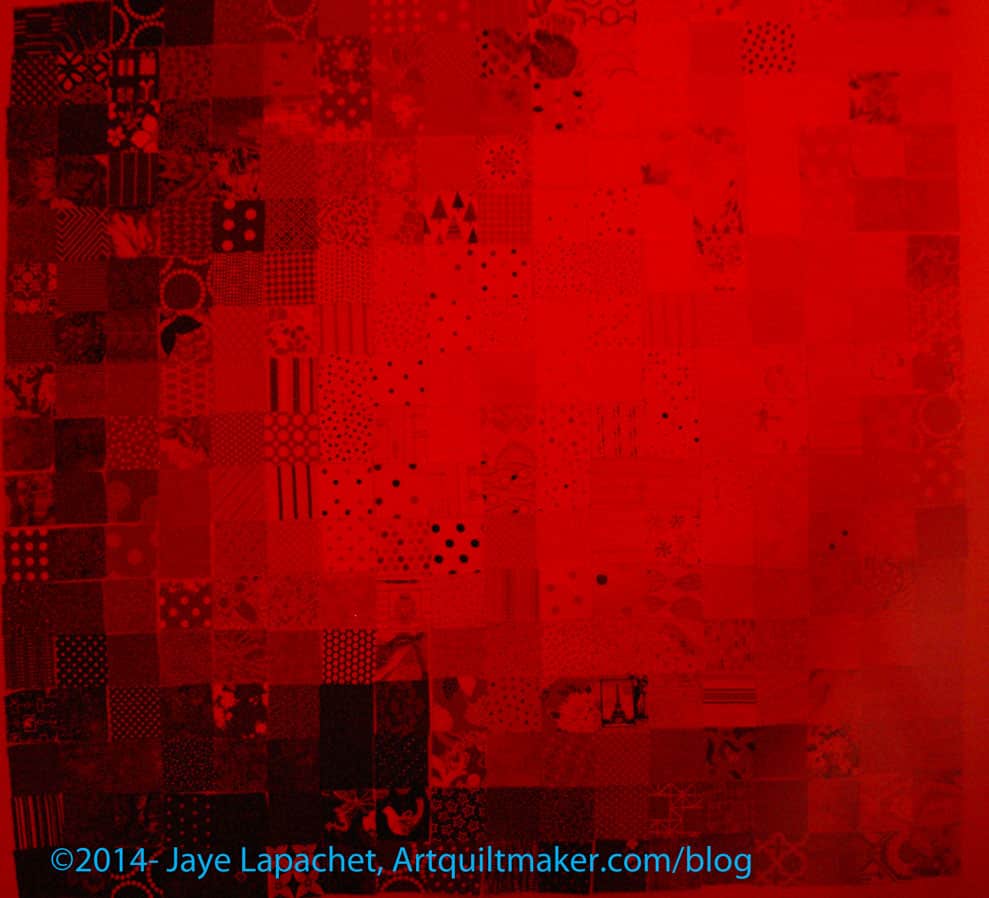
A week or so ago, I posted some black and white photos of the Fabric of the Year 2013 quilt. I also took photos through the red and green film of the Ultimate 3-in-1 tool. I am not sure they were very help, but they are interesting. I thought I would share those photos with you.
FOTY 2013 in Green
The green makes the entire quilt look a little sick and this might cure me from this color green for awhile.
It is helpful, though, as there are a couple of places that stick out that also stuck out in the black and white photos I posted previously. A few other things stick out that I need to look at in the real piece.
FOTY 2013 in Red
The red makes the colors extremely subtle.
One thing to remember is to look at the piece in real life. I mentioned it above, but it is an important point. These different views that I have shown are great tools to use to point out glaring problems. The key thing to remember is that they are tools. TOOLS. Your viewers won’t be looking at the quilt through a black and white, or green, or red filter when the quilt is on your wall. Be sure to use these tools to get an idea of what might not be working, then look at the real pieces in color before moving patches around.
It almost feels sinful to enjoy sewing for charity so much. Odd, I know.
I spent all afternoon on Saturday sewing at the Charity Sew Day. At first, since I don’t like lugging my sewing machine around, I thought I would run around and cut and press for people. Nobody responded to my forum post about that idea so I brought my back up machine. What a waste! I forgot the foot pedal so I ran around and used other people’s machines while I was doing an improv quilt top, then Gerre let me use hers pretty regularly when I started on the second top.
One of the great things was showing Gerre how to do leaders and enders. She was charmed and made 2.5 blocks at least in between her Dr. Seuss wonky log cabin blocks. That means another person knows how to do leaders and enders and more blocks will get made.
Michelle and Peggy were really well organized, as usual, and had a number of different solids to use with our scraps.
Flower Sugar Lap Top
I took the ends of quilt backs, which Colleen cuts off and returns to me. They aren’t much good unless I want to cut them up into squares or something and I never seem to get around to that. It occurred to me that I could make some Improv quilt tops with them so I brought them along. Two birds, one stone: gets the ends out of my house, adds comfort and, hopefully, beauty to someone else’s house.
The first top I made was made from the leftover back pieces from the Flower Sugar hexagon quilt. Edge pieces were quite large and I sewed them together relatively quickly. This is not great work of art, but it isn’t completely boring either. I brought it home to make the back for it. I’ll use some of the leftover Flower Sugar fabrics. I still have a lot of them and I am happy to use them for a good a cause. I may also ad something to the bottom. It looks a bit unfinished.
Star Sampler Charity Quilt
Next, I took the edges from the Star Sampler and worked with those. Michelle had an idea to make a sort of easy log cabin, but I thought the pieces were too small and I made them into rectangles. I got pretty far – to putting on the sashing – but I wasn’t able to finish the top, which would have been my preference.
I still have trimming to do and the sashing to finish. I will have used all the green fabric, from the charity stash, before I get to the two outer borders, so I have to figure something out about that. I don’t know what, but something.
I have two long strips of Philip Jacobs Chrysanthemums that I will put on the outside. I’ll probably put another border on after that, but we will see. I pinned a lot of it together so I could just sew on Sunday.
It was also fun being there with other people. Gerre, Rhonda, Susan, Leanne and Lindalee, with our bosses, Michelle and Peggy, of course, were all there sewing and we were laughing quite a bit. Kelly stopped by, but couldn’t stay.
Rhonda’s Improv Medallion
Rhonda made a large house block quilt and then worked on an Improv medallion piece. The stripes were made by sewing 2 parallel straight lines the width of the black and white fabrics (right sides together) about an inch apart, then she cut 1/4″ away from the sewn line and had strips already sewn together. I want to try the idea.
We played around with the placement of the stripes – both width and direction. It was kind of a group activity and really fun to see how people interpreted the design.
That coffee cup fabric is really nice and in a colorway I haven’t seen. I have some with a teal background. This colorway goes well with Rhonda’s overall design.
Rhonda’s House Block quilt
Rhonda has only been quilting for a few years and I am continually impressed with her design sensibility and what she chooses to tackle. The house block quilt reminded me of my house block quilt, mostly because of the placement of the house block.
In case you can’t tell, she made the door open, which is a really nice touch.
I also really liked the four patches she used as windows in the upper story.
Gerre was using Dr. Seuss fabrics to make wonky log cabin blocks. The red in that line of fabric is very primary, making the blocks really super bright. Working at her table made me feel very cheerful.
Leanne brought some fabrics that were not her style and she was trying to figure out what do with them. They felt as though they had never been washed even though she said they had.
Lindalee was making strip sets and ended up with two strip blocks, where the strips are on the diagonal. She does really nice and precise work.
Michelle was working on two really, really Improv quilts. One was blue and gold and had inset strips throughout the blocks. The other was a beige and purple piece with a lovely New York Beauty-like arc as part of the design.
Peggy’s Brown & Turquoise Charity Project
Peggy was working with brown and turquoise and she did an excellent job. I really love the color combination and know that my sister would love it as well.
there was a lot of discussion about layout and at one point the two shorter sections were down at the bottom, placed symmetrically. I’ll let your imagination consider what the visual symmetry could have symbolized. Someone suggested moving one up and filling in top and bottom and that solved the problem. It is really a nice looking quilt and a good use of color.
Even though I sewed steadily, I didn’t get as much done as I expected. I have high expectations, but am satisfied with what I got done.
I spent last Saturday making the facing for See. I merrily cut strips (straight of grain), pressed hems and sewed. The whole process was going so well!
I put all the facing strips on to the piece and was about to press them all to the other side, when I realized, as you can see from the photo, that I had sewed them to the wrong side.
Sigh.
I ripped out all of the stitching, which wasn’t hard, but, apparently, required lots of sighing. What an idiot. Finally, I was done and sewed all the pieces to the front. I made a few adjustments that I was only able to do because I had noticed them while I was ripping.
See – Facing on Correct Side
The photo shows the facing before I pressed it to the back. Hopefully you can see two important things:
the sides of the facing do not go all the way to the edge of the side – this is to minimize bulk in the corners
the sides of the facing are on top – this is so that the top and bottom facing strips can encase the side strips and make a nice finished edge.
After I pressed the facing to the correct side (front to back), I made a tiny sleeve. I have been stitching away on the facing while watching TV. I have all but a few inches of the facing sewn on. The sleeve comes next. I hope to finish soon.
We live in a house called a Doelger House. It is split level and very open plan. That means we have a railing in the hall that is open to our living room. After I ran out of space in the Fabric Closet, where I hang quilts, I started draping them over this railing.
Basically the photo shows one area of my house and how we display quilts.
Recently we had dinner guests and they wanted a quilt show. We pulled quilts off of the chairs, couch and rail in our living room and held up many, many quilts.It was really fun to see some quilts I hadn’t pulled out in a long time. It is also always interesting to hear the reaction of people who really don’t sew or make quilts.
My friend, also a law librarian, commented on how different the quilts were and what a lot of creativity was involved. My thought was “if I was allowed to use this creativity to solve problems at work, my library and information services would be way more awesome than they are.” I don’t know where that popped from but it was kind of a revelation. Lesson? Show your quilts to non-quiltmakers!
As you have seen on this block I make a lot of quilts. I do give some away, but a lot of them just pile up around the house. They get used as nap quilts or TV watching quilts, but mostly they just pile up.
Some of you may think that is a big waste, but making the quilts really keeps me sane and able to live with people.
I actually have at least two quilts that I need to send off as gifts; I just need to spend a little time wrapping and packaging and writing notes. I just haven’t done it yet.
I feel fortunate that I can contribute to a charity that helps people locally by using my sewing and quilting skills. I don’t think that contributing to charity should be unpleasant or painful and making quilts or quilt blocks is an awesome way to contribute.
That being said, this year has not been the most stellar example of charity quiltmaking on my part. Life is like that sometimes. I think I am back in the saddle with my charity-teenager-boy quilt.
I wrote about my whole dilemma a little while ago and got 3 blocks almost immediately from a quilt-mate. I also got a promise of blocks from a Twitter friend. I was so excited that these lovely women just made and gave! Quiltmakers are often such nice people. Thanks, ladies.
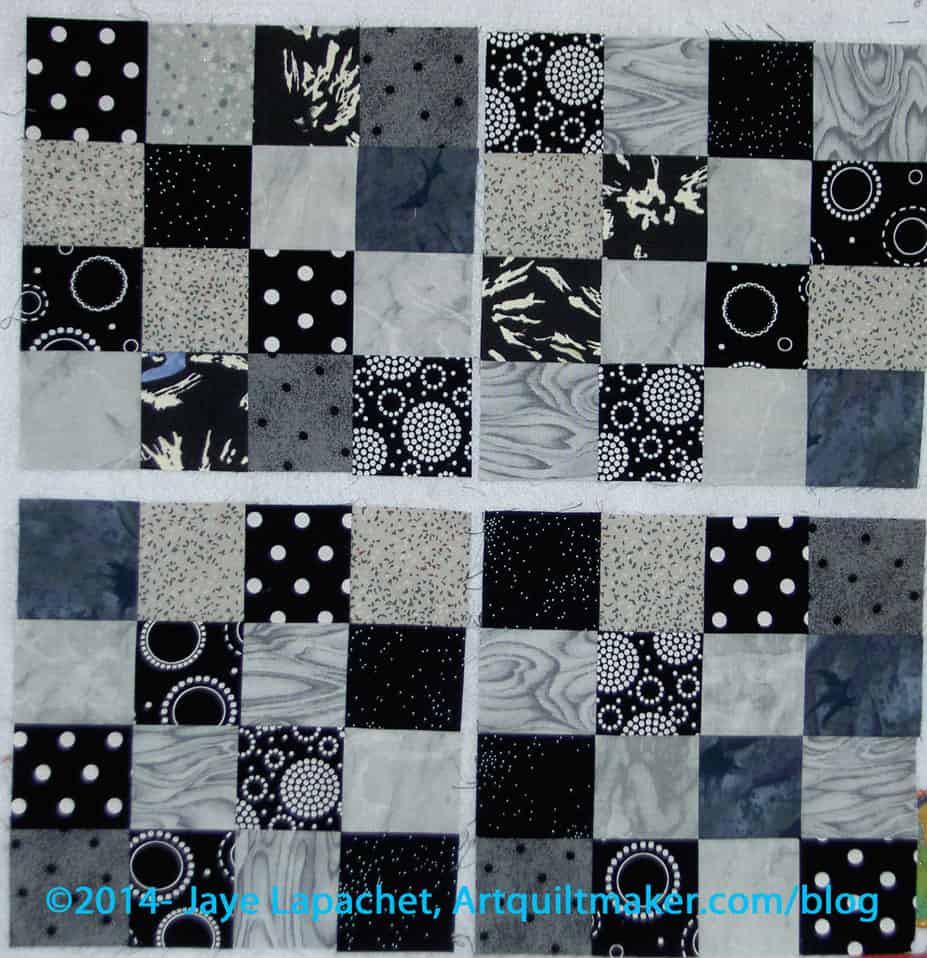
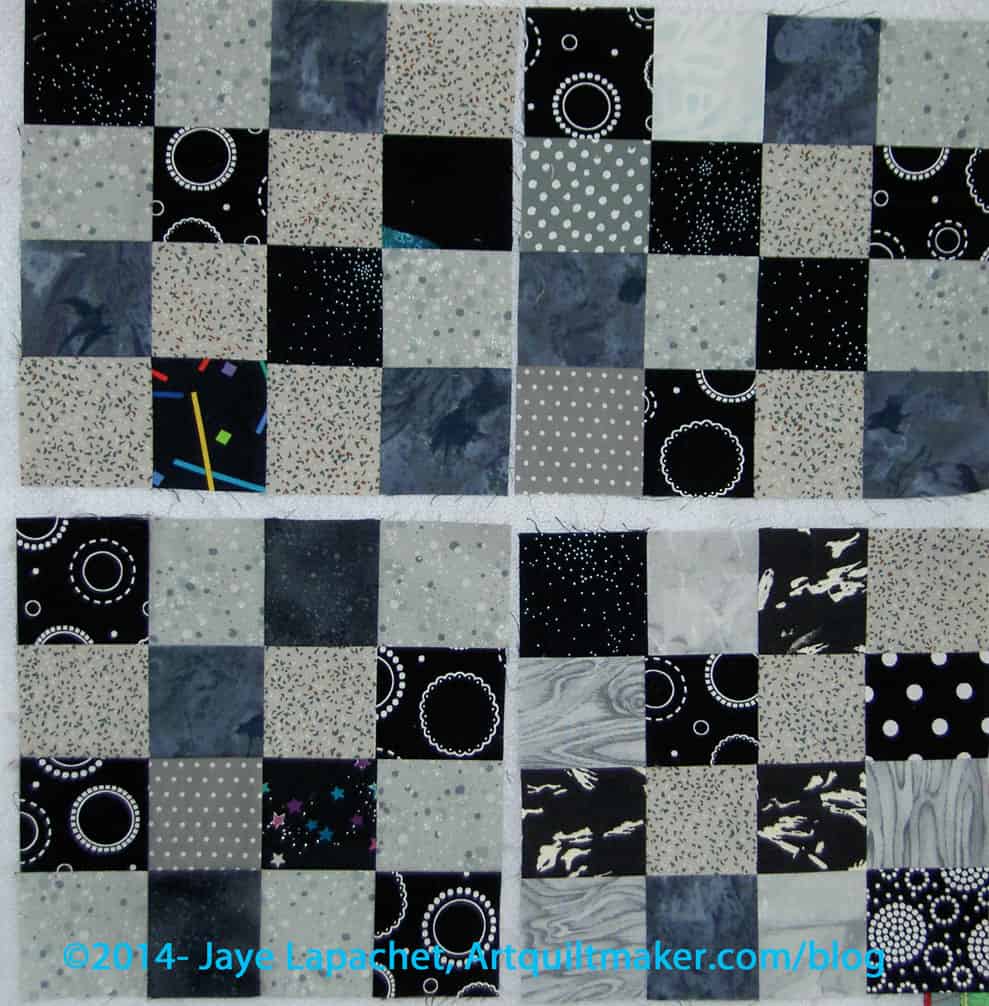
4 More Black/Grey Donation Blocks
Their generosity got me going again and I made eight blocks last weekend in between sewing on the facing to See and sewing triangles on to the Russian Rubix octagons.
I was feeling a little stuck in terms of fabrics. I really want this quilt to be interesting even with the limited ‘color’ palette. I dug into my grey box and got some new greys. I had a few black scraps around, so I cut those up into 2.5″ squares and that made the project a little more interesting.
I have over 20 blocks now and if I had even a few feet of space on one of my design walls, I would put the blocks up to look at them and see how large the quilt could be. I don’t expect or want it to be bed sized, but teenaged boys are large and I want to make sure it will cover most of one.
Last 4 Black/Grey Weekend Blocks
I really would like to get this project into a quilt top as I don’t want it to get to the point where it is dragging me down. I want the project to be filled with positive energy. I guess I just have to do it!