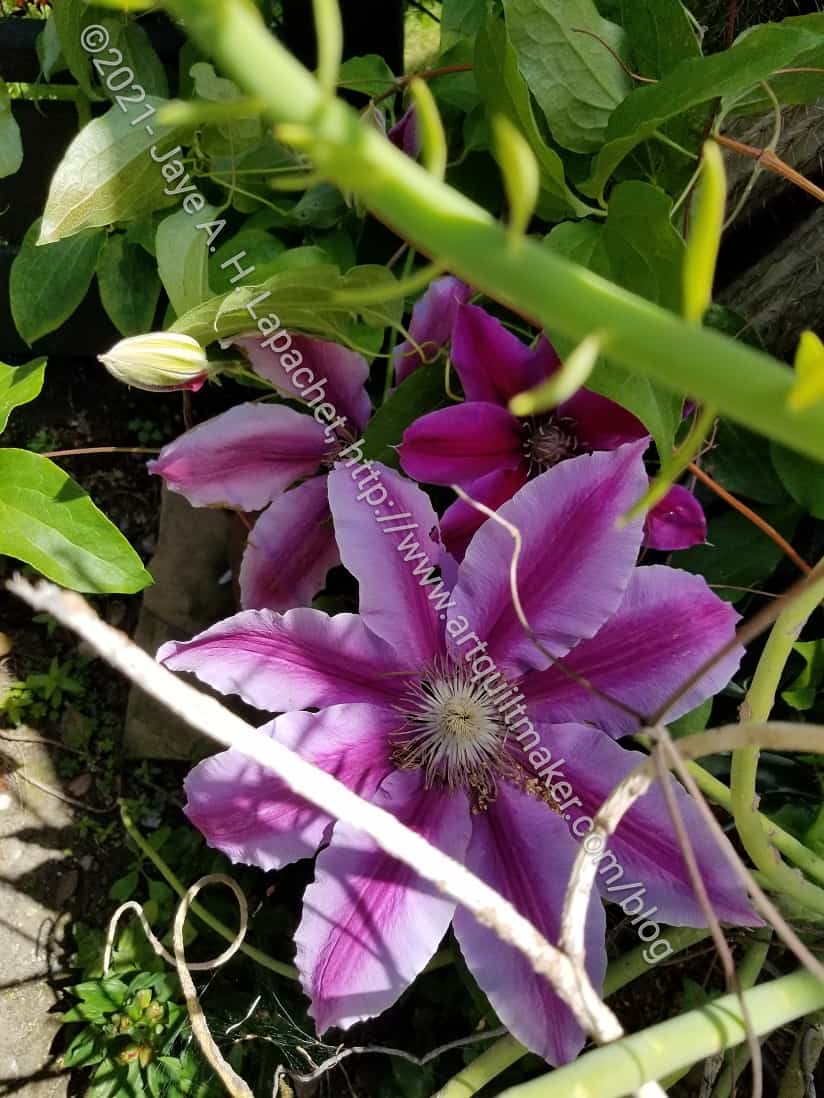
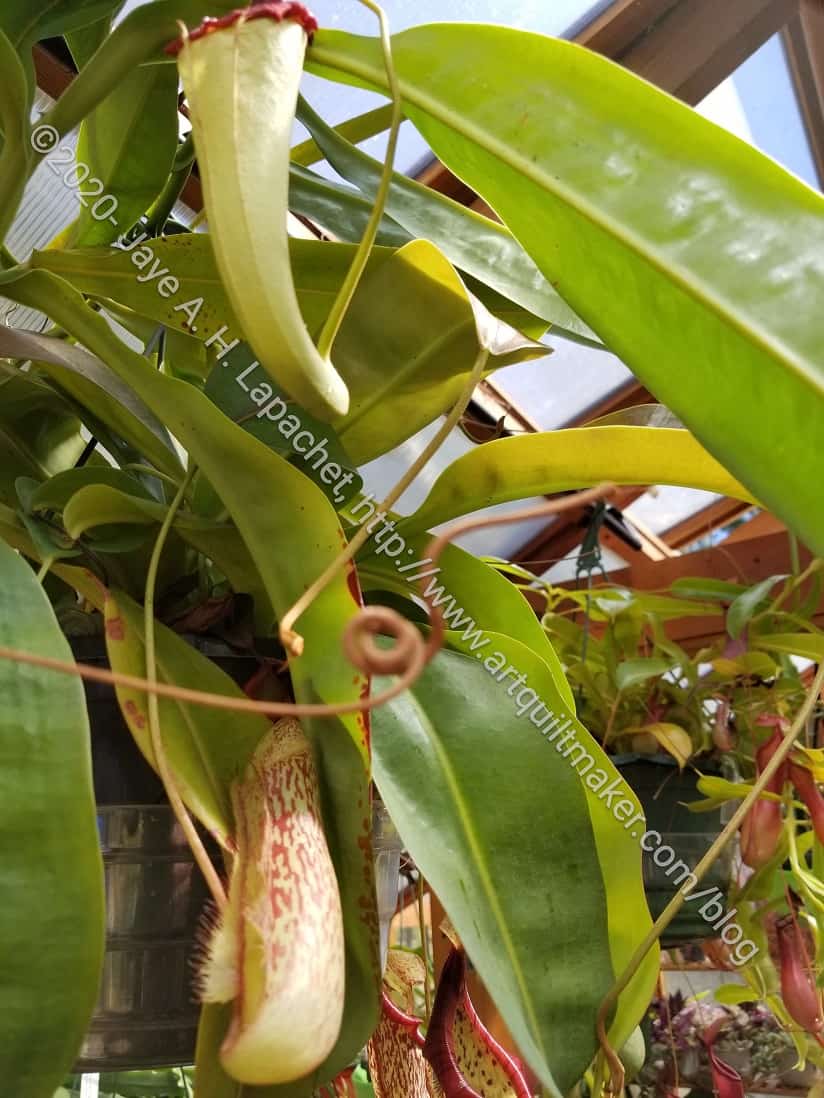
I saw this beautiful flower in a friend’s garden yesterday. Isn’t it gorgeous?
I thought it was fake when I first saw it, but it just a perfect specimen.
Commentary about works in progress, design & creativity
I saw this beautiful flower in a friend’s garden yesterday. Isn’t it gorgeous?
I thought it was fake when I first saw it, but it just a perfect specimen.
My machine was running badly and it was loud. This was well deserved punishment for me, because I didn’t take it for its usual spa service last May.
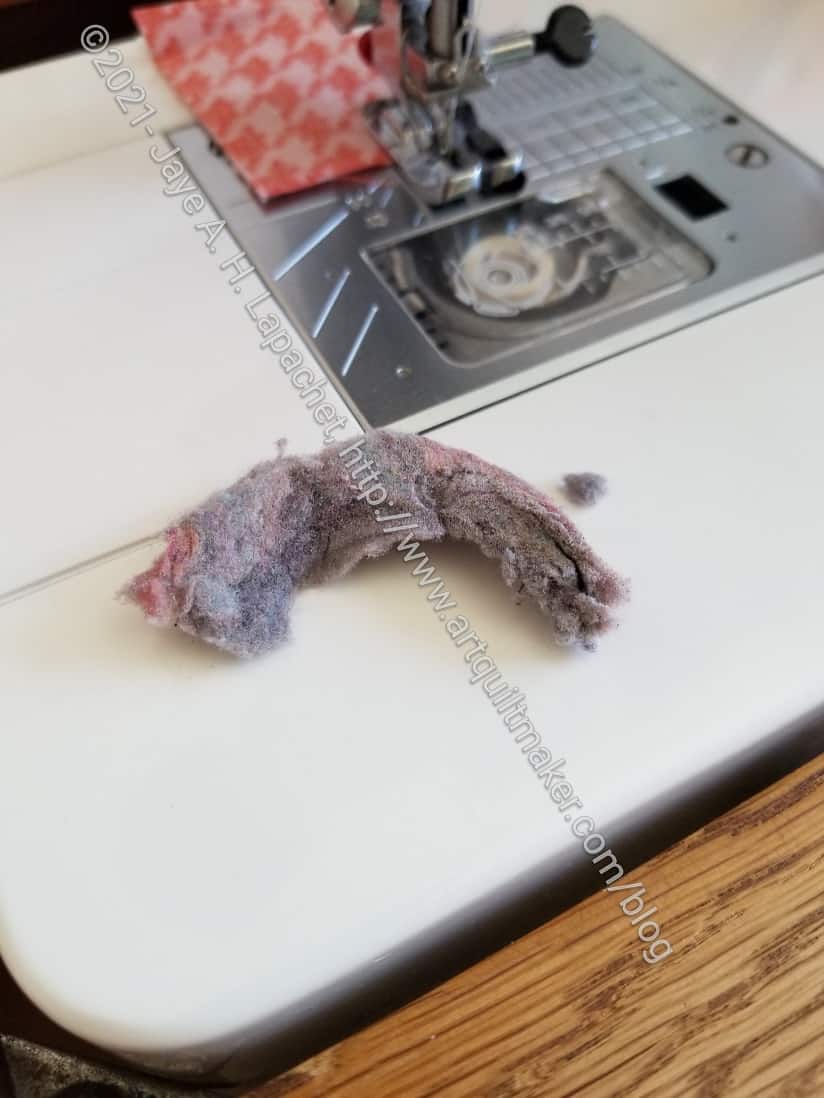
When the stitch quality started to deteriorate, I decided it was time to, at least, clean it out. I took off the sole plate and the bobbin case and cleaned out any lint I could find and reach. It was actually quite a lot, I am ashamed to say.
I am planning to take it in. I have to make an appointment. I’ll do the two machines in tandem with my 6600 going while I am on a short trip DH has to take.
Lesson: clean out your machine even if you can’t get it serviced.
I am making two of these purse organizers because I am not sure of the sizes. I made good progress over the weekend, after I was finished with the Rings top.
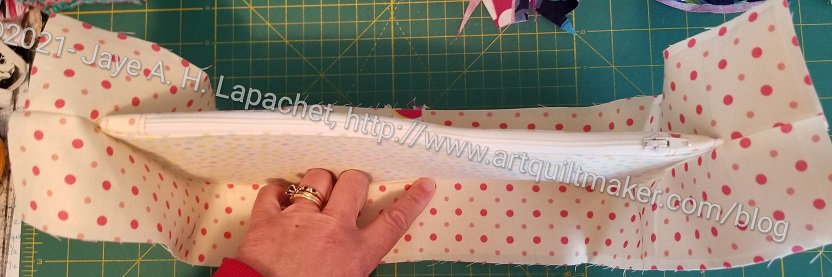
I am enamored of the way this bag goes together. The photo above shows the center of the pouch. Unlike the Sew Together Bags and the All Rolled Up Tote, this zipper pocket is fully enclosed. The edge of the zipper pocket, however, is not enclosed in the seam allowance so there is less of an issue with layers being too thick to go through the machine.
I haven’t put the whole thing together, but that is the next step.
Many of the Minikins patterns come with multiple sizes. This one comes with two sizes and I am making both at once.
I am making progress; notable progress. Because this is still kind of a back burner project, I am making slow progress.
I know I’ll need some more pieces and parts, but am getting all I have cut sewn together before I decide what else I need to cut.
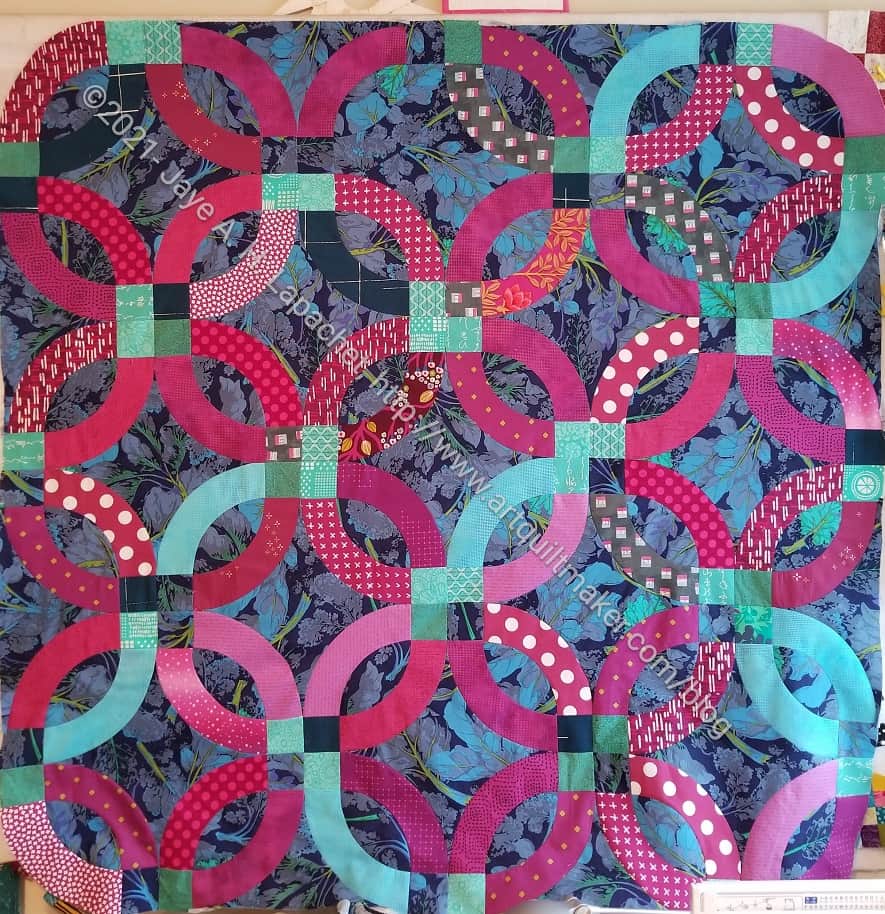
I finished the Rings top over the weekend. Yay! I also started on the back. It is small enough, so it shouldn’t take long and then I can get it ready to be quilted.
 Sew Stow: 31 Fun Sewing Projects to Carry, Hold, and Organize Your Stuff, Your Home, and Yourself! by Betty Oppenheimer
I borrowed this book from SFPL and it sat around a long time before I read it thoroughly. It is geared towards people who sew and are looking to organize rather than quiltmakers and bagmakers. There is something about the tone that gives me this impression. I also think it might be geared towards beginners, but the sections at the beginning didn’t insult my intelligence. I found the definitions and terms useful. It starts off with ‘the projects in this book are designed to be used.’ (pg.3). That explains my impression.
The projects are arranged in order of complexity (pg.3). The author, Betty Oppenheimer also says that as readers make these projects, we will gain the experience needed to design our own practical projects. Hhmm. I wonder about that, but appreciate her faith. To help, the book concludes with a chapter to get readers thinking about the design process in a practical way.
One of the fabulous things about this book is the beginning (starting on pg.4). Projects are shown, one to a page, in full color with a reference to where readers can find the directions in the book. I love that there is a visual index to all of the projects.
That being said, most of the projects are not items I would make, though if my child were setting up house, I might change my mind. I’d love a hammock (pg.4, 82), but probably wouldn’t use it. Our showers have doors, so the shower curtain (pg.5,86), as cute as it is, is of no use to me. I can see some use for the Pocket Packet Holder (pg.10, 102), but I would make it out of vinyl and, maybe, resize the pockets a little. I can imagine putting this near the front door for masks, keys and other things that need to go with a person who leaves the house. I really want the knitting Needle Tote (pg. 11, 105) to work for me, but I don’t have many straight needles and my circular needles mostly won’t fit in this kind of holder. I do like the Nifty Visor Organizer (pg.13, 112) and think that might make a good gifts for guys. I really like the Over-the-Shoulder Bottle Sling (pg.19, 135). It would be very useful for me. I have a buckle and may make one to use on my walks. It would be nice not to have to hold the bottle all the time and let my arms swing free. Another great gift idea, especially if it isn’t too difficult. I think my favorite project is the Customized Hobby Tote (pg.30, 182). It looks like a wonderful size to keep around the house for hand sewing. The tote also comes with a strap, presumably for carrying.
The pictures of all the items tempt the reader. The table of contents doesn’t show up until after the all the projects on page 33. By this point, readers are well and truly hooked. The table of contents gives you more than the projects. It starts with ‘Selecting the Right Equipment and Fabric’ (pg.37-54) and Techniques & Tools for Cutting, Sewing, and Finishing (pg.55-80). The projects start after the second chapter and are organized into groups such as ‘Sew Simple’ (pg.81-100),’ Bag-a-Thon’ (pg.121-144) and ‘Stow it Your Way’ (pg.179-187). The book also includes an Introduction (pg.34-36), a Resources List (pg.189) and an Index (pg.190-191) YAY!
A couple of lines written in the Introduction (pg.34-36) touched me. The author writes “Sewing is an art and science that can contribute to our material and our spiritual growth. It speaks to the idea of basic human survival on the practical side, and of community and personal growth on the philosophical side.” (pg.35).
The reader is promised “in the ‘Selecting the Right Equipment and Fabric” (pg.37-54) chapter, “you’ll learn everything you need to know to acquire the right materials and get set up” (pg.37), which I think is a tall order. Oppenheimer starts out by talking about what a maker needs in a sewing machine, followed quickly by what you need to know about your machine. There are sections about tuning up your machine, cleaning, and tension. Other tools such as needles and pins, thread (pg.40), Scissors and other Cutting Tools (pg.41) as well as measuring and marking tools (pg.4-42) and irons (pg.42) are all discussed.
The rest of the chapter is all about fabrics (pg.42-54). Selection, fiber content, weight, weave, attributes, absorbency and breathability, thickness, hand, yarn size and thread count are all discussed. I haven’t seen such a comprehensive guide in many, if any other books.
The ‘Techniques & Tools for Cutting, Sewing and Finishing’ (pg.55-80) is advertised as “helpful for you to know how the patterns are designed and best to use them. (pg.55). This section basically covers general sewing techniques and finishing touches. There are tips for laying out pattern pieces (pg.56), transferring the pattern layout (pg.57), marking rounded corners (pg.59), more on tension (pg.60), hand stitching (pg.61), forming a felled seam (pg.63), types of pleats (pg.66) and much, much more. This might be a very good reason to buy this book**. There is so much here that is useful, including basic, but not used very often terminology.
After the basic chapters (and 80+ pages!), the patterns start. All the tips and tricks, math as well as details about supplies are included. Each pattern is 3-5 pages in 3 or so colors, but not including photos. The step-outs are all drawings. The reader gets different views of the projects by looking at each pattern. In some cases, variations are included. For example, the Knitting Needle Tote pattern (pg.105-107), with a few changes, can be used for a cosmetic case.
The last chapter, ‘Stow It Your Way’ (pg. 179-188) has patterns, but they are all used as tools to teach the reader how to customize projects to suit his/her individual needs. The author talks about questions to ask yourself when designing or modifying a pattern (pg.179). She goes through the steps required to create your own pattern, such as adding seam allowances and the order the project should be sewn (pg.181).
The Index (pg.190-191) is pretty comprehensive. It includes techniques as well as projects. Bags are listed by their name as well as under the ‘bag’ heading.
All in all, I think, looking at this book in much more detail has made me more excited and interested in it than I was during my first cursory glance. I think you would like it and find it useful.
**I use affiliate links and may be paid for your purchase of an item when you click on an item link in my post. There is no additional cost to you for clicking or purchasing items I recommend. I appreciate your clicks and purchases as it helps support this blog.

The Mustang Purse Organizer is another project from Minikins Season 3. I decided to try out the pattern to give as a gift. I am making both sizes so the recipient can choose which works best in her handbag.
I started cutting them out at Craft Night earlier this week. I had other things to do, so didn’t get to spend the whole time on this pattern. I was able to cut out and interface the main exterior panels. I also cut out grab handles for both sizes.
There are so many great patterns in Season 3 (no affiliation!). There are really interesting shapes. It is also interesting to see how the different sizes of each pattern sew up.
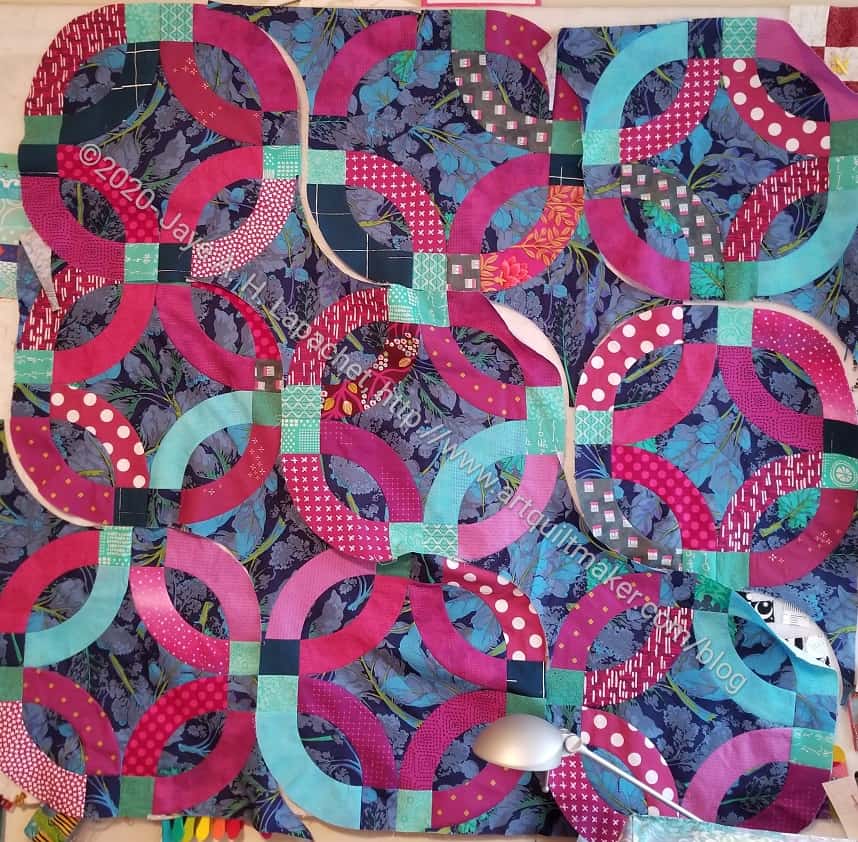
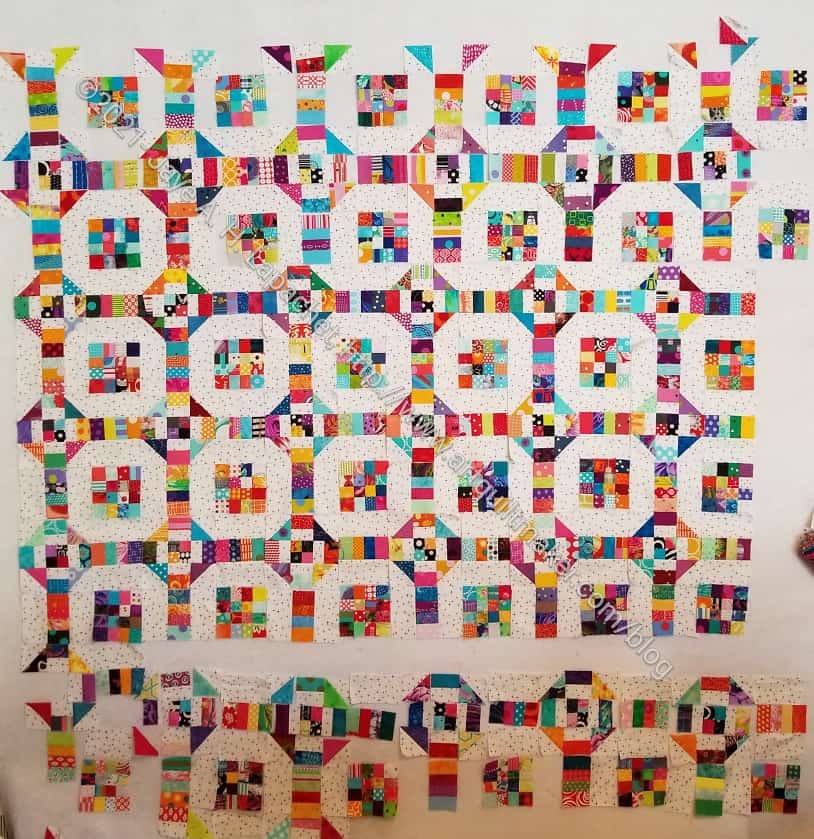
I have started to put the quilt together. This one I have to put together in rows despite preferring the chunking method as I am not as familiar with the construction.
I did have a little trouble cutting the edge pieces, but I think it will work out.
I am leaving the corners round. Why not? I think it will look nice. It will also be very easy to bind.
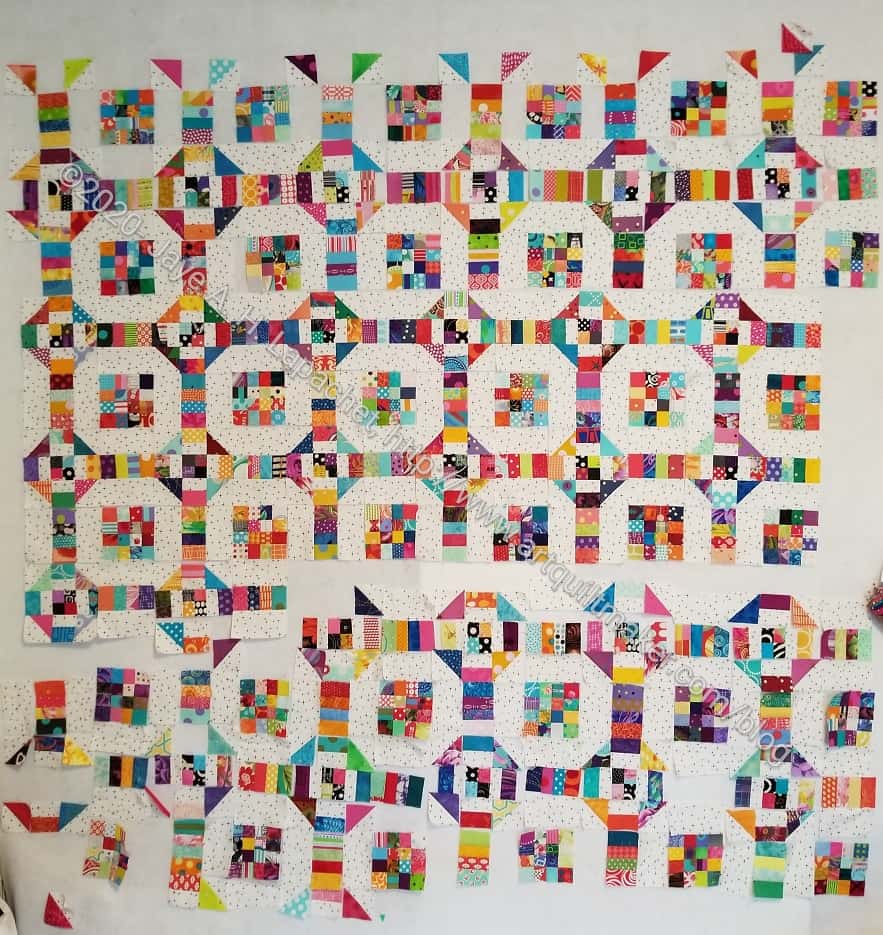
While I was making progress on the Rings quilt, I was also making progress on Scrap Dash. As I said before, I am using the Scrap Dash blocks as leaders and enders for the Rings quilt. I get more done, which is great.
I started in the middle, because I couldn’t really reach the top row without a stool. You can see that the middle has shrunk up quite a bit.
I plan to put another column of blocks along the right hand side. The quilt is supposed to have the Churn Dash blocks around the whole exterior of the quilt and I plan to follow that advice.
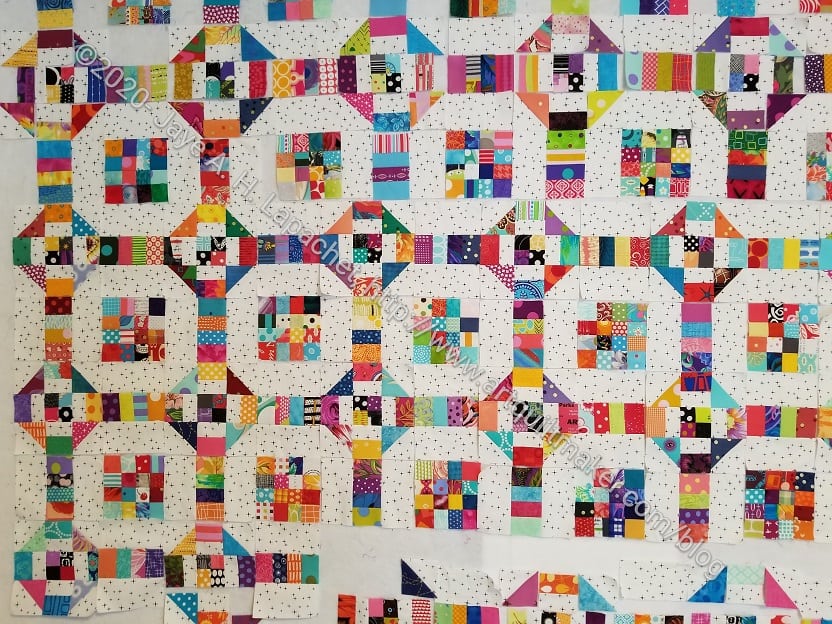
I think the section where I have sewn the blocks looks nice. I like how the 1.5×2.5 strips create a path through the quilt.
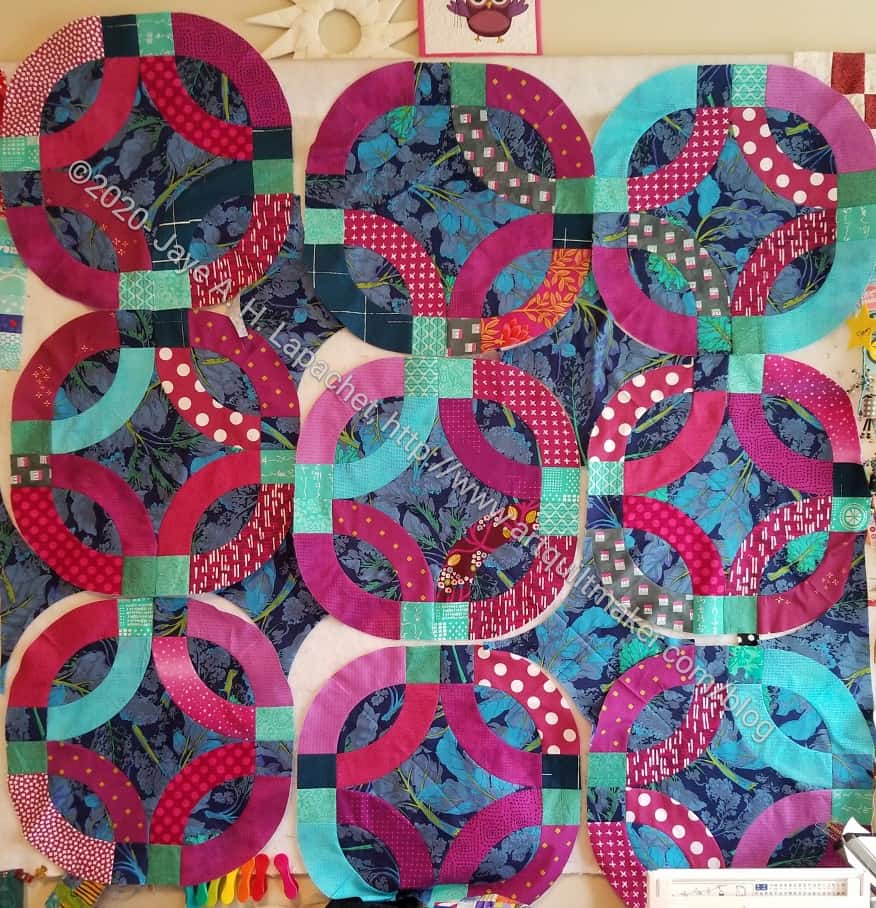
I was able to finish all the Rings blocks over the weekend. I had hoped to put it together also, but, with one thing and another, it didn’t happen. Still, I am pleased and look forward to getting the piece together.
Recently, I posted the first part of the tutorial for the Large Pocket #2. That tutorial included a pocket that would help you organize your WonderClips.
In order to sew along, you will need:
You can find more information at the following links:
Additional Supplies**
Today we will finish putting together the second large pocket. As I said in the previous tutorial, the Clippy pocket is not part of the original pattern, but using that tutorial, you can easily add it to P1 and still have enough space for other tools.
The pattern calls for a mesh pocket on the back of P1. You can add slip pockets instead, if you want. Follow the general directions in the tutorial for the first large pocket. To add the mesh pocket, follow these directions:
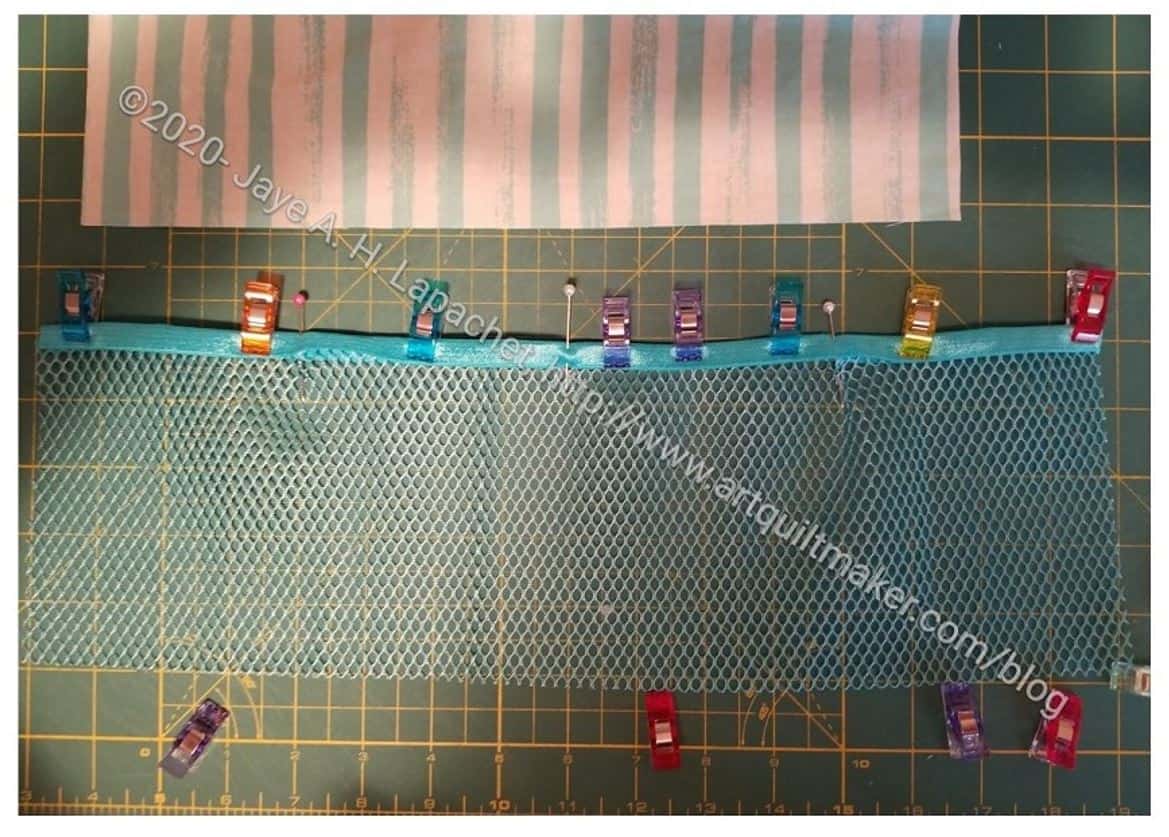
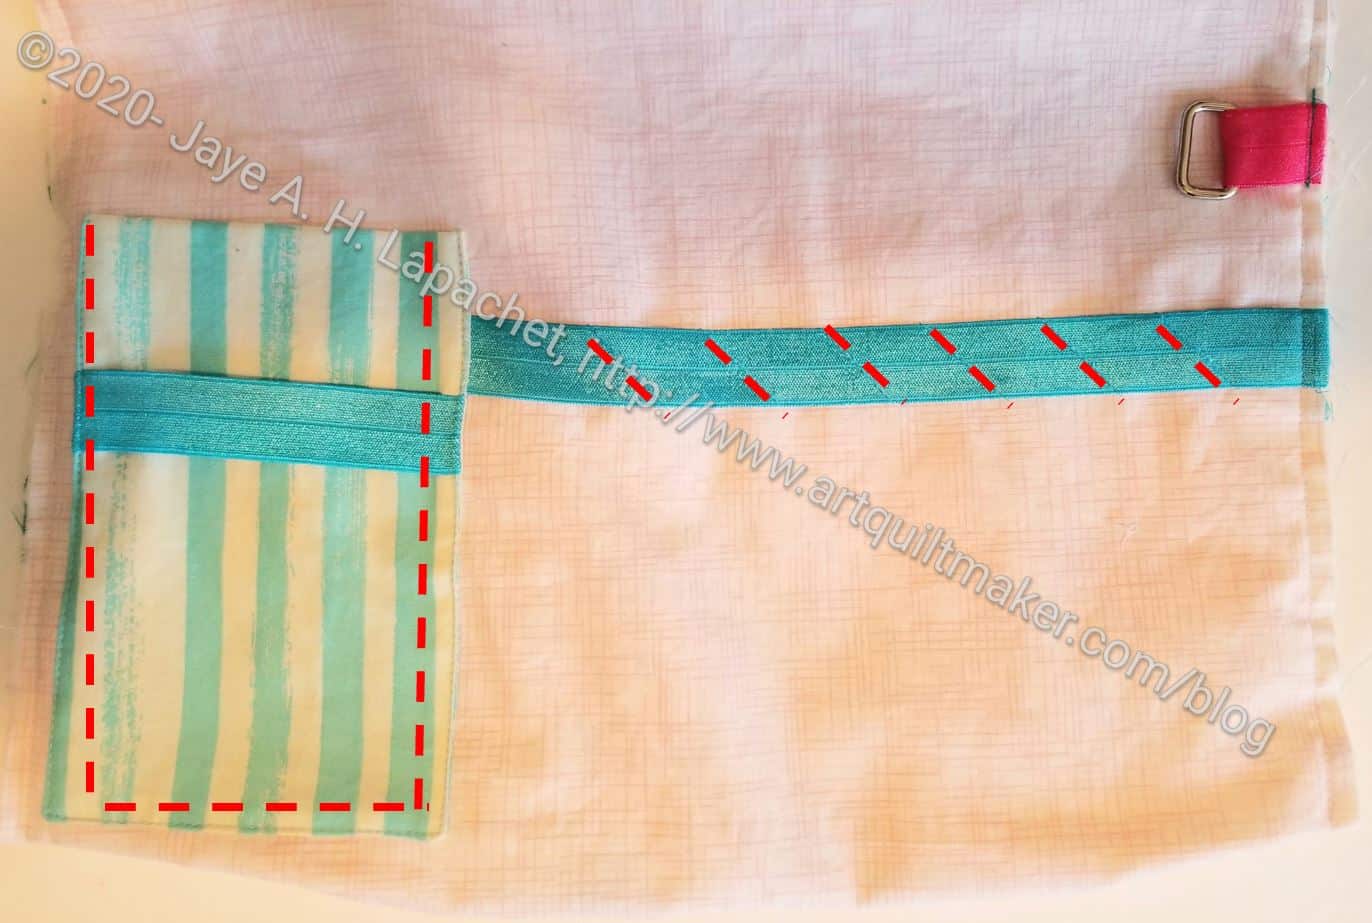
Seal the edges of the mesh with doublefold elastic like you did on Large Pocket #1.
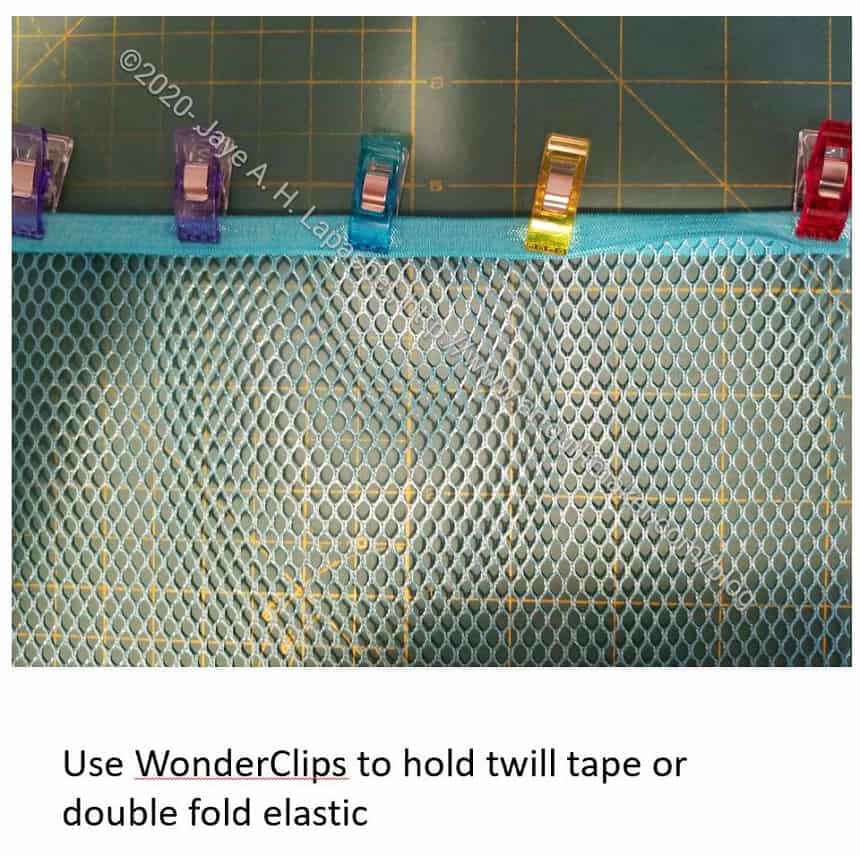
The first step is to bind the top of the mesh pocket. Take the fold over elastic and fold it in half. Use WonderClips to hold the elastic in place.
Using matching thread, sew along the edge of the binding closest to the mesh. I used a straight stitch.
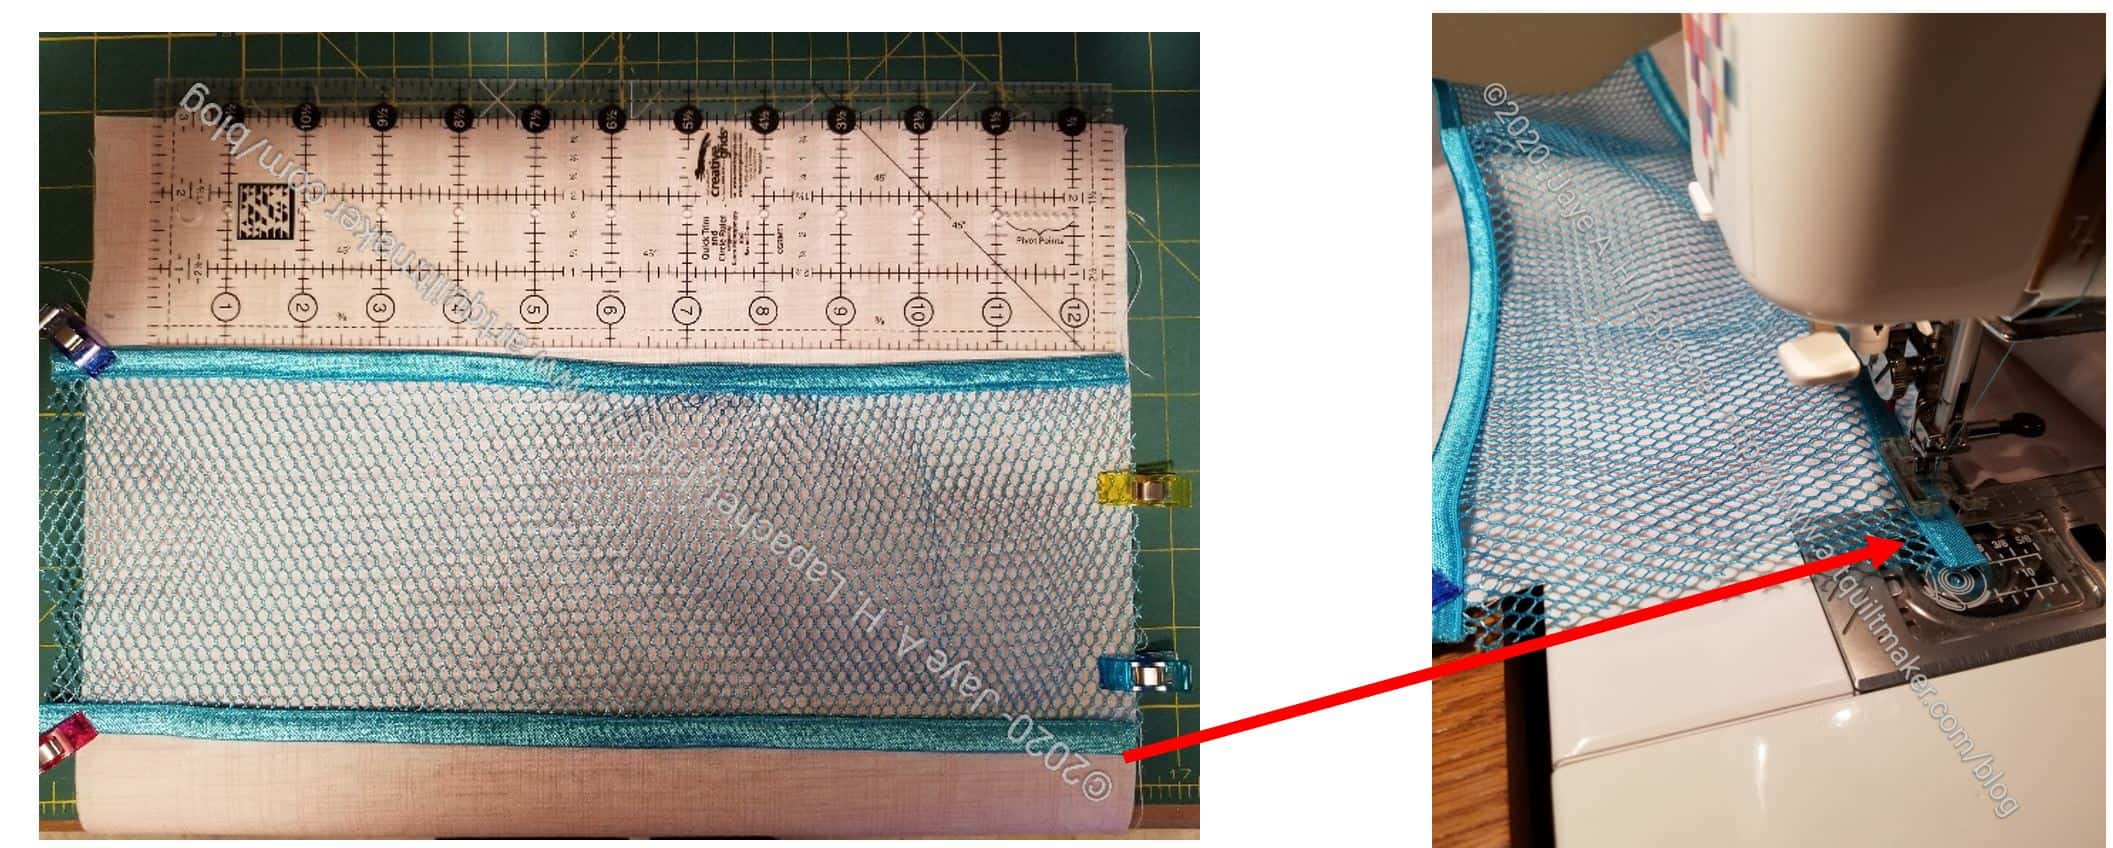
Mark 3” down from the other side of the right side of P1.
Tip: Make sure, before sewing that both pockets (Clippy & Mesh) have their openings in the same direction up. When the two raw edges are held WST, both pockets should have their openings up, closest to where the zipper will be sewed.
Line up top of mesh with 3” line.
Sew bottom of mesh pocket to P1.
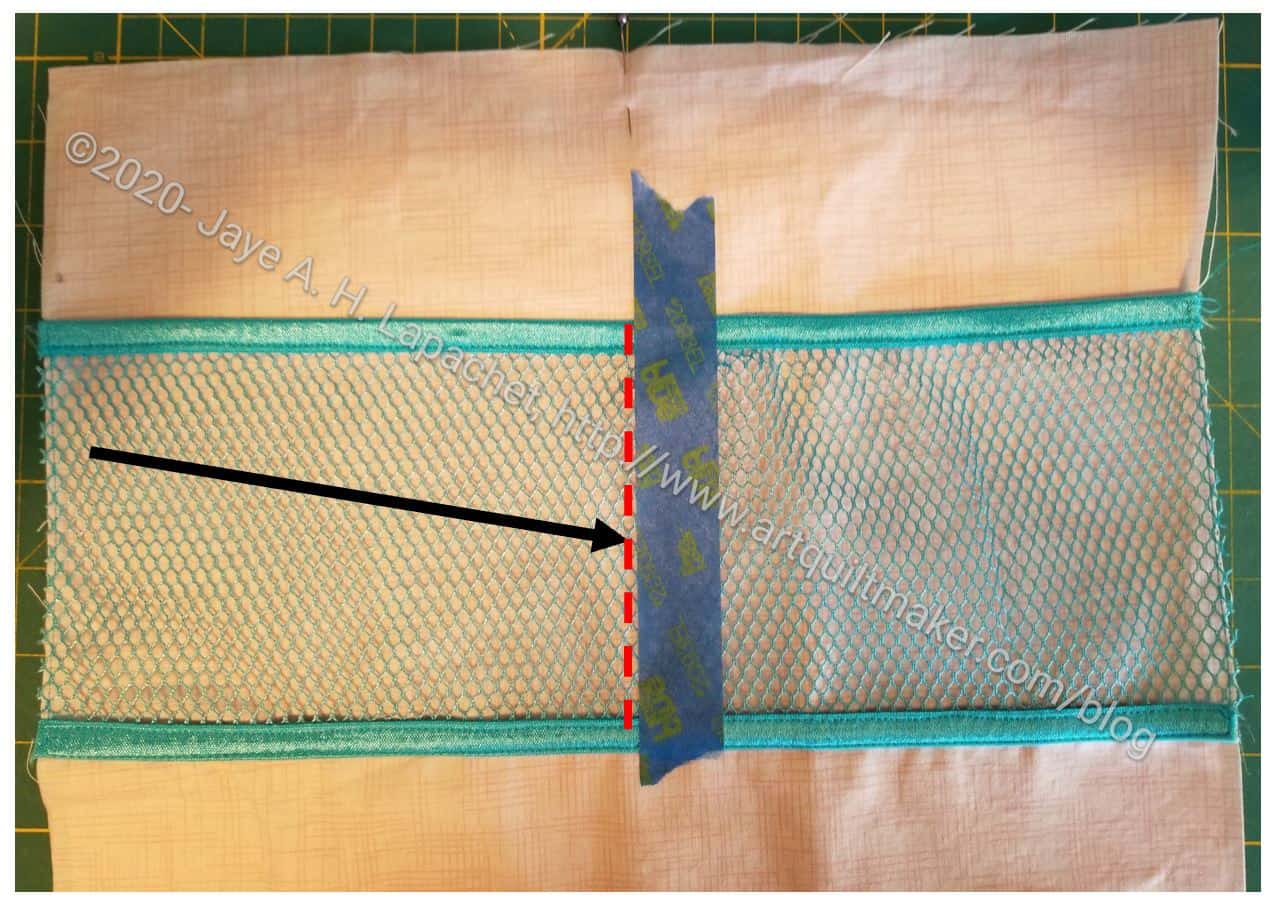
Mark your pocket divisions with blue tape – make however many you want. I have two, separated by one line of stitching
Sew NEXT to blue tape.
Add Zipper
You can also look at the zipper instructions from the first large pocket tutorial.
Lay L1 down face up/right side up.
Lay zipper on top of L1 with zipper pull facing up.
Line up P1 with Clippy Pocket on top of zipper right side down.
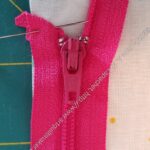
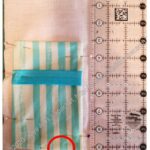
Natalie Patton does something really clever with her zipper. She folds the ends of the zipper tape at a 45 degree angle and pins it. This makes it look really neat and tidy once the zipper is sewn in.
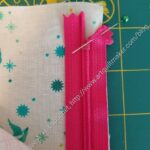
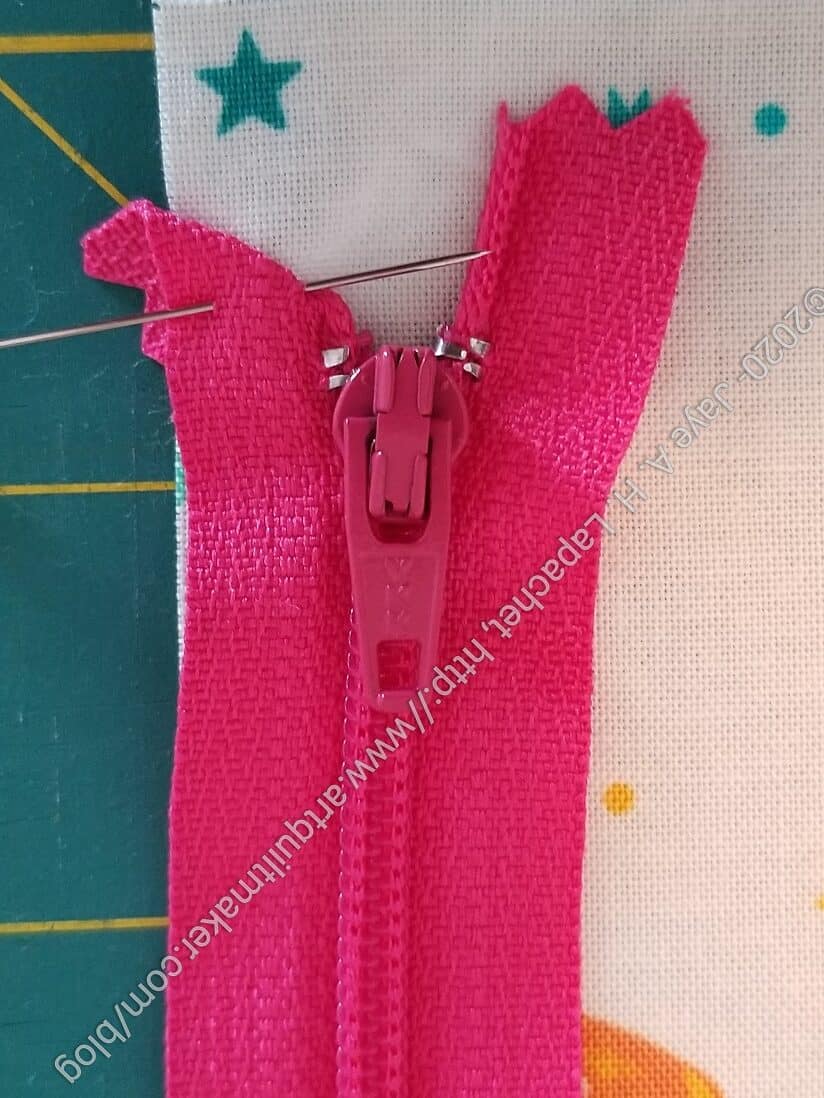
In the pattern (pg.10), she talks a lot about pinning, horizontal pins, etc. I found it to be kind of confusing.
The photo (left) shows how I interpret her instructions. I tried it and it worked for me. Sotak Handmade has a video where she adds the zipper using a similar method.
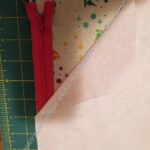
Once you have the zipper tape folded and pinned, continuing layering the last piece of fabric on top.

The edges of the folded zipper tabs stick out a little bit from the side of the piece where you will be sewing. This is ok and how it is supposed to look.
Sew along clipped edge to secure zipper. I use my quarter inch foot, but you can use your zipper foot, if it works for you. Make sure you move the zipper out of the way as you sew so it doesn’t interfere with your seam.

Open up three layers.
Top stitch near zipper. Follow the same directions for the second side of the zipper.
Pleat the bottom.
I use the ½” marking on a ruler to mark the ½”. Push it into the bottom.
Clip to keep it in place and sew along the edges using the seam allowance noted in the pattern.
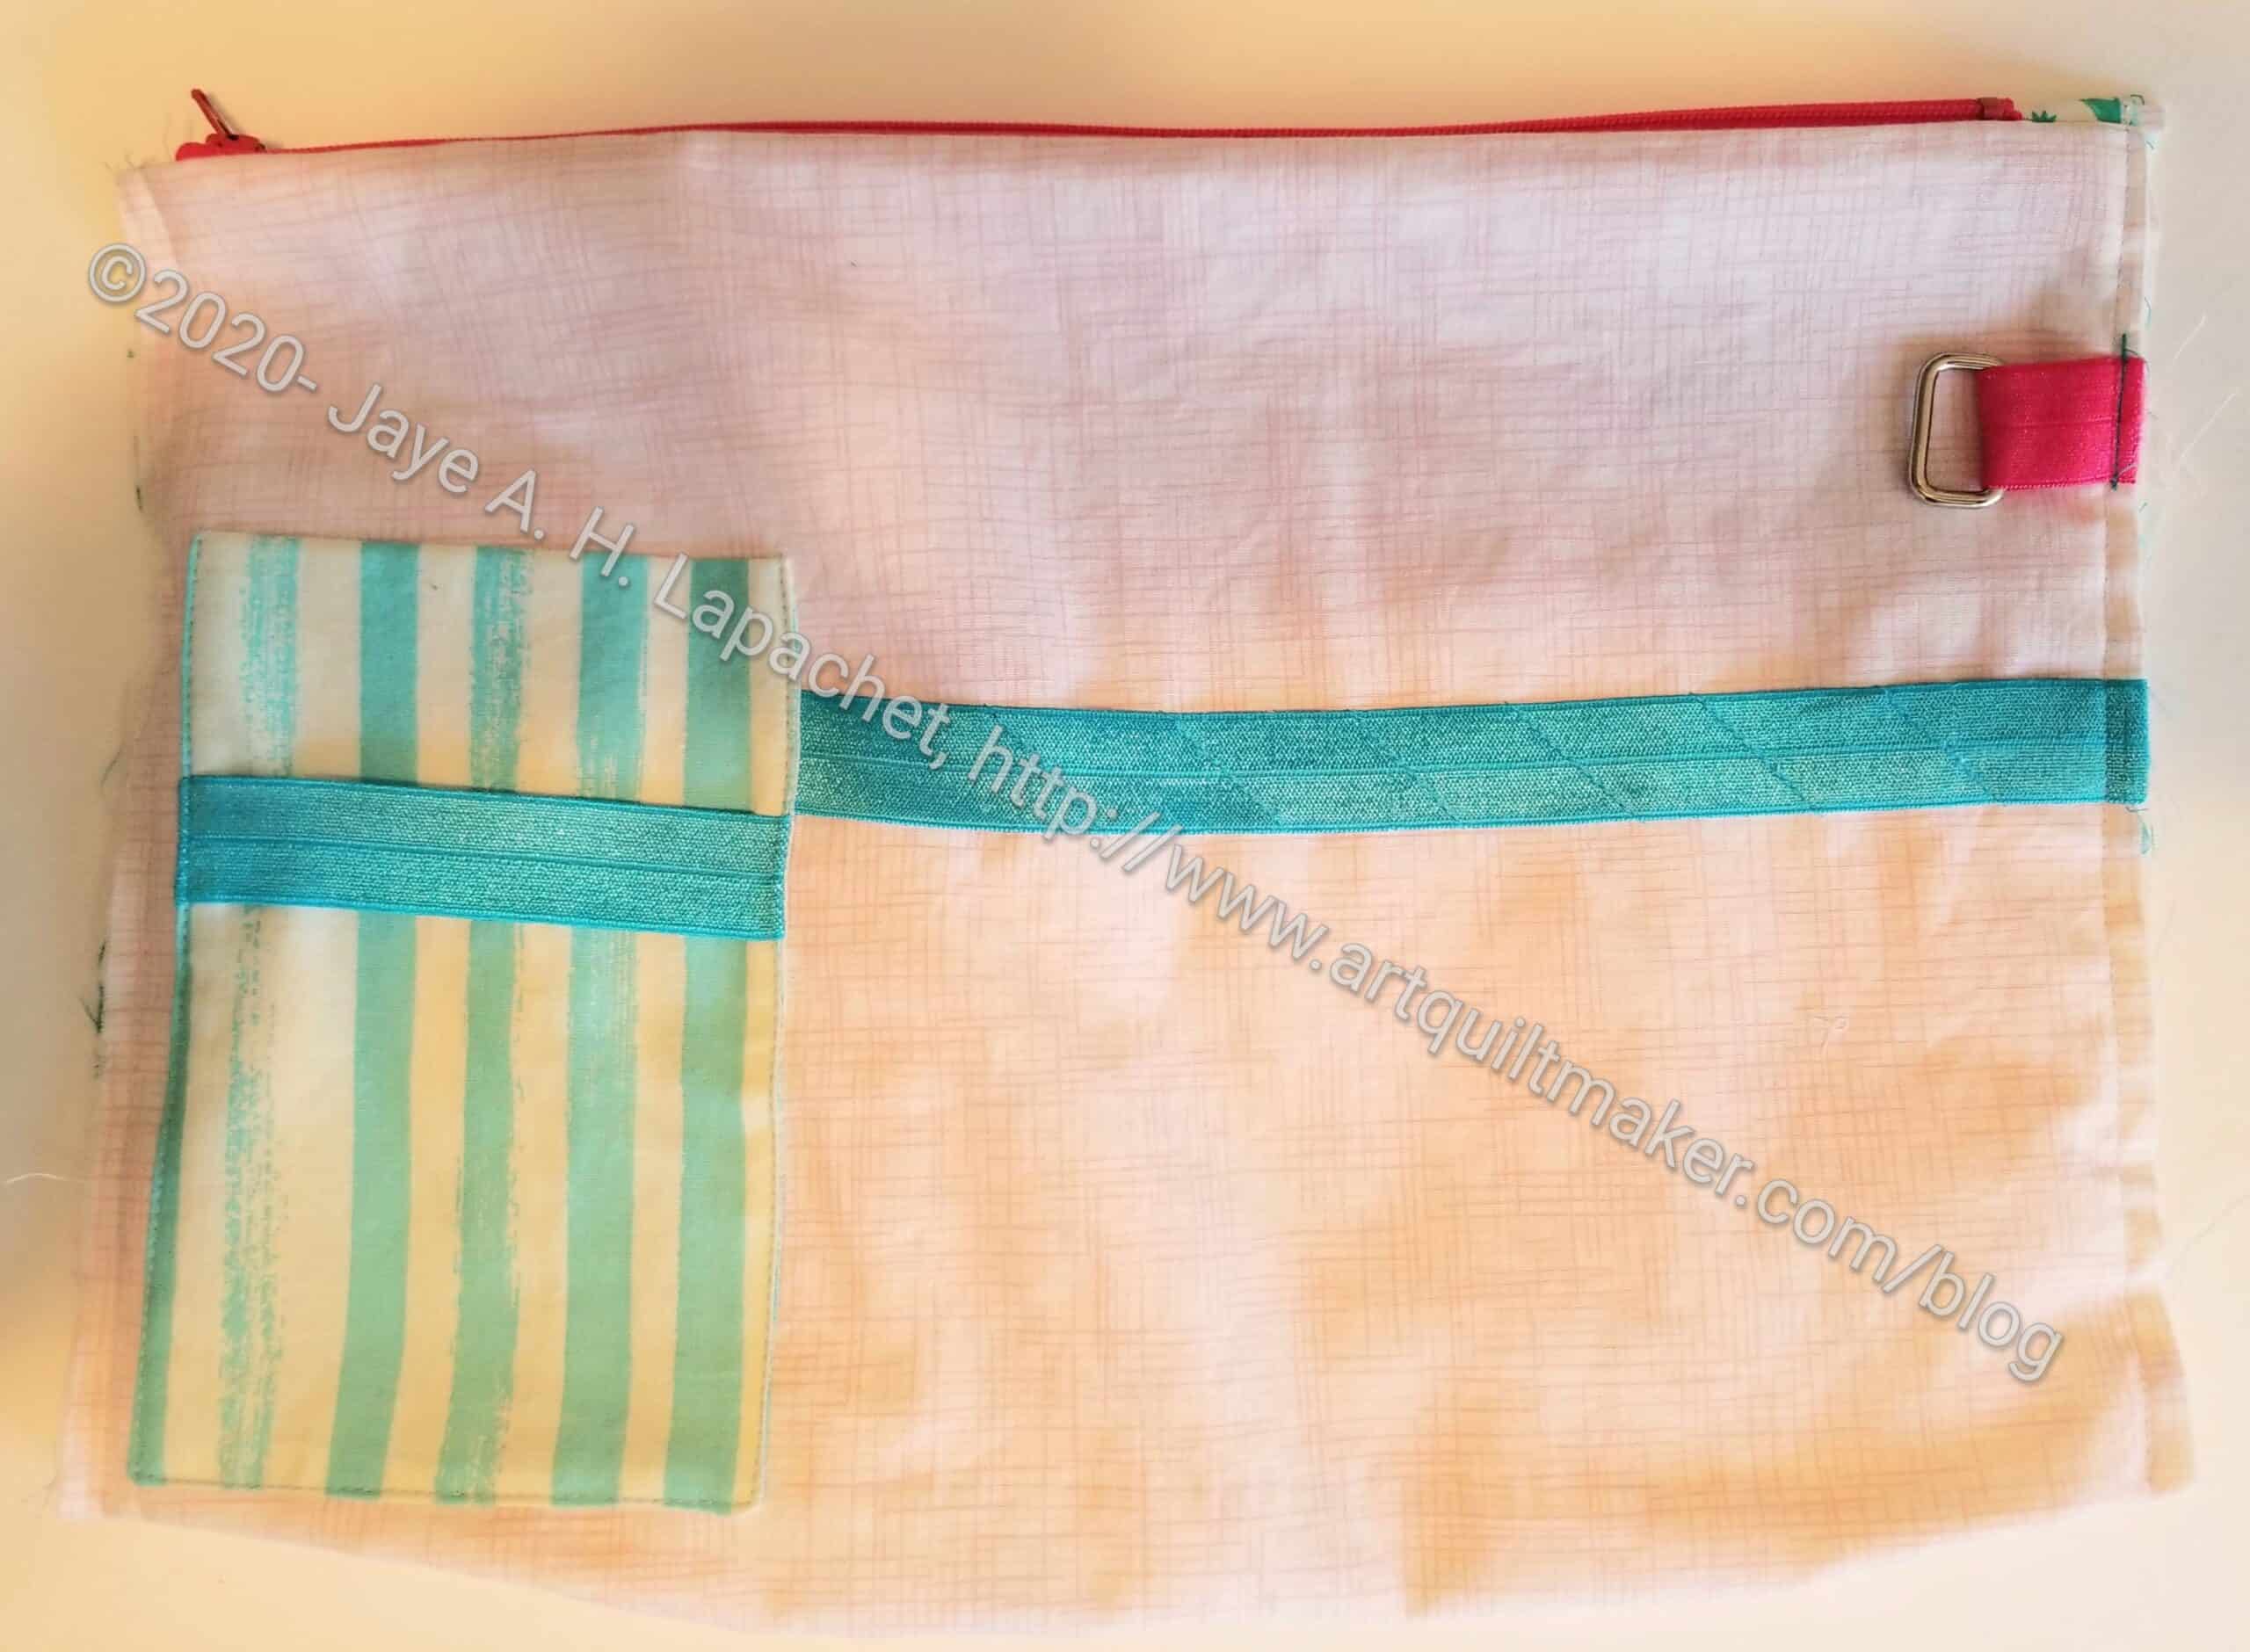
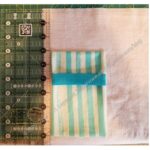
Your pocket will look something like this.
Previous Tutorials:/
**I use affiliate links and may be paid for your purchase of an item when you click on an item link in my post. There is no additional cost to you for clicking or purchasing items I recommend. I appreciate your clicks and purchases as it helps support this blog.
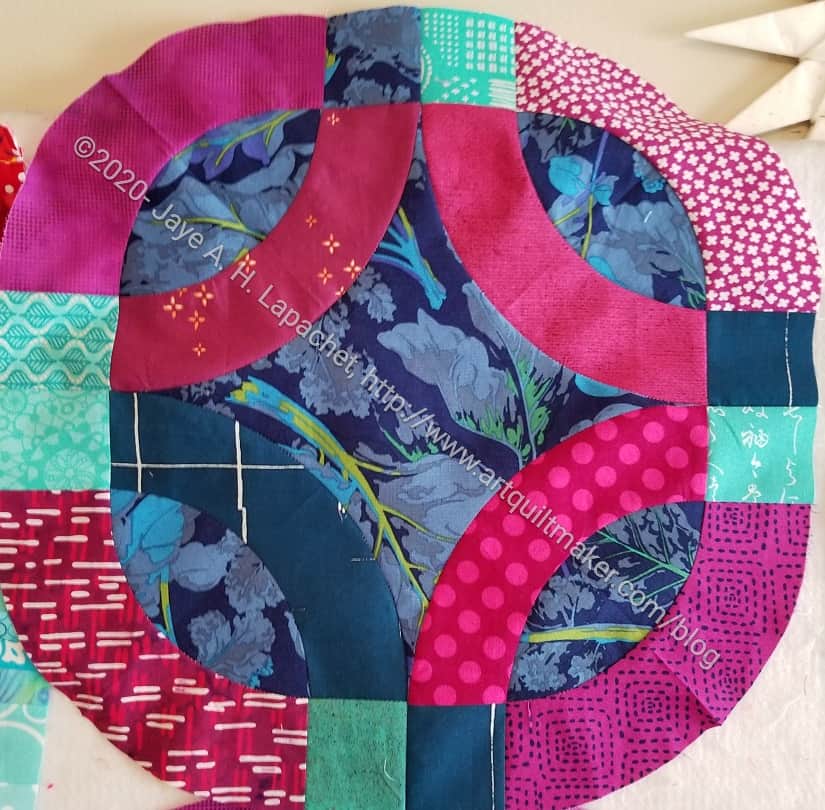
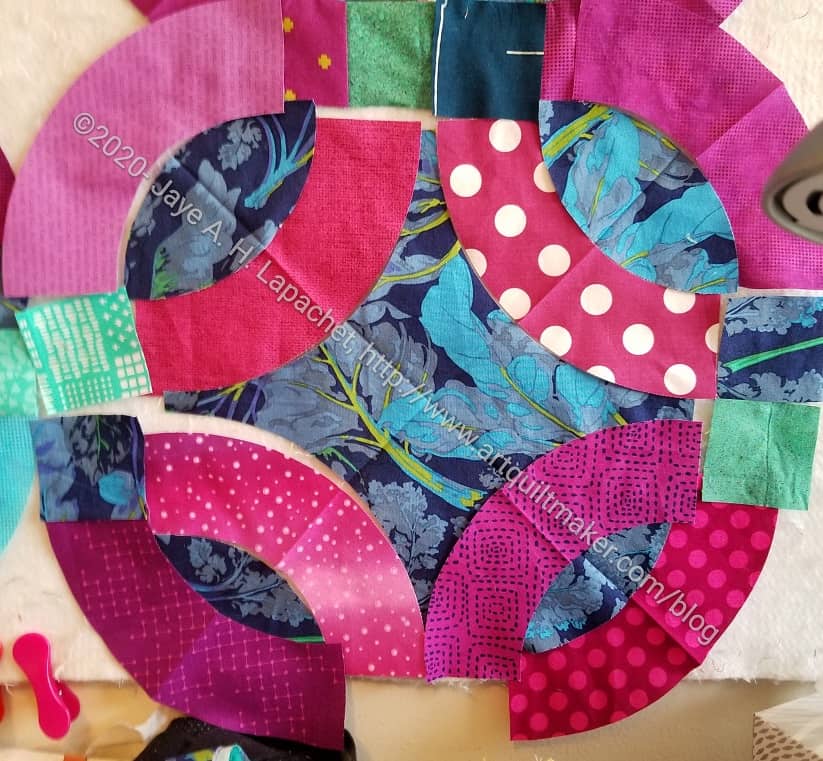
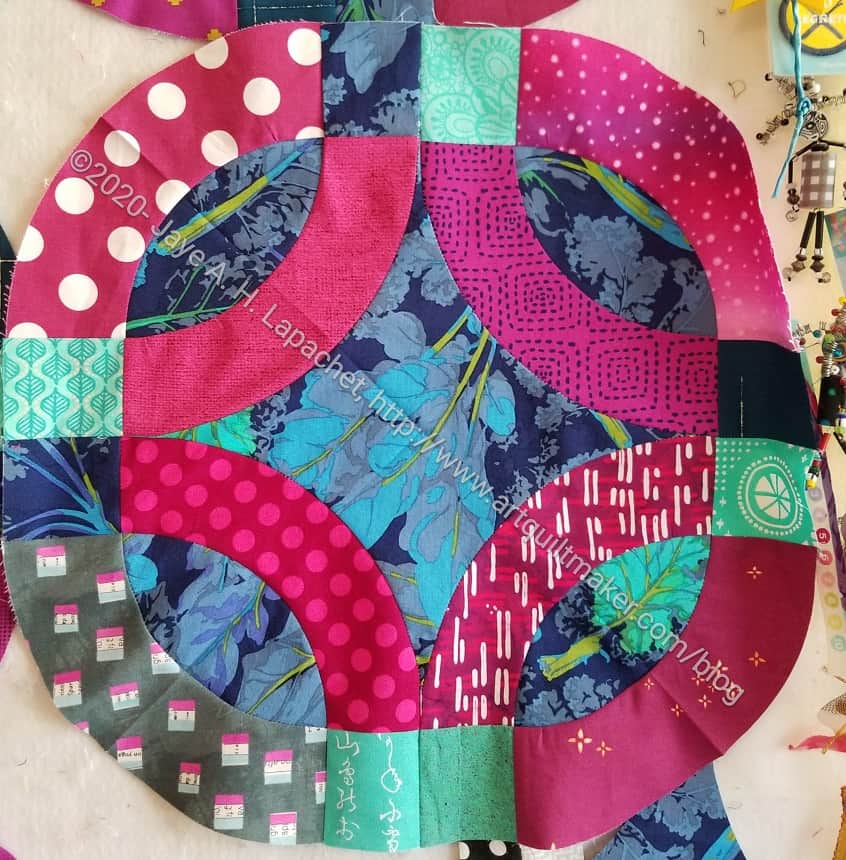
While I didn’t achieve my goal of having all the Put a Ring on It rings done before the weekend, I did make more rings.
One problem was cutting. I didn’t have all the arcs cut, but that was a good thing to do while I listened to the meeting. I made good progress at cutting and have about half a block left to cut to finish 9 blocks.
As a result of cutting during the meeting, I was able to make good progress Saturday after the meeting and Sunday.
I am, however, running out of design wall space. Scrap Dash is taking up almost every inch of space on my large design wall and my random and various other projects are taking up a lot of space on my small design wall. Now, the leftover significant portion of space is filled with Put a Ring on It rings.
One issue I am having is that I keep thinking how I want to change this project and what I don’t know about the tools to do it. I think I would like skinnier arcs better. I know that means smaller cornerstones, but what else does it mean? Would I have to change the size of the center? Probably.
A few days ago, I posted the second part of the tutorial for the first Large Pocket needed to complete the Ultimate Carry All Bag by Natalie Patton. This is the tutorial for the second Large pocket.
In order to sew along, you will need:
You can find more information at the following links:
Additional Supplies**
Today we will start the second of the large pockets. The directions for this step in the pattern start on page 8, step 2 of your pattern.
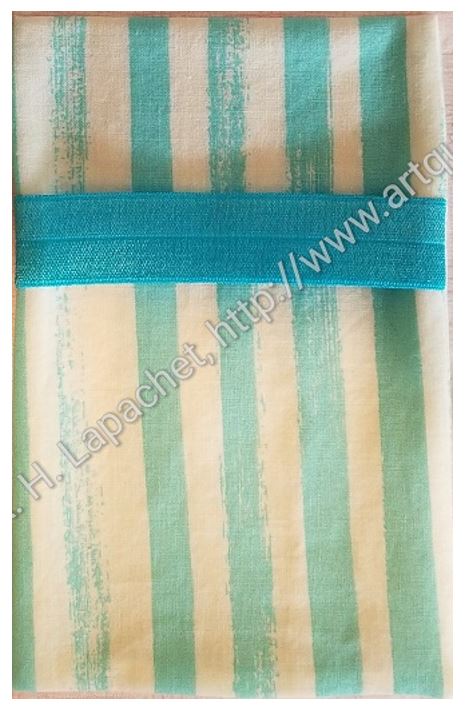
My version of this Large Pocket #2 includes a type of Clippy pocket that I added. The elastic holds your WonderClips and the pocket holds a rotary cutter.
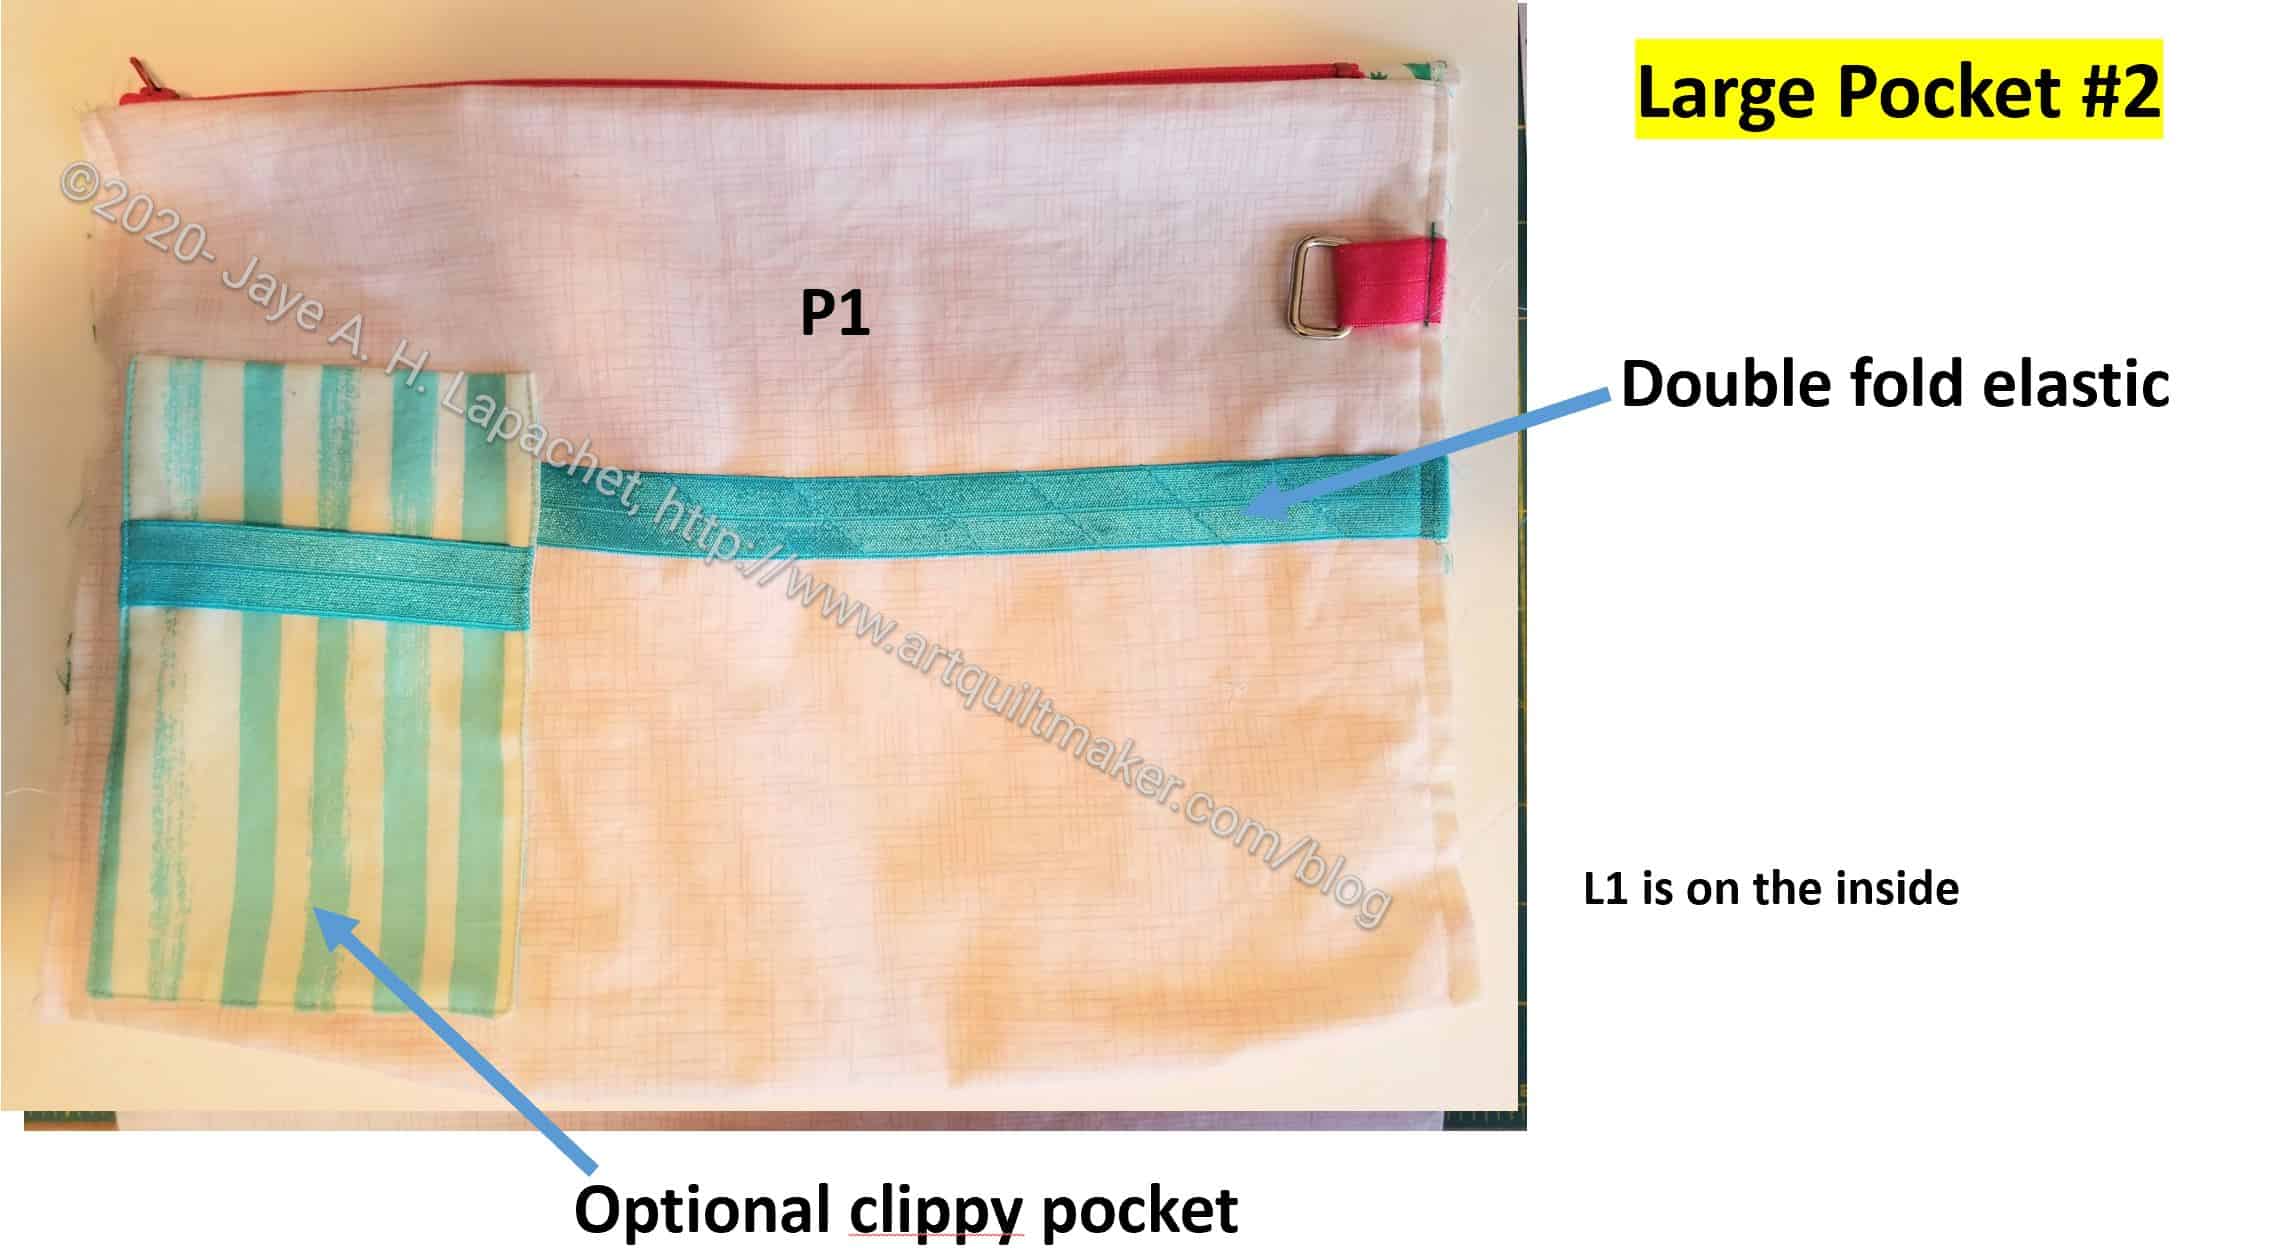
This Clippy Pocket is not part of the pattern, but I will share how to make it.
The picture shows all the pieces with which we will be working. If you want to omit my Clippy pocket, skip those parts of this tutorial. If you want to include it, make this Clippy Pocket before starting on the bulk of Large Pocket #2, but after you have cut all the pieces. Having the small bits and bobs ready makes the assembly of Large Pocket #2 easier.
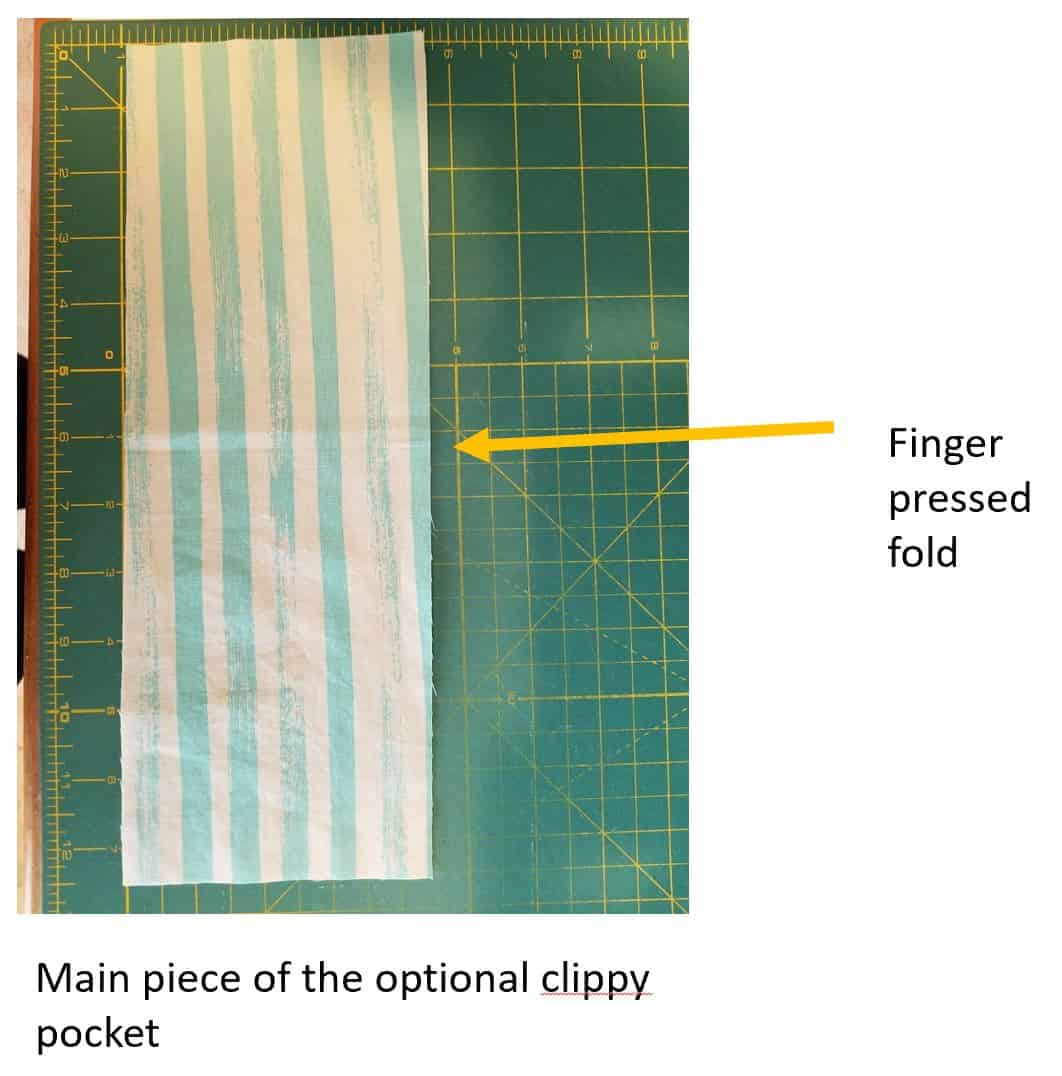
Fold pocket fabric in half and finger press. You want the short edges to touch when you fold and finger press. The folded piece will be 4.5”x6.25 (approx.)
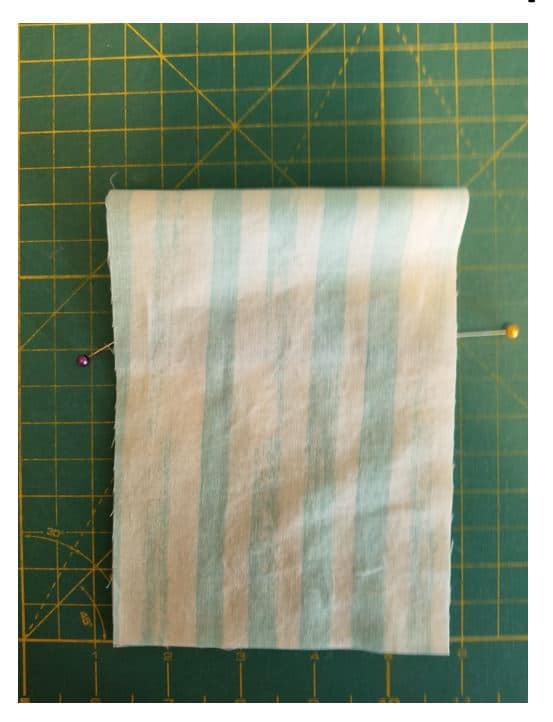
Unfold and pin elastic to piece 1/3 down from the fold or 1 ¾” down from finger pressed center
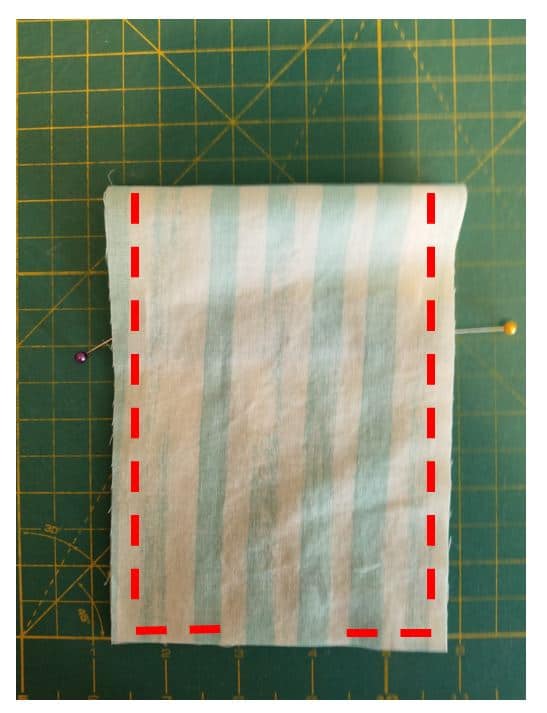
Sew around edge, leaving an opening the bottom to turn and avoiding the top with the fold.
Press.
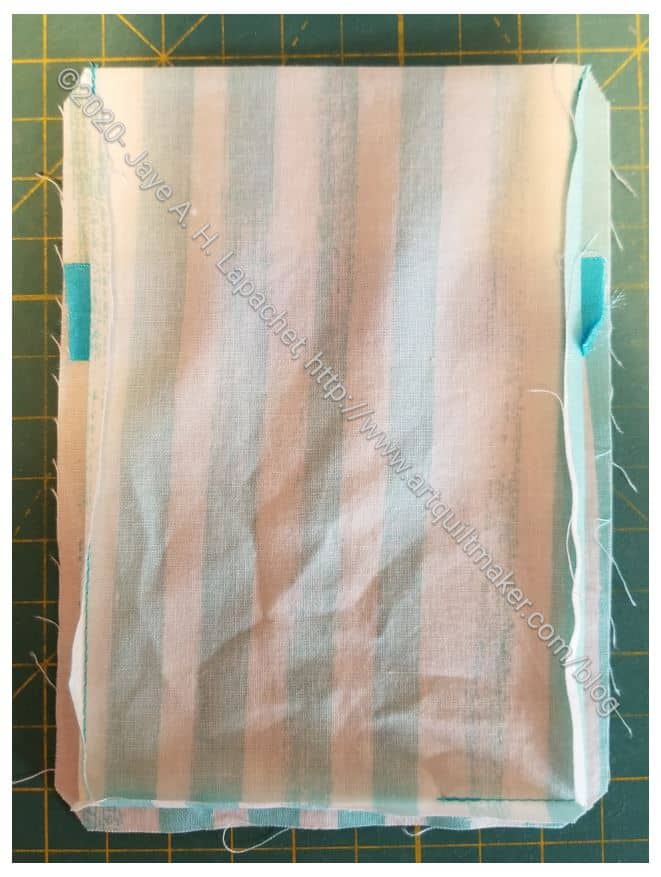
Turn RS out, push out seams, especially corners. Make sure seams are crisp, the press again.
Sew around 3 sides of the Clippy Pocket (not the top), ensuring that you catch the elastic in your seam.
If you are not adding the Clippy Pocket, cut your elastic 20″, mark and sew, following the directions on the pattern.
Check back in a few days for the rest of the tutorial for putting the large pocket #2 together.
I updated the About page to include the most recent podcast in which I was featured.
For Sale
$60+ shipping: La Passacaglia papers and acrylic cutting templates. PayPal cash only. This set includes:
Projects, Classes, Patterns & Tutorials
You know you want to make a flock of chicken ornaments. Check out this tutorial from Ann Wood Handmade. She has a number of free patterns and resources, including a slightly grumpy looking apple core ornament. This site, which is new to me, came through the Oliso newsletter. They frequently have interesting sites to visit. They also tell you about new products and when irons are back in stock. Sign up for their newsletter through MailChimp.
Check out the BlockBase Sew-a-Long.
Barbara Brackman is starting a new appliqued BOM. Free patterns will be released on the last Wednesday of the month. It is taking place on her Civil War blog, but think about what you could do with more contemporary fabrics.
Marie Bostwick has new pattern, designed by Deb Tucker, to go with her new book, The Restoration of Celia Fairchild. Find other patterns linked with previous books in the same location. Deb is the head of Studio 180 Designs, and creator of two of my favorite rulers, the SplitRects, which I have discussed before, and the Wing Clipper.
Katie Ward is hosting an HRT class on May 15.
Sew Kind of Wonderful is hosting a Rock-the-Block Sew-a-Long. Maybe it is a Block of the Month? Anyway the blocks are really great. They do require all three of the SKoW rulers – the Quick Curve ruler**, the Mini Quick Curve ruler** and the Wonder Curve ruler**.
Articles, Media, Exhibitions and Shows

As I may have mentioned, I signed up for Winsor & Newton’s articles on color. The recent one is about about Green, specifically Chromium Oxide Green. What caught my attention was “What humans do have in common is a shared ability to recognise variations of green better than any other colour.” I have been thinking about this in the context of our 6000 piece puzzle. We have done all the easy bits – the castle, the wall, the lakes. Now we are on to trees (green), mountainsides (green) and sky (flat blue). It is a matter of trying every piece in every space and celebrating when you find one piece. BUT that has nothing to do with what I was talking about. I have been trying to sort the green pieces in this puzzle and I realized that I my efforts were working, but I wanted to sort them in much more detail. While driving down the highway recently, I glanced at the mountains and noticed (again) how many greens I could see. Somehow all of these experiences came together with the Winsor & Newton newsletter.
The other thing the article says is “The average number of colours humans can distinguish is around a million.” A MILLION!! Sheesh! No wonder my photos never look like what my eye can see.
Books, Fabrics, Notions & Supplies
The Glenstone Museum in Maryland is having a Faith Ringgold exhibit. Faith is an artist who sometimes works in textiles and quiltmaking. She expand one of her quilts into a book called Tar Beach. There is a book that goes a long with the exhibit. The buying process is a little strange, but I am sure the book will be fascinating.
I was a little disappointed in the colors I received from my recent zipper order. It occurred to me that there might be such a thing as a YKK zipper color card. There is! I’ll add it to my WAWAK order next time I get zippers. It is also available at ZipperStop on Etsy, but is slightly more expensive.
**I use affiliate links and may be paid for your purchase of an item when you click on an item link in my post. There is no additional cost to you for clicking or purchasing items I recommend. I appreciate your clicks and purchases as it helps support this blog.
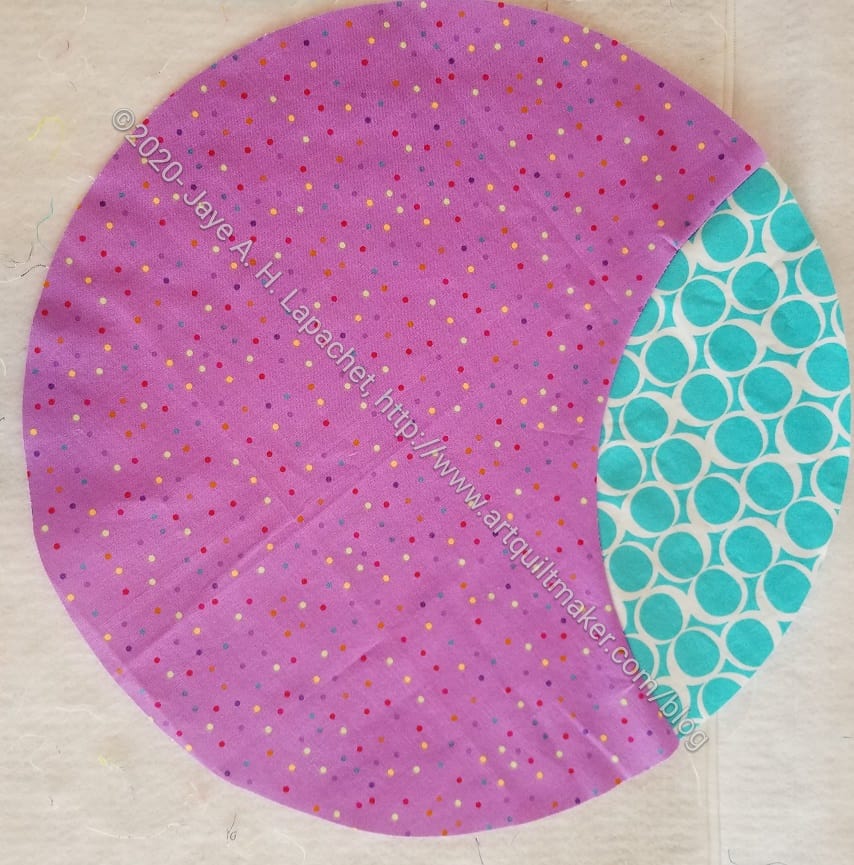
Remember a few weeks ago when I was thinking about circles? I was fortunate that Latifah agreed to show me how to make the cuts using the Clammy to make my Orange Peel Circle. She took time out of class on Saturday to show me two methods of making the shape.
I went away and tried out the technique. I came up with piece on the left. I used the 12 inch Clammy** for this test. It was always in my plan to use different sized Clammies. After this test, I won’t use many of the 12 inch circles – a few, but not many. It is too big and looks like it takes up too much space. I am going to try one of the smaller Clammies later, 10 inch** for sure, but the 6 inch** maybe as well, and see what I think. I am full up on design wall space so I need to finish some things before I commit to any other projects. Even tests have to be put on the back burner.
Still, I am pleased I know how to to do this now.
**I use affiliate links and may be paid for your purchase of an item when you click on an item link in my post. There is no additional cost to you for clicking or purchasing items I recommend. I appreciate your clicks and purchases as it helps support this blog.