This piece is at the painfully growing stage since the last time I showed it. The rest of my blue scraps are either very small or weirdly shaped, which makes it hard to use them. I am trying to use as many of them as I can, despite the problems. I am not sure the piece will be big enough for a donation top. It might be close and I’ll have to figure what to do with it if it is.
I didn’t get Triumphant on the wall as early on Sunday as I would have liked. I was busy finishing the Sidewalk #2: Blue Strips so Triumphant would have some design wall space.
Triumphant blocks on the wall
When I finally did get it on the wall, I found that I had miscounted the pieces I cut at Sew Day. I was short about a dozen units. Sigh.
The photo doesn’t show any of the side border pieces I cut on Saturday. You’ll have to trust me when I say it wasn’t enough.
I was actually glad to get it on the wall as I could see what I was working with. The main part of the quilt is just a giant 9 patch, so I sewed it together and then sewed the top and bottom borders on which I had finished a week or so ago.
Then I sat down and had to correlate the pieces I had with what I needed. Once I figured out what happened, the cutting went relatively quickly.
As mentioned the other day, I worked on my Open Wide Pouches at Sew Day. They went from flat to 3D.
They are not yet finished, but I have only a few steps left: finishing the zipper tabs and sewing up the lining where I turned the pouches. I’ll definitely be able to finish these to take to my mom next week.
I worked on Sunday to get Sidewalk #2 off my large design wall.
I am really pleased with how it came out. I like the differences between this one and the first one. I am excited about how it looks, excited about the possibilities of other versions and excited that it is finished.
I think the scrappy strip blocks look good. I will be curious to see how they look in different colors. Maybe I’ll use a colored background for one of these quilts?
Sidewalk #2 back
I delved into my box of blues to find backing fabrics. I came up with oldies, but goodies.
I’ll give this one to the Community Quilts team at the next meeting.
I followed the Sweet Cinnamon Roses IG “tutorial” and had mixed results. I was making 4 at once. Two were ok and I could use them. The other two needed unsewing. I sewed too close to the zipper tape and couldn’t turn them right side out. After unsewing and sewing the two again, everything was fine. Once I gave the zipper tape some space, the technique worked pretty well.
What I learned is that you don’t need to sew right next to the zipper tape. It is actually better to sew farther away so there is less bulk to sew over when inserting the zipper into the pouch later.
I suspect that I don’t even need to sew up the sides next to the zipper. I suspect that is just for convenience, or because it looks better/ easier on the video. I haven’t tried that, so stay tuned for further results.
2. Cut some squares or rectangles of fabric about 2.5 in. by 3.5 in. I made sure I had at least .75 in. on each side of the zipper tape. This is not exact and you’ll be cutting off much of it anyway, so use scraps. These will be your zipper tabs. The longer you make your zipper tabs the more options you will have for positioning the head of the zipper. I found that a solid would have worked better for the pizza print. Having part of the print show just looked a bit weird to me. YMMV.
3. Lay two zipper tab squares / rectangles on top of and under your zipper. You will be able to see the end of the zipper and the stop after you lay them out. The squares will have the zipper sandwiched in between. The zipper stop and 1- 1.5 ish in. of zipper tape will be sticking out. You are going to cut off the zipper stop, so make sure you have enough space so your needle does not hit the stops.
Sew in a U shape
4. Move the zipper pull out of the way
5. Sew in a U shape from the side where the zipper pull lives towards the zipper stops and back towards the pull. Make sure the top of the zipper tab fabric, by the zipper stops, is sewn a quarter inch away from the top. Sew far enough away from the zipper tape (on the uprights of the U) so you don’t catch it in the stitches
6. Make sure you haven’t caught any zipper tape in your stitching
7. Cut off the stops at the top. Use the edge of the fabric as a guide
Zipper tab finished
8. Turn the zipper tab right side out.
9. Press
Zipper with zipper tab inserted into pouch pieces
10. Insert your zipper into your pouch or bag. In the photo of the stingray view of the pouch, you can see that I have at least 1.5 inches of extra zipper tab. I could have lined the end of the zipper tab up with the edge of the exterior pouch pieces in order to lengthen the zipper. This is a good way to eek out a little more space if your zipper is not quite long enough.
In my case, I positioned the zipper head where I wanted it and sewed it into the pouch pieces.
Zipper tab finished
Once I turned the zip pouches right side out, I was happy and unhappy with the results.
I think the technique looks good. It is a useful finish for a zipper end. It came out as expected.
What I don’t like about it is that it isn’t great for an Open Wide pouch like the Noodlehead Open Wide Pouch. It doesn’t allow the part by the zipper to open wide.
Lynette gave me some tips for finishing the zipper ends, so I’ll try those and see what happens. For certain types of pouches, like the Triple Zipper pouch I sewed awhile ago.
As you can see it was a beautiful day. It was a nice day for getting away from the fog of my neighborhood. I went with some friends to Morgan Hill the other day to visit Quilts & Things. This was the first time I visited a quilt shop since I went with Mom to Quilter’s Hollow back in March. The visit was fun and was also a good break from all the other stuff going on.
I left my phone in the car, so all the photos are courtesy of Carrie and SueG! They were kind enough to take photos for me and let me use their phones to take the shots that I wanted. These photos don’t have watermarks, but that doesn’t mean you can steal them. Thank you for respecting my work on this website.
Quilts & Things – view from front door
The store isn’t large, but it had a great selection. As is usual, it had a number of fabrics I hadn’t seen before. I thought there was a good variety. I saw a number of fabrics I would use for gift bags or drawstring bags.
There were some areas that were super messy, but the store was dusty and just seemed to have some regular clutter.
Quilts & Things – right from front door
Quilts & Things – right from front door
Off to the right as you come in was a selection of pre-cuts and a variety of panels. I was pleased to see that they had some samples that gave shoppers ideas of how to use the panels.
Quilts & Things – right – FQs
On the right of the store but farther back was a good selection of fat quarters including some fat quarter stacks/packs. I was tempted by the arrangement. They had Kaffe dots together and I thought I could use those, but decided to look and see what I had at home. I also saw a pack of Ruby Star Society FQs, but decided that I needed to work through the FQ packs I bought at Family Threads before I bought another one. A few days have passed and I don’t regret that choice.
Behind the fat quarter section (at the top of my photo) was one of the messy areas. I am sure it is on their to do list. 😉
Quilts & Things – more cutting tools
Quilts & Things – left – notions
Off to the left as you entered the store was more fabric and a rack of notions. You know I love notions. The section was small, but well curated. I show only one side of the stand, but all four sides had different groups of notions. This side shows sharp things – needles, rotary cutters, blades, etc. Over near the blenders and tone-on-tones was another rack of scissors and other sharp things.
Behind the notions, I found some more chocolate fabric and intend to make some pillowcases for the Angel family parents. The fabric (see below) isn’t exactly the same as the ones I made for their little kids, but it is similar. It is also different enough so the pillowcases don’t get mixed up.
In the front window was a selection of food fabrics that made me nostalgic for the Food Quilts I made for Will, Kieran and Jeremy. I seriously considered whether I should buy more food fabric and make another one. I decided that the ship had sailed and restrained myself.
Quilts & Things – back left
There was a small classroom area in the back behind the section shown in the photo. There was a class or workshop going on, but I couldn’t tell what project the students were making.
This section had a lot of blenders and tone-on-tone fabrics. This is where I found a white I can use for a background. I couldn’t find a plain bright white – not cream or eggshell or any of those other off white options. I found the white you can see below and at the register I noticed it had a faint dot motif. The owner / lady checking us out said that the plain had been on backorder for awhile. I decided to go with the fabric I had chosen. Why not? Most of it was going to donation tops and blocks anyway.
Quilts & Things – blenders
That area was intriguing as well. There weren’t tons, but well chosen blenders and tone-on-tone fabrics. I didn’t see any brown or Civil War fabrics in the shop which is A-OK with me, though I do respect those, like Liz Porter, who love those Civil War prints.
I found a really nice dot print with a white background, but decided that I would look through what I have before buying another background.
Quilts & Things – bag patterns
This section was also where the bag patterns were congregated. Julie and Carrie were looking at some that I had made in the past. One was the lunch bag I made for my Grama a million years ago. I thought the pattern was a free one so I sent it to Julie later.
Another good thing about this display was the samples. It is so much better to be able to see the size and shape of bags in person rather than relying on the measurements. I can never visualize the size from looking at finished measurements.
Quilts & Things – Sewing Caddy
One example is in the upper left hand corner, the Stylish Sewing Caddy. I was interested in this pattern when I first saw it some months ago. I am really interested in bag patterns that use frames to make them open wide. This was a new one to me when I first saw it. The fabric on the pattern front was not that appealing and I also don’t like the design of the pattern. I know that shouldn’t matter, but sometimes I just can’t get past it. I think the Sheffield and the Quilts Illustrated Tool Tote are better patterns IMO. I suppose this one would be good if you needed something similar, but smaller.
Quilts & Things – thread and books
The shop had a small selection of Aurifil. I bought another spool of 2600 since I am down to my last spool. They had a large selection of Guterman.
Next to the thread the shop also had some books.
Carrie bought some bowl cozy kits. The shop has the Accuquilt die** and cuts out the fabric, batting (the kind that can go in the microwave) and sells the kits with a sheet of directions. OMG! I thought this was a fantastic idea. It makes no sense for me or one person to buy the die. How many bowl cozies can one person make? I suppose if you are selling them at craft fairs it might be worthwhile. Otherwise, I can see making them for the family one time and then moving on and never using the die again. Now I am thinking about going there, getting her to make me kits for the whole family. LOL!
Quilts & Things purchases
I went with a small list of things I needed. I came away with a couple of extra things, but they are earmarked for projects that I hope to start and finish this week. I don’t feel like I lost my mind despite the temptations. The little scissors were a nice gift from SueG.
I feel like this shop was a trip down memory lane for me. I saw so many things that reminded me of projects I had worked on or quilts I had made.
Julie is already on top of the visit. She wrote about it on her blog a few days ago.
Quilts & Things is in a strip mall not far from the freeway, though I wasn’t driving, so look at a map. The shop is worth a visit. The people were friendly, the lady working knew people who came in and there was a good selection of quiltmaking supplies.
There are a few restaurants in the mall and a Dollar Store, which was interesting to visit.
Quilts & Things
16985 Monterey St, Ste 316, Morgan Hill, CA 95037
Tel: +1 408 776 8438 Online Store – always open. 🙂
Hours: Mon – Fri 11am – 5ish
Saturday 11am – 4ish
Sunday *Closed
**N. B. : Obviously, you should shop at local quilt shops and small businesses. However, if you are too busy or can’t find what you need there, I use Amazon affiliate links and may be paid for your purchase of an item when you click on an item’s link in my post. There is no additional cost to you for clicking or purchasing items I recommend. I appreciate your clicks and purchases as it helps support this website.
WOW! Sew Day was a mob scene on Saturday. It was great, but very busy. I thought there wouldn’t be very many attendees, because of the holiday weekend, but I was wrong.
We even had a person Julie and I met at the Fair come and visit. I only got to talk to her a little bit, but I hope she joins. The more the merrier!
After reading several installments of the Jenny Starling series** (The Castle Mystery** was the one I really remember the cake playing a part) and hearing about her delicious walnut cake, I decided to make one. I looked at a few recipes and decided on one by Nigella Lawson. I had everything except Caster sugar, so was pretty much set.
Sew Day is a great way to try new recipes as I have a lot of good tasters available. Also, usually I only want a piece, or two, so a whole cake is too much for the two of us. I came home with one large piece left, which tells me it was a success. I think I will add a little more of the coffee flavor to the batter next time I make it. I posted about it on IG and like to think it was the lure of cake that brought some many people out to Sew Day.
I got a lot done. I cut out the final Triumphant border.It was a struggle, but I did it. I felt like I had totally forgotten how to use the HuRTy rulers since the last time I worked on the quilt. 🙁 I got a free HuRTy PuRTy quilt pattern and may make it just to cement the use of the rulers in my mind.
I cut a few pieces for a Hackney pouch that I have been working on since I visited Birch Fabrics. This was sort of an in between project while I waited for Lynette to be free to work on my lesson.
Anchoring lining to exterior – ready to sew
I brought the 6 Open Wide pouches I had prepared and we went through anchoring the lining to the exterior.
I have done the technique before, but needed a refresher and this was a great one. It all came back to me as we worked together.
I also showed Lynette what I was doing with the zipper tabs. I was able to
After I got home, I did a yoga session and saw some fabrics I can use for more zipper pouches.
All in all a good day!
**N. B. : Obviously, you should shop at local quilt shops and small businesses. However, if you are too busy or can’t find what you need there, I use Amazon affiliate links and may be paid for your purchase of an item when you click on an item’s link in my post. There is no additional cost to you for clicking or purchasing items I recommend. I appreciate your clicks and purchases as it helps support this website.
I am well into my second Sidewalk quilt. I got such good feedback on it at the guild meeting last month that I decided to write a tutorial for it. I want to encourage people to make donation quilts using the 16 patch blocks the guild makes tons of. This tutorial will enable you to make one of your own.
I saw the original quilt at the Sonoma County Fair. There was no attribution. If I find that someone has written a pattern for the quilt, I will add a link here.
Supplies
Sewing machine
Background fabric
Random scraps
Basic sewing kit
Thread
Iron
Pressing surface
Graph paper
Pencil
Optional: Colored pencils
Draw
1. Draw out the design on graph paper
2 Mark the pieces that will be background. You could do this with colored pencils
3. Mark, or color in, the pieces that will be your foreground
4. Count up the pieces on your design and confirm my math is correct.
This gives you a map to work from.
Cut
Nota bene: Cutting directions are duplicated below. I have included cutting here in case you want to cut the background in advance.
Cut 25 4.5 in. x 4.5 in. background patches (B blocks)
Cut 16 8.5 in. x 8.5 in. background patches (C blocks)
I used one full yard to cut these 8.5 inch blocks out.
Sew
1. Create 40 8.5 in. x 4.5 in. patchwork blocks, unfinished. (A blocks) There are several ways to do this:
improv piecing similar to my improv donation quilts / made fabric
one solid piece of fabric cut at 4.5 in. by 8.5 in.
2. Cut 25 4.5 in. x 4.5 in. background patches (B blocks)
3. Sew 24 4.5 in. x 4.5 in. background squares (B blocks) to 24 patchwork pieces (A blocks). This creates an A+B block.
3A. Keep back 8 A+B blocks for the ‘border’ or outside edge
4. Press to the background squares (B blocks), because there is less bulk. If you are using white, there might be a shadow.
5. Cut 16 8.5 in. x 8.5 in. background squares (C blocks)
6. Sew 16 8.5 in. x 8.5 in. background squares (C blocks) to 16 patchwork pieces (A blocks). This creates an A+C block
7. Press to the background squares (C blocks)
Sidewalk #2, block 1
8. Sew 1 4.5 in. background + patchwork combination block (A+B block) to 1 A+C block )8.5 in. background + patchwork combination block).
You will end up with a block like the one shown on the left.
You need a total of 16 of these blocks, so go ahead and sew them.
Blue Strip Sidewalk blocks
9. Put all of your blocks on the design wall.
10. Rearrange them until you like the design.
As I was looking at these blocks on the design wall, I realized that I had focused on putting like blues together rather than mixing them up, so in this arrangement there are big blobs of dark blues that I will need to mix up before I sew the blocks together.
11. Find the 8 A+B blocks for the ‘border’ or outside edge that you set aside in step 3A. Position them along the right side and the top.
This pouch serves several purposes. First, I have wanted to try the Noodlehead Open Wide Pouch pattern for awhile. This is a very popular and free pattern. It is nice to have a go-to, simple yet straightforward pouch pattern that I can make up quickly. I still haven’t found one, which is why this was on my list to try. The instructions are basic, but complete. I found it useful to have some experience with other pouch pattterns. Don’t you think it looks like a stingray?
Second, I told my Mom I would make her some pouches that she could give out as thank yous. This is an easy pattern to follow and I know that I will be able to make a few of them relatively quickly. It also doesn’t require any hardware, such as a frame, which makes the pouch more cost effective.
Finally, I want to learn how to anchor the lining of bags to the exterior. Yes, Lynette showed me once and I did it on the Hildegarde Trunk after Lynette gave a mini-workshop at Bag Club. Then, I didn’t use the technique again and forgot how to do it. I think if I can cut out two or three of the Open Wide pouches and get them to the boxing corners point, I will be able to practice anchoring the lining a few times. That should get the process stuck in my head.
Open Wide- ready to box
The pouch is now at the point where I need to box the corners. I arranged with Lynette to do the boxing of the corners at Sew Day. I hope I can, again, learn to anchor the lining to the exterior.
I was surprised to find that the directions are similar (a shortened version?) of the Emmaline Retreat bag. Then I realized that both are very simple zipper pouch patterns and they are all made the same way. I referred to the Retreat Bag directions, because I wasn’t sure what to do when I was sewing around the edge of the pouch and got to the top of the zipper.
For the next pouch, I plan to use a technique from Sweet Cinnamon Roses (IG) for creating zipper tabs on the top end of the zipper. I have wanted to try it as it looks like it will reduce bulk a bit and make the corner of the zipper pouch actually close.
For those of you who celebrate, Happy Independence Day! For those of you who do not celebrate, have a great day and please send wishes that our country can wake up from this nightmare in which it is immersed and get back on a good path.
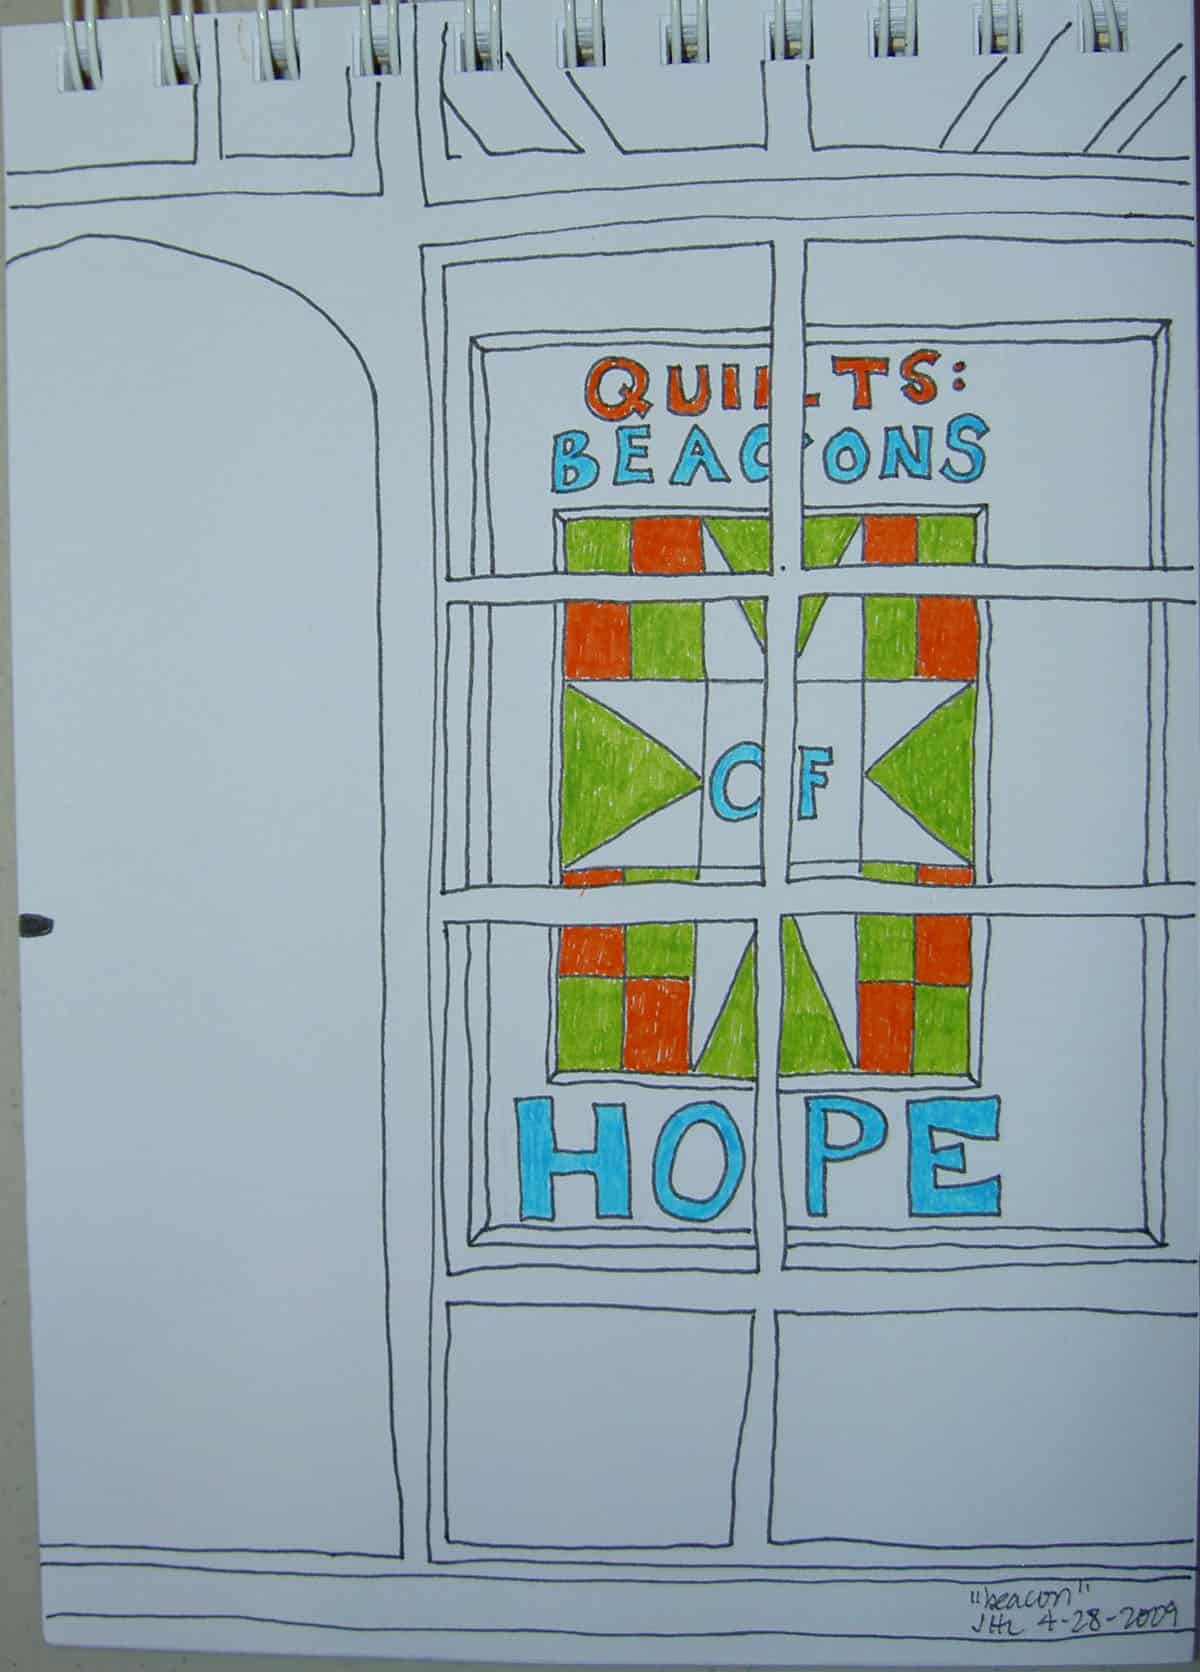
Beacon #11
This isn’t specifically a Fourth of July image, but our country needs something. Some hope is a good start.
I have more than plenty of the blue color strip blocks to make another Sidewalk quilt similar in size to the first.
This is the first block I have put together with the white background and I think the block looks nice.
Sidewalk #2, block 2
I made a second one using some darker blue strip blocks. It looks nice, too and the sewing is going pretty quickly in between the Chain Link and Triumphant piecing.
I need to finish something as finding the time to finish four projects is making my head swim a little! LOL.
Rose Petrillo bag – I found the pieces for this bag cut out, but not sewn.
Still UFOs
I still have UFOs. Who doesn’t, after all? A project in the ‘UFO’ category means I am stalled, it hasn’t been worked on in awhile or it is waiting its turn to be worked on. The list is a lot shorter and the projects are newer, for the most part.
I am annoyed that some of these are still UFOs. I have to give myself credit for completing some of them last year.
Handbag Sampler – I found the blocks! I found them in a bin I thought I had thoroughly searched! I also found the fabrics carefully stored together. Hooray!!
While I worked on the Chain Link top, I used blue improv piecing as leaders and enders. I am really enjoying watching the improv piece grow as my blue scrap pile shrinks.
I still have a big pile of pieces that I am working on enlarging. As the scrap pile shrinks it gets harder to match up pieced units and make them bigger. Still, I seem to be doing it and I am having fun.