La Pass M6

Finished Rosettes month 6

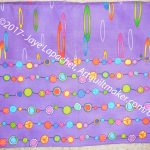
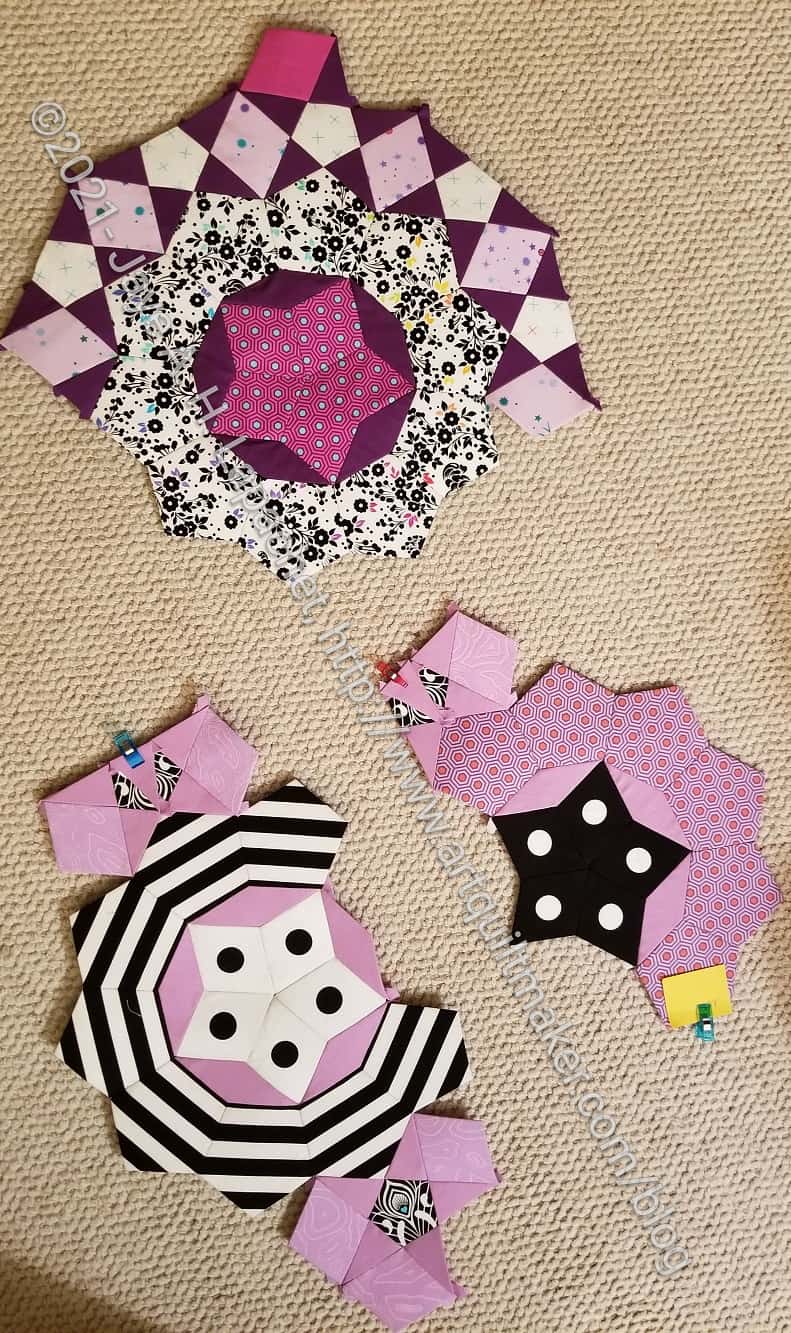
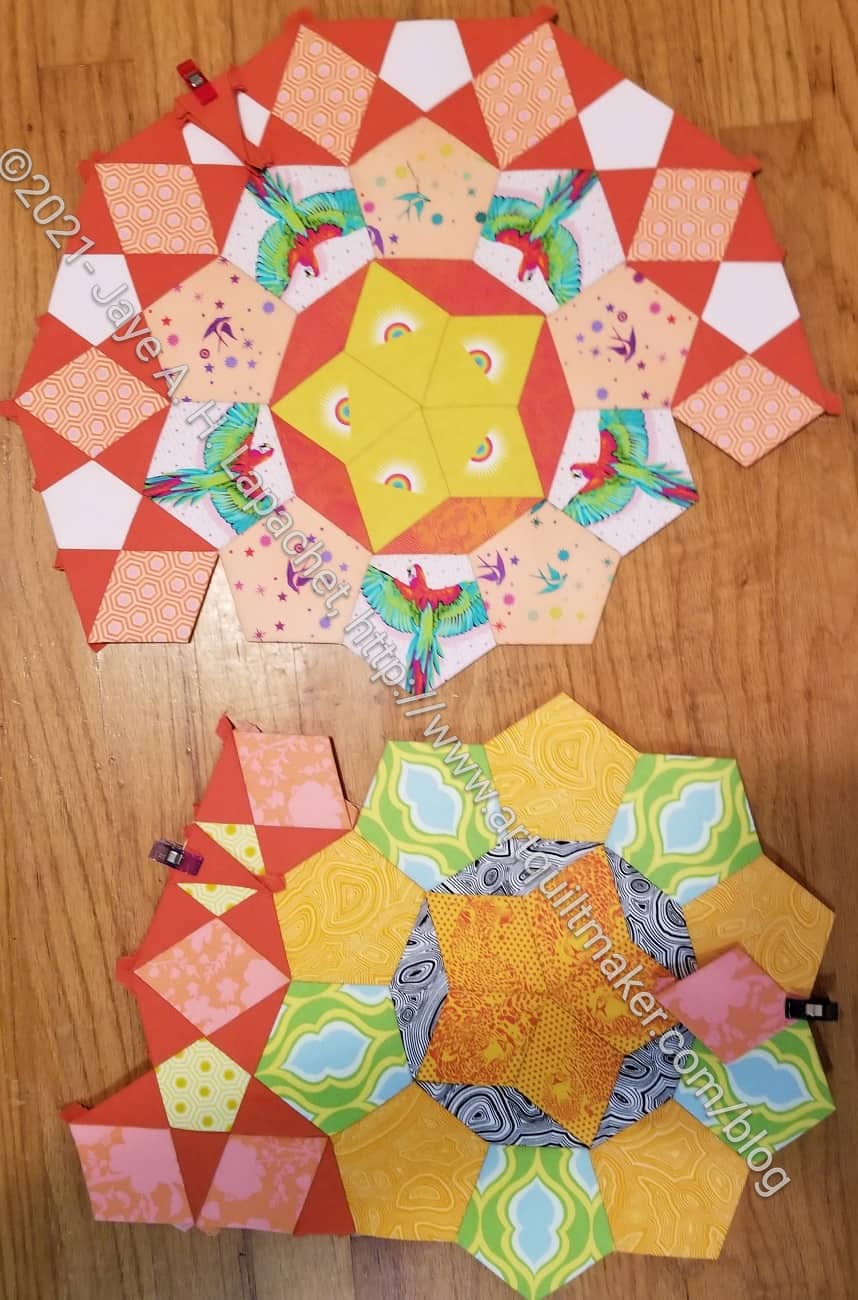
I finished the rosettes for Month 6!!! I can’t tell you how excited I am to report that completion. It really makes a difference sewing every evening for an hour or so.

I also notice that I am more in tune with the project. I am more aware of strategies to line things up and I don’t feel stressed about stitching fast, so I am making fewer errors.

Of course, the giant puzzle will come back at some point, but it won’t be before April, so I have more time.

Month 6 - center of one rosette
Month 6 – center of one rosette

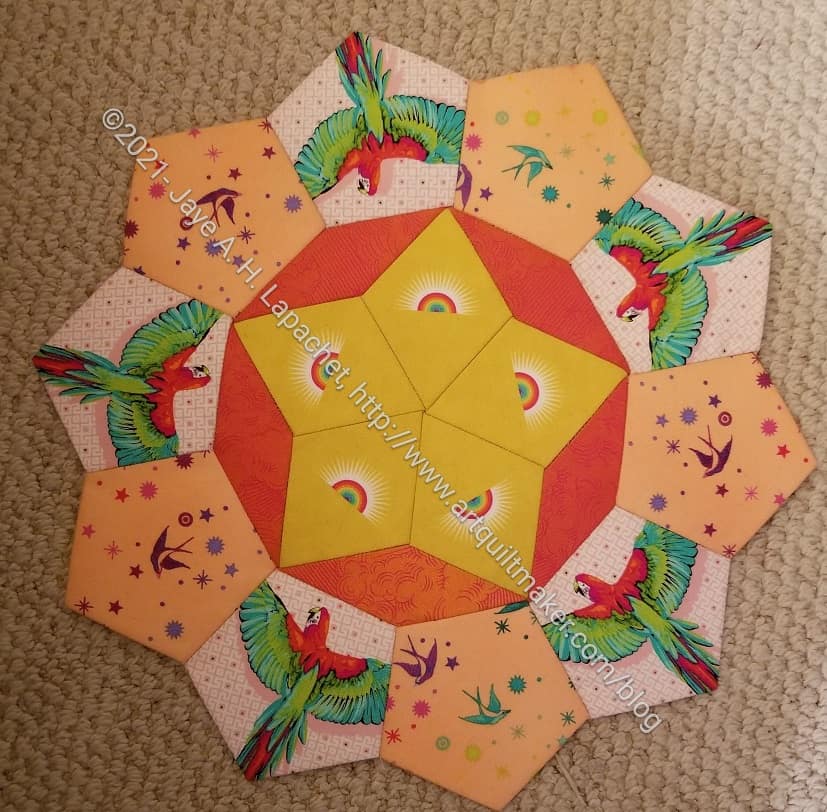
First, I finished the center of one rosette and I was thrilled.

The colors aren’t really my style, but I was too exhausted to make any changes.

I do kind of like the fussy cut parrots. I know I have been saying that I am not using many of the animals, but I like the colorful quality of these parrots, so I used them. They don’t scream “this is a Tula quilt” to me. I may be deluding myself.

Lindsay pointed out that she didn’t like the alternating fabrics (pentagons). I realized it is not a favorite either. My go-to response is that in the grand scheme of the whole quilt, it won’t be that noticeable. Also, as I have said before, I bought the fabric option and I need to use it.

Now I am back to finishing up Month 3. I might be able to finish it tonight.

We are now 1/3 of the way finished with this project. Can you believe it? Time has flown by.

Scissor Cozy

Maria's Scissor Cozy
Maria’s Scissor Cozy

I got a bug in my ear to make some scissor cozies over the weekend. I’m not sure why, but I just went with it and made two. I didn’t like the way the tips came out, but I am pleased with the overall effect.

I made a scissor cozy for Julie and one for my Mom some time ago, so I had the directions, which I tried to use. There was some confusion, so went and looked up the pattern on Sotak Handmade’s IG feed. It turns out she has a YouTube tutorial now, so I watched that. She has tightened up the pattern and made a few changes, which worked well for me.

I used flannel for the inside instead of batting. I am not sure it made the corners much thinner. I might keep the batting away from the corners in a future version.

This one was for Maria just because. No particular reason. Making two was just as easy as making one. I added the leash.

APfE v2 Bag Progress

I felt confused and exhausted the other day when I finally got the pieces I needed quilted and cut. The prep on these ByAnnie bags are not trivial.

Zipper pocket installation

I spent time on and off prepping pockets, then all day Sunday making the ‘pages’, which are a big feature of this bag.

I chose to make all vinyl pockets, but with either type of pocket (mesh or vinyl), you have to add zipper heads to the zipper tape and then sew the zippers to the vinyl. There are a lot of pockets so it took forever. It took even longer, because, again, I used Tula Pink’s suggestion of covering the edges of the zippers with ribbon. I really like the effect, but it did take time.

Finished Pages - front
Finished Pages – front

I added a few more pockets than the pattern suggested. Fortunately, I was working on the project in little bits of time. This gave me time to think about the sewing before I actually did it. I realized that I would be sewing pockets to the back of a page that had pockets on the other side and that I had to be really careful. I only ran into problems one time and I was able to cover the part I didn’t like with ribbon. I am pleased, though, because I ended up with more pockets.

Finished Pages - back
Finished Pages – back

There are two sets of page. Each full page has two facing half pages. The pattern suggests you can play around with the pages and put they type of pages you want, but the choices are limited by the sewing.

You have to put one of the full page pockets (see pink back, bottom left) behind the two or three pocket pages, for the most part. If I make this bag again (or additional pages to swap out), I will make sure there is a full page behind a page of pockets with 2 or 3 pockets.

The pages are done and I am really pleased. This bag is taking much longer than I thought. Forget about the months I just thought about working on it. These four pages took me about 8 hours just to sew, not including prep. People will make these bags for you on Etsy for about $200 and the money is totally worth it!

Tutorial: Adding Zipper Heads

I have said before that adding zipper heads to zipper tape is pretty easy. I don’t do it that often, so I always have to look it up. The main tutorial I use is Sara Lawson’s tutorial. Sara provides a ton of detail and I would advise watching it at least once. I am writing a quick tutorial so you can see another version.

Supplies:

Supplies required
Supplies required
Place zipper head face down

1. Place your zipper head face down in your towel holder

2. Flip your zipper tape wrong side up. N. B. This means that both zipper tape and zipper head are facing in the same direction, wrong side up

3. Pull your zipper tape apart 3-4 inches and configure in a V formation

Make a V with the zipper tape

4. Carefully place each end of the zipper tape into each side of the zipper head

5. Push the tape in evenly until you can pull from the bottom

Completed zipper head installation

Voila! You did it!

In the future you can find this tutorial on the tutorials page.


Resources:

    • Natalie from Sew Hungry Hippie has a video tutorial using a jig she sells


*N.B. : If you use a fork, you might want to get one at a thrift store and just use it for zippers rather than using one you eat with.


**I use affiliate links and may be paid for your purchase of an item when you click on an item link in my post. There is no additional cost to you for clicking or purchasing items I recommend. I appreciate your clicks and purchases as it helps support this blog.

More Donation Blocks

Pink Words donation block

I spent a lot of sewing time making gift bags with fabric I unearthed from my fabric closet. I finished about 10 bags and was able to get back to using donation squares as leaders and enders.

Some of these blocks are from last year – as in a few weeks ago.

Pink & purple donation block
Red-violet dot donation block
Purple Paris donation block
Black with dots donation block


Gift #8: Boxy Clear Pouch #3

Carrie's Boxy Clear Pouch with gift bag
Carrie’s Boxy Clear Pouch with gift bag

I forgot to take pictures of Carrie’s pouch, but she kindly took some and sent them to me. You’ll get a different view from the ones I usually provide. Perhaps it will shake up my photographing a little bit.

Carries pouch
Carries pouch

In the pouch I put one of the color wheel pins I bought for gifts. I also put in one of the small Altoid tin sewing kits I made for the officers earlier this year. (see above)

I tried something different with these based on my desire to cover the ends of the zipper tape on the Inside Outside pouch. This is, however, a different bag and I ended up ripping out a lot of work when I realized it wouldn’t work. My idea of zipper tabs will work on the Inside Outside pouch, if I make it again.

Carries pouch end
Carries pouch end

Carrie was really happy with it and sent me a lovely thank you note. Don’t you love a good thank you note? I can’t wait to see how she uses it.


A Place for Everything Bag Progress

A Place for Everything Bag to be

I thought I would be able to finish this bag over my break from work. HA! I spent a lot of time on it, though not as much as I anticipated. I made progress, but didn’t finish.

There is a lot of prep to this bag. I took a different route by following Tula Pink’s sketchy directions on cutting out the fabrics in such a way to highlight the designs. I finally finished all the quilting and such and felt exhausted and confused. I hope have done the right thing and it won’t all go off the rails..


Resources:

  • ByAnnie A Place for Everything v.2 pattern
  • Tula Pink video on how she deviates from the pattern to make more design decisions
  • Tula Pink video on applying ribbon to cover ‘connections’

Gift #7: Boxy Clear Pouch #2

Tim's Boxy Clear Pouch
Tim’s Boxy Clear Pouch

I finished another Boxy Clear Pouch right before Christmas. This one is for Tim and I gave it to him when we had an after Christmas Sew Day. It is the same pattern as the ones I made for my students. The difference is that I used fabric that will coordinate with the Sew Together Bag I made him last year.

The Bernard
The Bernard

Inside I put a point turner from Modern American Vintage. Remember I talked about them in a recent Various & Sundry post? (Ignore the pink pocket in the photo; that is from an unrelated project.) The company have some beautiful tools. They make wooden point turners, seam rippers and Hera markers. Often wooden tools are over the top, but these are simple,  gorgeous and amazingly functional. Tim is a great friend and my bagmaking buddy, though he makes fun of me for the complicated bags that I make. Every bagmaker needs a good point turner. I have several different ones and this is the best. I know Tim would like it as well.

Tim's Boxy Clear Pouch - back
Tim’s Boxy Clear Pouch – back

Aneela Hoey’s patterns are pretty well written. The thing I don’t like about this pattern is the binding on the ends. It looks great in the end, but is a hassle to hand sew down at the end of the project.

I think this is a useful bag, because you can see what’s in it.


More Gifts for Julie

In the past, I made a list of gifts I had made for Friend Julie. I am doing it again because I want to see all the items together. I still feel like I have made more for her, but I’ll have to update it as I come across items.

I used some really good fabrics for her gifts.

I forgot I made her the Halloween blocks, which I hope she will use to finish her Halloween quilt at some point.

Gift #6: Boxy Clear Pouch

Color Wheel Boxy Clear Pouch

This is a gift I made for Sue, one of my students. I put a small Altoids tin handwork case and a pin inside.

I used the Boxy Clear Pouch pattern from Aneela Hoey. It is related to the Inside Outside Pouch I made for myself. The difference is fewer zippers. I think I like the Inside Outside pouch better, though this is in no way a terrible pouch. It would be great for a small knitting project.

Color Wheel Boxy Clear Pouch - back
Color Wheel Boxy Clear Pouch – back

I am pleased with the fabric I used. It is Carrie Bloomston fabric. I am constantly referring to the color wheel when we are in class. Sue will have a color wheel with her if she keeps this pouch around.

Gifts for Kim

Since I have been revisiting gifts I have made, I thought I would do the same for gifts I have made for my sister.

I am not sure if this list shows everything I have made for her, but it is a good start. The Inside Outside pouch is the one I made her for Christmas.

La Pass M3 Progress

M3 - 3 Rosettes (La Pass)
M3 – 3 Rosettes (La Pass)

My idea was to finish months as they come, then go back to M3 to finish those rosettes. I am happy to say I am making progress. Not finished, but making progress.

I am working on the last rosette. Somehow I forgot that I had waited to baste fabric for some of M3 pieces until I was downstairs piecing away and started to run into the lack of pieces problem. I know I waited because I wasn’t sure when I would get to M3 and didn’t want the glue to fail.

I don’t want to use the hat fabric that came with the BOM. I need to find some fabric and baste those 60 degree diamonds before I can make much more progress.

La Pass triangle fabric

I am thinking of using the Carrie Bloomston fabric with the pink triangles again. It will create some continuity with other pieces and is far enough away from the M5 piece where I used it to not look bad. Even though most of the fabrics for these rosettes are in the lavender range, I think it could work. I could also use the zebras I cut and didn’t use, or more Dripping Roses. I think I need to look through my fabrics and decide. I bought a Marti Michell Magic Mirror**, as mentioned yesterday, that I will try.


**I use affiliate links and may be paid for your purchase of an item when you click on an item link in my post. There is no additional cost to you for clicking or purchasing items I recommend. I appreciate your clicks and purchases as it helps support this blog.

Pink Door Parade

Pink Door order - Dec 2021
Pink Door order – Dec 2021

Pink Door was having a sale. I took the opportunity to pick up a few things I needed for my La Pass project, few gifts and some things I had been eyeing for awhile.

The idea was that you place your order and they hold it until the sale is over then send it. That meant that I received a giant box of quilt gifts right before Christmas. Some of the items were gifts. I’ll have to save a couple, because the box didn’t arrive in time. It is okay, because I forgot that I bought them for the recipients!

Marti Michell Magic Mirror

One of the things I bought, which was not on my mind, was the Marti Michell Magic Mirror**. Total impulse buy, but I think I can use it when I am selecting fabric for fussy cutting for my La Pass project. I could have really used this when I made the Peacock. It is a recommended tool for One Block Wonder quilts.

I also bought more glue pens – not the refills, but the actual pens. I have one, but wanted one for my travel bag and one on my cutting table as well. I got a lot of refills with the pens, so I am in good shape there.

Pink Door purchase
Pink Door purchase

I am excited about also excited about the long handbag zippers that were on sale. I am sure I can use them  for future bags. I got some mesh that will go with the fabrics I use for Mom’s bags.

As you can see I also got some fabric and some Tula Project pouches.  It was fun to be able to shop for what I wanted for once.


**I use affiliate links and may be paid for your purchase of an item when you click on an item link in my post. There is no additional cost to you for clicking or purchasing items I recommend. I appreciate your clicks and purchases as it helps support this blog.

Gifts for Mom Again

Since taking a look at gifts I made for Gerre a week or so ago, I decided to look at gifts I have made for Mom and Julie. Here are the various gifts I have made for my mom. Many have the different artist fabrics I have collected.


Gift #5: Inside Outside Pouch for Lil Sissy

Lil Sissy's Inside Outside Pouch
Lil Sissy’s Inside Outside Pouch

Cutting out pieces for bags is the hardest part. It is also, for me, the worst part. I often make two of a pouch or bag at the same time. Cutting out two  of each piece at one time doesn’t seem to be that much harder than cutting out one. That is how I made this pouch. I decided on the spur of the moment to make the same pouch for Lil Sissy for Christmas that I was making for myself. I didn’t think really hard about the fabric. I grabbed this Alison Glass fabric, which is super cheerful, IMO, and for which I hadn’t yet found a use.

Lil Sissy's Inside Outside Pouch - 3/4s view
Lil Sissy’s Inside Outside Pouch – 3/4s view

I am on the fence about whether I should have used a different fabric for the zipper plackets. I have trouble figuring out where pieces are going to go and most independent pattern makers don’t really tell you beyond naming the piece. I think using the same fabric on this pouch looks fine. If I used fabric like the Dripping Rose again, I would probably use different fabric. The motifs get broken up too much.

Lil Sissy's Inside Outside Pouch - interior
Lil Sissy’s Inside Outside Pouch – interior

I picked a specific inside for this pouch, because it is for my sister. She is an artist, thus the splatter print. She seems to like the bags I make for her, though I have always used Paris related prints for her. This fabric is a departure.

Lil Sissy's Inside Outside Pouch - closed
Lil Sissy’s Inside Outside Pouch – closed

I put a gift certificate inside.