This is a post that I have written a little differently from most of the posts I write. I am going to write and then post it right away. Normally, I write a few days ahead and schedule my posts so I am not in a rush to get something posted at the last second.
We had a nice New Year’s Eve and also a nice New Year’s Day. We went and saw Skyfall last night after going to dinner. Today we watched the Rose Parade, did some stuff around the house and then went to our BIL and SIL’s house for a potluck-football watching-socializing kind of day.
I planned on being at the machine a good portion of the day, but didn’t want to seem anti-social, so I worked on the Corner Store while watching the Rose Parade and on the Garden while over at SIL’s.
Corner Store Finished
Why is this all relevant? Because I finished the Corner Store this morning! I wasn’t looking for such a big finish, but I do like to finish something on New Year’s Day as a way of setting the tone for the New Year. I suppose it is my version of a resolution since I don’t make the normal kind of resolutions.
I had a little bit of binding left and two repairs (don’t ask). Just stitching away for half an hour got the job done.
This quilt will go to my brother-in-law, who is ill. I hope he wraps up in it and feels people hugging him all the time.
Take a look at the last post about quilting this piece. It might be a long time until you read about me quilting again! 😉
Yes, after YEARS this quilt is finally finished. I love finishing quilts. I love working on them, too, in case you hadn’t noticed, but finishing a quilt is awesome as well. I am pleased with how this one came out.
It is a great pattern and I would encourage you to try it out.
After the skirt misadventure, TFQ and I decided to make a charger case. I was using a very elegant vegetable bag crammed full of tangled cords and that was the inspiration.
We used a SewCraftyJess tutorial for a jewelry case and modified it slightly.
Charger case – closed
Some of the modifications we made had to do with size.I also noticed that Jess, who did the tutorial, must have had a different type of vinyl (I used the leftovers from my clear bag project), because she did not need a roller foot or tissue paper. I need both of those at various times to force the vinyl through the machine. I don’t think this is problem/issue if you are using some of the flannel back oilcloth and keep the flannel side against the machine bed. For the purposes of this charger case, I couldn’t guarantee that I could have something between the vinyl and the machine bed at all times. This is when I put the tissue under the vinyl. Yes, the bits of tissue paper had to be picked out with tweezers, but that was the lesser of two evils (the first evil being me screaming and berating the vinyl, my machine, etc). I have some tweezers with very sharp points and long handles and they worked very well.
Charger case – half open
Also, as the layers built up (vinyl twice for top stitching, zipper, etc), the thread started to break, so I lengthened the stitch length and that worked better. I might use a larger thread than 50wt if I made another charger case.
I thought not stitching the back to the front would be a problem, but it seems not to be, though you could stitch all the way through the layers if you wanted.
The tie was a bit of a puzzle. I ended up machine sewing it to the center of the binding on one of the short ends. It seems to work fine. I might try velcro or a magnetic snap if I made this again. I used the technique for making the ties that I use for making bag handles (4x desired width, fold in half and press, fold outside edges to press line and press again, fold on original press line, stitch around entire outside edge). The ties would have had more style if I had made a point at the end.
I am pretty happy with how it came out, though I am thinking that aqua dots might have been a better choice for the inside. I wanted something light so I could see what chargers were where. All of these little tweaks are why I made things more than once – to see if my imagined tweaks would work better.
No other name really occurred to me as I was working on this quilt. It is kind of sad, because most of my other quilts have much better names. Still, it is better than “The No Name Quilt” and it is descriptive.
I finished the binding in time to show the quilt at BAMQG. I was excited to see the other pieces in the challenge. I wasn’t the only one who used a colored background, but mine was the only red and aqua quilt. It received a good response.
I will put a sleeve on this quilt, but I want to have the back photographed before I do that, thus it is not in the back photo I am showing today and I don’t know when/if I will show a picture of the sleeve.
Whole Cloth Quilt: back
I have to say that the binding went on to this quilt really fast.
Did I tell you? I’d like to use this design again for another rendition of this quilt. I wouldn’t do it as a whole cloth quilt again, but perhaps fusible applique’.
I know I already posted today, but I have posts for the whole week waiting to be posted and I just couldn’t let another week go by without posting this finish!
I finished the binding last week, which means the Food Quilt is FINISHED!!! Hooray!!!!
Aside from just finishing something, this is great for a lot of other reasons:
can move on to other projects without guilt (not that I have much anyway)
The bad part is that I am out of hand work. Really out, not just sort of out. I am diligently quilting on the Garden quilt so the beading and embroidery on that quilt can be my hand work, but I am not there yet.
Still, I am thrilled to be done with another project. The Young Man piled this quilt on top of the other ones and has slept under it for a few nights already. I took it to BAMQG without washing it and hope no boy smell permeated the room! People liked it.
I was back in pillow hell on Monday, except that it wasn’t really hellish. I made four pillows using embroidery panels my SIL and I created on her embroidery machine when I was in Maryland/DC last year. My part in that was saying yes or no to colors of thread and whether the letters should be curved or not. She is the embroidery queen and I was just her humble assistant.
Embroidery panel (1 of 4)
While I was in Maryland, we made a few pillows for the Native Daughters, of which we are both lurker members, but I took the embroidered panels home to make the Native Sons pillows later. As I have mentioned, my DH in on the Board of Trustees of a non-profit. When they are running for off their parlor (e.g. chapter) sponsors a hospitality suite at the Grand Parlor (e.g. annual conference). In the hospitality suite, they play cards, offer liquid refreshments and raise money for their Cleft Palate charity using raffles. For the past year or two, since DH has been running, I have made pillows for him to raffle off. They were wildly popular the first year and he raised a record amount for the charity.
Guess what?
“Later” is this weekend! Can you say last minute? I wasn’t planning on spending my day off making pillows, but this coming Saturday would be even more last minute, so I did the job. I was prepared for drama and there was none. I think I only had to rip out one seam. I measured correctly, counted properly and generally made 4 pillows in record time.
Batting Foundation
The big difference was that Cathy, my SIL, suggested using batting as a foundation. It makes the block look nice and gives the maker a goal. You cut the batting the size (including seam allowance, so if finished is 14″ you cut the batting 14.5″, etc) you want the pillow and then sew on top of it. I don’t know how this would work if you didn’t have a flip and sew friendly pattern, but I am sure there is a way to figure that out.
Anyway, the pillows are done and packaged ready to head to NSGW Grand Parlor. DH was pleased and I am going to the dentist and then am going to work on something fun that doesn’t feel like “quilt work.”
The Sunday Stash Report (a la Pam at Hip to be a Square podcast) is 2 yards. More on that later.
Nota bene: if you think there are photos missing, there are. I am having trouble uploading some pictures to the blog. Check back later. It will be resolved eventually.
Last weekend I finished the Blue Donation top that evolved from blocks into an actual top.I am pretty pleased with the way it came out. Chunking made this go together really well.
Last night I made a Franken-batting for it and started a back, but I don’t think I will finish the back. We’ll see.
This is for the BAMQG Charity project. Although it is not completely finished, I am putting it in MY finished category, because someone else will take over the quilting and binding.
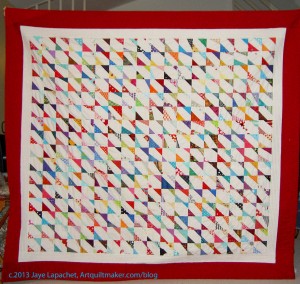
As promised, I am posting a photo of the Stars for San Bruno #3 quilt.There is probably only one more post left in this project and that will be to tell you how the deliveries went.
My normal quilt hanger was not tall enough and his wing span wasn’t large enough to hold the quilt straight, so I commandeered Mom and TFQ to do the work. They are both tiny, so they stood on chairs and let me snap away.
I know that I am going to start the FOTY 2011 quilt next week, so I have been working on smaller projects. I have, either, been finishing projects in process or making items I have had on my mind.
Here is the Blue Belle Fleur journal cover that I finished this week. I started it some time ago and the pieces ended up in a pile on my old cutting table while I worked on the Stepping Stones quilt.
I set up my new cutting table and found them in the process.
For this journal cover, I worked on putting pieces of the fabric (stamps, postmarks, writing) that I liked where I could see them. You can see, in the top photo, left, where I have done that.
Belle Fleur Journal Cover - inside
The inside ended up with a really nice full piece of the Belle Fleur fabric. I am not much of a butterfly person beyond the norm, but in this context, they look really nice.
I am not sure why I decided to pair this fabric with black. I think the black works well with the Belle Fleur, but I don’t remember why I chose it. Perhaps it was handy. I was using those black fabrics for the Food Quilt, so I have a feeling there strips available.
Belle Fleur Journal Cover - outside
The only part of the fabric I didn’t get was a bird head. Oh, well. I have some bits and pieces of the fabric left, so I will keep trying.
You can make your own journal cover by checking out the tutorial. If you are not using the Miquelrius journals, you will need to adjust the size to the size of your journal.
Frustratingly, I had trouble with the size. The size of the journals hasn’t changed so I don’t know what the issue is. Perhaps not measuring? I had trouble getting the cover to fit the journal. I think this is why I want to finish a project rather than leaving it lie for a long time.
For a long time, I had an idea in my mind that I would make two pencil rolls for some friends who worked with me on the Primal Green show. Somehow the pencil rolls never got made. Then, the idea morphed into journals as I worked on the Purple Journal and I got in the groove of making the pages. I ended up just kept making more and more pages until I had enough for the two additional journal.
I used the Circa 1934 mosaic piecing pieces that I had started when I got off track for Julie. The words are appliqued on to the cover using raw edge applique’ (straight stitch down the center of the letters). I started out with a freezer paper template using my own, slightly stylized, handwriting. I am not much of a calligrapher, so I reworked the design of the letters until I was happy.
It took me a long time to cut out the freezer paper templates. The letters were thin and I didn’t want to rip them. It was meditative. I wanted the words to be subtle so I chose another fabric from the group I used in the Stepping Stones quilt.
Good Job Journal - backGood Job Journal closed
I might have put the words on the back so that the closure wouldn’t cover them when closed, but I didn’t think of it. That is one reason why I like to work in a series (which sounds so much more arty than “make projects over and over”) – so I can learn and do better the next time.
On the other hand, it kind of looks like a surprise. You get a little peek of something else, then you open the closure and see the words.
Good Job Journal - signatures
The signatures are the same or similar size to the signatures in the Purple Journal. I left a little more space to write and draw on these pages and thought about the Design Series Sandy and I have been working on while I embellished the pages. This project gave me the opportunity to get a little design practice in without starting a new quilt.
Well Done Journal - closed
These two journals are really twins: cut from the same cloth and made at the same time.
I didn’t pay a lot of attention to the design while I was piecing, because I knew it would be ok. One thing that encouraged me on to add the words was the large expanse of that mustardy dot that ended up on the front. It is really too big of a piece for the front. One large piece of fabric in this mosaic piecing technique does get the piece to the right size faster, but also looks boring. It is, however, a great background for words.
Well Done Journal - open
Shocking as it might seem, I stitched on the words AFTER I put the cover together. That means I stitched through the manilla folder which provides the base and gives the journal shape.
The ‘Well’ word was more tricky than the ‘Good’, ‘done’ or ‘Job’ words. I think the fact that they are taller and thinner were part of the issue. My second ‘l’ is leaning a bit more than I intended, but I think it looks ok. If I had thought of it I might have used a light fusible to keep the words in place while I sewed them.
Well Done Journal - signature 1
I made a big effort in these two journals to vary the types of paper and put more blank pages in.
I didn’t realize until I started on the signatures for Good Job and Well Done that I was making mini art pieces as pages rather than embellishing pages to add interest and providing space for the recipient to write.
Well Done Journal - signature 1
Andrea, at A Work of Heart, where I took the original class, had a lot of great ideas about embellishing pages and adding interesting things to them. She also has a huge supply of all different types of items that could be used for pages, in addition to interesting paper.
I have a smallish bag of paper to use. I found an envelope in it, so I added that to one page so the owner could tuck bits into it. In some cases, I also sewed down only two sides of a piece of paper to embellish so that something could be tucked behind that embellishment as well. I like to tuck things into my journals and imagine that others might, too.
Well Done Journal - signature 2
On the left, which is the last part of signature 1, you can see that red strip of paper. That is the kind of embellishing that I was trying to do.
In signature 2, on the left, you can see how my stitching shows up on the first page of the signature, but embellishments are actually on the back of the page.
I also try to position the edges of the pages a bit unevenly. I wanted to highlight the handmade nature of the piece and also draw attention to some of the handmade paper I used.
Well Done Journal - inside back
The inside back cover isn’t terribly interesting. I put a pocket on the Purple Journal, but forgot to do so on these two journals.
I thought the card with printed words saying good-bye in different languages was appropriate to put on the last page. I am sorry that I don’t remember where I got them, because I would like to get a few more. I had a few so I think each of these recent journals got one.
Well Done Journal - Good-bye detail
I also like the small images printed in between each of the words.
In this photo, you can also see that I used a zigzag stitch to adhere the paper to the other pieces of paper. I used the same color thread and the same stitch throughout both journals. I played around with the setting a little bit to get a width and length that I liked. I remembered to not make the stitch length too tight or close together (like a satin stitch) otherwise it would have torn the paper.
I think that little bits can be tucked behind the Good-bye card.
The bad thing about this project is that it makes me tempted to save much more paper than I really should save. I really don’t have any place to keep paper and A Work of Heart is too far away to depend on for a ready supply of paper. I guess that is another reason to use a lot of blank paper and embellish it slightly.
Well Done Journal - back
Mosaic piecing is not only good for journal covers, but it is a great way to get something done that you don’t have to think about too much while working on another project. Remember leaders and enders? Mostly, when using fabric, I sew like colors together, but in this case, I used a group of fabrics I had used for a quilt, the Circa 1934 + fabrics. You can see that my cover includes a half square triangle piece. I didn’t use it in the quilt, so why not give it additional life?
The Red Journal cover had a lot of super tiny pieces, but not all mosaic quilting needs to use super tiny pieces. Larger pieces become larger faster. In some way, Pieced Backs are a larger version of mosaic piecing. Of course, a cover can be made much more simply from two pieces of fabric. Piecing like I have done is not required.
Things I would like to try for next time (not that I know when next time will be):
use Timtex or similar for the base. I kind of want to see how that works and whether using a more fabric friendly base would be better.
use batting for the cover and see how a softer cover works.
push the limits on how many pages I can fit into a journal this size. One problem is that the sewing machine needle gets dull, so I have to make all the pages at once or keep track of a “for paper use only” needle and keep switching out the needle. It would be great to use the leaders and enders technique for making the pages.
try to put more blank (or nearly blank) pages in the journals. I want people to be able to use these as a journal, so more blanks would be one way to do that.
Three Journals, 2012
So, above are the three journals. I am really pleased.
Awhile ago, I decided I wanted to make Julie a really special gift for her birthday. I decided on a journal similar to my Red Journal as a gift. The date slid as my November and Decembers were pretty busy and it ended up as a Christmas gift.
She is a purple person, so I decided to make the cover from some of my purple scrap. I had quite a few from the Purple quilt, so it wasn’t difficult. However, I got really busy and distracted right before her birthday, so I didn’t finish it. Then December was really busy and I didn’t finish it in time to give it to her for Christmas. I told her about it and promised her it would be done.
I did work on it over the holidays, but in the course of being distracted, I somehow got off track and started making her a new cover out of the fabric I used for the Stepping Stones quilt.
Huh? I know. Not sure what was happening in my mind, but there you have it.
Purple Journal Signature 1
Finally, I stopped working on the cover and turned my attention to the pages. The point is to make signatures (groups of pages). I was going for 12 pages in 2 signatures, which, when folded in half, would give 48 pages total to write or on which to journal.
I have a small stash of random, scrap paper, which I got out and started sewing together. This process ruins the needle for fabric, so I worked on all the pages I needed. As I worked through this process I decided to make two more journals for other gifts and made the pages for those, too.
Purple Journal Signature 2
Since my needle was ruined for fabric anyway, why not? I’ll talk more about those journals later.
You can use any kind of paper, but you shouldn’t use ALL really thick paper. You need to use different weights otherwise it is too hard to bind at the end.
I sewed the various pieces together to make 8.5″x11″ sheets, which I, then, folded in half. Julie will have to use different pens to write on the different papers as some of the papers are shiny and won’t work with roller ball type pens. It will be interesting to see what she does with it.
Purple Journal Back
I have been struggling with what it means to be an art quiltmaker lately (for awhile, actually) and whether I am or not. I think this project puts me firmly in the camp of art quiltmaker.
I got this back from the framer last Tuesday and am thrilled with the way it turned out.DH and I decided where to hang it and hung it up on Christmas Eve so it would be nice looking on Christmas when my parental units were over.
Now I can add another finished project to my list! My quilting best for a year used to be 9 quilts. With this quilt, I have completed 10 this year. YAY! A new JayeWorld Record!
Yes, the Frosted Stars has been finished for a long time. I went looking for a photo and realized I had never taken one. So, cheap date as it may be, here is the finished item! YAY! Another completed project.
This quilt is growing on me. I think it is the turquoise.


")


