I finished the two Dogwood pouches at the Retreat. This is a worthwhile pattern as there are multiple sizes, but also a couple of new techniques to use in making your pouches.
Pouch F is the larger one and would be great for chargers and other small electronics. It went together very quickly.
The zipper instructions were a little tricky, but I watched the video (glad I brought my tablet to the Retreat!) and it was clear. I was actually kind of excited about the zipper instructions. They make a very cool finish to the zipper ends.
Finished: Dogwood Pouch-J
Pouch J is the smaller one. It would be good to corral small items in your handbag.
I found that the boxing of the corners was a different technique as well. I had to watch the video (Yay tablet, again!), which made the technique clear.
These are already off to their new home. I haven’t had a clear answer as to whether the Angel Mama likes her set of bags, but I feel good having made an effort to thank her somehow.
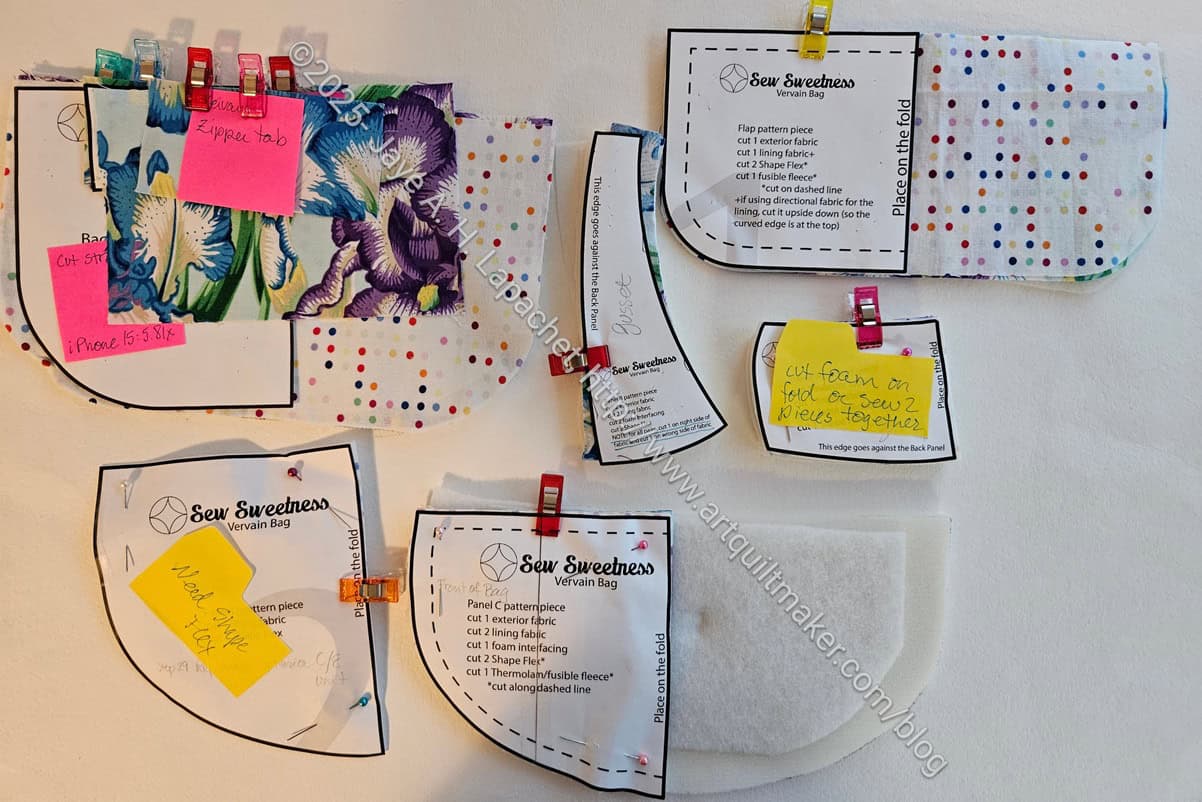
I started the Vervain at Sew Day the other day. The Vervain is a small belt bag (fanny pack). A front pocket on the outside and a lining zipper pocket on the inside lend storage space. The main compartment secures with the top zipper.
I am making this for my aunt, mostly because I have more iris fabric. She wants to use it to hold her cell phone on her daily walks I am happy to do it as she is my favorite aunt and I have wanted to make this bag.
Honestly, I almost cut out two of them. I restrained myself, though. I decided just to make the one and go from there.
Sew Sweetness has no templates for this one, which is a shame as the pieces are weirdly shaped. I used my scissors and that worked fine. I have a couple of pieces of foam I cut separately rather than on the fold. I’ll either stitch them together or cut a new piece on this fold this time.
I didn’t have much time to sew on Sunday due to my caregiving duties. Between Sunday and Monday, however, I sewed two more Old Town blocks. I really like having my design wall on which to lay them out.
Old Town block #16
Old Town block #17
These two blocks were possible because, first, I sewed all the HSTs I would need to finish the block assembly. Now it is just laying them out and sewing the pieces together.
These are some of the pillowcases I made at the Retreat.
Angel Family Pillowcases
I wasn’t planning on making them, but I was inspired by the chocolate fabric. I have been thinking of making the kids pillowcases and seeing the fabric at Family Threads was a little nudge. Knowing I had 2.5 days to get them done made the weekend a good opportunity. I don’t need another small project hanging around.
I chose some of the V&Co Galaxy fabrics for the cuffs. I wanted the pillowcases to be mostly equal so the kids wouldn’t fight. I like to call the chocolate pillowcases “Sweet Dreams.”
I used different bodies for the older kids. One of them really likes soccer and the other is really grownup, so I wanted to make him a pillowcase that was a little more sophisticated. The older boys got the same cuffs in different colors.
I wasn’t able to wash the fabric and I was pleased that I didn’t have any kind of reaction to ironing the unwashed fabric. I am giving them some Color Catchers** and strict instructions to wash them in hot water with the Color Catchers so they don’t bleed on their other laundry.
**N. B. : Obviously, you should shop at local quilt shops and small businesses. However, if you are too busy or can’t find what you need there, I use Amazon affiliate links and may be paid for your purchase of an item when you click on an item’s link in my post. There is no additional cost to you for clicking or purchasing items I recommend. I appreciate your clicks and purchases as it helps support this website.
As mentioned, I made about 15 of these blocks while on Retreat. The pattern called for sets of Flying Geese and Half Square Triangles ( HSTs), so slapping them together any old which way didn’t work. As you saw in my initial efforts, I had to choose the sets carefully. Surprisingly, it mattered which turquoise Flying Geese star legs went with the pink ring made up of Flying Geese and HSTs.
I call this type of work ‘controlled scrappy’. The paper bag method alone doesn’t work for me. I want a scrappy look, but I want the quilt to be cohesive.
I ended up coordinating the fabrics that make up the pink ring of Flying Geese and HSTs. Then I would match the lavender so that it wasn’t too dark or light in relation to the pink ring. I got a lot of different looks. I think it will make the viewer’s eyes move around the quilt.
There was no organized Community Quilt project at the Retreat this year as both Community Quilt chair people were otherwise occupied and didn’t attend. Despite that, the group made (or brought) ~15 quilts to hand in. First, I brought the White Strips donation quilt, but couldn’t hand it in, because nobody was there to collect it. Oh well, I’ll hand it in on Saturday.
Lee Ann put the finishing touches on the Improv quilt above. I made a number of the pieces and it was fun to see them. She said it has been sitting around for awhile. I was really glad to see what a great job she did.
Lee Ann’s Flying Geese quilt
Lee Ann also put together a Flying Geese quilt for the Community quilt project that was really interesting.
Peggy gave her the mauve-y red awhile ago and asked her to do something with it. The color wasn’t exactly Lee Ann’s style, but recently she got a layer cake that included fabrics she used for a background. This isn’t a quilt I would make, but I think the combination works really well! Lee Ann did a great job on the piecing. She ran around the room with the quilt fluttering behind her like a cape when she finished! It was a joyful act.
Anna’s heart quilt
Anna also finished a donation quilt that has been hanging around. We all helped her arrange the last few blocks, so she could get the quilt off her UFO list. I thought it was a Pulse quilt that Anna wasn’t able to finish, but she finally figured out it was intended for the victims of the Las Vegas shooting in 2017. In looking through the posts where I communicate the call for victims who need quilts, I was reminded how many times recently there has been some tragedy where a call has gone out. This quilt will make someone very happy. As usual, Anna did a great job.
Melinda was on a binge. She made 10 baby quilts (~34 inches square) from a tub of children’s fabric she can’t remember buying. LOL! I didn’t get any photos of her quilt tops and backs because she was so fast at showing them. She was pleased with how much she got done, but disappointed that she didn’t use up more of the fabric.
Pillowcase donation top
I made a donation quilt with some of the leftover fabric from the pillowcases.
I got the black and white triangle (pinwheel?) fabric from Melinda. She was happy to offload it. I added it to the pillowcase fabrics to make the quilt slightly larger.
As you can see, I messed up the layout somewhere along the way. Someone will like it.
Lynette’s Pillowcase quilt top
I wasn’t that happy with the black quilt once I saw what Lynette made with the other pillowcase scraps. She added a cream background fabric from Melinda to really make the pillowcase scraps shine.
Lynette is a on a potato chip quilt binge. I may have heard of Potato Chip quilts, but I have never made one. I might now that I know how great they can look.
Lee Ann’s special 4-patch donation quilt
Lee Ann found this block somewhere – I didn’t hear the story and made a donation quilt out of children’s fabrics. She added some solids and the quilt top looks really great.
I didn’t bring a scrap bin or my 2.5 inch squares bin and I was sorry. I had to scramble around for leaders and enders and that wasn’t easy. I got quite a bit done using other projects for leaders and enders, but it was difficult. I was shocked at how ingrained sewing with leaders and enders is for me!
I made really good progress on Old Town at the Retreat.
I was able to piece 15 (of 25 total) blocks. Each block has 69 pieces so that was a LOT of piecing. I was SUPER happy to be doing that piecing, I have to tell you.
Julie helped me put them up on the design wall so we could look at them.
Even with out much sashing, there is a distinct secondary design going on.
Old Town Retreat progress – detail
I sewed a little bit of the sashing and put that up as well, so we could kind of see what was coming.
I am back from the guild Retreat and pretty pleased with what I accomplished. It is ever enough? No, but I am trying to be satisfied with what I accomplished.
2025 Retreat Completed projects
Two bobbins made 7 pillowcases and 15 blocks containing 1,035 pieces, plus some of the chain Link blocks, two pouches and some various other leaders and enders pieces.
This is my stack of projects. I am quite proud of how much I finished.
Family Threads purchase 2025
I did decide at the last minute, while I was at Family Threads, to make pillowcases for the kids in the Angel Family. I didn’t give them anything last time I saw them. I am so grateful for their good care of my stepdad that I felt like I wanted to do something. Pillowcases have been on my mind so I bought some fabric at Family Threads and then made them.
Last weekend was the guild‘s quilt retreat. It was great to get away and sew for 10 hours per day. Like last year, we went to the St. Francis Retreat Center in San Juan Batista.
This is a picture of all the attendees with some of our projects.
2025 Retreat setup
The room had a different setup than last year, but we had plenty of space to work. There was a tall table where people sandwiched quilts and laid things out. There was a couple of design walls and two cutting tables.
2025 Retreat – my space
My space was more than I needed, but I used it all. LOL! I plunked my machine down when I got there and just used it in that space. I had a whole 6 ft. table to myself and could have moved it over to have more space on the left. It worked pretty well. I got plenty done.
Julie sat across from me, so we were able to chat and get opinions pretty easily.
Hats on machines
Fabric on machines
People started putting ‘hats’ on their machines at night. I am not sure what sparked that, but I saw it a few times with fabric and bags. Keeping the dust off? The machine with the fabric is SueG’s machine and I think she just wanted a decoration for her machine.
They fed us very well. Nice healthy meals even for me. I felt good after the retreat from a food point of view.
Julie and I brought some cocktails and drank them before bedtime. Such a good way to sleep well.
I was very cold the first night. I got up in the middle of the night and put on my fleece jacket. The next day I remembered doing that last year as well. I’ll have to make a note about it for next year.
All in all, a good layout, a good weekend and a general good time.
The Dogwood Pouch is another Sew Sweetness pattern. The pattern has multiple sizes, so it is a good one to buy (no affiliation), if you want to try out making pouches.
Dogwood Pouch size F & J – cut out
I haven’t made any of the sizes yet, but cut a couple of sizes (F & J) over the weekend. These will be more gifts for the angel taking care of my stepdad.
The pieces are mixed up to fit my photo setup. I used the same fabrics for both and I am interested to see how they turn out. If these are easy to make, I might make more.
I measured the leftover zipper pieces from previous projects and have some that will fit and match the color scheme. I just have to find some zipper tabs.
I sent another pillowcase off the other day. Well, really, DH did it for me. I was rushed off my feet last week and he had Friday off, so I asked him to do it for me while I left for the retreat.
The nephew should have this one by now.
I didn’t know what to call the main fabric, thus the Shark’s teeth moniker.
After finishing the White Strips #3 donation top, I needed another leaders and enders project.
This grey improv scrap top has hung on my small design wall for almost a year. I am shocked at that! I didn’t realize how much time had flown by.
My grey-black-brown drawer isn’t crammed full, but it isn’t empty either and I decided that I need to work on this project to get it off the design wall and to someone who needs it. Also, it will be a relatively quick win on my fabric used spreadsheet.
At the moment, as leaders and enders, I am sewing together all the scraps that are not strips. I am sewing them into pieces that I can then sew on to the top above. You can see pieces I have placed, but not sewn. They are just temporarily in place until I can add more pieces to them to make a unit large enough to expand the top. It’s a lot of piecing, because the pieces are small.
The main piece I have already sewn together is about 32 inches wide. I need another 10 inches, at least. I’ll probably have to dig into the strips to make the quilt big enough.
I finished White Strips #2 and was able to hand it in to the Community Quilts Committee at the Retreat.
I was not surprised, but rather disappointed that my white scrap bin does not seem to be emptier. As I said before, I have a lot of plain white scraps so I have to decide what do with the plain white scraps. I am going to work on some other scrap quilts until I decide.
Rose Petrillo bag – I found the pieces for this bag cut out, but not sewn.
Still UFOs
I still have UFOs. Who doesn’t, after all? A project in the ‘UFO’ category means I am stalled, it hasn’t been worked on in awhile or it is waiting its turn to be worked on. The list is a lot shorter and the projects are newer, for the most part.
I am annoyed that some of these are still UFOs. I have to give myself credit for completing some of them last year.
Handbag Sampler – I found the blocks! I found them in a bin I thought I had thoroughly searched! I also found the fabrics carefully stored together. Hooray!!
Sara of Sew Sweetness has a tutorial on adding a waist strap to any bag on her March Live show. It is recorded and available to watch on YouTube. This is good, because the tutorial is straightforward and shows you how to take your favorite bag or pouch and add a waist strap. Also, the tutorial is complete, but pretty short, so you can get busy in a few minutes. As an added bonus, Sara comprehensively shows you how to add a parachute buckle and an adjustable slider to the strap. It’s totally worth your time.
I ended up joining the Bag of the Month club I discussed at the end of 2024. It hasn’t been stellar. The January offering was ok and I planned to make it, but was busy with my mom. February required a frame and I just wasn’t interested enough to make the effort to buy one. The latest Bag of the Month Club offering was actually almost worth me joining. I might not have ever seen the pattern otherwise. It is from the Sewfisticated Craft site and is called The Pandora Charisma. It is a cross body bag with outside zipper pockets that open at an angle, allowing access. You can watch a video of the bag in action. There are a number of interesting bags on the site, including the Pandora Allure and the Voyageur Cube. I am not sure how practical either would be, but I like the shapes.
Moni Malene has a lot of great videos on IG. One that I saw reminded me of my journal cover pattern. It is also a journal cover and I might buy it and adjust the sizes to fit my own journals.
I needed more SF101 and since Joann is out of business, I went to Wawak. I also went to Wawak, because their SF101 is 60 inches wide, which is my preference. To get free shipping, I also bought some zippers, but accidentally bought pink separating zippers. Oops. This is why I prefer shopping in person. I hope there will be a store that has a good selection of zippers. Wawak does, but I don’t know how I got onto separating zippers. I’ll have to find a project that requires separating zippers.
Remember last month when we talked about printing AO sized patterns? Needles Studio in Los Altos can also print your PDF patterns.
The Sewfisticated patterns above is from the same shop as offers the Sewfisive foam. I wonder how different it is from Soft and Stable? The Pandora Charisma calls for various thicknesses and I would like to try it. One interesting thing is that they have some self adhesive versions, which seem like they would be better than iron-on stabilizers or foam. Some of the options are out of stock and I’d like to get them all so they can all be shipped at once. I can’t seem to find it from any other suppliers.
Exhibits and Organizations
Women’s View 2025 is in progress at Twin Pines Art Center in Belmont for only a few more days. I hope you get to see it.
The San Mateo Office of Arts and Culture is pleased to support the annual Congressional Arts Competition for high school students in the 15th Congressional District. Each spring, a nation-wide high school arts competition is sponsored by the Members of the U.S. House of Representatives. The Congressional Art Competition is an opportunity to recognize and encourage the artistic talent throughout the country.
The winning artwork of our district’s competition will be displayed for one year in the U.S. Capitol building in Washington D.C. The exhibit will include the winning artwork from all participating districts from around the country. The winning artwork is also featured on the official House of Representatives website’s Congressional Art Competition page.
Submissions are due April 6, 2025. Learn more about rules, eligibility, and details on how to apply by visiting Rep. Kevin Mullin’s website.
Join our guild. We’d love to share sewing projects with you.
**N. B. : Obviously, you should shop at local quilt shops and small businesses. However, if you are too busy or can’t find what you need there, I use Amazon affiliate links and may be paid for your purchase of an item when you click on an item’s link in my post. There is no additional cost to you for clicking or purchasing items I recommend. I appreciate your clicks and purchases as it helps support this blog.