I am glad this thing is completed. It was a pain from start to finish, but it will be cute for my young friend.
I think it will be perfect for a beach bag or some such for a teenager. I do think a teen would like it better.
I think I am not liking it that much because of all the problems I had with hardware. The last part was the*&^%$ grommets. Dritz grommets, I think, are not that good in terms of quality. DH helped me and we had problems putting them in. He had to pound like a crazy man and we ruined 2 of them in the process.
Still, the adjustments I made to the sizes worked out and I did a nice job finishing, so I think it looks ok. One friend told me my standards are too high. I’ll keep that under advisement. 😉
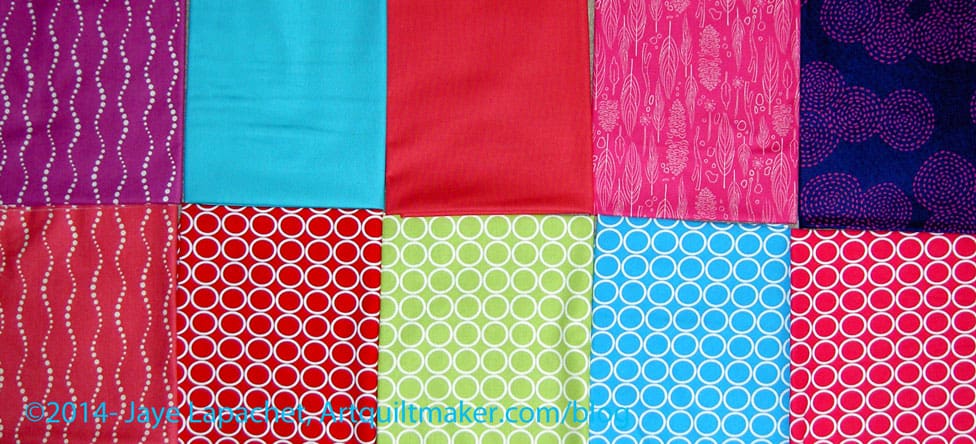
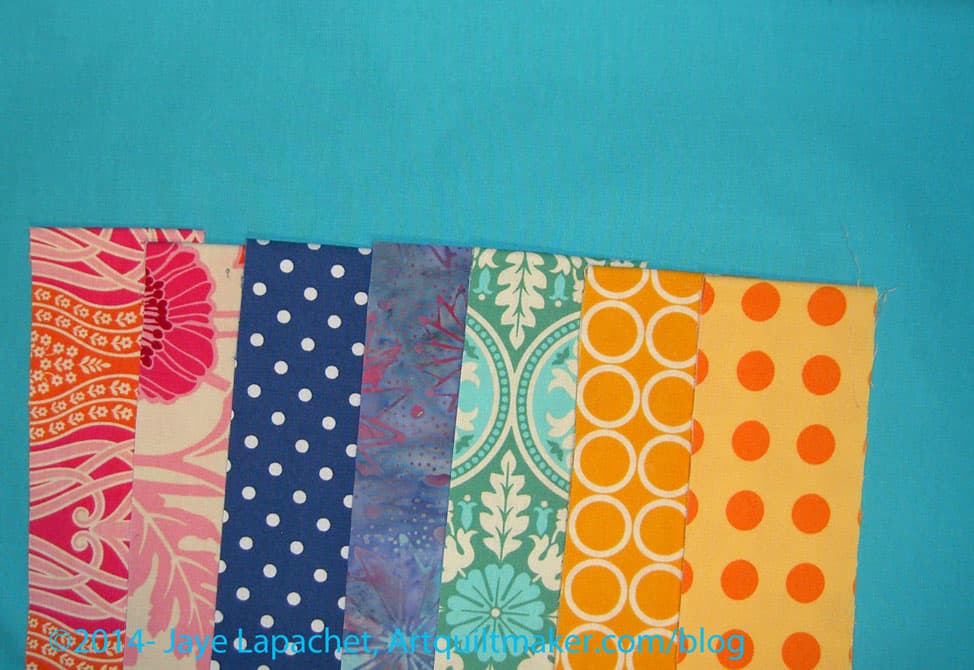
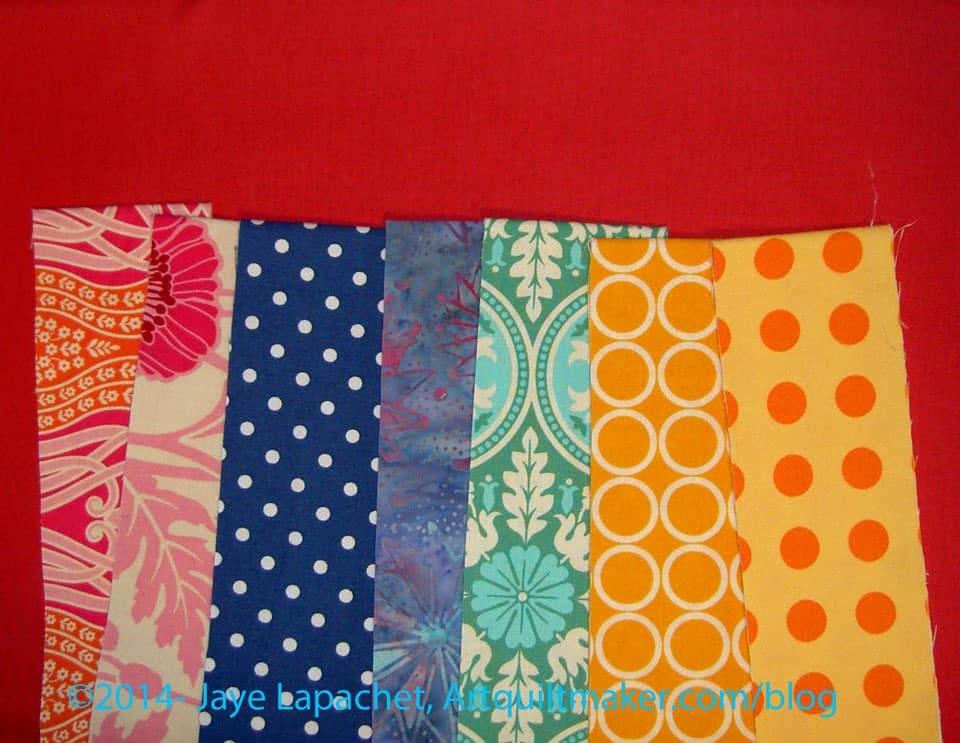
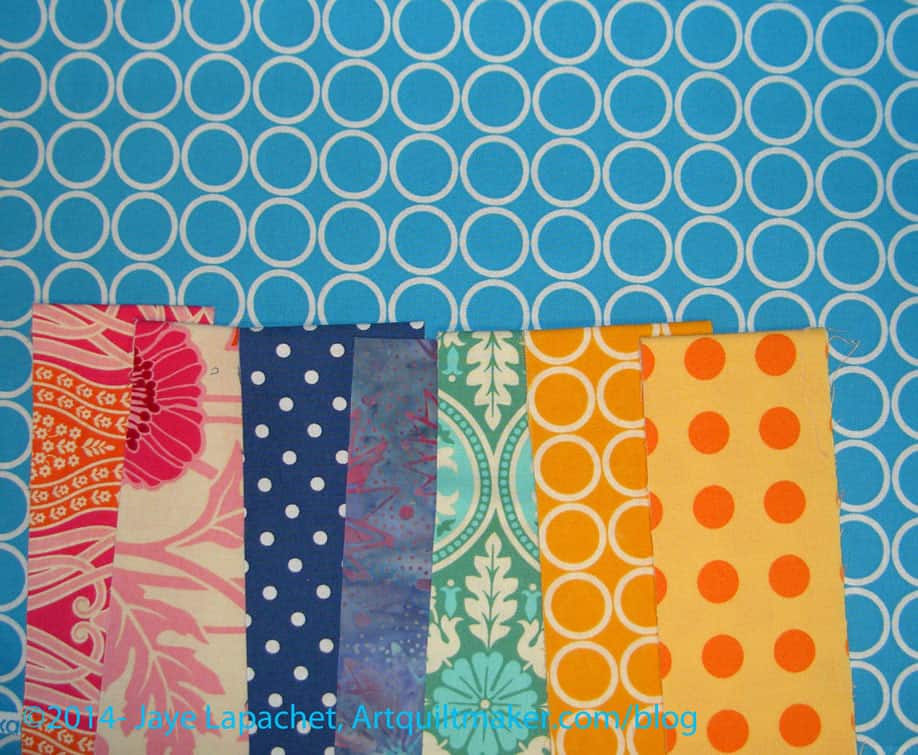
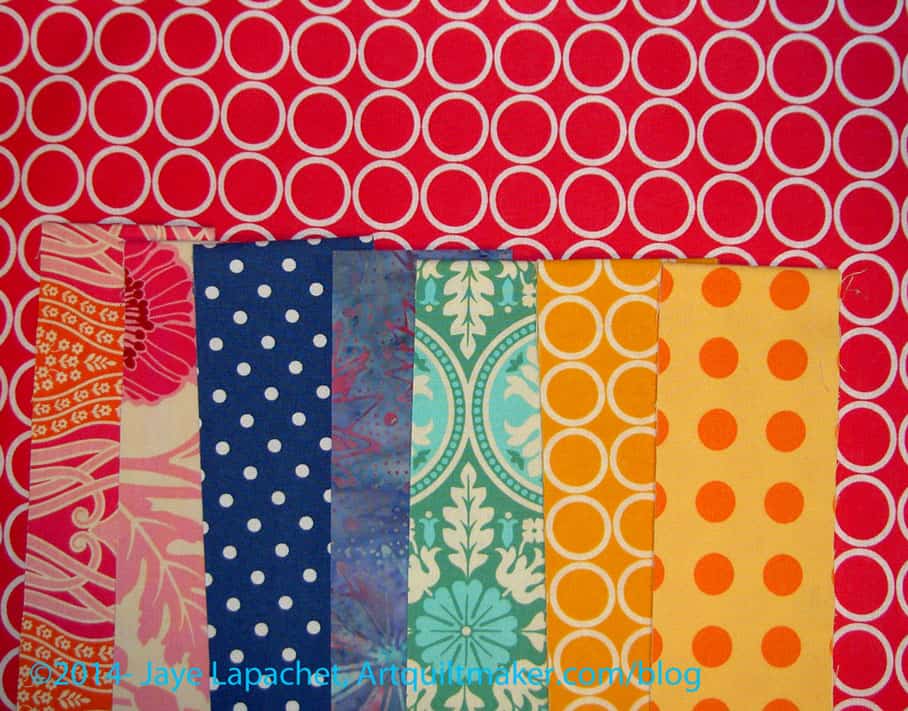
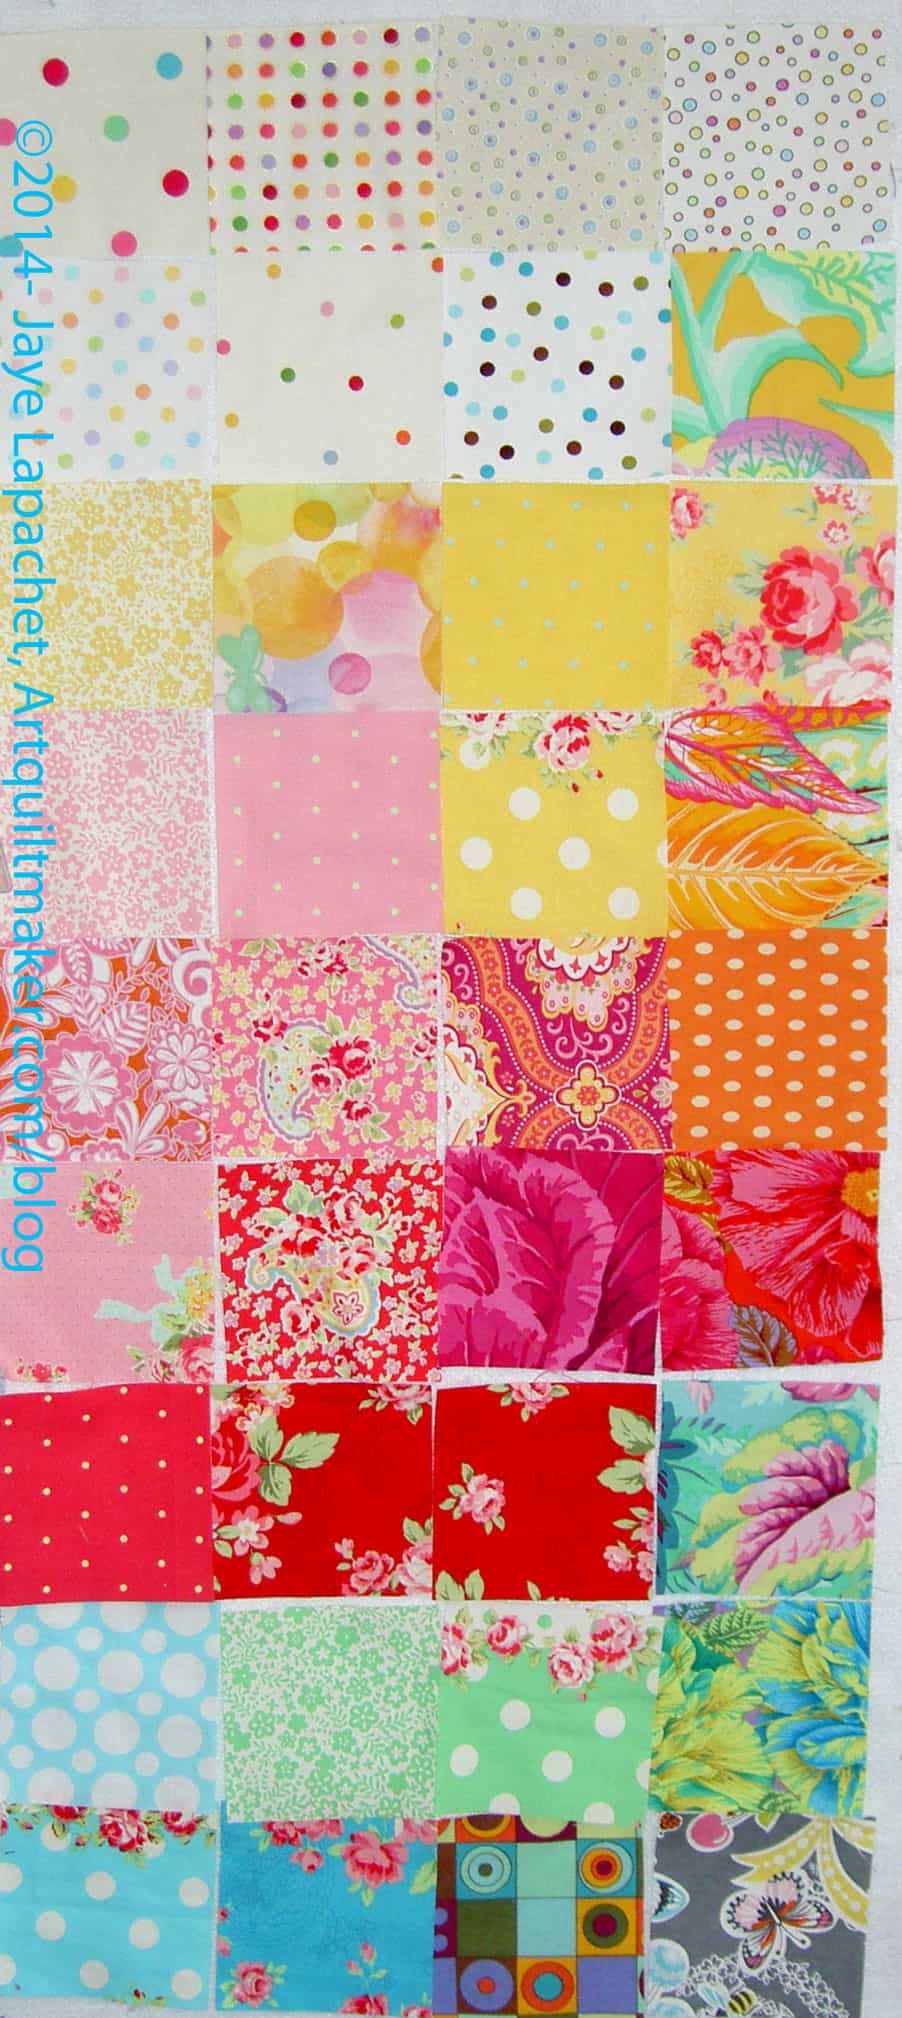
Some confluence of events made the planets come into alignment over the weekend. I picked out the rest of the fabrics (plus a few extras) for the Russian Rubix, photographed them and put them up on the wall. I think I might be ready to sew. I think so.
The above fabrics are the fabrics I picked. I didn’t pick them after comparing color cards and color wheels to what I already had. I wish I could say that I did a lot of work to find these fabrics, but I would be a liar. I received a coupon from Pink Chalk Fabric and, despite my vow to tone down the fabric buying, I went and looked.
Then I bought some fabrics. In fairness, I had deleted a previous coupon.
Yes, I couldn’t help myself. Something about these fabrics called my name and when I received them, I thought “yes, these are the fabrics for the Russian Rubix.”No, there aren’t a ton of cool colors like I thought I needed, but some and I think the whole group, mostly, works.
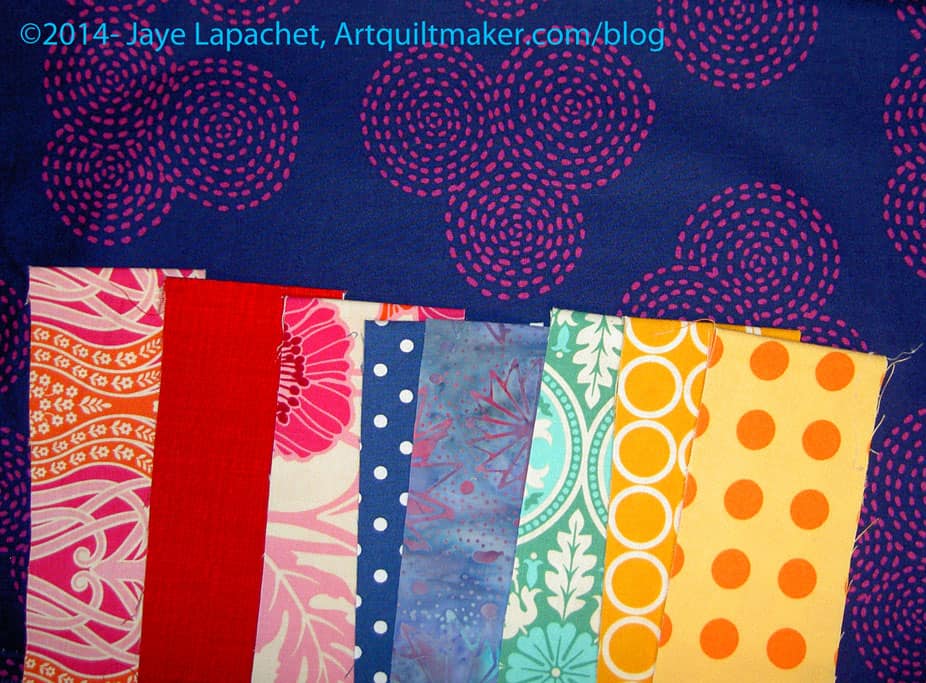
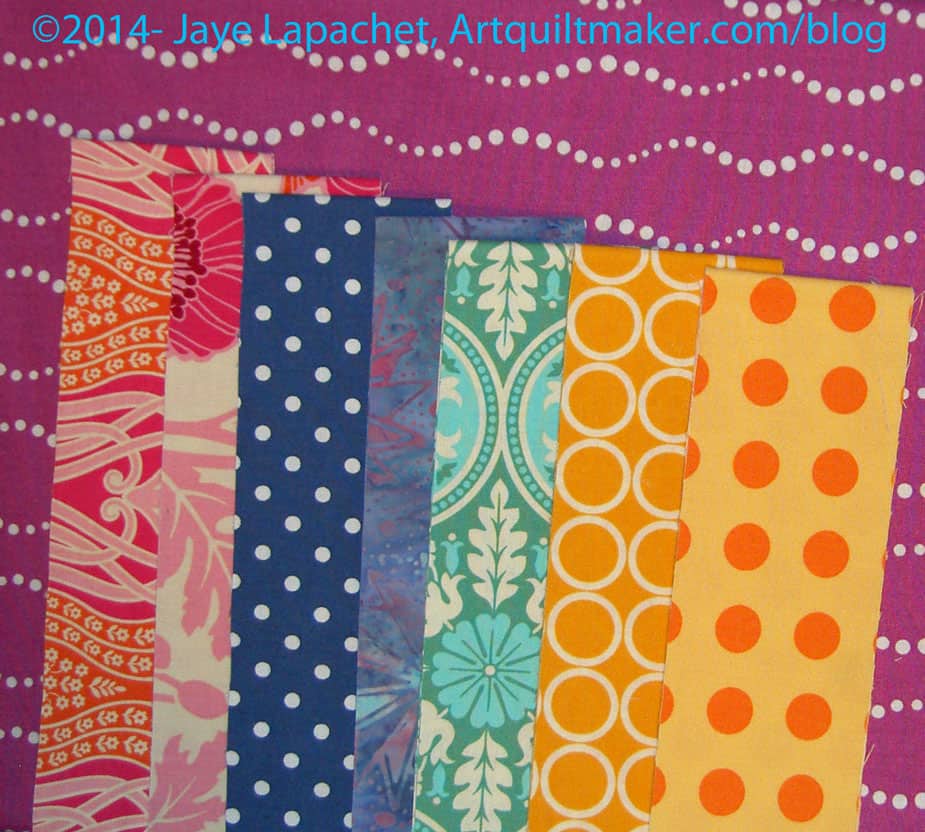
Michael Miller Fabrics Midnite Gems Stitch Circle Passion
I also thought of the dark blue/purple Stitch Circle fabric (upper right hand corner) quite a bit after I bought it. I couldn’t get it out of my head and I was really pleased when it arrived. It shimmers in a way. You should get some and look at it.
Alison Glass Sun Print Bike Path Fuchsia
One thing I liked about this fabric is stripey effect.I didn’t want, necessarily a stripe, though I auditioned some, but this has a stripe effect without the stripe being straight. I also thought the color was one that I was missing from the group.
Free Spirit Designer Solids Parrot Blue
I am becoming enamored, again, with solids.When I first started to make quilts, I thought I would do all of my quilts in solids. The only thing that tempted me into the print arena was a very expensive piece of a border print. I bought an 1/8th of a yard and used it very judiciously in my Sampler quilt. Now look at me! Barely a solid in sight. 😉
Free Spirit Designer Solids Cranberry
The solid above is definitely NOT cranberry. That is the official name, but it is not like any cranberry I have ever seen, especially if you go off cranberry juice. It is very similar in color to the Alison Glass Sun Print Bike Path Peony below. I think it works and I didn’t have many solids in the warm colors.
Sarah Jane Wee Wander Nature Walk Magenta
I like this print very much, but I don’t like the name. If I had seen the name before the print, I probably would not have looked at it. It turns out that I really like the feathers. It is a good intermediate print between the solids and some of the bold prints I have included.
Alison Glass Sun Print Bike Path Peony
I like the idea of the stripe as I mentioned above, but I also like having multiples of the same print in different colors. Again, there is some continuity without being boring.
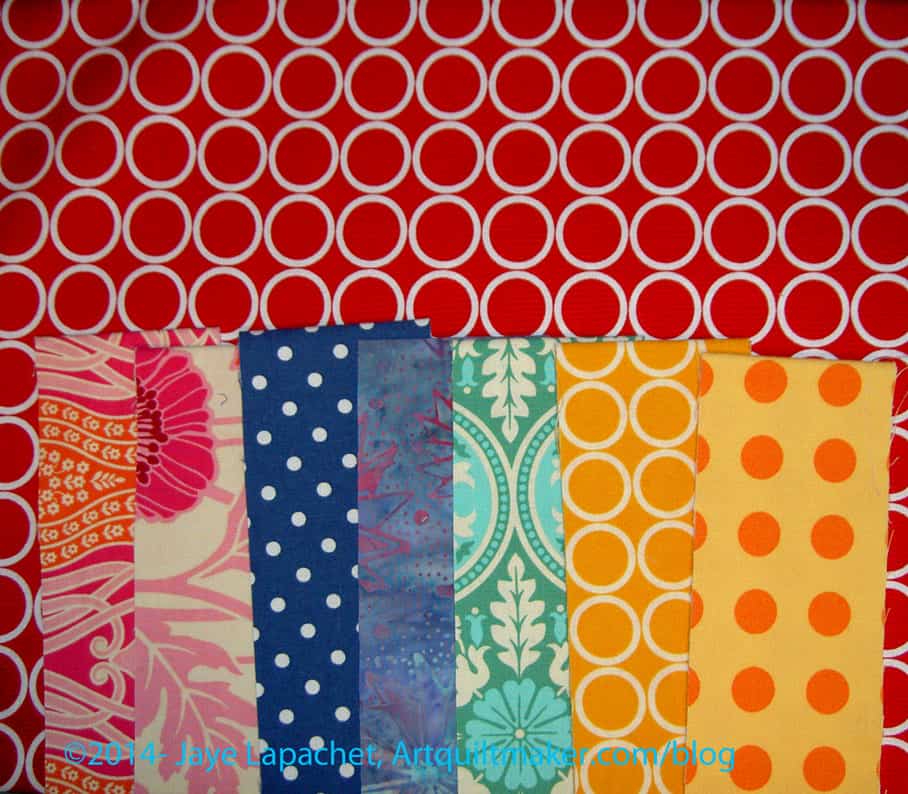
Metro Living Circles Red
If I had to throw out one of the prints, it would be this Metro Living Circles Red. I am not 100% sold on it as part of the group. It might be the one in the quilt that is a little off and, thus, it works. Or it just might not work at all and I need to not use it.
I realized after auditioning the prints that I had a number of these Metro Living Circles, even one already in the group of fabrics I will use. Hhmm. Who knew I would like these circles so much? They are prints that I might not use if I did not have this Russian Rubix project even though I would buy them.
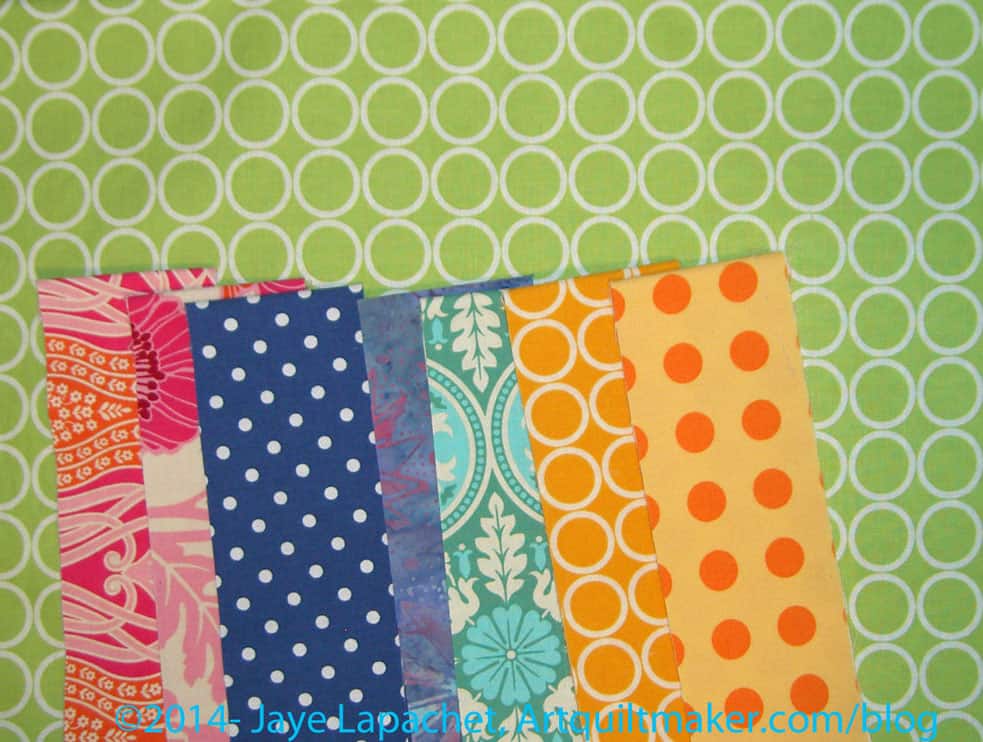
Metro Living Circles Chartreuse
This chartreuse is definitely in. It really lightens up the other prints. That sounds odd since the ones I chose are mostly light, but it reminds me of a ray of sunshine streaming in on the fabrics.
Metro Living Circles Turquoise
The circles above are a fabulous color and go really well with the Free Spirit Designer Solids Parrot Blue. I like the way it looks with the Notting Hill pink prints as well.
Metro Living Circles Fuchsia
I can never get enough pink, though this is called fushsia. These circles make me think of bags. Perhaps I should save some so I can make a bag, or accent a bag, with them.
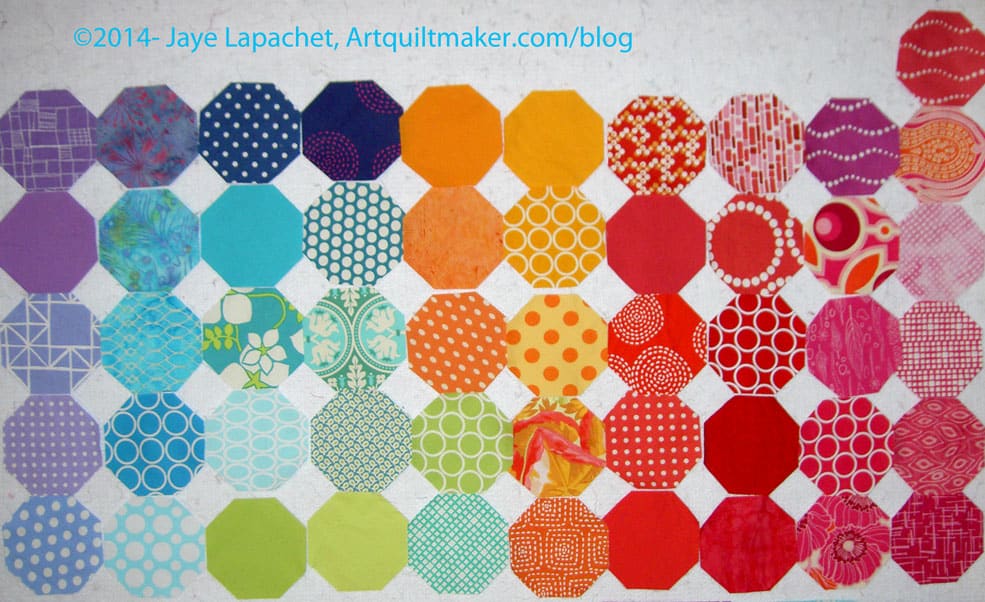
Colorful Octagons
I really like the way they look together. I feel like I have made a successful stack, like Anna Maria Horner and some of the other modern designers put together. Yes, I have one extra and these are way more fabrics than a Jelly Roll. My quilt, my rules? I guess I have enough to toss some if I don’t like them. I am pretty sure I want to make a couple of the blocks with just these fabrics. Let’s see if I remember to do it.
You might think it is odd that I used the same strips to review each of the fabrics, but I thought I needed a constant.
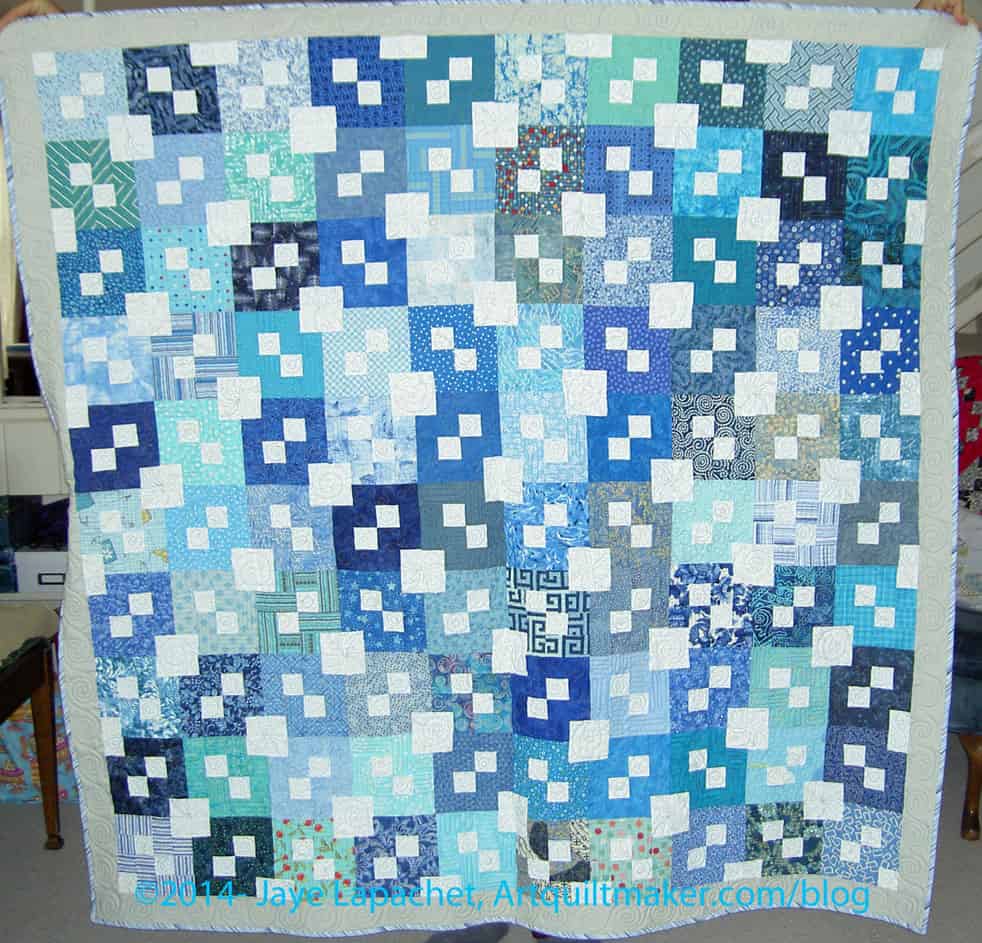
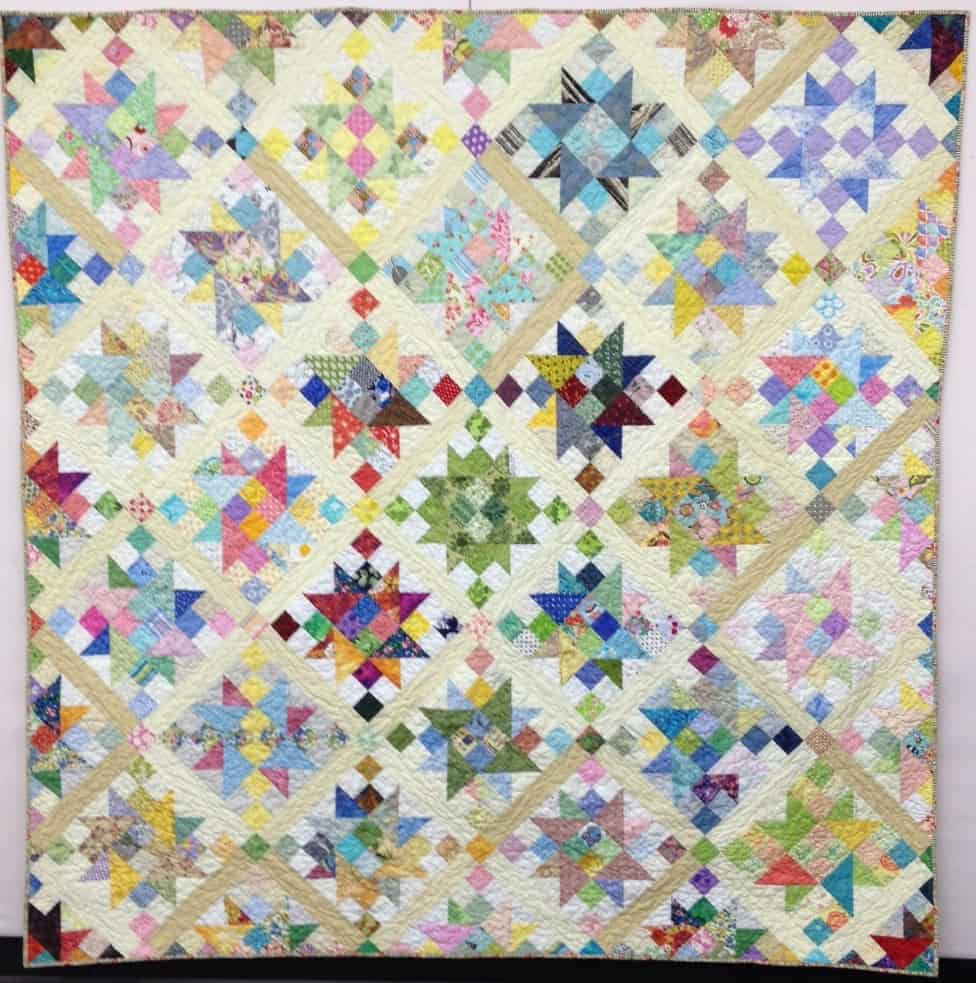
The Infinity Quilt is finally finished. I finished it last week and am relatively pleased.
I think it is an interesting quilt from a color perspective. I didn’t really try and arrange the blocks much. They came out pretty well when I laid them out. There is a quite a lot of variety in the fabrics and also a good balance of light and dark. There were a few places where I switch a couple of blocks so that a print was next to a tone-on-tone rather than next to another print.
Colleen did a great job quilting it. It is a little stiff. I can’t tell if it is from the Harry Potter panel I used for the back or if the quilting made it stiff, so I might wash it.
Gradation is a principle of design, but it is not included in all books about design.
If gradation had an opposite, it would be contrast.
Definitions:
Gradation refers to a method if creating the elements by using a series of gradual changes in those elements. Unlike contrast, which stresses sudden changes in elements, gradation refers to a step-by-step change.” For example, gradual changes from a dark to light value, or from large to small shapes would be called gradation. (Deer Creek High School Principles of Design)
An idea that is expressed by a smooth flow of colors, size, shape, etc from one part of the continuum to the other. (The Nature of Design)
“Gradation of size and direction produce linear perspective. Gradation of of color from warm to cool and tone from dark to light produce aerial perspective. Gradation can add interest and movement to a shape. A gradation from dark to light will cause the eye to move along a shape.” (John Lovett)
Gradation definition, any process or change taking place through a series of stages, by degrees (definition from Dictionary.com)
“Refers to a way of combining elements by using a series of gradual changes. Examples of gradation:
1. gradually from small shapes to large shapes (an example is Ann Johnston’s quilt, Seven, which you can see on pg. 94 of The Quilter’s Book of Design.
2. gradually from a dark color to a light color
gradually from shadow to highlight ” (Newton K-12)
Examples:
You gradation to express depth. If you want to show a long road, put a line of trees next to it with the largest closest to you and the rest in ever diminishing size to the horizon.
Gradation of shading on a circle produces a ball that looks 3D for the eye.
Notes:
“Understanding that gray lies between black and white gives us an idea of what lies between light and dark. When we think about the value gradation of any given color, we can imagine it in its darkest form as having black added and in its lightest form as having white added.” (A Fiber Artist’s Guide to Color and Design, pg.104)
gradation is very common in solid fabrics. If you look at the Kona color card, you will see excellent examples of gradation from one color to another.
“Gradation is most often used with the Design Element Color. But with a little bit of thought Gradation can applied to the six other Design Elements as well.
Line – A gradual change from perpendicular to curved.
Direction – A gradual change from vertical to horizontal.
Shape – A gradual change from angular to round.
Size – A gradual change from small to large.
Texture – A gradual change from smooth to rough.
Value – A gradual change from light to dark.
Gradation is the Principle that banishes boredom from your work. It adds movement to otherwise boring areas. I consider ti one of the most useful Design Principles and one of the most easily applied. ” (Fine Art America Blog, Dec 21, 2009)
Recently Daisy asked for some of us Twilters to donate some pastel/springy Scrapitude blocks. It was intended for one of our Twilter/podcast pals who is going through a tough time.
As you know, my fabric selection tends to brighter fabrics so I had to dig deep to find springy pastel fabrics. I succeeded and came up with these two blocks, which I think are quite pretty.
Pastel Scrapitude Finished
Daisy finished the whole quilt around March 5 and sent it off to the recipient on March 6. There are a couple of really dark blocks. Daisy did a good job clustering them in the center of the quilt.
I see one of my blocks (center top with the yellow with orange dots) and another in the middle towards the bottom.
Daisy really did the lion’s share of the work. I was pleased to be asked to be a part of the project. It was such a nice thing for Daisy to organize.
Daisy had put tracking on the package and reported back to us as she watched the package cross the country. There was a lot of excitement when the package went “out for delivery.” We all on pins and needles as the status changed to ‘delivered.’ Finally squealing could be heard across the country as the recipient posted to Twitter thanking everyone. It was unexpected and perfectly timed.
The recipient LOVED it. She was very surprised and slept under the quilt that very night.
Pillow basalt is a volcanic igneous rock that forms when lava of basaltic compositionis erupted underwater.
pregnancy pillow
Pillow Culture showcases innovative pillows using current material technologies that relate to human comfort, beauty and well-being.
cushion
Gideon Johnson Pillow (June 8, 1806 – October 8, 1878) was an American lawyer, politician, and Confederate general in the American Civil War.
pillow cover
The Hair Pillow offers the right blend of firmness and comfort to help suspend the head and neck, preventing the hair from being compressed.
bed pillows
Definition: “A pillow is a cushion support for the head or other parts of the body, usually used while sleeping on a bed, or for the body as used on a couch or chair.[1]
There are also throw pillows[2] (also called toss pillows, and in the UK Pillow shams), which are pillows that are purely decorative and not designed for support or comfort. A cushion[2] is a soft bag filled with air or padding such as feathers or foam rubber. In the United Kingdom, pillows used on chairs, sofas or daybeds are called cushions, with the word pillow used only for pillows on a bed. In the UK, cushions are usually square, while bed pillows are oblong.[3]”
pillow shams
Michelle M. Pillow: Bestselling Author of the Dragon Lords and Lords of the Var futuristic romance series.
pillow pets
pillow python
Pillow is a borough in Dauphin County, Pennsylvania, United States. The population was 304 at the 2000 census.
pillow fight
Pillow shortage in Sochi?
pillow talk
The Fort Pillow Massacre in Tennessee on April 12, 1864, in which more than 300 African-American soldiers were killed, was one of the most controversial events of the American Civil War (1861-65). Though most of the Union garrison surrendered, and thus should have been taken as prisoners of war, the soldiers were killed. The Confederate refusal to treat these troops as traditional prisoners of war infuriated the North, and led to the Union’s refusal to participate in prisoner exchanges.
Post the direct URL (link) where your drawing, doodle, artwork is posted (e.g. your blog, Flickr) in the comments area of this post. I would really like to keep all the artwork together and provide a way for others to see your work and/or your blog.
We are also talking about this on Twitter. Use the hashtag #CPP
The Creative Prompt Project, also, has a Flickr group, which you can join to post your responses. I created this spot so those of you without blogs and websites would have a place to post your responses.
I was thinking about my WIPs last Sunday as I tried to adjust to the horror that is Daylight Savings Time. There is a lot of chaos in my head about projects lately. I couldn’t figure out why until I realized that I had too many leaders and enders projects and not enough front burner projects.
At the moment my leaders and enders projects are:
The Disappearing Pinwheel
Black/grey donation quilt
Brown mosaic piecing
I really was quite happy with the progress I was making on each of those projects when they were the only leaders and enders project on which I was working. Then I finished Scrapitude and all I had with a quarter inch seam allowance were leaders and enders projects. Now none of them are looking very appealing.
To make matters worse, the Scrap Lab Backpack, as I mentioned, uses a 1/2″ seam allowance which requires a different foot, so there is no progress being made on the leaders and enders projects.
I tried to work on the DPW as a front burner project and I just wasn’t as happy. I like that project, but it isn’t exciting enough to be front burner project. This is the moment when projects get derailed. I don’t want to replenish my UFO list so I need to power through these projects and get them done.
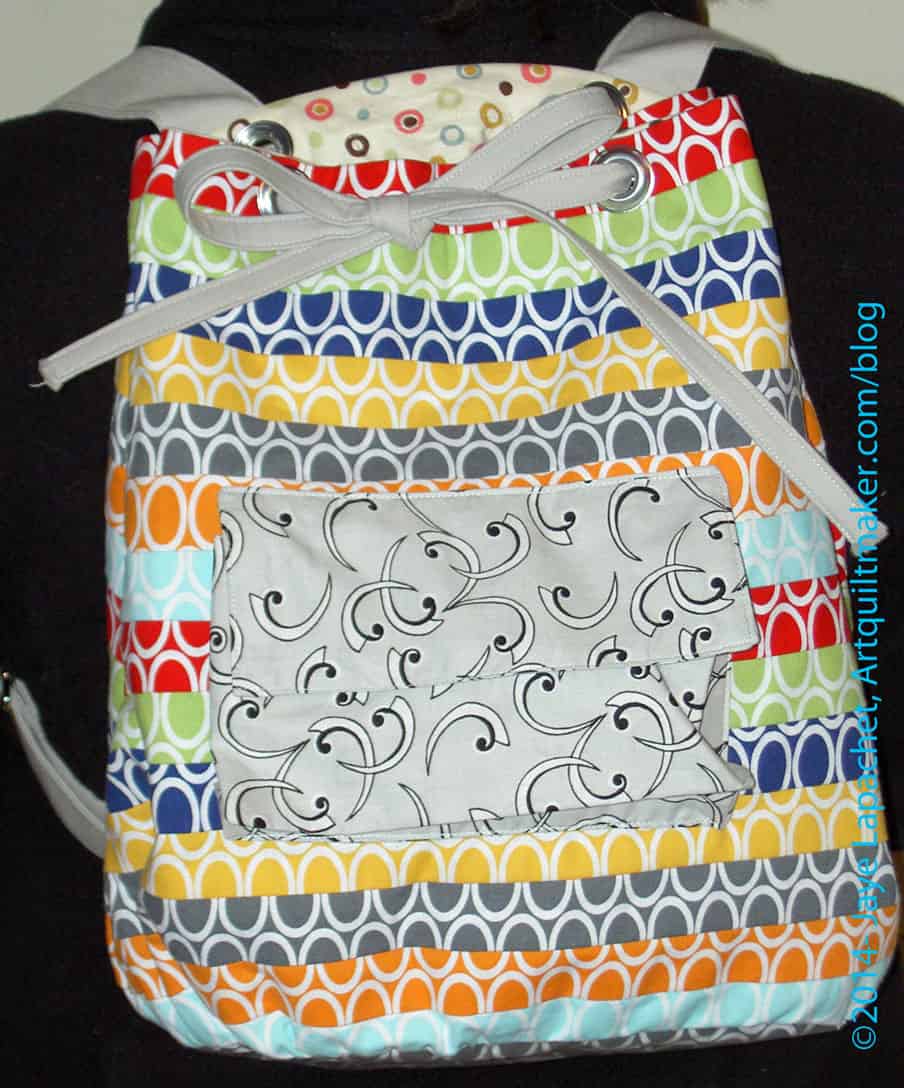
Some weeks ago, I saw a backpack in the Scrap Lab article in an issue of Quilts & More. The pattern is also on the web on Allpeoplequilt.com. It captured my attention in a “hhmmmm interesting” kind of way. After meeting a young friend at one of DH’s events, I decided to sew it for her. I wanted to make it, but I didn’t want to keep it, so this was a great solution. The Fat Quarter Shop, at that time, had a fabric kit (no hardware), which I bought.
Scrap Lab Backpack Bag Body
Last weekend I started on the project. It has a lot of steps and the directions were not always completely clear *to me*. I know magazines have limited space.
The pattern calls for fat quarters to create the bag body. That is what came in the kit. The pattern also said that I should cut 2″x21″ strips from the FQs. The problem turned out to be that the FQs were not 21″ wide even before I squared them up. It made no sense to me since that is what I understood the whole point of the Scrap Lab is – to use a small amount of fabric. I worked at adjusting all the measurements to accommodate this problem.
Sewing Strips
The backpack requires two panels, like the one made from strips (shown above). In order to keep the strips in order, I laid them out on my design wall and sewed them in order. I found that, in order to keep them in the same order, I had to sew them in the same order, but upside down. For example, I always placed the strip I wanted to end up lower on the panel on top to sew it.
I was further disappointed when I also found that the half yard of background was not enough for all the pieces that needed to be cut. I am not sure if I cut wrong. I didn’t see a cutting layout (like they have in garment sewing), so I cut the largest pieces first, but still did not have enough. Shifting gears deftly, as I did not what a ‘lack’ of fabric to derail the project completely, I chose a different fabric for the pocket, which will look nice and will solve that problem. All in all these fabric problems were unexpected and, as I said, disappointing.
I worked on it on Sunday this past weekend. It has a 1/2″ seam allowance, so I couldn’t really make progress on my various leaders and enders projects without the 1/4″ foot on the machine. That was a little frustrating.
I did make good progress on the backpack, though. I have the straps and drawstring done. I have the bag outside and the lining done. I wasn’t able to finish it, because I didn’t have a slider buckle/triglides. I also didn’t really understand what they were even after searching out a photo on the web.
The slider buckle/triglides turned out to be pretty hard to find. I found some nice ones in the UK and Australia. Amazon has packs of 50. My local Joann and Beverly’s had none. ERGH! Monday, after work, I went to Britex and they had them there. They usually have weird stuff like this. With bags being so popular, I was surprised that these were so hard to find.
It was good that I went to Britex, though, as the people there actually know something about what they sell. We looked at our own bags and the pieces I was thinking of buying and kind of talked through where the parts went on the bag. It was a good experience.
I think I have said before that I prefer to make all the fiddly pieces first – straps, pockets, etc. This pattern is not written that way, so it was a little hard to backtrack and make the straps and drawstring when I was on a roll with getting the larger pieces of the bag done.
There were some directions on the pattern that were confusing or poorly explained. I was able to figure out making the pocket, even though I wasn’t familiar with the type of pocket. Once I figured out that it was a 3D pocket, I thought the method was clever. The pattern leaves the inside edges raw. The method could have been improved somewhat by finishing the inside edges, which I did even though the directions didn’t say to do it. The location of a 3D pocket is a little odd, I thought, as whatever you put in it will pull the whole bag down from the shoulders.
I had some trouble applying the pocket to the bag. The directions just say to topstitch the pocket on to the body of the bag. They do not take into account the corners which are multiple layers thick. Since the pocket is 3D, I could have used some more detailed directions and additional photos on going around the corner.
I also thought the pattern on the web did not use the web to maximum effect. I would have had the PDF, as they do, since it is easy to print. I would have also linked out to videos showing how to apply the pocket, how to add the grommets and other handy hints. These videos could be used over and over for many different patterns and would drive traffic to their site.
It could be that this pattern was perfectly written and the problems were all user error. I am a visual person and learn better with lots of pictures and when people show me how to do something.
I was determined to make the Scrapitude back this past weekend. In order to do that I had to finish the label. I had some time on Friday night and used it to make the label and order some rotary blades.
Rotary blades, you ask? What do they have to do with making a back? There are some tasks that are not hard, but they can interrupt the flow of sewing if you have to stop and do them. I have been trying to identify these tasks and put them into slots of time that are not suitable to sewing.
Making labels, making bindings and ordering rotary cutter blades are three of those tasks, which I have identified so far. I figure that if I put them into these odd slots of time, I’ll get more sewing done. It’s a theory anyway.
I wasn’t up to sewing a lot of small pieces together, so I tried to find some larger pieces of yardage. I found the large piece of Philip Jacobs. I knew I had a large dot piece that I liked with it, so I found that as well and went from there. I always have to piece a bit around the label, but I found that bird and tree print, which was perfect, because I didn’t have to cut it up too much. The trees show up pretty well and I was pleased to see the butterfly. There is something nice about that print and this turned out to be the perfect use for it.
I made the binding last weekend, so this baby is ready to go to the quilter. Yippee!
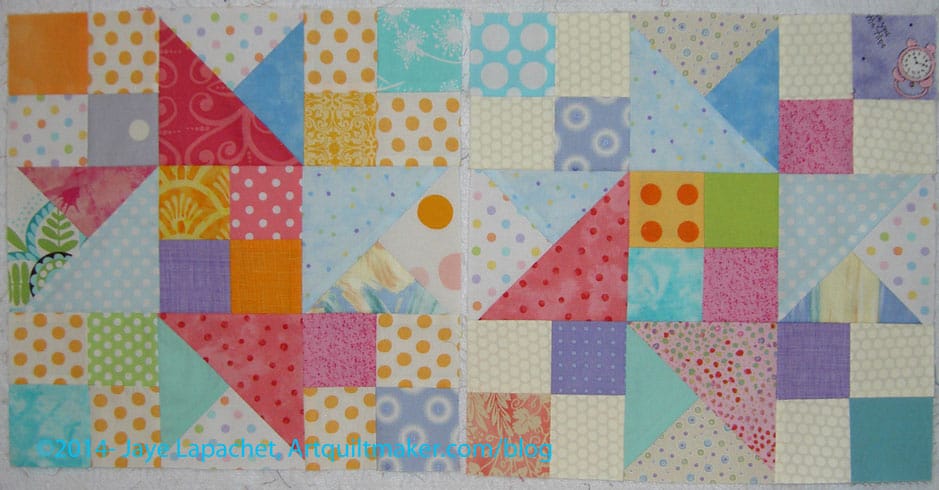
I picked out more colors for the Russian Rubix last week.I’m nearly there. I seem to be inspired to make progress all of a sudden. Perhaps my mind is freeing up from the rigors of other projects. I am not sure why that would be true since I seem to have three projects actively going all at once.
I can’t remember, offhand, where I bought that dark blue. It isn’t quite navy, but it definitely tends towards navy. It is darker and more primary than the other colors I have selected so far, but somehow I like it. I think it goes well with the selection of colors already in the pool.
It has taken longer this year to get to this point. I didn’t have the Retreat as a firm deadline. I decided that I had to create a deadline and few pieces of fabric I had washed, but not pressed provided the deadline. As soon as I took care of those, I closed the collection.
I haven’t sorted the squares, but I have an idea of how I will sew them. I think I need to finish a couple of projects before I start sewing this one. That doesn’t mean that I will put it off forever, but I have to clear my mind so I can spend time on arranging the squares.
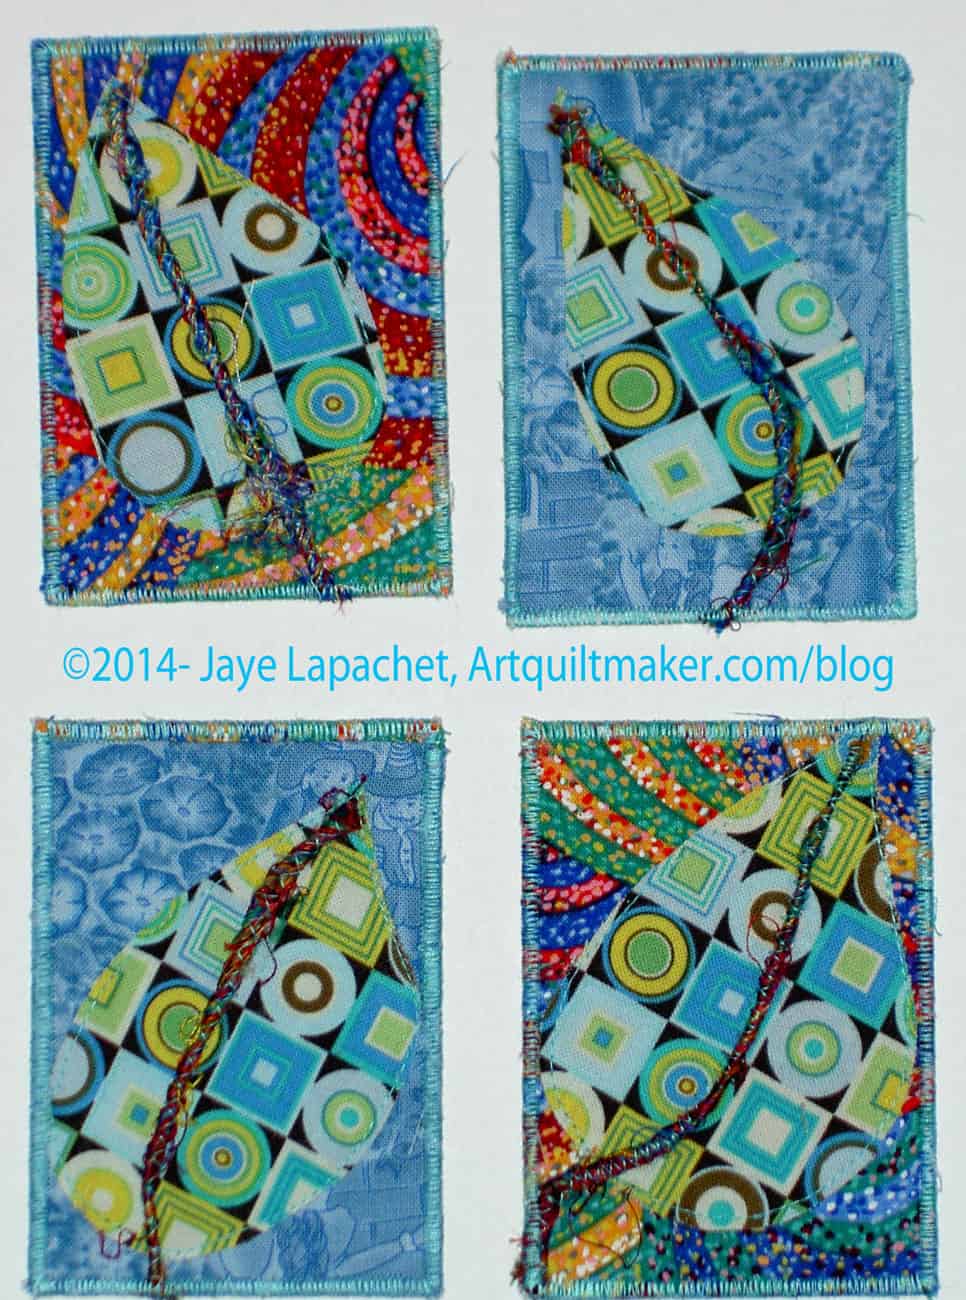
I made some ATCs for the CQFA meeting, leaving it, again, until the last minute. I worked on them on Friday in between starting the process of renewing the Young Man’s passport and some other chores. I really didn’t have an idea, but then I hit on the idea of a leaf and the design went from there. I ended up with something with which I was very happy.
The step is a piece of thick thread or yarn. I only had about a yard of it and now I have, perhaps half a yard. Maureen thought the thread was sari thread. I hadn’t heard of that before and she explained that threads from saris are wound together to make the thread. It is colorful.
I couldn’t find my couching foot, so I used a zig zag to keep the thread on the ATC. It worked pretty well, but I need to practice more.
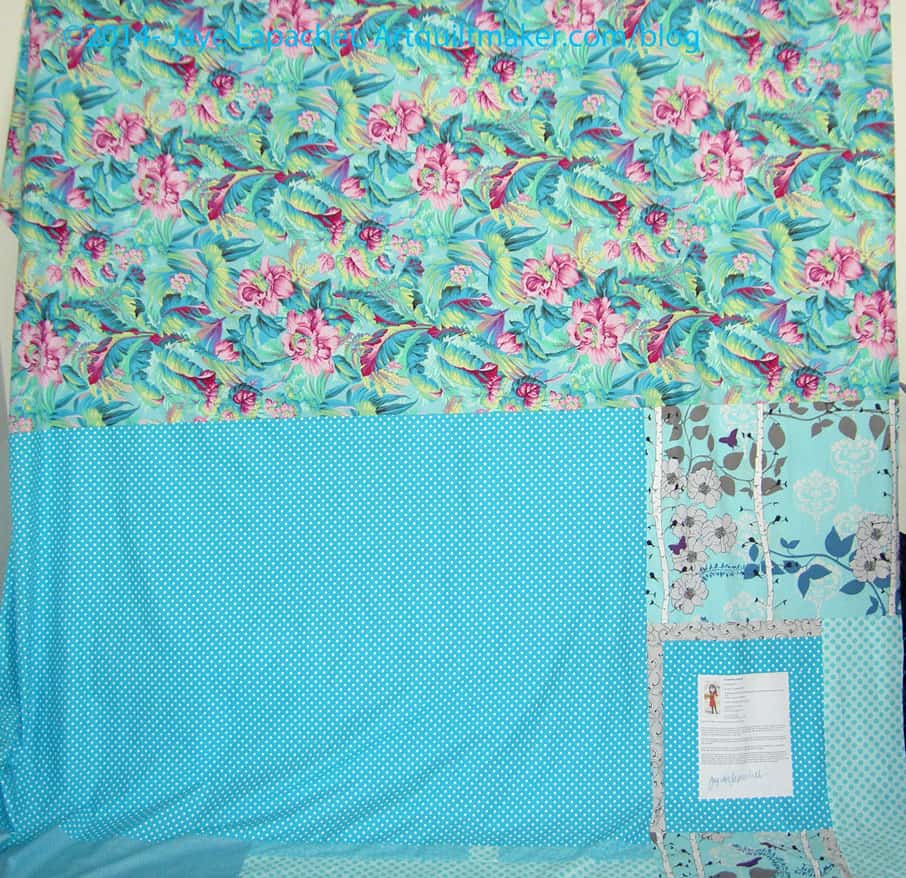
The background is from the Infinity quilt. It is leftover from the quilter cutting off the sides of the backing. I am sure you will see a journal cover or two along the way as well. 😉
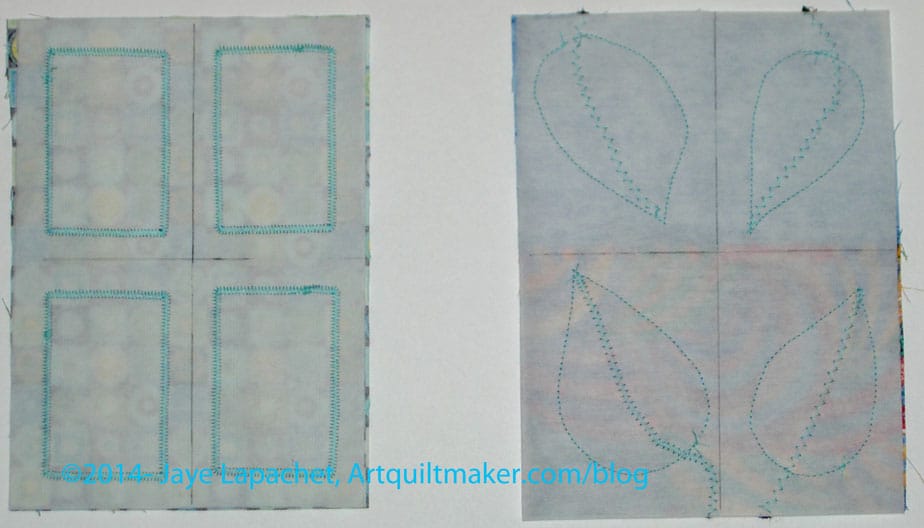
ATC guts
Inside the ATC, I use 2 layers of tearaway stabilizer on both sides. This allows for no wrinkling when I zig zag.
First I make the backs and put the labels on. I do this first, because it doesn’t really matter what the back looks like. It gets me in the mood and gets everything cut. In this case, I used the same fabric – or group of fabric – for the back, front and leaves. You might be thinking that you see different fabrics ont he finished ATCs and you would be right. When I say ‘fabric’ I mean that which has been cut off the sides of the backing of my quilt. Even though there are different fabric designs, technically, it is one piece of fabric to me. I used what was on the end of the leftover backing fabric.
ATC fronts in progress
I tried, really hard, this time to make the corners of the stitching around the labels look really nice. I had to slow down.
They are a little easier to work with when I make them in a group and then cut them apart. I had to take care when lining up the motifs for the front and the back.
ATCs are 2.5″ x 3.5″. You don’t have to make them out of fabric. Some of the ones the CQFA people trade are partially paper. I like mine stiff, thus all of the interfacing.
The Fireplace Project in East Hampton, New York, is a contemporary art gallery that features solo and group exhibitions, and artistsí projects.
Definition: “A fireplace is an architectural structure designed to contain a fire. Fireplaces are used at the present time mostly for the relaxing ambiance they create. Historically they were used for the practical purposes of heating, cooking, and heating water for laundry and domestic uses. A fire is contained in a firebox or firepit; a chimney or other flue allows exhaust to escape. A fireplace may have: a foundation; a hearth; a firebox; a mantelpiece; a chimney crane, used in kitchen and laundry fireplaces; a grate; a lintel; a lintel bar; overmantel; a damper; a smoke chamber; a throat; a flue. On the exterior there is often a corbeled brick crown; the projecting courses of brick act as a drip course to keep rainwater from running down the exterior walls. A cap, hood, or shroud serves to keep rainwater out of the exterior of the chimney; rain in the chimney is a much greater problem in chimneys lined with impervious flue tiles or metal liners than with the traditional masonry chimney, which soaks up all but the most violent rain. Some chimneys have a spark arrestor incorporated into the crown or cap.
With valuted ceilings, exposed beams and a large wood burning fireplace, the Fireplace Room in the Wirth Chalet offers the ambiance of a rustic lodge. An adjacent stone terrace creates the opportunity for your guests to enjoy both the inner elegance of the Fireplace Room and the peaceful wilderness of Wirth Park.
The Girl in the Fireplace is the fourth episode of series 2 of Doctor Who. It was first broadcast on 6 May 2006 and was written by Steven Moffat.
outdoor fireplace
Pixel Fireplace is a cozy, interactive simulation. Type words to interact with the fire or just sit back and enjoy while the logs burn down in real time.
The song Fireplace by R.e.m.
Post the direct URL (link) where your drawing, doodle, artwork is posted (e.g. your blog, Flickr) in the comments area of this post. I would really like to keep all the artwork together and provide a way for others to see your work and/or your blog.
We are also talking about this on Twitter. Use the hashtag #CPP
The Creative Prompt Project, also, has a Flickr group, which you can join to post your responses. I created this spot so those of you without blogs and websites would have a place to post your responses.
I didn’t think I would actually start with fabric, but last week was a challenging week and I did! I had about an hour before life started in again, so I stood at my cutting table, cut fabric and glued it to my pattern. Having a limited amount of time was good, because I didn’t get overwhelmed with the thought of starting.
I know she looks like a big helmet haired weirdo, but I promise she will get better. I am putting all the dark pinks on parts of the hair that are supposed to be farther away and lighter fabrics on hair that is supposed to be closer. That is what my research told me to do, so hopefully it will look ok.
I am making the roses (perhaps some other flower, but I think of them as roses) blue and am working with the same principle.
So far all of the fabrics are from my scrap bin.
Two products you MUST try: Karen Kay Buckley Perfect scissors and Sewline Glue Pen. DH bought me the scissors for Christmas. I don’t do much hand work and thought this would be a great project on which to use them. It is! They are a fabulous tool! They are sharp and precise and you absolutely need them. I recently spoke about being interested in the Sewline Glue Pen. I came across one and bought it. Again I thought it would be good for this project and, again, it is perfect. The glue is just sticky enough to keep the pieces down. It is also very smooth, so it doesn’t pull as much as a glue stick. I feel like I got a lot done in a short amount of time and these two tools really helped.
This method is a great way to rotary cut large hexagons. You might be able to cut smaller hexagons, but I think it would be really fiddly. It is also a great way to get practice with Y seams as well as impress your friends with your machine sewing prowess.
I decided that I would do a more detailed post for those of you who might want to use this shape for a project of your own. That is not to say that you shouldn’t go and look at Little Bluebell’s blog. She has a lovely blog with lots of creative ideas.
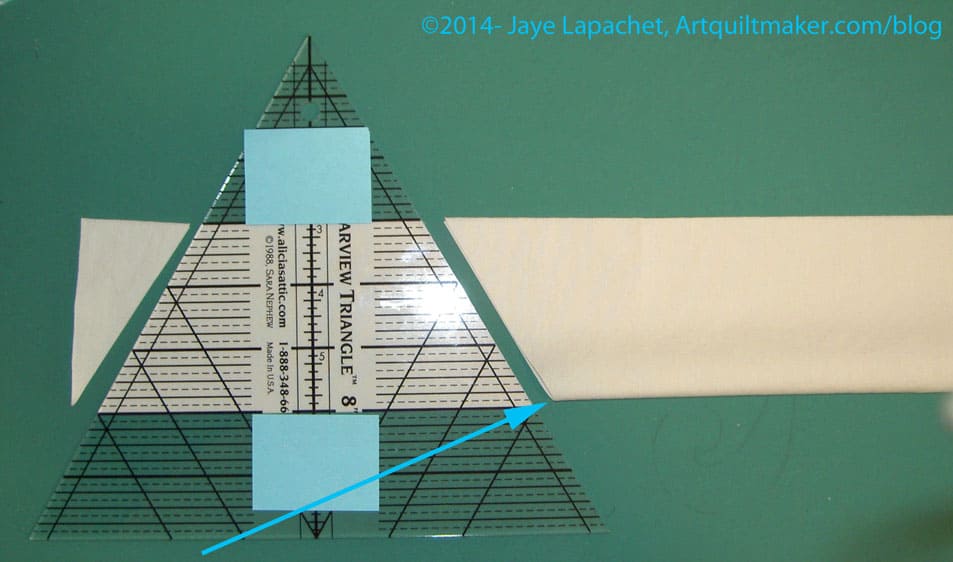
Next, unfold the strip, turn it so the long way is horizontal. Fold it so the crease is longways along the bottom (closest to you). In the picture above, you can see the curve of the fabric on the left hand side of the picture, which indicates where the crease should be.
Place ruler
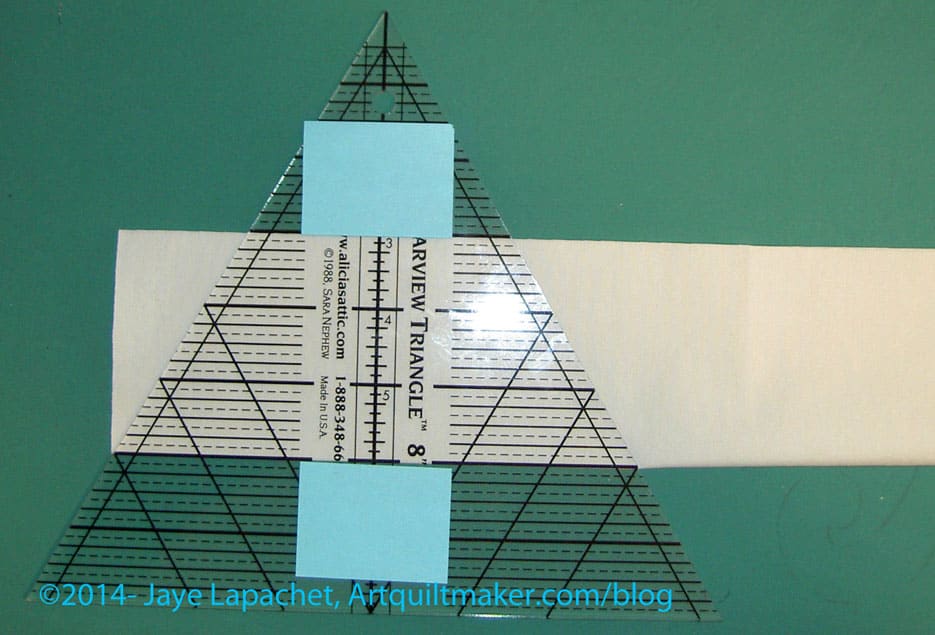
Follow the above step up with cutting. Place the Clearview Triangle ruler on the crease using the lines you have marked (using the technique described in the Kay Wood video). You must have this type of ruler. For example, I tried the Fons & Porter Pyramid ruler and that did not provide the right shaped hexagons.
In the photo above, I have marked my ruler at 3″ and 8″ using Post-it notes. You really only need to mark the bottom line, that which you place on the crease. I marked the top just to help me line up my ruler. Painter’s tape is another way to mark your placement line(s).
Nota bene: the above Clearview Triangle ruler does not have anything to help grip, so I recommend you add True Grips or something similar to the back of your ruler.
Cut
Now it is time to cut. If you are right-handed, line your ruler up on the left. Make two cuts to form your half hexagon shape.
Line up your ruler
Next, line up your ruler to make the next cut. The left side of the ruler, at the end of your marked line should be placed where the arrow indicates. Cut along the whole strip. Do not turn the ruler upside down. You will end up with a weird shape that looks more like an hourglass. Little Bluebell has much better pictures of this step in her tutorial.
I am going to show you how to do this with 3 hexagons to start. Once you sew three hexagons, you can just sew the rest in groups of 3 then sew them to the other groups, sew them in rows or sew one hexagon to the group you have made. Let’s start with 3.
3 hexagons
Put them on your design wall or on your floor and gaze at them. See the V formed by the top of the 2 bottom hexagons? Pay attention to that. You will need it later.
Start with 2 hexagons
First, you sew two sides together. These will be two separate hexagons that you have already marked. Remember, you can mark with the Jinny Beyer Perfect Piecer and a Sewline pencil or with your favorite ruler and marking tools.
Put one Hexagon right sides together
Put the first 2 hexagons right sides together and sew between the marks. Don’t sew into the seam allowance. If you did sew into the seam allowance, rip out the stitches outside of the marks.
2 hexagons sewn together
When you open those pieces you will have 2 hexagons sewn together. YAY!
3 hexagons
Second, for the third piece, you have to do a Y seam. Remember that I told you to pay attention to the V? There will be a V where the two already sewn hexagons meet and that is where you will place the 3rd hexagon.
You will need to sew 3 seams total to completely add the third piece to the first 2 already sewn pieces.
Adding 3rd hexagon
Third, you line up the third piece with piece 1, right sides together, so that one side of piece three will be sewn to one side of piece 1. The side of piece one to which you sew should be one part of the V referenced above.
Fold over Hexagon 3 to hexagon 2
Fourth, once you have sewn one side of piece three to one side of piece one, you fold the neighboring side on piece three right sides together to the adjacent side of piece two. You will fold it on to the other side of the V. It looks awkward, but should line up exactly if you have not sewn into the seam allowance.
Fifth, sew the second side of piece three to the second side of piece two.
3 hexagons sewn together
Now you have 3 hexagons sewn together. AND you did a Y seam. That wasn’t scary, was it?
Hexagon Flower
Sixth, press from the back so all of the seams twirl in the same direction.