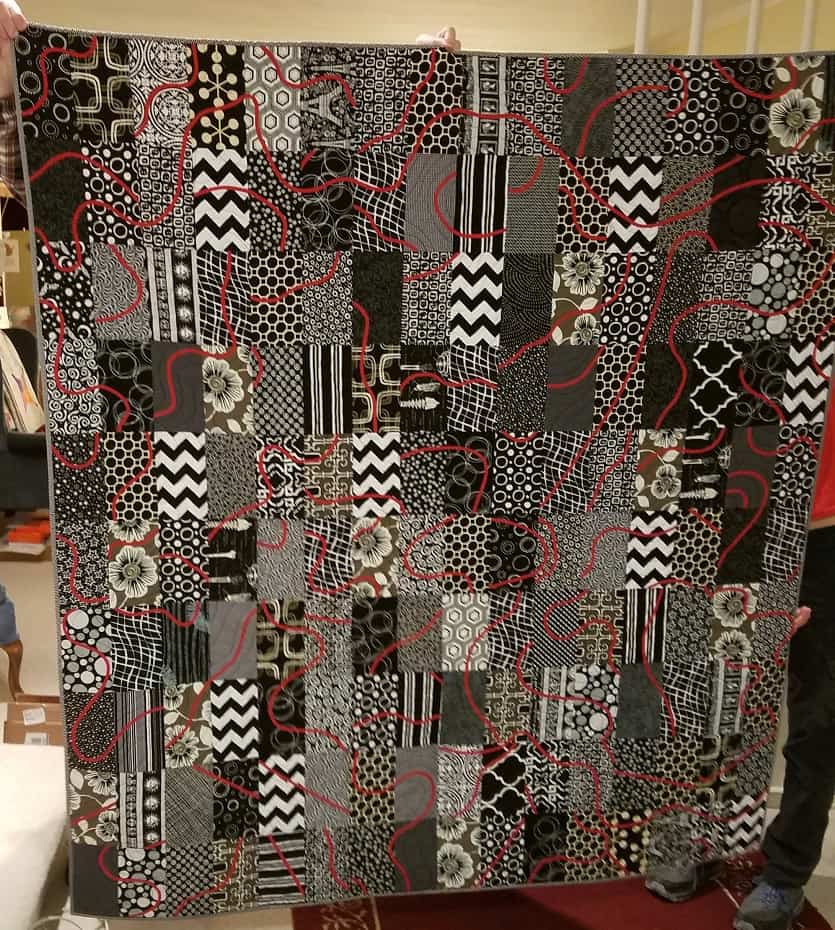
I finally finished Red Scribbles about two weeks ago. It is has been go-go-go here, so I didn’t post until now.
I only had to finish the binding, which shouldn’t have taken very long except that I am not getting a lot of handwork done since we are working on the giant puzzle. I also had some other handwork projects with firm deadlines.
This quilt took a long time to come together, but I am really pleased with how it came out. As a result, I am now teaching the bias tape technique as part of my basic quiltmaking class. I haven’t written up a tutorial, so you’ll just have to pay me to teach you!
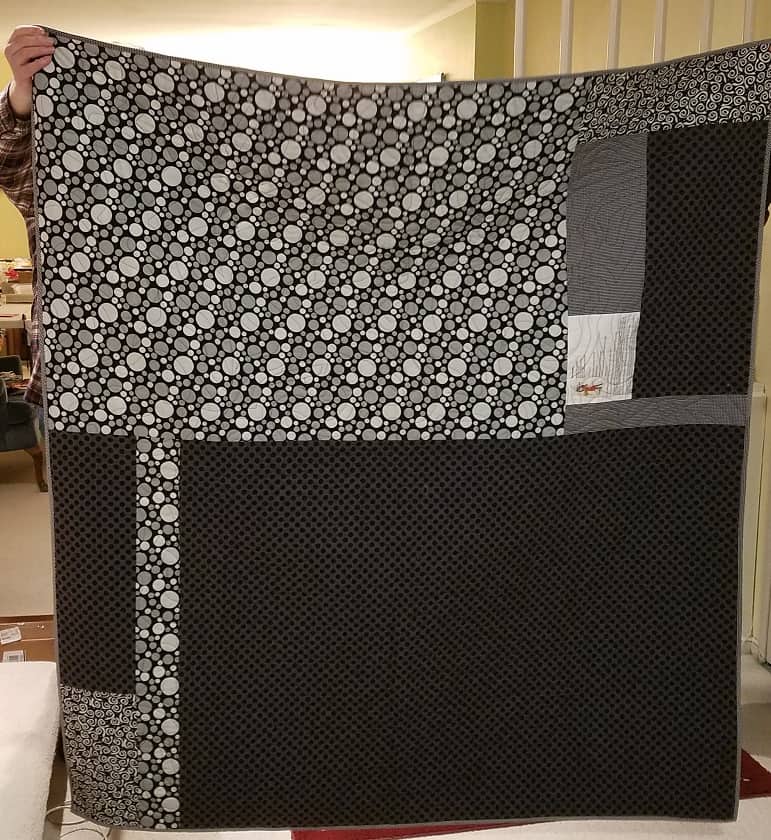
Red Scribbles Completed – back
I think this might constitute the start of a series. I gave another quilt to my SIL when DH’s brother died and now I have given this quilt to my husband’s sister and her husband. Of course, my sister has received at least two quilts.
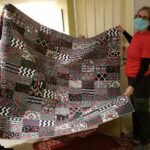
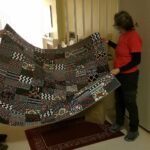
SIL and BIL came over to get it close to their anniversary. Too bad I was teaching when they eventually showed up, because I didn’t get to hear their comments. DH handled everything and got photos as well, so it was fine.
Red Scribbles recipients -1
Red Scribbles recipients -2
This quilt has encouraged me to get back to Who Am I? Instead of doing a lot of satin stitching for the words, I plan to use bias tape. I have to experiment with widths of bias tape.
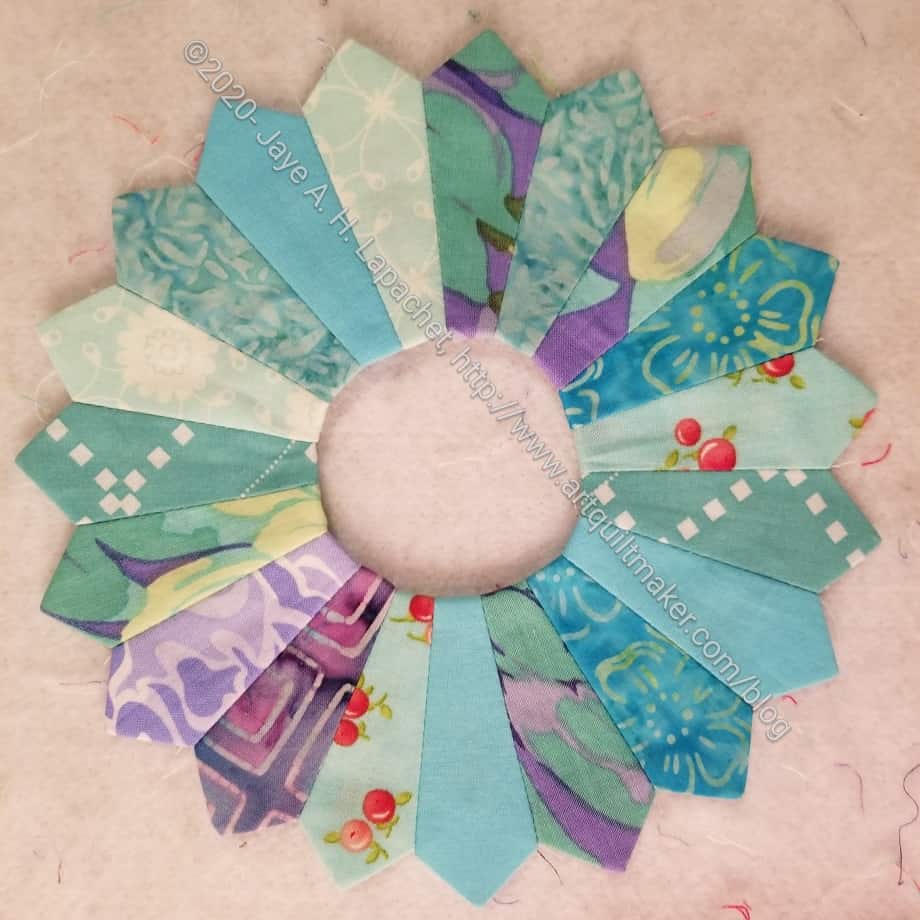
We will be doing Dresden Plates in class next week (we are off for Thanksgiving, which gives me more time to prep), so I made a mini Dresden Plate. It is a little different from the tutorial I created before. Mostly it is different because I made the ends of the petals pointy rather than round. I might make a short tutorial talking about making pointy petals. We’ll see.
This Dresden Plate is a little larger than 7 inches in diameter. Petals were relatively easy to make. I sort of used the tutorial on the V& Co website, but really I just looked at the sizes and they type of wedge then did my own thing. It could have gone very wrong, but I got lucky. I am going to use this as an applique on a Sew Together Bag I am making.
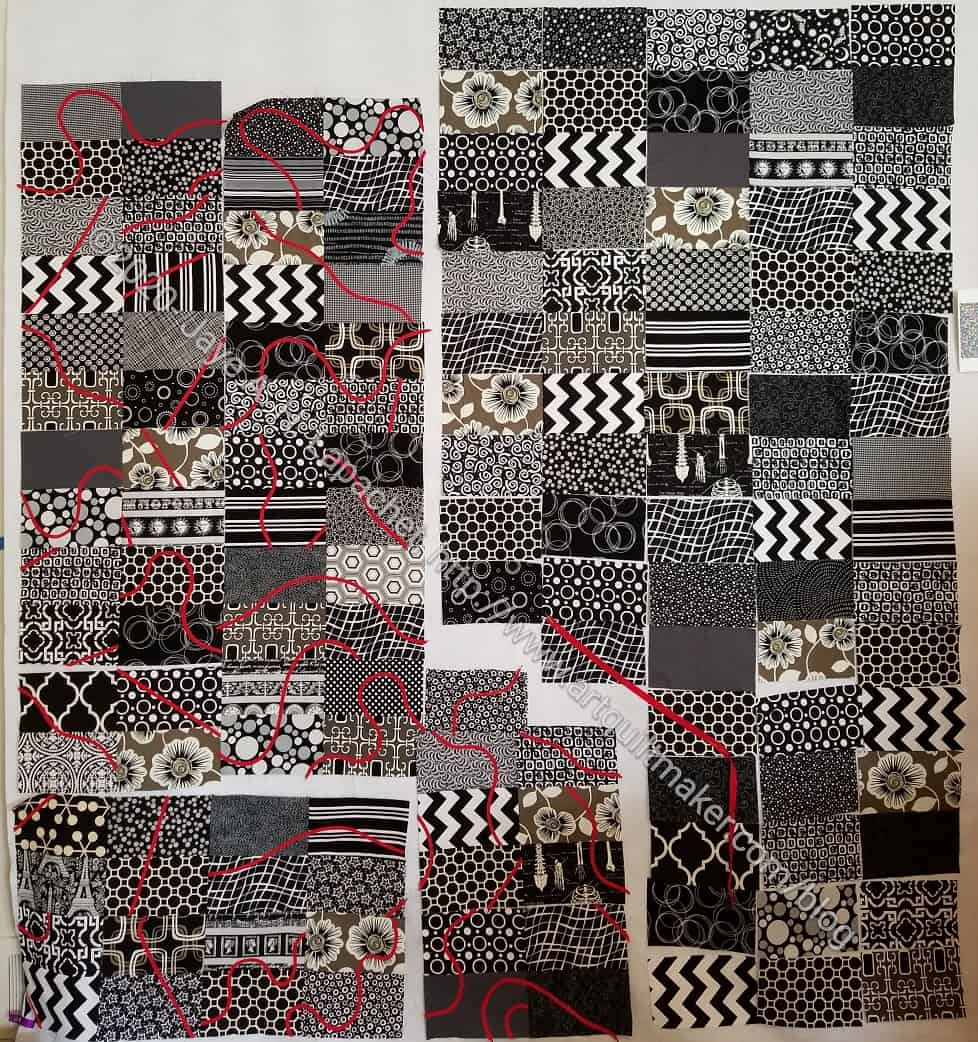
I made a big push and got the top and back ready for the quilter. I am very pleased.
The last piece of bias binding didn’t go as planned. I thought I would applique’ a really long piece all across the top. It didn’t quite work out as I hadn’t planned ahead an there wasn’t a clear path. I filled in some large-ish spaces on each side, but that’s it.
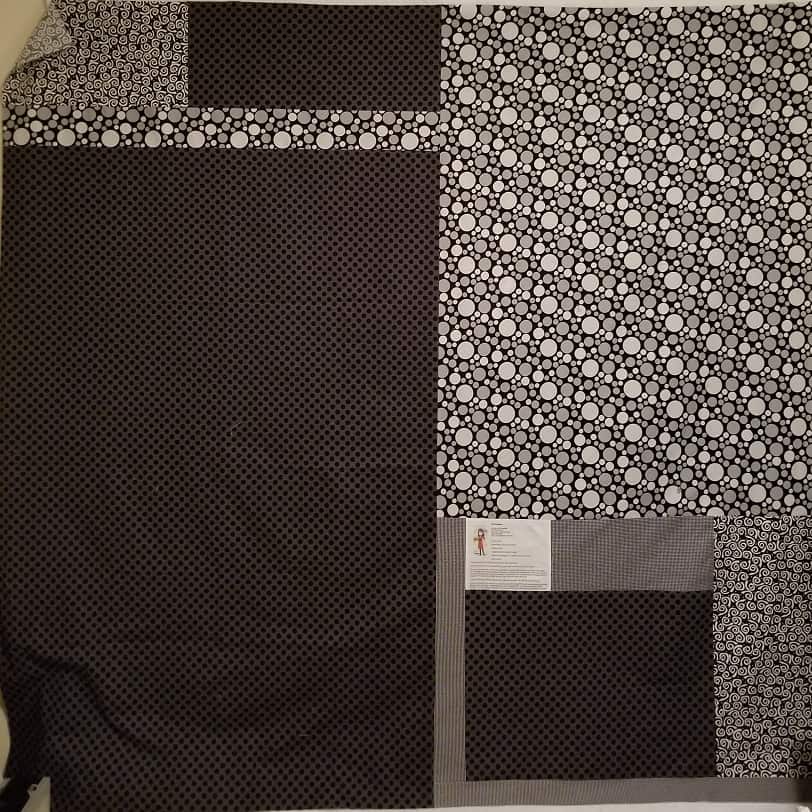
Red Scribbles back finished
I delved into my backing fabrics for the back. i didn’t have to do too much fussy piecing so the back didn’t take forever. I am really glad this is done and hope to put something lighter and cheerier up on my design wall very soon.
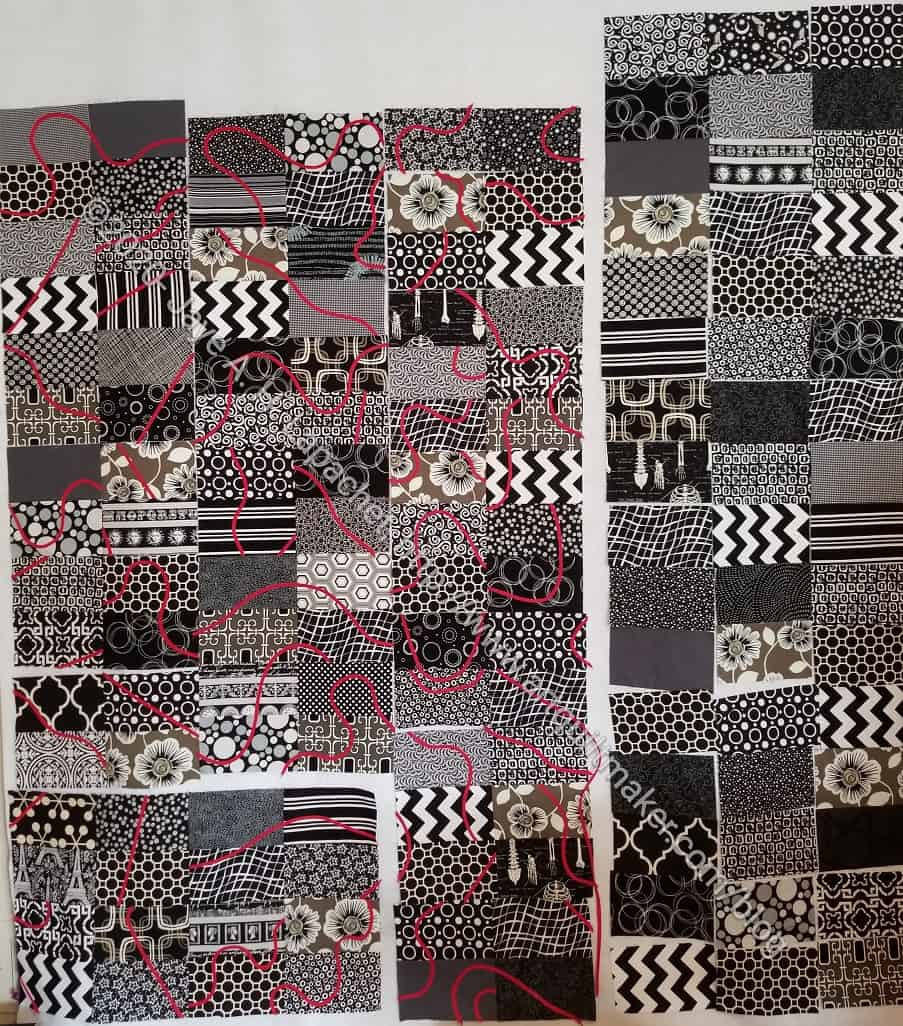
I spent some time yesterday working on the Red Scribbles quilt top. I made good progress and am now ready to put the whole top together.
I cut one last rectangle and appliqued bias strips on the rest of the individual rectangles. I am happy about my progress. I am hopeful that I can finish the top and the back this week, but things seem to be taking longer lately, so we will see.
I spent a lot of time over the weekend appliqueing bias tape to the Red Scribbles quilt. I feel like I am making good progress and may be done with the top this week.
I was thinking about the red and what a pain the joins are. I wonder if a more tightly woven fabric would work better. I am kind of interested in trying it, though not on such a large piece.
I made more progress the other day. When I think about this project, I don’t want to work on it. When I actually work on it, I don’t mind it. It’s weird, but I think it comes from not working on the right project at the right time.
Obviously, work is getting done on this, however I am not working on it as quickly as I had hoped. I want to work on something else, something with more mind sorbet type of piecing. Perhaps one of the Vanessa Christensen patterns using her ombre fabric that has been sitting around waiting for my attention? I want to work on something easy and fun and not as dark.
I made a little progress on the black & red quilt I am now calling Red Scribbles. I am calling it that because I think it looks like someone took a red crayon and scribbled all over my quilt.
I thought I would get more done, but Sunday was not a good sewing day. It may be time for some four patches or mind sorbet sewing. I do want to finish this piece, though. Oh well, I am sure things will even out.
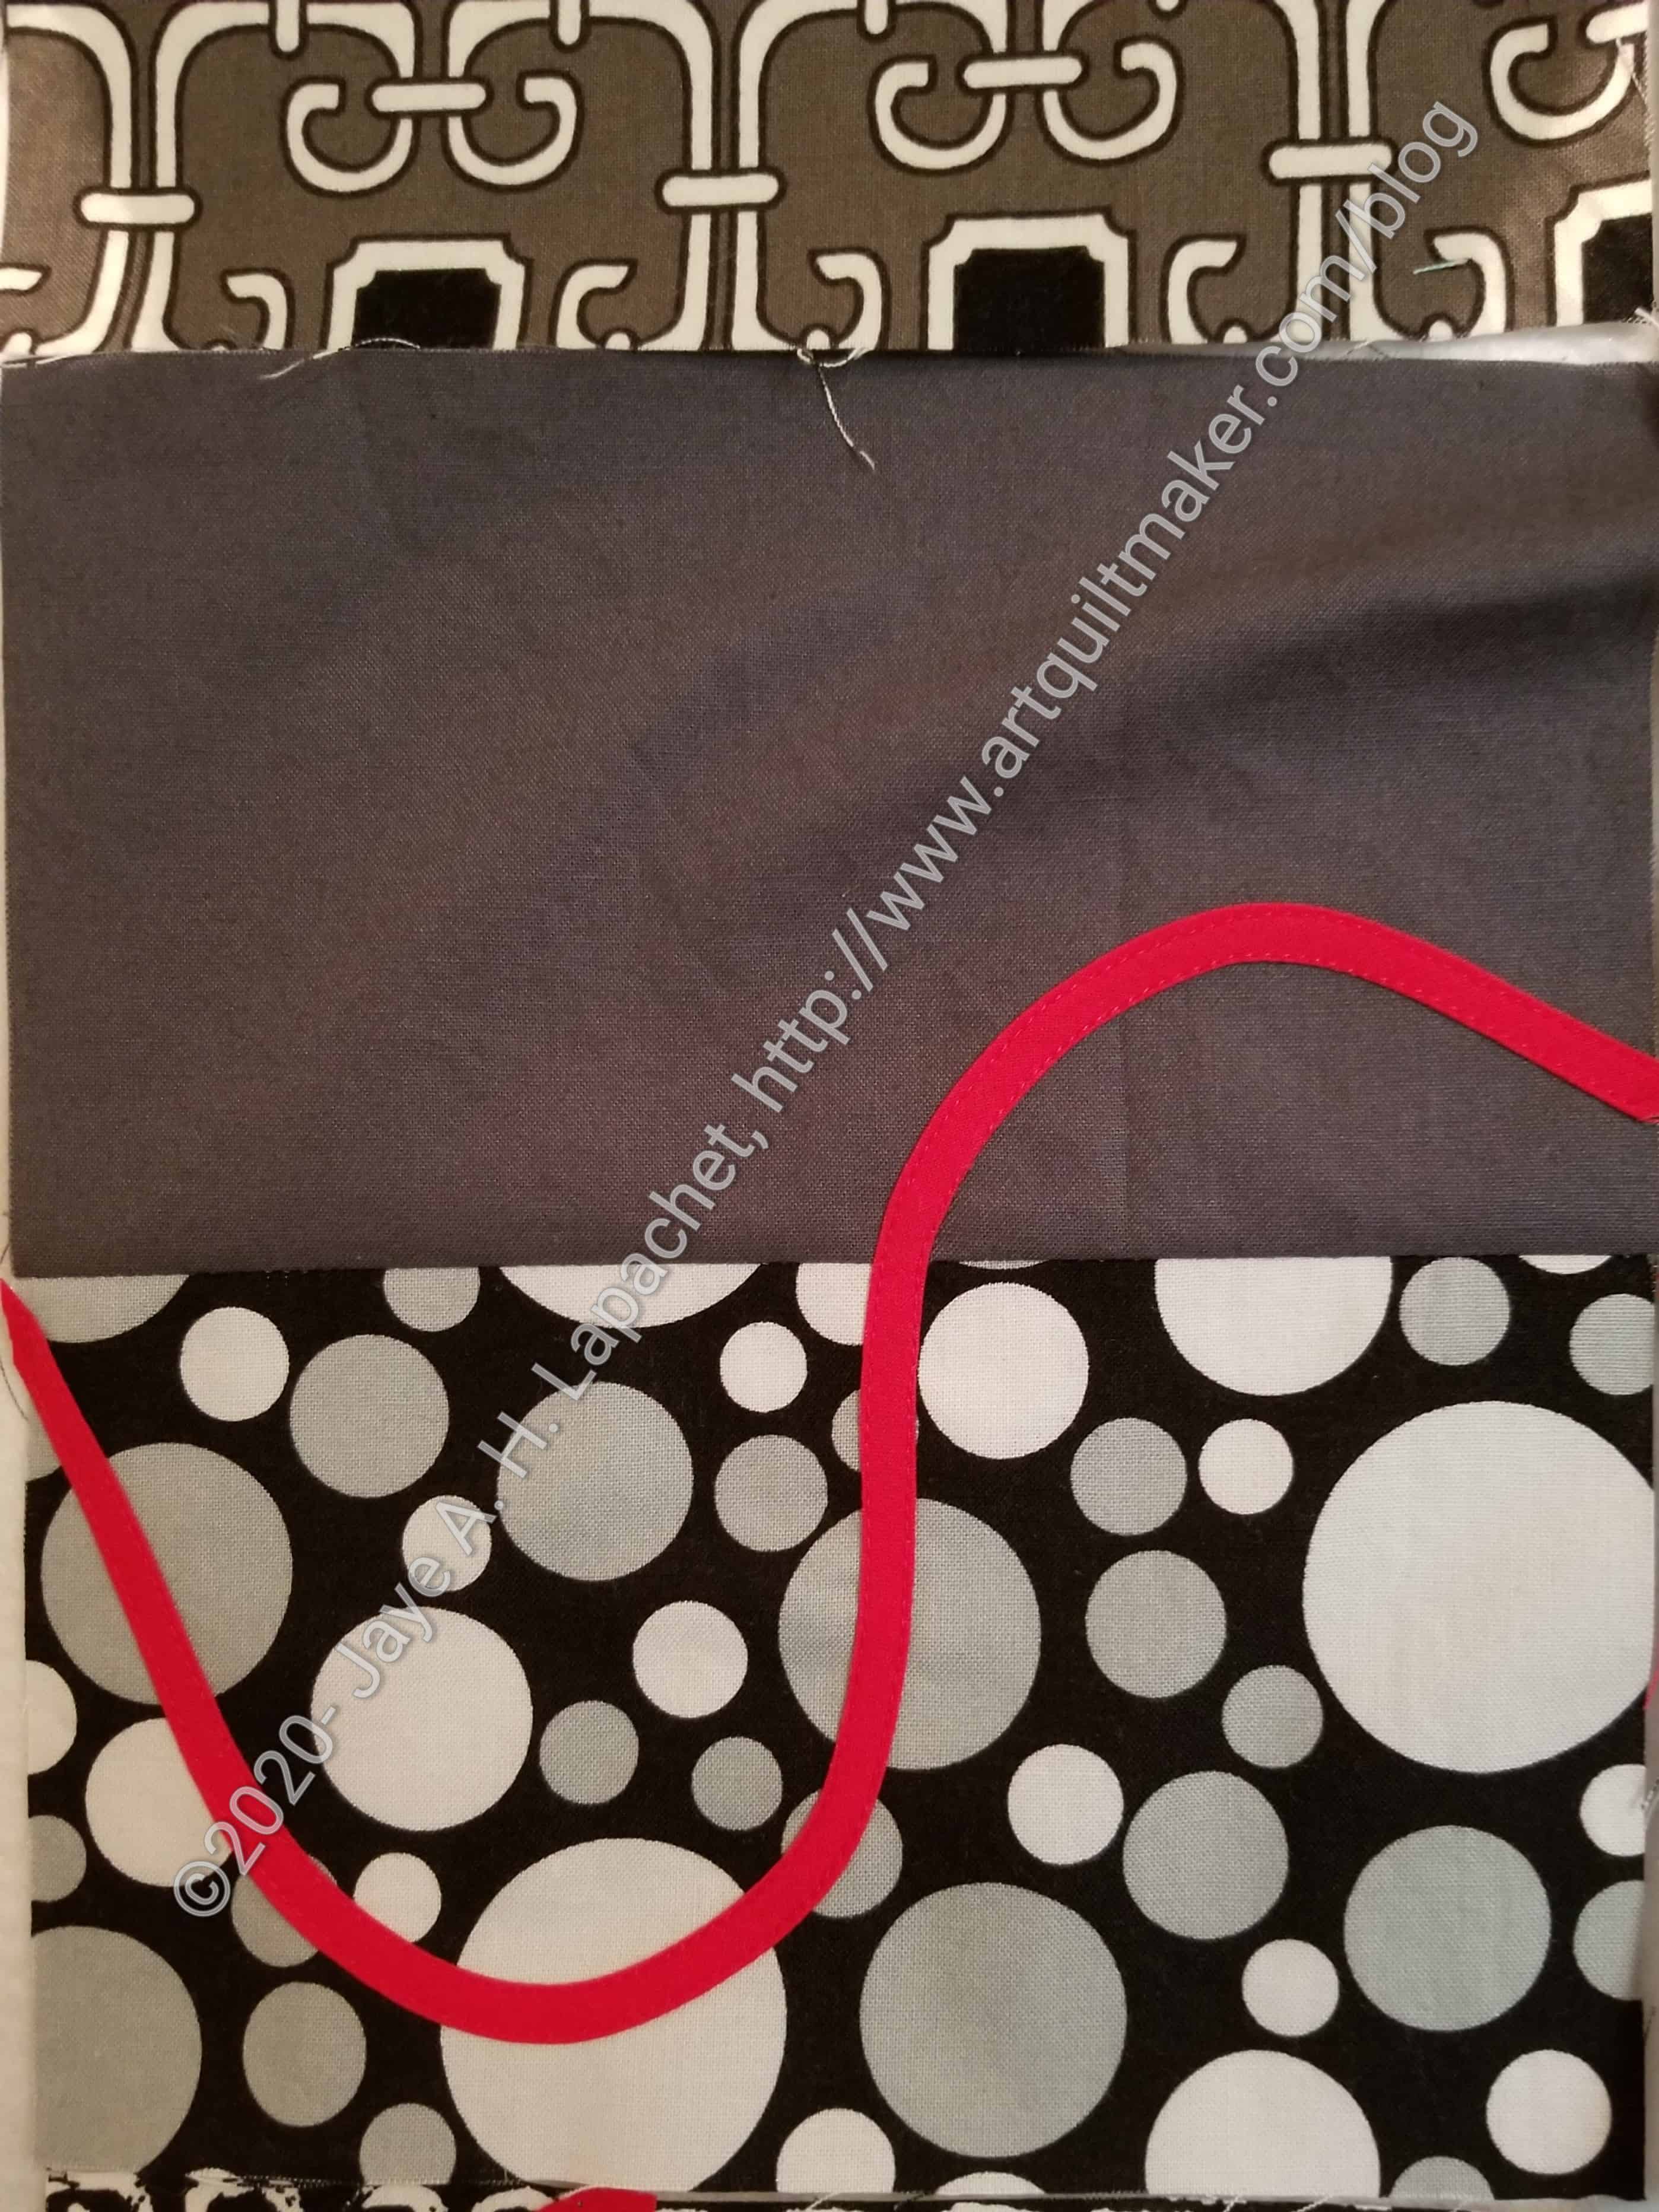
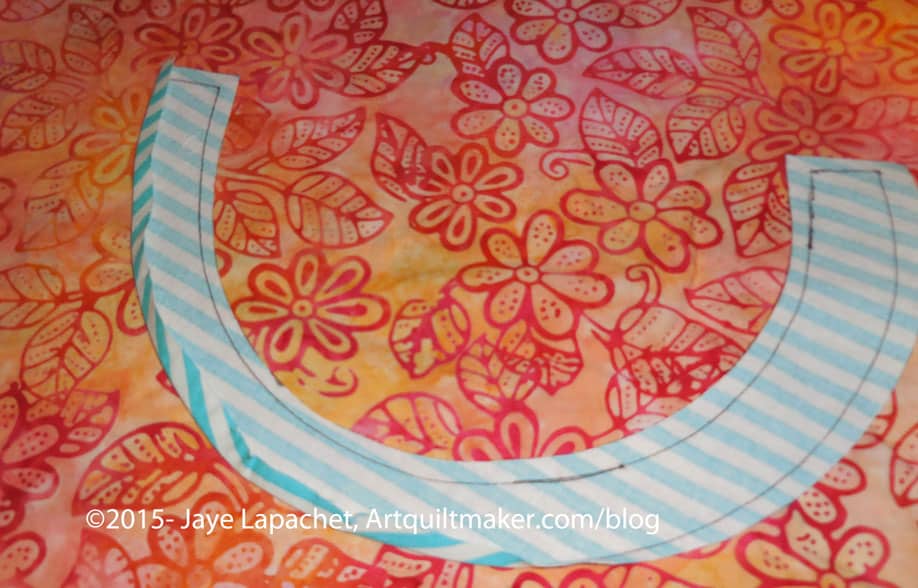
I said yesterday that I was enjoying the bias tape applique’. You can see from the photo that the curve is smooth and flat.
I am trying out how tight I can make the curves and still keep them smooth. While machine applique’ is generally a hassle, it is much better with the bias tape, because the edges are not raw. I don’t like to leave my edges raw. I usually cover them with satin stitching and that takes time. I don’t like it, though I like the look because I have to reset my machine. With the bias tape, I can use a straight stitch and follow the applique’ with my regular leaders and enders.
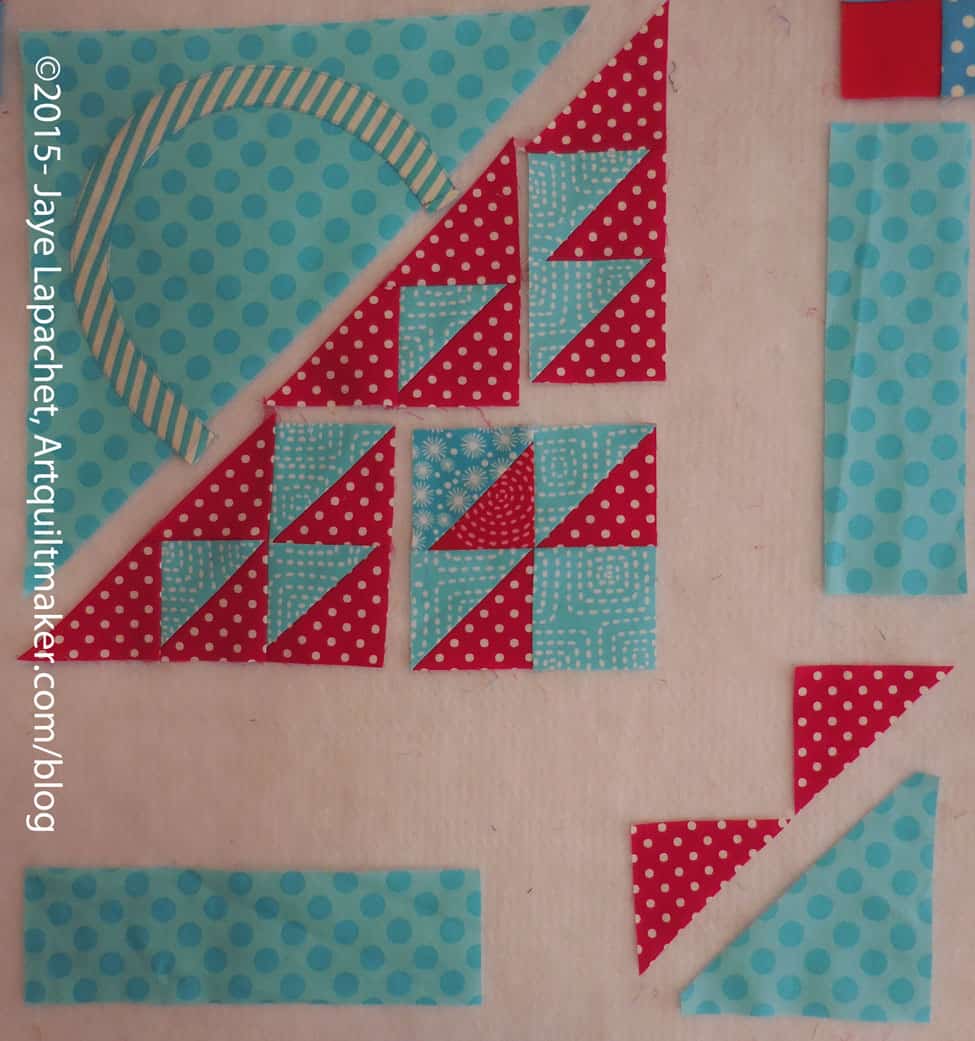
I spent some time on Sunday working on the Black & White with Red quilt. I wasn’t sure what I would do, but I just started sewing rectangles together first.
Testing Bias Tape
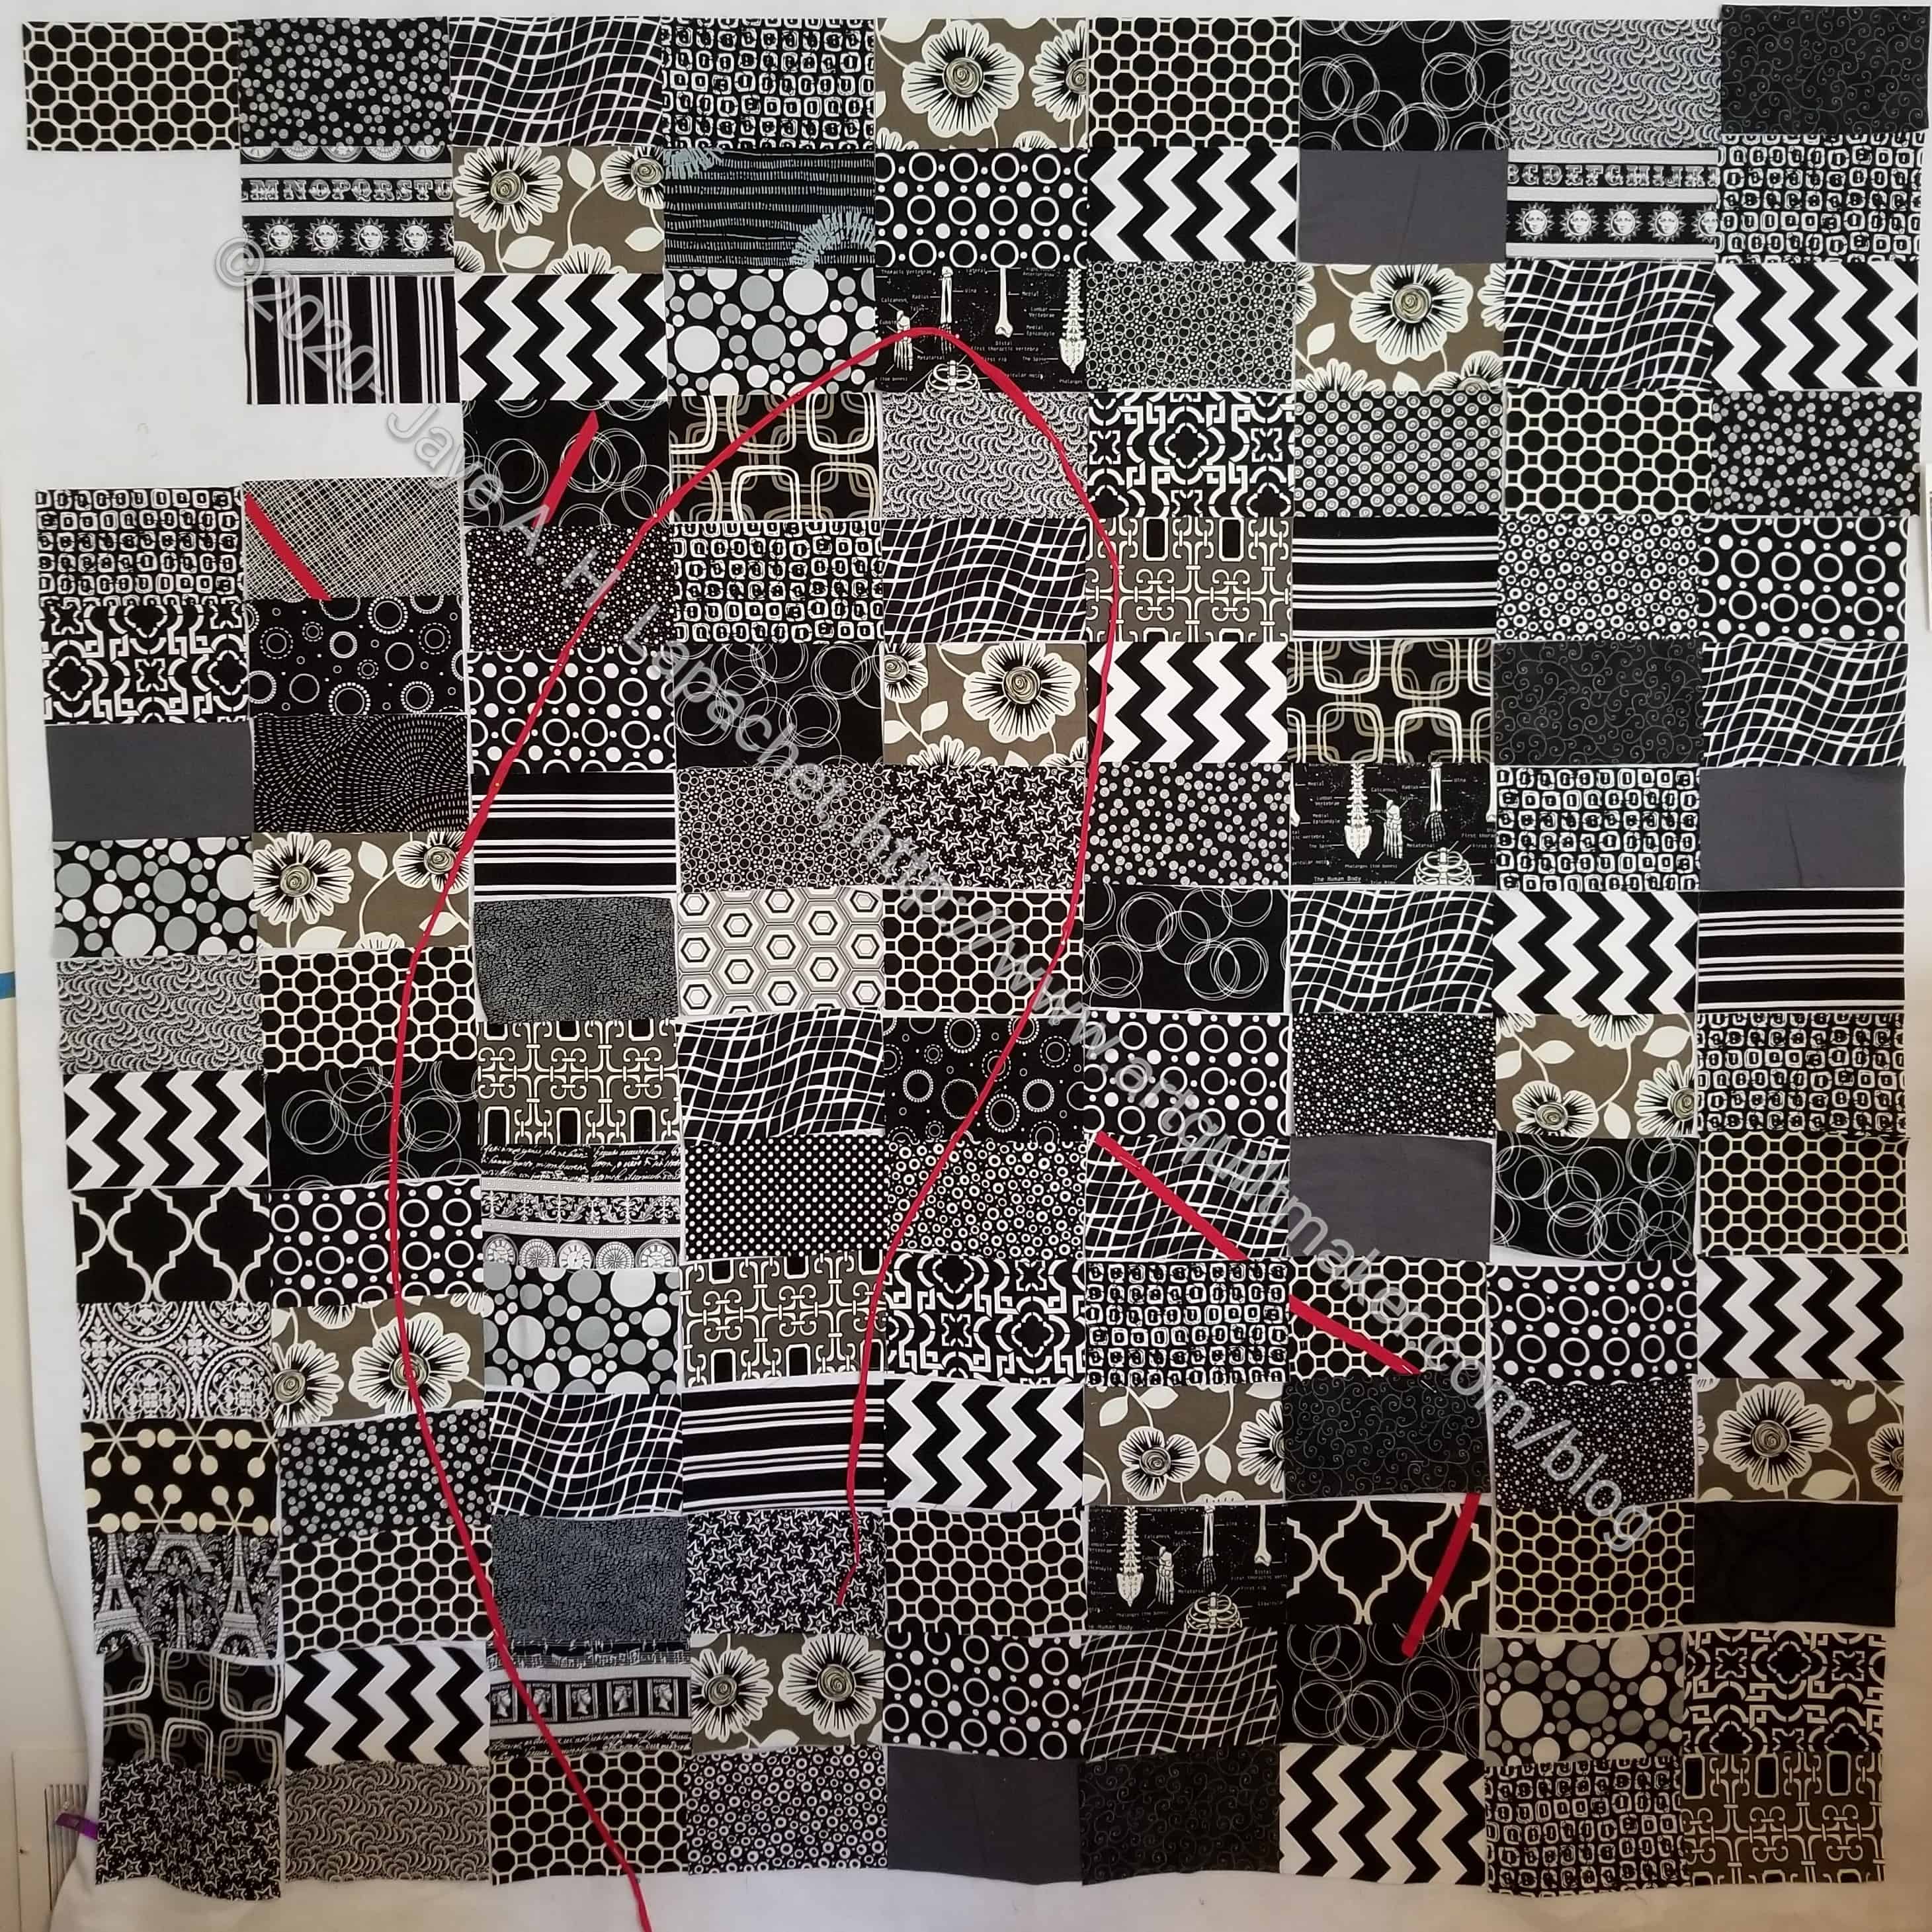
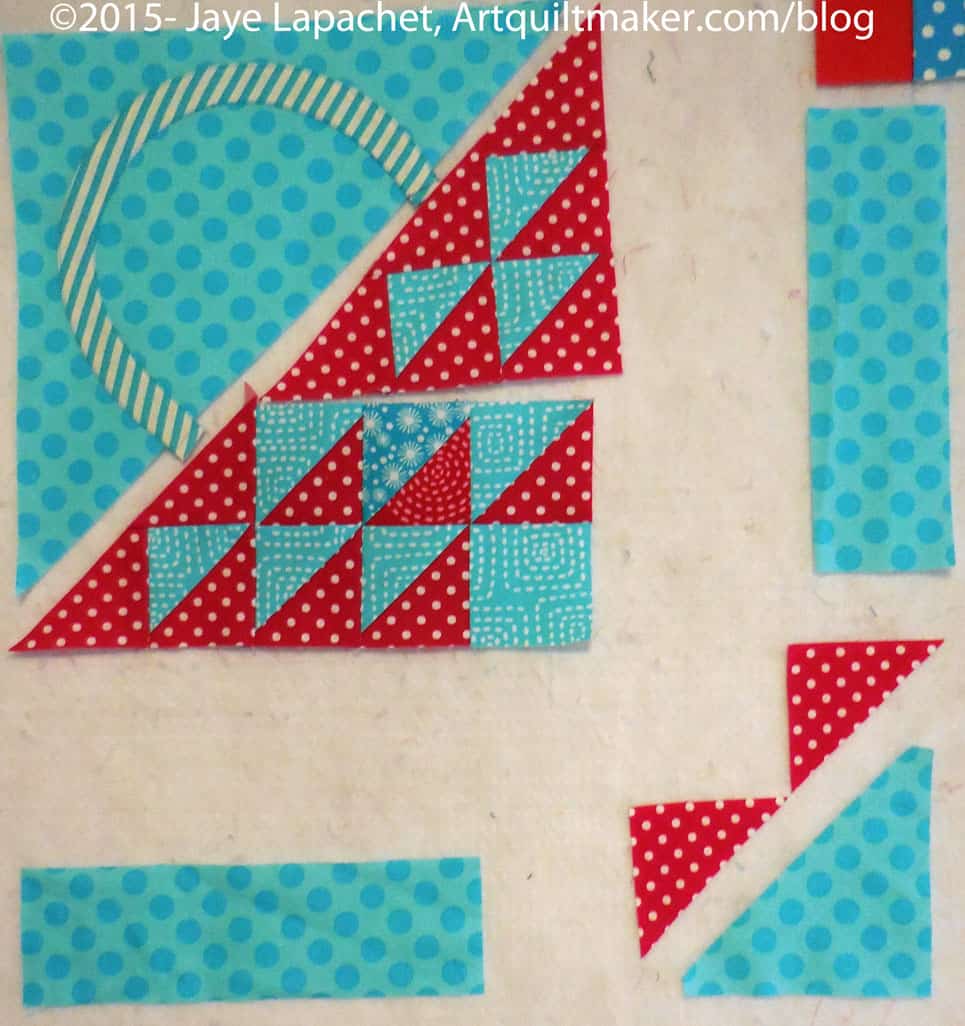
Per my rule, Make Visual Decisions Visually, I pinned up some of the bias tape to see what the piece would look like with the bias tape applied.
I am not happy with the look of the bias as applied in the photo, but I do think putting a larger piece over the whole top is a good idea. I don’t want it to look like a giant *enis so I have to make sure about that.
When I pinned that long piece of bias tape on the top, I hadn’t done any sewing. Now I have sewed shorter pieces of bias tape to smaller sections and now I am much more confident and have a better idea of how the bias tape works.
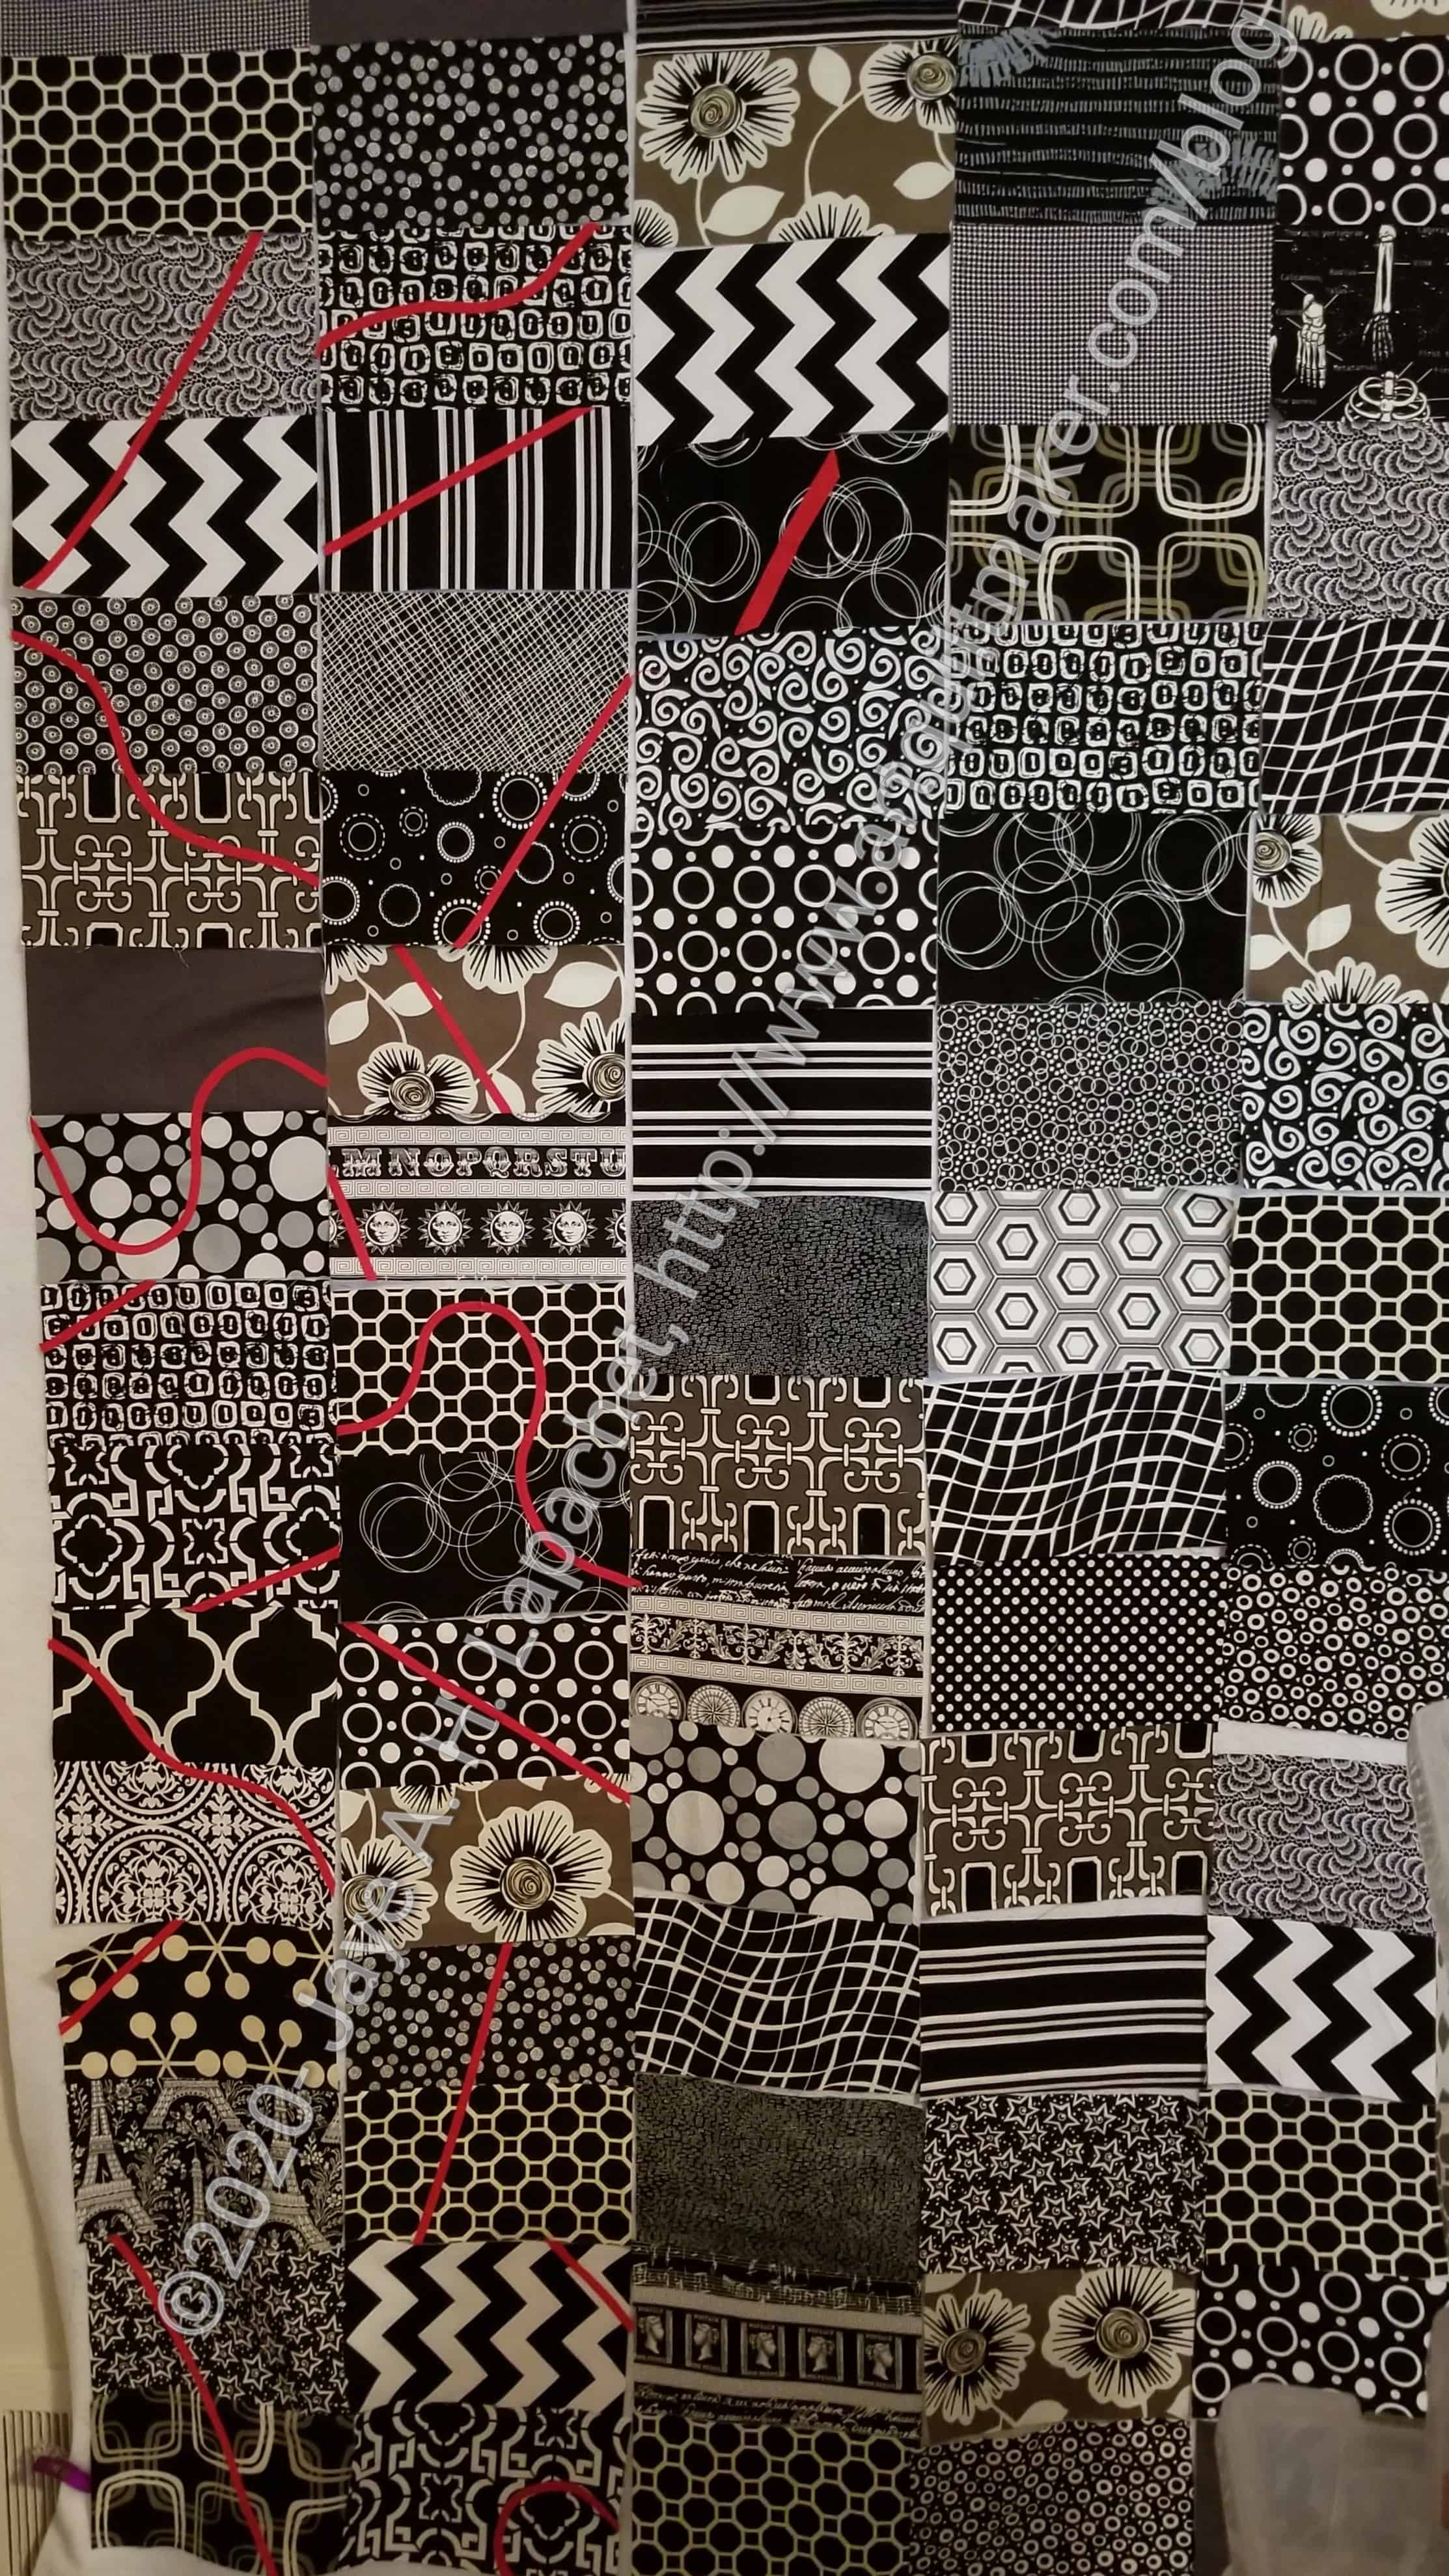
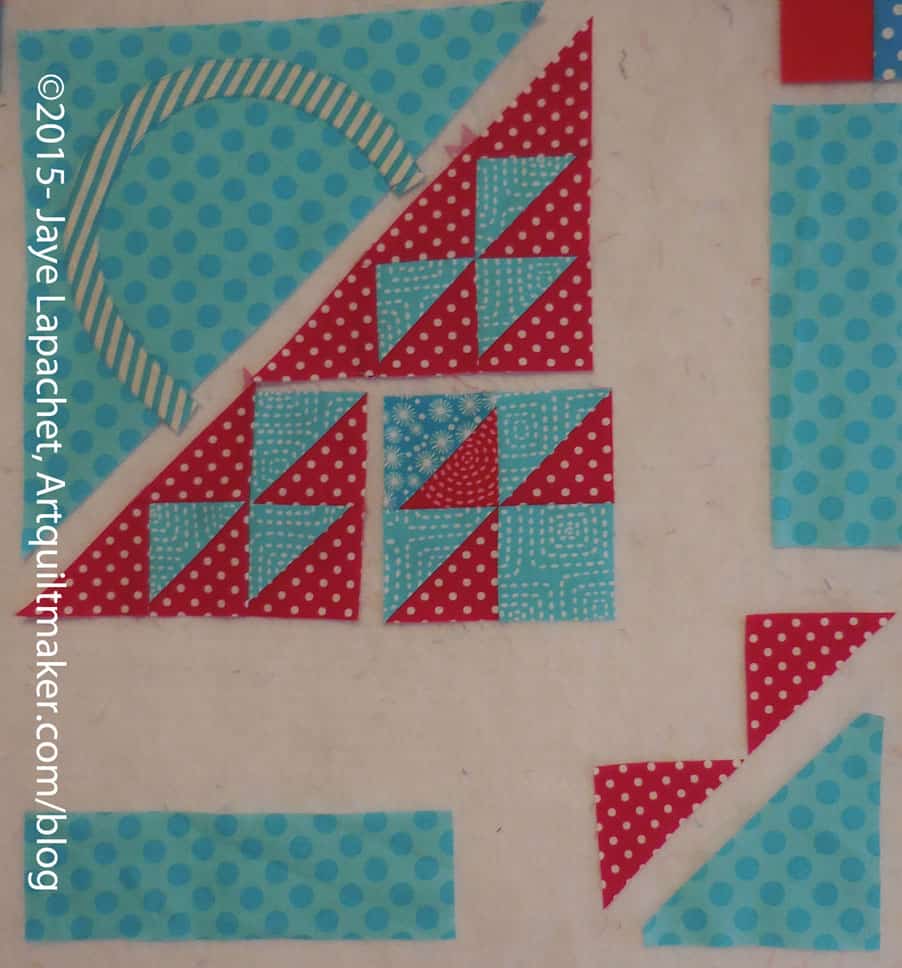
Black & White quilt with some red
I am really liking the bias tape. It is amazing how the curves work! I am getting much better at sewing them down flat and I am testing how tight I can make the curves. I think I have to do something else with curves. First I have to find my bias tape makers
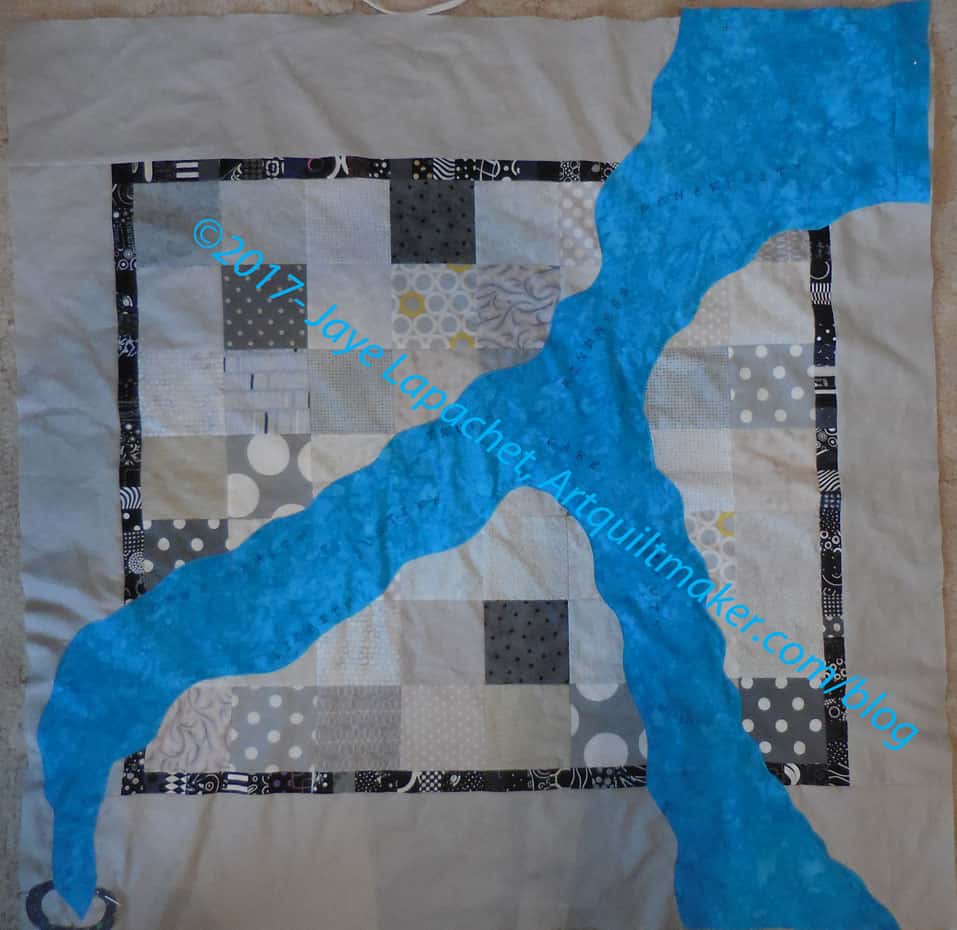
You saw the other day that I had finished the first layer, or perhaps it was the second layer?
I really kind of liked this look despite the slightly depressing look, but I was on a mission.
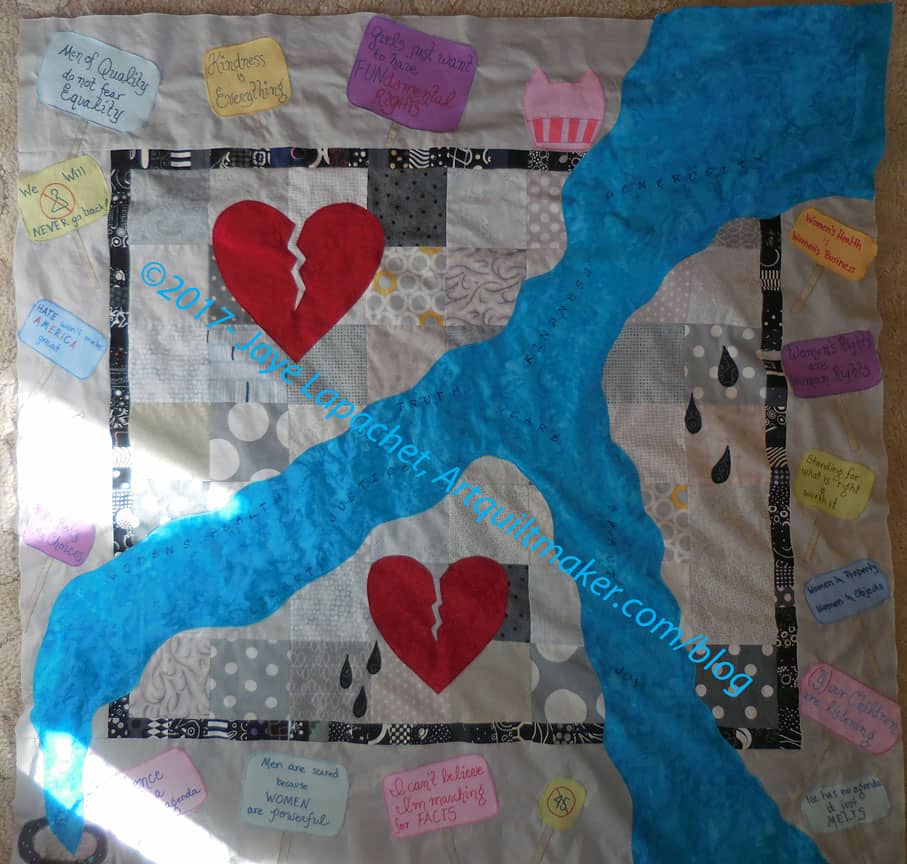
I used a satin stitch, but not a dense one stitch down the River. In some cases I will straight stitch first, but I didn’t in this case. I try to keep track of the settings so I can use the same density again. I often start with the density I used to sew on Merit Badges and then adjust from there. Despite the siren call of temptation, I always test the density before I sew on the actual piece. Have you every tried to rip out a satin stitch. It is doable, but I don’t find it to be fun.
After applique’ing down the River shape, I moved on to the broken hearts.
Art Quilt: with hearts in progress
After making some hearts some time ago I have a trick, so I used it to make the heart shape then cut into them with very sharp scissors (should have used my Karen Kay Buckley scissors) and made the broken part. I put fusible on the back of the hearts and pressed them down. I use Soft Fuse. I have used other products, but that is my current favorite.
I had to play around with the placement of the hearts. I wanted them on the background, not on the borders or covering the River. Once they were placed where I wanted them I satin stitched them down and added the tears. I think tears coming off of a heart is powerful imagery.
Art Quilt: Signs in process
The signs took a lot longer. I needed to add sticks and get the placement right, trim the shapes and write the messages.
I don’t know why I wanted these Easter Egg colors, but they seemed right. I didn’t even have to hunt for them as they magically appeared in a convenient stack of fabric.
Weird.
I fused the sticks, then found they didn’t show up very well, so I stitch around them to highlight them. I still don’t think they show up as much as I wanted, but I am okay with the look.
Art Quilt: Top finished
This is very much a quilt where you get one view from afar and need to come closer to get a more detailed view.
I am making some progress on Under the Sea. It is a shock, because this piece has been on my list and a UFO for YEARS. I really never thought I would finish it and here I am.
Under the Sea – Late August 2016
We went to Southern California for the weekend, so no sewing machine and I missed the BAMQG meeting. My DH better know I love him. 😉 I did take Under the Sea and my EPP project to work on. I didn’t do much in general – no sewing, no EPP, no quilt shop visits, but I worked on Under the Sea a little on the way home in the car.
I bought some 12wt Aurifil and have used a little of it along with the Perl Cotton that I have had laying around. It is fun to add layers of texture to this piece. The stitches are adding interest.
Under the Sea (detail) – Late August 2016
I am not sure about the green circles. I like them as a motif. I am not sure I like them around the turquoise dots. I don’t want to disrupt that bubble like effect.
I am hoping that the viewer won’t see them until they get closer. We’ll have to see.
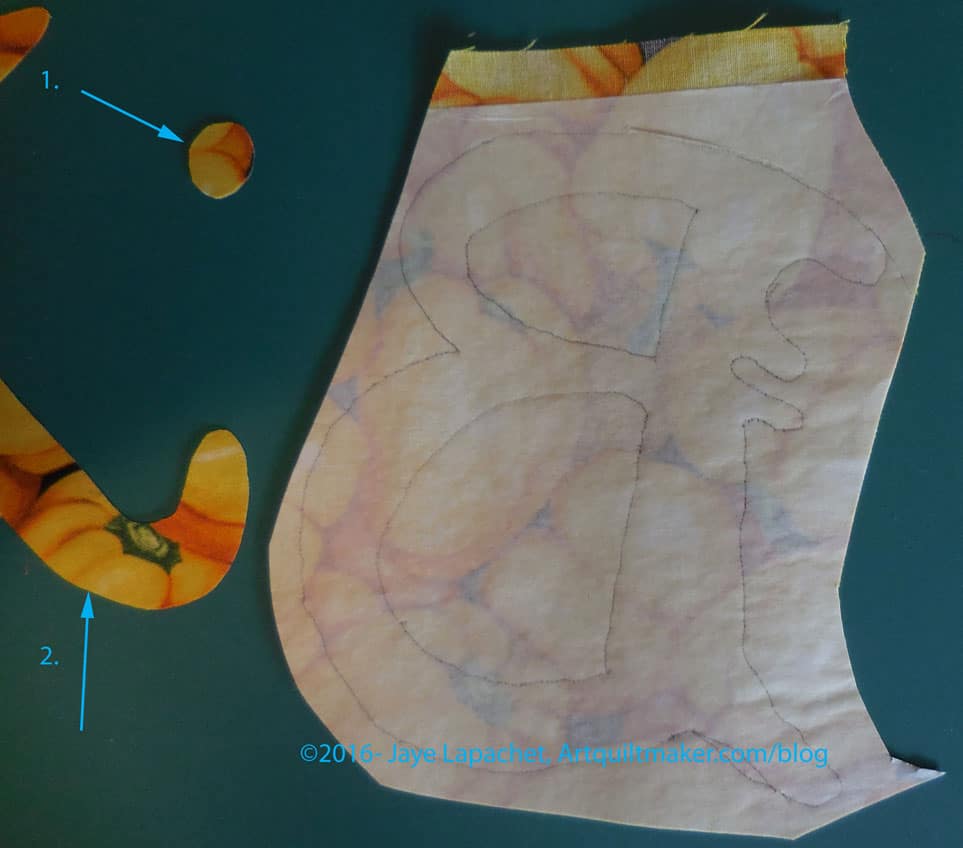
In my previous machine applique’ tutorials, I used designs where the direction of the motif didn’t matter. When I went back to review the tutorial (yes, I do use my own tutorials!) in preparation for doing some machine applique’. I was preparing to applique’ letters, which have a definite right and wrong way. I realized I had omitted directions for using directional motifs (where the direction of the motif matters, such a numbers or letters) for applique’, so I had to figure out how to do them again.
In order to understand this tutorial, you will need to look at How to Applique’-TJW and the 3 Fusible Applique tutorials (pt.1, pt.2 and pt.3). All of these are part of a whole.
Paper backed, double-sided fusible web, such as SoftFuse, Steam-a-Seam 2 or Steam-a-Seam Lite. There are many brands. Use your favorite. Follow the directions.
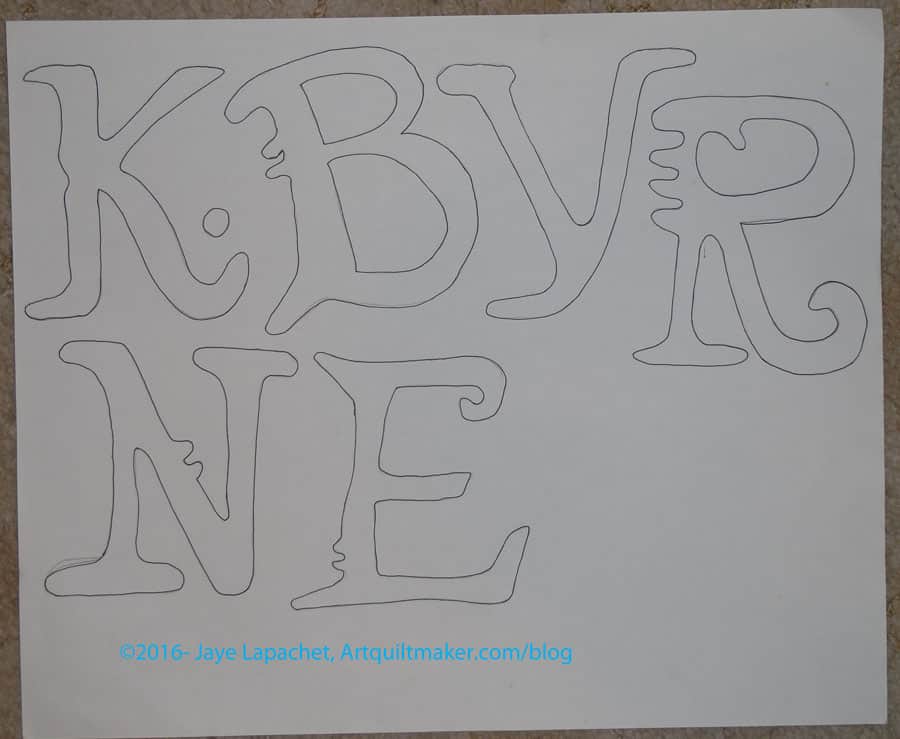
Draw out your design. I used a pattern for the letters I wanted to applique’. You can draw or print your design. There are a lot of free clipart you can use. Since I had a pattern, I laid out the pattern, placed a piece of drawing paper over the letters I needed and drew out the design using a pencil.
Trace over the pencil lines you used to trace the design with a Sharpie. The lines should be dark. Make sure the Sharpie does not bleed through to your table.
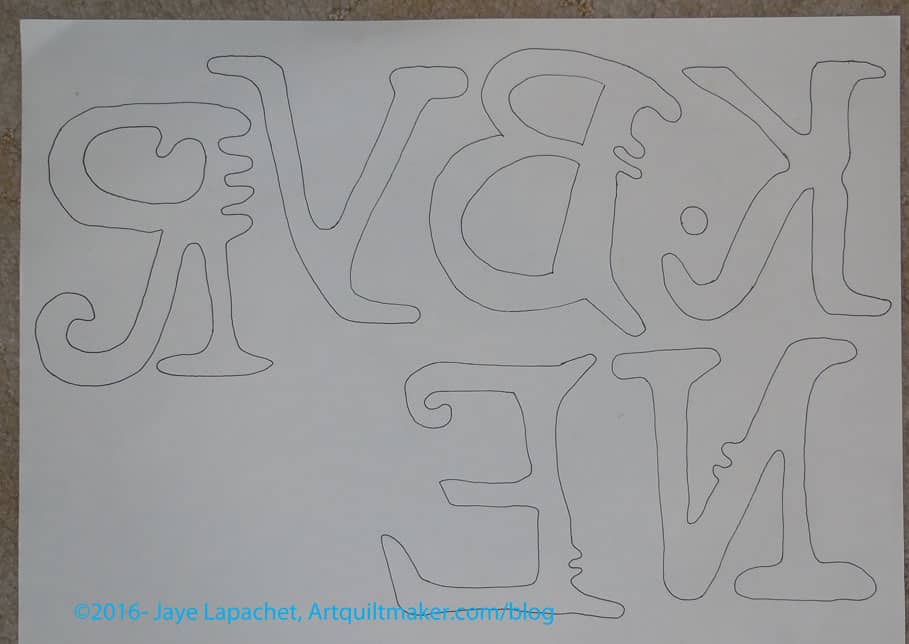
Flip your drawing paper over and put it on your light box. You can also tape it to a window or sliding glass door. The wrong side of the letters or directional motif will show through.
Directional motifs backwards on drawing paper
Using your Sharpie, trace the letters again on the wrong side of the paper. You will be tracing the backwards image of the letters.
Leaving the paper taped to the window (or laying on the light box), tape a piece of paper backed fusible, paper side UP, over your design which is on the window or light box.
Trace the backwards design on to your paper backed fusible using a Sharpie. **Nota bene: my Sharpie tended to smear on the paper of the fusible. I couldn’t find a pen that worked well, so be really careful to keep your hand out of the way to avoid smearage.
Once finished, remove everything from the window or light box.
Place the fabric you will use for your directional motifs right side down on the ironing surface. The fabric should be sized slightly larger than the fusible.
Place the fusible on top of the fabric with the paper side up. Make sure no edges are over your ironing surface.
Place your applique’ pressing sheet over everything.
Press according to the directions on the fusible package.
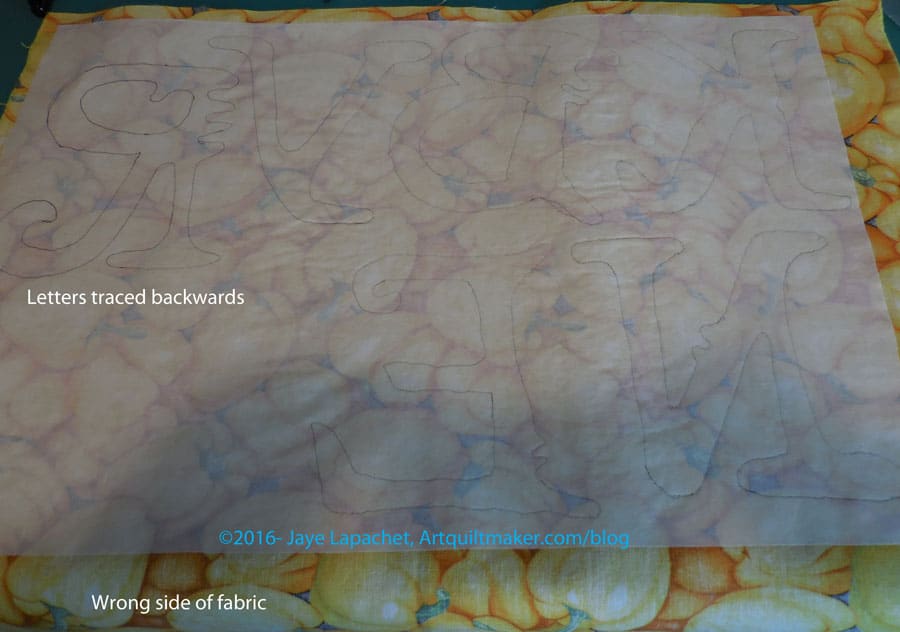
Fusible pressed to fabric
Once you are finished pressing, you will have a piece of fabric with fusible on the wrong side. The motifs (letters) should appear backwards and you will see the wrong side of the fabric.
Decide on which scissors you will use. I always have a fight with myself about this. I don’t want to ruin my Ginghers, which are super sharp and great for cutting out detailed types of designs by using them to cut through paper. I also don’t want to ruin the edges of my motif with a pair of papers scissors that will not be sharp enough to cut through the fabric. I have a pair of Fiskars that I end up using for this task. Not ideal, but the best I am willing to do.
Cut out directional motifs
Once you have decided on scissors, cut out your designs (letters, in this case). First I do a rough cut, then I cut with more detail.
Cut out directional motifs – detail
Layout your background fabric on a flat surface, right side up. I use my ironing board, so I don’t have to move the motifs in order to press. If I have to sew two pieces of fabric together to make a large enough background, I press the seam open.
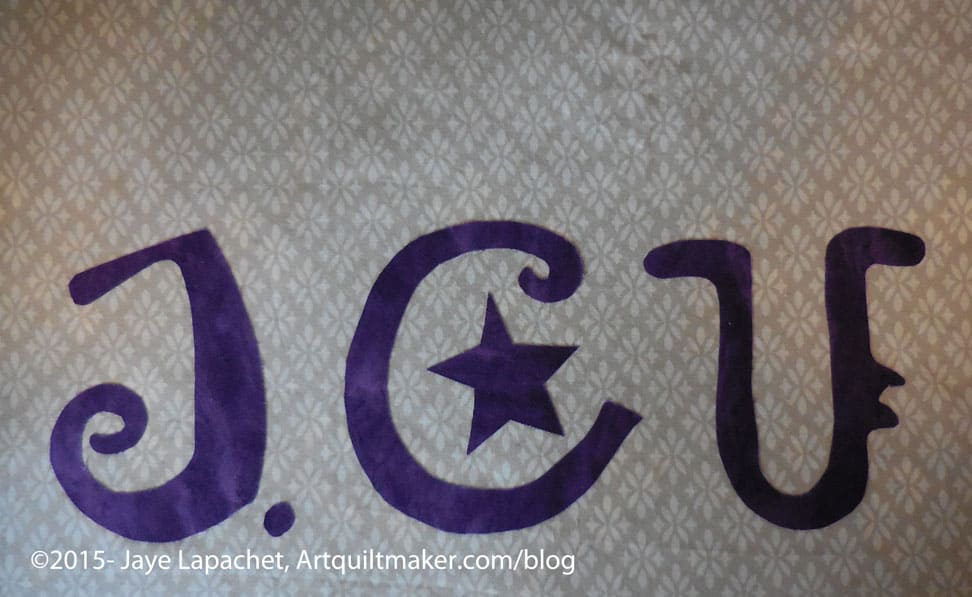
Take each motif, one by one, and peel off the paper. Carefully place each prepared applique’ motifs in their desired location before moving on to the next one. With motifs such a letters, I use a ruler to make sure they are straight.
You should be able to see your design correctly. If you are using letters they should not be backwards and you should be able to read the word.
Place your applique’ pressing sheet over everything.
Press your applques so that they are stuck to the background fabric.
Set up your sewing machine with the correct colored thread and a foot suitable for zigzag or satin stich.
I set the zigzag to 3.5 (width), 0.7 (density). I like my satin stitch to be a little open, but you can adjust it to your favorite length and density.
Cut a piece of tearaway the width of your motif and twice as long
Fold the tearaway in half.
Pin the double layer of tearaway to the back of the background fabric. Pins should be out of the way of the machine foot.
Satin stitch all the way around each motif, carefully negotiating curves so the satin stitch looks smooth.
Trim and/or tie off all threads.
Tear away/cut away the excess tearaway stabilizer.
The Food Quilt #2 still needs a back. I have been putting it off, because I wanted to applique’ the recipient’s name on to a piece of fabric as part of the back. The idea is to discourage theft. We’ll see if it works.
I had a good chunk of time over the weekend. Thus, I spent most of the afternoon on Sunday preparing and appliqueing the name to a piece of fabric.
Applique’ Back
I accomplished the job, but it was a really big pain and not very pleasant. I fought with the fusible the whole time. It wouldn’t stick and then it stuck too much. I felt the whole process took much more time than it should have.
The picture (left) is part of the work I did. I am not showing the whole name, because of privacy, but you can see the work.
The alphabet is from a pattern called Critters Alphabet. I like it because it is cheerful and different. I used it on another quilt I made for a nephew. I bought the pattern at PIQF about a zillion years ago and I am pretty sure I saw it there last year. I did a search and found it under a new name, Alphabet Critters.
Next time, though, I might try paper piecing for the letters. We’ll see.
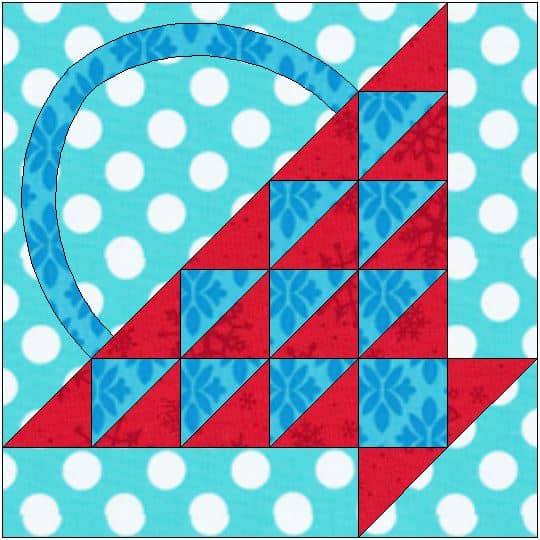
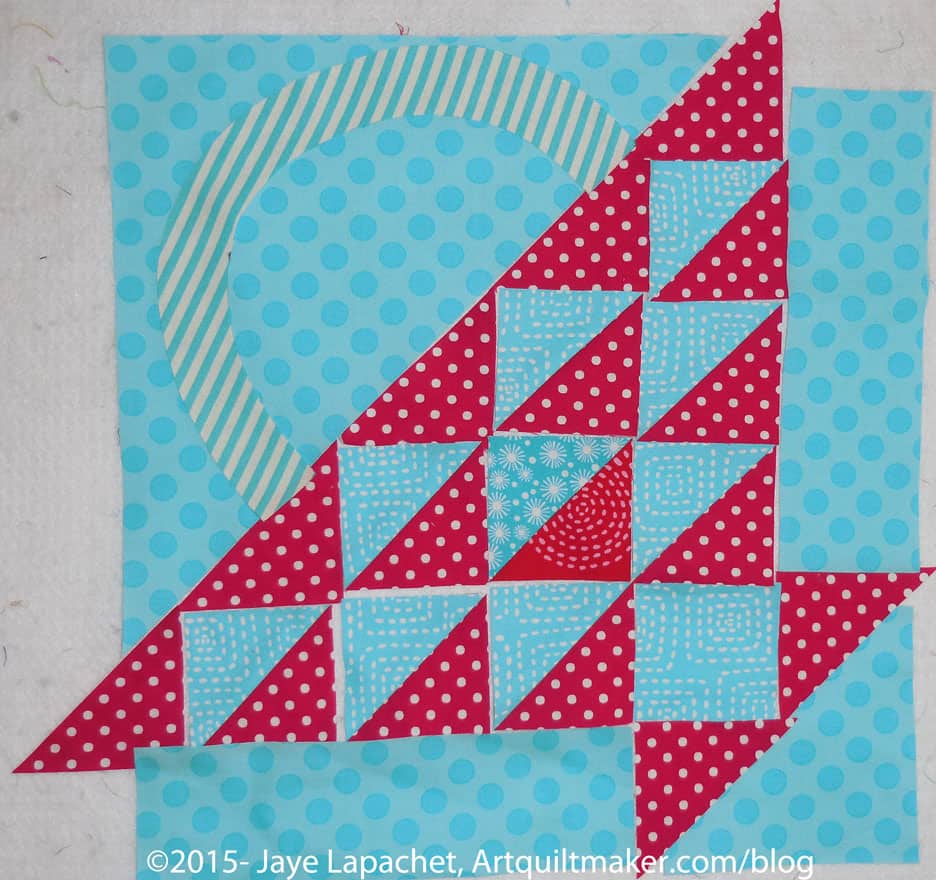
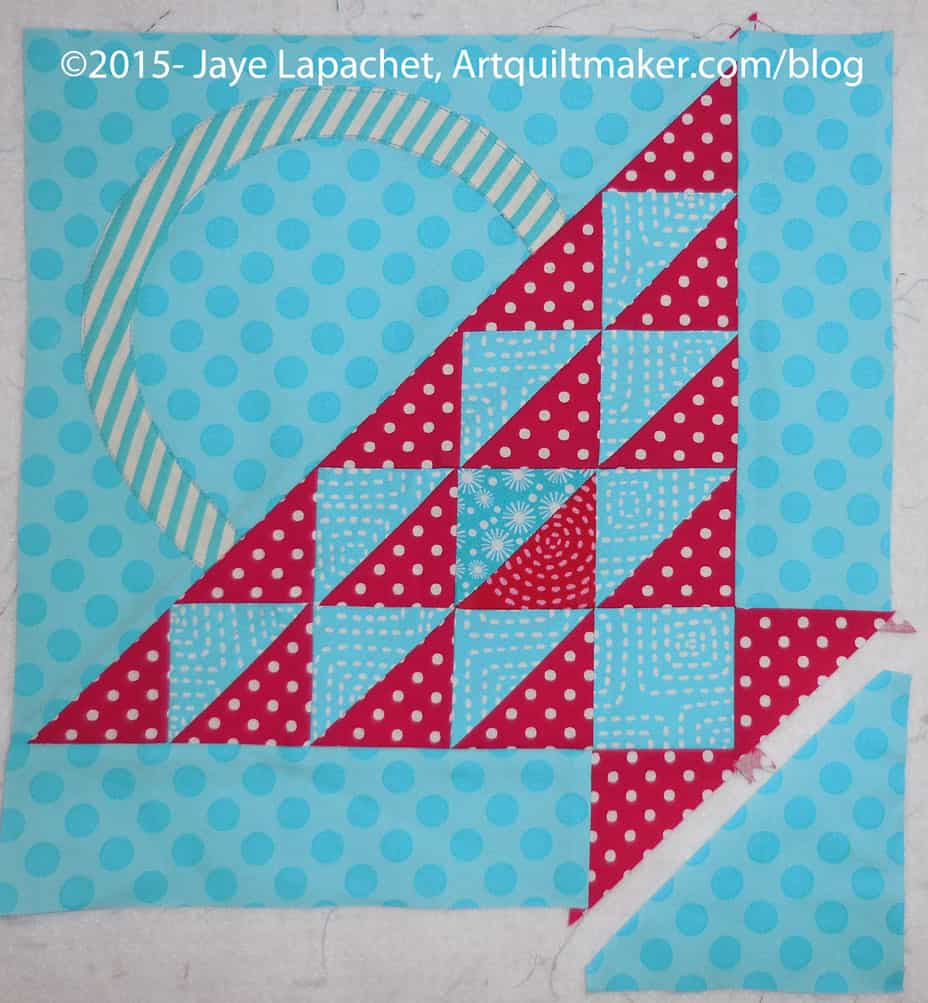
As mentioned in part 1, above is the current block in our Sampler Quilt Class. These directions are for machine sewing your Flower Basket and include a little applique’. The applique’ can be done by machine or hand.
Are you playing along? If you are just starting, below is the complete supply list. You won’t need everything for this step, but you will need to start with part 1 and that part requires more supplies. Also, note, there are a LOT of photos in this tutorial.
These directions use a quarter inch seam allowance. Check your seam allowance before you begin. If you don’t know how to do that, there are resources available, including one from Connecting Threads and Craftsy. You can search the web for others if you don’t like these tutorials.
You will be directed to use the Triangle Technique. Make sure you have the chart as well as the instructions handy.
Respect the bias.
After working through part 1, you have already chosen your fabrics, made your templates and cut your pieces. You are ready to sew.
Sewing
Carefully stitch along the hypotenuse of the large background triangle, about 1/8″ from the edge, to stabilize it. This stitching will be covered up when you stitch the handle part of the block to the basket part of the block.
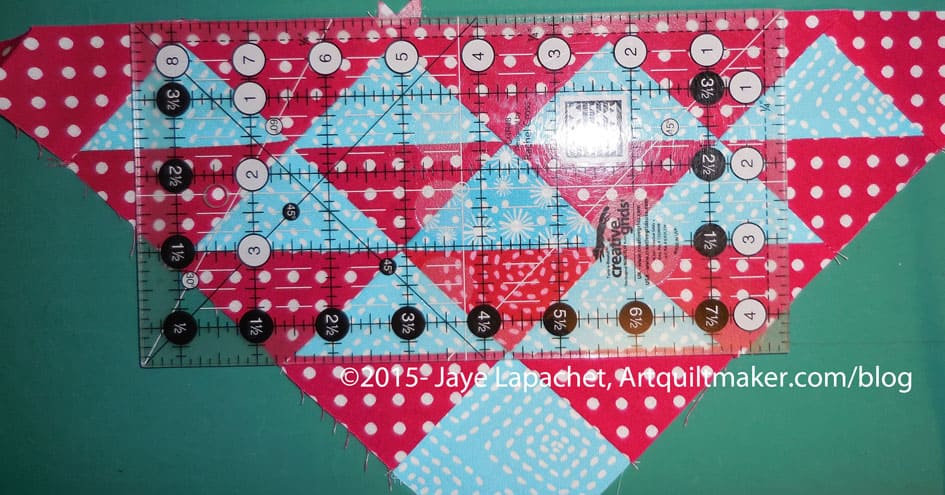
Triangle Technique
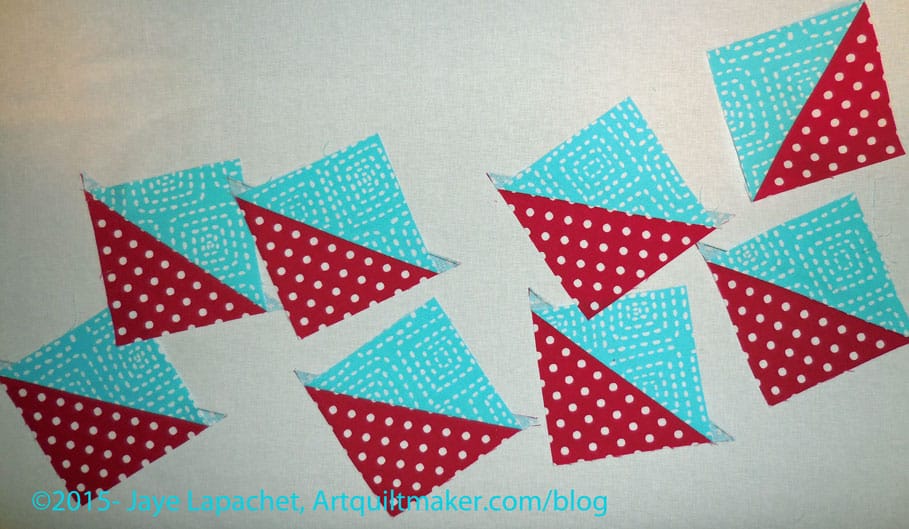
Use the Triangle Technique to make your half square triangles. Make sure you have the chart available to confirm sizes. A brief overview is:
Draw an X from corner to corner diagonally on the wrong side of each of your 6.25″ x 6.25″ squares.
Place them right sides together and sew 1/4″ on each side of the diagonal lines.
Nota bene: If I had wanted to pin I would have pinned far away from any of the diagonal lines.
Now you have a piece with four seams forming an X.
Next cut the ‘Plus’ of your sewn piece. This means that you are cutting horizontally down the middle and vertically down the middle.
Line up your ruler with the edge of the fabric and the point in the middle where the two lines forming the X come together.
Cut vertically.
Do NOT move your fabric.
Reposition your ruler and then cut the piece horizontally.
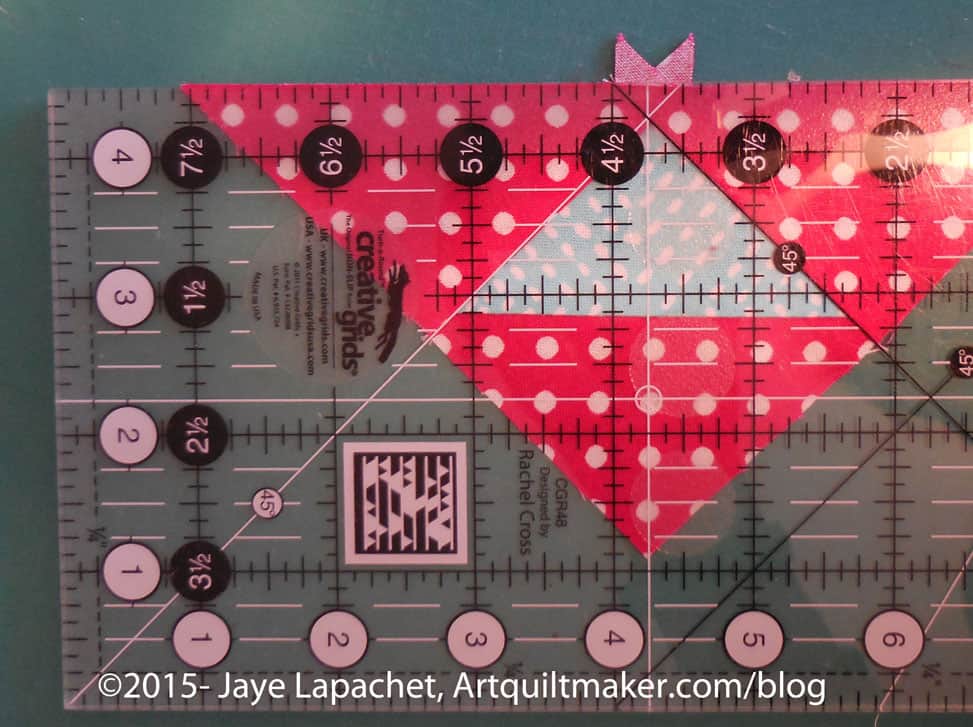
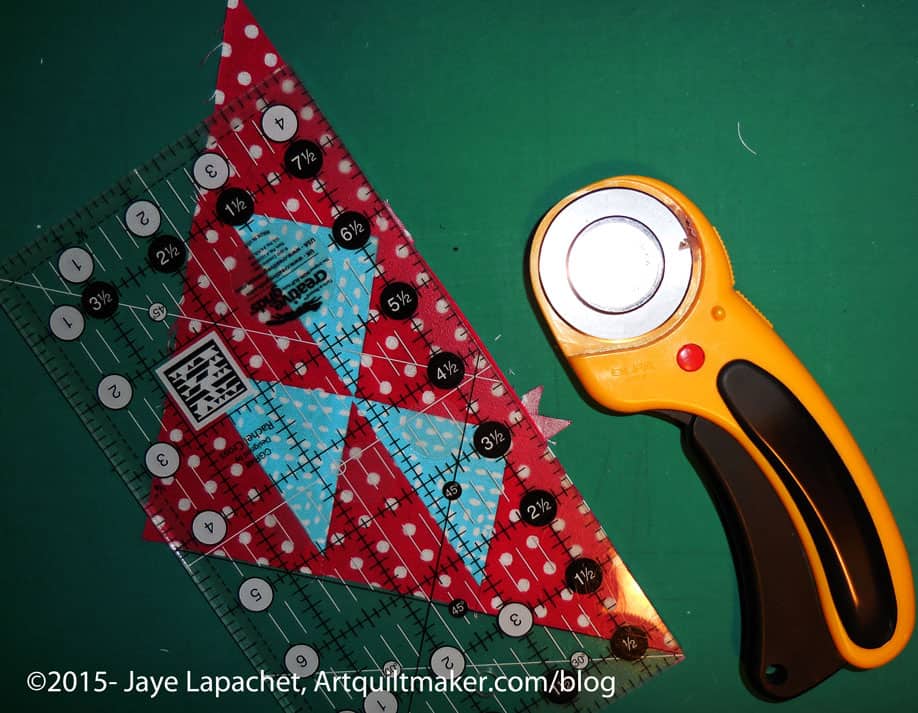
The result is 8-2.5″ half square triangles. The above are actually a thread or two larger than 2.5″, which leaves the perfect opportunity for trimming to make them an absolutely perfect 2.5″.
Trim your HSTs to an absolutely perfect 2.5″.
Now you have 8 beautiful HSTs.
Of course, you can use whatever technique you like to make the half square triangles.
Layout and Assembly
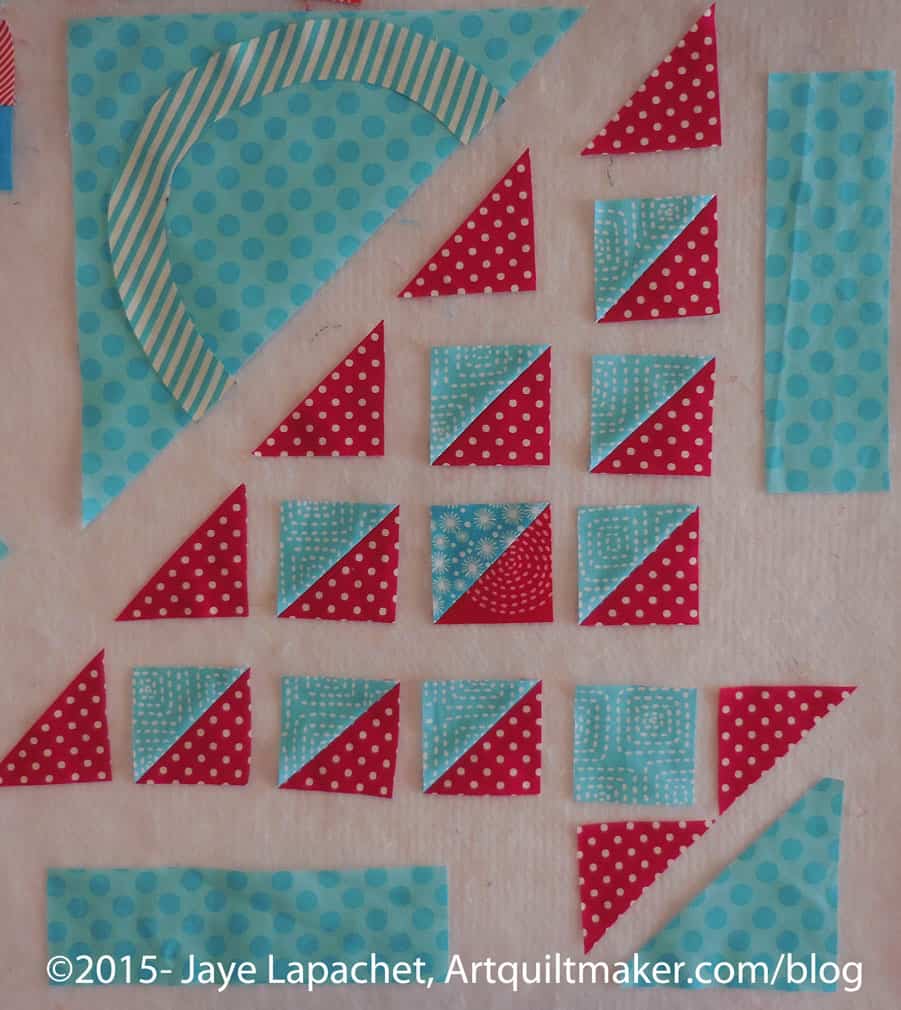
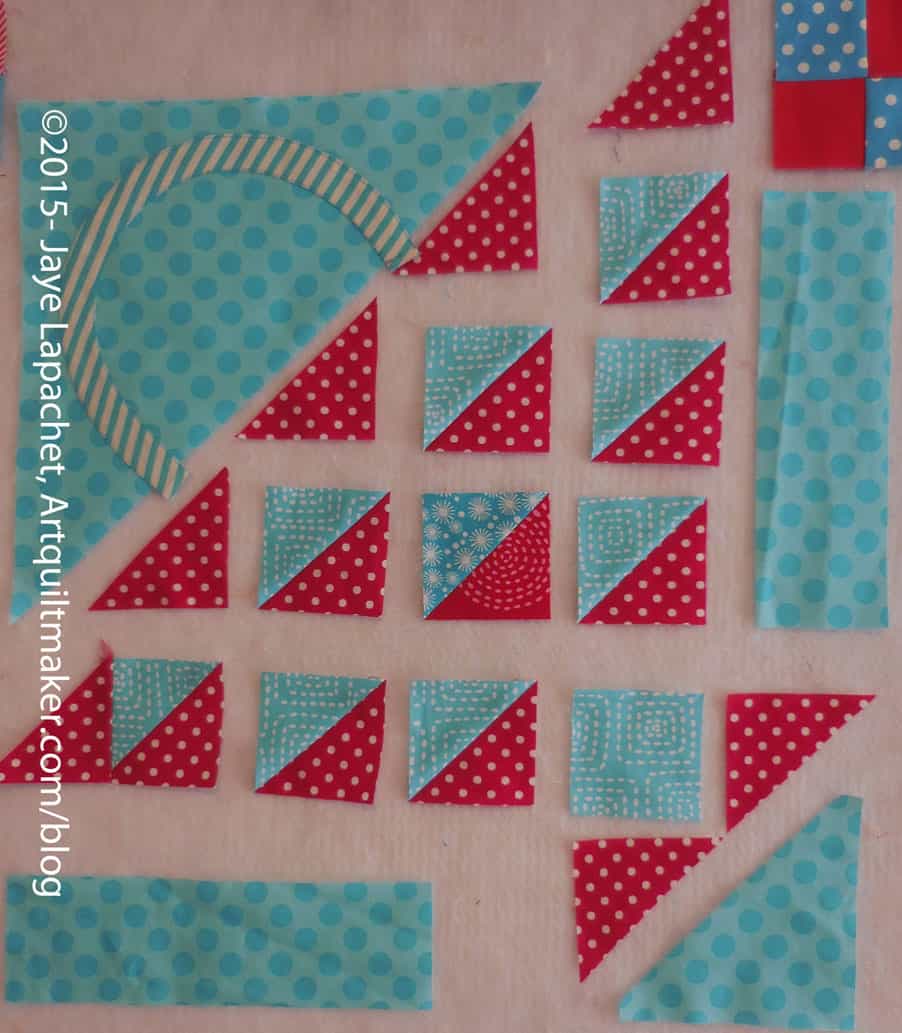
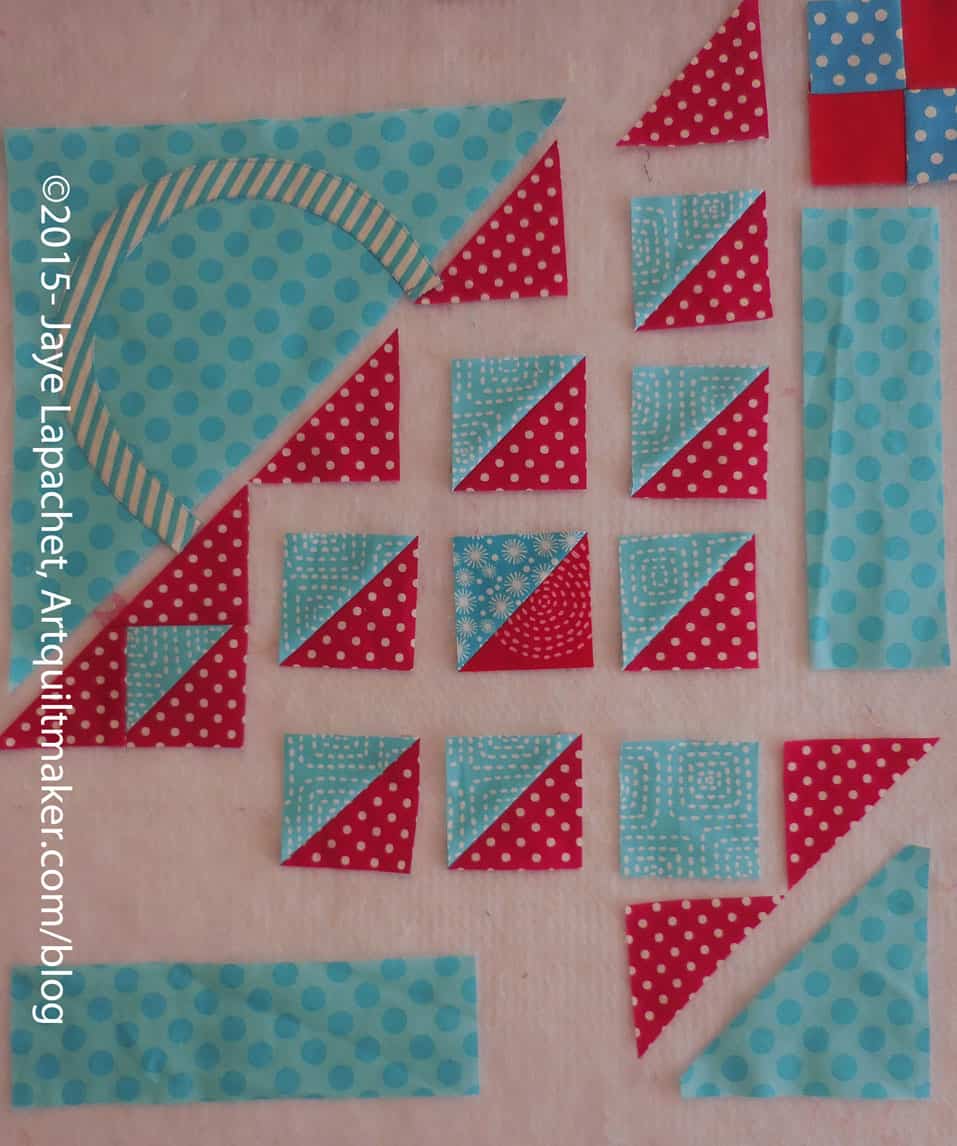
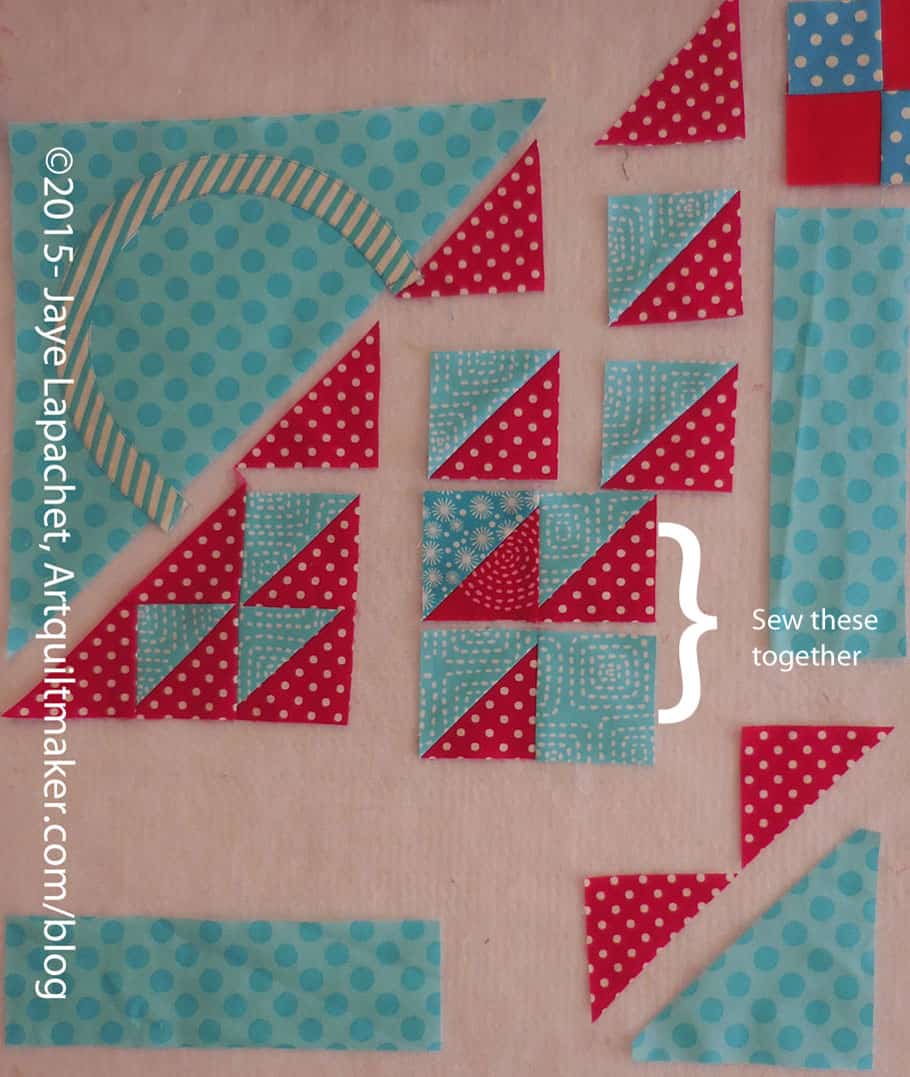
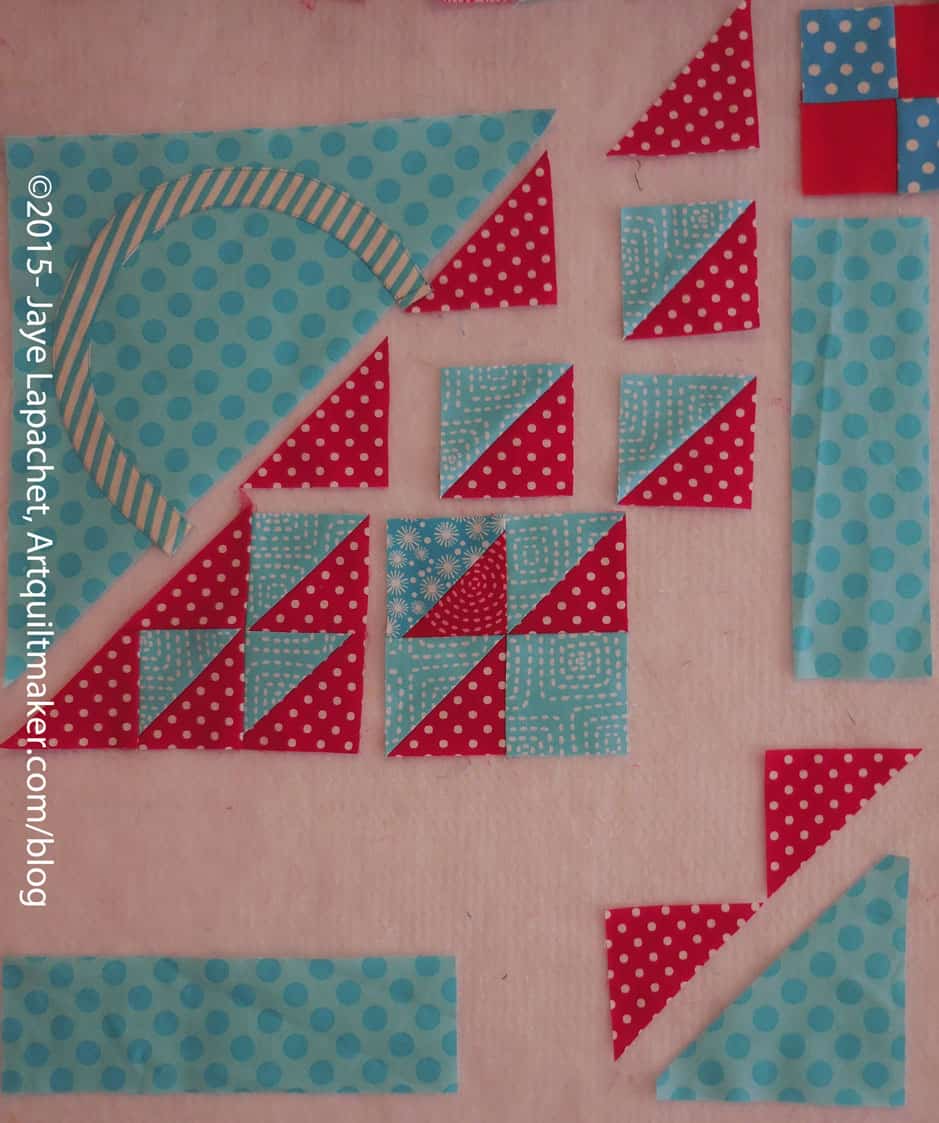
Pieces cut and ready to sew
Now that you have cut all of your pieces, lay them out on your sandpaper board, or put them up on your design wall. It is great to be able to see where all the pieces belong and adjust any pieces that need adjusting before you sew.
Sew Handle to Background
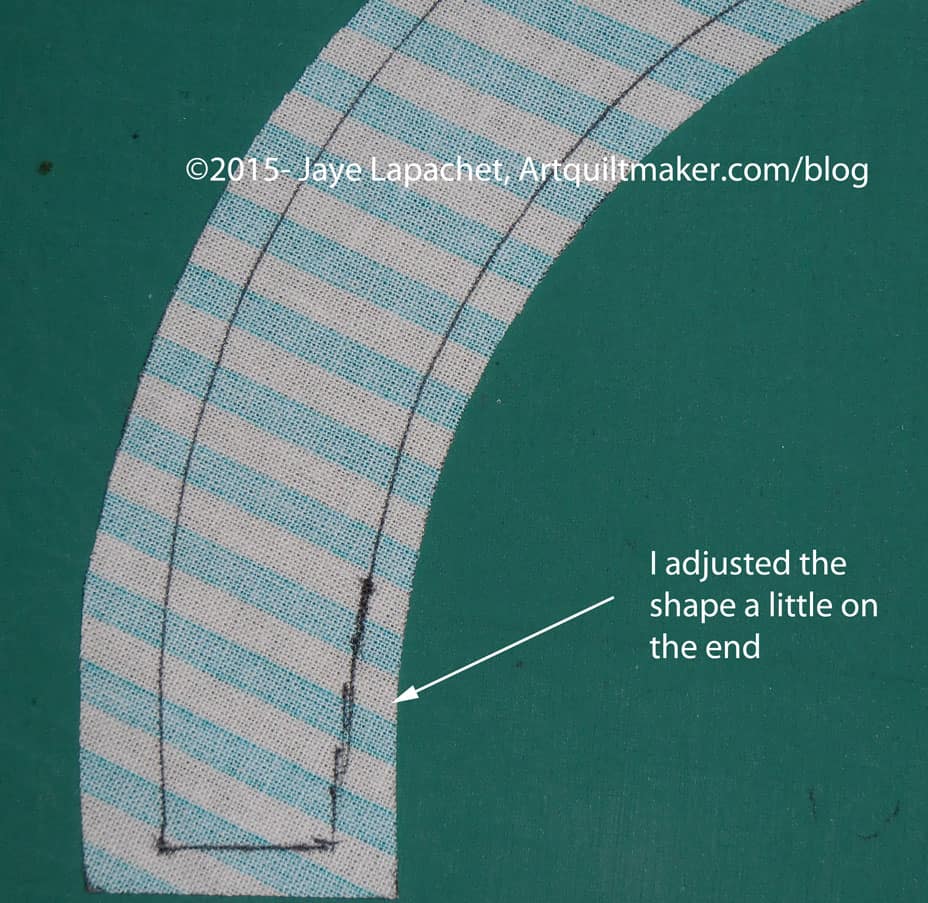
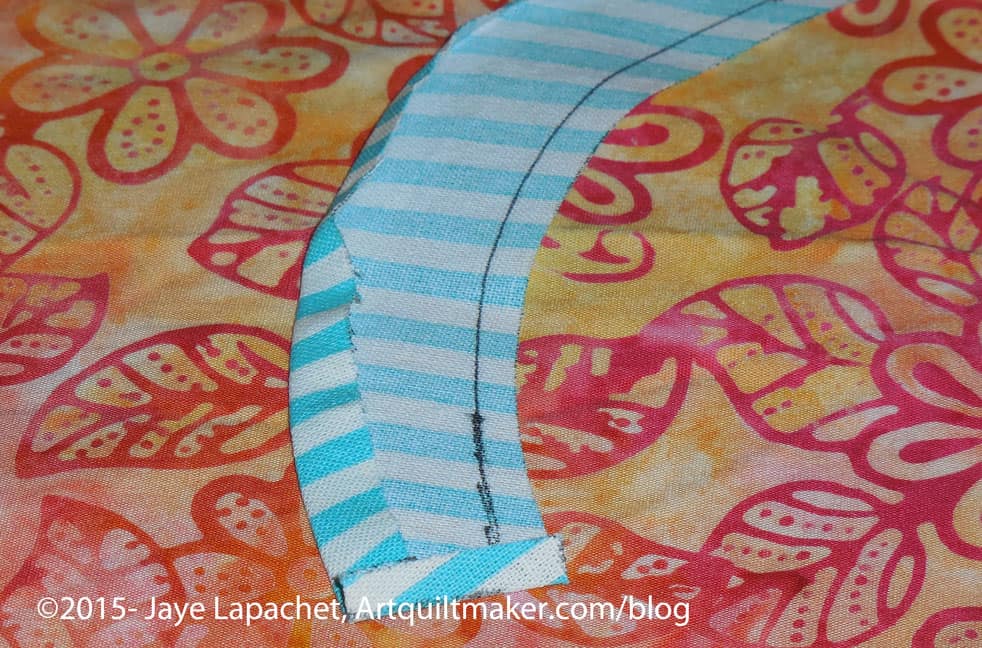
Template on Handle, ready to traceTraced & Adjusted
Because I decided to use the method described below, I made another handle template with NO seam allowance. I placed it on the handle I had cut from the striped fabric carefully so there was an even seam allowance on all sides. Then I traced around it with my thin black pen. I thought the template was a little wide at the end so I adjusted the line a bit to make the seam allowance larger.
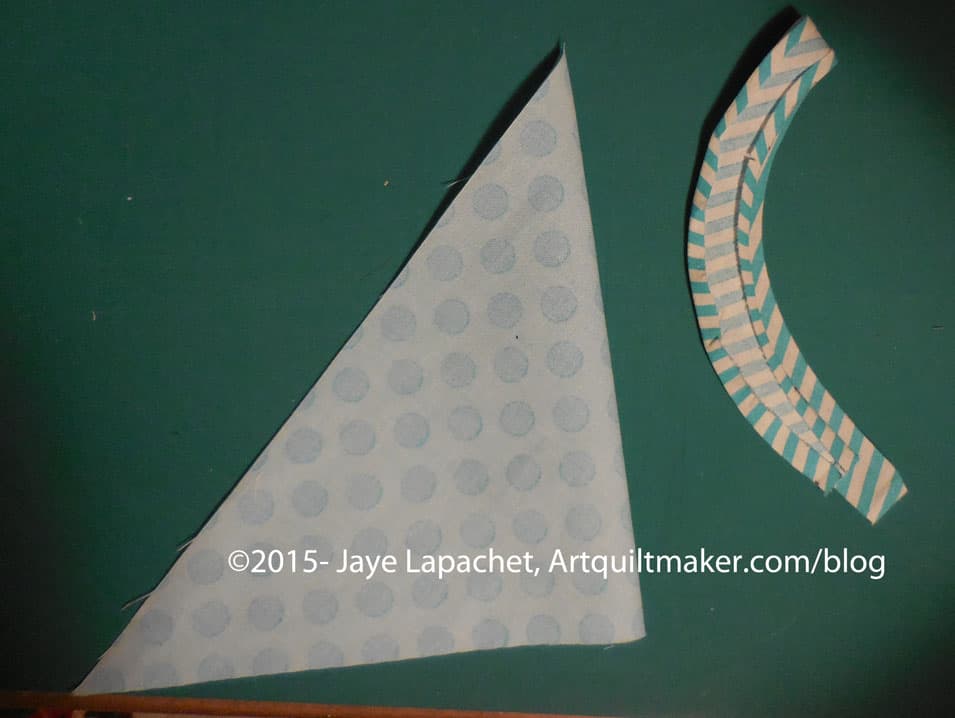
Handle & Background Triangle Cut, Laid OutPieces Laid Out
My pieces looked a little weird-not the right size, etc when I laid them out. Have no fear! They will improve.
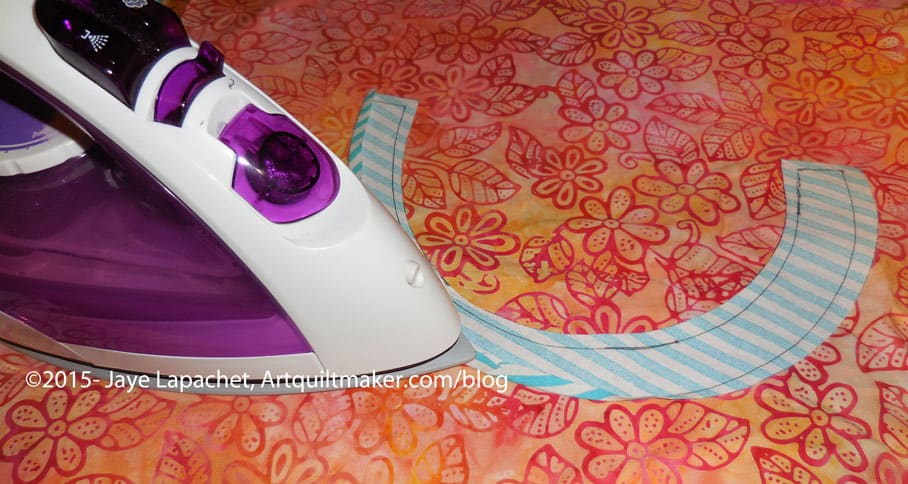
Press seam allowance underPress with hot iron
I was using my stiletto to adjust the seam allowance, but it was impossible to hold the stiletto, the camera and the iron all at once. Press carefully, so as not to distort your pieces.
Watch out for corners
Pay attention to the corners. The layers of fabric will want to pooch in weird directions. This is where one of those mini irons might come in handy. I used my regular iron and a stiletto, so I know those tools work.
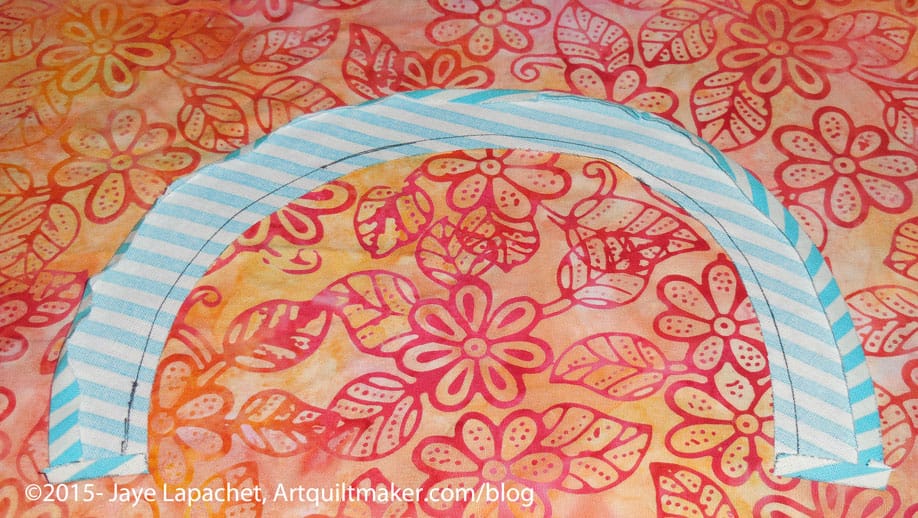
Press seam allowance on handle under
Take your handle and press the the seam allowance under on both sides of the piece. Press so that the drawn line is on the inside of the handle and is covered by the piece once the handle is sewn.
<Nota bene: the orange fabric was selected for good contrast so that the steps would show up well>
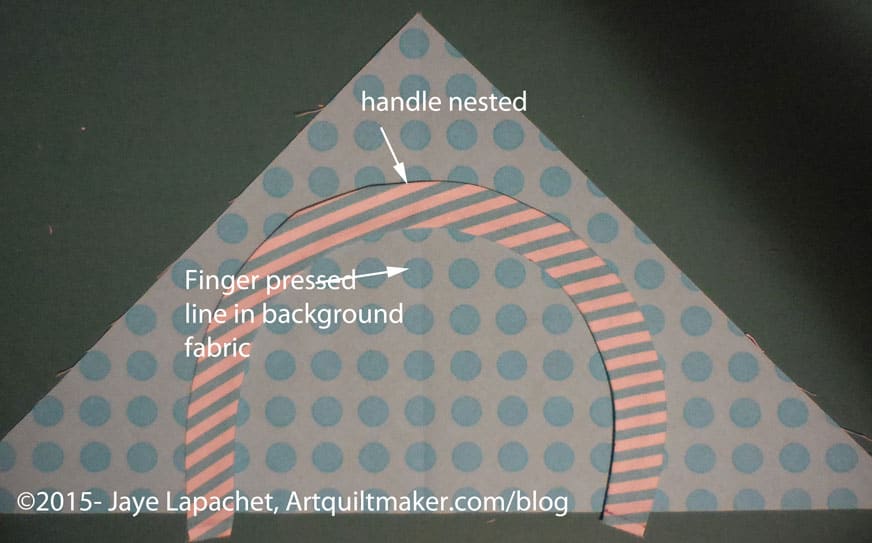
Finger press patches in half
Fold the handle in half with wrong sides together and finger press on the midpoint. Unfold.
Fold your large triangle in half with right sides together and finger press. Unfold and layout.
Nesting handle & background
Nest the handle into the triangle with the right sides up.
Line up the bottom edges of the handle with the hypotenuse of the background triangle. If the handle ends are a little over, it will be fine. You can trim them later.
Eyeball your piece to make sure everything looks good and even.
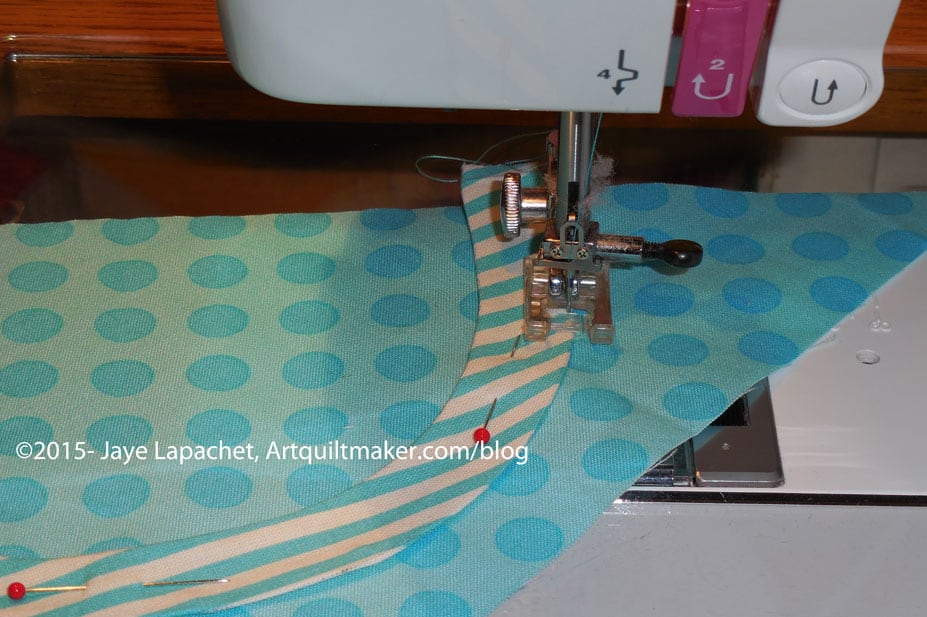
Pin the handle to the background down the center of the handle. Remove the pins as you sew. Try not to sew over them.
Using a lot of pins will help keep the handle in place as you sew
Sew carefully
Sew slowly and carefully along the drawn line around the curve. I chose a matching thread, an applique’ foot and a topstitch/sharp needle.
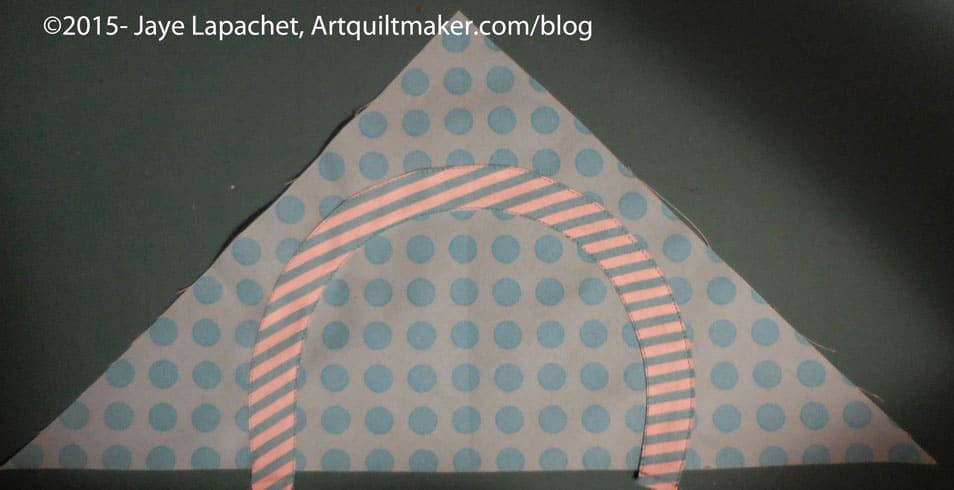
You will either need to hand applique’ the other side down or using a machine stitch that suits you.
You could sew both sides down with a straight stitch, like I did. There are many options.
Optional: You can satin stitch (see the Machine Applique’ tutorial) or blanket stitch or use some other decorative stitch to machine sew the handle to the background triangle piece. If you use one of these stitches, you may need some tearaway stabilizer
Optional 2: you can hand applique’ the handle to the background triangle.
Handle sewn to background with straight seam
Once the handle is sewn you are ready to move to the woven part of the basket.
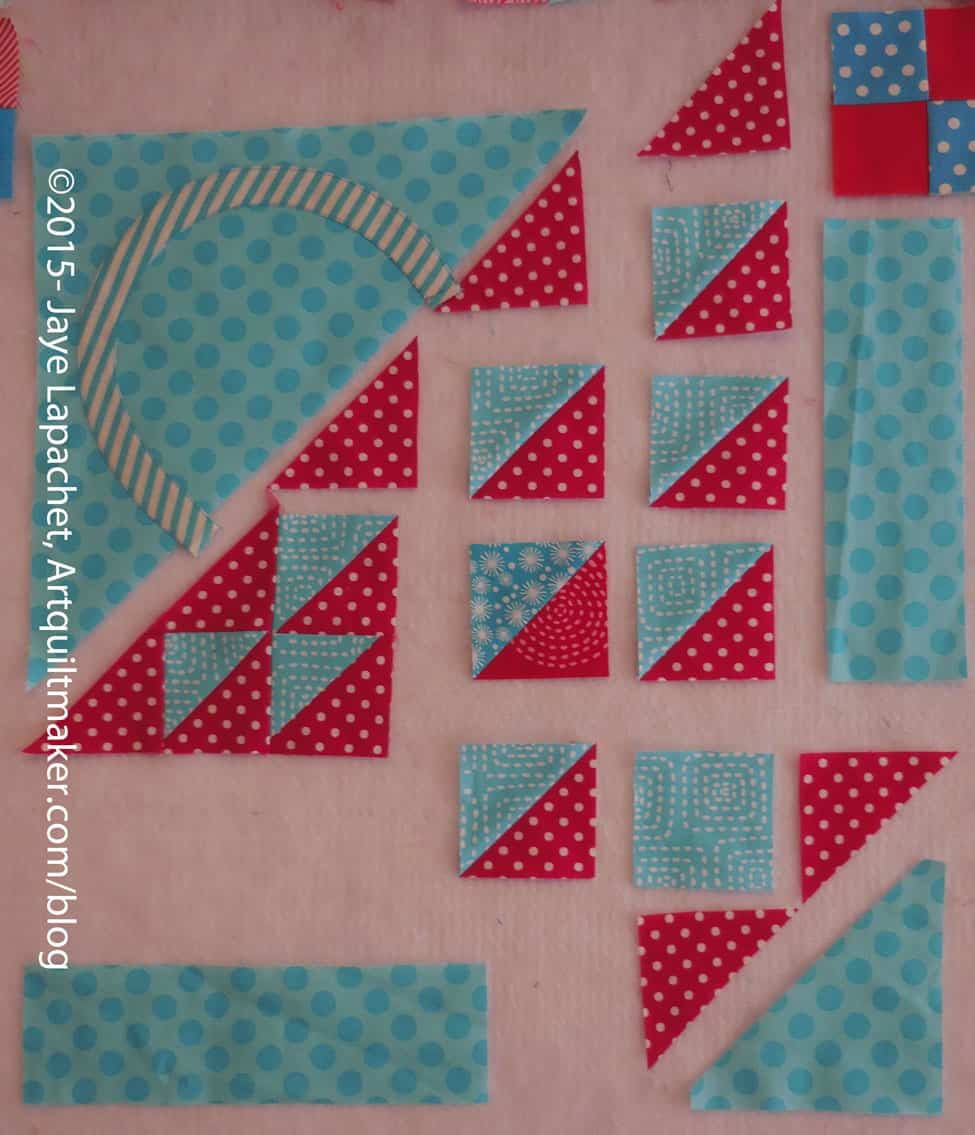
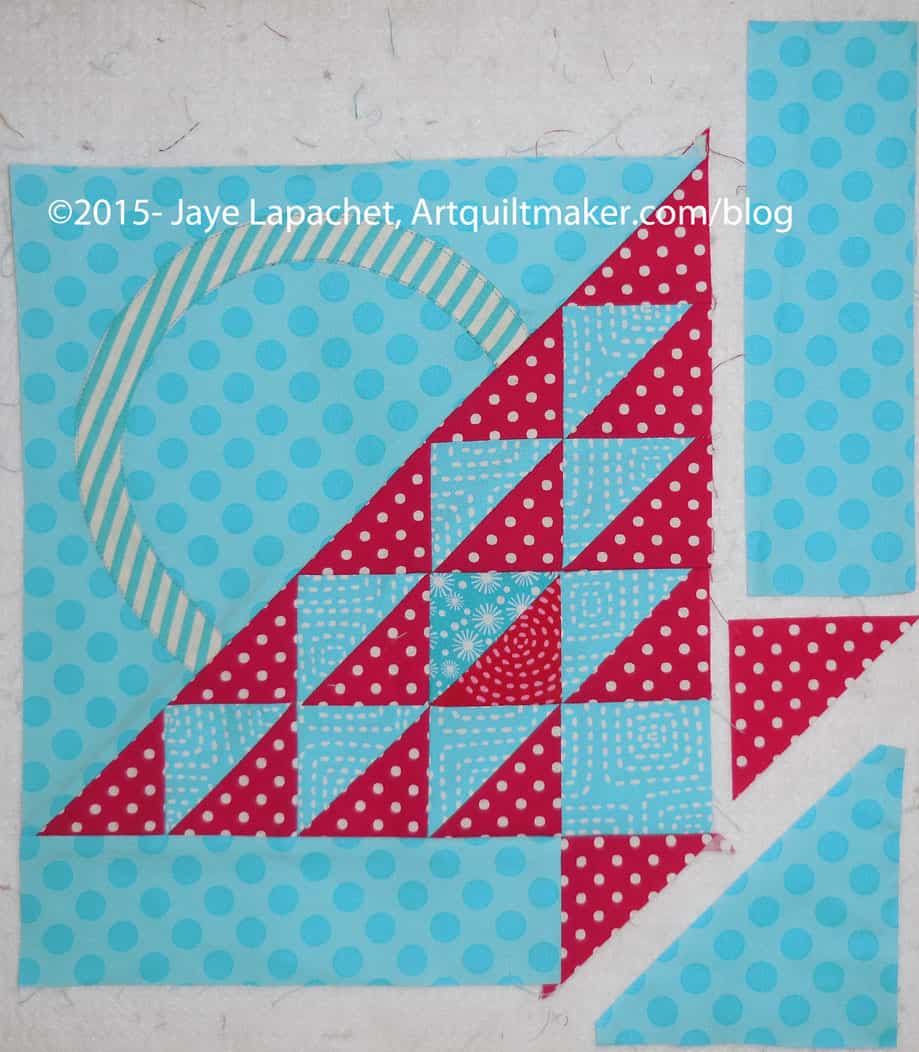
Basket Sewing Layout
Sew Basket Together
The block can be broken down into two pieces: the top half with the handle and the bottom half with the basket.
The two colored HSTs are supposed to give the illusion of a woven basket.
Trim off dog ears
Trim off dog ears from the A,B-HST/1 combo.
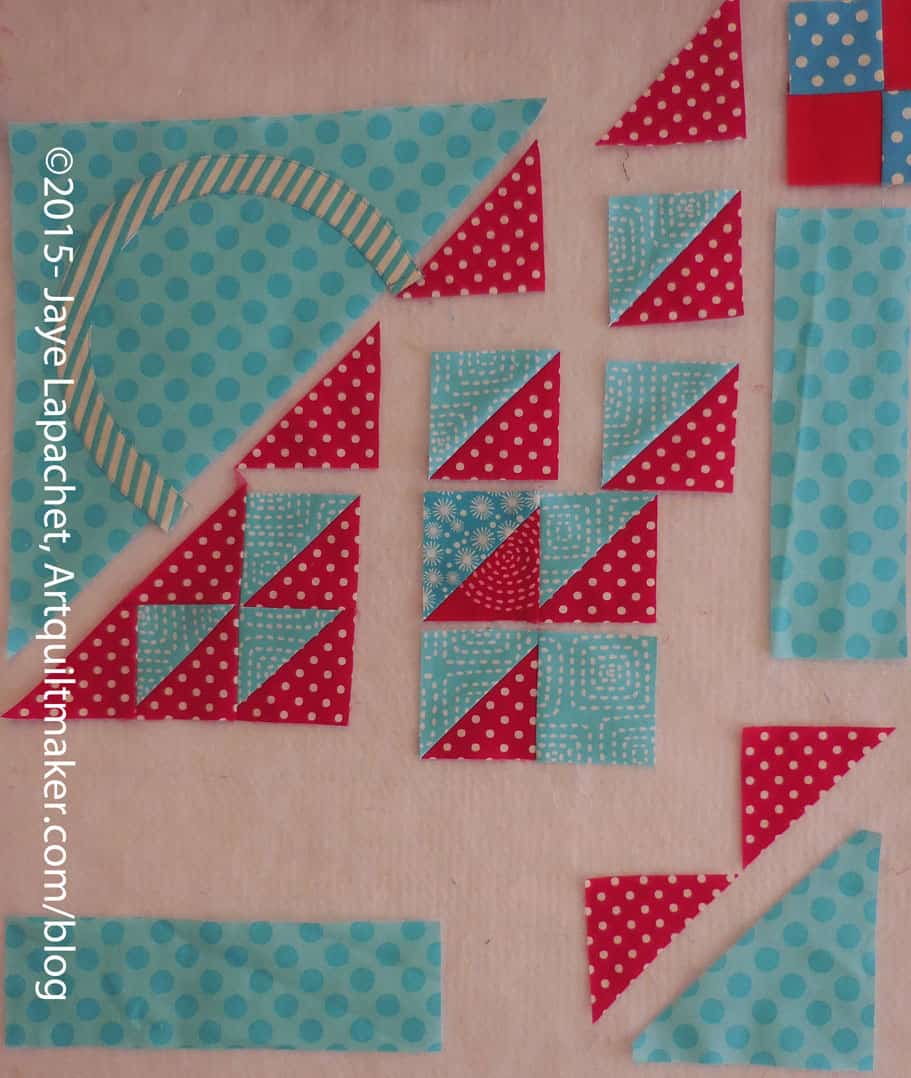
Sew Basket parts together
Sew HST/2 to HST/5. Press towards HST/5.
Using the diagram above to confirm placement, sew your A,B-HST/1 combo to your HST/2-HST/5 combo. Press towards the red.
Sew basket parts together
Sew HST/8 to Square 10. Press towards the Square 10.
Sew HST/6 to HST/9. Press towards the red part of the HST.
Sew 2 sets of woven basket parts togetherSew basket parts together
Using the diagram above to confirm placement, sew your HST/6-HST/9 combo to your HST/8-Square/10 combo. Press towards the HST/6-HST/9 combo.
Sew Triangle to HSTs
Using the diagram above to confirm placement, sew C to HST/3. Press towards the red.
Sew triangle D to C-HST/3 combo
Using the diagram above to confirm placement, sew D to your C-HST/3 combo. Press towards D.
Trim your dog ears
Trim your dog ears.
Sew HST/4 to HST/7. Press towards HST/7, making sure your seams will nest with the seams you have already pressed.
Sew parts of the basket together
Sew HST/4-HST/7 together and then sew the HST/4-HST/7 combo to E. Press towards E.
Four sections of the Basket
Using the diagram above for placement, sew your HST/4-HST/7-E combo to your C-D-HST/3 combo. Press.
Trim dog ears.
Sew 2 Sections together
Sew your A,B-HST/1-HST/2 segment to the HST/6-HST/9 segment.
Trim Your Dog Ears
Trim your dog ears!
Sew last two segments
Sew the last two segments of the basket part together. You may have to re-press some seams.
I didn’t move the borders the whole time I worked on the quilt See how much the basket part shrank? That is seam allowances for you!
Trim the dog ears
Trim the dog ears, if you haven’t already.
Sew 2 halves together
Now you have two halves of the basket. Sew the woven part to the handle part by placing the woven part on top of the handle part, lining them up and then sewing carefully. You can fold the two sections in half, bisecting the handle, to match them up if you think that you need to trim the handle portion later.
Ready to sew last borders
Now you are ready to sew on the borders.
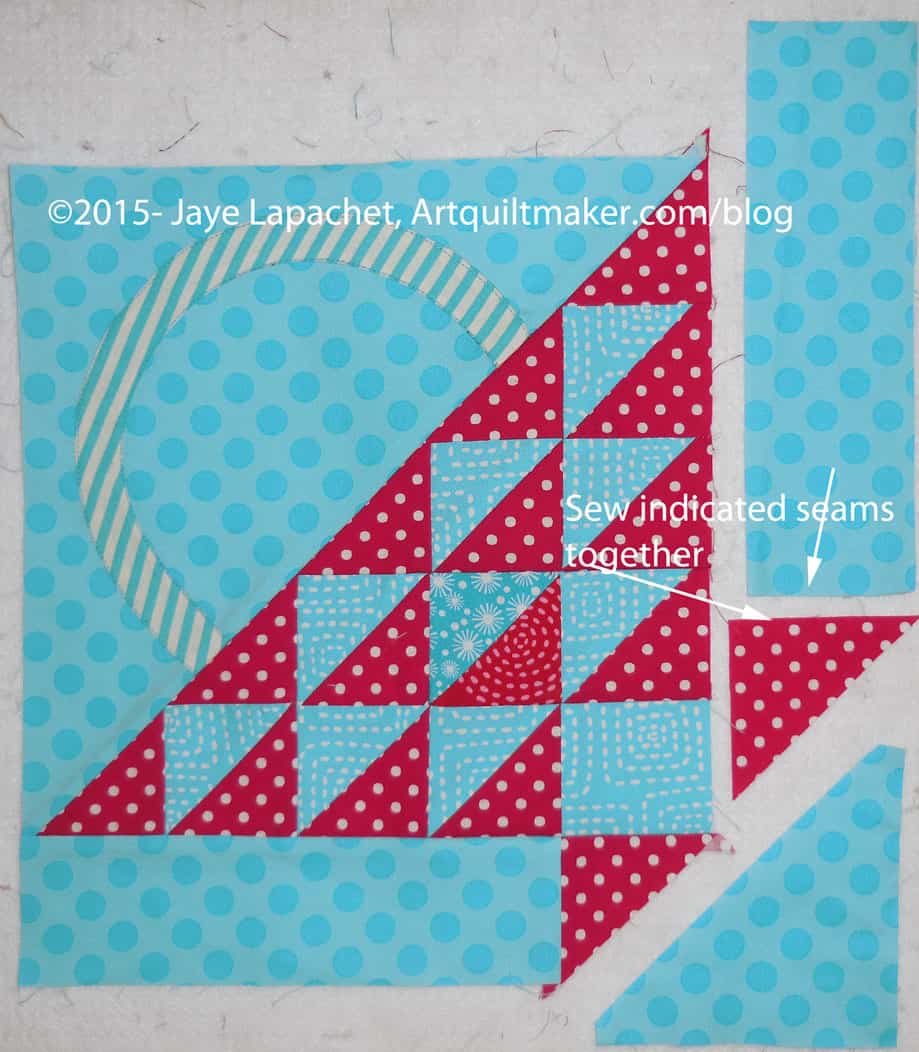
Sew triangle to borderSew triangle to border with words
Sew the B2-G background section by placing the red triangle (G) face down on top of background piece B2 and sew the short end of the background to the triangle, as shown in the picture.
Sew on background B2/Triangle-G
Take the basket piece that you sewed together above and place the B2-G background section on top of the basket section. Line up the red triangle’s seam from the B2-G background section with the HST/8-Square 10 section. You want the seams to match, so pin. Press towards background piece B2.
Only one more border to go.
Take the basket piece that you sewed together above and place the B1-F background section on top of the basket section. Line up the red triangle’s seam from the B1-F background section with the HST/9-Square 10 section. You want the seams to match, so pin. Press towards background piece B1.
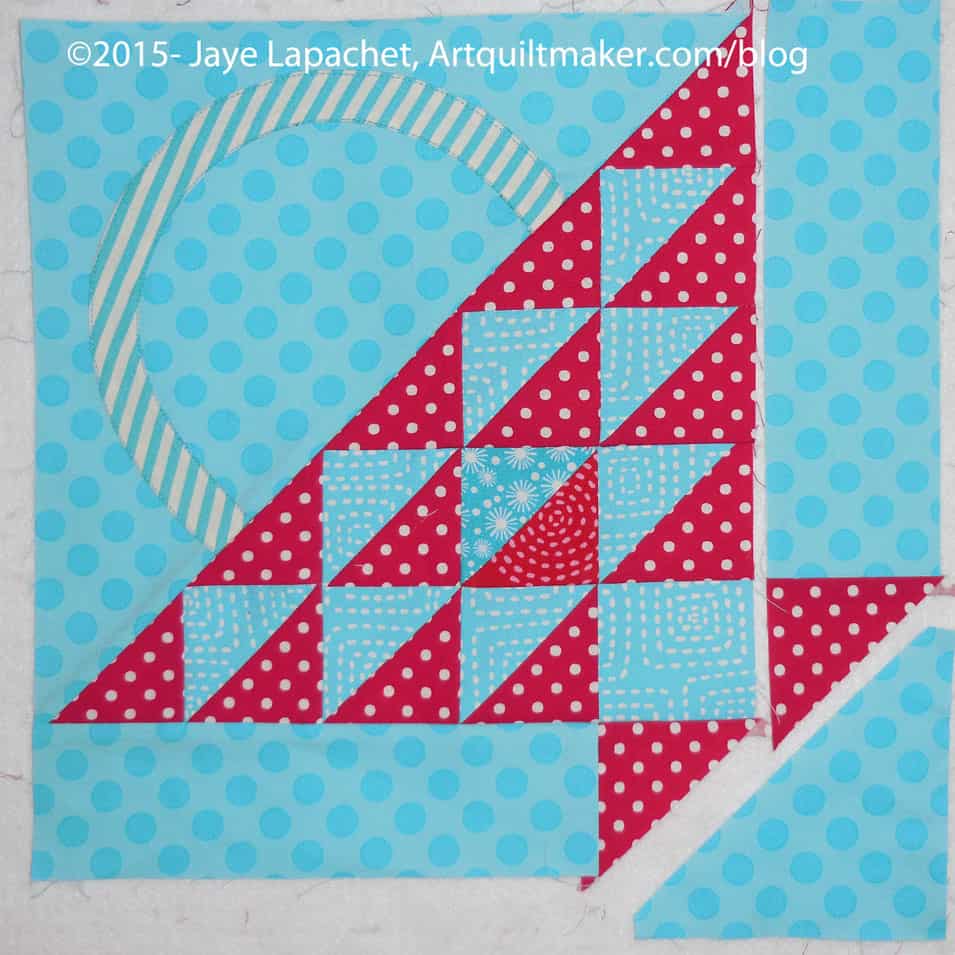
Sew on Final Triangle
Now you are ready to sew the last piece.
Trim dog ears
Trim dog ears.
Basket almost complete
Your basket is almost complete.
Line up triangle with borders
Complete your basket half by sewing background piece B3 to the basket. You have already snipped off the corners so you just have to line up the triangle piece with the borders already sewn to the block. Press towards the background piece B3.
Your half is complete.
Take the top half of the basket, the piece with the handle, and carefully sew it to the basket half.
Frances finally let me know she was ready to move on with her sampler quilt. We decided to make the Flower Basket Block, so I sent her the pattern, promised the tutorial and did nothing.
These directions use a quarter inch seam allowance. Check your seam allowance before you begin. If you don’t know how to do that, there are resources available, including one from Connecting Threads and another from Craftsy. You can search the web for others if you don’t like these.
You will be directed to use the Triangle Technique. Make sure you have the chart as well as the instructions handy.
Respect the bias.
Templates
You really only a need a template for the basket handle. If you are using templates for all of your pieces, then prepare all the templates for pieces in the patterns as directed below.
Prepare pattern for your basket handle template by printing two copies of the pattern. I am telling you to do this first so when you get into the throes of sewing you won’t have to stop and fiddle around with templates.
You will eventually place one copy of the pattern in your binder, but keep it handy so you can use it as reference.
Nota bene: You probably know how to make templates. However, I am including a quick refresher. Look for a comprehensive tutorial soon. (I’ll update this post and link it from here)
Rough cut* the handle pattern out of the second printout.
Rough Cut Pattern
Glue the paper pattern (with seam allowances) using the glue stick (or other suitable adhesive) to the template plastic.
Ok to use scraps of template plastic
It is okay to use scraps of template plastic. Put a piece of tape on seam lines to keep the joins stiff.
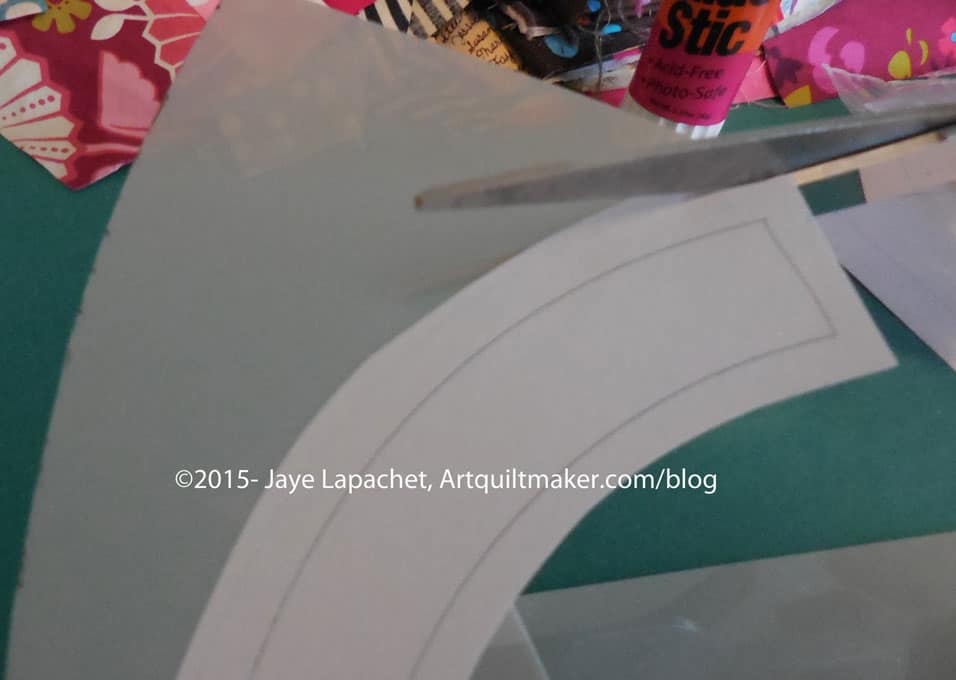
Fine cut templates
Fine cut** the paper pattern and template plastic you have adhered so you have an accurate template, cutting off any seam allowance that may have printed.
If you plan to machine sew the handle at all, you will want to prepare another basket handle template, in the same manner, without seam allowance.
Fabric
Gather your fabric and press it all. You can rough cut some pieces and press it with Mary Ellen’s Best Press to help deal with the bias. Consider this step for the large background triangle and the basket handle.
Cutting
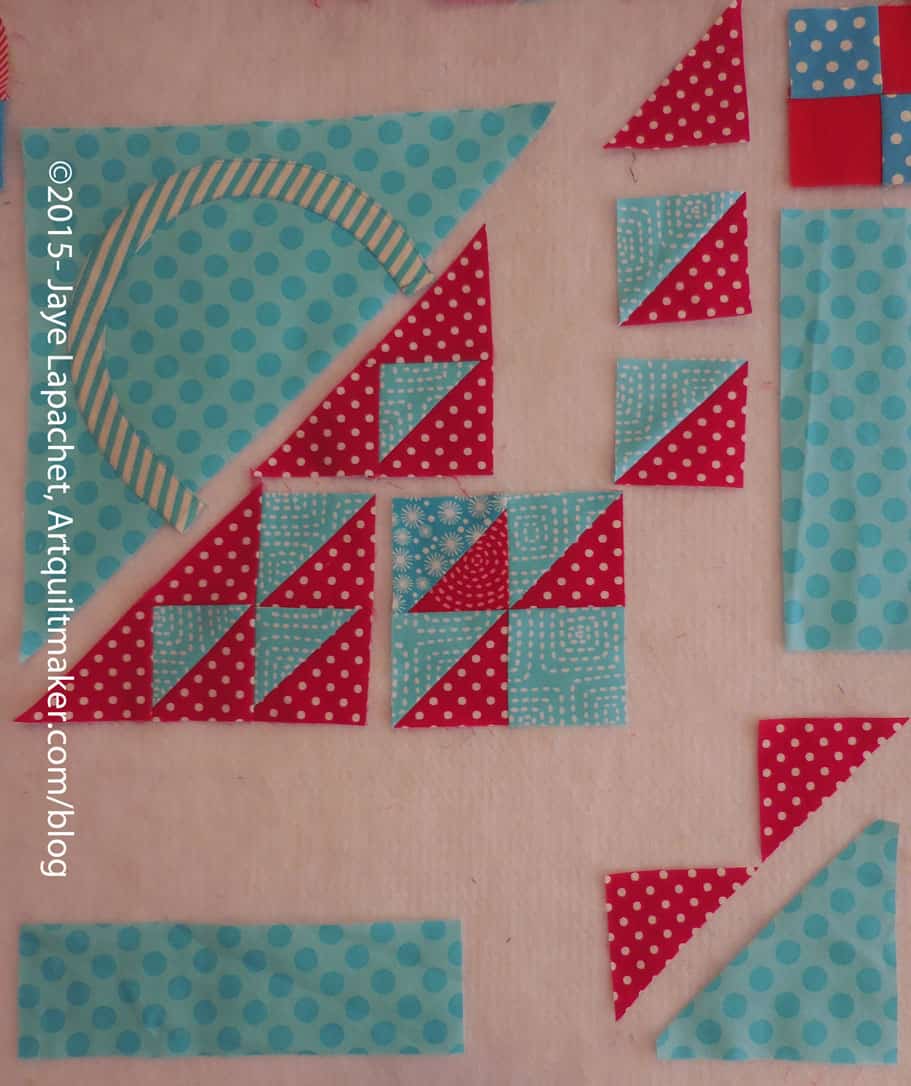
Flower Basket
Basket Handle
In my example basket, above (same as at the beginning of the post), this fabric is the medium blue.
Lay out template piece
Draw around the template with your black fine tip marker. Rough cut a piece of fabric large enough for your basket handle.
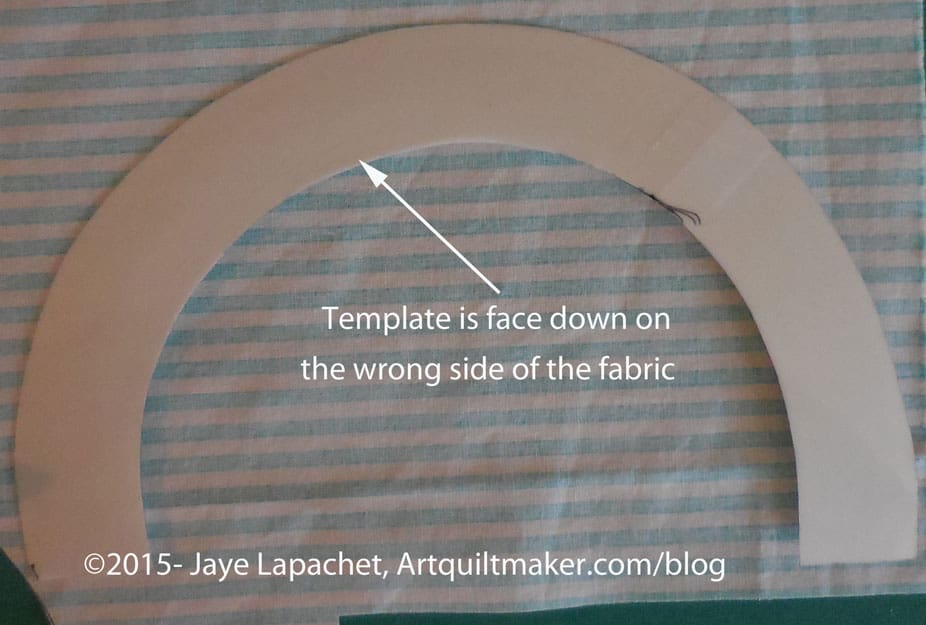
Place template face down on fabric
Place your handle template right side down on the wrong side of the fabric. Trace around the template carefully with your Pigma pen. Trace carefully without pulling or tugging at the fabric. You will be dealing with some bias on the curves. You will need to carefully move your hand along the template to keep it in place while you trace. Use the Pigma pen with a light touch.
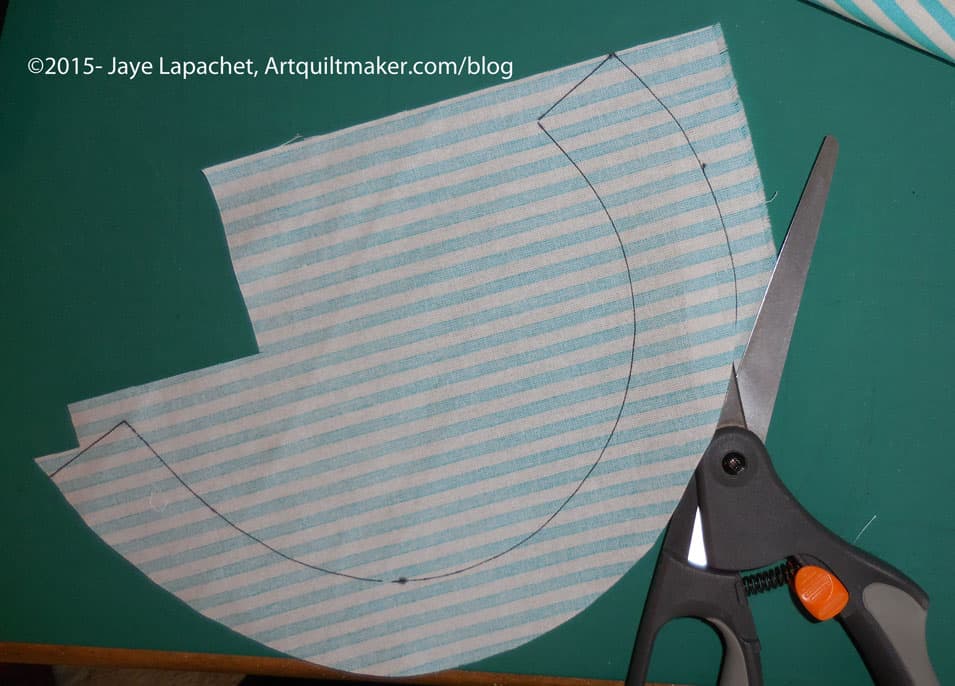
Cut out handle
Using your fabric scissors, cut around the traced image, cutting the drawn line off. If you are using a template with no seam allowance, leave approximately a quarter inch seam allowance on all sides.
Background:
In my example, above, this fabric is the blue Michael Miller Ta Dot with white dots.
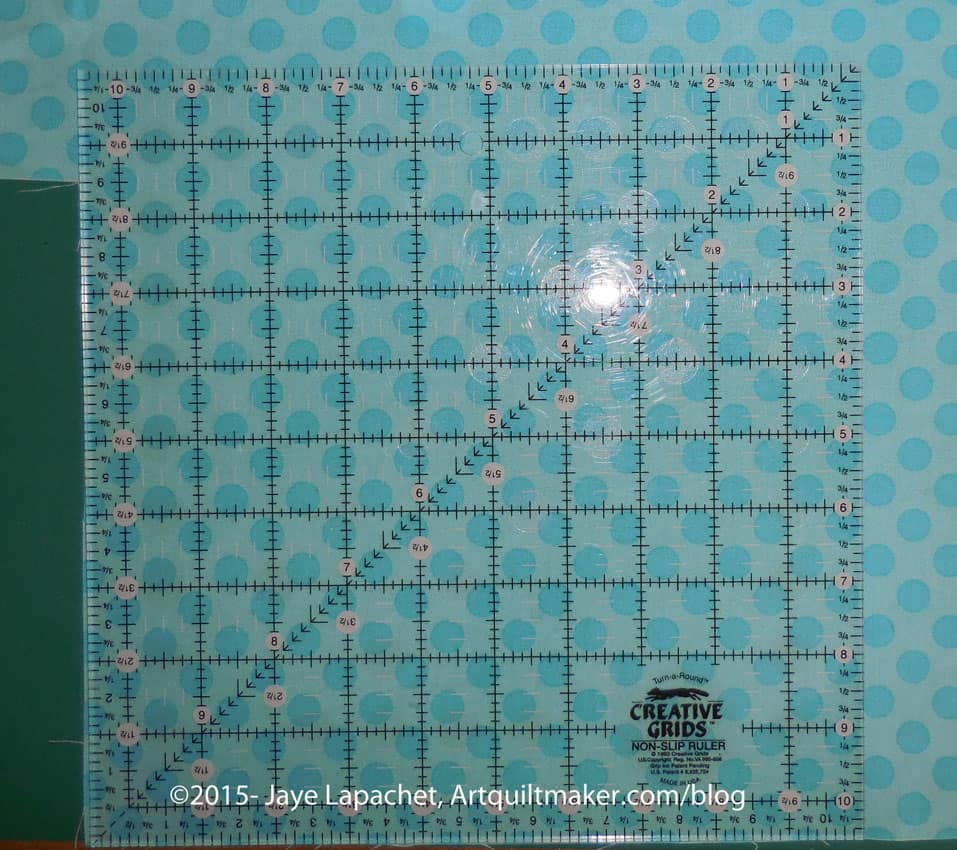
Measure background
Measure the template for the large triangle of background fabric. It should be 10″ on each of the outside edges WITH seam allowance. Cut a square 10.5″ x 10.5″. You can trim it later. Better safe than sorry. Press the square with Mary Ellen’s Best Press.
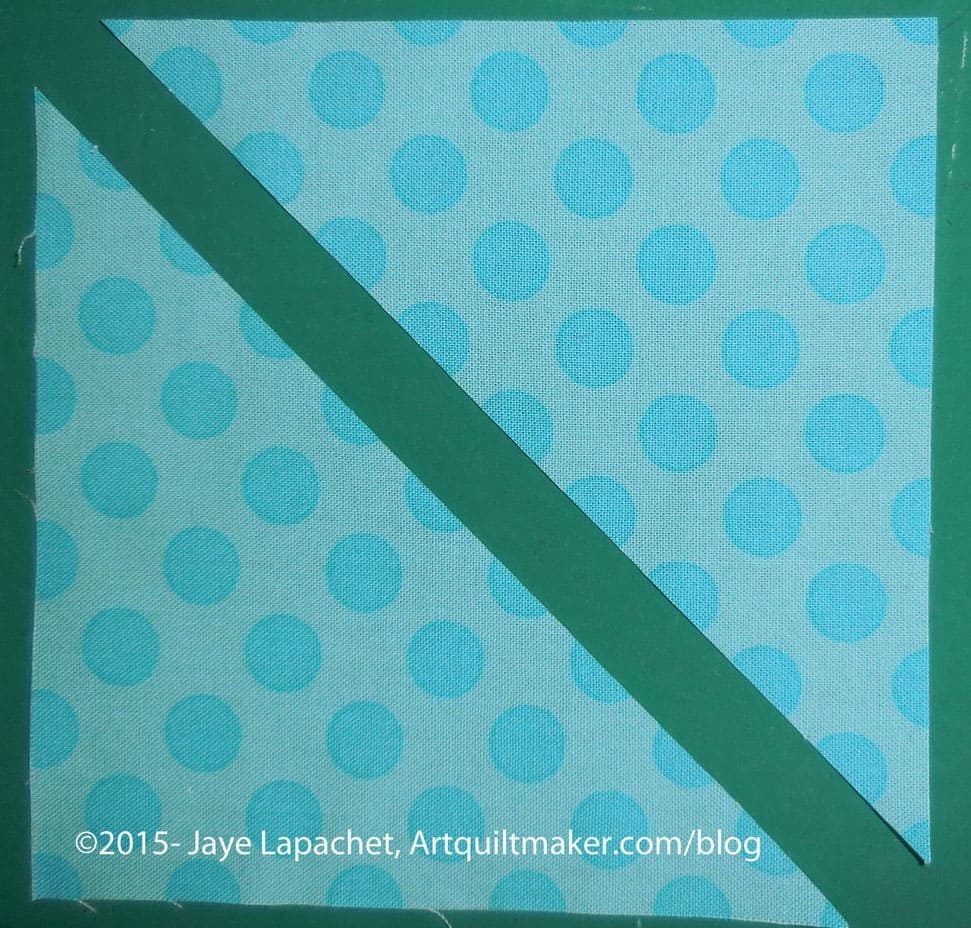
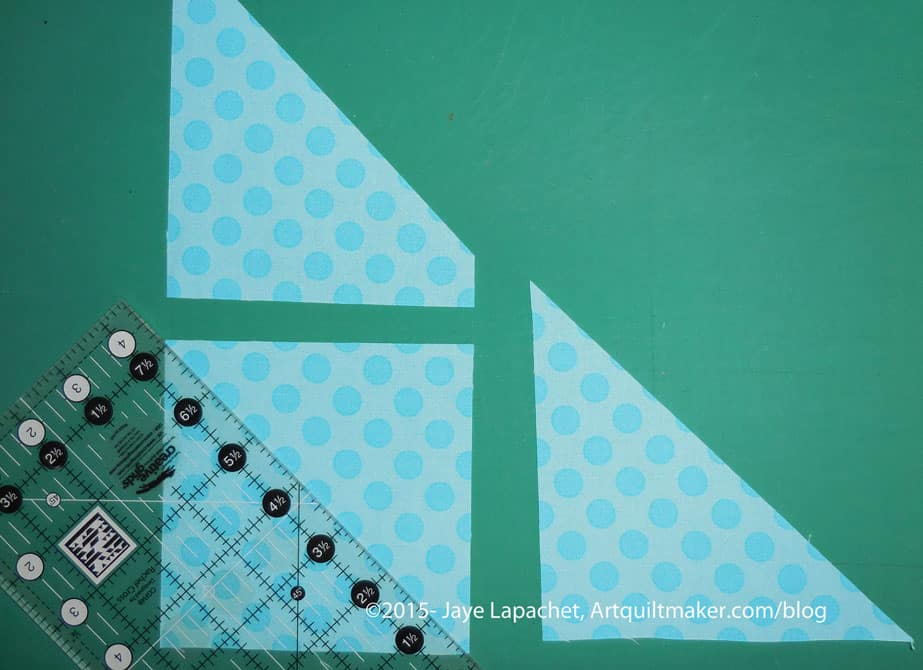
Cut square on diagonal
Cut the square in half along the diagonal.
Cut the following additional pieces according to the measurements given:
Background fabric:
2 patches: 2.5″x8.5″
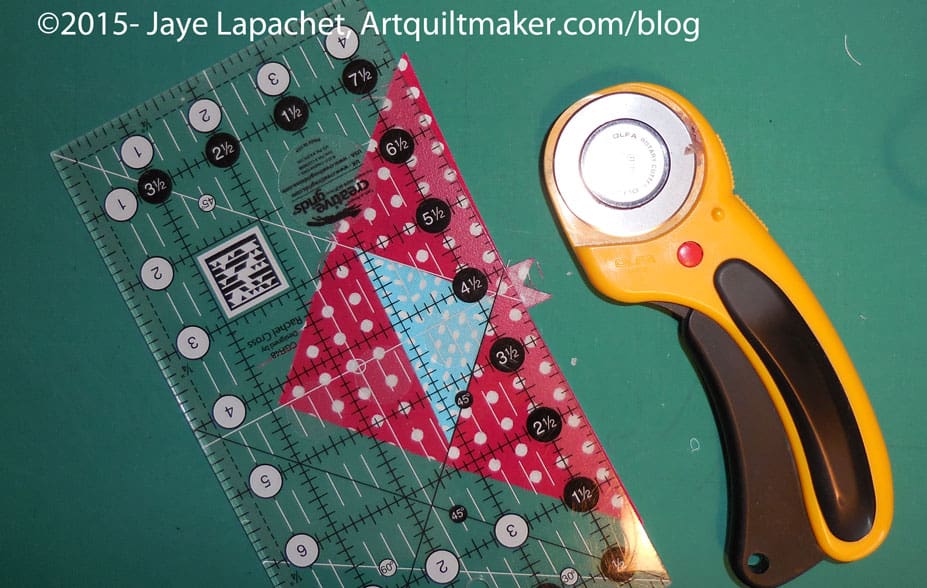
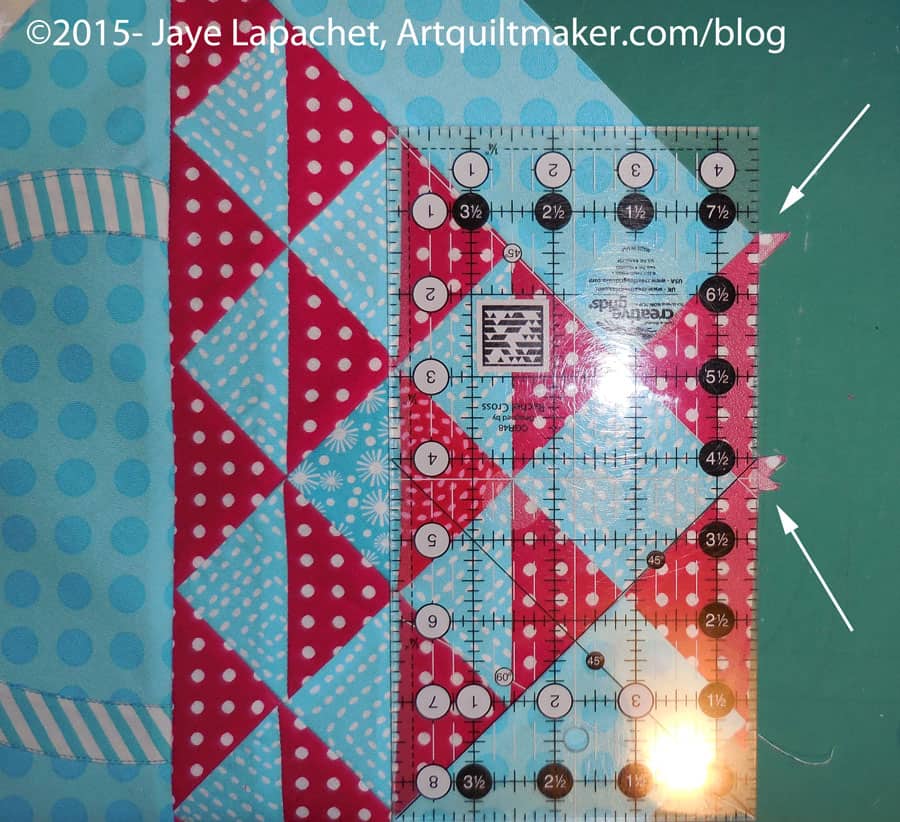
Nip off Bunny Ears
1 patch: square 4 7/8″x 4 7/8″. Cut in half. Nip off the bunny ears with the Judy Martin Point Trimmer
1 square: 5″ x 5″. Cut in half on the diagonal and set your second triangle aside
Remember: you have already cut the large background triangle
Cut some pieces from extra background triangle
You can cut some of the background pieces out of the leftover triangle.
Foreground fabric:
The foreground fabric is used for the basket. You will need at least two fabrics for this part. In my example I am using a scarlet red and a medium blue. See picture above for placement of foreground fabrics.
1 square: 2.5″ square
For the HSTs, you will need 2 squares, according to the Triangle Technique Chart, 6.25″ x 6.25″. Each square should be from a different foreground fabric. See the picture above.
Nota bene: The above Triangle Technique only yields 8 HSTs. You can make another set using the Triangle Technique directions and have some extras, or you can cut the triangles themselves
1 square 2.5″ x 2.5″
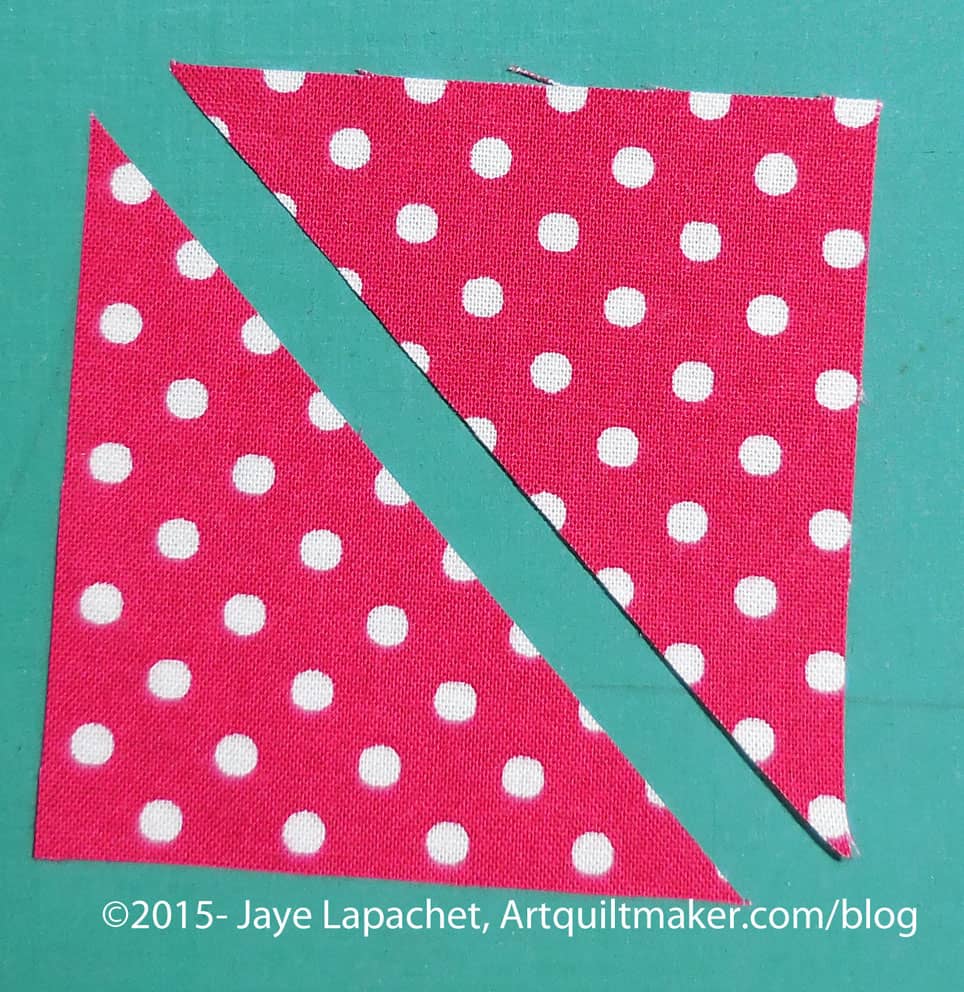
Cut trianglesCut squares in half
Cut 4 squares 2 7/8 in by 2 7/8 in the second background fabric (red in my project). Cut in half. These are the base and top line of your flower basket.
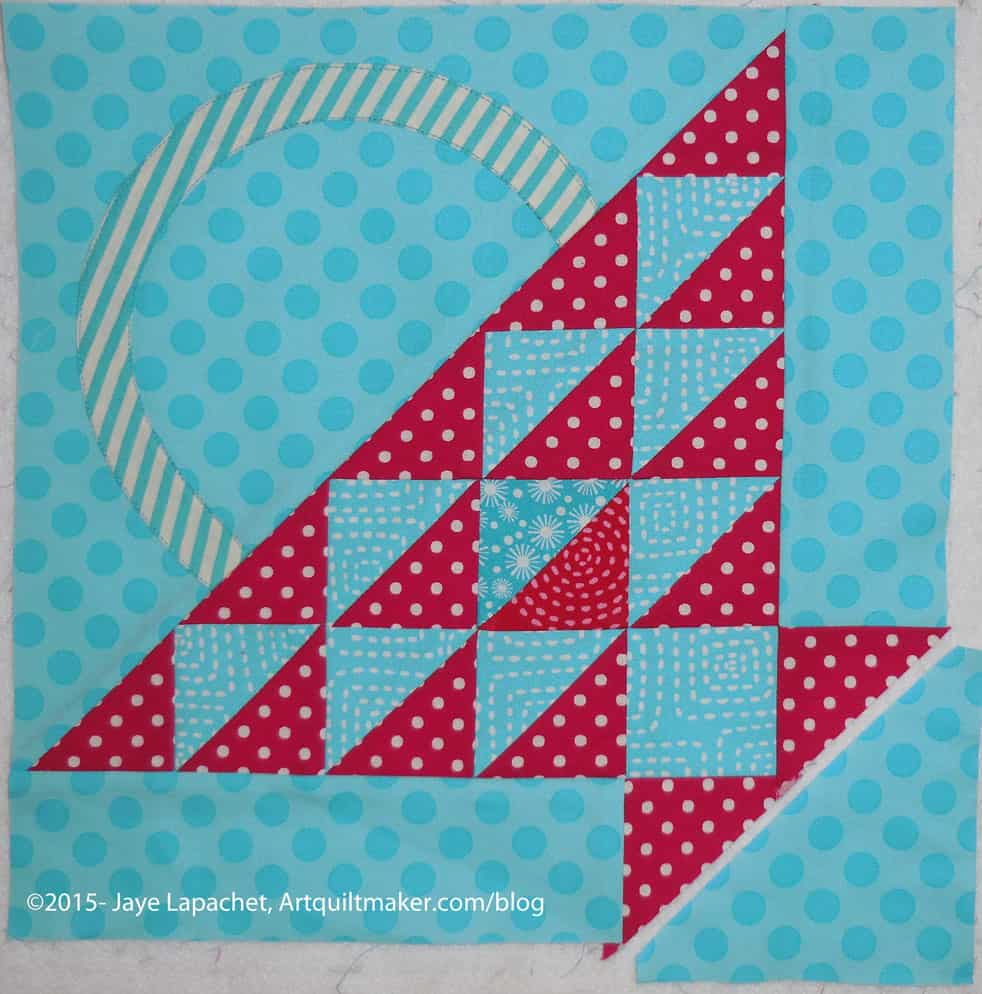
Cut Pieces
You should now have all of your pieces cut. Look for the next part of the tutorial on sewing the block together.
* Rough cut means that you cut around the outside line and a little away from it, leaving some extra paper. This helps to position the template properly and eventually cut it accurately.
** Fine cut means that you cut the template out very exactly and carefully getting rid of any extra paper and template material used when you rough cut. This is the shape you will use to cut your fabric so prepare this step with care.