You might think that I did a lot of amazing work between Monday and now, but really I made the blocks I showed Monday over the Labor Day weekend and the most recent work, which I will tell you about in this post, was done this past Sunday. It just so happens that I have a lot to say on the blog and haven’t been able to keep up. I could double up topics on posts, but it makes everything so messy in terms of tagging and categorizing and finding posts later. Some of my earlier posts include multiple topics and I don’t like linking to them as I don’t know if you, dear reader, will feel like wading through a long post to find a specific topic I meant you to find. It’s all about you, you know. 😉
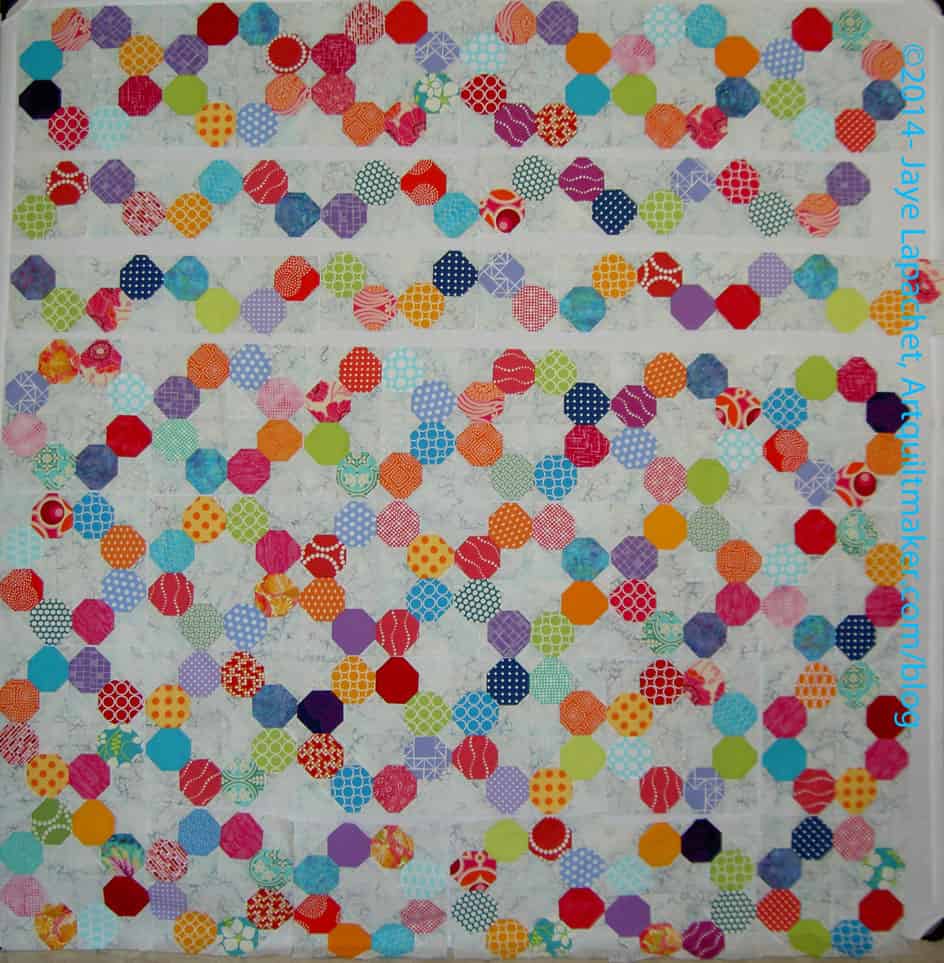
So, I got an idea in my mind and as soon as I did the Hell Binding for the FOTY 2013, I put the Russian Rubix blocks up on the design wall to see what my idea would look like.
The idea is to break up one row of blocks and make them look a bit off from the other blocks so the quilt is not as boring. I would put some of the grey in between the full ring rows in order to highlight the difference.
I put the separated blocks off center from the full blocks. I don’t think there is much differentiation and the parts still look like blocks and the blocks still look like rings.
Seeing it all up on the wall like this makes me think that I should just put the whole thing together and be done with it. I have already done a lot of work on this project and I don’t want to ruin it. I am also ready to be done with it.

Alas, I have a ton of pieces and parts that which have not yet been made into blocks. What would I do? Make a second one? Cut squares out of all those octagons? Donate to charity?
Previous Posts:
- Monday September 8, 2014: Additional Russian Rubix
- Monday August 25, 2014: Making Progress Again on Russian Rubix
- Thursday June 5, 2014: Russian Rubix – 6 More Blocks
- Sunday May 25, 2014: A Few More Russian Rubix Blocks
- Tuesday May 6, 2014: Russian Rubix Again
- Susan: Wednesday April 16, 2014: Podcast episode #41
- Saturday March 1, 2014: The Colors of the Russian Rubix
- Saturday February 22, 2014: Russian Rubix Colors
- Saturday December 7, 2013: Russian Rubix Center Square Test
- Monday October 28, 2013: Russian Rubix Color Choices
- Wednesday October 9, 2013: Russian Rubix Test Blocks
- Tuesday October 8, 2013: More Background Drama
- Saturday October 5, 2013: Russian Rubix Backgrounds
- Saturday September 28, 2013: In a Clear Space You Can See Across the Room
- Wednesday September 11, 2013: Chosen Colors
- Thursday August 26, 2013: Russian Rubix Templates
- Tuesday August 20, 2013: Continuing to Choose Colors
- Susan: Tuesday August 20, 2013: History Quilter Podcast Episode 39
- Monday July, 22, 2013: Russian Rubix
Nota bene: I was kind of shocked that there was a dearth of posts at hte beginning of August. I feel like I have been working on this project all the time. I realized that I had been making parts with leaders and enders and not really making discernible progress until I put a bunch of blocks together.
I’m happy to see it ‘whole’. I would not call this boring. I’d remove the two strips, and sew it together. It is happy, bouncy, and bubbly! I like the idea of using the strips in a border. If you feel it needs a border.
Susan
I’m with Susan. This is a fun, cheerful quilt that is as ready to be done as you are to be done with it!