Sunday Work

I felt a bit of freedom in my sewing today. I finished the Blue Janus back yesterday (have to write about that, yes) and didn’t have anything pressing to work on. That left me to see how I felt and work on what I felt like.

Frosted Star Blocks
Frosted Star Blocks

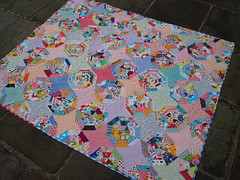
I sewed two more test blocks for the Frosted Star pattern. My pattern is much easier to follow and trimming the segments before sewing the block together works really well. I used a mostly monochromatic color scheme for these latest blocks so I can also donate them to the Rainbow project. I couldn’t resist using a bit of one of my Philip Jacob prints.

I think I need to test the 9″ pattern rather than the 12″, because the 12″ is just too big and the 9″ is what I would use in the quilt. I am thinking that I won’t make this quilt even though I like it a lot.

Merry & Bright Wrap Back

I felt compelled to make a back, so now the back for It’s a Merry & Bright Wrap is finished. This back was less arduous than the one for the Blue Janus quilt. Quite simply, it was much smaller. I also made a big effort to use very large pieces of fabric. Rather than days, it was only a few hours in progress. I am happy that it is done, though I don’t have plans to quilt it yet. I’ll have to see about that.

Making the above back gets me farther along in the various finishing tasks I have to do. I still need to make the sleeves for FOTY 2009 and the Chocolate Box as well as the facing for the Chocolate Box.

Half Moon by Moda
Half Moon by Moda
Kaffe Fassett Dot
Kaffe Fassett Dot

I don’t know what is next on the list, but am thinking a tote bag is in order. I have this new black and white fabric that is demanding my attention. Half Moon by Moda will be the bag body with possibly a pink inside.

The Kaffe Fassett dot attracted my attention for handles (I think I may be in a monochromatic phase right now). GAQF only had a fat quarter, but I found a half yard in my fabric closet, which will be enough for the handles. I like the combination of big and small dots.

I am thinking I will use the AMH Multi-tasker tote pattern again even though it isn’t exactly the bag I want. I’ll peruse my other bag patterns first.  I do know how to make the AMH MTT and it is a pretty good bag pattern.

Book Review: Journal Bliss

Journal Bliss: Creative Prompts to Unleash Your Inner EccentricJournal Bliss: Creative Prompts to Unleash Your Inner Eccentric by Violette

My rating: 5 of 5 stars

Violette’s book has been in my to read stack for awhile. I was finally able to read this book when I took it with me on a trip. I found that it was a quick read. It might have been a quick read, but it was a powerful read as well. Violette, in this book, is a cheerleader, life coach, therapist and art teacher. She mixes in the right amount of words with pictures, the right amount of encouragement and support.

She dives in with a discussion about the reader’s inner critic. I was a little surprised that she would start out with this, but it was the right way to organize the book and she didn’t go on and on in that chapter.

She clearly describes a lot of techniques and a lot of different ways to do small but effective bits of embellishment. Her writing style makes the reader think that s/he can create borders, backgrounds and any of the techniques described. The one part that really intrigued me was the part about faces. Reading this section and looking at the pictures gave me confidence She makes drawing faces seem simple. I don’t mean simple as in stupid looking, but simple as in with a little practice everyone can do faces as well as she can.

Violette provides lots of examples of her artwork. The book is mostly drawings and examples of her written creativity. The majority of the book is not typeset, but embellished, drawn and colored. This style provides lots of examples of her. She shows it is simple. The drawings are not simple, but if the reader breaks them down and looks carefully at the lines, there is nothing tricky going on and the style is quite do-able.

One great suggestion Violette gives is to do a Gratitude journal page using a list rather than prose. I think that is a great idea for any kind of journal page, not only a gratitude page.

I really liked this book and think that it is one that will be a great reference book. I would like to try the various drawing techniques to spice up my journal pages, especially the border ideas. I also want to try making the faces.

View all my reviews, including my non-quilt reviews

Frosted Stars Test

Frosted Stars Test
Frosted Stars Test

Since I am thinking about going out and actually buying special fabric for a project, I thought it might be a good idea to test the pattern to see if I liked it. Since I finished the top and back of the Blue Janus quilt this morning, I thought it was something that I could manage.

I dug out the directions and went to work. I can’t say I was enamored with the directions from the Moda Bakeshop. It really too me a long time to make one block and I had to follow the directions step by step, because there weren’t cutting directions for one whole block at the beginning of the section where the star starts.

I redrew the block in EQ7 just to see what it would take to make some straightforward cutting directions. I can see why Charlie Scott used some fancy triangle tricks. I created rotary cutting directions in 12″ and 9″ (both finished) sizes. These blocks use quarter square triangles and the triangles need to be cut weird sizes, which I know nobody likes. Still, my directions are a lot more straightforward than those on the Moda Bakeshop page. You can cut the quarter square triangles slightly larger and then cut them down to the normal size. I hope you will be able to click on the numbers above and download the rotary cutting directions.

I am going to make another one using my directions and let you know what happens. I am not knocking Charlie Scott. I love the free patterns out there and have a really difficult time following them. I will probably put some borders on the one above and send it to Anna Maria Horner for the Rainbow project.

Corner Store Project

Corner Store Test
Corner Store Test

I have written a lot about the Corner Store pattern from Pretty Little Mini Quilts. This block is very appealing especially since I have been thinking about my scrap pile lately. I bought a large piece of Kona Snow and finally cut into it for the Zig Zaggy quilt and for this Corner Store project. I didn’t cut a multitude of pieces in advance (always a recipe for disaster for me), but I did cut some.

You are probably wondering why in the world I am starting  this quilt at the same time I started the Zig Zaggy quilt and am still working on the Blue Janus quilt. Insanity? Perhaps.

The true reason is that the box in which I store the triangles for this project is getting full. Also, I thought I would make a few blocks and see how they looked.

My first step was to ask TFQ for the dimensions. She has the Pretty Little Mini Quilts book at the moment. She emailed me back right away with a 3.5″ size. When I cut a few of  the squares I thought that looked terribly small. When I put one triangle on, the block did not look at all like the version I saw in Pretty Little Mini Quilts or on Flickr. I must have misunderstood the size. Again, something that should have been a quick chain piecing and trimming start to a project has turned difficult.

Difficult is a strong word. I have to test different squares sizes to see which one will suit the look I am trying to achieve. I wanted to focus on the Blue Janus quilt, so this was put to the side.

Stay tuned!

Anna Maria Horner Rainbow Project

AMH has made a movie of the recent blocks she has received. I didn’t recognize mine until I saw the little label I attached with a pin before I sent the blocks off. My block is shown at time marker :50.

The next deadline for blocks is August 1st. Send one in. The directions are posted on her site.

Creative Prompt #76: Night

nightclub

nightlife

nightmare

Friday Night Lights

at night

dark of the night

into the night

It was a dark and stormy night….

Night by Elie Wiesel

Go to bed

Night of the Living Dead

Post the direct URL (link) where your drawing, doodle, artwork is posted (e.g. your blog, Flickr) in the comments area of this post. I would really like to keep all the artwork together and provide a way for others to see your work and/or your blog.

The Creative Prompt Project, also, has a Flickr group, which you can join to  post your responses. I created this spot so those of you without blogs and websites would have a place to post your responses.

Saturday Night Live

night sky

Starry, Starry Night

Night sky

last night

First Night

Three Dog Night

Fashion’s Night Out

Night terrors

Zig Zaggy Start

Jelly Roll for Zig Zaggy Quilt

This past weekend I mostly worked on the Blue Janus Quilt, which I called the Blue Quilt in a previous post. Those squares required a lot of chain piecing and I needed something to piece in between so that I wouldn’t have to cut threads each time I wanted to press as I moved farther along in the process.

I decided to start the Zig Zaggy quilt and use the pieces to help with my chain piecing.

Measuring
Measuring

First, I looked at the Happy Zombie site again and confirmed the sizes. then I cut some samples. Happy Zombie used a special ruler and cut 5″ long wedges. Elizabeth Hartman from Oh Fransson! blog originally used templates and cut the wedges longer. I decided to use Happy Zombie’s method and trim later.

Zig Zaggy Sewn
Zig Zaggy Sewn

I cut and sewed a few together, think I would do another colorwash look.

Blech!

I am not doing the colorwash. With just the purples it is too boring. the purples are all the same value and just don’t look like the colors are gradating. I am going to mix up the colors. I just didn’t get very far.

Blue Janus Quilt

I decided to name this quilt the Blue Janus quilt, because Janus is the Greek God of doorways, gateways and transitions. This quilt is going to someone who is embarking on a huge transition. More on that later!

I started out with 6.5″ patches. Each one of those squares is 6.5″, which makes the block about 24′. I needed 16 of the 6.5′ patches across and down to make the desired sized quilt. Yet another monster!

Big Blocks of Big Patches

These are the first of several blocks this size.

Quilt Top Finished
Quilt Top Finished

I cannot spread the whole thing out in my workroom, so you get a little piece of the action. It took me about a day plus a couple of hours to sew the whole thing together. Since I want the edges to be straight I added a quilting border that will get cut off later.

Completed Top
Completed Top

You can see a little of the quilting border in this picture.

I am almost finished with the back. It is causing me a few headaches so I wasn’t able to finished before I had to be away from my sewing machine for a week. I plan to quilt this baby at my next longarm appointment at the end of the month so I need to get it done. I am sure I can since I have only a few more seams to get a back that is large enough.

Purpose Journal Progress

Finished Cover + Marker

Don’t get too excited, I haven’t started writing. I had a big burst of writing inspiration back in April, but the journal wasn’t ready. After working on it recently, it is more ready. It is funny. I worked on it diligently and thought I was done with all of the backgrounds. As I looked through it after everything was dry, I saw other spots and pages that needed work.

If you haven’t been to work of heart, you need to put it on your list for your next vacation. After going to see the Rosacrucian Museum, you need to spend some time at A Work of Heart. As I have said before, it is an awesomely creative environment.

Lightening a Page
Lightening a Page

Some of the pages were too dark. In my previous post about this journal, I showed the Credit Card plaid. While the page above is not the credit card plaid page, it was just as dark. Andrea had some spray on Gesso, which makde short work of lightening the page. It is a spray paint type of application, which I didn’t much like (had on my cute clothes), but I did like the end result. I think it will be much easier to write on this page with it lighter.

Adding Words
Adding Words

While I don’t have a complete plan for how I am going to work with this journal, I do know that I wanted page numbers. The Child usually gets a slice of pizza at a place which requires we take a number. I realized that the numbers would make interesting, if a little large, page numbers.

The point of the journal is to explore the word “Purpose.” To that end, I wanted to, first, explore the shape of the letters of the word. I stamped and pasted letters on to almost every page. The letters on the page above are favorites.

Chalk and Silhouette

One of the techniques Andrea showed us was the one above – creating a silhouette page out of pan pastel and a magazine photo. One of the other students did it and I borrowed her silhouette and added it to my journal.

The page number on this page is a little different.  I got a pack of note cards at IKEA which depict address signs on one side. Each pack has a different group of numbers, but the back of each pack shows a tiny illustration of all of the notecards. I cut out each of the  numbers and used it for the page numbers. There weren’t enough for every page, so there are a variety throughout the book.

There is another class in July. We’ll see if I can make it and actually finish my journal.

Sketching #58: Quiet

CPP Response #58
CPP Response #58

I have been wanting to the create the Library or reading area in my house forever and this prompt was the perfect opportunity. It took me awhile to get the chair the way I, mostly, wanted it. I have a similar chair that I never get to sit in anymore. I may add some color to the books.

Check out the original prompt. Your responses are welcome!

What Works for Me

Various podcasters have gotten together on a service called Big Tent and created a Quiltcast Supergroup. I don’t know the ins and outs of Big Tent, but it is basically a way for all the podcast listeners to get together and talk. I am assuming that this is like LISTSERVs back in the day or Yahoogroups used today. The nice thing about Big Tent is you can have one giant group with a bunch of subgroups and that is how they have organized it.

One of the podcasts I have started to follow is Stash Resolution. You can find it on iTunes. There is also a blog, of course. In the Big Tent Stash Resolution Group a week or so ago, some asked what people were afraid of. Someone said the Storm at Sea block. Another person said Mariner’s Compass. Someone else mentioned that she did not have much time to sew and wanted to guarantee success every time she had time. I thought this last comment was the most interesting. It made me think of whether I need success every time.

I wrote that I thought it would be hard to guarantee success every time. I think one has more success when one is more confident in their own technical skills and can assess quickly when the project is going well or not.

It occurred to me that I use some strategies to  maximize my sewing time and also to have more success. Here is what I wrote to the group:

1. take notes from the time the project is an idea until it is finished. This helps me get it organized, keep track of where I am and remember what I did after I finish the project, which is helpful if I want to do it or something like it again. Everything flat (e.g. paper, some fabric) gets organized in folders.
2. Take lots of photos and put them in computer files by the project name and printed out in the folder.
3. Remind myself there is always more fabric. This is so that if something is going badly, I don’t feel like I have just used the last piece of good fabric.
4. I focus on quiltmaking. The only other crafts I do is knitting and some paper crafts. I only knit when I cannot quilt and I do not keep a stash. I do the paper crafts at a local shop and try to keep the stash to a minimum.
5. I plan well for days when I am free, so that I am ready to go. I also do little bits, if I can, during the week. Cutting straps and interfacing, making patterns, cutting templates are all things that can be done in a little bit of time.
6. I warm up as I start. I use easy blocks (like 4 patch) that I piece from scraps to get me in the groove.
7. When I cannot be at my sewing machine, I read, listen and think about quiltmaking.
8. I have to play and realize that I will make mistakes and things will come out badly. It is just the way it is. I was a lot more successful when I acknowledged that and worked with it. Mistakes can be repurposed.
9. I make the same project over and over again, especially for smaller projects(tote bags, pencil rolls and journal covers are the biggies). Doing things over and over helps you get to know the pattern, your machine, your skills. This is much easier with sewn accessories like bags as opposed to quilts. You can make the same block over and over.
10. Always use good fabric, because you might not ever make the project again.
11. If one way of doing something doesn’t work, try a different way. I suggest making pillows to try different ways of machine applique’.
12. Take classes and learn.
13. Try it again next year.

I am not sure if these are my ‘rules’ for quiltmaking, but it is a pretty good list to think about.

Creative Prompt #75: Violet

purple

Violet Parr

Violet Baudelaire from a Series of Unfortunate Events

flower

The Violet Fairy Book

color

Violet magazine

plant

Girl’s name

A simple and easy-to-use UML editor, suitable for students and casual users. [Open Source, GPL]

shrinking violet

Violet Beauregarde from Charlie and the Chocolate Factory

Post the direct URL (link) where your drawing, doodle, artwork is posted (e.g. your blog, Flickr) in the comments area of this post. I would really like to keep all the artwork together and provide a way for others to see your work and/or your blog.

The Creative Prompt Project, also, has a Flickr group, which you can join to  post your responses. I created this spot so those of you without blogs and websites would have a place to post your responses.

Tempting Fabrics

Aren’t these colors wonderful? This group from the FabricWorm is very tempting…
clipped from ep.yimg.com

http://ep.yimg.com/ca/I/yhst-10775676472182_2114_93921163
blog it
clipped from www.fabricworm.com

Fabricworm Custom Quilt Bundle, Rainbow, Half Yard Set, 10 Total

Fabricworm Custom Quilt Bundle, Rainbow, Half Yard Set, 10 Total

Each Half Yard Measures 18″ x 44″

You Will receive a Half Yard of Each:

Anna Maria Horner Filigree Plum
Amy Butler Momento Burgandy
Denyse Schmidt Four Square New Day
Michael Miller Ta Dot Teal
Heather Bailey Pop Daisy Green
Anna Maria Horner Filigree Meadow
Robert Kaufman Pure Organic Solid Maize
Cosmo Cricket Early Bird Crosshatch Yellow
Monaluna Mingle Dot Tangerine
Momo Freebird Eggs Melon
Monaluna Circa 50 Woodland Chain Strawberry (Organic)

Alice Kennedy Apple Swirl Red
100% Cotton

Fabric is sold by the ½ Yard. For example, if you would like to purchase 1 Yard, you would enter 2 in the Qty. box at Checkout. Yardage is cut in one continuous piece.

blog it

I would love to see them in real life. I am glad they gave the names of the fabrics so I can look them up.  I can’t think of what I would use them for. They would be gorgeous together.