I am slowly making more of these blocks. I know it seems like I am working on very little. I seem to be really busy on things that keep my mind scurrying in a zillion different directions.
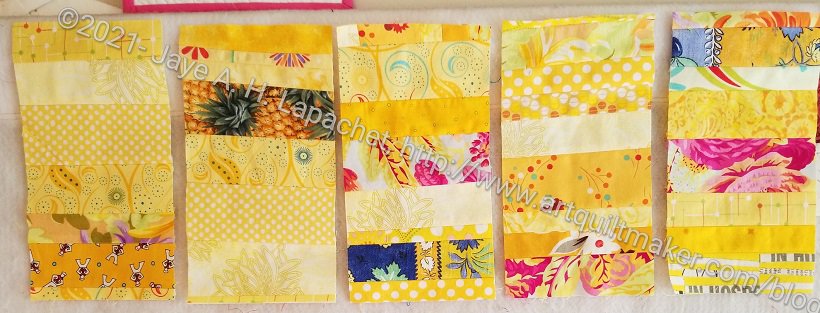
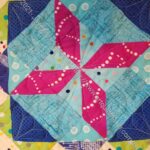
Five Yellow Donation Blocks
I wanted to make enough blocks so I could see what I had. I think I will place the blocks 5 across. I might do 6 across, but we’ll see. My plan is 5 across right now. I also won’t set the blocks this close together. My design wall is a little full right now so I don’t have the blocks placed as they would be. I also am not sure what color I will use for the sashing. Blue is the complement, but I don’t think that blue will be good for the look I want. I think white.
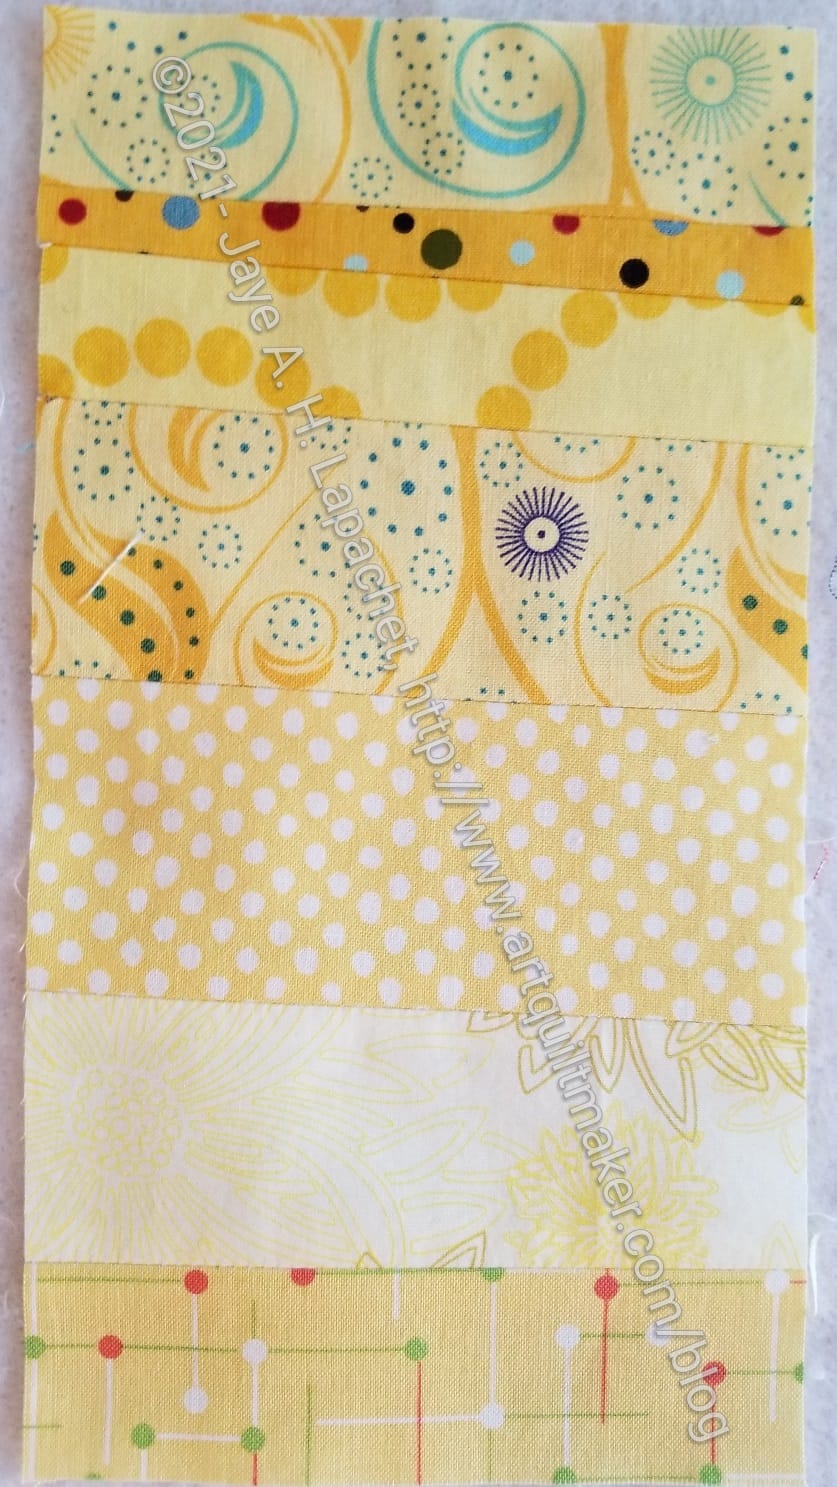
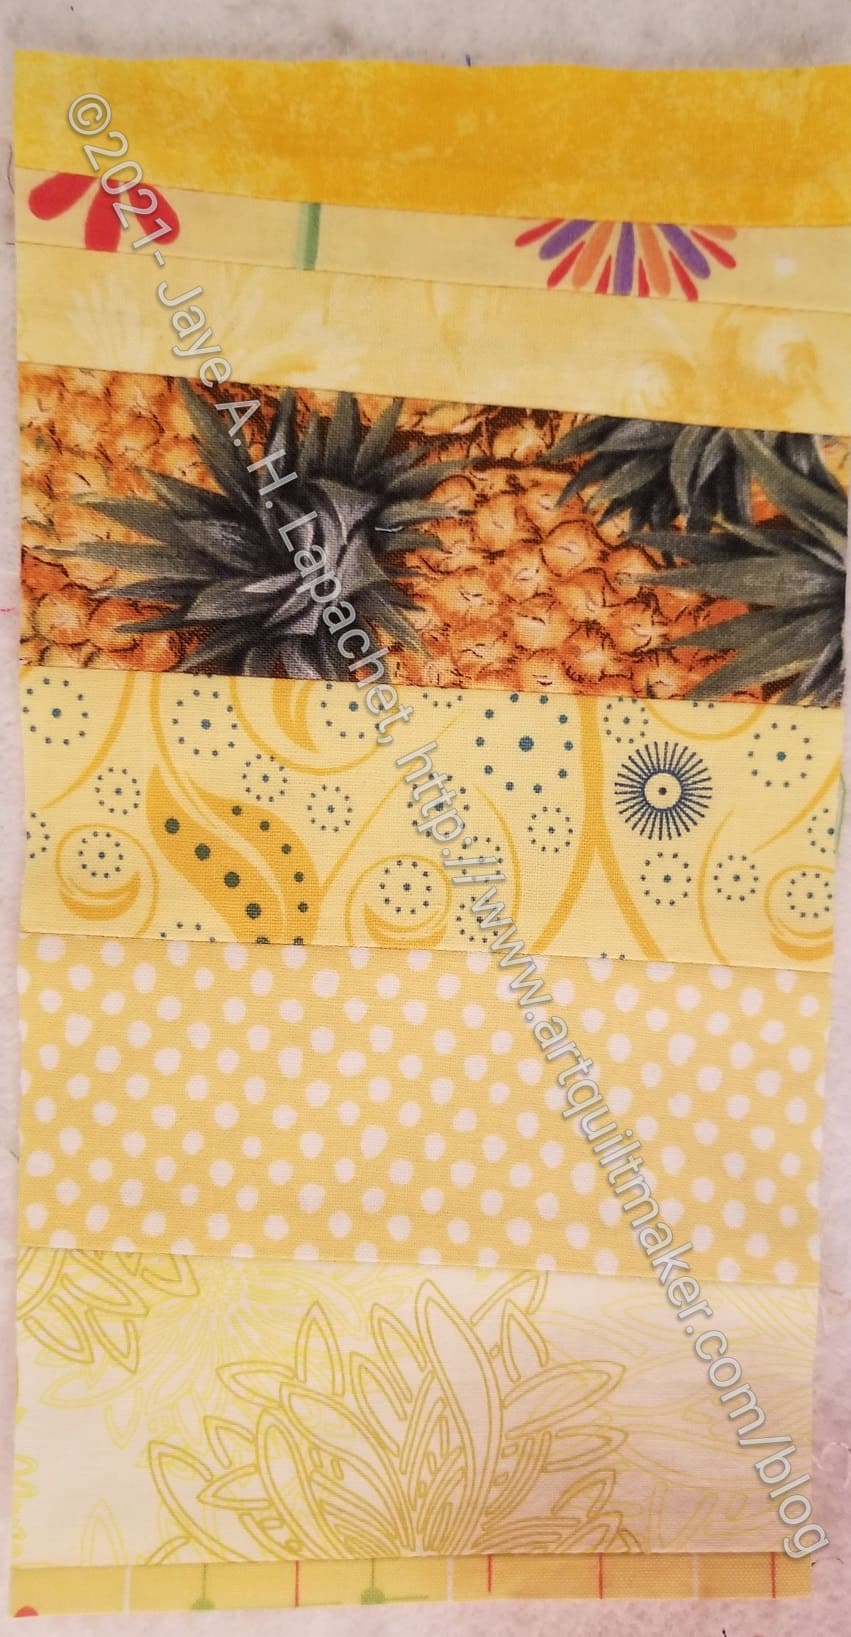
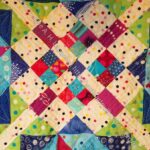
Yellow strip donation block #6
I also made one more block, so I have a total of 6 right now.
I actually went to a museum the other day. I am fully vaccinated, wore a mask, stayed away from people and the place was almost empty. This trip contained a lot of firsts: first time in a museum in over a year, first trip across the Bay Bridge in over a year, first time in a car with a friend, first time wearing a mask for 5 hours or more (health care workers: I salute you!). Milestone day!
I went with my friend from CQFA, Nancy. Nancy is much more in tune with what is going on in local arts than I am and let me know that the Rosie Lee Tompkins exhibit was on for in person viewing. She got us tickets and I drove us over.
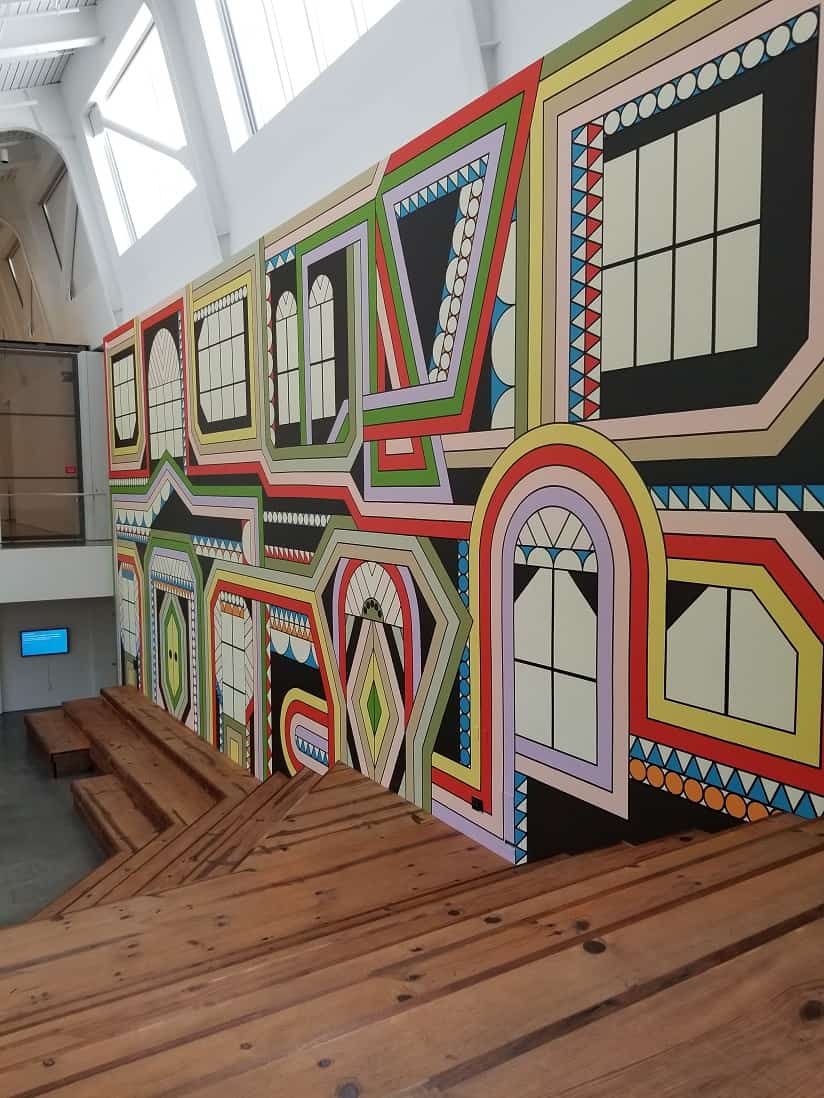
I used to live next door to BAMPFA, but hadn’t been there in years. The space is gorgeous. The entrance is made human by the mural you see when you walk in (above). The mural is part of an auditorium/amphitheater (??)/performance space. The walls of the museum are tall and white, so the mural grounds visitors as they come in – at least it did for me.
Rosie Lee Tompkins Exhibit entrance
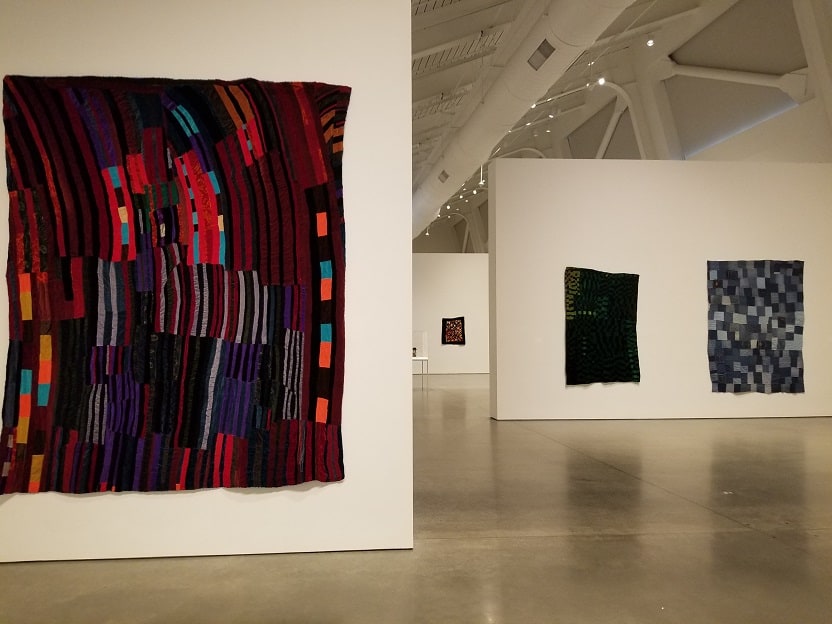
We went straight into the exhibit, which was on the ground floor near the entrance. There is not a lot of information about the quilts and most of them are untitled. I love to hear about inspiration, so this was disappointing, but not surprising. I don’t think people think about the making of their quilts as much as I do. In writing this, I realize that I think a lot more about placement of individual pieces and don’t write each of those comments down.
The brief description of the show says, in part, “…And while most of the Tompkins’s textiles are referred to as ‘quilts,’ this term technically only refers to works comprising pieced tops, insulating material, and backing that have been sewed together – a process she rarely undertook herself, instead leaving this finish work to other local quilters.” I love this, especially the last part, because it means that my quilts could someday end up in a museum!!
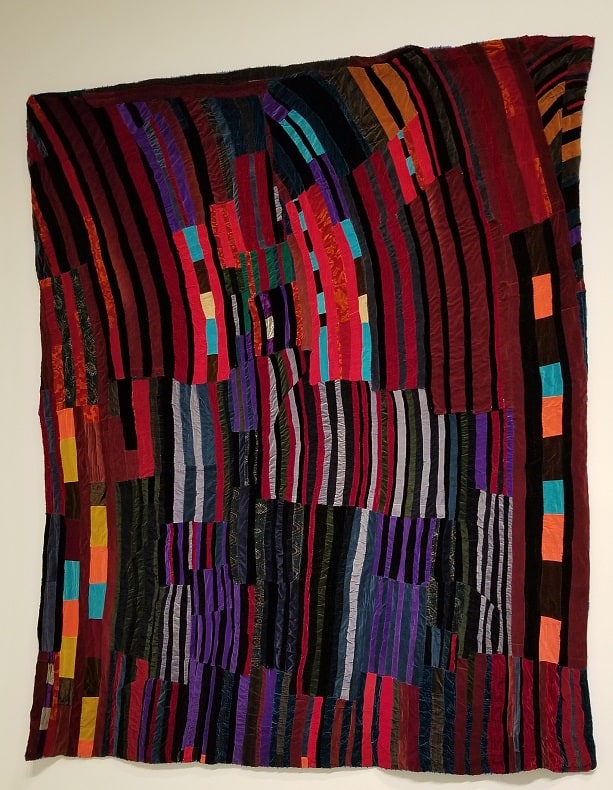
Rosie Lee Tompkins ‘Lines’ quilt
My two favorite quilts were from her older quilts. They were mostly made of velvet, crushed velvet and velveteen (I don’t really know if these are the same).
One of the things I like about this piece is the not so obvious improv piecing. Current improv piecing comes across as contrived to me sometimes, though you know I am not a huge fan. This piece looks like it was designed so that the pieces lean to the left. I am not sure I could make a piece with so much movement using improv techniques. This piece does not scream improv to me. It looks like Ms. Tompkins designed it that way. The color and sheen, which do not come through very well in the photo really add to the success of this quilt.
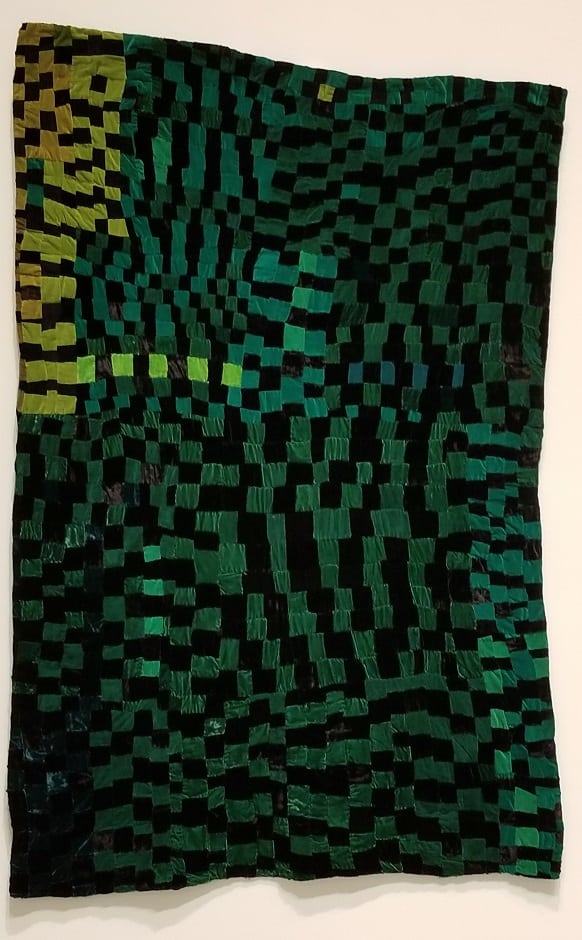
Rosie Lee Tompkins Emerald Velvet
My second favorite is a piece that is jewel-like in its success. The various greens show up with some contrast in the photo. In real life the darker greens are much more subtle in their shading. This makes the chartreuse line of squares in the center-left stand out. Even though those four squares are the only green of that color, the design element seems to work. There are a couple of places where four squares show up and perhaps that is the reason. Again, the color and sheen really add to the success of this quilt.
Look for part 2 of my thoughts about this exhibit soon.
Yes, I wrote the title correctly. I have just one block to show you.
I worked to make many, many donation blocks last year. This year I feel like I am sewing a lot and not getting anything done. Am I not finishing things or what? I don’t know.
As I said, I have started some new color improv strip blocks, but I haven’t made any guild donation blocks.
I have been using other projects for leaders and enders. Do I need to get on the ball or can I take a break?
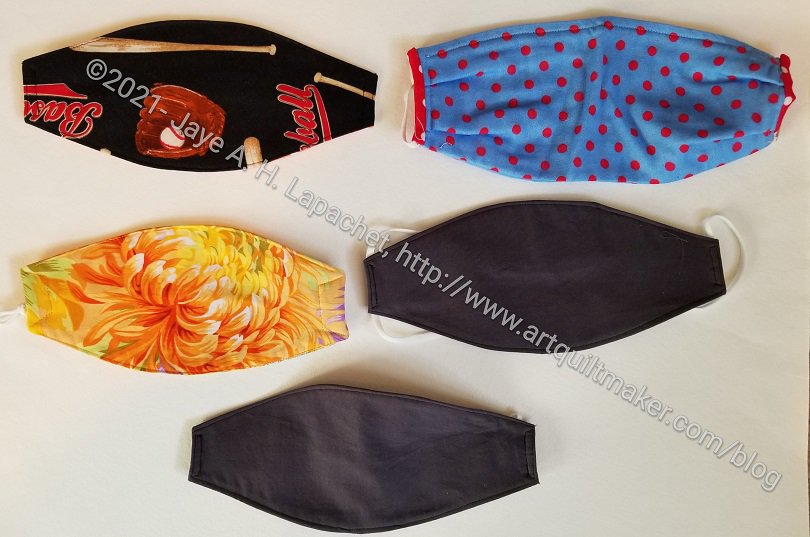
I had to get back to mask making. 🙁 Masks, it seems, get a little worn. I find that I wear the same mask over and other. It fits the best, stays on the best and is breathable. However, it is getting a little frayed around the edges.
For the first time in over a year, we are heading out on a trip. Grand Parlor is next week and we will attend. I don’t want to go without sufficient masks. Since I have been having issues with my skin, I don’t want to buy the paper masks in case they add to my problems. Also, I want us to have enough masks so we have fresh ones to wear every day.
May 2021 Face Masks
I had about 7 that were either cut out or half made. I finished all of those. Some needed ripping out, but I just made them work. The time it takes to make a new mask doesn’t make ripping out really worth it.
I also made two dark ones for for the ‘Banquet’, so we look black tie-ish.
I plan to make more of the masks I know how to make even if people don’t think we need to wear masks anymore. I have enjoyed not getting the ‘flu and not getting a cold, and, of course, not getting COVID-19.
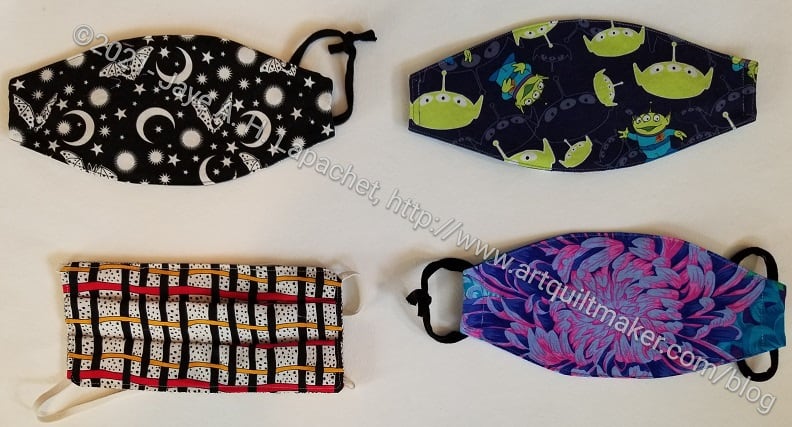
Judy Coates Perez masks in process
I started the Judy Coates Perez masks, but didn’t get very far. Cutting them out was exhausting and, since I had a larger number than I originally ordered from Spoonflower, there were a lot of them.
I haven’t made this pattern. While It looks straightforward, it also doesn’t seem very difficult. I didn’t want to get stuck on trying a new pattern when I needed to get several masks done. I will make these, but I’ll start fiddling with them after I have enough masks for our trip.
There are some links from a previous post that I am reposting here.
Improved Summer Mask tutorial (video) by Keiko Olsson
Judy Coates Perez mask tutorial based on the Improved summer mask tutorial by Keiko Olsson. Judy also has some wonderful fabrics in her new Spoonflower shop that make fun masks.
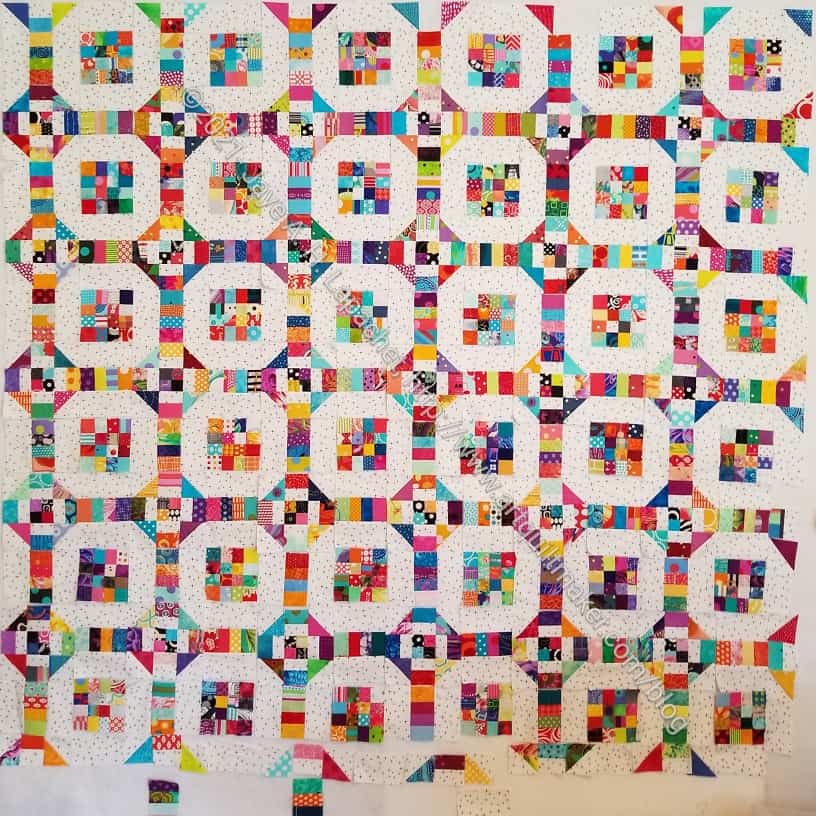
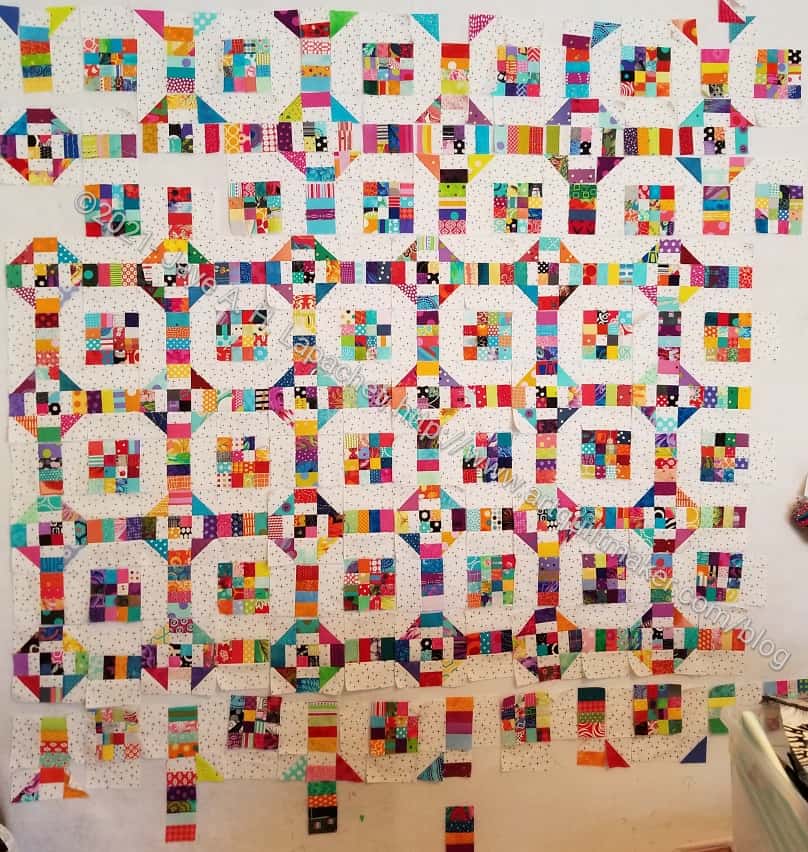
I really made good progress over the weekend. I figured out what I need to do to finish this quilt, e.g. how big it is going to be. I also cut more of the 1.5×2.5 inch rectangles. I need a lot of them, so more cutting is coming.
I am at the point where I really want to start sewing blocks together, but I am trying to restrain myself. As I moved the blocks around to make more space on the left, I moved blocks to different positions in order to make them stand out more. Sewing will also give me more space on my design wall, so restraint or no I might need to sew to gain the space I need to finish putting all the pieces on the design wall. I suspect I will never have a large enough design wall.
While you might think the cutting is the hardest part, the actual hardest part is getting each fabric in the quilt to shine. Obviously, each one can’t stand out when the viewer looks at the whole thing, but I want each fabric to stand out when someone looks at it up close. I don’t want fabrics to blend together.
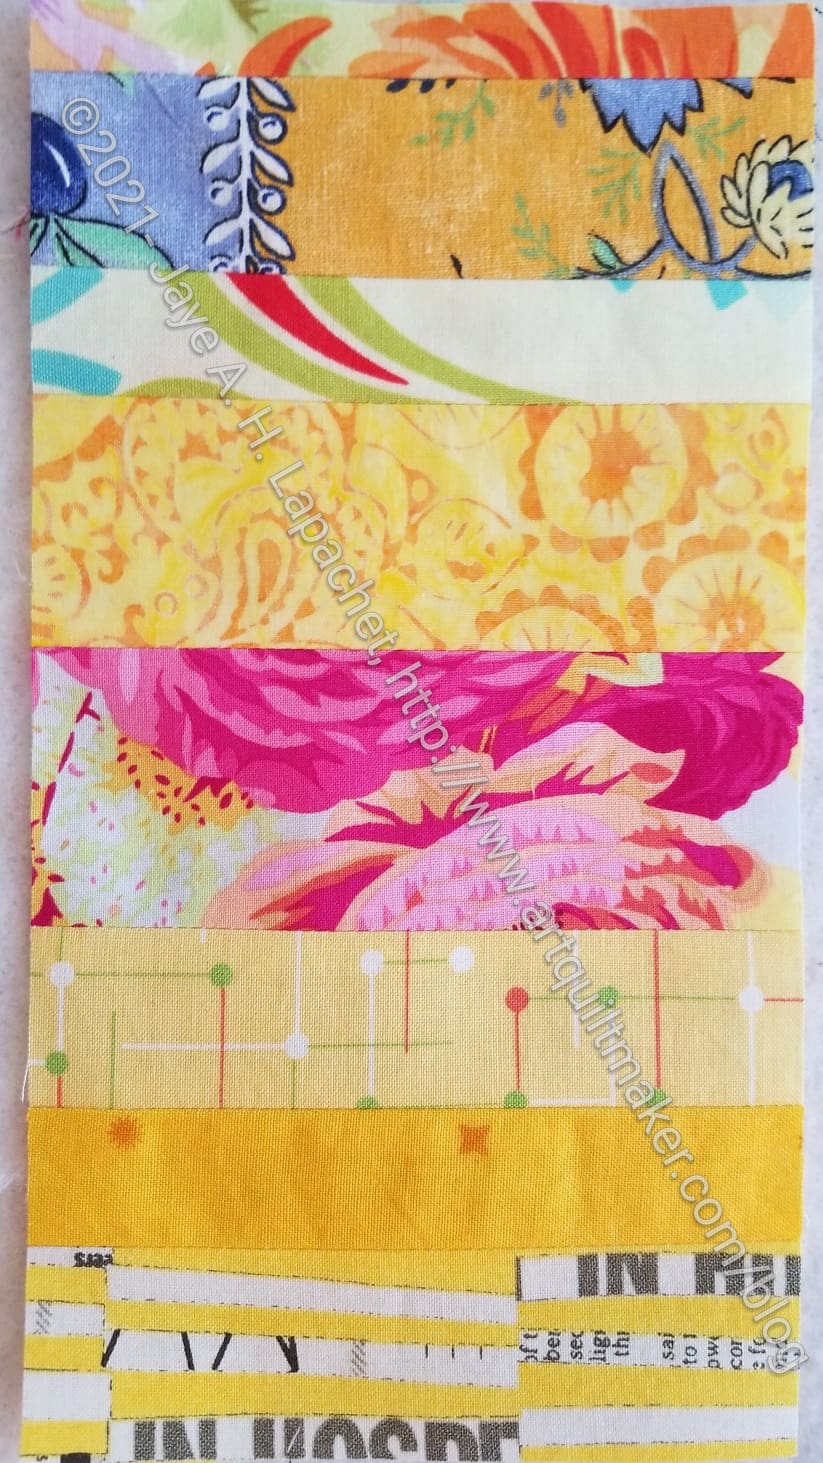
I finally needed some leaders and enders, so I started another Color Strip Donation Quilt, this time in yellow. I am, first, working on making as many blocks as I can with yellow strips. I don’t want to get into chunks if I can avoid it. I don’t know how many yellow strips I have, however. I may need to create some chunks from the non-strip scraps in order to clear away the scraps I don’t want to use right away.
The pink in block #1 is from one of my favorite fabrics. It is, of course, a Philip Jacobs (maybe Martha Negley?) and I only have bits of it left. It was an eye watering yellow with big pink roses on it and I couldn’t help but like it.
Yellow strip donation block #2
These blocks are supposed to be yellow, but they will be mainly yellow. As in the other quilts in this series, other colors will sneak in. I think that adds more interest than dilutes the piece.
I am glad I am doing yellow, though I really should be reducing pink scraps as that drawer is full to bursting. I just have had the yellow version of this quilt on my mind and it was time.
I am also glad I am doing yellow, because I am finding bits of fabrics that I love. The yellow dots at the top of block #2 is a favorite. I can’t say why it is different than other dots, but it is.
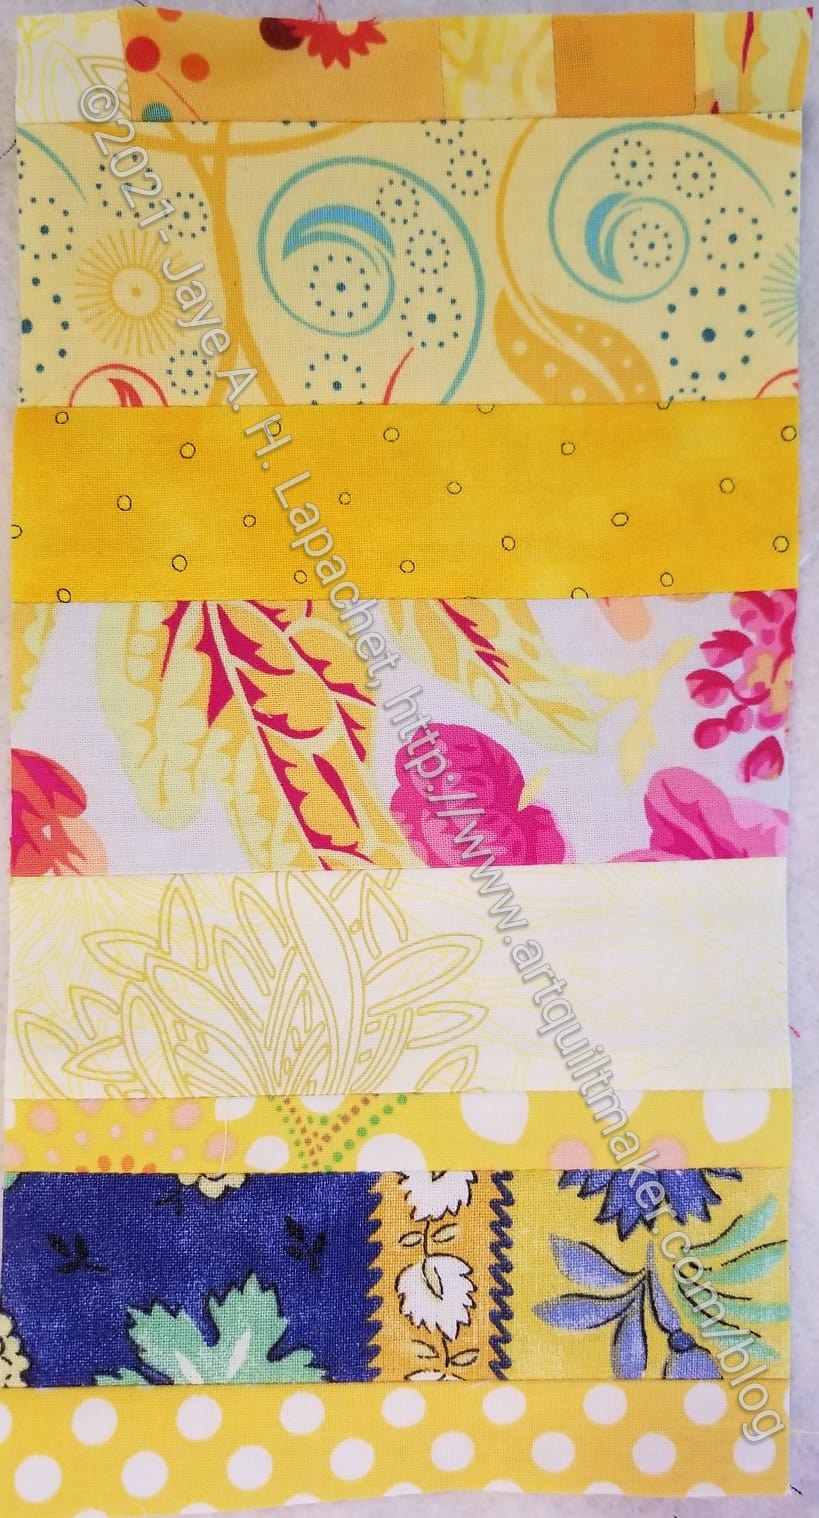
Yellow strip donation block #3
I have four blocks made and 3 others in process. I am concerned that I won’t have enough strips to make enough blocks for a whole quilt. I have two choices if that happens: 1) use the yellow blocks I have for the quilt I have planned with the extra blocks of all colors. I have a few each of red, orange, blue and black; or 2) make some blocks using chunks and combine the strips and chunks as I have in at least one quilt. I don’t know why I am so adverse to that right now. Perhaps I know something intuitively about that design that isn’t readily apparent right now.
Yellow strip donation block #4
I always struggle through the first few blocks. I start making several at a time and it always seems like nothing is happening. Then, all of a sudden, block after block is finished. I have four finished now I am can see a burst of sunshine appearing on my small design wall. I am really excited about how these will work out.
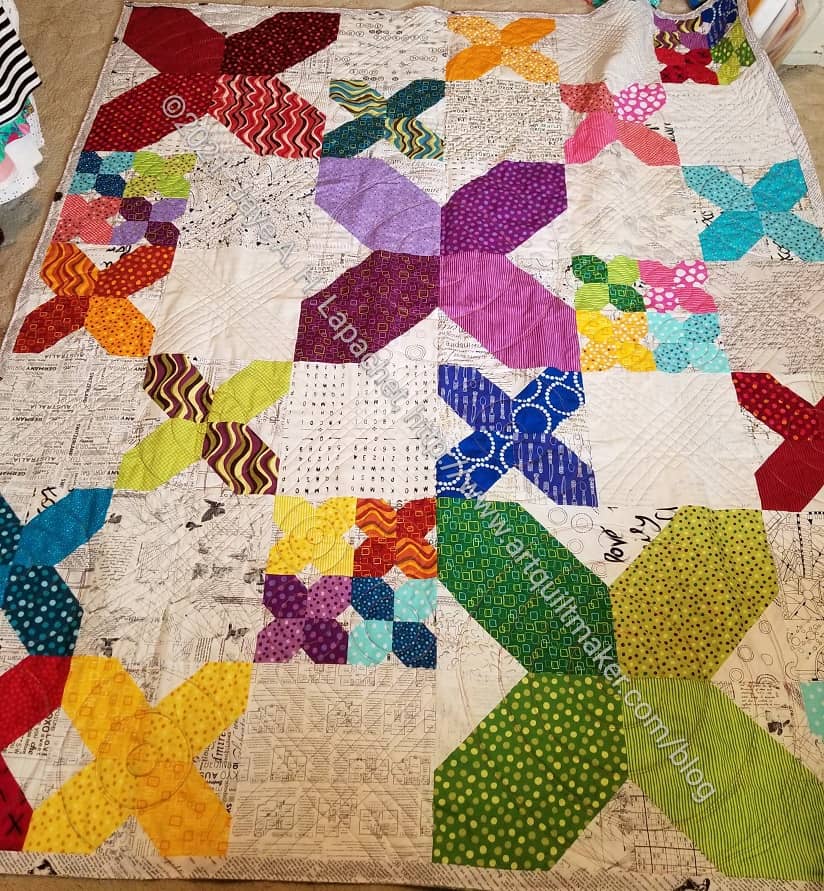
I went to see Colleen the other day and came home with the X Quilt. This quilt hasn’t been gone very long at all, so quite a contrast to Frolic!
This is another photo where I just flung the quilt on the floor of my workroom.
Colleen did a kind of Xes and Os motif, which is nice. I have to do the binding, but don’t need to do a sleeve. Perhaps it will be ready for me to send on its way soon.
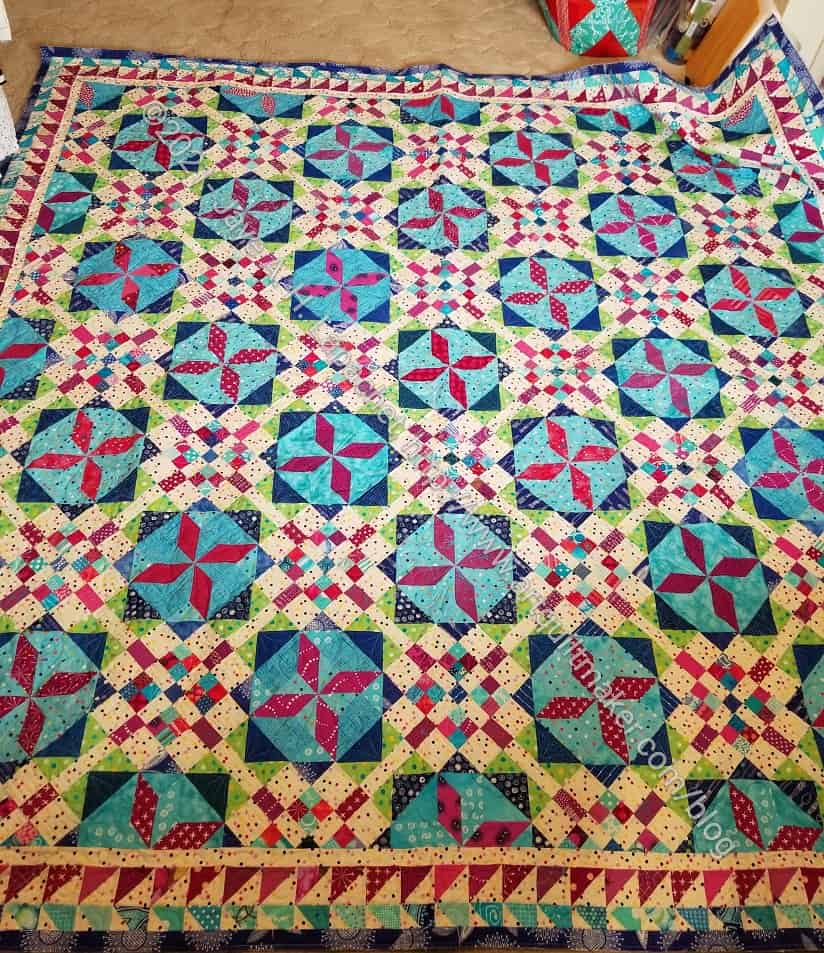
I finally got Frolic! back from Colleen as well. I checked and it has been about a year since I finished the top. Colleen said she was horrified to realize that she had had the top since September. I don’t really remember, though I know, because of the pandemic, that I probably didn’t take it to her until then. Last year is such a blur that I can’t really remember. I don’t have a photo of the back or any note about making it. Frolic! was a much bigger project than I anticipated, so I was probably glad to get it off to be quilted.
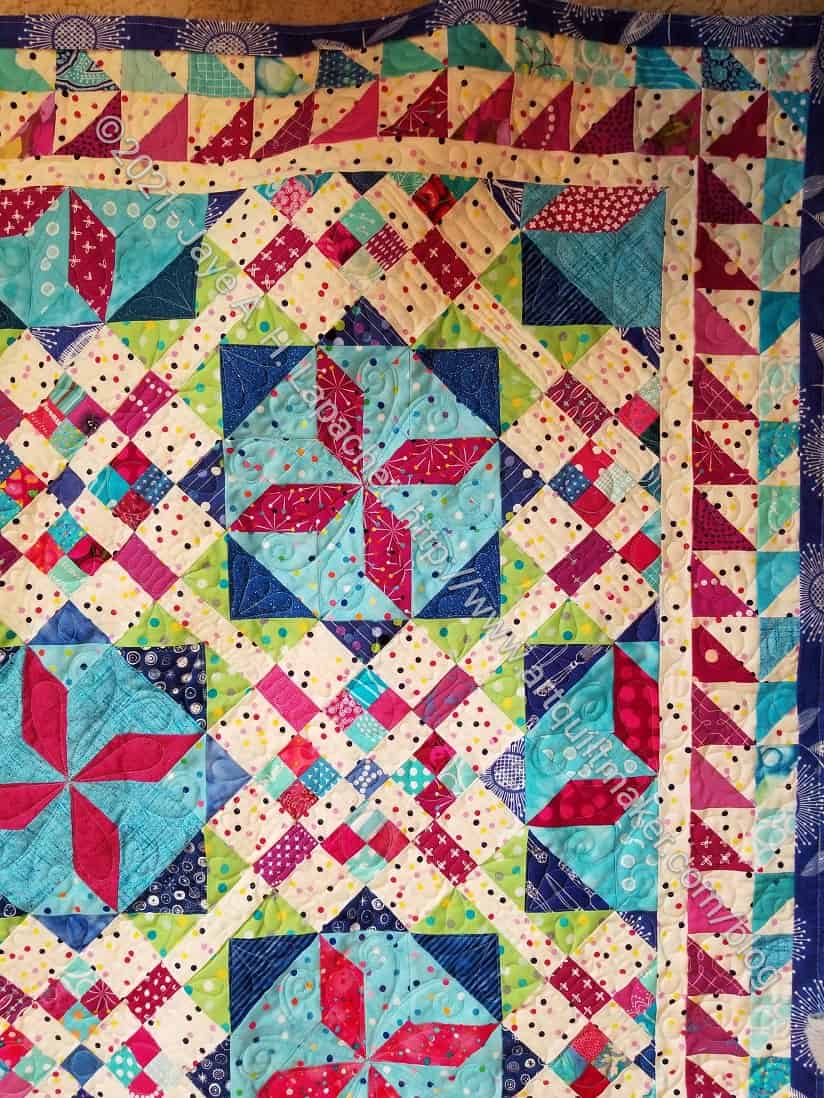
Frolic! Corner detail, quilted not bound
Again, I flung the quilt on the floor of my workroom and took a photo. It is really large and I know even my tall DH couldn’t hold it up enough for me to get a good straight on photo.
I am still really excited about the border and how perfectly it came out. I remember how excited I was making the borders and how much more excited I was when they came out really well.
I am still not much of a fan of the corners, but that is a small part of the quilt.
Quilting detail
Quilting detail
The quilting is pretty intricate, so I know it took her a long time even once she got it on the machine. I really like the way this quilt came out. I don’t know what I will do with it. Soon, I am going to need another house to hang and store all these quilts!
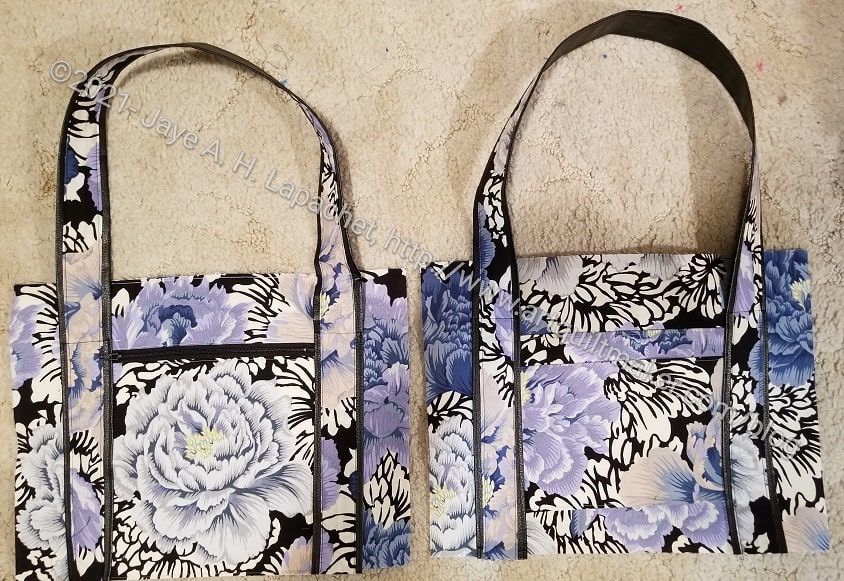
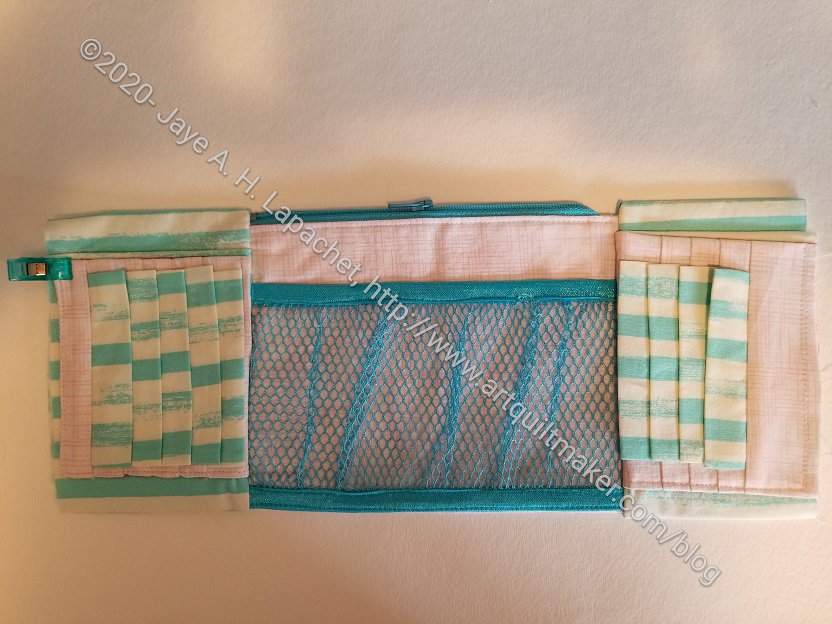
During the tutorial session on Saturday during Sew Day for the Ultimate Carry All Bag, Lynette showed how to complete the front panel. I had tried and messed it up. Don’t worry, though, I will write a tutorial for this step now that I know how to make it to post here later.
UCAB front and back panels
Lynette went further than I had planned. I had planned on just doing the front zipper pocket, which I talked about the other day. She showed us how to complete that pocket, plus apply the pocket to the front, add handles and make the back panel with handles. I am really glad as it makes the tutorials move along faster and I have to create fewer. I am not afraid; the work just takes time.
One thing that came out is one piece was missing from the list on the pattern of pieces we needed for this step. On part 2, pg.16, you need to add L6, an 8×8 lining piece, to the list of pieces you’ll need. This pattern would improve significantly if the designer went through and numbered all the pieces. I know you know that we did that at the beginning, but you can’t number pieces in the pattern that aren’t listed.
One thing I did was use the handles I made for the All Rolled Up Tote, which I ended up not using for that project. I decided that those handles would work for this bag even though they are a little wider than called for in the pattern. One side, which you can see in the other blog post, is pleather and the side you can see above is the accent piece I sewed from Philip Jacobs Brocade Peony fabric to cover the pleather seam.
I had to unsew and redo the back luggage sleeve because I forgot to put SF101 on the back. I thought it would be ok, but decided it was too flimsy. I am much happier now that I redid it, though unsewing takes awhile.
Finally, this project is starting to look like something. With the back and front panels finished, I can see the end of the road in the distance. In some part of my brain, I feel like I am wasting time when I am working on this project. I feel like I could be working on better projects. In another part of my brain, I tell myself that I am making progress, this bag will use up some fabric in my palette, etc. It is so weird. I just think this project has been hanging around for longer than I like and I want to be done with it.
I have to remind myself that one of the reasons we started this was to encourage people to make bags and show them they could do it. Perhaps we didn’t choose wisely with this weird and difficult bag. Fortunately, it will be a useful bag. I don’t know if people will be encouraged to make other bags or be daunted.
We had another tutorial session on Saturday during Sew Day for the Ultimate Carry All Bag. This time Lynette was the teacher. I was relieved not to have to do the tutorial, because I was confused about how to complete the front zipper pocket. I had tried and messed it up. I hadn’t quite given up, but had put it off for awhile.
The directions seemed to be more complicated than necessary, but once Lynette discussed the steps, I was able to follow. The key is that L7 is sewn to the rest of the zipper panel by top stitching the top part of the zipper. you sew around the outside of the whole panel eventually, but this top stitching is such a weird instruction. I have never seen that type of instruction before.
I made a little progress on Scrap Dash over the weekend in between parts of the UCAB and Triple Zip Pouch. I am still using it as leaders and enders, so I can’t help but make some progress. There was a lot of machine foot switching while I worked on the Ultimate Carry All Bag.
What I really need to do is figure out where the edges are in this quilt. I am not sure if I will add rows and columns or what. Once I figure that out, I will be able to work towards finishing it. Somehow this quilt reminds me of the Corner Store quilt.
Recently, I posted the tutorial for the second Large Pocket. That is one of the pockets needed to complete the Ultimate Carry All Bag by Natalie Patton. Next we are going to work on the first part of the small, interior front pocket
SF101 – add this to whatever section you think needs it. I added it to P4 to add some stability to the Clippy Pocket
Post-it Notes** (really, you can use any post-it notes. I just like the shape and color of these. Another good product is Semikolon’s Sticky Tab Markers in a Booklet-no affiliation)
The directions for the small interior, front pocket start the bottom of pg. 12 in the pattern.
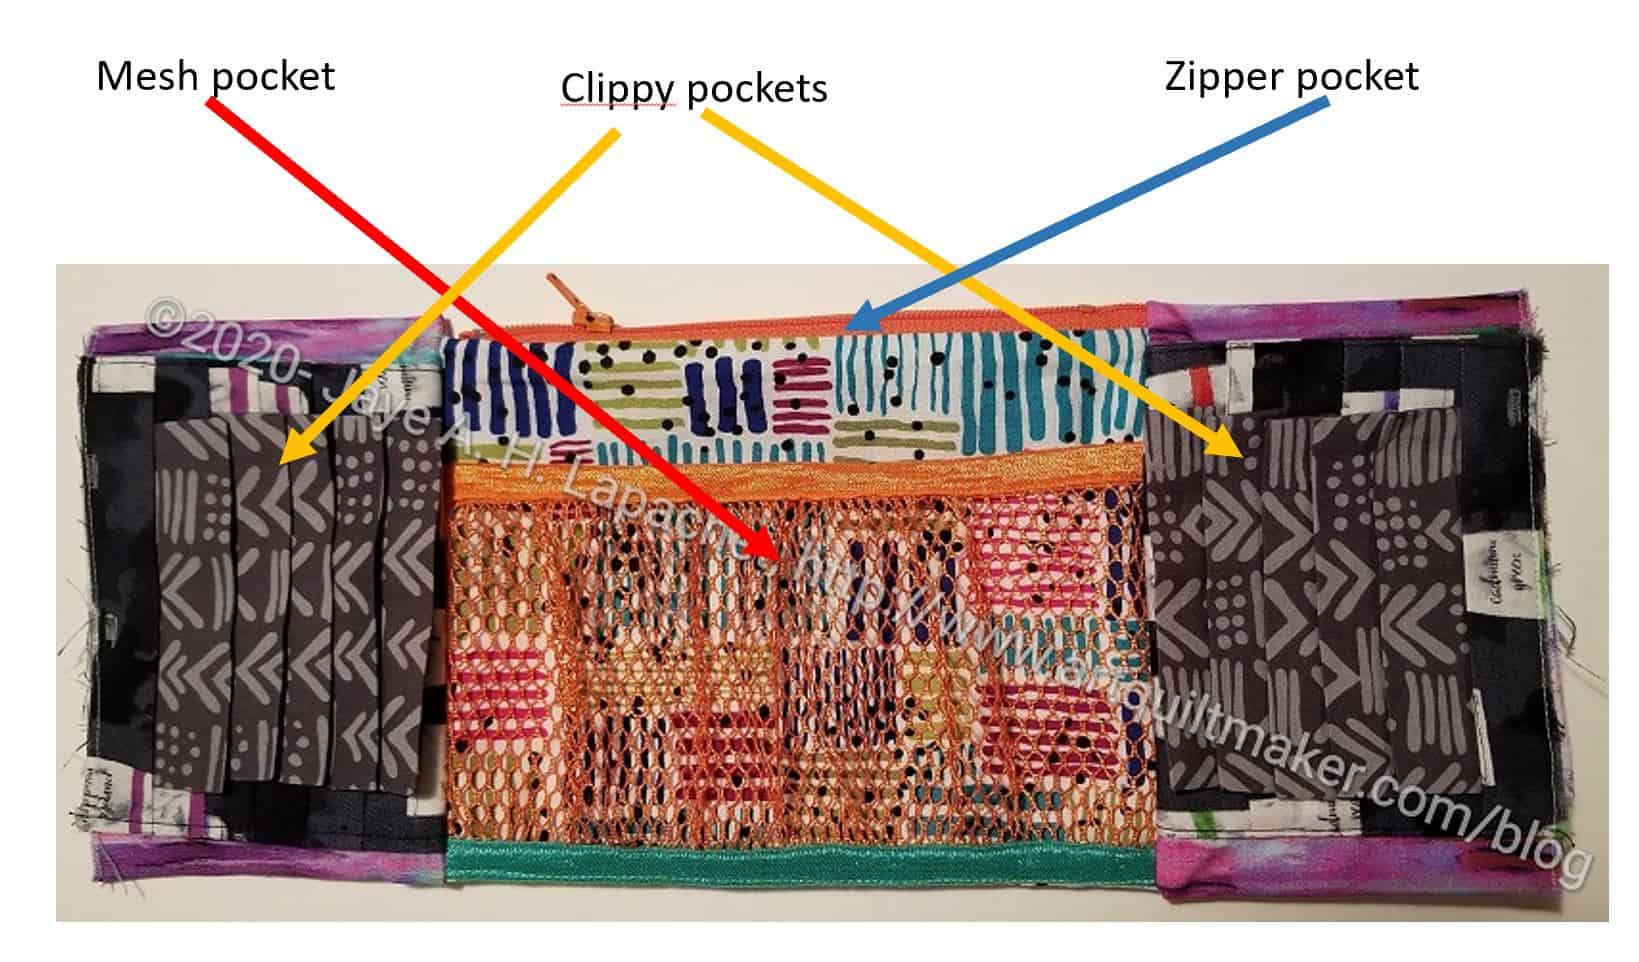
N. B.: My version of this Small Front Pocket eliminates the vinyl/badge holder pockets and includes a second type of Clippy pocket that I developed from a pincushion pattern.
N.B.2: put a Post-it note on pg.9 to remind you where her zipper instructions can be found. She refers back to them in a non-specific way and marking them is helpful for quick access.
N.B.3: I am using a couple of different versions of the front pocket for this tutorial. Ignore the differences in fabric and pay attention to the location of the parts as well as the piece numbers.
Tutorial:
UCAB – Front, small pocket
This pocket is made in 3 parts.
Center Zipper Pocket
UCAB -layer fabrics to insert zipper
First, we will make the center zipper pocket. If you haven’t already done so, fuse SF101 (or similar) to the pieces that make up the zipper pocket.
We need to add a zipper to the center part of the pocket. Full directions for adding a zipper start on pg.9. We also talked about this in the Large Pocket Tutorial.
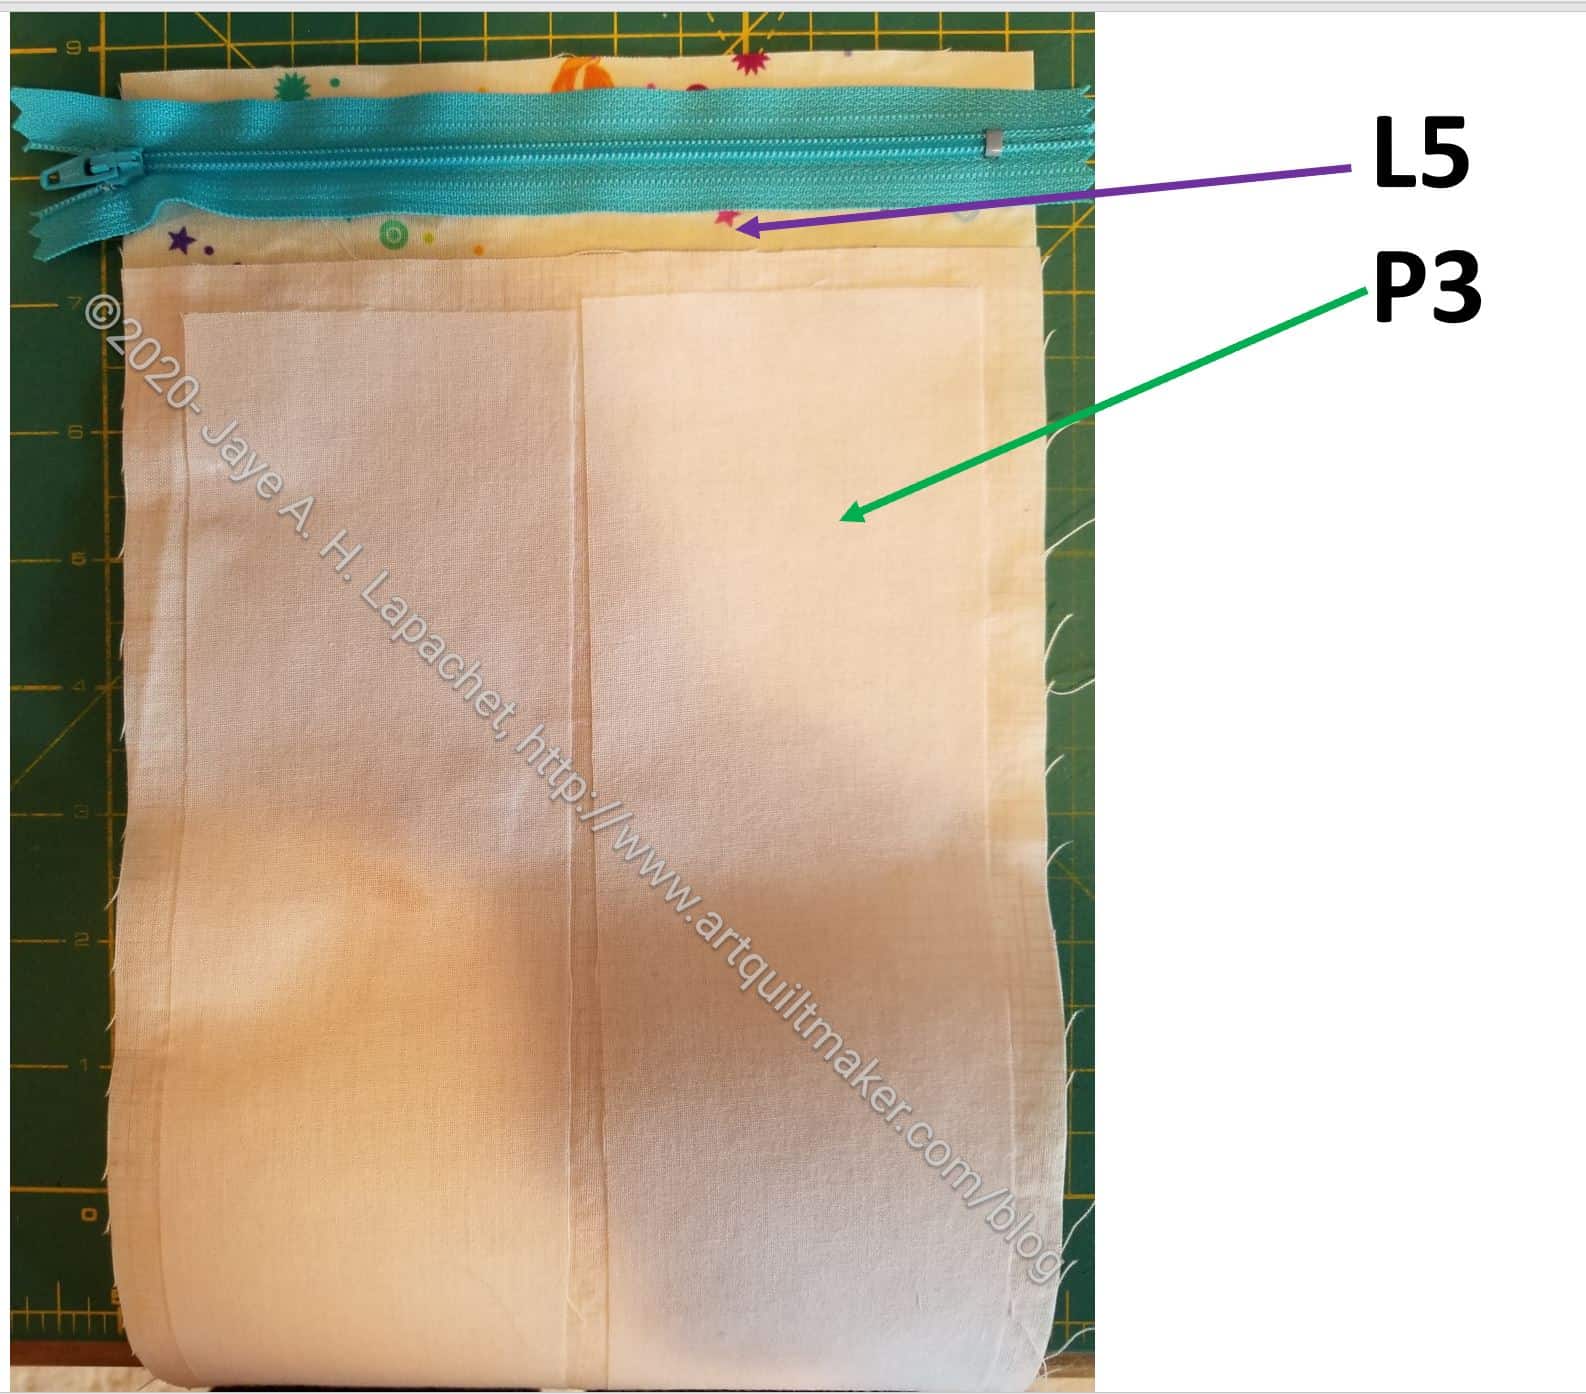
First, lay L5 down face up/right side up.
Lay zipper on top of L5 with zipper pull facing up.
On top of L5 and the zipper, lay P5 on top of zipper face down/right side down. The layers should be L5 and P3 RST with the zipper in between.
Pinning Zipper ends
As I said before, Natalie Patton does something really clever with her zipper. She folds the zipper tape at a 45 degree angle and pins it. This makes it look really neat and tidy. Do this, as shown in detail in the Large Pocket Tutorial. Sew the layers including the zipper, being careful to move the zipper pull out of the way as needed. The last photo above shows how to sew (green line) and reminder to stop half way (red line) in order to readjust the zipper pull.
Turn over and press. Top stitch next to the zipper.
Wait to sew second side of zipper until later.
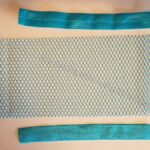
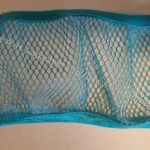
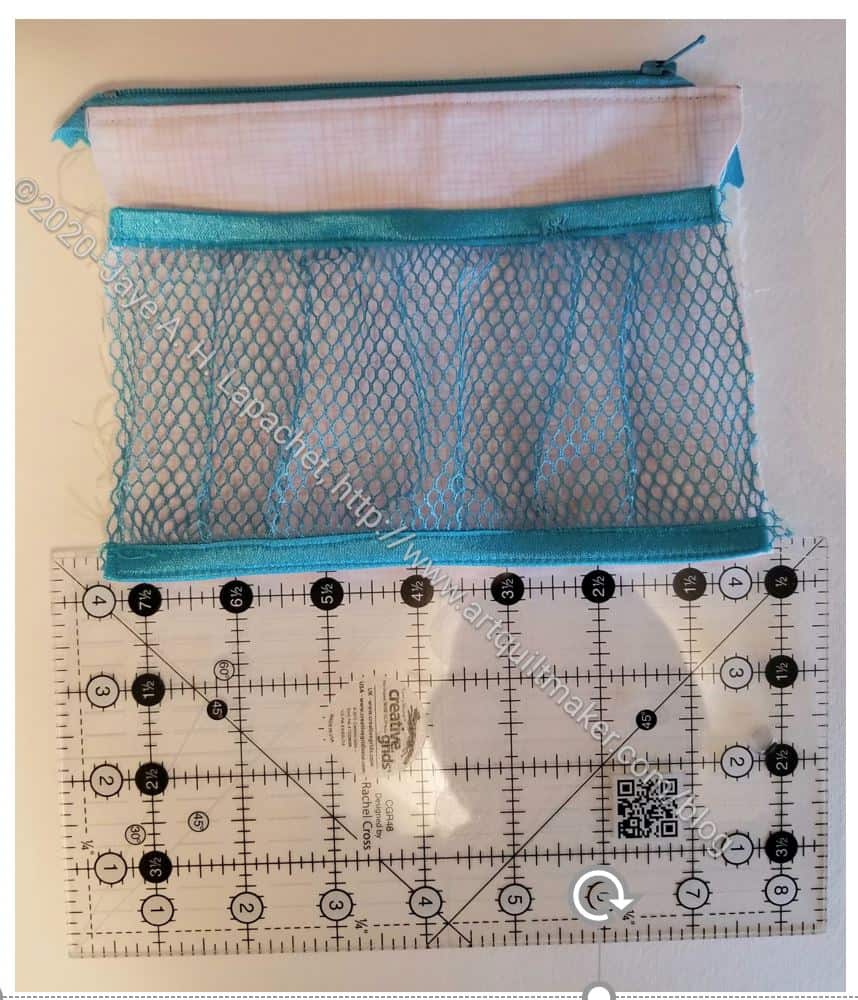
Cover mesh edges with double-fold elastic
Completed mesh prep
The center pocket has mesh, so cut the mesh and the double-fold elastic. The pattern doesn’t say, but you need to cover both long edges of the mesh with double-fold elastic or twill tape. I prefer the double-fold elastic.
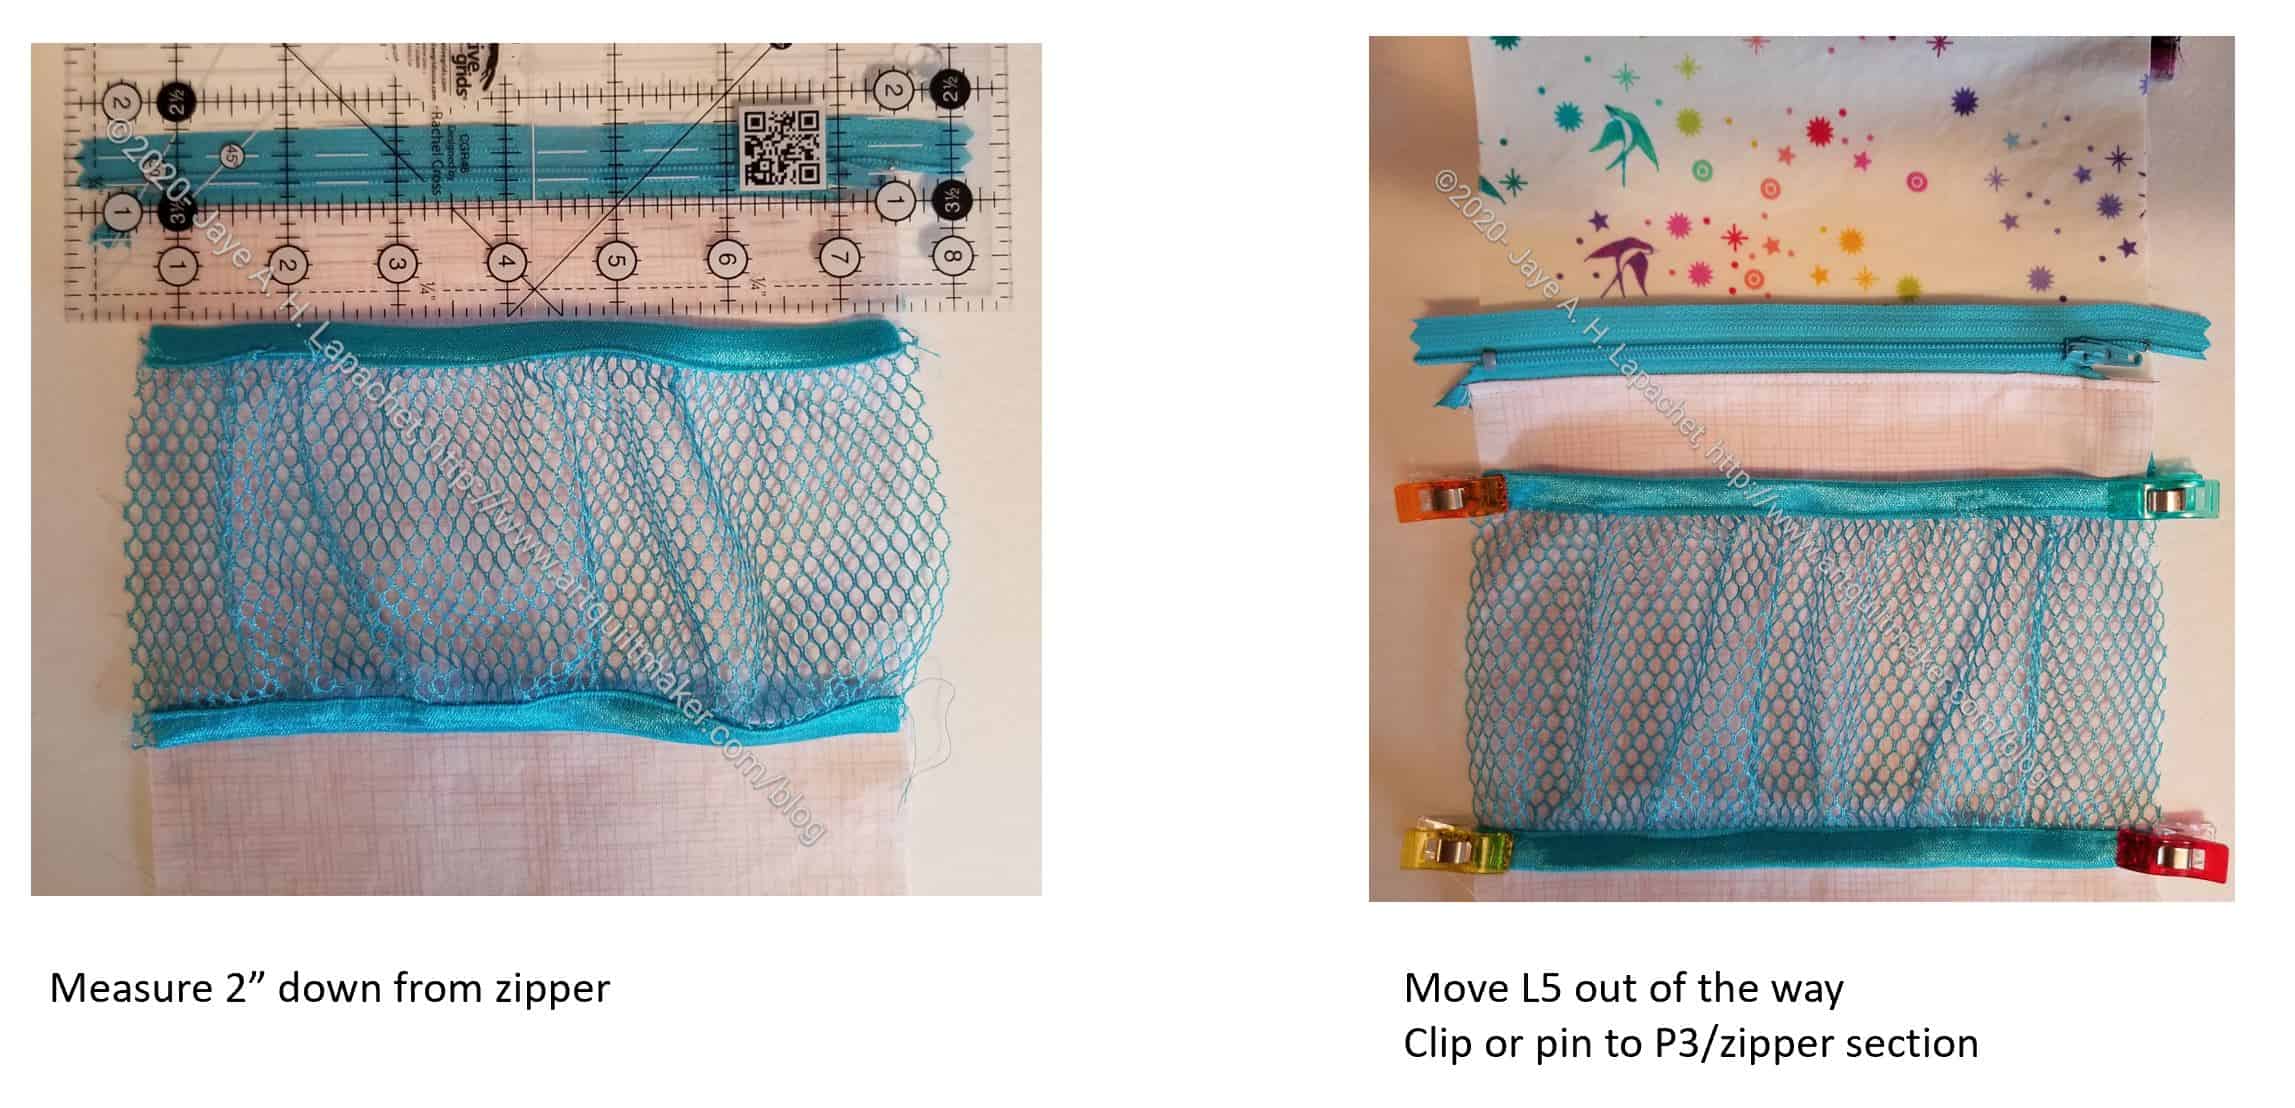
Add mesh pocket to center zip pocket
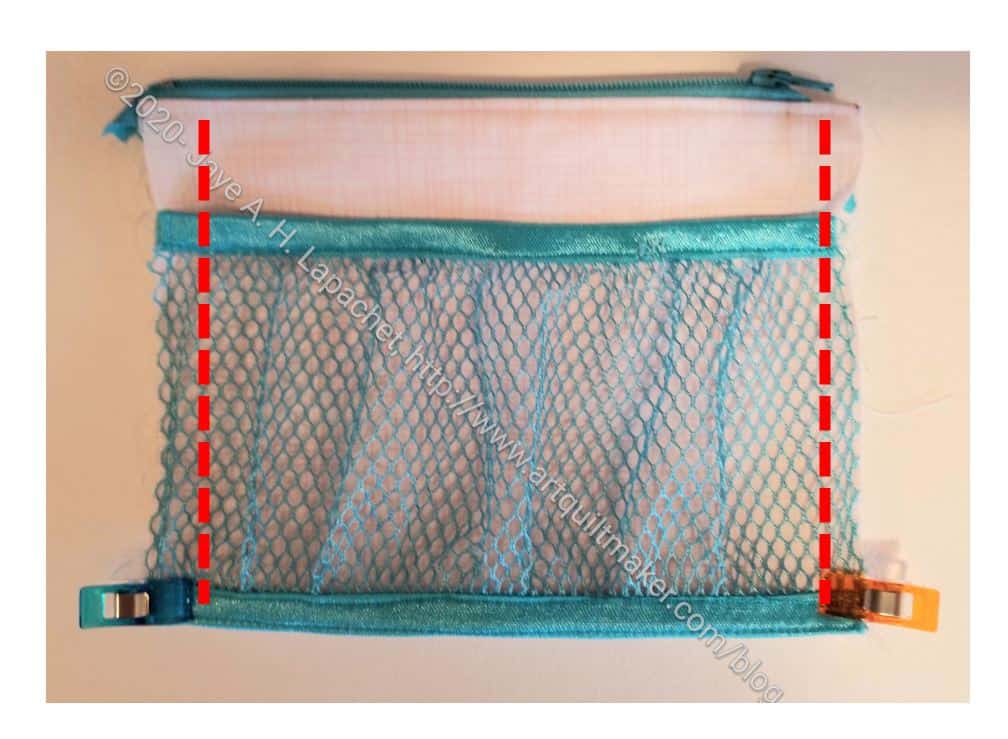
In order to attach the mesh pocket to the center zipper pocket, first mesh 2″ down from the zipper.
Move L5 out of the way (right photo above).
Clip the mesh pocket to P3/partly sewn zipper section.
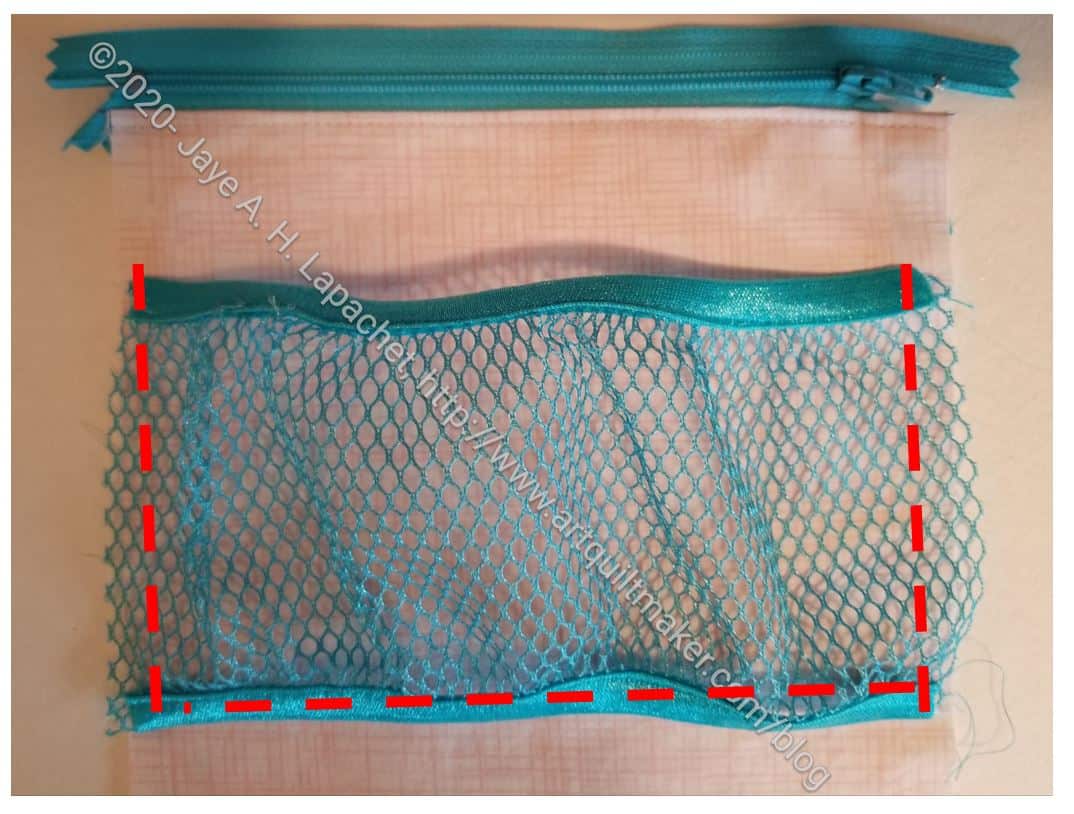
Sew around the mesh pocket
Leaving the top open (opening/top is closest to the zipper), sew around 3 sides of the mesh pocket. If you want to divide the pocket, mark as many divisions as you want with painter’s tape and sew very close to the painter’s tape without sewing through it.
After you finish sewing the mesh pocket, finish the center section by layering the other sides of P3 and L5 with the zipper the way you did before and sew. You will be sewing more of a roll this time.
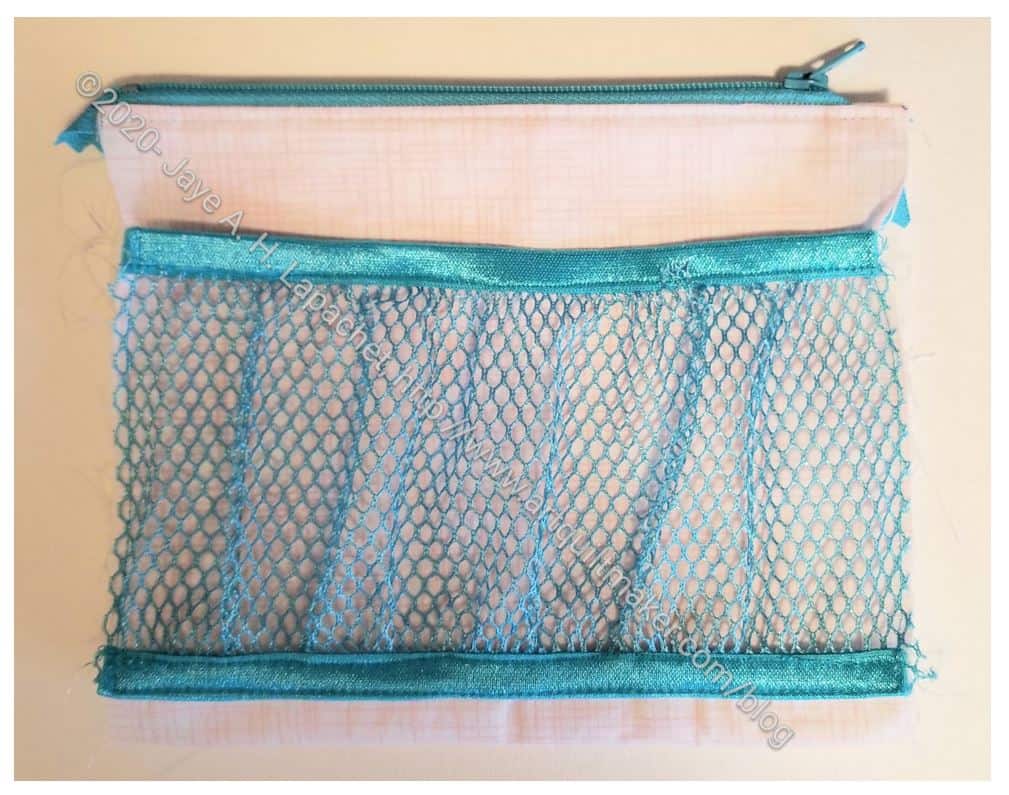
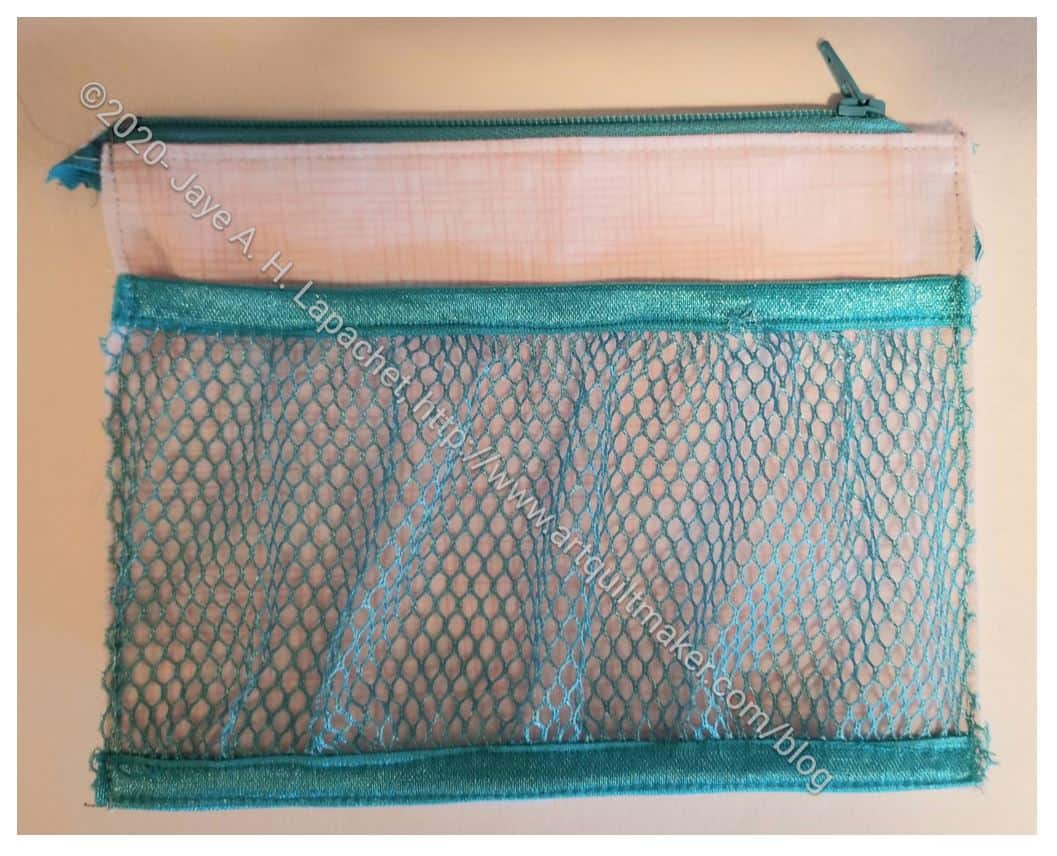
Almost finished center zipper pocket
Your finished center pocket will look like the above photo. You still need to make the pleat so you can add 3D items to the pocket.
use ruler to measure for pleat
Stick your ruler 1/2in into the bottom of the mesh/zipper pocket to create the right sized pleat.
Clip and sew
Use Wonder Clips on the sides and the bottom to keep everything in place, especially on the top double-fold elastic. I didn’t take a photo, but you do want to put clips on the top double-fold elastic, because it tends to curl in from the mesh pocket wanting to curl.
Sew up the sides. These seams will be sewn again later, so you just need to sew enough to hold them in place until final assembly.
Finished interior center zipper pocket
Your center section is finished.
Next time we will work on the side Clippy pockets.
**I use affiliate links and may be paid for your purchase of an item when you click on an item link in my post. There is no additional cost to you for clicking or purchasing items I recommend. I appreciate your clicks and purchases as it helps support this blog.
Friday, I spent some time looking through all the patterns I have collected to see if there was a quick project that would inspire me. I moved some to other places my computer and deleted some in which I was no longer interested. It is always good to do a bit of Spring Cleaning.
Zippers from Kelly O
This Spring Cleaning reminded me of the Triple Zip pattern from A Quilter’s Table. I have had this Triple Zip pouch pattern waiting around for 7 years. I thought it might be a good quick go-to gift pattern I could make over and over. I haven’t found such a thing and hope springs eternal.
Kelly Orr and I talked about this pouch years ago and she gave me the zippers to use before she moved away. I have had them segregated out from my other zippers all this time.
I know I didn’t tell you that I started this project. I started cutting on Saturday and nearly finished it by Saturday evening. I had one more seam to finish sewing on Sunday, then turning it and done!
The pattern doesn’t have a lot of pieces, but they do need to be labelled. I didn’t do that and was somewhat confused. The pattern requires careful attention, especially to the renaming of the zippers part way through the project. Labeling the pieces can reduce this confusion.
If I made this again, I would omit the fusible fleece on the top of the project (where the yellow dot fabric is in my pouch). It made turning the project a little difficult and the top too thick for my taste.
I was also confused about the finishing. I think I did ok, but the top of the inside still has some raw edges. They are less than an inch and don’t show, but I am concerned that there will be unraveling. I am unclear whether I finished the inside correctly. I also wonder if there is a different way to finish the inside. I plan to send the extra pattern I printed to Lynette to see what she thinks.
I also added a leash, which I always like to do for pouches.
A Quilter’s Table had a sew-along for this pouch and the post showed over 70 pouches! She also has a tag in which you can see many other Triple Zips as well as links to others doing classes and other sew-a-longs with the pattern. It is very popular!
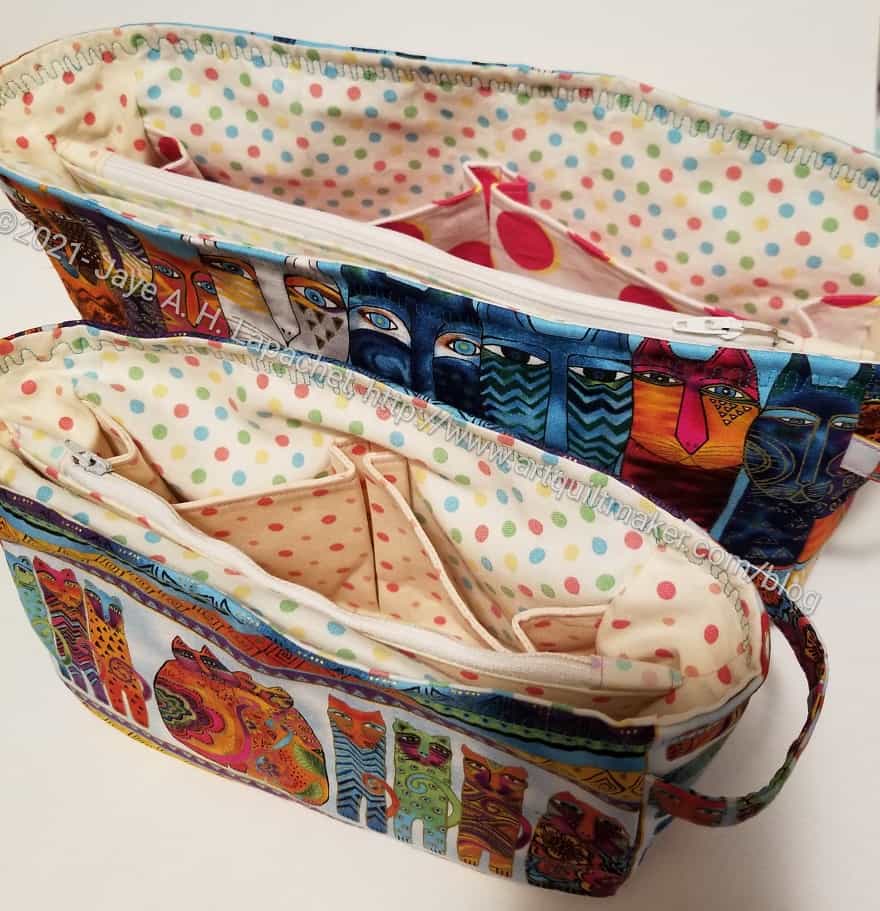
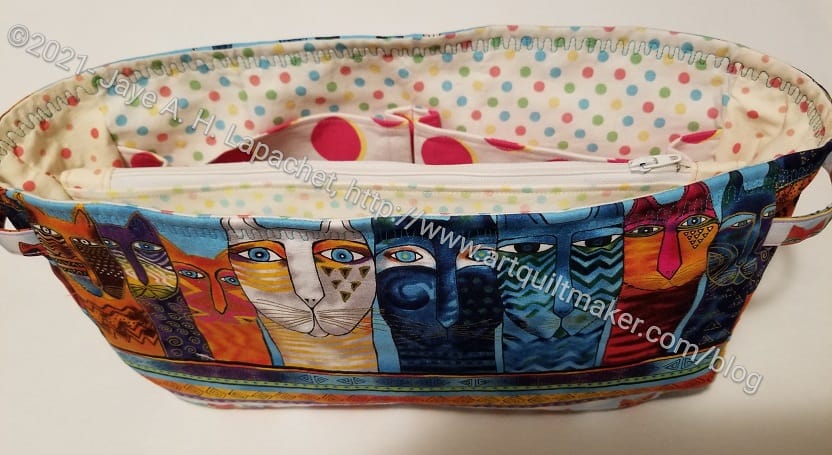
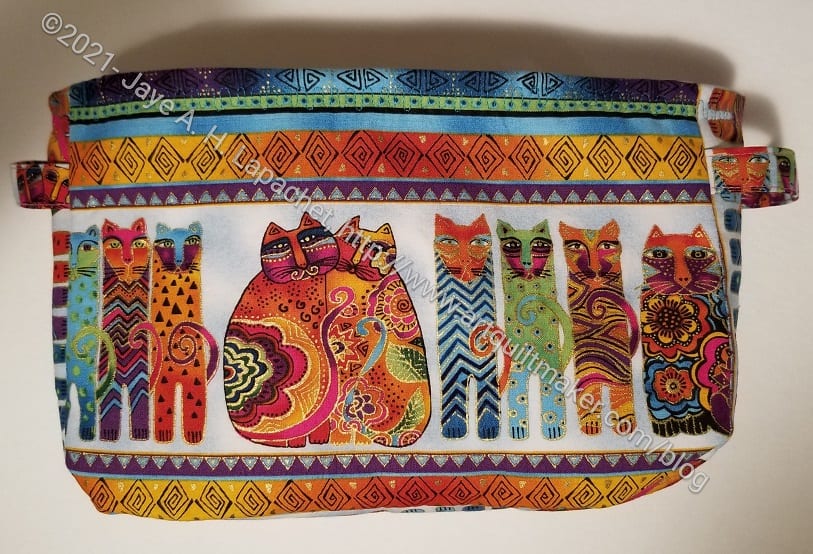
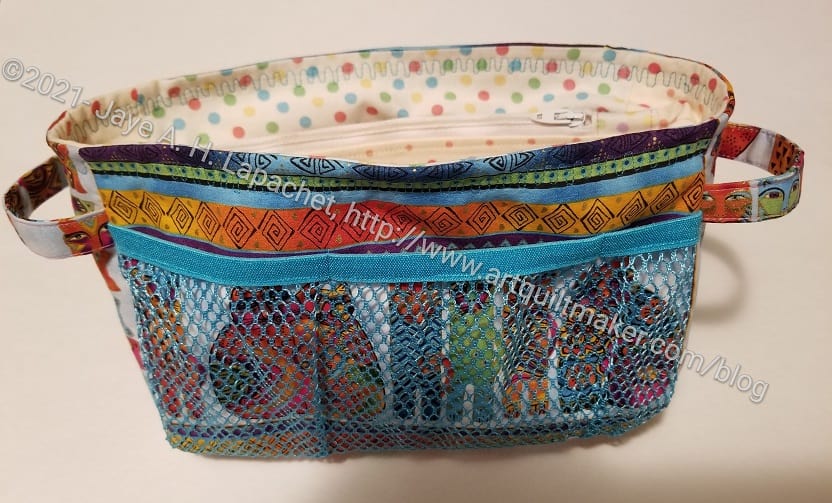
I finished these organizers at the end of April, but I couldn’t show you until today. They are gifts for my mom for Mother’s Day. As I mentioned yesterday, she opened her gifts early when I saw her on Friday. Good thing I got them done early!!!
Purse Organizers were a special request. As I said, I was showing her the new Minikins Season 3 patterns and she immediately saw these and loved them. I had already made her a gift, but I have put that item aside for her birthday.
Large Mustang front and top
There are two sizes. She can choose the one that works best for her handbag or tote bag. She already has an idea of how she will use these. Someone said that using these for a tote bag would be a good idea. It never occurred to me, but I have to agree. How often do you scrabble around in your tote bag for whatever it is you need. I’ll need to think about whether one would work in the bag I take to quilt shows.
Small Mustang front
For these pouches, I used Laurel Burch fabric that I purchased to make items for Mom. I know it doesn’t go with the Artist Paint tube fabric, but these won’t be with the items I make for her to take to Sew Day. I made an effort to fussy cut well so the cats faces would show. The fabric has two sizes of cats, so I used the small cats on the small pouch and large cats on the large pouch. I am pretty happy with the fussy cutting.
Small Mustang -mesh pocket
One thing I didn’t think about was the outside pockets. I realized that the outside pockets would cover up the cats, so I omitted them. It means fewer pockets. I made a note on my pattern and will use the main fabric for those pockets next time.
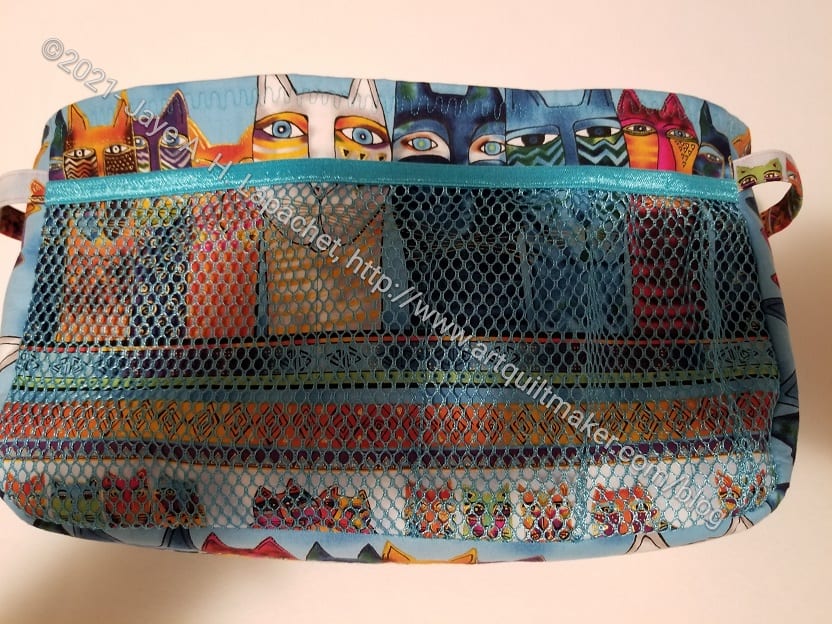
Large Mustang -mesh pocket
One side of both pouches already has mesh, which obscures the cats, but doesn’t cover them up completely. In my large version, the cats look like they are peeking over the edge of the mesh. Total luck, but cute, don’t you think?
A lot of people don’t like mesh pockets, because items get caught. I don’t mind them. One has to pick carefully what to put in them.
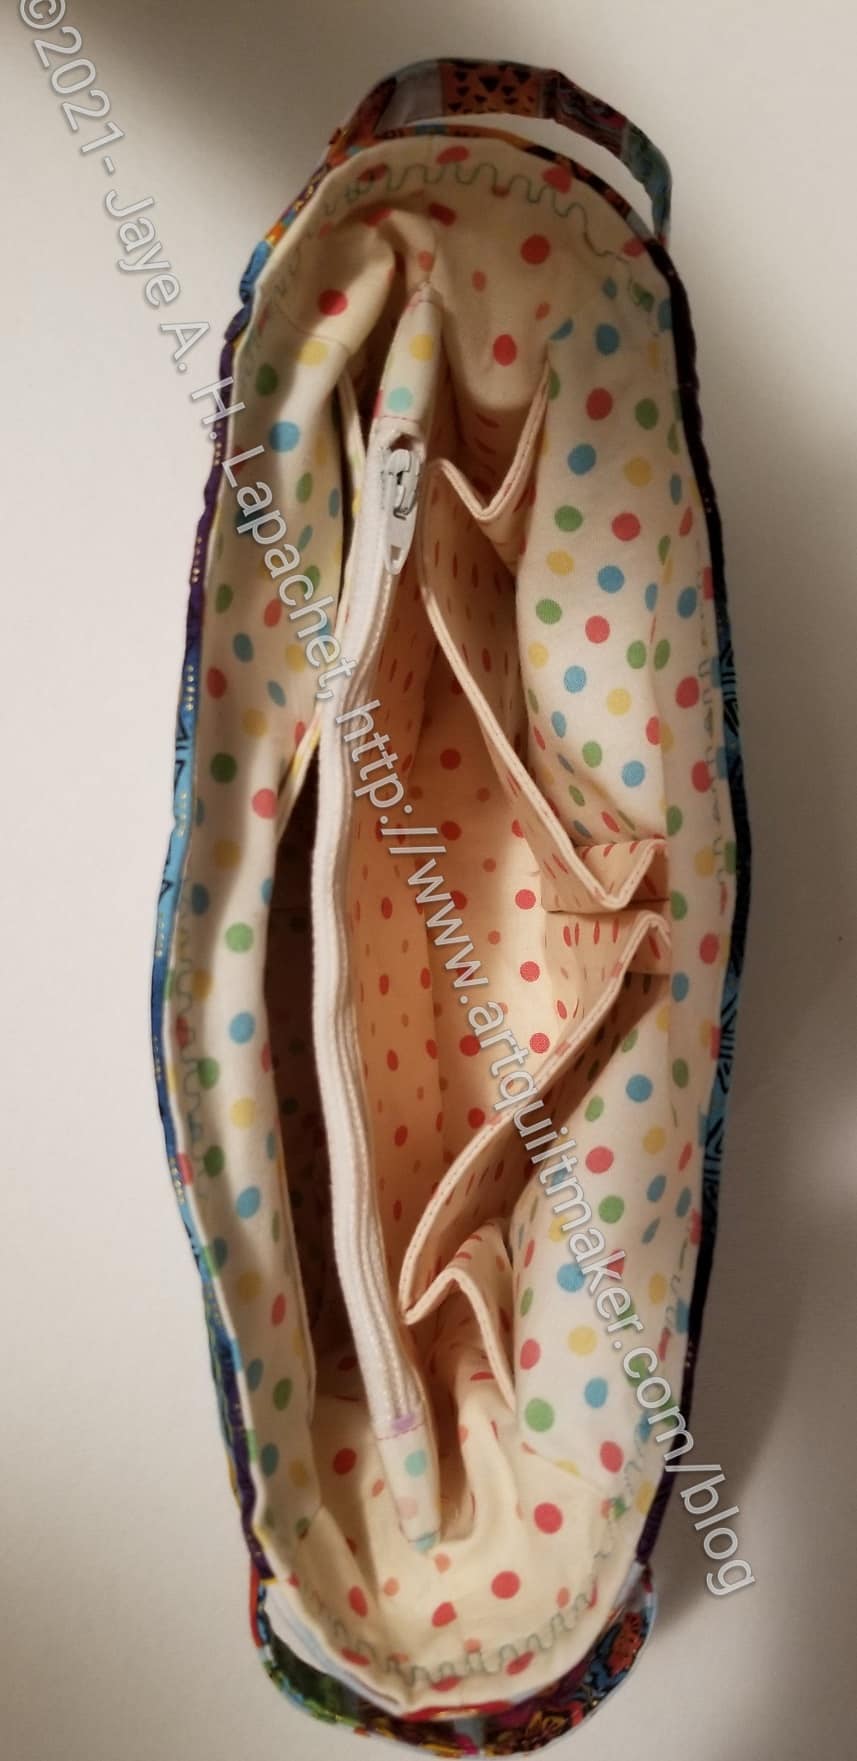
Large Mustang – interior
Even without the outer slip pocket, these bags have a lot of pockets. In addition to the mesh pockets, there are two slip pockets, a zipper pocket and two pleated pockets.
I am a little concerned about how much can be put inside as the Organizers look so slim, but I hope Mom can put enough in to make them useful.
I am also ridiculously pleased with the grab handles. Aren’t they cute?
There is no top to this pouch, so everything will fall out if it is tipped over. I hope Mom likes these pouches and they work for her.
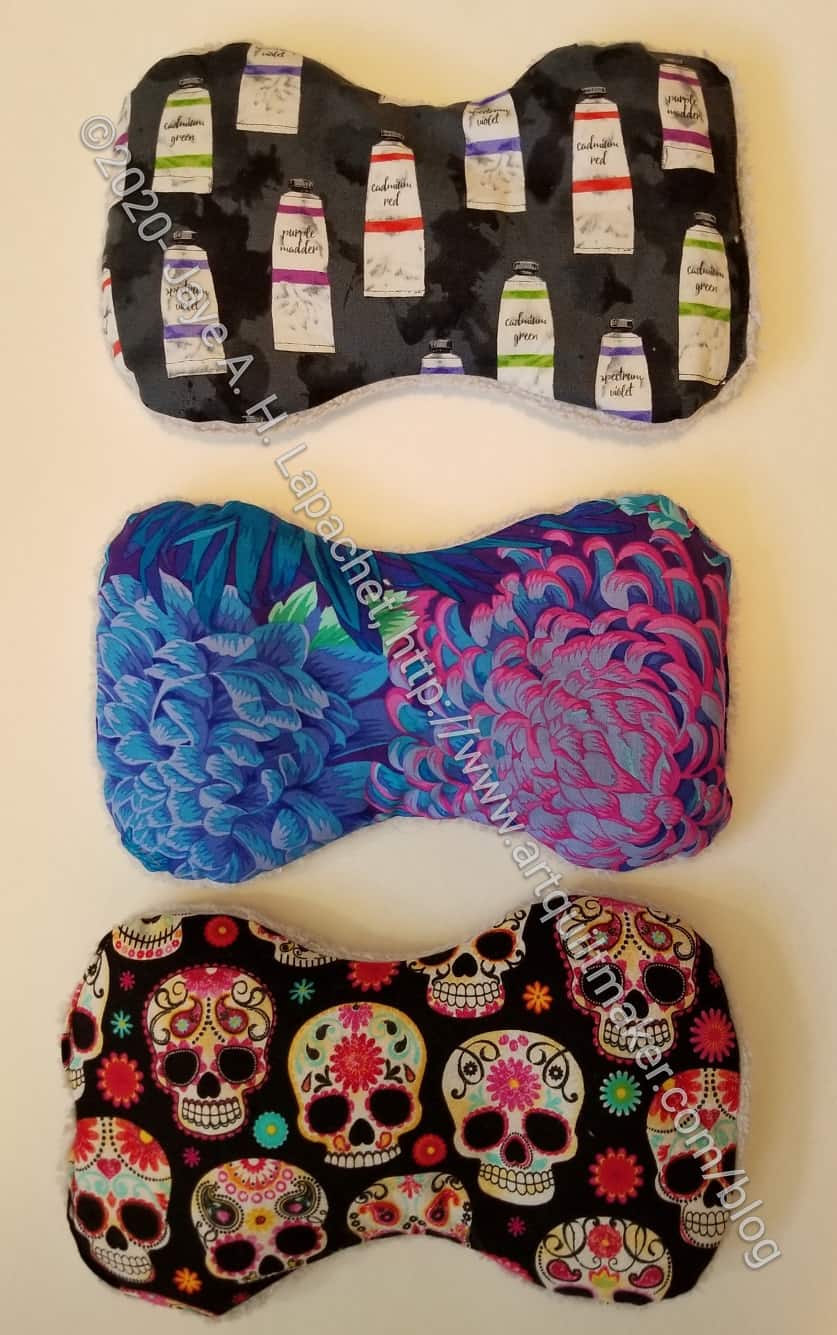
Finally, I can show all of the eye masks together. I delivered the last eye mask yesterday to my mom for Mother’s Day.I know Mother’s Day is a week away, but she came over and refused to wait to open her gifts. It was fun to see her open it.
She has a gel mask, but I had already started making her this when I found that out. She said the one I made is much softer and larger, so will work really well for her.
You might remember that I showed my mask in January, which is when I finished all of them. Then, I showed Gerre’s mask in March after International Women’s Day.
You can see that I used Mom’s fabric so this goes with her set of small items. I have used the Dia de los Muertos fabric for Gerre before and this is now the fabric I am designating for her gifts since I ran out of the purple Asbury fabric.