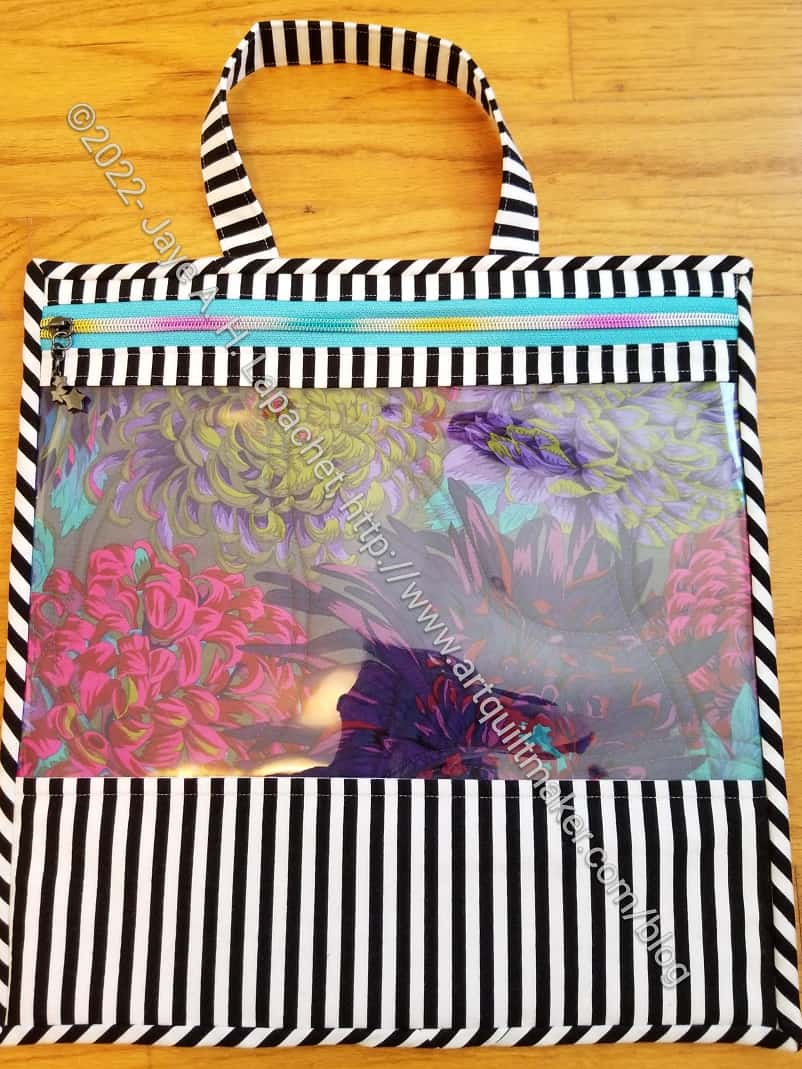
I have been wanting to try this pattern. I was thinking that a project bag might be a good gift for my bag recipients, but I wanted to try it before committing to another ByAnnie pattern. I think, in general, ByAnnie patterns seem overly complicated, but the projects usually turn out well.
I cut out the pieces at Super Sew Day, then finally sewed it together. I used one of the pieces of zipper I got for my birthday. I love it. It is so pretty. I also used more of the Philip Jacobs Chrysanthemum fabric like in the Without a Trace/Take a Stand bag and the APfE v.2.0. I am pleased with the binding, too.
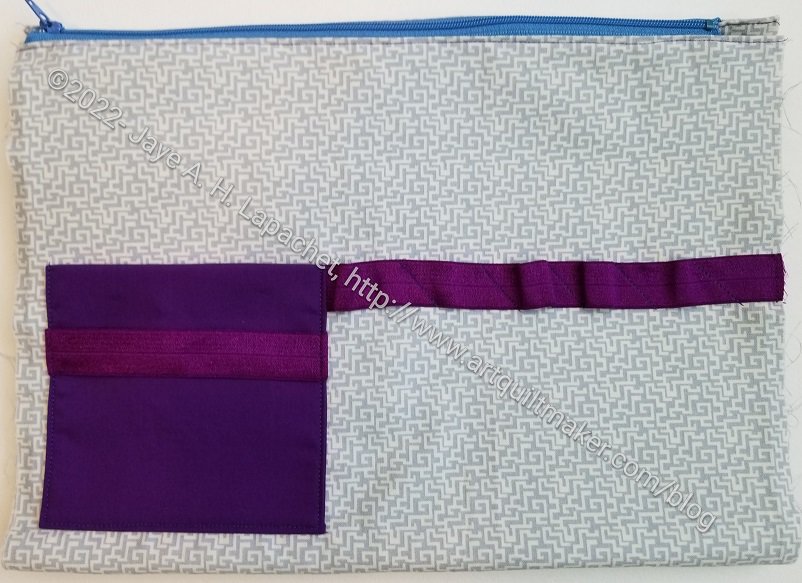
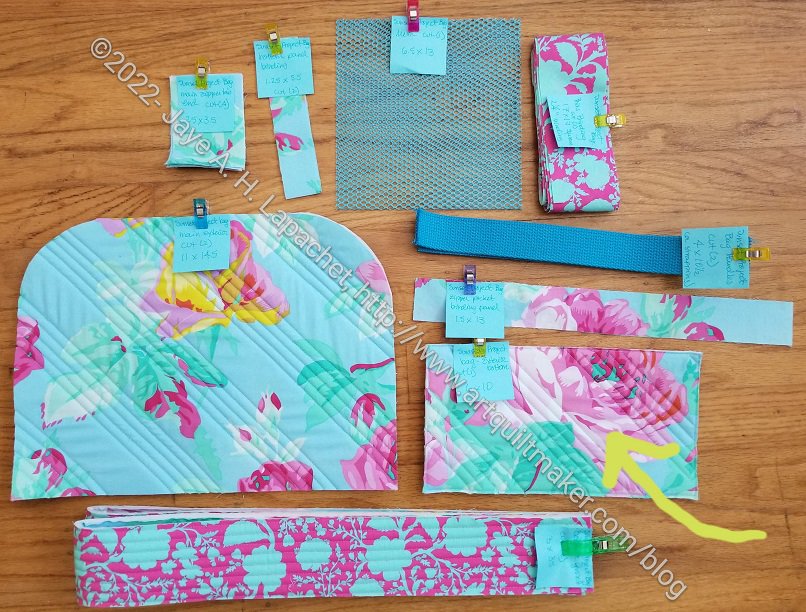
I am back on the UCAB bandwagon! I worked on the pockets for the Brocade Peony UCAB over the weekend and made some good progress. This is part of my effort to clear off my to do list. I know I have gifts to make, so there is a push-me-pull-you going on in my brain. Fortunately, this ticks off both areas.
UCAB: Front Pocket
I started the work on the two large pockets at Tim’s on Saturday. We got together for the meeting and to sew and catch up. I started in carefully on the large pocket #1 and made good progress until I realized I had screwed up. I had the wrong piece noted in the pattern and sewed the extra pockets to the wrong piece of fabric. I didn’t have the extra fabric with me, so I stopped and worked on binding some other bags.
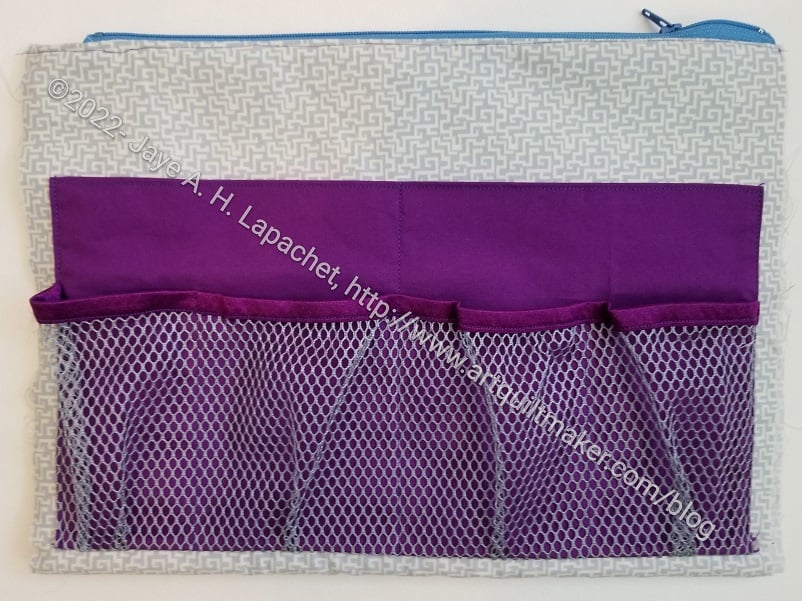
UCAB: Large Second Pocket -front
By the next day, I had figured out the problem and was ready to go. I thought I would abandon my efforts and start over. Unfortunately, I couldn’t find the extra fabric I thought I had, so I unpicked everything and redid it. It worked out. It took time, but unpicking is rather meditative.
Despite this inauspicious start, I was able to complete the two large pockets and make the center section of the small front pocket. I also started making the sides of the small front packet, including the Clippy section. There is a lot of fiddly sewing and cutting, so I didn’t make much progress yet.
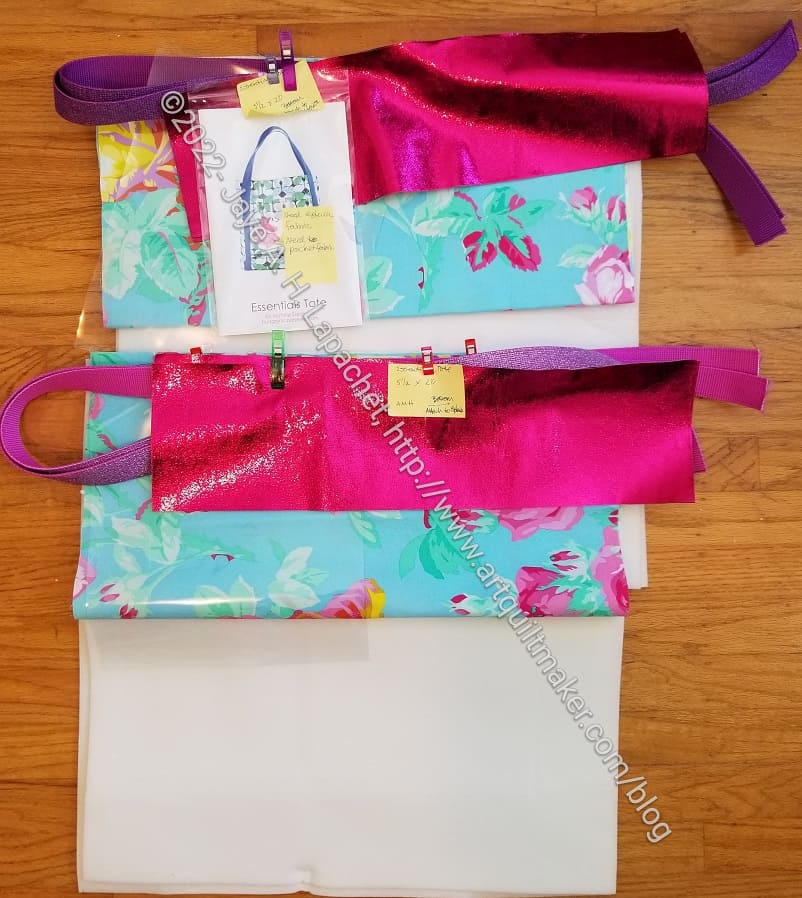
I spent one day over the weekend working on the Essential Totes. I had only cut them out and the two stacks of pieces had been languishing for a few days. First, I had to cut the exterior fabric. Yes, I finally got the Echinacea Glow fabric!
Cutting was no big deal and quickly accomplished. Then I started working my way through the pattern. It was very soothing to just work on a bag that was straightforward.
As I started to work I found that the pattern is really well written and easy to follow. It has images in the right places and enough explanation. I found the part on what to cut required that I get oriented to how it was written. I made a few annotations that will be helpful when I make this project again.
One thing I did differently was use foldover elastic** instead of binding to cover the edges of the vinyl. After so many ByAnnie patterns and all of their binding requirements, I had no interest in making more binding. One good thing about the ByAnnie patterns is that I now have a good system for making binding that isn’t as arduous as either of the techniques I have used in the past. Here I am talking about actual fabric and sewing technique not the math part. The math part is tried and true and I use that because it works every time.
The handles cover the edges of the vinyl pocket so the maker only has to cover the top and bottom of the vinyl.
I used the glitter webbing I bought from SewHungry Hippie. Total impulse buy, so I thought I would go with lots of glitter in these bags. The background of the exterior tones everything down a bit. The webbing is much stiffer than fabric handles, so I’ll have to make sure not to load them down too much. I sewed slowly and with a sharp needle and didn’t have any problem sewing through them.
I got interrupted before I could finish them and need to get back int he swing. Part of what I need to do is make more pockets. Somehow that step is holding me up.
**Obviously, you should shop at local fabric, knitting shops or quilt shops. However, if you can’t, please know that I use affiliate links. I may be paid for your purchase of an item when you click on an item’s link in my post. There is no additional cost to you for clicking or purchasing items I recommend. I do not recommend items I don’t like. I appreciate your clicks and purchases as it helps support this blog.
As mentioned in the Super Sew Day post, this is another project I cut out – mostly. I am still waiting for one of the fabrics to arrive, so I can cut out the exteriors.
I have one of the fabrics, but was waiting for the other to arrive so I could wash them together. I am trying to conserve energy while it is so hot here in California. Even where I live, which is often covered in fog, it is 86 degrees, which is down from the 91 it was earlier. I am definitely thinking of getting solar panels for my house.
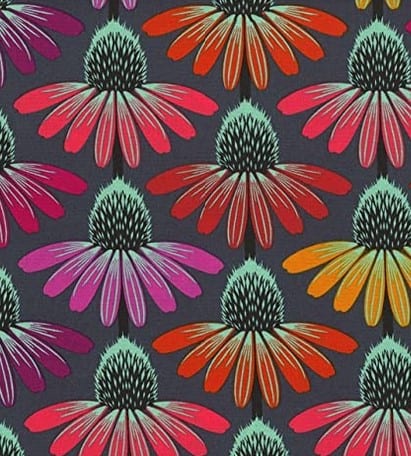
Hindsight Echinacea Glow
The fabric I am waiting for is the Hindsight Echinacea Glow** from Anna Maria Horner. I thought I had a large enough piece in this colorway, but I think I only had a half yard or FQ, which isn’t enough. I ordered it for next day delivery and here we are a week later.
I also haven’t cut the pockets out for the inside. I was going to skip them, but I know I will regret it, if I do, especially if these bags become favorites. I have to think about adding a leash and maybe some penholders as well.
You can buy the Essential Tote pattern (print and PDF) from Sew Hungry Hippie. I wasn’t going to buy the pattern, but I did. I couldn’t stop thinking about that vinyl pocket on the outside of the bag. I probably could have added a vinyl pocket to another bag…
**Obviously, you should shop at local fabric, knitting shops or quilt shops. However, if you can’t, please know that I use affiliate links. I may be paid for your purchase of an item when you click on an item’s link in my post. There is no additional cost to you for clicking or purchasing items I recommend. I do not recommend items I don’t like. I appreciate your clicks and purchases as it helps support this blog.
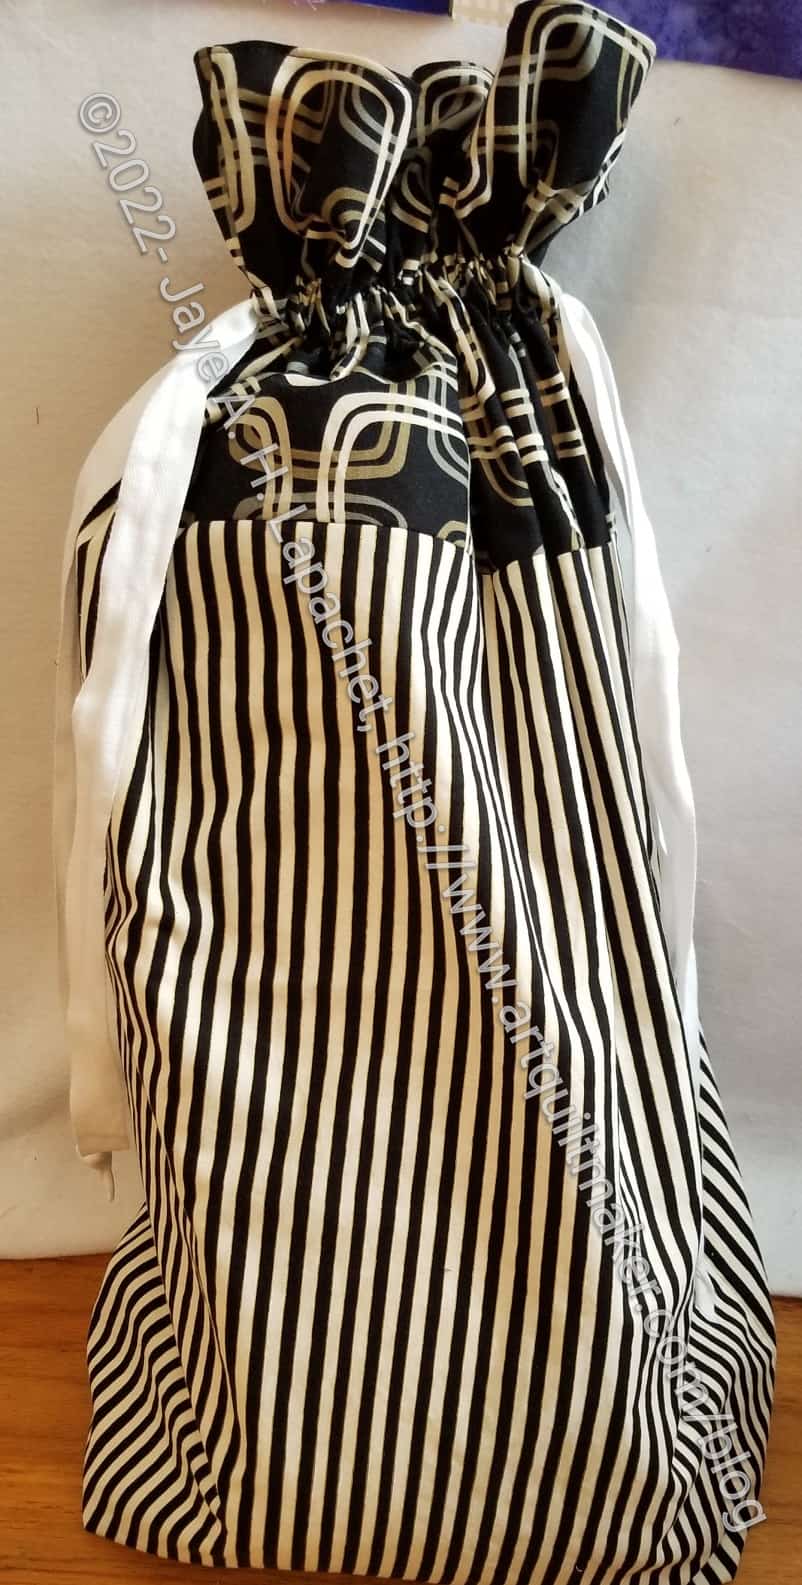
I made a drawstring bag as a storage bag for the Diagonal Nine Patch.
I used the Jeni Baker/In Color Order pattern. As I have said before, this pattern went together very quickly. The hardest part was choosing the fabrics (or finding pieces large enough!)
I keep buying black and white stripes so I have a lot right now. I used it for another project, then though it would work on this one as well. My niece loved the bag.
I got the idea for the storage bag form SIL#2. She makes a storage bag for every quilt she gifts. Once she mentioned it, this pattern came to mind and I knew I could incorporate some orange,which is my niece’s favorite color. Everytime I use this pattern, I wonder why I don’t make more of these bags.
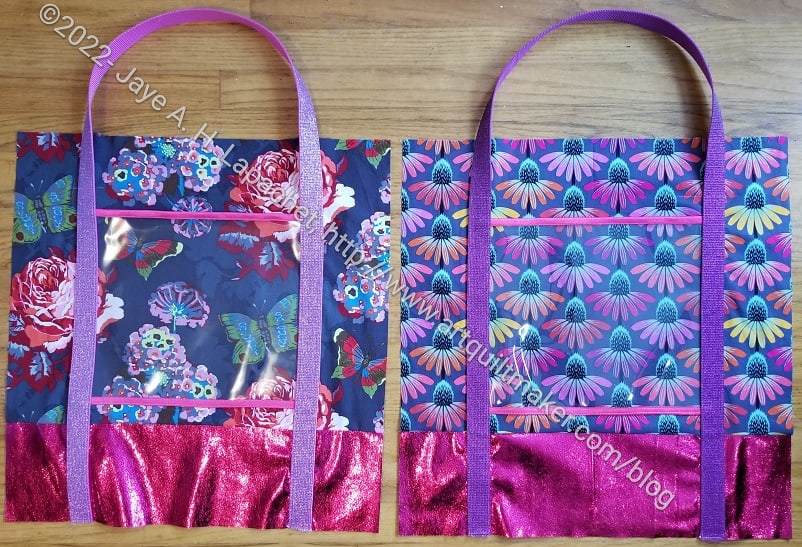
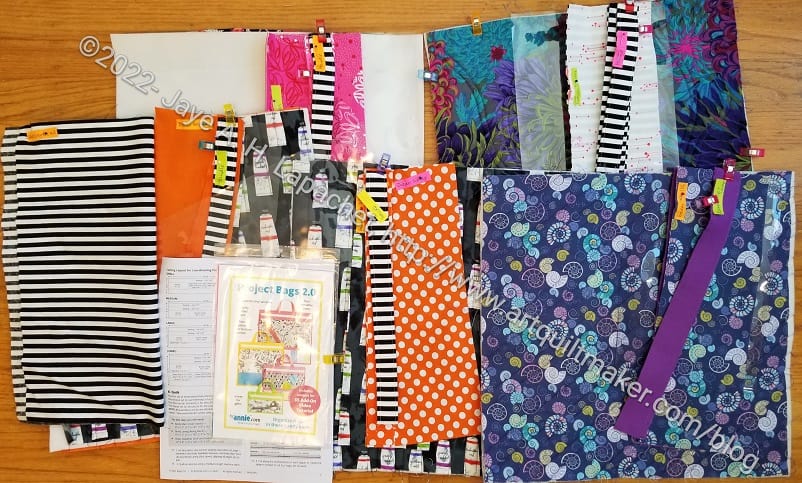
As I mentioned, I spent part of Super Sew Day cutting out Project Bags. My idea for these bags is that they will allow me to collect pieces and parts, such as thread, templates, fabric, of projects so everything is together when I am ready to sew.
Partly, this project and the process has to do with organization. If I have a few minutes and am not at the machine, I can gather some fabric or find the pattern and templates for a future project. This uses my precious time well.
The way I have organized them helps me keep all the pieces with their fellows. This works especially well when I am making more than one at a time.
Yes, I have plenty of ziploc bags and other, purchased containers for projects, but this allows me to use some of my fabric stash. It also makes my space prettier.
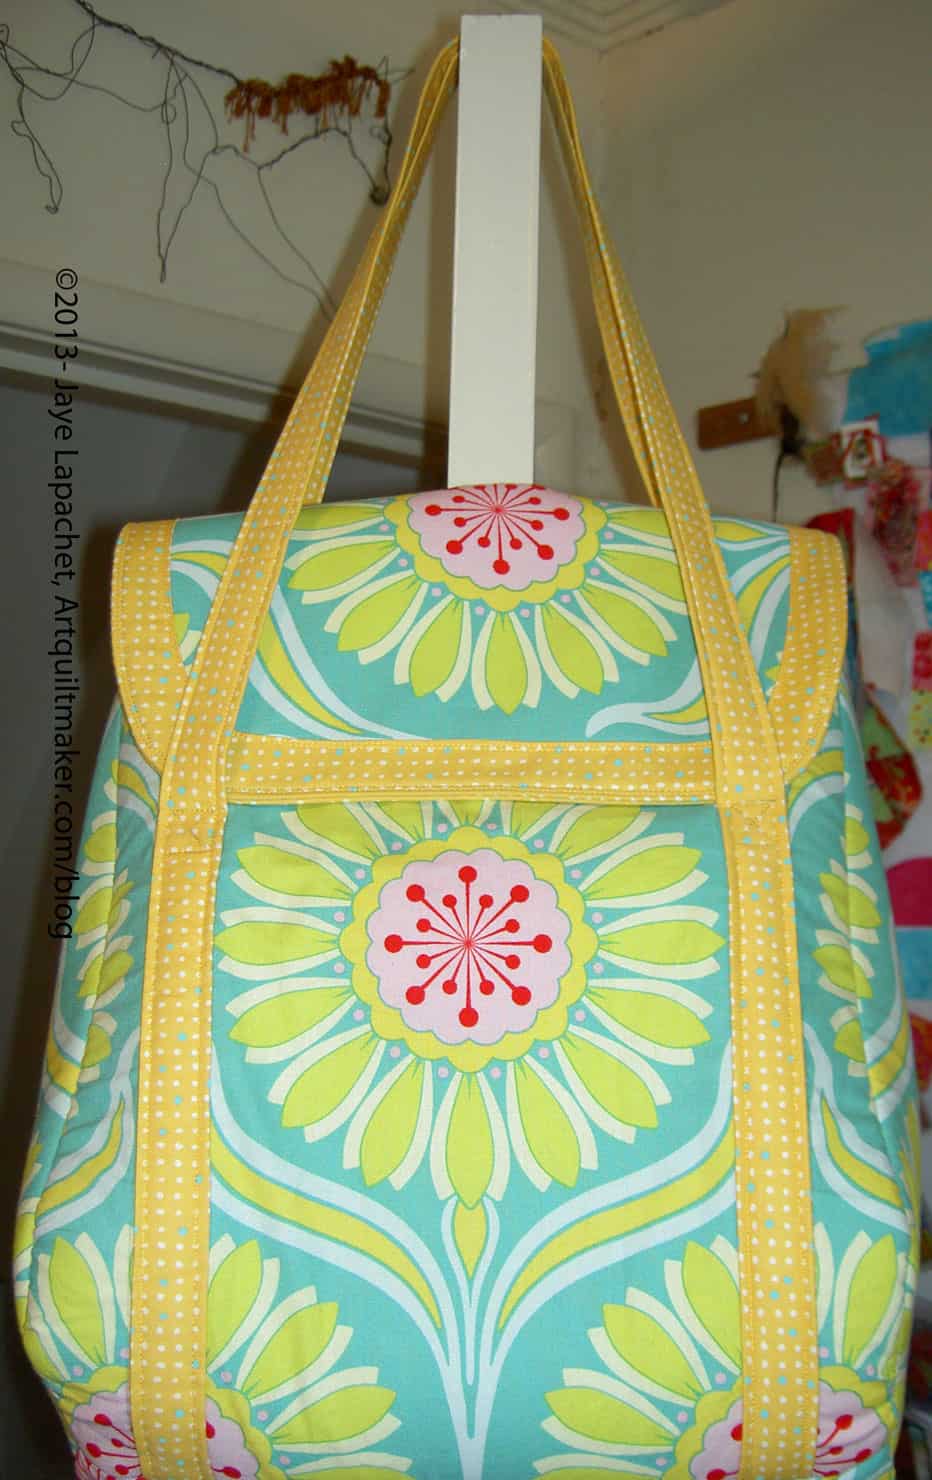
Take a Stand/Without a Trace Bag finished & repaired
I wrote about my unhappiness with the Take a Stand/Without a Trace zipper a few weeks ago. In a way this is the project that keeps rearing its head. Finally, though, I think it is finished, repaired and available for use.
It is a good, medium sized bag, so I hope to put it to good use in some way I can’t think of right now.
Take a Stand/Without a Trace Bag zipper tab updated
I changed out the zipper tab to match the binding. I haven’t checked the pattern to see if it calls for exterior (my first choice) or binding fabric for the zipper tab. I am pretty sure I cut what the pattern suggested. I like the zipper tab matching the binding better.
I also adjusted the size to match the width of the binding and the zipper. I don’t like the zipper tabs being larger. The Quilts Illustrated Tool Tote pattern calls for a larger tab and it bugs me every time I see it. now that I have changed the zipper for the Take a Stand/Without a Trace bag, I might change that one as well.
I love it when people use and love the items I make for them.
I went to a conference recently, as mentioned, where SIL#4 and I shared an apartment at the resort. She brought the Petrillo Bag I made for her back in 2013.
The bag was beautiful and pristine in 2013. It was probably the first Petrillo Bag I made and may have been the first Sew Sweetness pattern I made.
I was reminded that I am a good bagmaker and the bag looked great when I gave it to her.
Petrillo Bag in 2022
The bag is now well loved and well used. It has been to Australia at least once and maybe even to to Europe. Not sure. It has been through the wash and SIL even Oxycleaned it when the dirt from carrying it on trips got to much.
I am tempted to make SIL#4 another one. I don’t know if I still have some of the same fabric, but I think I might.
If any project required attention to process, this one did.
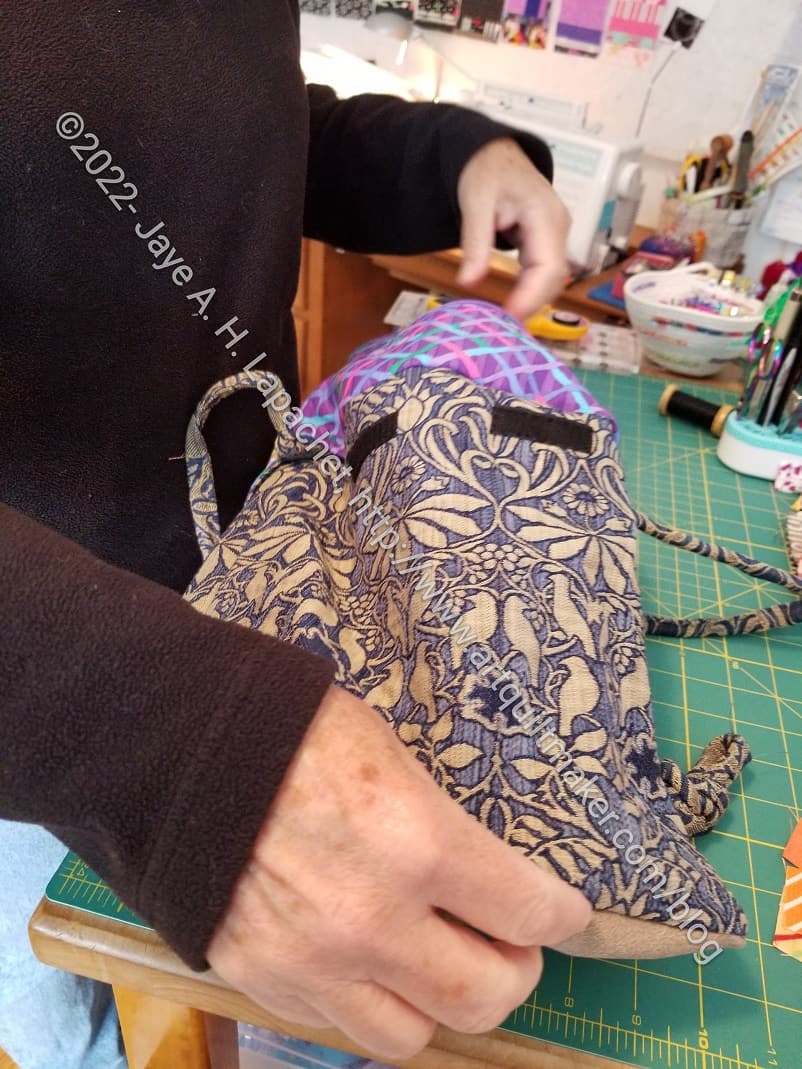
My friend has been talking with me about helping her make a bag. I have been putting it off because of work and other things. Since I have a break from a lot of responsibilities, I felt it was time to get the bag made.
I had hoped that I could convince my friend to use a pattern, but she was certain she wanted to copy the bag she took traveling. I am a good bagmaker, but beyond cobbling together some basic tote bags or modifying patterns, like the Petrillo hack I created, I have not had a lot of experience creating new patterns. I was concerned about the pitfalls I wouldn’t even know I was facing.
We met a few weeks ago and I was able to get a better idea of what she was thinking. That meeting and seeing the bag allowed me to think about the bag and process before we met the other day. I had a basic plan and figured that I would work things out as I went along.
Cyndi B’s bag
The worst part was getting started. The best part was that my friend didn’t have many preconceived notions about how the bag would look. We kind of muddled along and resolved issues as they came up.
The first issue was the fabric. She has a limited piece of upholstery fabric that was leftover from recovering her living room chairs. I have done a few things with heavier fabric, but I can’t think of a project I have done with upholstery fabric, including a pencil roll, but this project was different in that I would have to deal with layers of upholstery fabric. I tried to minimize it, but wasn’t always able to.
Next was the bottom. My friend wanted to use a thin piece of leather (maybe suede) for the bottom. This made sense, especially since she wanted to use it for travel. My Microtex** needle was not happy. Shockingly, I had a leather needle**. I have never used these before, but did on the bag bottom and it worked.
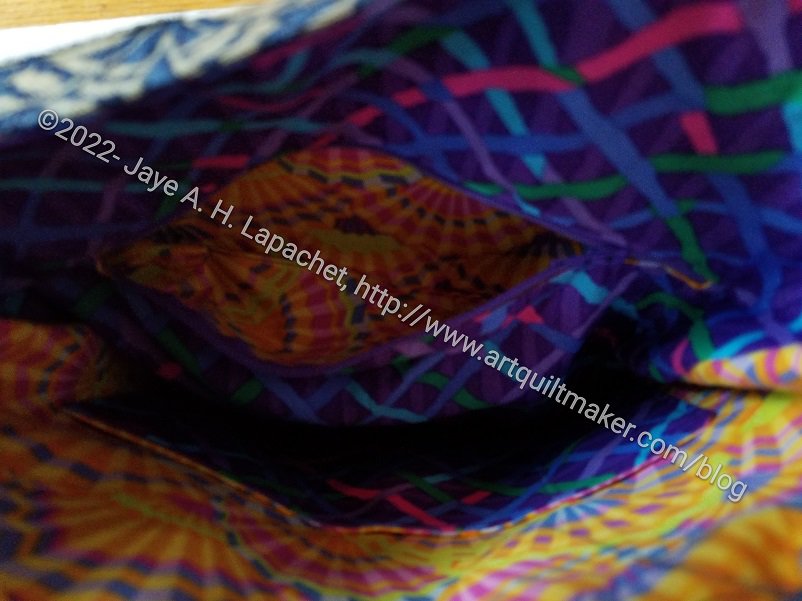
Cyndi B’s bag: turning the lining
The lining was fairly straightforward. I knew what I wanted to do, which included adding an internal zipper pocket that I could use to turn the bag right side out.That worked perfectly, though I had to look up a couple of references to make sure what I had in my mind would work.
The turning of the bag is very satisfying, so I had my friend do it. It was her bag, after all and I thought she would get a kick out of the experience. She did.
Cyndi B’s bag: lining and zipper pocket
I used my friend as studio assistant. I asked her to mark the lines for the zipper pocket, press seams open and sew on Velcro. These are all tasks I didn’t want to do. She did a lot of pressing and marking while I did most of the sewing. I also wanted her to be involved and since she had not sewed since junior high, I preferred to do the sewing. It is my machine after all.
When we got to the handles, she brought out the idea of using rope (like clothesline weight rope) for the handles. I wouldn’t normally do that and really didn’t have a clue how to do it. After searching the web, I came up with a great tutorial that expanded my skills. The result was what my friend wanted, too.
I used the Cotton Candy pouch pattern to remind me how to put the outside of the bag together with the lining.
I used the The Complete Bag Making Masterclass : A comprehensive guide to modern bag making techniques** by Mrs. H for some information on attaching the straps.
I used the RsIsland Crafts video on turning a bag through the internal zipper pocket to remind myself how to do that.
I used the Seaman’s Mom corded handles tutorial to make the handles.
I am pleased with how the bag came out, though it is certainly not perfect and it is not a bag I would use. My friend was happy and that is all that counts.
**Obviously, you should shop at a local quilt shop. However, I use affiliate links and may be paid for your purchase of an item when you click on an item’s link in my post. There is no additional cost to you for clicking or purchasing items I recommend. I appreciate your clicks and purchases as it helps support this blog.
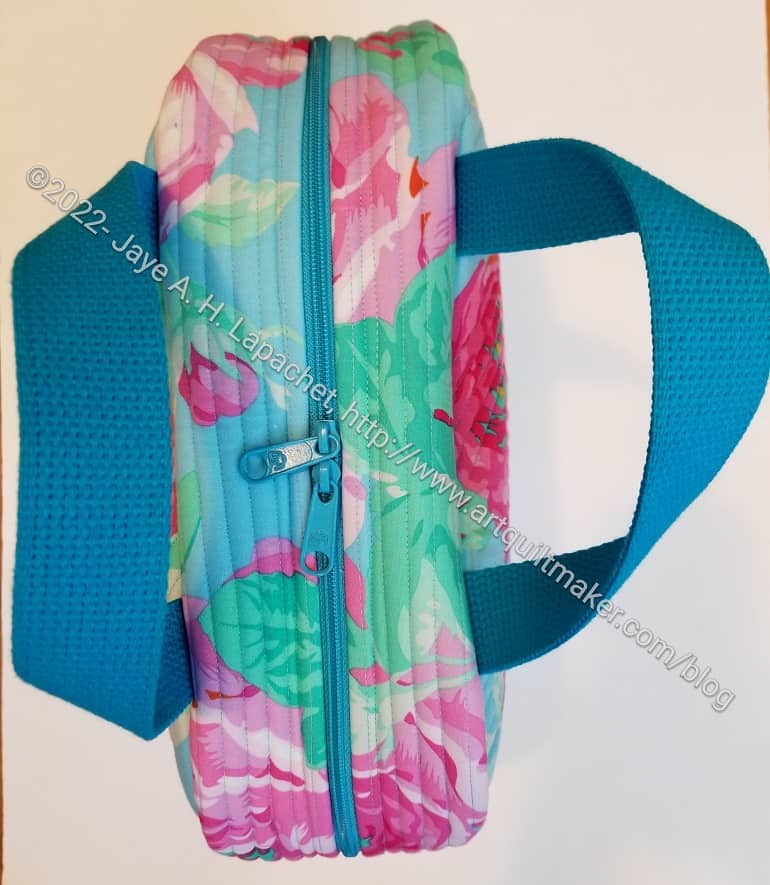
I really like the way the zipper came out. It works as expected. I was a little disappointed in the zipper on the my Take a Stand bag. It just seems weird to use.
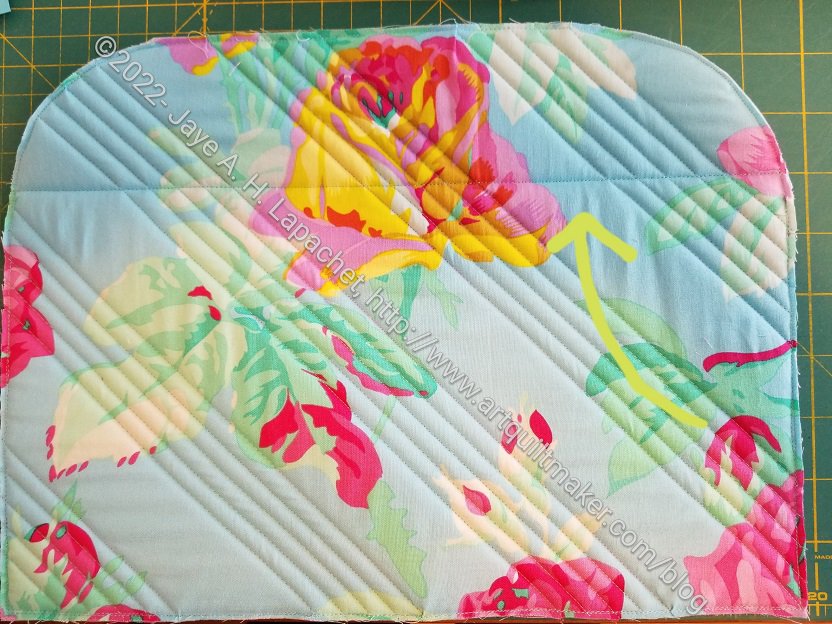
Sunset Project Bag: front panel
Sunset Project Bag: back panel
I fussy cut the front and back panels to take advantage of the beautiful roses. The yardage I have left now looks a bit like Swiss cheese, but I am more interested in a good looking bag than non-Swiss cheese fabric.
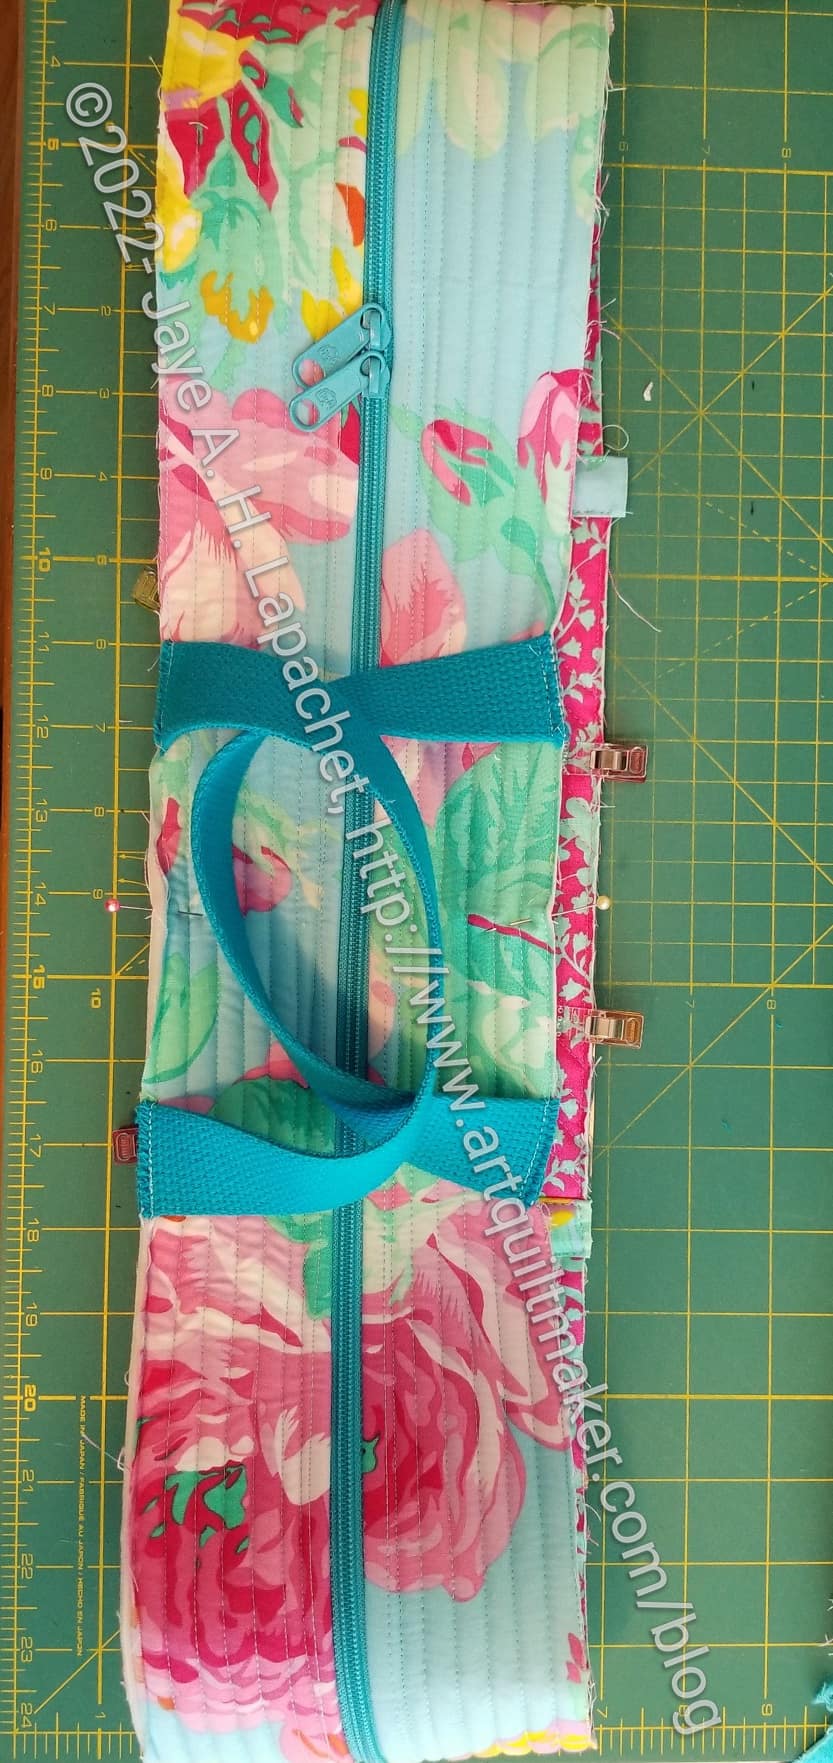
I would have preferred pink or light blue handles, but I don’t think the darker turquoise looks bad. The handles came from some cotton webbing I have had around for a long time. It was time to use it.
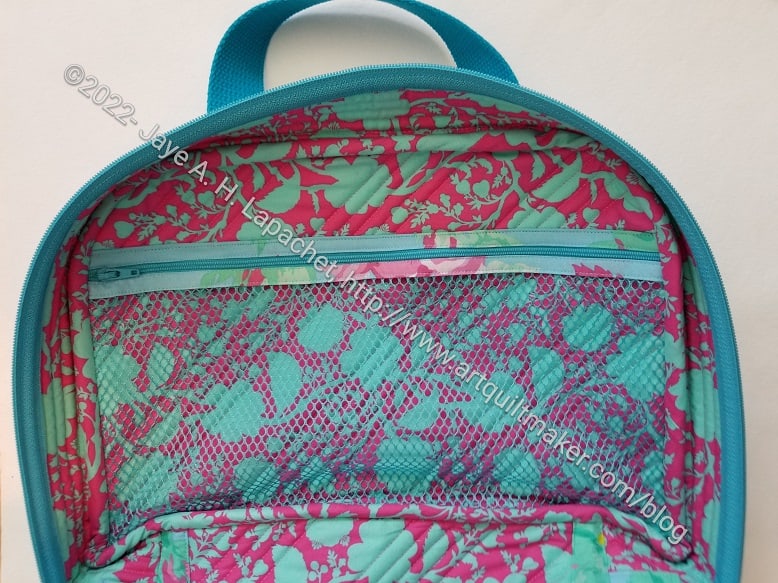
Sunset Project Bag: inside full
The inside came out particularly well. The True colors fabric I used looks great. I thought that I would want to save it for something special, but what? I don’t have a lot of it left, but I decided to use something that would make me happy when I opened the bag and now I am really glad I did. I need to remember to use the good fabric.
As you can see the bag opens flat. Vanessa from Crafty Gemini uses this bag for knitting (or maybe crochet?) projects. Opening flat provides good access to the contents. With balls of yarn, however, they might roll away if the bag was opened flat.
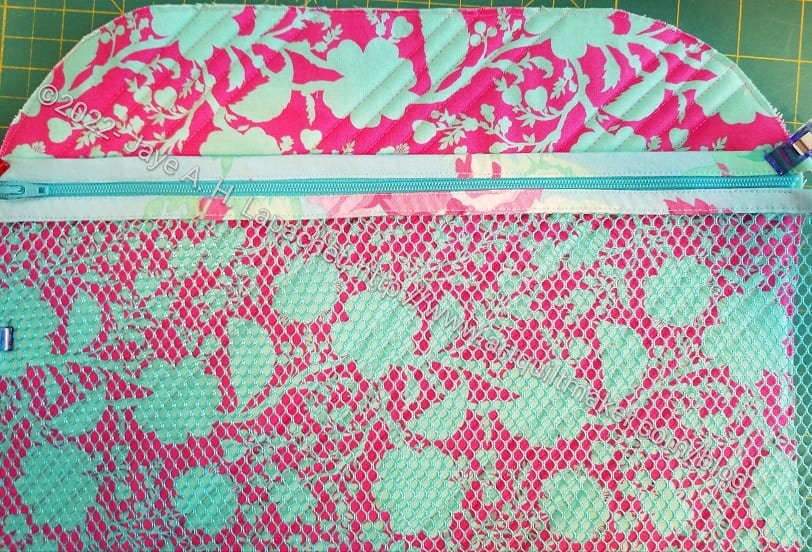
Sunset Project Bag: inside mesh pocket detail
The mesh pocket works well and will allow me to see what is inside. The pocket is a good size, I think. I wonder if there are other pockets I should have added, but I think just tossing in a pouch with additional supplies will work. What are pouches for anyway?
Sunset Project Bag: inside binding detail
The other side has no pocket, but you can see that I had to bind the raw edges on the inside to cover them. I machine sewed one side of the binding, then hand sewed the other. It wasn’t as much of a hassle to hand sew this bag’s binding as it was to sew the binding on my Take a Stand bag or my A Place for Everything v.2.0 bag. I still stabbed myself several times. One of the risks.
I am struggled with the finishing. I like to poke out the corners and make the bag nice and finished looking. In this case, I have rolled the seam joins, I have also pressed them and poked them out. Nothing I have tried will get them all the way out. I am not sure why, but maybe the binding since it is on the back of the joins.
I think it came out pretty well, though there are some things I would like to change.
I spent some time over the weekend working on the Sunset Project Bag. As you saw, I was ready for assembly, after getting everything cut and quilted. In my mind, at least, I was ready for assembly. As I found out, I had more prep (prep plus?) to do.
Sunset Project Bag: Front panel
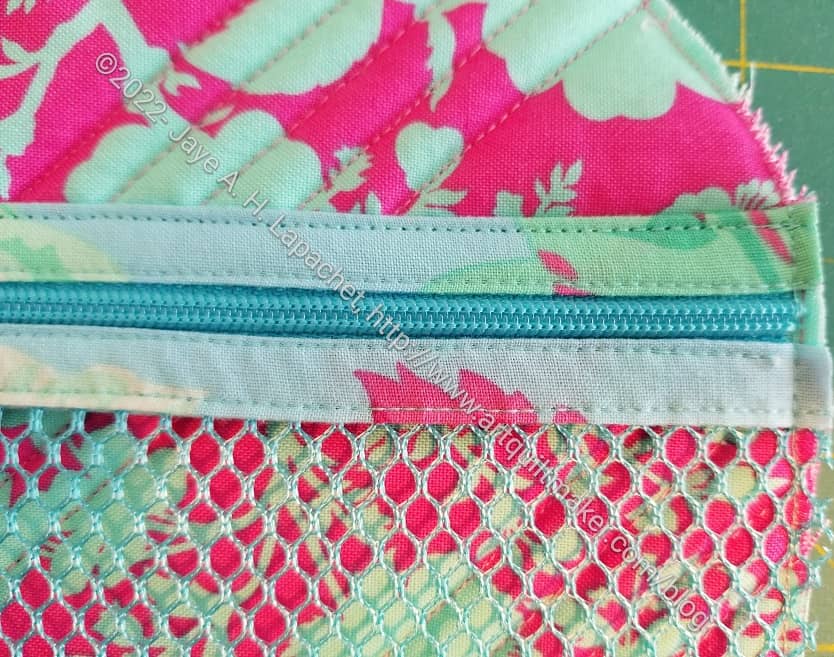
First, I had to add the mesh pocket. Generally, this is no problem, but I immediately found a problem: my beautiful quilting would be ruined. Ok, ruined is a little bit dramatic, but one of the lines of stitching needed to keep the mesh pocket in place would go through and show on the front. That line would not fit in with my previous diagonal lines. 🙁
Sunset: mesh pocket
There was no way out. I had already quilted what I had quilted, so I just had to move on. I know that the Muggles won’t know.
Sunset Project Bag: mesh pocket detail
The line of stitching across the top of the mesh pocket is the area that shows through
Note to self: if I make this again, use horizontal lines. I do think the diagonal lines look nice.
I will say that the mesh I chose goes really well with the pink and turquoise True Colors fabric I used on the inside.
Sunset: Out of place quilting line
You can see how the top line of stitching now shows through on the front. Sigh.
Fortunately, it is only one line not the top stitching for the other parts of the zipper assembly.
I did think about what I could do to hide the line, but I couldn’t think of anything that didn’t require remaking the front panel or unpicking a lot of stitching.
Sunset Project Bag: main zipper end detail
In order to assemble the bag, I had to make the gusset into a loop. I have done that before. It isn’t difficult, though the detail of the zipper end was something I hadn’t done before.
Sunset Project Bag: gusset and handles detail
I should have used the True Colors fabric, but I think it looks fine. Also, the way the raw edges are enclosed within the zipper are very clever. I had to watch the video to completely understand it. I don’t always watch all the steps in the video, but I usually go through a few of the steps and the videos are always helpful.
The handles are attached to the gusset, which I thought was a good idea. I had the opportunity to sew over them several times as I completed the bag.
I also added a piece of vinyl to the bottom, now incorporated into the gusset, to keep the bottom clean when I use the bag. I wanted to try that technique after seeing it in a Tula Pink Tuesday video. I only used the vinyl for the bottom, not for the whole bag. It was sticky on the bed of the machine, as is usual for vinyl. I am out of practice with vinyl and needed to reorient myself to sewing with vinyl.
I struggled with final assembly. The bottom corners had a bit too much fabric in them for me. I wonder if I could round the corners to make the assembly easier. I found that to be a real help with the Andalusian pouch, the Andalusian does not have a gusset.
Last Autumn (sheesh! Has it been that long???), at the urging (temptress-ness) of Angela I joined the Crafty Gemini 8th Bag club. I liked the bags and some of the techniques I would learn, so it was a good idea. I tried to keep up, but cutting (which you know I dislike) really kept me from keeping up. I made the Flagler backpack and that was it.
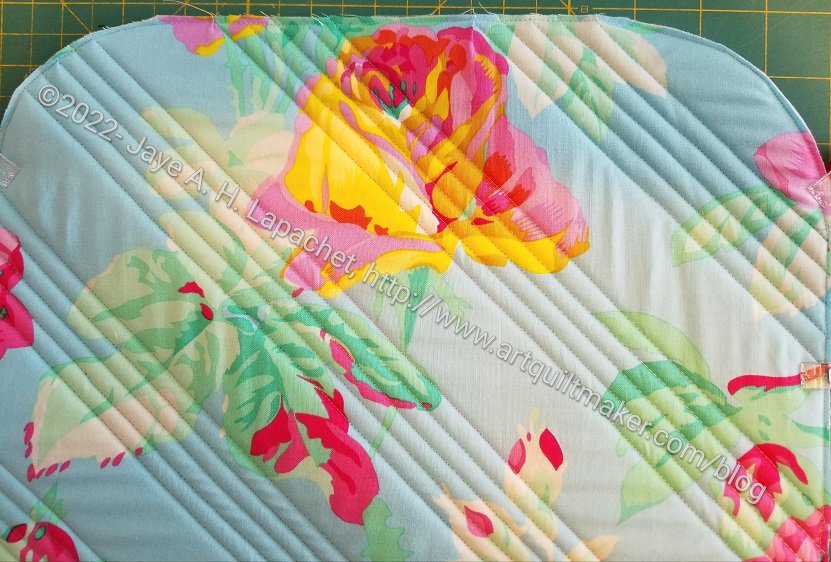
Sunset Project Bag cut out and quilted
The Sunset Project Bag has been on my mind and I finally started it. Cutting, of course, takes me so long. I tried get into a Zen frame of mind about, but almost lost it when I realized I had to quilt a bunch of pieces, too. I started and then after four lines of stitching, I decided to vary the design to leave a 1.5 inch space between four lines of stitching. I really like the way that design turned out. I think it looks like I actually know how to design quilting designs rather than just wanting to get it over faster.
I just did straight line quilting horizontally along the gussets. I didn’t want to stop and start after 20 stitches over a 35 inch wide piece.
Sunset Project Bag – fussy cutting?
I lined up the pieces and noticed that it looks like I fussy cut some pieces to fit together well.
Those pieces don’t go together and I didn’t plan it, but it would be nice if they did.
I am in the process of sealing the edges of the quilted pieces and will be ready to start assembly soon. There aren’t very many pieces so I should be able to finish quickly. Fingers crossed anyway.
I made a Sheffield Tote for Gerre as a gift in 2020. I make gifts because I want people to know I am thinking about them. I do know that what I think is great may not be great for someone else, but I don’t have hard feelings when someone doesn’t use a gift I made for them.
Alternatively, I am super thrilled when I see a gift being used. This ‘t the first time I have seen Gerre bring it. She says she uses it all the time. Whenever we sit near each other I see it packed with supplies. It makes me so happy that it is a useful tote.
The Take a Stand** bag (which for some reason I keep wanting to call the “Without a Trace” bag) bag is done and I am on my way to give it to my Mom for Mother’s Day.
This is the first time I have made this bag and it has the usual things that annoy me about a ByAnnie pattern: quilting all the pieces and lots of binding. It is also a great size and shape. It might be a good replacement for my Travel / Go-to-Sew-Day Bag. Or at least a partial replacement.
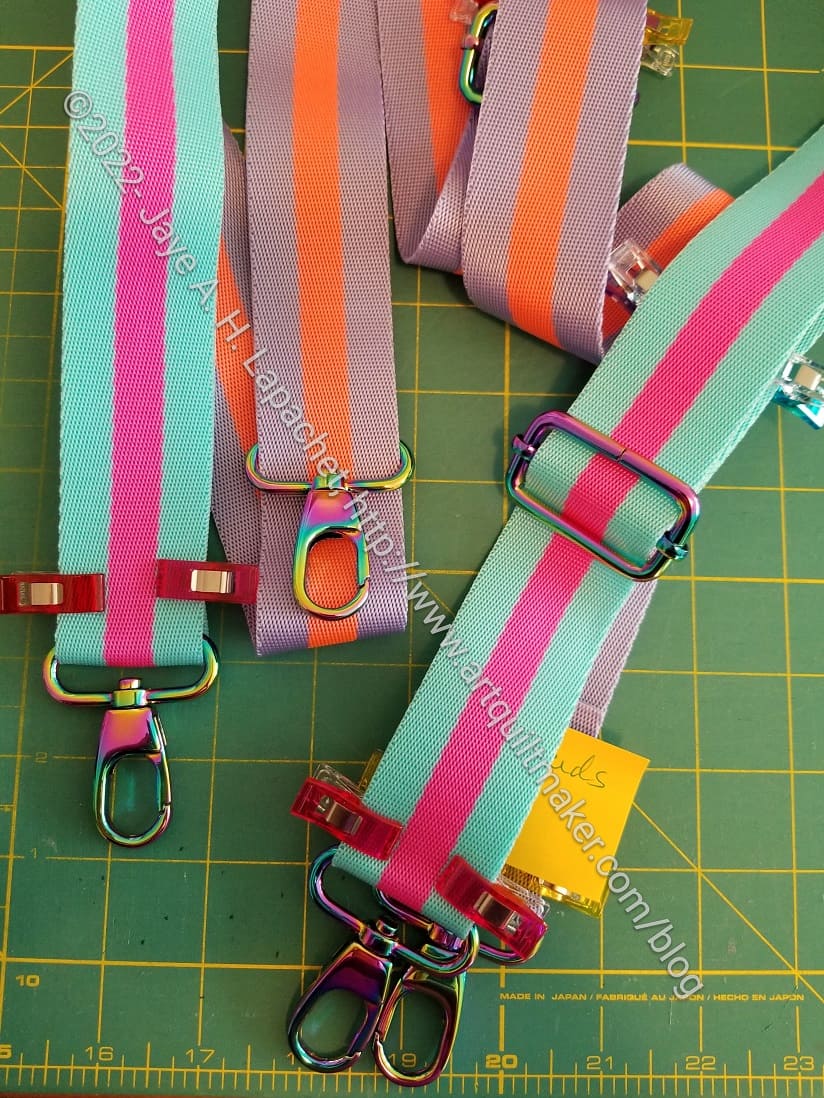
Yes, I used the Tula Pink webbing for the shoulder strap. It isn’t the perfect color, but works ok and Mom can unhook it and use it for other things. Using webbing means that I don’t have to make straps. I seem to remember making straps with webbing as the inside a la ByAnnie, but I can’t remember (or find) what project they were used on. It wasn’t a completely smooth process, but the strap went together pretty quickly and I am happy with them.
I adore the rainbow hardware!
Take a Stand Bag for Mom lining/inside
I am pretty proud of the inside/lining. It is hard to see in the photo, but easier if you make the photo larger. I used a text print with color wheel type paint blobs on it. It is perfect for my mom and came out really well in terms of placement in the bag.
I have two more in the works, meaning that I have two more cut and quilted (such a chore), so you’ll see at least one of those soon. I decided that I want to make the larger size as well, but will have to cut and quilt that one before I can decide if it will be a good replacement for my Travel / Go-to-Sew-Day Bag.
I hope Mom likes this bag. She is getting quite the collection.
**Obviously, you should shop at local quilt shops. However, I use affiliate links and may be paid for your purchase of an item when you click on an item’s link in my post. There is no additional cost to you for clicking or purchasing items I recommend. I appreciate your clicks and purchases as it helps support this blog.
Finally, I started the three Take a Stand totes. Yes, I decided to make three. I had all the supplies and, of course, plenty of fabric, but just couldn’t start cutting. I went on Saturday to sew with a friend and that was the impetus I needed to do the cutting.
One bag is due next month so I focused on making sure I had all the pieces for that. I am just waiting for one piece of webbing for that one, but it is already on its way, so I am not worried.
Take a Stand Straps
I am not making straps out of fabric. I am using Tula Pink’s webbing. I wish ByAnnie’s patterns would say “if you are using webbing, start here –>”. Of course, I have only used webbing twice (this time and for the APfE v.2. Still, I am a convert. I really like it. Tula has fun colors, but they are not for every instance. I’ll have to explore some of the other colors available.
I am resigned to all the prep ByAnnie bags take. I am trying to teach myself not to want to get to the end as ASAP as I seem to demand of myself. It is that old problem for my brain of process vs. product. I can’t seem to get over it, though I do try.
I ran out of Soft & Stable so there are a few pieces of that I need to cut. Since I have that deadline, I quilted as many pieces as I could. I have now started sewing. I want to do the three at once, but have to get the one done.